
1)Read about bones, joints, fracture and their types 2)General examination
Reading File
Now let me search the library for both topics in parallel.
Finding Sources
Finding Sources
Finding Sources
Finding Sources
Finding Sources
Reading File
Good - I found Bailey & Love's with fracture content. Let me now search specifically for bones, joints and fracture fundamentals, and also read the general examination section from Bailey & Love's and Pye's.
Finding Sources
Finding Sources
Reading File
Excellent! Found key sources. Now let me read the core content - Gray's Anatomy for bones/joints and Campbell's/Bailey & Love's for fractures, plus the general examination content:
Reading File
Reading File
Reading File
Now let me get the fracture fundamentals from Campbell's and the joints section from Gray's:
Reading File
Finding Sources
Reading File
Finding Sources
Excellent! Now let me read the Rosen's fracture description box and Parikh's forensic medicine bones/fracture section:
Reading File
Reading File
I now have rich content. Let me also read more of the Rosen's fracture section and general examination from a clinical textbook:
Reading File
Reading File
I now have comprehensive content from all key textbooks. Let me also fetch one key image of fracture types:
Loading Image
Loading Image
I have all the material needed. Let me now compile the comprehensive answer.---
PART 1: Bones, Joints, Fractures and Their Types
1. BONES
(Gray's Anatomy for Students)
Bones serve five major functions:
- Supportive framework for the body
- Protection of vital organs
- Reservoirs of calcium and phosphorus
- Levers on which muscles act to produce movement
- Containers for blood-producing cells (haematopoiesis)
Types of Bone Tissue
There are two types of bone tissue:
| Type | Description |
|---|---|
| Compact (Cortical) | Dense, forms the outer shell of all bones; surrounds spongy bone |
| Spongy (Trabecular/Cancellous) | Spicules of bone enclosing cavities containing bone marrow |
Classification of Bones by Shape
| Type | Characteristics | Examples |
|---|---|---|
| Long bones | Tubular; diaphysis + two epiphyses | Humerus, femur, tibia |
| Short bones | Cuboidal | Carpal (wrist), tarsal (ankle) bones |
| Flat bones | Two compact plates separated by spongy bone | Skull, sternum, scapula |
| Irregular bones | Variable, complex shapes | Vertebrae, facial bones |
| Sesamoid bones | Round/oval; develop within tendons | Patella, sesamoids of thumb/big toe |
| Accessory bones | Normal variants; not always present | Os naviculare, supernumerary carpals |
Bone Vasculature and Innervation
- A nutrient artery (usually one per bone) enters directly into the internal cavity, supplying marrow, spongy bone, and inner compact layers.
- All bones (except at articular surfaces) are covered by the periosteum - a fibrous connective tissue membrane with the unique ability to form new bone. A bone stripped of its periosteum will not survive.
- The periosteum is richly supplied with sensory nerve fibers and is very sensitive to injury. Bone itself has few sensory fibers - this is why periosteal injury (e.g. in fractures) causes intense pain.
Bone Development
- Intramembranous ossification: Mesenchymal models undergo direct ossification (e.g., flat bones of skull)
- Endochondral ossification: Cartilaginous models are replaced by bone (e.g., long bones, base of skull)
2. JOINTS
(Gray's Anatomy for Students)
Joints are sites where two or more skeletal elements come together. They are divided into two major categories:
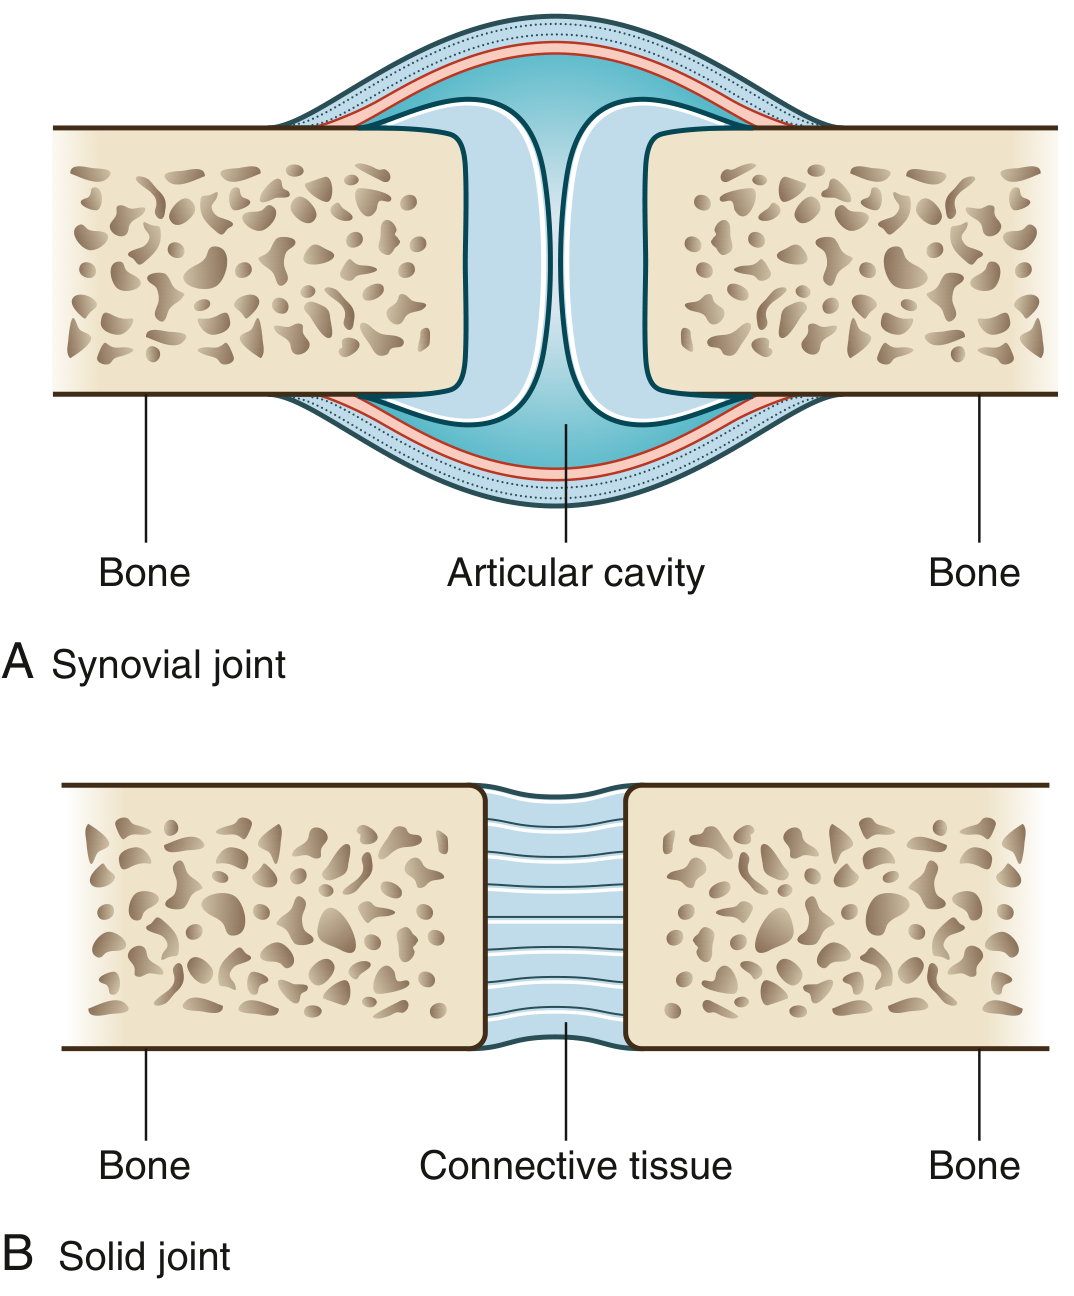
A. Synovial Joints
Skeletal elements are separated by an articular cavity. Key features:
- Articular cartilage (usually hyaline) covers opposing bony surfaces - they never contact each other directly
- Joint capsule - two layers:
- Inner synovial membrane: highly vascular, produces synovial fluid for lubrication
- Outer fibrous membrane: dense connective tissue; thickenings form ligaments
- Accessory structures include bursae (reduce friction between tendons/bone) and tendon sheaths
Types of Synovial Joints
| Joint Type | Movement | Example |
|---|---|---|
| Plane | Gliding/sliding | Acromioclavicular joint |
| Hinge | Uniaxial - flexion/extension | Elbow (humero-ulnar) |
| Pivot | Uniaxial - rotation | Atlanto-axial joint |
| Bicondylar | Mainly uniaxial + limited rotation | Knee joint |
| Condylar (Ellipsoid) | Biaxial - flexion, extension, abduction, adduction | Wrist joint |
| Saddle | Biaxial - all above + circumduction | 1st carpometacarpal joint (thumb) |
| Ball and socket | Multiaxial - all movements | Hip, shoulder |
B. Solid Joints (No cavity)
Adjacent surfaces linked by connective tissue or cartilage. Less movement than synovial joints.
Fibrous joints:
- Sutures - skull only; thin sutural ligament (nearly immobile)
- Gomphoses - teeth in bony sockets (periodontal ligament)
- Syndesmoses - bones linked by an interosseous ligament (e.g., distal tibiofibular joint)
Cartilaginous joints:
- Primary (Synchondroses) - hyaline cartilage; temporary (e.g., growth plates/epiphyseal plates)
- Secondary (Symphyses) - fibrocartilage; stronger, slight movement (e.g., pubic symphysis, intervertebral discs)
3. FRACTURES AND THEIR TYPES
(Rosen's Emergency Medicine, Parikh's Forensic Medicine, Gray's Anatomy)
Definition
A fracture is a break in the continuity of a bone.
Clinical Features
- History of trauma
- Pain and tenderness over the fracture site
- Swelling and bruising
- Loss of function
- Deformity / abnormal motion
- Crepitus
Primary Classification: Open vs Closed
| Type | Description |
|---|---|
| Closed (Simple) | Skin and soft tissue overlying the fracture are intact |
| Open (Compound) | The fracture communicates with the outside environment (skin lacerated); risk of infection - can cause osteomyelitis, delayed union, or septicaemia |
If doubt exists about whether a wound communicates with a fracture, it must be treated as open.
Types by Fracture Line Direction
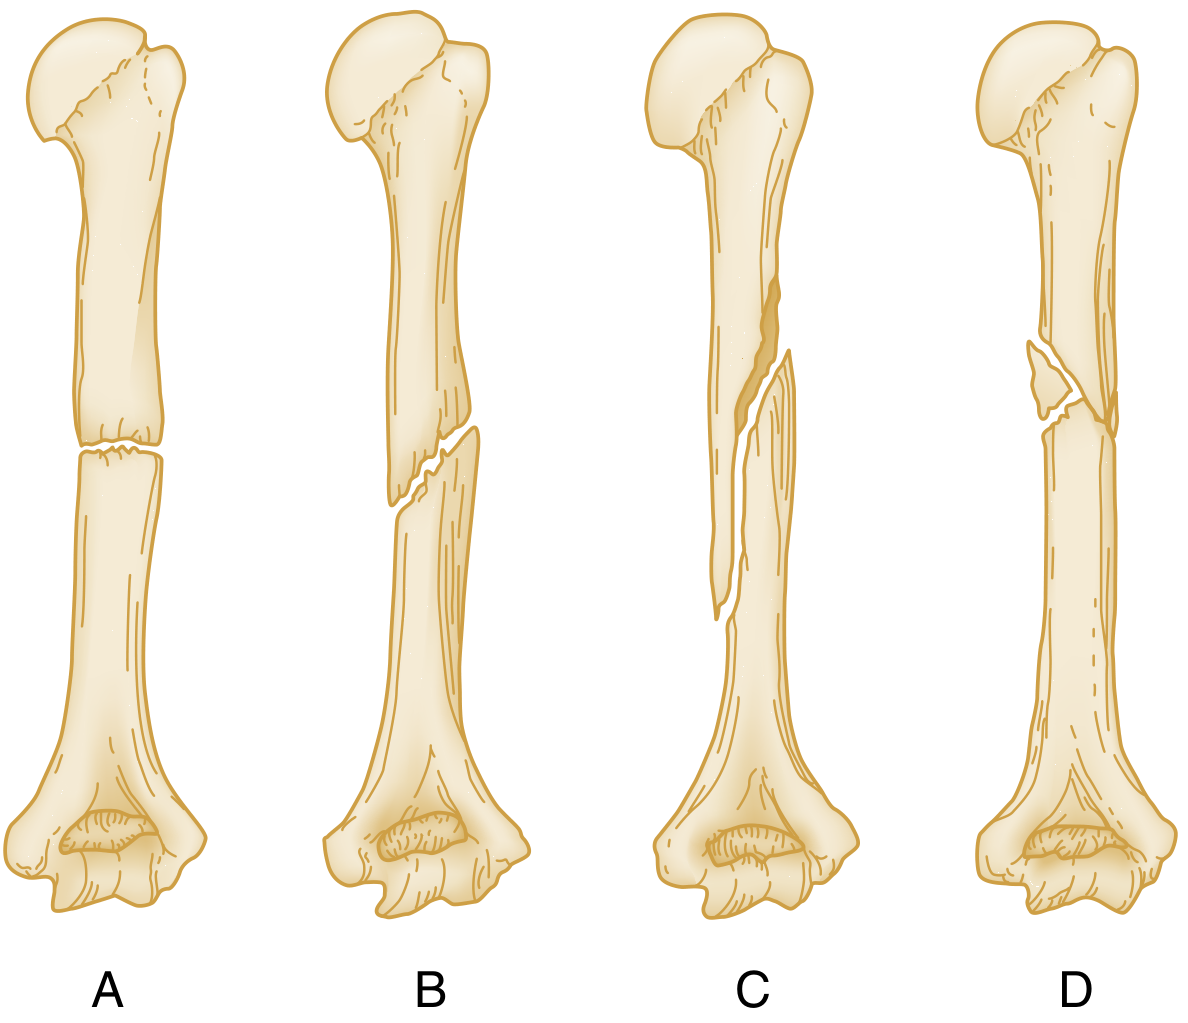
| Type | Description | Force Mechanism |
|---|---|---|
| Transverse | Fracture line at right angle to long axis of bone | Bending load |
| Oblique | Fracture line runs at an angle to the long axis | Axial compression + bending + torsion |
| Spiral | Encircles shaft in a helical pattern | Torsion (rotational force) |
| Comminuted | Multiple fragments / multiple breaks | Variable high-energy forces |
| Butterfly | Wedge-shaped fragment + oblique/transverse lines | Axial compression + bending |
| Linear | Single thin crack line | Low-energy impact (skull) |
Types by Completeness
| Type | Description |
|---|---|
| Complete | Fracture line passes entirely through the bone |
| Incomplete | Fracture line does not fully transect the bone |
| Greenstick | Incomplete fracture in children - one cortex breaks, other bends |
| Impacted | Fracture ends are driven into each other |
Special Types
| Type | Description |
|---|---|
| Pathological | Occurs through diseased bone after minimal trauma (e.g., osteoporosis, tumour, Paget's disease) |
| Stress (Fatigue) | Repeated low-level loading over time; common in tibia, fibula, metatarsals, femoral neck; may not show on initial X-ray |
| Avulsion | Fragment pulled away by ligament or tendon |
| Compression | Bone compressed axially (e.g., vertebral body, calcaneum) |
| Depression | Fragment driven inward (e.g., skull, tibial plateau) |
| Epiphyseal | Occurs through the growth plate in children (see Salter-Harris below) |
Salter-Harris Classification (Epiphyseal Fractures in Children)
| Type | Description | Mnemonic |
|---|---|---|
| I | Fracture through the epiphyseal plate only (may just widen the growth plate) | S - Straight through |
| II | Through the plate + triangular metaphysis fragment (most common) | A - Above the plate |
| III | Fracture from joint surface through plate and epiphysis | L - Lower (below plate) |
| IV | Fracture through joint, plate, epiphysis AND adjacent metaphysis | TE - Through Everything |
| V | Crush injury of the epiphysis; worst prognosis - may destroy the growth plate | R - Ram (crush) |
All growth plate fractures must be reduced urgently to prevent asymmetrical bone growth.
AO/OTA Classification (Universal System)
Used for long bones: a 2-digit code specifies the bone + segment, followed by:
- Type A - Simple (single fracture line)
- Type B - Wedge fragment present
- Type C - Complex / comminuted
Fracture Healing Stages
- Haematoma - rupture of vessels at fracture site forms clot (procallus - no structural strength)
- Soft callus - fibroblasts and osteoblasts invade; cartilaginous bridging callus forms
- Hard callus - calcification of callus, acts as a biological splint
- Remodelling - over months to a year, callus fully ossifies and remodels to mature bone
On X-ray: fracture line becomes more visible at 10-14 days (due to bone resorption). Callus first appears at 2-4 weeks.
PART 2: GENERAL EXAMINATION
(Bailey & Love's Surgery, Bradley & Daroff's Neurology, Rheumatology)
A general examination is a systematic head-to-toe assessment that looks for evidence of systemic disease, the severity of illness, and clues pointing to the underlying diagnosis. It is performed before or alongside the focused regional examination.
Preparation and Positioning
- Patient should be lying flat (supine), adequately exposed
- For abdominal examination: hips and knees flexed to relax abdominal muscles
- Ensure proper lighting and patient comfort
- Vital signs recorded at the start: heart rate, blood pressure, respiratory rate, temperature
- Elective setting: weight and BMI also recorded
Components of General Examination
1. Vital Signs (BPRT)
| Parameter | Clinical Significance |
|---|---|
| Blood Pressure | Hypotension (<MAP 60 mmHg) - hypovolaemia, sepsis, MI, drugs. Hypertension - Cushing reflex (raised ICP), essential hypertension |
| Heart Rate | Bradycardia - Kocher-Cushing reflex, drugs (beta-blockers). Tachycardia - fever, anaemia, hypovolaemia, hyperthyroidism |
| Respiratory Rate | Decreased - CNS depressants, CO2 narcosis. Increased - hypoxia, sepsis, acidosis, pulmonary embolism |
| Temperature | Fever - infection (warrants consideration of lumbar puncture in coma). Hypothermia - metabolic/endocrine causes |
Core temperature in comatose patients is best measured rectally - oral and axillary are unreliable.
2. General Inspection (Look First)
Begin by observing the patient from the end of the bed:
- General appearance: well/unwell, distressed, comfortable
- Body habitus: obesity, cachexia (weight loss / muscle wasting - suggests malignancy, chronic disease)
- Nutritional status and hydration: skin turgor, sunken eyes, dry mucous membranes
- Colour: pallor (anaemia), jaundice (liver disease), cyanosis (respiratory/cardiac), pigmentation abnormalities
- Oedema: pedal oedema (cardiac failure, hypoproteinaemia, venous disease)
- Posture and movements: involuntary movements, asymmetry
- Clothing and environment: IV lines, drains, monitoring equipment
3. Hands
Often provide the first diagnostic clues:
- Pallor of palmar creases - anaemia
- Clubbing - chronic lung disease, cyanotic heart disease, cirrhosis, IBD
- Koilonychia (spoon nails) - iron deficiency anaemia
- Leukonychia - hypoalbuminaemia (liver disease)
- Dupuytren's contracture - liver disease, alcoholism
- Arthropathy in finger joints - rheumatoid, osteoarthritis
- Palmar erythema / spider naevi - chronic liver disease
- Tremor - Parkinson's, intention tremor (cerebellar), thyrotoxicosis
4. Head, Face and Neck
| Region | What to Look For |
|---|---|
| Eyes | Jaundice (scleral icterus), pallor (conjunctival anaemia), exophthalmos (thyroid), xanthelasma, Kayser-Fleischer rings |
| Mouth | Central cyanosis, angular stomatitis, glossitis (B12/iron deficiency), leukoplakia, fetor hepaticus |
| Thyroid | Goitre (inspect + palpate) |
| Carotid arteries | Bruits |
| Lymph nodes | Cervical lymphadenopathy; left supraclavicular (Virchow's node - intra-abdominal malignancy) |
| JVP | Elevated in right heart failure, cardiac tamponade |
5. Skin
Inspect for:
- Jaundice, pallor, cyanosis
- Grey Turner's sign - flank discolouration (retroperitoneal haemorrhage; severe acute pancreatitis, leaking AAA)
- Cullen's sign - periumbilical discolouration (severe acute pancreatitis, ruptured ectopic pregnancy, liver trauma; blood tracks via ligamentum teres)
- Rashes, petechiae, purpura
- Wounds, scars (previous surgery)
- Spider naevi, telangiectasias
6. Lymph Nodes
Palpate systematically: cervical, axillary, inguinal regions.
- Generalised lymphadenopathy - lymphoma, leukaemia, viral infections
- Regional - local infection or malignancy
7. Neurological Screen (Brief)
For focused neurological general examination, assess:
- Level of consciousness (GCS)
- Orientation (time, place, person)
- Gait if ambulatory
- Cranial nerves screen
- Motor function - tone, power, reflexes (upper and lower limbs)
- Sensory function - light touch, pain
- Upper motor neuron signs (spasticity, hyperreflexia, extensor plantars) - cervical cord compression, stroke
8. Abdominal Inspection (Briefly)
- Visible masses, distension, visible peristalsis, dilated veins, abdominal wall hernias
- Check whether abdomen moves with respiration (absent movement - peritonitis)
- Note any scars
Sequence Summary
Vital signs → General inspection → Hands → Face/head/neck →
Skin → Lymph nodes → Cardiovascular → Respiratory →
Abdomen → Neurological screen → Peripheral vascular
Sources
- Gray's Anatomy for Students - Bones and Joints sections
- Rosen's Emergency Medicine - Fracture Description and Classification (Ch. 41)
- Parikh's Textbook of Medical Jurisprudence, Forensic Medicine and Toxicology - Fracture Types
- Bailey and Love's Short Practice of Surgery, 28th Ed - General Examination
- Bradley and Daroff's Neurology in Clinical Practice - General Examination (coma assessment)
- Rheumatology, 2-Volume Set (Elsevier 2022) - General Examination in rheumatological context
General examination of bone joint and fracture
Finding Sources
Finding Sources
Finding Sources
Finding Sources
Reading File
Reading File
Finding Sources
Reading File
Finding Sources
Finding Sources
Reading File
Reading File
Reading File
Reading File
Finding Sources
Reading File
Finding Sources
I now have comprehensive material from multiple authoritative textbooks. Let me compile the full answer.
General Examination of Bone, Joint, and Fracture
A structured musculoskeletal examination follows the classic surgical sequence: Look → Feel → Move → Special Tests → Neurovascular Assessment. This applies whether examining a bone, a joint, or a suspected fracture.
FRAMEWORK
"The examination of the painful joint is performed in a systematic manner following the general principle of inspection, palpation, range of motion (ROM), neurovascular evaluation, special tests, and imaging when appropriate."
- Rosen's Emergency Medicine
STEP 1: HISTORY (Before Examination)
Before touching the patient, establish:
- Site and onset of pain
- Mechanism of injury (nature of force - direct, indirect, rotational)
- Duration and progression
- Functional loss - can the patient weight-bear? Use the limb?
- Prior injuries or joint disease in the same area
- Systemic symptoms - fever (infection/septic arthritis), weight loss, fatigue (malignancy, RA, IBD)
- Medications - steroids, bisphosphonates, anticoagulants
STEP 2: GENERAL INSPECTION (Before Local Examination)
Begin by watching the patient from the end of the room:
- Gait and posture - observe the patient walking; this reveals much before any hands-on examination
- Antalgic gait - shortened stance phase on the painful limb (pain avoidance)
- Trendelenburg gait - pelvis dips to opposite side when standing on the weak limb (hip abductor weakness)
- High-stepping gait - foot drop (peroneal nerve palsy, often from fibular fracture)
- Leg length inequality - limping with pelvic tilt
- General appearance - distress level, sweating, pallor (shock from blood loss in major fractures)
- Position of comfort - patients splint an injured part in the position that minimises pain
STEP 3: LOOK (Inspection)
Always expose the region fully and compare with the opposite (unaffected) side:
Inspection Findings
| Finding | Significance |
|---|---|
| Deformity | Gross deformity along a long bone shaft is pathognomonic of fracture. Deformity at a joint suggests dislocation or peri-articular fracture |
| Swelling / effusion | Localised swelling over a bone = haematoma/periosteal reaction; articular swelling = effusion or synovitis |
| Ecchymosis / bruising | Fracture site or disrupted ligaments; may track distally due to gravity |
| Muscle wasting / atrophy | Chronic disuse or nerve injury |
| Skin integrity | Lacerations over fracture = open (compound) fracture; skin tenting or puckering indicates bone end pressing on skin |
| Erythema | Infection (septic arthritis), acute gout, inflammation |
| Scars | Previous surgery, injury |
| Sinuses | Chronic osteomyelitis |
| Abnormal resting position | Fractured neck of femur - limb shortened and externally rotated. Posterior shoulder dislocation - arm internally rotated and adducted |
In joint examination: check equality of landmark heights bilaterally (shoulder tips, scapulae, pelvic brim, gluteal creases) and inspect the spine for normal curvature and scoliosis.
STEP 4: FEEL (Palpation)
Warn the patient before touching. Start away from the point of maximal tenderness, then work toward it.
What to Palpate
1. Temperature
- Normal large joints (e.g., knee) feel cool compared to surrounding skin
- Warmth = inflammatory process or effusion
- Hot = infection (septic arthritis) until proven otherwise
2. Tenderness
- Point tenderness directly over a bone = fracture until proven otherwise
- Palpation should extend beyond the painful area - pain may be referred (e.g., hip pathology presenting as knee pain)
- Begin at a control area (e.g., occipital protuberance for neck, uninjured bone proximally for limbs) to calibrate the patient's pain response
- Over joints: palpate the joint line, ligament attachments, tendon insertions, and nearby bursae
- Distinguish articular (from joint itself) vs periarticular (surrounding structures) tenderness
3. Swelling - characterise the type:
| Type of Swelling | Feel | Cause |
|---|---|---|
| Fluctuant | Fluid-filled | Synovial effusion |
| Grape-like / compressible | Soft, rubbery | Synovial hypertrophy |
| Firm as a nut | Hard | Bony hypertrophy (OA) |
| Boggy | Soft, doughy | Synovitis |
| Bony step-off | Hard, irregular | Displaced fracture ends |
4. Crepitus
- Fine crepitus - common in large joints, often insignificant
- Coarse crepitus - advanced cartilage degeneration (OA); also felt in fractures (bony crepitus - do NOT elicit deliberately as it causes pain and displaces fragments)
5. Bony landmarks
- Palpate systematically: e.g., for a shoulder injury - sternoclavicular joint → clavicle → acromioclavicular joint → humeral head → entire humeral shaft → scapula posteriorly
6. Effusion detection (specific tests for knee):
- Bulge sign (small effusions) - milk fluid from medial gutter, tap lateral side; a bulge returns medially
- Ballottement / patellar tap (larger effusions) - fluid pushed distally, patella tapped down and "bounces"
STEP 5: MOVE (Range of Motion)
Assess both active (patient moves unaided) and passive (examiner moves) range of motion.
Active vs Passive ROM
| Active | Passive | |
|---|---|---|
| Tests | Muscle + tendon + joint | Joint + capsule only |
| If passive > active | Suggests tendon rupture, myopathy, or periarticular problem | |
| If both reduced equally | Intra-articular pathology |
Key Principles
- Always compare with contralateral (unaffected) side
- Assess movement in all planes appropriate to that joint (flexion, extension, abduction, adduction, rotation, circumduction)
- A goniometer may be used to accurately quantify range
- Pain at end of range - may indicate bursitis or early arthritis
- Pain throughout range - suggests intra-articular pathology
- For suspected fracture - do NOT put the limb through ROM; simply assess if movement causes pain and note which movements are restricted
Normal Reference Ranges (Key Joints)
| Joint | Key Movements | Normal Range |
|---|---|---|
| Shoulder | Flexion / Extension | 0-180° / 0-60° |
| Abduction | 0-180° | |
| Internal / External rotation | 70° / 90° | |
| Elbow | Flexion / Extension | 0-150° |
| Pronation / Supination | 80° / 80° | |
| Wrist | Flexion / Extension | 80° / 70° |
| Hip | Flexion / Extension | 120° / 30° |
| Abduction / Adduction | 45° / 30° | |
| Knee | Flexion / Extension | 135° / 0° |
| Ankle | Dorsiflexion / Plantarflexion | 20° / 50° |
Types of Abnormal Movement
| Finding | Meaning |
|---|---|
| Limitation of movement | Inflammation, effusion, deformity, pain, ankylosis |
| Flexion contracture | Fixed loss of extension; chronic synovitis or immobilisation |
| Hypermobility / laxity | Ligament injury, Ehlers-Danlos, Marfan's syndrome |
| Abnormal plane of movement | Joint damage (RA/OA); fracture allowing movement where none should occur |
| Dislocation | Articular surfaces completely non-contact |
| Subluxation | Articular surfaces incompletely apposed |
STEP 6: NEUROVASCULAR ASSESSMENT
This is especially important in fractures and dislocations, as vascular injury or nerve damage can be limb-threatening.
Neurological Assessment
Assess peripheral nerve distribution (not dermatomes) for limb injuries:
Upper limb:
| Nerve | Motor Test | Sensory Area |
|---|---|---|
| Radial | Wrist/finger extension (thumbs up) | Dorsal first web space |
| Median | Thumb opposition, "OK sign" | Volar index fingertip |
| Ulnar | Finger abduction, intrinsic function | Volar little finger |
| Axillary | Deltoid contraction (shoulder abduction) | Lateral shoulder (regimental badge area) |
Lower limb:
| Nerve | Motor Test | Sensory Area |
|---|---|---|
| Common peroneal | Dorsiflexion, eversion | Dorsum of foot |
| Tibial | Plantarflexion, toe flexion | Sole of foot |
| Femoral | Knee extension | Anteromedial thigh/leg |
Document neurological deficit before any reduction manoeuvre - to prove it was not caused by treatment.
Muscle Strength Grading (MRC Scale)
| Grade | Finding |
|---|---|
| 0 | No movement |
| 1 | Flicker / trace movement |
| 2 | Movement with gravity eliminated |
| 3 | Movement against gravity only |
| 4 | Movement against gravity + resistance |
| 5 | Normal strength |
Vascular Assessment
- Palpate pulses distal to the injury (radial, ulnar, dorsalis pedis, posterior tibial)
- Capillary refill - should be < 2 seconds
- Skin colour and temperature distally
- Compartment syndrome warning signs (especially tibial shaft fractures, supracondylar fractures):
- 5 Ps: Pain (disproportionate, especially on passive stretch), Paraesthesia, Paralysis, Pallor, Pulselessness (late sign)
- Tense, woody swelling of the compartment
- This is a surgical emergency requiring urgent fasciotomy
STEP 7: SPECIAL TESTS
Specific manoeuvres to confirm diagnoses:
| Test | Joint | Positive Finding | Diagnosis |
|---|---|---|---|
| Lachman / Anterior drawer | Knee | Anterior tibia slides on femur | ACL injury |
| Valgus / Varus stress | Knee | Excessive opening | MCL / LCL injury |
| McMurray's | Knee | Click + pain on rotation | Meniscal tear |
| Patellar tap / Bulge sign | Knee | Fluctuance | Effusion |
| Apprehension test | Shoulder | Patient resists external rotation | Anterior shoulder instability |
| Sulcus sign | Shoulder | Dimple below acromion | Inferior instability |
| Finkelstein's | Wrist | Sharp radial pain | De Quervain tenosynovitis |
| Watson test | Wrist | "Clunk" on radial deviation | Scapholunate ligament injury |
| Thumb CMC grind | Thumb | Crepitus / grittiness | CMC arthritis |
| FABER / FADIR | Hip | Groin/lateral pain | Hip labral pathology / FAI |
| Trendelenburg test | Hip | Pelvis drops contralaterally | Gluteus medius weakness |
| Straight leg raise | Spine/Hip | Sciatica < 60° | Lumbar disc prolapse (L4/L5/S1) |
STEP 8: IMAGING
X-ray is the first-line investigation for suspected fractures:
- Rule of twos - two views (AP + lateral), two joints (above and below), two limbs (compare with contralateral if needed), two times (initial + repeat at 10-14 days to confirm stress fractures)
- MRI - soft tissue, ligaments, cartilage, occult fractures, bone marrow oedema
- CT - complex fractures, intra-articular assessment, planning surgery
- Ultrasound - effusion, soft tissue, tendon integrity
- Bone scan - stress fractures (especially if plain X-ray normal)
SUMMARY TABLE
| Step | Bone | Joint | Fracture |
|---|---|---|---|
| Look | Deformity, swelling, skin changes | Swelling, erythema, deformity, wasting | Deformity, bruising, open wound, limb malposition |
| Feel | Point tenderness, step-off, crepitus | Warmth, effusion type, joint line tenderness | Point tenderness, bony crepitus (note: don't elicit deliberately), step-off |
| Move | Assess adjacent joint ROM | Active + passive ROM, end-feel | Restricted painful movement; avoid forceful ROM if fracture suspected |
| Neurovascular | Pulse, sensation distal | Usually intact (unless dislocation) | Check distal pulses + sensation before + after reduction; watch for compartment syndrome |
| Special tests | Bone-specific (e.g., percussion test) | Joint-specific ligament/stability tests | Stress views to confirm alignment |
Sources
- Harrison's Principles of Internal Medicine, 22nd Ed (2025) - Musculoskeletal Examination
- Rosen's Emergency Medicine - Joint and Fracture Examination
- Tintinalli's Emergency Medicine - Physical Examination of Fractures
- Rheumatology, 2-Volume Set (Elsevier 2022) - Regional Musculoskeletal Examination, Gait, Deformity, Inflammation
- Sabiston Textbook of Surgery, 21st Ed - Musculoskeletal Examination
This is a shared conversation. Sign in to Orris to start your own chat.