
Open cholesystecyomy surgical procedure every step every detail information
open cholecystectomy surgical procedure steps anatomy
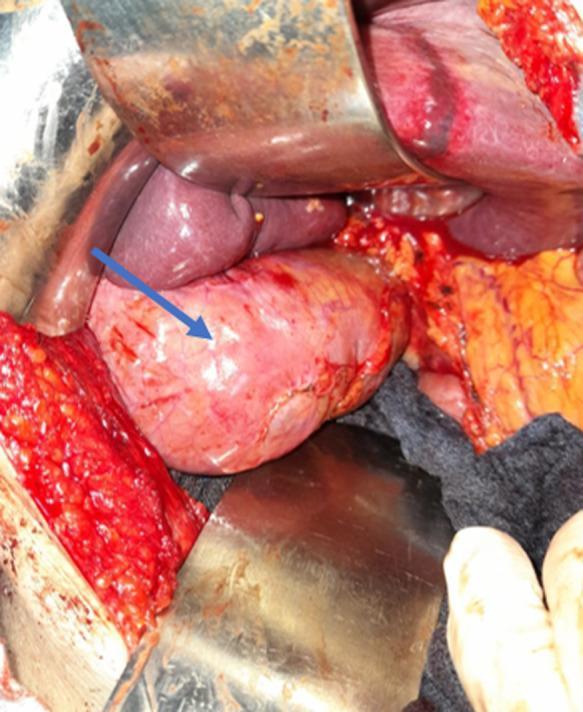
This intraoperative clinical photograph shows an open abdominal surgical field during a cholecystectomy. The primary focus is a significantly distended and enlarged gallbladder (indicated by a blue arrow), which exhibits a thickened, hyperemic wall with a smooth, light pinkish surface. The surrounding anatomy includes the inferior surface of the liver, which appears reddish-purple and healthy, and adjacent adipose tissue. Surgical retraction is maintained by several metal retractors, exposing the subhepatic space. Signs of surgical manipulation are evident, including minor hemorrhage and the presence of surgical gauze. The image illustrates cholecystitis or biliary obstruction, demonstrating the typical morphological changes of a tense, distended gallbladder (hydrops) prior to resection.
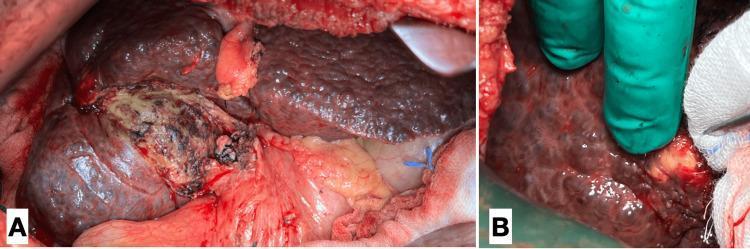
This clinical photograph displays intraoperative findings of the liver during an open surgical procedure. Image A shows the gross anatomy of the liver, characterized by a markedly nodular contour and a heterogeneous, irregular surface texture. The parenchyma exhibits areas of dark, congested discoloration and visible scarring consistent with chronic liver disease, such as advanced hepatosplenic schistosomiasis. Evidence of surgical manipulation from a cholecystectomy is present in the hilar region. Image B provides a close-up view of a specific hepatic lesion in segment VII. The lesion is a yellow-white, firm, and well-defined nodule with a rough surface, indicative of a calcified granuloma. A gloved finger and surgical gauze are visible to provide scale. These findings demonstrate the typical macroscopic progression of chronic parasitic or infectious hepatitis, characterized by diffuse macronodular cirrhosis and focal calcified parenchymal densities. The images serve as an educational reference for identifying late-stage fibrotic liver changes and associated calcified lesions in a clinical surgical setting.
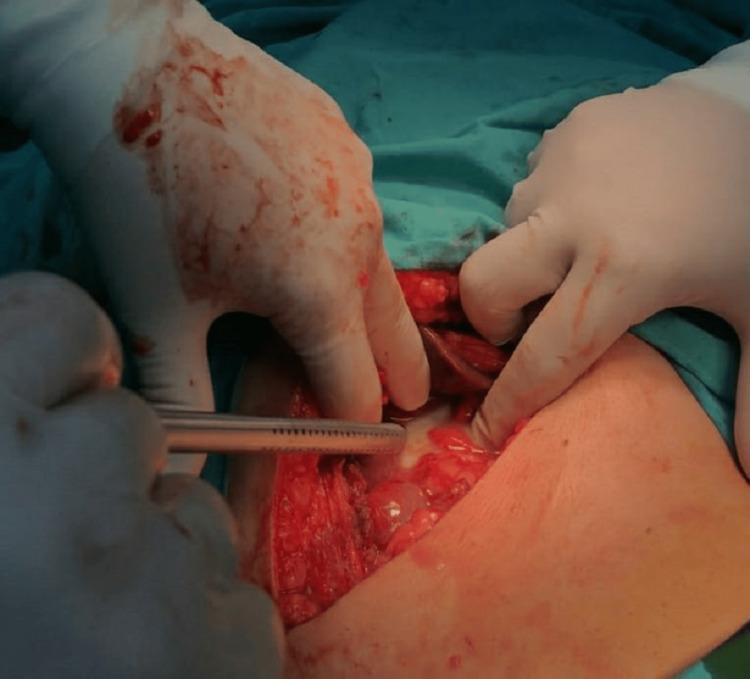
This intraoperative clinical photograph displays an open abdominal surgical procedure via a Kocher incision (right subcostal). The surgical field demonstrates significant acute inflammation and complications associated with gangrenous cholecystitis. Key findings include an exposed subhepatic space containing yellowish-white purulent exudate (pus) and friable, erythematous, and congested tissues. The gallbladder is ruptured, contributing to the localized peritonitis and the presence of subhepatic fluid. Visible surgical manipulation reveals blood-stained gloves and the use of metallic surgical instruments to retract and inspect the inflamed region. The anatomy of Calot’s triangle appears obliterated by dense inflammatory adhesions and phlegmon (frozen Calot's), a clinical finding that necessitates a subtotal cholecystectomy for patient safety. This image serves as a high-fidelity educational example of acute biliary sepsis, gallbladder perforation, and the intraoperative challenges encountered in complex hepatobiliary surgery.
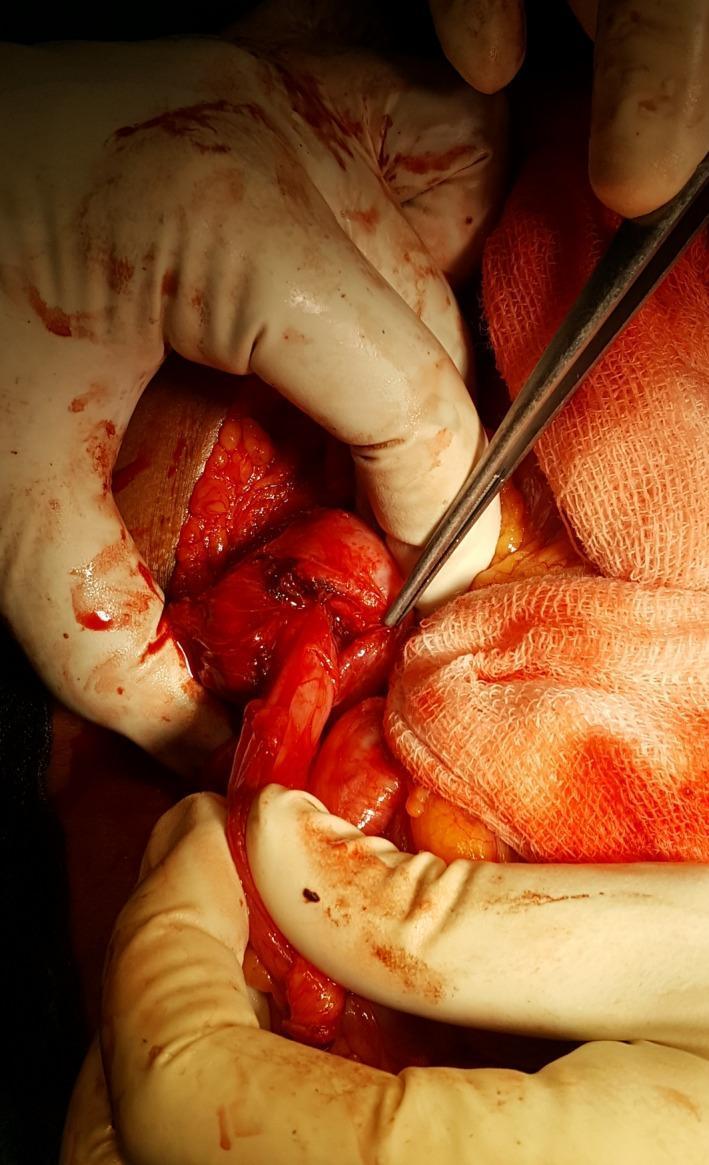
This clinical photograph captures a close-up view of an open abdominal surgical procedure, specifically an open cholecystectomy following conversion from laparoscopy. The surgical field demonstrates the excision of a cholecystocolic fistula, a rare complication of chronic cholecystitis. Key visible elements include the gallbladder, which appears distended and erythematous with reddish-brown discoloration indicating significant inflammation. A visible fistulous tract connects the gallbladder fundus to the transverse colon. Surgical forceps and gloved hands are shown manipulating the tissues to expose the colonic defect for primary repair. The surrounding anatomical region exhibits signs of acute-on-chronic inflammation, congestion, and serosanguinous fluid typical of complex biliary dissection. Gauze sponges are positioned at the periphery to maintain field clarity. This image illustrates a critical intraoperative decision-making scenario where inflammatory adhesions and fistulous connections necessitate conversion to open surgery for safe management of the hepatobiliary and gastrointestinal tract communication.
Open Cholecystectomy - Complete Surgical Procedure
Overview & Historical Note
Indications for Open Approach
- Hemodynamic instability
- Uncontrolled coagulopathy
- Frank peritonitis
- Severe COPD or congestive heart failure (ejection fraction <20%) - cannot tolerate pneumoperitoneum
- Conversion from laparoscopic: inability to tolerate pneumoperitoneum, intraoperative complication, inability to identify structures, no progress after set time
- Mirizzi syndrome, cholecystoenteric fistula (complex cases)
Preoperative Preparation
- Full blood count
- Liver function tests (LFTs)
- Renal function tests
- Prothrombin time / coagulation screen
- ECG and chest X-ray if medically indicated
- Abdominal ultrasound (assess CBD diameter, wall thickness, stones)
- Antibiotic prophylaxis: second-generation cephalosporin (e.g., cefazolin) given 30 minutes before incision - covers enteric flora and skin flora
- DVT prophylaxis: subcutaneous heparin + antiembolic (TED) stockings
- Sequential compression devices applied to lower extremities
- Informed consent: patient aware of procedure, alternatives, risks including bile duct injury, bleeding, conversion
- Consider ultrasound-guided subcostal transversus abdominis plane (TAP) block to reduce postoperative pain
Patient Positioning
- Supine on the operating table
- Arms extended outward (to allow space for retractor attachment on bed rails)
- Table should be fluoroscopy compatible - C-arm can be positioned over the right upper quadrant for intraoperative cholangiogram if needed
- Skin preparation and draping of the entire abdomen in standard sterile fashion
Step 1 - Incision
A. Kocher (Right Subcostal) Incision - Classic Choice
- Right-sided, oblique incision made approximately 2.5-5 cm inferior to and parallel to the right subcostal margin
- Extends from xiphoid laterally to accommodate at least one working hand
- Carried down through: skin → subcutaneous fat → anterior rectus sheath → rectus abdominis muscle (split or transected) → posterior rectus sheath → peritoneum
- Associated with more postoperative pain (cuts through muscle layers)
- If converting from laparoscopy, can incorporate the subcostal port incisions
B. Upper Midline Incision - Alternative
- Vertical incision through: skin → subcutaneous fat → linea alba → peritoneum
- Relatively bloodless - no muscle cutting
- Preferred for emergency operations or when access to surrounding organs may be needed
- Easily extended inferiorly for full abdominal access
Step 2 - Abdominal Entry and Exploration
- On entering the abdomen, inspect the right upper quadrant for additional pathology
- Sweep a hand over the top of the right lobe of the liver
- Packing:
- Laparotomy sponges packed posteriorly and laterally to the right lobe of the liver to deliver the gallbladder into the incision
- Additional moist lap pads to pack the small bowel and colon caudally out of the operative field
- Packs placed on hepatic flexure of colon, duodenum, and lesser omentum for a clear view of the porta hepatis
- "It is the left hand of the assistant that does all the work" - Moynihan's classic dictum
Step 3 - Retraction and Exposure
- Fixed retractor (e.g., Thompson or fixed ring retractor) used to retract the costal margin - frees the assistant's hands
- Retractors placed over:
- Superior liver edge
- Gastroduodenal area (to put Calot's triangle on stretch)
- Critical retraction direction (Table 71.5 - Bailey & Love):
- Fundus retracted toward the patient's right shoulder (cranially/anteriorly)
- Infundibulum (Hartmann's pouch) retracted inferolaterally toward the patient's right side
- This opens the hepatocystic triangle, increases the angle between cystic duct and CBD, and limits dissection above Rouvière's sulcus
Step 4 - Adhesiolysis
- Any adhesions from omentum, colon, or duodenum to the gallbladder must be divided before proceeding
- Use electrocautery or sharp scissors
- In chronic/complicated cases, significant adhesions may obscure normal anatomy - careful sharp dissection required
Step 5 - Gallbladder Decompression (if needed)
- If the gallbladder is tense and distended, decompress at the fundus using a large-gauge aspiration needle and syringe
- Clear, thick fluid indicates long-standing cystic duct obstruction
- Close the puncture with a PDS (polydioxanone) purse-string stitch, which then also serves as a traction suture
- Alternatively, grasp it closed with a clamp
- Decompression facilitates retraction and exposure
Step 6 - Dissection of Calot's Triangle (Hepatocystic Triangle)
- An artery forceps or Duval forceps placed on the infundibulum of the gallbladder
- Fundus retracted anteriorly and superiorly; infundibulum retracted inferolaterally
- The peritoneum overlying Calot's triangle is put on stretch
- Peritoneum is then incised/divided close to the wall of the gallbladder (staying close avoids injury to deeper structures)
- Clear all fibrofatty and soft areolar tissue from the hepatocystic triangle
- Only two structures should be seen entering the gallbladder: the cystic duct and the cystic artery
- Expose at least the medial third of the cystic plate (gallbladder-liver attachment)
- Failure to achieve CVS = warning sign; stop and reassess
- Usually runs within Calot's triangle
- Skeletonized using careful right-angle dissection and electrocautery
- An important landmark: Lund node (lymph node) sits superficial to the cystic artery reliably in most patients
- In the open approach, the surgeon's left index finger can be introduced into the foramen of Winslow to palpate for calculi in the CBD and help orient the anatomy
- Introduces finger into foramen of Winslow
- Palpates CBD for stones
- Retracts the duodenum for exposure of the porta hepatis
Step 7 - Ligation and Division of the Cystic Artery
- Cystic artery is dissected, skeletonized, and secured near the surface of the gallbladder (not at its origin from the right hepatic artery)
- Dividing near the gallbladder reduces bleeding during peritoneal dissection and separation of areolar tissue
- Ligated with ties (2-0 or 3-0 absorbable/silk) or metal clips
- Warning: With a short cystic artery, the right hepatic artery must be carefully identified before ligating
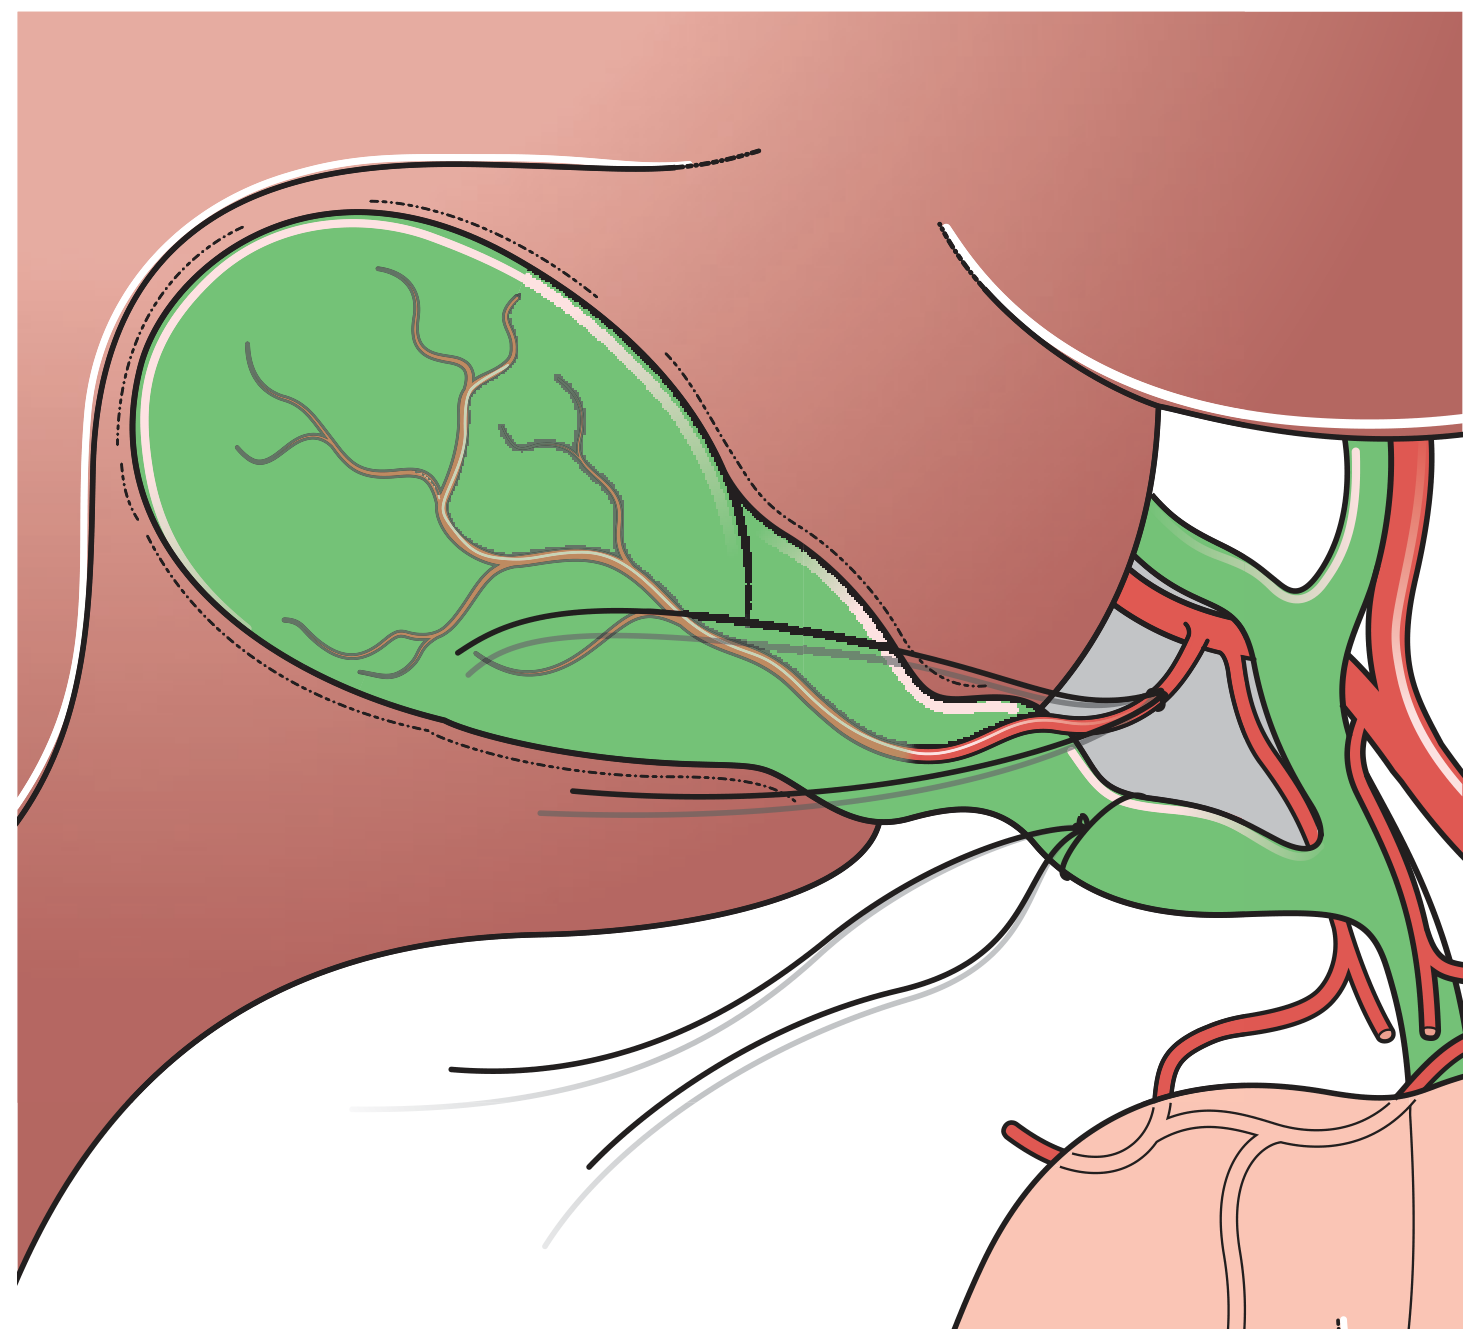
Step 8 - Ligation and Division of the Cystic Duct
- Confirm the cystic duct is clearly identified
- Confirm its entry into the CBD (common bile duct)
- Achieve and confirm CVS
- The entire triangle of Calot is displayed to ensure clarity of ductal anatomy
- Cystic duct is cleaned down to where it joins the CBD
- Ligated between two ties (or clips) and divided between them
- Ligation should be performed close to the gallbladder to avoid inadvertent injury to the CBD
- A cystic duct stump of adequate length (~5 mm) is left
Step 9 - Intraoperative Cholangiogram (IOC) - Optional but Recommended
- Clarify biliary anatomy
- Identify bile duct injuries
- Detect choledocholithiasis and other obstructions
- Once CVS achieved, a metal clip or 2-0 suture tie placed proximally on the cystic duct close to the gallbladder
- A small incision made just distal to it on the anterior surface of the cystic duct
- A cholangiogram catheter passed into the ductotomy and threaded in a few millimeters
- Catheter secured with a clip or balloon, connected to a three-way stopcock
- Two syringes attached: one with injectable saline, one with half-strength iodinated contrast (full strength may obscure stones)
- Air must be eliminated from tubing to prevent false-positive "stones"
- C-arm fluoroscope (sterile draped) positioned over the right upper quadrant
- A complete cholangiogram shows: right and left hepatic ducts, common hepatic duct and CBD, cystic duct junction, and free flow into the duodenum
- If contrast does not flow freely: give cholecystokinin (20 mg/kg) or glucagon (1 mg IV) to relax the sphincter of Oddi
- CBD stones appear as filling defects
- Air bubbles (not stones) float to non-dependent areas on tilting
- Strictures appear as waisting/narrowing of ducts
- If stones found: proceed to CBD exploration
Step 10 - Dissection of Gallbladder from Liver Bed
Retrograde (Infundibulum-first) Approach - Standard
- After cystic duct and artery are secured, the gallbladder is dissected off the liver bed from the neck toward the fundus
- Dissection stays close to the gallbladder wall
- Cystic plate (fibrous tissue between gallbladder and liver) is left attached to the liver to avoid bleeding from liver sinuses and bile leakage
- Electrocautery is used for hemostasis
Antegrade (Fundus-first / Top-down) Approach - Alternative
- Dissection begins at the fundus and proceeds downward toward the neck
- After separating the gallbladder from the liver bed, the ductal and vascular structures are dissected subsequently
- Sometimes beneficial to open the gallbladder and insert a finger into the lumen to guide dissection when tissue planes are not clear
- Cystic duct and artery are ligated after the gallbladder is largely freed
Step 11 - Hemostasis of Liver Bed
- The gallbladder fossa is inspected carefully for bleeding and bile leakage
- Bleeding points controlled with electrocautery or suture ligation
- The cystic plate is left intact to minimize oozing from liver sinusoids
- Irrigation with warm saline if needed
Step 12 - Intraoperative Precautions Against Bile Spillage
- Throughout the procedure, minimize spillage of bile into the peritoneal cavity
- If the gallbladder is inadvertently punctured, a second clamp or purse-string suture is applied immediately
- If stones spill: remove all visible stones; retained stones may lead to abscess formation
Step 13 - Drain Placement (Selective, Not Routine)
- Drains are not mandatory
- Indicated only if the surgeon is concerned about identifying or controlling a possible bile leak postoperatively
- If placed: a closed suction drain (e.g., Jackson-Pratt) in the subhepatic space (Morrison's pouch)
Step 14 - Subtotal Cholecystectomy (for Difficult/Unsafe Cases)
- Perform a subtotal cholecystectomy: leave a portion of the infundibulum/posterior gallbladder wall in situ
- Remove all stones from the residual pouch
- Suture ligate the mucosal side of the cystic duct origin
- This avoids catastrophic CBD injury in hostile operative fields
Step 15 - Wound Closure
- Peritoneum closed (if opened separately)
- Fascial layers closed with mass closure technique or layered closure using slowly absorbable sutures (e.g., PDS No. 1 or looped)
- Subcutaneous tissue irrigated
- Skin closed with staples, subcuticular sutures, or interrupted nylon sutures
Key Anatomical Landmarks and Safety Principles
| Structure | Importance |
|---|---|
| Calot's Triangle | Bounded by cystic duct (inf.), common hepatic duct (medial), and liver edge (sup.) - contains cystic artery |
| Critical View of Safety (CVS) | Only two structures entering gallbladder visible - mandatory before clipping |
| Rouvière's Sulcus | Horizontal fissure on right lobe of liver - safe dissection stays cephalad to this |
| Foramen of Winslow | Finger inserted here palpates CBD for stones |
| Lund's Node | Lymph node reliably superficial to cystic artery - helps locate it |
| Cystic Plate | Left on liver to prevent hepatic sinus bleeding and bile leak |
| R4U Line | Imaginary line from Rouvière's sulcus to umbilical fissure - defines safe dissection zone |
Common Pitfalls and Complications
| Pitfall | Consequence | Prevention |
|---|---|---|
| Inadequate exposure | Misidentification of structures | Proper retraction, packing |
| Severe inflammation | Bile duct injury | Subtotal cholecystectomy, time-out |
| Short cystic artery | Right hepatic artery injury | Identify RHA before ligating |
| Short cystic duct | CBD transection | High ligation close to GB |
| Missing anatomical variants | Injury to aberrant ducts/arteries | Always achieve CVS |
| Bile spillage | Peritonitis, abscess | Immediate clamp/purse-string |
| Failure to recognize "red flags" | Major vascular/biliary injury | Stop, reassess, call for help |
- Failure of timely progression of dissection
- Anatomical disorientation
- Difficulty visualizing the operative field
- Excessive bleeding
Postoperative Care
- NPO until bowel sounds return / flatus passed
- IV fluids, analgesia (opioids + NSAIDs + TAP block)
- Early ambulation for DVT prevention
- Wound care
- Monitor for bile leak (abdominal pain, fever, rising bilirubin)
- Drain output assessed if drain placed
- Hospital stay: typically 3-5 days (vs. 1 day for laparoscopic)
Overall Outcomes
- Mortality rate: ~0.1%
- Wound infection and cardiopulmonary complications are higher than laparoscopic approach
- Bile duct injury risk: historically similar to laparoscopy when performed carefully
- Conversion to open from laparoscopy is not a failure - it is sound surgical judgment