
I have nerve pulling sensation in my elbow previously I have neck pain but not now some times nerve pulling sensation ij neck also what to do
nerve pulling sensation elbow cervical radiculopathy neck treatment
cervical radiculopathy nerve roots arm pain dermatome diagram
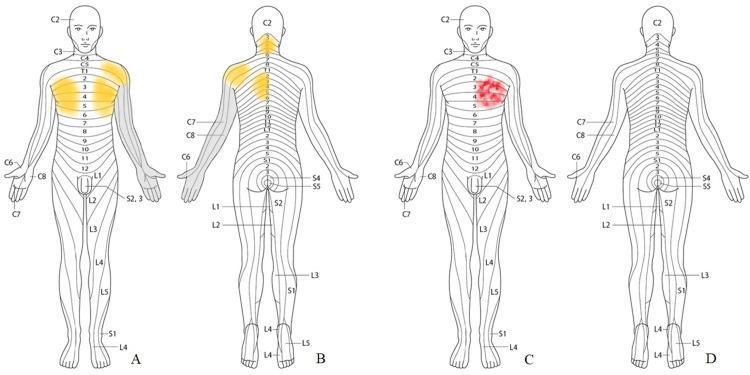
A series of four schematic anatomical diagrams (A-D) illustrating dermatomal distributions of pain and numbness on human figures. Panels A (anterior) and B (posterior) show preoperative cervical radiculopathy symptoms, with yellow shading indicating persistent pain in the neck (C2-C3), bilateral upper chest (C4-T4), left shoulder, and left subscapular area. Gray shading on the left upper extremity represents numbness involving the arm and all digits (C6-C8 distribution). Panels C (anterior) and D (posterior) illustrate postoperative symptoms following cervical surgery. A red shaded area on the left anterior chest (spanning approximately C3-T4 dermatomes) represents the location of angina pectoris pain. The diagrams use standard dermatome labeling (C2-S5) to map clinical sensory manifestations. This medical illustration is used to differentiate between cervical referred pain and cardiac-origin chest pain in a clinical context, highlighting the importance of sensory mapping in differential diagnosis.
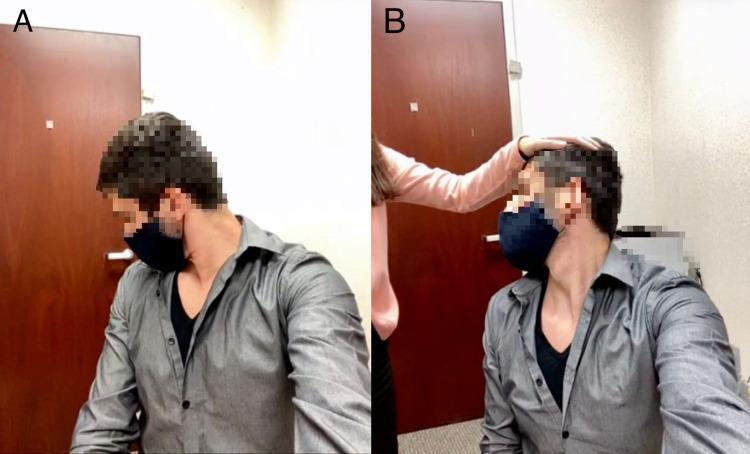
Clinical photographs demonstrating physical examination maneuvers for cervical radiculopathy. Panel A illustrates the forward flexion test, showing a patient with the head rotated to the side and the neck flexed anteriorly. Panel B demonstrates the Spurling test (foraminal compression test), where an examiner applies a downward axial load to the apex of the patient's head while the neck is rotated toward the symptomatic side. These provocative maneuvers are used to evaluate cervical nerve root irritation or impingement; a positive result is indicated by the reproduction of radicular pain radiating into the shoulder or arm. The images show a clinical setting with the patient in a seated position. These tests are essential components of a neurological neck examination to differentiate cervical spine pathology from shoulder-related disorders.
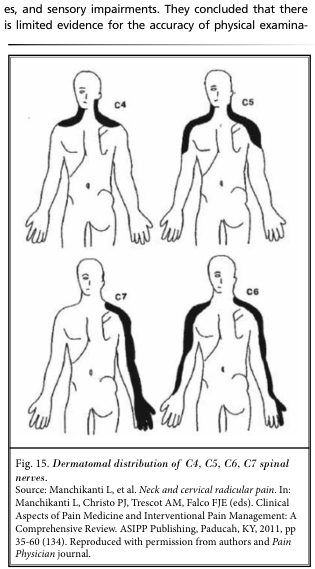
Summary : This figure illustrates the dermatomal distribution patterns of the C4, C5, C6, and C7 spinal nerves on the human body, showing the specific skin areas innervated by each nerve root. illustration: # Overview : • Four schematic diagrams of the human upper body (front and back views) are shown, each labeled with a different cervical spinal nerve (C4, C5, C6, C7). • Each diagram highlights a distinct region of the skin corresponding to the sensory distribution (dermatome) of the respective nerve. # Dermatome Regions : • C4: – Shaded area covers the lower neck, upper shoulder, and extends over the clavicle region. • C5: – Shaded area includes the lateral (outer) aspect of the upper arm and shoulder, extending down to just above the elbow. • C6: – Shaded area runs from the lateral neck and shoulder, down the lateral arm and forearm, to include the thumb. • C7: – Shaded area extends from the posterior neck and shoulder, down the posterior arm and forearm, to include the middle finger. # Design Encodings : • Black shading is used to indicate the dermatome for each nerve root on a simplified human outline. • Each diagram is labeled in the upper left or right with the corresponding nerve root (C4, C5, C6, C7). # Spatial Relationships : • The diagrams are arranged in a 2x2 grid, with C4 and C5 on the top row, C7 and C6 on the bottom row. • Each dermatome is shown on one side of the body for clarity. # Analysis : • The figure visually distinguishes the unique, non-overlapping cutaneous territories supplied by each cervical nerve root. • The C4 dermatome is most superior and medial, while C7 is more posterior and extends to the middle finger. • The C6 dermatome uniquely includes the thumb, and C5 is limited to the upper lateral arm. • This layout aids in clinical localization of nerve root pathology based on sensory symptoms.
What's Likely Happening
What Could Be Causing This
- Cervical disc herniation or spondylosis - a disc pressing on a nerve root in the neck that refers sensation down the arm to the elbow
- Thoracic outlet syndrome - compression of the brachial plexus between the scalene muscles and first rib
- Poor posture - forward head posture puts chronic tension on the cervical nerve roots
- Cubital tunnel syndrome - ulnar nerve irritation at the elbow (independent of the neck)
What You Should Do
Step 1: See a Doctor (Important)
- Do a Spurling test (press down on your head with neck rotated) - positive result reproduces arm symptoms and confirms cervical origin
- Order an MRI of the cervical spine to check for disc herniation or nerve root compression
- May order nerve conduction studies (EMG/NCS) to check the ulnar/radial nerve at the elbow
Step 2: Conservative Treatment (First Line)
- Activity modification - avoid positions that worsen symptoms (chin-poking forward, prolonged overhead work, leaning on elbow)
- NSAIDs (ibuprofen/naproxen) for pain and inflammation - short courses under medical guidance
- Physiotherapy - the most important long-term measure:
- Cervical traction
- Neck range-of-motion exercises
- Scapular/shoulder blade squeezes
- Core and postural strengthening
- Soft cervical collar (short-term) - reduces nerve irritation during acute phases
Step 3: Exercises You Can Start Now
- Chin tucks - gently pull your chin back (like making a "double chin") while keeping eyes level. Hold 5 seconds, 10 reps.
- Neck side bends - slowly tilt your ear toward the shoulder on the non-painful side. Hold 20-30 seconds.
- Scapular squeezes - sit straight, squeeze shoulder blades together as if pinching a pencil. Hold 5 seconds, 10 reps.
- Nerve gliding (neural mobilisation) - extend your arm to the side, slowly flex/extend wrist. Do gently - this can irritate the nerve if done aggressively.
Warning Signs - See a Doctor Urgently If:
- The nerve sensation becomes numbness or weakness in your hand or fingers
- You develop wrist drop or grip weakness
- Symptoms spread to both arms or legs
- You develop bladder or bowel problems (this would suggest spinal cord compression - needs emergency evaluation)
Summary
| What to do | Timeline |
|---|---|
| See a spine specialist / neurologist | Within 1-2 weeks |
| MRI cervical spine | As directed by doctor |
| Start physiotherapy | As soon as possible |
| NSAIDs for pain relief | Short course only |
| Postural correction & exercises | Daily habit |
Disclaimer: This information is for educational purposes only and does not replace a medical consultation. Please see a doctor for a proper diagnosis.
At present I have no neck pain or anything but I had neck pain previously nerve pulling sensation in elbow
nerve pulling traction sensation elbow cubital tunnel ulnar nerve treatment
ulnar nerve cubital tunnel syndrome elbow anatomy
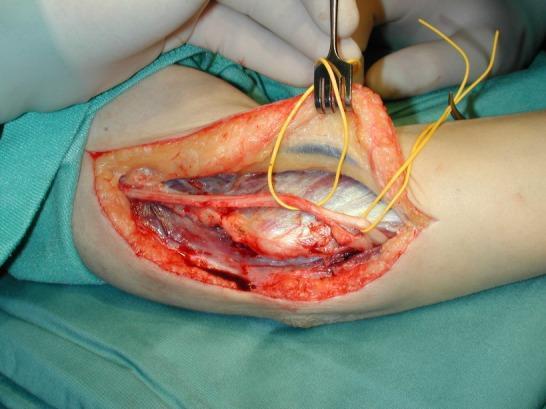
This clinical photograph displays an intraoperative view of an open surgical procedure on the medial aspect of the elbow, specifically illustrating a subcutaneous transposition of the ulnar nerve for the treatment of cubital tunnel syndrome. The incision reveals several anatomical layers, including skin, a thick layer of yellowish lobular subcutaneous fat, and underlying muscle fascia. The ulnar nerve is clearly identified as a slender, yellowish-white cord-like structure that has been mobilized from its native position in the cubital tunnel. It is being retracted and supported by yellow vessel loops and a metal rake retractor. The surgical field also shows deep venous structures and dissected muscular tissue with visible striations. The procedure demonstrates the transposition technique where the nerve is relocated anteriorly to the medial epicondyle to relieve compression and tension during elbow flexion. This image serves as a teaching tool for orthopedic and neurosurgical trainees to understand the surgical anatomy and topographical shifts involved in peripheral nerve decompression.
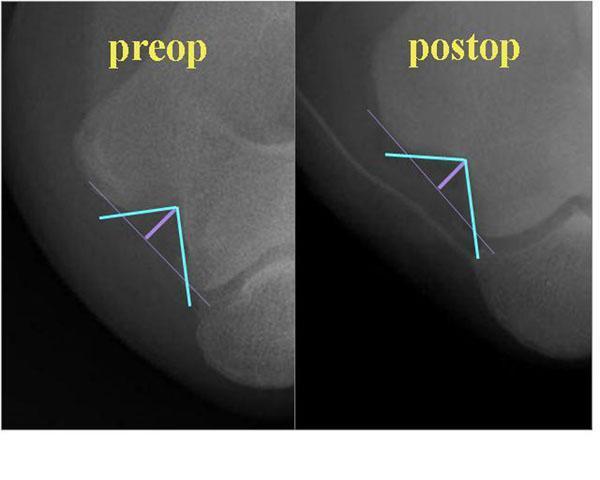
This diagnostic image consists of two side-by-side X-rays of the elbow in a specialized cubital tunnel view (anteroposterior view with full flexion and 20 degrees of external rotation). The radiographs compare pre-operative (preop) and post-operative (postop) anatomy following a minimal medial epicondylectomy and in situ decompression for cubital tunnel syndrome. The images are annotated with cyan lines to measure the Cubital Tunnel Angle (CTA) and a purple line to indicate the Cubital Tunnel Depth (CTD). In the 'preop' image, the CTA is narrower and the CTD is deeper, illustrating the bony constriction that can lead to ulnar nerve irritation. In the 'postop' image, following the partial removal of the medial epicondyle, the cyan lines demonstrate a significantly widened angle and a shallower depth. This comparison serves as an educational tool to visualize the surgical objective of increasing the volume of the cubital tunnel to relieve ulnar nerve entrapment.
Most Likely Cause: Cubital Tunnel Syndrome
Why the Previous Neck Pain Matters
- A past cervical disc issue sensitised the nerve along its entire length (called "double crush" - a nerve already slightly irritated at the neck is more vulnerable at the elbow)
- The cervical problem has largely healed, but residual nerve sensitivity remains at the elbow
Common Triggers (Do Any of These Apply to You?)
- Sleeping with elbow bent (very common cause of morning symptoms)
- Leaning on the elbow on a desk or armrest
- Holding a phone to your ear for long periods
- Prolonged typing or driving with bent elbows
- Repeated pulling, reaching, or lifting
What You Can Do Right Now
1. Avoid Elbow Bending Positions
- Do not rest your elbow on hard surfaces
- When sleeping, keep the elbow straight - wrap a towel around the elbow or use a pillow to prevent bending past 70 degrees
- Straightening your arm when symptoms appear often gives immediate relief
2. Elbow Splint at Night
3. Nerve Gliding Exercise (Ulnar Nerve Floss)
- Hold your arm out to the side, elbow straight
- Slowly bend the elbow bringing your fist toward your shoulder
- At the same time, tilt your head away from that arm
- Then slowly straighten the elbow and return the head to neutral
- Do 10 slow repetitions, 2-3 times a day
- Stop if it causes sharp or worsening pain
4. NSAIDs (Short Term)
When to See a Doctor
- The pulling sensation becomes numbness or tingling in the ring/little fingers
- You notice weakness in grip or hand muscles
- Symptoms do not improve within 4-6 weeks of conservative care
- The sensation is getting worse over time
Quick Summary
| Action | When |
|---|---|
| Stop leaning on elbow | Immediately |
| Night elbow splint | Tonight onwards |
| Nerve gliding exercises | Daily, gently |
| NSAIDs if painful | 3-5 days max |
| See a physiotherapist | If no improvement in 4 weeks |
But yesterday I use my mobile phone excess at that time I had nerve pulling sensation in my elbows and neck now also I have neck nerve pulling sensation but it is unfrequent and
mobile phone use neck elbow nerve pulling sensation text neck ulnar nerve posture
text neck posture mobile phone cervical spine forward head posture
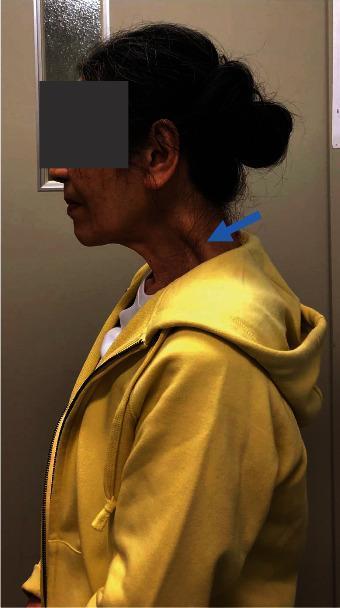
A clinical photograph presenting a lateral view of a patient’s head and neck, demonstrating Dropped Head Syndrome (DHS) with characteristic forward head posture. The image shows the head positioned anteriorly relative to the torso, with a marked forward inclination of the cervical spine. A blue arrow points to a distinct, abnormal bulge in the posterior neck region, corresponding to the trapezius and levator scapulae muscles. This visible hypertrophy or prominence indicates compensatory muscle strain or underlying musculoskeletal pathology associated with impaired cervical extension. The photograph was captured during the follow-up phase of athletic rehabilitation-based physical therapy (AR-PT), illustrating persistent muscle tonus despite symptomatic improvement. This visual serves as an educational example of postural deformity, sagittal imbalance, and compensatory myofascial changes in cervical spinal disorders.
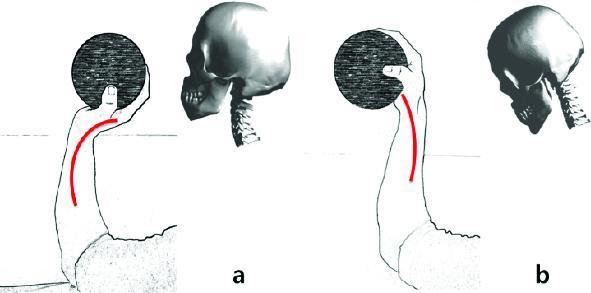
This Comparison Chart uses a conceptual analogy to illustrate the biomechanics of cervical spine posture. The image is divided into two sections: (a) representing correct alignment and (b) representing incorrect alignment or Forward Head Posture (FHP). In section (a), an anatomical diagram of the skull shows it balanced directly over the cervical vertebrae with a natural 'C-shaped' lordotic curve. This is paralleled by an illustration of an arm holding a weighted ball, where a red line indicates a curved, efficient support alignment through the wrist. In section (b), the skull is displaced anteriorly (forward), causing a straightened or reversed cervical curve and increased mechanical stress. The corresponding arm illustration shows the hand and ball shifted forward, resulting in an angled red line that demonstrates the increased moment and tension required by the wrist and forearm muscles to support the weight. The educational focus is on the clinical significance of head displacement and its relationship to neck strain and musculoskeletal tension.
What Is Actually Happening
Why You Have Background Symptoms Even Without Phone Use
- After long phone sessions, symptoms linger for hours
- The elbow sensation persists even when you're not using the phone
- Occasional neck nerve pulling happens from daily posture habits (looking down at anything)
The Fix - Mostly Posture
While Using Your Phone
| Wrong | Right |
|---|---|
| Phone in lap, head bent down | Phone raised to eye level |
| Elbow bent and unsupported | Elbow rested on armrest or belly, arm supported |
| Holding phone for 1+ hour straight | Break every 20 minutes - put the phone down |
| Lying in bed with phone held up | Sit upright or prop phone on a stand |
Daily Exercises (5 Minutes, Do These Daily)
- Chin tuck - gently pull chin straight back (not down). Hold 5 sec, 10 reps. Reverses forward head posture.
- Neck stretch - slowly tilt ear to shoulder, hold 20 seconds each side.
- Head rolls - slowly roll head side to side (not full circles). Loosens tight neck muscles.
- Elbow straightening - fully straighten your arm and hold for 5 seconds, 10 reps. Releases ulnar nerve tension.
- Nerve glide - arm out to the side, slowly bend and straighten elbow while tilting head away. 10 slow reps.
Sleep Position
- Do not sleep with elbow bent under your pillow or head
- Keep elbow as straight as possible at night
The Good News
- Triggered by a specific activity (phone use) - this means they are fully preventable
- Infrequent in the neck - meaning the cervical irritation has not become chronic yet
- No numbness, no weakness - you are at an early/mild stage