
Short segment soft stricture of the bulbar urethra
"bulbar urethral stricture" AND treatment
Short Segment Soft Stricture of the Bulbar Urethra
Anatomy of the Bulbar Urethra
Definition and Significance of "Soft" Stricture
- It is more amenable to endoscopic treatment
- It carries a better prognosis with less invasive management
- The degree of spongiofibrosis is the key pathological determinant of recurrence risk
Imaging
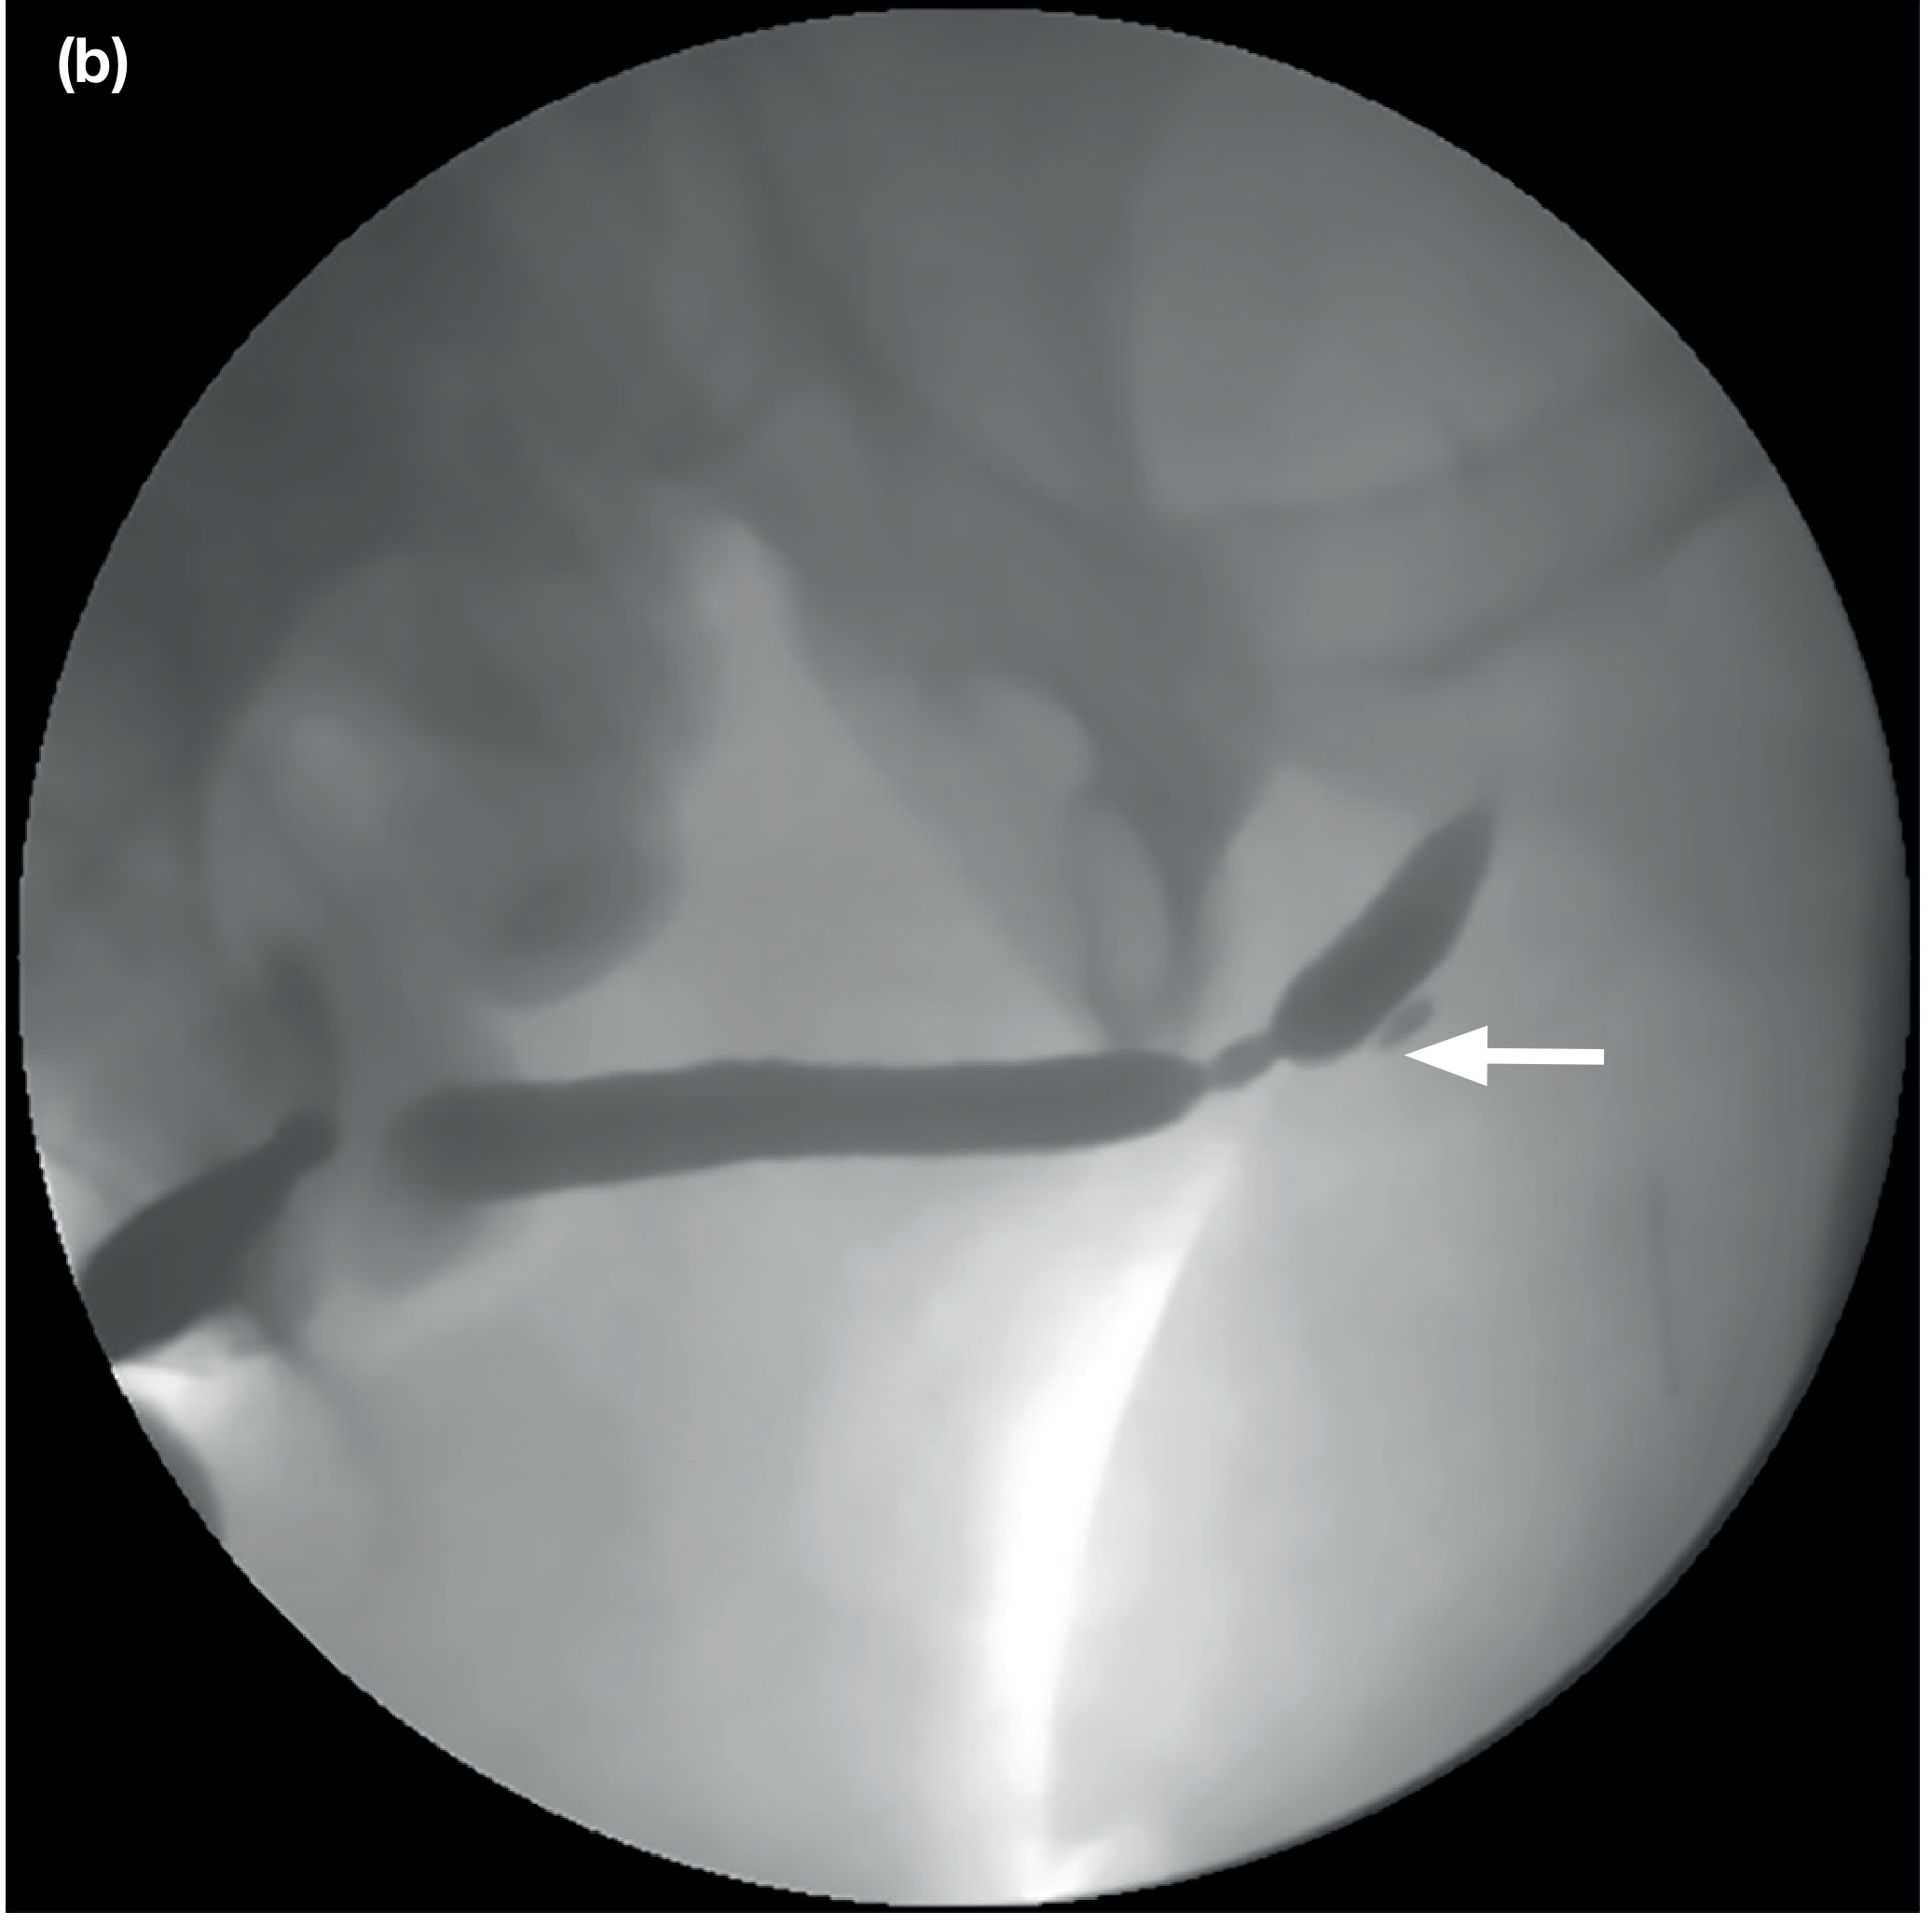
Aetiology
| Category | Examples |
|---|---|
| Iatrogenic (33%) | Prolonged catheterisation, large-bore catheters, urethroscopy, TURP resectoscope, ischemic insult during major surgery |
| Traumatic (19%) | Straddle injury to perineum (direct blunt injury to bulbar urethra - the most common site for straddle trauma) |
| Inflammatory (15%) | Lichen sclerosis, gonococcal urethritis, lichen planus |
| Idiopathic (33%) | No identifiable cause |
Clinical Presentation
- Weak/reduced urinary stream (most characteristic)
- Prolonged voiding, sensation of incomplete emptying
- Straining to void (Valsalva voiding)
- Urinary urgency and frequency
- Dysuria; urinary tract infections (UTIs)
- In severe cases: acute or chronic urinary retention, bladder hypertrophy, upper tract deterioration (hydronephrosis, renal impairment)
Management: Treatment Ladder
1. Endoscopic Options (First-line for short, soft strictures)
- Performed with filiform bougies or balloon dilators over a guidewire, progressing stepwise
- Appropriate for a soft, early stricture - gentle pressure may allow passage
- Not curative; provides temporary relief
- Suitable for patients who are poor surgical candidates or decline surgery (can be taught self-catheterisation/self-dilation with 12-14 Fr catheter)
- Performed with an optical urethrotome (Sachse urethrotome); stricture incised under direct vision using a cold knife, typically at the 12 o'clock position
- Alternatively a holmium/thulium laser fibre can be used
- Specifically indicated for short, non-traumatic bulbar strictures - should NOT be used in the penile urethra or at the sphincter-active membranous urethra
- Success rate of a single endoscopic attempt: ~30%; drops to ~13% for repeat attempts
- Recurrent dilations risk worsening spongiofibrosis and making subsequent reconstruction more complex
- Common practice: attempt one endoscopic intervention before referral for urethroplasty
2. Urethroplasty (Definitive/Gold Standard)
- Bulbar strictures >2 cm in length
- Bulbar strictures <2 cm that recur after endoscopic management
- Any primary soft stricture in a patient preferring definitive treatment upfront
a) Excision and Primary Anastomosis (EPA) - Anastomotic Urethroplasty
- Perineal incision; bulbocavernosus muscles split in midline (or one-sided dissection if stricture is distal to the muscles - releasing the ischiocavernosus on one side to access the dorsal urethra without dividing bulbocavernosus)
- The strictured segment is excised completely between vascular clamps using a fresh scalpel - full-thickness excision of corpus spongiosum
- Distal stump: spatulated dorsally, calibrated to ≥26 Fr
- Proximal stump: spatulated ventrally, calibrated to ≥28 Fr
- Because the bulbar urethra is eccentrically positioned within the corpus spongiosum: dorsal anastomotic sutures are full-thickness; ventral sutures through urethra only
- 8-12 interrupted sutures of 4-0 or 5-0 PDS or polyglactin placed 2-3 mm apart
- Spongioplasty: preserving the most proximal corpus spongiosum protects lateral bulbar arteries, ensures blood supply, and aids haemostasis
- Success rate for EPA: >90% at long-term follow-up
b) Augmentation Urethroplasty (for non-traumatic / longer strictures)
- The strictured segment is incised (not excised) and widened with a free graft patch - oral mucosal graft (OMG), either buccal (cheek) or lingual (ventral tongue)
- OMG is the gold standard tissue substitute: hairless, moist, easy to harvest, good take
- Can be placed dorsally (Barbagli technique - quilted to corpora), ventrally, or laterally
- Reserved for strictures where primary anastomosis would have tension (i.e., longer segments), or non-traumatic soft strictures
- Hair-bearing skin must never be used (risk of stone formation and UTI)
Decision Summary for Short Segment Soft Bulbar Stricture
Short segment (<2 cm), soft, bulbar urethra stricture
|
v
First attempt: DVIU (cold knife/laser) OR dilation
|
Success (~30%) --> Surveillance, consider self-dilation to maintain
|
Recurrence --> Urethroplasty (do NOT keep repeating DVIU)
|
v
Urethroplasty type:
- Traumatic/gap present --> Excision + Primary Anastomosis (EPA)
- Non-traumatic, soft, no gap --> Augmentation with oral mucosal graft
- EPA also applicable if short enough that tension-free anastomosis is possible
Key Points
- The bulbar urethra is the most common site for urethral stricture
- "Soft" implies minimal spongiofibrosis - more favorable for endoscopic treatment compared with dense/traumatic strictures
- One endoscopic attempt (DVIU) is appropriate first-line; success ~30%
- After recurrence, urethroplasty is the definitive treatment - do not repeatedly instrument as this worsens fibrosis
- For short bulbar strictures: EPA (excision and primary anastomosis) gives >90% long-term success
- Use RUG to characterise length/location; cystoscopy to assess density
- Sabiston Textbook of Surgery, Biological Basis of Modern Surgical Practice
- Schwartz's Principles of Surgery, 11th Edition
- Bailey and Love's Short Practice of Surgery, 28th Edition
- Hinman's Atlas of Urologic Surgery (E-Book)
- Campbell-Walsh-Wein Urology, 3-Volume Set
- Recent meta-analysis: Oszczudlowski et al., "Outcomes of transecting versus non-transecting urethroplasty for bulbar urethral stricture," BJU Int. 2023 Sep [PMID: 37402622]
Short segment soft stricture of the bulbar urethra
"bulbar urethral stricture" AND urethroplasty
Short Segment Soft Stricture of the Bulbar Urethra
Anatomy
Pathology
- Minimal or early-stage spongiofibrosis
- The surrounding tissue is pliable, not indurated
- The narrowing can often be traversed or dilated more easily than a dense/traumatic stricture
- This is the most favorable type for both endoscopic and reconstructive management
Aetiology
| Category | Proportion | Examples |
|---|---|---|
| Iatrogenic | ~33% | Urethral catheterisation (especially prolonged or large-bore), cystoscopy/urethroscopy, TURP resectoscope, pelvic surgery with ischaemic insult |
| Idiopathic | ~33% | No identifiable cause |
| Traumatic | ~19% | Straddle injury - direct perineal blunt trauma is the classic cause of bulbar stricture |
| Inflammatory | ~15% | Lichen sclerosus, gonococcal urethritis, other infective urethritis |
| Other | rare | Radiation, malignancy (consider if recurrent or atypical) |
Clinical Features
- Weak, reduced urinary stream (most common presenting complaint)
- Spraying or split/double urinary stream
- Prolonged voiding, sensation of incomplete emptying
- Post-void dribbling
- Need for Valsalva or suprapubic pressure to void
- Urinary frequency and mild dysuria
- Chronic urethral discharge (suggests associated prostatitis)
- Urinary tract infections
- Acute urinary retention (less common unless infection or prostatic obstruction co-exists)
- Induration palpable along the course of the urethra at the stricture site
- Tender perineal mass = periurethral abscess
- Urethrocutaneous fistula in chronic severe cases
- Palpable bladder in chronic retention
Investigations
| Investigation | Purpose |
|---|---|
| Retrograde urethrogram (RUG) | Gold standard for location and length of stricture |
| Voiding cystourethrogram (VCUG) | Delineates proximal extent; assesses bladder |
| Uroflowmetry | Objective assessment of obstruction severity |
| Flexible cystoscopy / urethroscopy | Directly visualises stricture; assesses luminal diameter and density/softness |
| Sonourethrography | Useful adjunct; detects extent of spongiofibrosis |
| Urine culture | Identifies concurrent UTI |
| Post-void residual | Quantifies bladder emptying impairment |
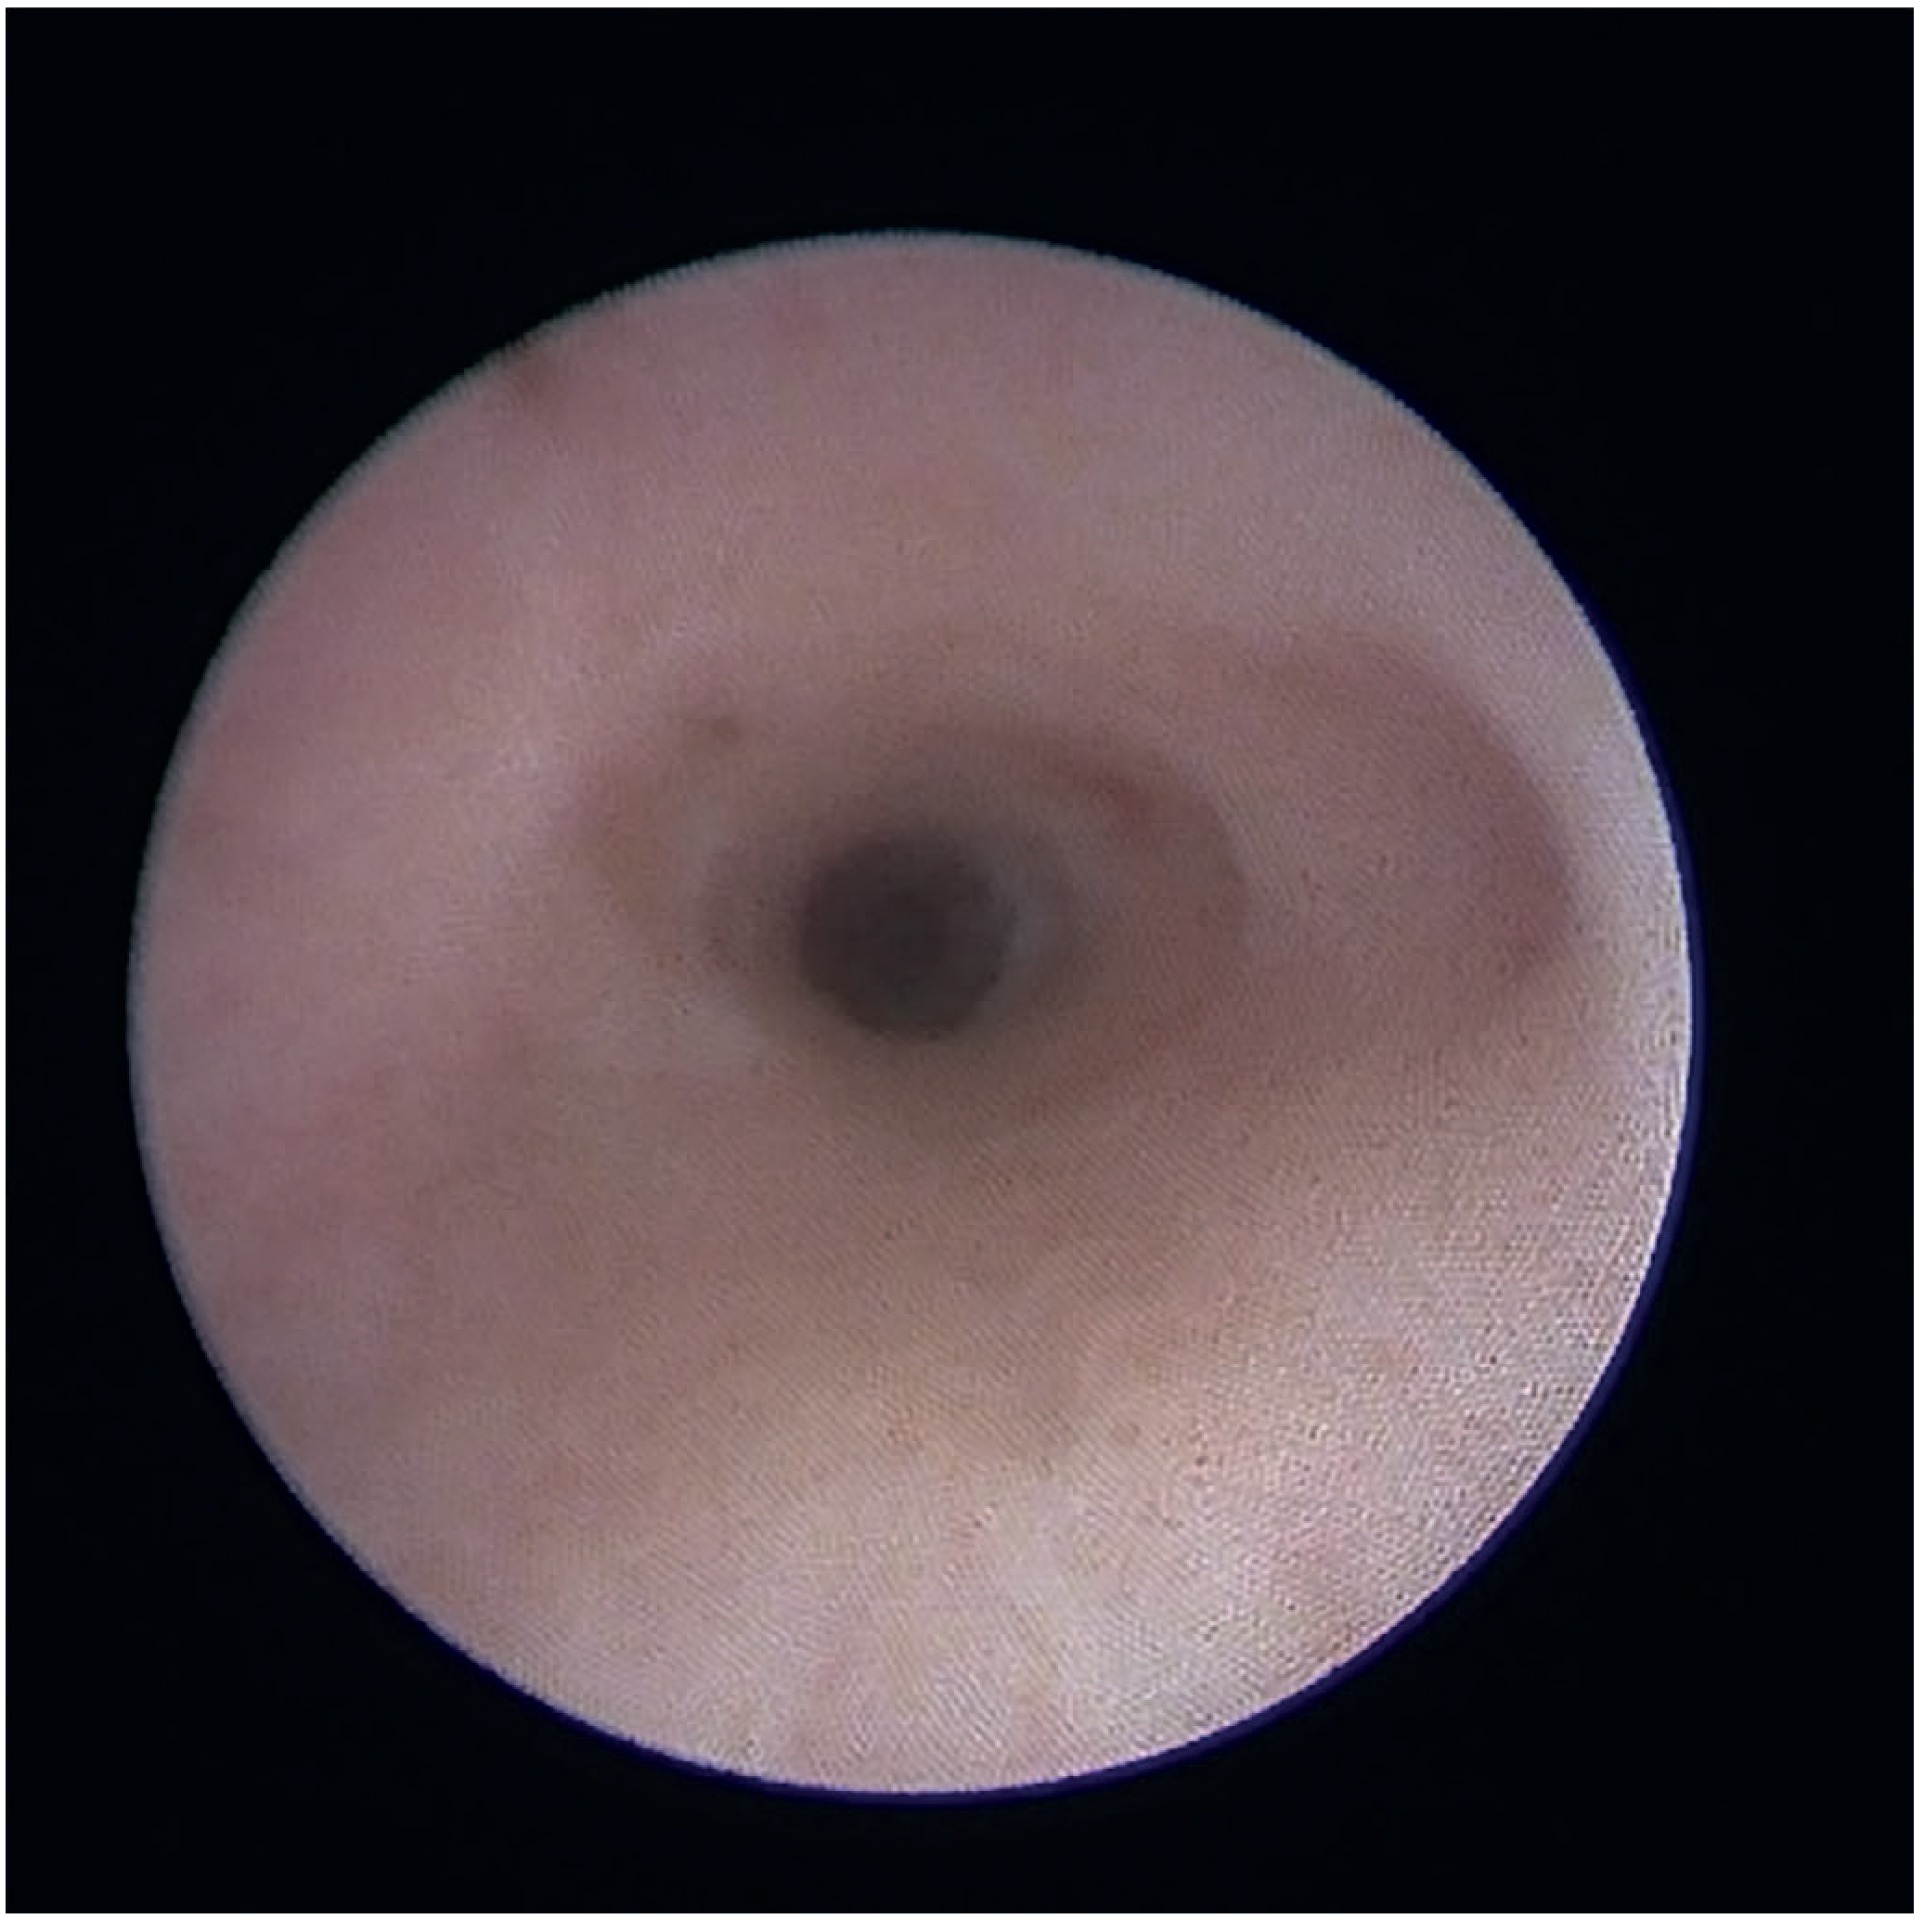
Treatment
1. Urethral Dilation
- One of the oldest urological procedures (5000-year history)
- Performed over a guidewire using serial plastic dilators (modern technique)
- Particularly effective for soft and short strictures - this is exactly the scenario where dilation is most appropriate as a first-line measure
- Also indicated for: unfit patients, patients refusing urethroplasty, multiple failed urethroplasties
- Mechanism: fractures scar tissue and temporarily enlarges the lumen; as healing occurs, scar tissue re-forms
- Rarely curative - most patients require repeated dilations
- Complications: pain, fever, bleeding, false passage creation
2. Direct Vision Internal Urethrotomy (DVIU)
- Performed with an optical urethrotome (Sachse type)
- The stricture is incised under direct visual control using a cold knife passed through the sheath; alternatively, a holmium or thulium laser fibre can be used
- A guidewire passed through the stricture serves as a guide to avoid false passage
- Specifically indicated for short, non-traumatic bulbar strictures - this is the archetypal indication
- NOT appropriate for: penile urethral strictures, sphincter-active membranous urethra (risk of incontinence)
- Short-term success: 70-80%; long-term success rate is much lower
- Single DVIU success rate: approximately 30%
- Repeat DVIU success rate drops to approximately 13%
- Advantages: minimal anaesthesia required (topical + sedation in many cases), easily repeated, very safe with few complications, more precise than blind dilation (Smith and Tanagho's; Bailey and Love's)
Key principle: Repeated instrumentation (repeated DVIU or dilation) worsens spongiofibrosis and makes subsequent reconstructive surgery more complex. The standard approach is one endoscopic attempt, then proceed to urethroplasty on recurrence.
3. Urethroplasty (Gold Standard / Definitive Treatment)
- Bulbar urethral strictures >2 cm in length (primary)
- Bulbar strictures <2 cm that recur after endoscopic management
- Any primary penile urethral stricture
- Meatal/fossa navicularis strictures recurrent after endoscopic management
- Patients not suitable for repeat endoscopy
A. Excision and Primary Anastomosis (EPA) - The Procedure of Choice for Short Bulbar Strictures
- The entire strictured segment is completely excised - the excision extends 1 cm beyond each end of the stricture to ensure removal of all spongiofibrosis and improve postoperative healing
- The two healthy urethral ends are directly anastomosed with wide spatulation
- Performed via a perineal incision
- The distal stump is spatulated dorsally, the proximal stump ventrally
- Because the bulbar urethra is eccentrically positioned within the corpus spongiosum: dorsal anastomotic sutures are placed full-thickness; ventral sutures through the urethra only
- 8-12 interrupted 4-0 or 5-0 absorbable sutures (PDS or polyglactin) placed 2-3 mm apart
- Spongioplasty: preserving the most proximal corpus spongiosum protects the lateral bulbar arteries and ensures adequate blood supply across the repair
- Long-term success rate: >90%
"Short strictures (≤2 cm) of the bulbar urethra should be completely excised and primary anastomosis done. If possible, the segment to be excised should extend 1 cm beyond each end of the stricture to allow for removal of any existing spongiofibrosis and improve postoperative healing." - Smith and Tanagho's General Urology
B. Augmentation (Patch Graft) Urethroplasty - For Strictures >2 cm or Where Tension-Free Anastomosis is Not Possible
- The strictured segment is incised (not excised) longitudinally and widened with a free tissue graft patch
- Oral mucosal graft (OMG) - buccal (cheek) or lingual (ventral tongue) mucosa is the gold standard tissue substitute: hairless, well-vascularised, moist epithelium with excellent take rate
- Graft can be placed dorsally (Barbagli technique - quilted to corpora cavernosa) or ventrally; in the bulbar urethra, dorsal or ventral onlay both acceptable
- The urethra is incised for the full stricture length plus 0.5 cm proximal and distal; graft is tailored, all subcutaneous tissue removed, and meticulously sutured into place
- Critical: hair-bearing skin must never be used (risk of intraluminal hair - nidus for stone formation and recurrent UTI)
- For very long, densely fibrotic strictures: penile fasciocutaneous flap (e.g., McAninch flap) - success in >80% of cases; can be combined with buccal mucosa graft in pan-urethral stricture
C. Two-Stage Urethroplasty (Johanson Procedure)
Treatment Decision Summary
Short segment (≤2 cm), SOFT, bulbar urethral stricture
│
▼
First-line: Dilation OR DVIU (cold knife / laser)
[DVIU is specifically indicated for short, non-traumatic bulbar strictures]
│
┌───────┴────────┐
│ │
Success Recurrence
(~30%) (~70%)
│ │
Surveillance ──► URETHROPLASTY
± self-dilation │
▼
Excision + Primary Anastomosis (EPA)
[procedure of choice for short ≤2 cm bulbar strictures]
Success rate: >90%
│
If length > 2 cm OR tension-free anastomosis not possible:
▼
Augmentation urethroplasty with oral mucosal graft (OMG)
Complications of Untreated Stricture
- Chronic prostatitis (very common)
- Recurrent UTIs, cystitis
- Bladder hypertrophy and trabeculation
- Periurethral abscess
- Urethrocutaneous fistula
- Vesical calculi (urinary stasis)
- Upper tract deterioration: hydronephrosis, renal failure (severe/chronic cases)
Recent Evidence
- Oszczudlowski et al., BJU Int 2023 [PMID: 37402622] - Meta-analysis comparing transecting (excision with anastomosis) vs non-transecting urethroplasty for bulbar stricture: both approaches showed high success rates with comparable outcomes, supporting the continued role of EPA for short bulbar strictures
- Barratt et al., Eur Urol 2021 [PMID: 33875306] - Systematic review of free graft augmentation urethroplasty techniques for bulbar strictures, confirming oral mucosal graft as the tissue of choice
- Smith and Tanagho's General Urology, 19th Edition
- Sabiston Textbook of Surgery, The Biological Basis of Modern Surgical Practice
- Schwartz's Principles of Surgery, 11th Edition
- Bailey and Love's Short Practice of Surgery, 28th Edition
- Campbell-Walsh-Wein Urology, 3-Volume Set
i have Short segment soft stricture of the bulbar urethra and i take miraben on night and it reduces urinary frequency and urgency what pelvic floor exercise i have to do
"pelvic floor" AND "urethral stricture" AND exercises
mirabegron AND "urethral stricture" AND "lower urinary tract symptoms"
"pelvic floor muscle training" AND "overactive bladder" AND urgency
PMID: 38698269
pelvic floor exercises men urethral stricture bladder outlet obstruction overactive bladder urgency physiotherapy
Important Note First
Understanding the Goal
- Urgency suppression - contracting the pelvic floor rapidly when you feel an urge, which reflexively inhibits the bladder detrusor from contracting ("the knack")
- Strength and endurance - building baseline pelvic floor tone so the bladder has better structural support and is less prone to uninhibited contractions
- Relaxation - a hypertonic (overly tight) pelvic floor from chronic straining to void actually worsens symptoms; learning to fully relax after contraction is equally important
How to Identify Your Pelvic Floor Muscles (First Step)
- Imagine you are trying to stop yourself passing urine and stop yourself passing wind at the same time
- You should feel a lifting and squeezing sensation inside your pelvis
- Do NOT: tighten your buttocks, squeeze your thighs together, hold your breath, or tense your abdominal muscles - these are all common mistakes that mean you are working the wrong muscles
- You can practise identifying the contraction by briefly stopping the flow of urine midstream once (not repeatedly - doing this regularly can interfere with normal voiding reflexes)
The Exercise Programme
Phase 1 - Weeks 1-2: Learning and Foundation
- Tighten your pelvic floor muscles
- Hold for 5 seconds, then fully relax for 10 seconds (the relaxation is as important as the contraction)
- Repeat 8-10 times
- Do 3 sets per day (morning, afternoon, evening)
- Contract the pelvic floor quickly and firmly, then immediately release
- Each contraction holds for 1 second only
- Repeat 10 times
- Do 3 sets per day
Phase 2 - Weeks 3-6: Building Strength and Endurance
| Week | Hold time | Relaxation | Reps | Sets/day |
|---|---|---|---|---|
| 3-4 | 8 seconds | 10 seconds | 10 | 3 |
| 5-6 | 10 seconds | 10 seconds | 10-12 | 3 |
Phase 3 - Week 6 onwards: Functional Training
The Urgency Suppression Technique (Most Important for You)
- Stop what you are doing - do not rush to the toilet immediately (this actually increases urgency by focusing attention on the bladder)
- Stand still or sit down if possible
- Quickly contract your pelvic floor firmly - 3-5 rapid strong squeezes, holding each for about 2-3 seconds
- Take a slow, deep breath and distract your mind from the urgency
- Wait until the urge fades (it usually settles in 30-60 seconds)
- Then walk calmly to the toilet - do not rush
Bladder Retraining (Works Alongside the Exercises)
- If you are voiding every 30-60 minutes, aim to extend to 90 minutes over 2 weeks
- Then aim for 2 hours over the next 2 weeks
- Target: voiding every 2.5-3.5 hours during the day (this is the normal range)
Specific Cautions for Urethral Stricture
Important: Because you have an obstructive stricture, there are things that apply differently to you compared with a person doing pelvic floor exercises for pure overactive bladder:
-
Do not try to forcibly stop your urinary stream mid-void repeatedly as part of pelvic floor training - your bladder already works against resistance from the stricture, and further voluntary obstruction is counterproductive and can cause incomplete emptying
-
Do not strain or Valsalva to void - this worsens the bladder's overactivity over time. A relaxed, unhurried void is always better
-
If you notice worsening of your stream, post-void dribbling increases, or you develop retention - stop exercises and consult your urologist promptly (this is unlikely from PFMT but important to flag)
-
The exercises address the bladder overactivity component of your symptoms. The stricture itself still needs management (monitoring, dilation, or urethroplasty as directed by your urologist). The Mirabegron + PFMT combination is a conservative holding strategy - it does not shrink or cure the stricture
Summary Programme at a Glance
| Component | Frequency | Duration |
|---|---|---|
| Slow contractions (hold 5-10s) | 3 x daily | 10 reps each |
| Quick flicks | 3 x daily | 10 reps each |
| Urgency suppression technique | Every urgency episode | Lifelong habit |
| Bladder retraining (extend intervals) | Daily | 6-8 weeks to target interval |
| Voiding diary | 3 days initially | Review monthly |
Evidence Base
- Hagovska et al. (2024, World J Urol, [PMID: 38698269]) - RCT in men with bladder outlet obstruction + OAB: adding PFMT with urgency suppression to medical treatment significantly reduced voids per 24 hours, urgency intensity, and IPSS scores compared to medication alone (p<0.001). The authors concluded PFMT should be the first-choice treatment for OAB in men with bladder obstruction
- Funada et al. (2023, Cochrane Database, [PMID: 37811598]) - Systematic review confirming bladder training is effective for overactive bladder in adults
Does cystoscopy clear the stricture
Does Cystoscopy Clear the Stricture?
What Cystoscopy Does
- Visually locating the stricture and confirming it is in the bulbar urethra
- Assessing the diameter - how narrow the lumen is
- Assessing the density/softness - is it a soft, pliable narrowing, or a hard, dense scar? (This is critical for choosing treatment - your stricture is soft, which is favourable)
- Measuring the length of the narrowed segment
- Ruling out other pathology - e.g. urethral carcinoma, which can masquerade as stricture
What Actually Treats the Stricture
| Treatment | What it involves | Does it cure? |
|---|---|---|
| Dilation | Serial dilators or balloon passed over a guidewire to stretch the stricture open | Rarely curative - scar re-forms as it heals. Temporary relief only |
| DVIU (Direct Vision Internal Urethrotomy) | A knife or laser attached to an endoscope cuts the stricture under direct vision | ~30% long-term success for short soft bulbar strictures. Often needs repeating |
| Urethroplasty | Open surgery - excision of the strictured segment + joining the two healthy ends (for your short soft stricture) | >90% long-term success. The gold standard cure |
A Common Source of Confusion
- The scope itself may dilate a very soft, narrow stricture slightly as it passes through - but this effect is minimal and temporary, not therapeutic
- Sometimes a diagnostic cystoscopy is combined in the same sitting with dilation or DVIU - in that case, it is the dilation/DVIU that treated the stricture, not the cystoscopy itself. The cystoscopy was just the assessment step that preceded treatment
Where You Stand
- Your urologist will use cystoscopy to assess and monitor the stricture
- Mirabegron (Miraben) at night is correctly managing the secondary bladder overactivity (urgency, frequency) caused by the obstruction
- Pelvic floor exercises are helping control urgency symptoms
- If/when your symptoms worsen or the stricture progresses, the definitive treatment options remain dilation or DVIU first (given it is short and soft), followed by urethroplasty (excision and primary anastomosis) if endoscopic treatment fails or recurs
I have lax les and mild hiatal hernia how to eat big meals without vomiting
"gastroesophageal reflux" AND "dietary" AND "lifestyle" AND "hiatal hernia"
lax LES hiatal hernia large meals vomiting prevention eating strategies GERD
Lax LES + Mild Hiatal Hernia: How to Handle Larger Meals
Why Big Meals Cause You to Vomit: The Mechanism
-
The hiatal hernia displaces your LES above the diaphragm into the chest, which reduces basal LES pressure and shortens the high-pressure zone. You lose the mechanical support the diaphragm normally provides.
-
Gastric distension from a large meal increases transient LES relaxations (tLESRs) - these are involuntary moments when the LES opens inappropriately. A hiatal hernia specifically increases these tLESRs during gastric distension with gas and food.
-
The hernia sac acts as an "acid pocket" - a reservoir of unbuffered acid sitting just below your LES that is ready to reflux the moment the LES relaxes. Large meals cause this pocket to expand significantly.
-
For the same degree of stomach pressure, your lax LES opens at a lower pressure than normal and allows a wider opening - meaning large volumes of food and acid come back up more easily.
-
Lying down, bending forward, or straining after a large meal removes gravity as your last line of defence.
The Fundamental Principle
Practical Strategies to Reduce Symptoms with Larger Meals
1. Slow Down Dramatically
- Chew every bite 20-30 times before swallowing - this is not an exaggeration
- Put your fork/spoon down between bites
- Eating too fast means you swallow excess air and overwhelm the stomach's ability to accommodate food gradually
- Target: a meal that normally takes 10 minutes should take 25-30 minutes minimum
- This allows the stomach to signal fullness, accommodate volume, and start emptying before you overload it
2. Drink Fluids Separately from Eating
- Do not drink during the meal - liquids add volume on top of solids, rapidly expanding the stomach and raising intra-gastric pressure
- Drink fluids 30-45 minutes before the meal to pre-hydrate
- Drink again at least 30-45 minutes after the meal
- If you need something with the meal, small sips of plain water only - never carbonated drinks, juice, or alcohol
3. Avoid Specific Foods That Relax Your LES Further
| Avoid or minimise | Why |
|---|---|
| Chocolate | Contains methylxanthines that directly relax LES smooth muscle |
| Coffee and caffeine | LES relaxant |
| Peppermint and spearmint | Directly relaxes LES |
| Alcohol | LES relaxant AND irritates oesophageal mucosa |
| High-fat fried foods | Delay gastric emptying, prolonging the window of reflux risk |
| Fizzy/carbonated drinks | Gas distension triggers tLESRs |
| Onions, garlic | LES relaxants |
| Tomato-based foods, citrus | Directly irritate already reflux-exposed oesophageal lining |
| Spicy foods | Oesophageal irritant |
| Mint teas | LES relaxant |
4. Eat in the Right Position
- Always eat sitting fully upright - never slouched, never lying back in a recliner, never lying down
- After eating, remain upright and gently active (slow walk, standing) for at least 2-3 hours - gravity is genuinely helping keep food in your stomach
- Never lie down within 3 hours of eating
- Sleep with the head of your bed elevated 15-20 cm (use wedge blocks under the legs, not just extra pillows - pillows only elevate your head, not your torso, and can worsen pressure on the stomach)
5. Choose the Right Foods for a Larger Meal
- Empty from the stomach quickly (low fat, low fibre initially)
- Do not relax the LES
- Are low in acid
- Lean proteins (chicken, turkey, fish) - grilled or baked, not fried
- Rice, pasta, bread (non-spiced)
- Non-citrus fruits (banana, apple, pear, melon)
- Cooked vegetables (softer = easier gastric emptying)
- Eggs (scrambled/poached)
- Oatmeal
- Ginger (actually helps gastric motility and has anti-nausea properties)
6. Take Your Medication Strategically
- If you are on a proton pump inhibitor (PPI) (e.g. omeprazole, pantoprazole) - take it 30-60 minutes before the anticipated large meal, not at bedtime or randomly
- If you use antacids (e.g. Gaviscon), take them after the meal and again 2 hours later - they form a raft that floats on top of gastric contents and physically blocks the acid pocket from reaching your LES
- Gaviscon Advance (alginate-based) is particularly well-evidenced for this: it forms a physical foam raft that sits at the top of the stomach contents, preventing the acid pocket from refluxing - this is specifically useful after meals (evidence from multiple GERD trials)
- Do not take antacids that contain calcium carbonate (e.g. Tums) frequently - they can cause rebound acid hypersecretion
7. Manage Intra-abdominal Pressure
- Avoid bending forward or lifting anything
- Wear loose clothing - tight waistbands and belts compress the abdomen and worsen reflux
- Avoid straining (e.g. constipation straining raises intra-abdominal pressure significantly - treat any constipation)
- Avoid vigorous exercise for at least 2 hours after a large meal
8. The "Pre-meal Trick" - Smaller Starter Before the Main Meal
When to Seek Further Help
- PPI therapy optimisation (dose, timing, type)
- H2 blockers (e.g. famotidine) added at night
- Prokinetics - drugs like domperidone or metoclopramide that speed gastric emptying and reduce the time acid sits in the stomach (useful if delayed gastric emptying is contributing)
- Surgical options: for a mild hiatal hernia with lax LES causing significant symptoms, laparoscopic Nissen fundoplication (or partial fundoplication) tightens the LES and repairs the hernia. This is a highly effective and well-evidenced procedure with good long-term results when conservative measures fail. (Bailey and Love's Short Practice of Surgery, 28th ed.)
Quick Reference Summary
| Do | Don't |
|---|---|
| Eat slowly, chew thoroughly | Rush meals |
| Stay upright 2-3 hrs after eating | Lie down after eating |
| Drink fluids before/after meals, not during | Drink carbonated drinks with meals |
| Choose lean, low-fat foods | Eat fried, high-fat, or spicy food |
| Take PPI 30-60 min before a large meal | Skip medication before a big meal |
| Split the meal into two with a 10-15 min break | Eat one massive portion all at once |
| Wear loose clothing | Wear tight belts or waistbands |
| Elevate head of bed 15-20 cm | Use extra pillows (ineffective) |
| Walk gently after eating | Bend, lift, or exercise vigorously after eating |
Show me xray of supinated and pronated right hand
xray right hand supinated pronated forearm radius ulna radiograph comparison site:radiopaedia.org OR site:learningradiology.com
forearm xray supination pronation radius ulna parallel crossed anatomy teaching
https://www.ncbi.nlm.nih.gov/books/NBK565865
forearm AP xray supination radius ulna parallel pronation radius crosses ulna radiograph teaching image
X-ray: Supinated vs Pronated Right Forearm

What to See on Each View
Supination (palm facing UP / anteriorly)
- Radius and ulna lie parallel to each other, side by side
- The radius is on the lateral (thumb) side and the ulna on the medial (little finger) side
- The two bones have roughly equal length apparent on the image
- The interosseous space between them is wide and clear
- This is the standard AP (anteroposterior) forearm projection used in clinical radiology - the hand must be supinated to get a true AP
Pronation (palm facing DOWN / posteriorly)
- The radius crosses over (obliquely over) the ulna at the mid-shaft - this is the defining feature
- The radius rotates around the fixed, stable ulna (which barely moves)
- The interosseous space becomes narrowed where the two bones cross
- The distal end of the radius swings to the medial side
- On a standard forearm X-ray if the bones appear crossed, it means the patient had their hand pronated - this is considered a positioning error that can cause misinterpretation
The Key Anatomy Behind It
| Feature | Supination | Pronation |
|---|---|---|
| Palm direction | Faces anteriorly (up) | Faces posteriorly (down) |
| Radius position | Lateral, parallel to ulna | Crosses over ulna to the medial side |
| Ulna position | Medial, barely moves | Remains relatively fixed |
| Interosseous space | Wide and open | Narrowed at the crossing point |
| Radius/ulna appearance | Two parallel bones | Two crossed/oblique bones |
| Muscles acting | Supinator + Biceps brachii | Pronator teres + Pronator quadratus |
Clinical Significance
- Standard forearm AP X-ray requires full supination - if the patient pronates even slightly, the crossed radius/ulna appearance can mimic pathology or hide fractures
- In forearm fracture assessment, both pronated and supinated views may be taken to check for rotational deformity
- In radioulnar synostosis (abnormal fusion of radius and ulna), the forearm is locked in one position - the X-ray shows the relationship of the two bones at the fused segment
- Ulnar variance (the relative length of the ulna compared to the radius at the wrist) changes measurably between supination and pronation - it increases in pronation, which is clinically relevant in TFCC (triangular fibrocartilage complex) injuries
short segment soft stricture of the bulbar urethra in retrograde urethrogram but in cystoscopy no stricture seen
"retrograde urethrogram" AND cystoscopy AND "bulbar stricture" AND discrepancy
urethrogram cystoscopy stricture diagnosis accuracy comparison
"urethral stricture" AND "retrograde urethrogram" AND cystoscopy AND diagnosis
PMID: 32459152
retrograde urethrogram shows stricture but cystoscopy normal no stricture explanation urethral spasm false positive
urethrogram false positive stricture cystoscopy spasm bulbar urethra
https://uroweb.org/guidelines/urethral-strictures/chapter/di…
RUG Shows Stricture but Cystoscopy Shows None - Explained
Why This Happens: 5 Possible Explanations
1. The Cystoscope Itself Dilated the Stricture (Most Likely)
2. Urethral Spasm on RUG (False Positive)
- The external urethral sphincter lies at the bulbomembranous junction and can contract reflexively when contrast is injected under pressure
- The bulbocavernosus muscle wraps around the bulbar urethra and can cause extrinsic compression artefact
- Spasm tends to produce a smooth, symmetric tapering narrowing
- It is often located precisely at the bulbomembranous junction (sphincter level)
- True stricture tends to produce an irregular, asymmetric or shelf-like narrowing with loss of normal mucosal pattern
- On VCUG (voiding study), a spasm-related narrowing typically disappears because the urethra is relaxed during normal voiding
3. The Stricture is a Mucosal Fold, Not True Fibrosis
4. Positional/Technical Artefact on RUG
- Inadequate distension - not enough contrast pressure to fully open the lumen
- Oblique positioning - if the urethra is not in true lateral or oblique projection, overlapping structures can mimic narrowing
- Underfilling at the bulbar region where the urethra curves
- Contrast dilution by urethral secretions creating a filling defect
- Compression by probe/clamp used to inject contrast
5. True Stricture That Resolved Between Tests (Less Likely)
What the EAU Guidelines Say About These Two Tests
| Investigation | Role | Limitation |
|---|---|---|
| Retrograde Urethrogram (RUG) | Gold standard for location and length of stricture | Supraphysiological pressure; susceptible to spasm/artefact; operator dependent; overestimates length in some cases |
| Cystoscopy | Best for assessing luminal diameter and density | Can dilate a soft stricture on passage; cannot assess length reliably; does not show proximal extent of obliterative stricture |
| VCUG (voiding cystourethrogram) | Most physiological - urethra is relaxed, under normal pressures | Requires bladder catheterisation first |
| Sonourethrography | Best for assessing degree of spongiofibrosis | Less available |
What This Means for YOU Specifically
-
Your stricture is extremely soft and has minimal to no fixed fibrosis - the cystoscope either passively dilated it on passage, or what was seen on RUG was partially or wholly due to spasm/artefact
-
This is the best possible category of stricture - it explains why your Mirabegron is helping the bladder overactivity component, and why your symptoms may be relatively mild
-
The normal cystoscopy does NOT mean you were misdiagnosed - the RUG finding was likely genuine but represents the very mildest end of the spectrum
Recommended Next Steps (to Discuss with Your Urologist)
| Investigation | Why it helps |
|---|---|
| Uroflowmetry | Objective evidence of obstruction - a plateau curve confirms functional narrowing even if not seen on scope |
| VCUG (voiding cystourethrogram) | More physiological than RUG; shows the urethra under natural voiding pressures; less susceptible to spasm artefact |
| Sonourethrography | Directly images the wall thickness and spongiofibrosis - will show if there is any true sub-epithelial fibrosis |
| Repeat RUG with VCUG combined | If spasm was the cause, the VCUG component will be normal while the RUG showed narrowing - this confirms the diagnosis |
| Urethral calibration (bougie-à-boule) | Passes calibrated instruments to measure true luminal diameter at the stricture site |
Taking amitriptyline 10 mg tamsulosin 0.4mg in night for 8 days and burning micturation gone how to prevent burning micturation in future
dysuria urethral stricture prevention recurrence management
tamsulosin amitriptyline lower urinary tract symptoms dysuria urethral
dysuria prevention hydration urethral irritation lifestyle dietary
amitriptyline low dose bladder pain dysuria urological chronic pelvic
prevent recurrent dysuria burning urination urethral stricture prostatitis lifestyle dietary hydration tamsulosin amitriptyline
chronic prostatitis pelvic pain syndrome dysuria alpha blocker prevention recurrence
How to Prevent Burning Micturition Coming Back
Why You Had It - The Underlying Mechanism
- Turbulent urine flow through the narrowed segment - the stricture creates high-pressure turbulence that irritates the urethral mucosa with each void
- Peri-urethral inflammation / chronic prostatitis component - the stricture causes urinary stasis and back-pressure, which is a well-known trigger for prostatitis and urethral inflammation. Smith & Tanagho's notes: "Prostatitis is a common complication of urethral stricture"
- Bladder outlet obstruction sensitising pelvic nerves - chronic low-grade obstruction sensitises the pudendal nerve and pelvic floor, causing neuropathic pain perceived as burning
- Tamsulosin 0.4 mg (alpha-1 blocker) - relaxed the smooth muscle in the urethra, bladder neck, and prostate, reducing the voiding pressure and turbulence at the stricture site. Also reduces intraurethral pressure spikes that irritate the mucosa
- Amitriptyline 10 mg (tricyclic antidepressant at sub-antidepressant dose) - acts as a central and peripheral neuromodulator: reduces sensitisation of pelvic visceral nerves, has mild anticholinergic effect calming the bladder, and provides analgesic action on the burning sensation via its effect on descending pain pathways
Prevention Strategy
1. Ask Your Urologist About Continuing Low-Dose Amitriptyline (Most Important)
2. Hydration - The Single Most Controllable Factor
- Target: 2.0-2.5 litres of total fluid per day (approximately 8-10 glasses)
- Spread fluid intake evenly through the day - do not drink large amounts at once (which worsens your stricture/overactive bladder symptoms)
- Your urine should be pale yellow - this is the practical target. Dark yellow means you are under-hydrated
- Reduce fluids 2-3 hours before bed to avoid nocturia (since you are already on Mirabegron for urgency/frequency)
3. Avoid Bladder and Urethral Irritants
| Avoid or minimise | Why |
|---|---|
| Caffeine (coffee, tea, energy drinks, cola) | Diuretic + direct urothelial irritant + increases detrusor overactivity |
| Alcohol | Diuretic + direct irritant + increases pelvic floor tension |
| Spicy foods (chilli, hot sauce, pepper) | Capsaicin-related urothelial irritation; directly worsens dysuria |
| Carbonated drinks | Carbonic acid irritates; causes bladder overdistension from gas |
| Citrus fruits/juices (lemon, orange, grapefruit) | Acid load worsens urethral irritation |
| Tomato-based foods | High acid content |
| Artificial sweeteners (aspartame, saccharin) | Known bladder irritants |
| Chocolate | Contains methylxanthines; mild irritant |
4. Address the Root Cause - Monitor and Manage the Stricture
- Regular uroflowmetry (every 3-6 months) - monitors if the stricture is tightening
- Post-void residual ultrasound - checks for increasing incomplete emptying
- If the stricture progresses, early treatment (dilation, DVIU, or urethroplasty) prevents escalating inflammation and dysuria
- Do not delay treatment if your stream weakens again - the longer obstruction continues, the more peri-urethral inflammation builds
5. Urethral Hygiene and Infection Prevention
- Stay well hydrated (already covered) - adequate urine flow flushes bacteria from the urethra
- Void completely - double voiding (void, wait 1-2 minutes, void again) helps clear residual urine, which is a bacterial growth medium
- After sex - void promptly within 15-30 minutes to flush any bacteria introduced into the urethra
- Condom use during sex if there is any risk of sexually transmitted infection - urethritis from chlamydia, gonorrhoea, or non-specific urethritis is a major trigger for burning and for worsening strictures
- Avoid catheter use unless medically necessary - even clean intermittent catheterisation (if you self-dilate) should use sterile technique and well-lubricated catheters to avoid introducing bacteria
6. Pelvic Floor - Keep Up the Exercises
- A hypertonic (overly tight) pelvic floor increases intra-urethral pressure during voiding, which worsens the turbulence at the stricture and the burning sensation
- The urgency suppression technique prevents high-pressure forced voiding that batters the narrowed urethra
- Relaxed, unhurried voiding at comfortable bladder volumes reduces mechanical irritation
7. Sitting Position and Voiding Posture
- Void in a relaxed, seated or semi-seated position rather than rushing
- Do not strain or Valsalva to void - this dramatically increases voiding pressure through the narrowed stricture and worsens mucosal trauma
- Take your time - a slow, low-pressure void is always better than a forced one
8. Warm Sitz Baths
- Relaxes the pelvic floor and external urethral sphincter
- Reduces local inflammation and muscle spasm
- Provides genuine symptomatic relief
9. Watch for Warning Signs - Act Early
- Burning returns and does not settle within 48-72 hours of restarting tamsulosin/amitriptyline
- You develop fever, chills, or perineal pain (suggests prostatitis or UTI needing antibiotics)
- Your urinary stream suddenly worsens significantly
- You develop blood in urine (haematuria)
- You cannot pass urine (acute retention)
Summary: Your Prevention Plan
| Priority | Action |
|---|---|
| High | Discuss with urologist: continue amitriptyline 10 mg + tamsulosin for a defined period, not just 8 days |
| High | Maintain 2-2.5 L fluid daily; keep urine pale yellow |
| High | Continue stricture monitoring (uroflowmetry every 3-6 months) |
| High | Avoid caffeine, alcohol, spicy food, carbonated drinks |
| Medium | Continue pelvic floor exercises and urgency suppression technique |
| Medium | Void relaxed, no straining; double void after each urination |
| Medium | Void after sex; use condoms if STI risk |
| Low | Warm sitz baths if symptoms start returning |