
ACL reconstruction surgical steps and anatomy of knee
Reading File
Now I'll run parallel searches across the library database for ACL reconstruction and knee anatomy.
Finding Sources
Finding Sources
Searching the Web
ACL reconstruction surgical steps anatomy knee 2024
Let me broaden the database search and extract the PMC article content in parallel.
Finding Sources
Finding Sources
Reading Web Page
https://pmc.ncbi.nlm.nih.gov/articles/PMC11453038
Excellent - found Campbell's Operative Orthopaedics 15th Ed 2026 and Miller's Review of Orthopaedics. Now let me read the key sections on ACL anatomy and surgical steps in parallel.
Reading File
Reading File
I have anatomy content from Miller's. Now let me read the actual ACL surgical technique section from Campbell's block25 (which starts around line 1-4500) and the Miller's section on ACL technique.
Finding Sources
Reading File
Let me now read the ACL technique section from Miller's (around line 9350-9600) and the Campbell's ACL anatomy section (block25 around line 2800 where the main ACL content begins).
Reading File
Reading File
The block25 at that offset is references. Let me find the actual ACL technique section in Campbell's and read more of Miller's ACL section.
Finding Sources
Reading File
Now let me read the ACL content from Campbell's block25 at the key surgical technique section (around line 1665 onwards) and also get the anatomy from block24.
Reading File
Reading File
The block25 ACL section at line 1665 is in the references section. Let me find the actual clinical/surgical text. Based on the para_line_ranges, the actual content starts after references. Let me read block24 at line 3957 and also look for the ACL surgical technique in a different location.
Reading File
Reading File
Excellent content! I have the anatomy section from Campbell's block24. Now let me read more of the surgical technique content from Campbell's.
Reading File
Reading File
Let me now read more of Campbell's block24 to find the detailed surgical steps for ACL reconstruction.
Reading File
Excellent! I have rich surgical technique content from Campbell's. Let me fetch the key anatomical image from Miller's to include.
Loading Image
Reading File
I have excellent content. Now let me get the core ACL reconstruction technique steps from Campbell's block24 (around line 4500-4700 where TECHNIQUE 50 series would be).
Reading File
I now have enough content from Campbell's and Miller's to compile a thorough answer. Let me now write the comprehensive response using all gathered information.
ACL Reconstruction: Surgical Steps and Knee Anatomy
Part I: Anatomy of the Knee Relevant to ACL Reconstruction
Knee Joint Overview
The knee is a modified hinge joint incorporating gliding, rolling, and a "screw-home" mechanism (tibia externally rotates ~5° in the final 15° of extension). Its stability depends on a complex interplay of bony geometry, menisci, and four primary ligaments.
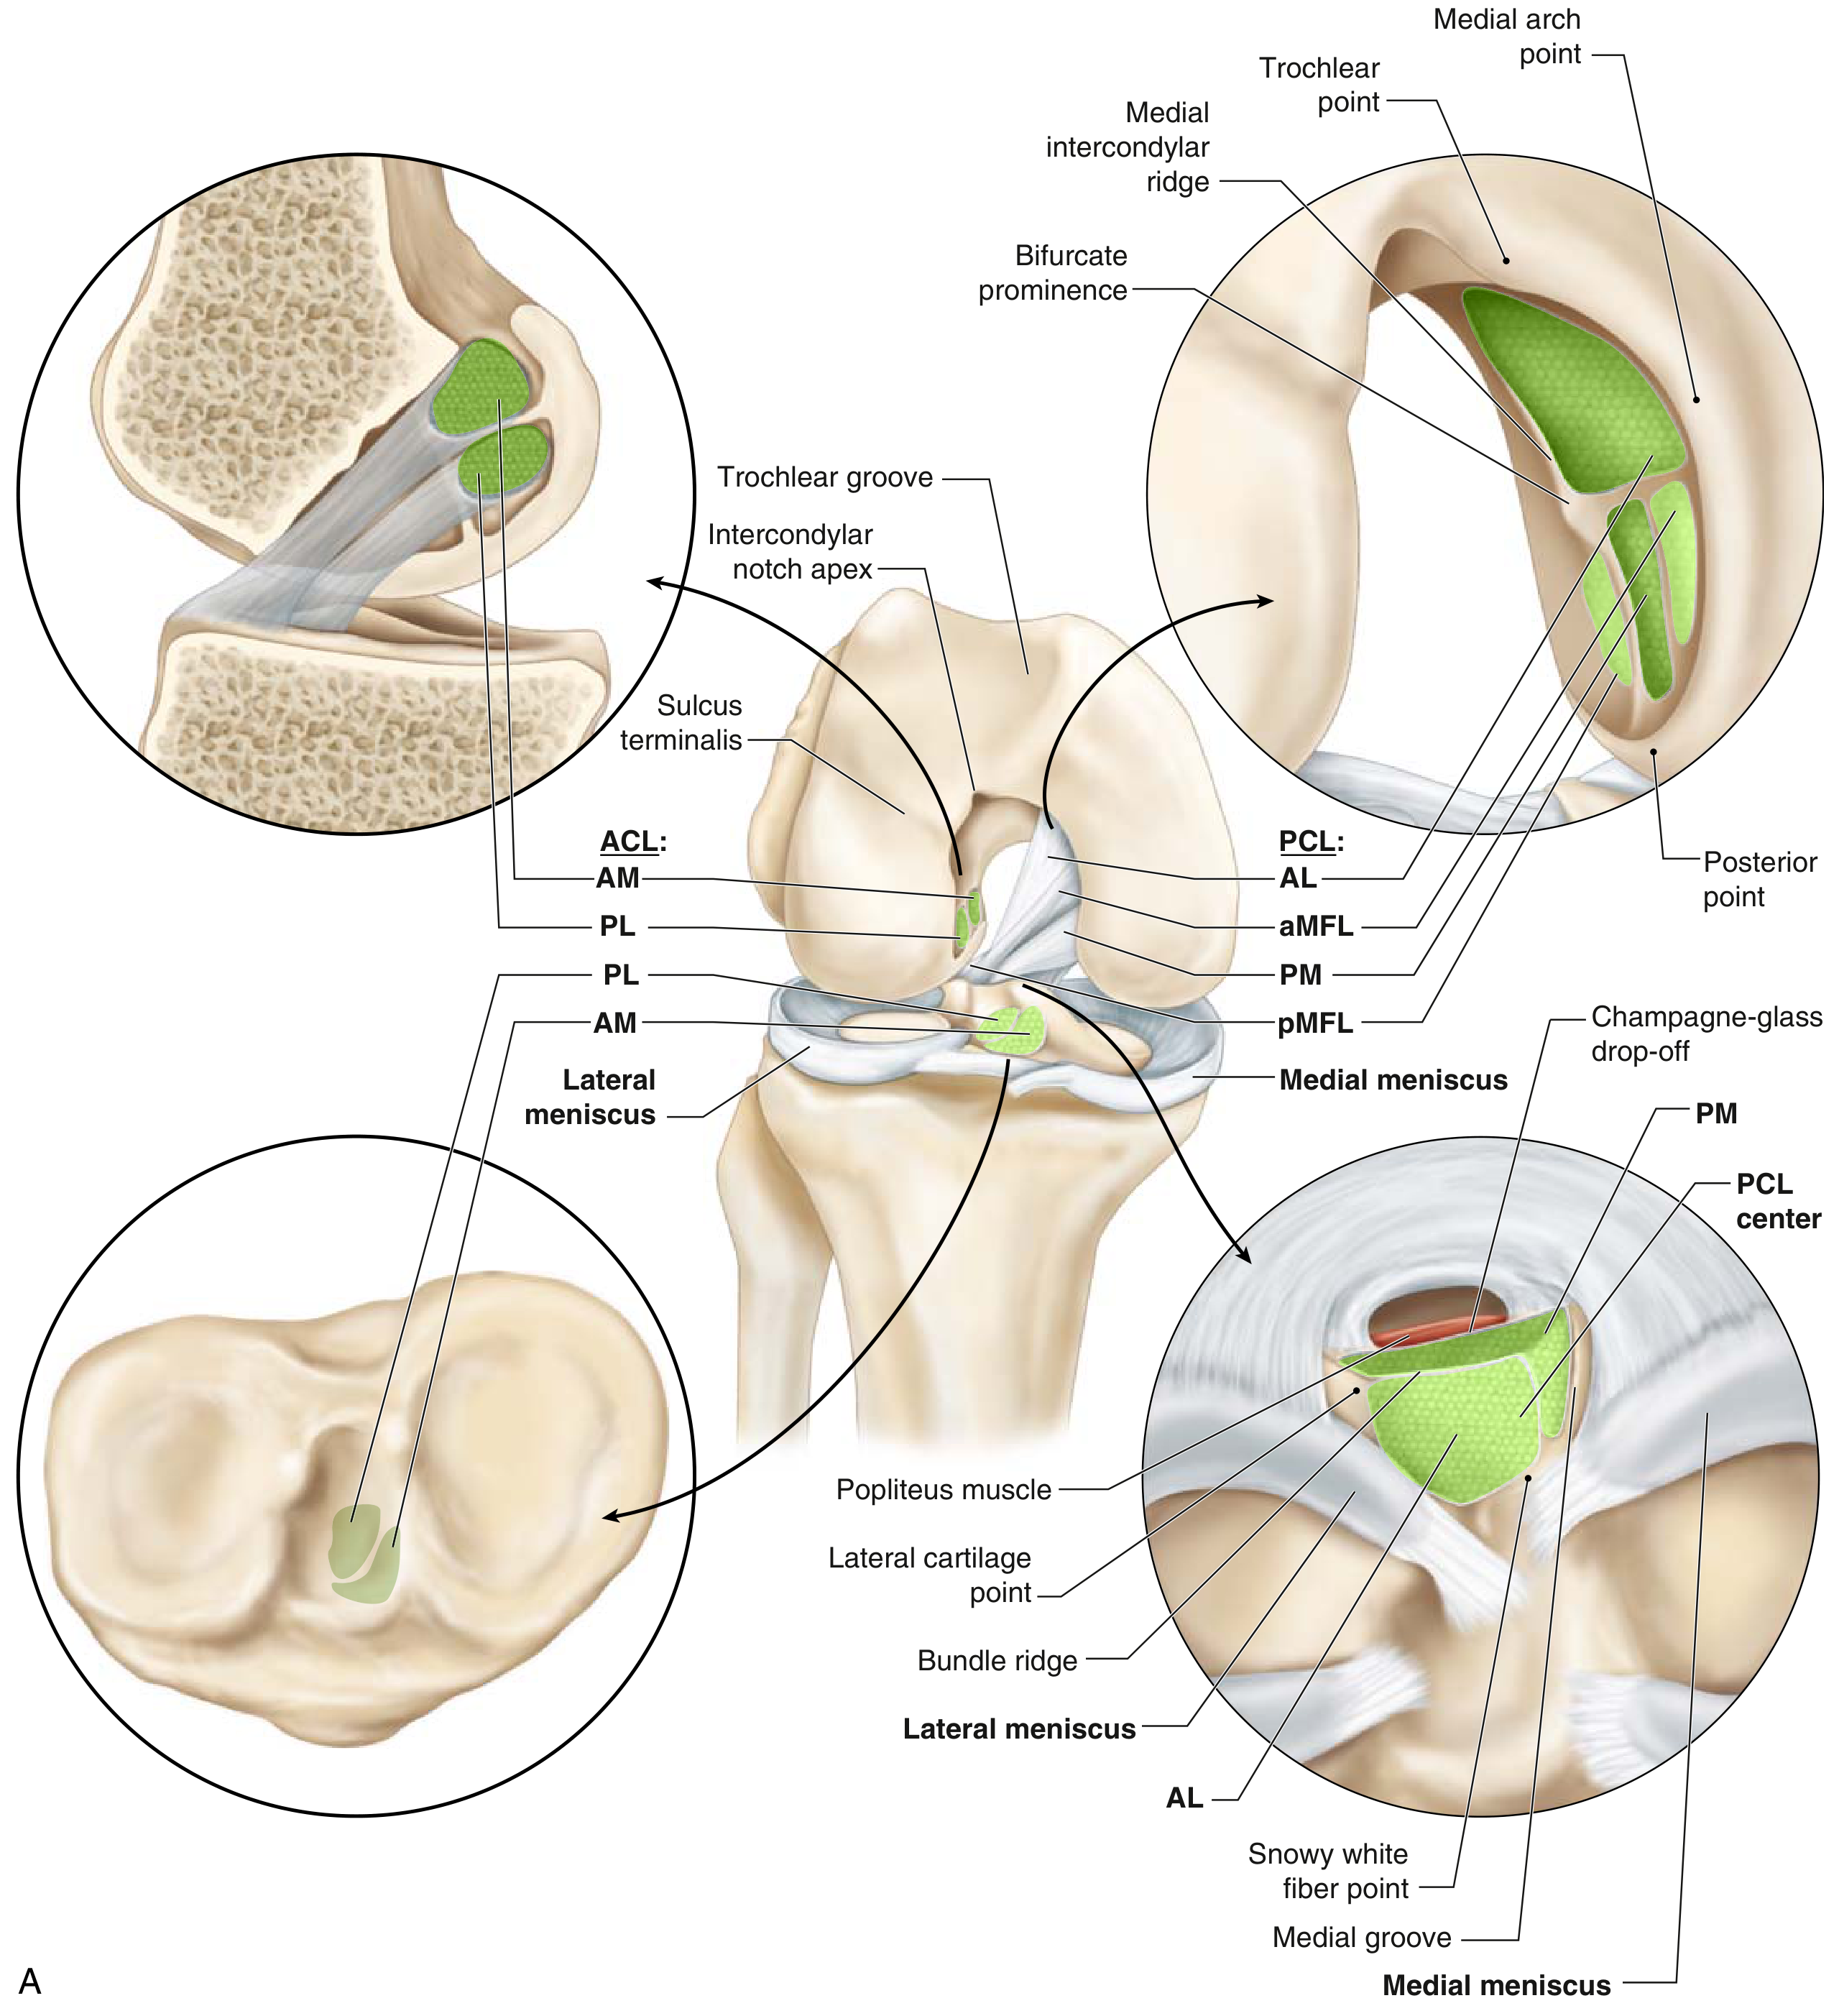
Fig. 4.1 - Cruciate anatomy with bundle insertions, meniscal anatomy, and all four primary ligament groups (Miller's Review of Orthopaedics, 9th Ed.)
Anterior Cruciate Ligament (ACL)
The ACL is composed of longitudinally oriented collagen fasciculi surrounded by synovium, making it technically extrasynovial despite lying within the joint. It has two functional bundles:
| Bundle | Tibial Insertion | Function | Tight When |
|---|---|---|---|
| Anteromedial (AMB) | ~2.7 mm posterior, 5.2 mm medial to lat. meniscus ant. horn | Resists anterior tibial translation | Knee in flexion |
| Posterolateral (PLB) | ~11.2 mm posterior, 4 mm medial to lat. meniscus ant. horn | Resists rotational instability | Knee in extension |
- Femoral attachment: Semicircular area on the posteromedial aspect of the lateral femoral condyle, divided by the bifurcate ridge and bordered by the intercondylar ridge
- Tibial insertion: Broad, irregular, oval area just medial to the anterior horn of the lateral meniscus, posterior to the tubercle of the anterior horn of the medial meniscus
- Vascular supply: Middle geniculate artery (branch of popliteal artery); synovial plexus around the ligament
- Length: ~38 mm; diameter 10-12 mm (compared to PCL at 38 mm length, 13 mm diameter)
- Clinical test: Lachman test tests the AMB (anterior restraint); Pivot shift test tests the PLB (rotatory restraint)
(Campbell's Operative Orthopaedics 15th Ed 2026, p. 2784; Miller's Review of Orthopaedics 9th Ed, p. 333-334)
Other Key Stabilizing Structures
| Structure | Location | Function |
|---|---|---|
| PCL | Posteromedial femoral condyle → tibial sulcus | Resists posterior tibial translation |
| MCL (superficial) | Medial epicondyle → 6-7 cm distal tibia | Valgus stability |
| LCL / Fibular collateral | Lateral epicondyle → fibular head | Varus stability |
| Anterolateral ligament (ALL) | Just proximal/posterior to lateral epicondyle → anterolateral tibia | Rotatory stability (supplements ACL) |
| Medial meniscus | Peripheral capsule attachment | Secondary stabilizer vs. anterior translation in ACL-deficient knee |
| IT Band / Iliotibial band | Lateral femur → Gerdy's tubercle | Dynamic lateral stabilizer |
Key point: The posterior horn of the medial meniscus is the most important secondary stabilizer against anterior tibial translation in an ACL-deficient knee. Lateral meniscal tears are more common acutely; medial tears accumulate with chronic deficiency.
Part II: ACL Reconstruction - Surgical Steps
Indications
- Young, active patients with functionally unstable ACL-deficient knee
- Athletes wishing to return to pivoting/cutting sports
- Concomitant meniscal tears requiring repair (instability must be corrected)
- Failure of conservative management with persistent instability
Graft Choices
| Graft | Advantages | Disadvantages |
|---|---|---|
| Bone-patellar tendon-bone (BTB) autograft | "Gold standard" - bony fixation, low revision rate | Anterior knee pain, extensor weakness |
| Hamstring (semitendinosus/gracilis) autograft | Less donor site morbidity | Risk of saphenous neuritis, increased laxity vs. BTB in young athletes |
| Quadriceps tendon autograft | Greater intraarticular graft volume, superior extensor strength post-harvest vs. BTB | Needs longer follow-up data |
| Allograft | No donor site morbidity | Higher revision rates, especially in young patients; slower incorporation |
(Campbell's Operative Orthopaedics 15th Ed 2026, p. 2784-2700; AOSSM 2024 review)
Surgical Technique - Stepwise Overview (Single-Bundle Arthroscopic ACL Reconstruction)
Step 1: Patient Positioning and Setup
- Supine with a lateral post and a foot holder to hold the knee at ~90° of flexion
- Tourniquet applied to the proximal thigh
- Examination under anesthesia (EUA) to confirm laxity pattern before draping
Step 2: Graft Harvest
- For hamstring graft: 3-4 cm oblique incision at the anteromedial proximal tibia, over the pes anserinus. Harvest semitendinosus ± gracilis tendons using a closed tendon stripper. Double or quadruple the tendon strands and size the graft (typically 8-10 mm).
- For BTB graft: Longitudinal incision over the patellar tendon; harvest a central 10 mm bone-tendon-bone strip (~25 mm patellar plug, 20-25 mm tibial plug).
- Prepare graft on the back table: trim to length, whipstitch the ends with #2 non-absorbable suture, measure and record graft diameter.
Step 3: Arthroscopic Inspection / Notchplasty
- Standard anteromedial and anterolateral portals established (inferolateral for scope, inferomedial for instruments), knee at 90° of flexion
- Systematic arthroscopic survey: suprapatellar pouch, patellofemoral joint, medial and lateral compartments including menisci, intercondylar notch, ACL and PCL
- Address concomitant injuries (meniscal repair/debridement, chondral lesions)
- ACL stump debridement: remove torn fibers from the tibial footprint using a shaver and electrocautery to visualize landmarks clearly
- Notchplasty if needed: a lateral notchplasty opens the roof of the intercondylar notch with a burr to prevent roof impingement of the graft; aim for ~1 cm clearance at full extension
Step 4: Tibial Tunnel Preparation
- A tibial ACL drill guide (typically set at 55°) is placed with the guide tip at the center of the native ACL tibial footprint: approximately 7 mm anterior to the PCL, just anterior to the posterior slope of the medial tibial spine, medial to the lateral tibial spine
- A guide pin is passed from the anteromedial tibia (through the pes anserinus area) through the tibial footprint
- The pin exits arthroscopically into the joint at the correct position
- Ream the tibial tunnel over the pin to the measured graft diameter (typically 8-10 mm), angled at ~55° to the tibial plateau to ensure a proper intraarticular angle
Step 5: Femoral Tunnel Preparation
- The femoral tunnel is the most critical step; anatomic femoral placement is paramount
- Two approaches exist:
- Transtibial: Guide pin passed through the tibial tunnel upward to the femoral footprint; limited ability to achieve anatomic placement
- Anteromedial (AM) portal technique: Preferred for anatomic reconstruction; a separate accessory anteromedial portal at 10 o'clock (right knee) allows direct access to the femoral footprint at the center of the native ACL attachment (posterior wall of the lateral femoral condyle, 1-2 mm anterior to the over-the-top position)
- Knee flexed to 110-120° for AM portal drilling to avoid posterior wall blowout
- Guide pin placed, tunnel reamed to graft diameter; tunnel length typically 25-30 mm
Step 6: Graft Passage
- A passing suture or looped wire is used to pull the graft through the tibial tunnel and into the femoral tunnel
- For hamstring/soft-tissue graft: A looped suspensory device (e.g., Endobutton or adjustable cortical button) is threaded through the femoral tunnel and deployed on the lateral femoral cortex
- For BTB graft: The patellar bone plug is impacted into the femoral tunnel
- Graft is seated firmly with the femoral fixation deployed first
Step 7: Tensioning and Tibial Fixation
- With the knee at 20-30° of flexion, gentle tension is applied to the graft while cycling the knee through full range of motion 10-20 times to pre-tension the graft
- Anterior drawer is checked and laxity corrected before fixation
- Tibial fixation at the tibial tunnel exit:
- Soft-tissue graft: Interference screw (bioabsorbable or metal) driven beside the graft or a staple/suture post
- BTB graft: Interference screw alongside the tibial bone plug
- Backup fixation (staple, post) may be added
Step 8: Notch and Graft Check
- Arthroscopic inspection confirms graft tension, absence of roof impingement at full extension, and that the graft lies in the anatomic position
- Gentle posterior drawer and Lachman maneuver confirm restored stability
Step 9: Closure and Postoperative Care
- Irrigate joint thoroughly, close portals and harvest sites in layers
- Drain is not routinely required
- Perioperative cryotherapy and compressive dressing applied
Single-Bundle vs. Double-Bundle Reconstruction
| Technique | Description | Outcome |
|---|---|---|
| Single-bundle (standard) | One graft, typically placed at the AMB footprint | Proven long-term results; simplest |
| Double-bundle | Reconstructs both AMB and PLB with two grafts | Theoretically better rotational stability; mixed clinical evidence; technically demanding |
(Campbell's Operative Orthopaedics 15th Ed 2026, p. 2706-2710; PMC 11453038)
Anterolateral Ligament (ALL) Reconstruction - When Added
For patients with high-grade pivot shift or revision cases, a combined intraarticular ACL + ALL reconstruction is increasingly used. The graft revision rate in combined ACL+ALL reconstruction was shown to be 2.5x lower than with isolated BTB and 3.1x lower than isolated hamstring grafts (Campbell's Operative Orthopaedics 15th Ed 2026, p. 2706).
ALL reconstruction technique (Technique 50.21 from Campbell's):
- Harvest gracilis tendon autograft; whipstitch the end
- Femoral fixation: guide pin placed 8 mm proximal and 4.3 mm posterior to the lateral epicondyle
- Tibial fixation: 22 mm posterior to Gerdy's tubercle, 10 mm distal to the joint line
- Test isometry through range of motion before final fixation
Common Failure Modes
- Malpositioned tunnels (most common cause): femoral tunnel too vertical/anterior
- Graft impingement on the notch roof at full extension
- Failure to address concomitant posterolateral corner (PLC) injury (occurs in ~10% of ACL tears)
- Use of allograft in young/high-demand athletes (2.1x higher revision rate vs. BTB)
- Premature return to sport before biologic graft incorporation (typically 9-12 months)
Rehabilitation Milestones
- 0-2 weeks: Crutches, full weight bearing tolerated, quad sets, straight leg raises
- 2-6 weeks: Range of motion 0-120°, closed-chain exercises
- 6-12 weeks: Progressive resistance, stationary bike, swimming
- 3-6 months: Running, agility training if quadriceps strength >70% of contralateral
- 9-12 months: Return to full sport; criteria-based clearance (strength symmetry, hop tests)
Sources:
- Campbell's Operative Orthopaedics 15th Ed 2026, pp. 2784-2710 (ACL anatomy, reconstruction techniques, anterolateral ligament)
- Miller's Review of Orthopaedics 9th Edition, pp. 333-349 (knee anatomy, ACL/PCL bundles, arthroscopic portals, ACL pathology)
- AOSSM 2024: Evolving Concepts in ACL Surgery - graft selection, lateral augmentation
- PMC Comprehensive Review - Graft Choices & Surgical Techniques (2024) - single vs. double bundle outcomes, anatomic tunnel placement
This is a shared conversation. Sign in to Orris to start your own chat.