
Hi
Can u explan me about skin grafting
skin grafting techniques outcomes
Skin Grafting
What Is a Skin Graft?
-
Burns (especially full-thickness burns)
-
Traumatic wounds
-
Surgical excision defects (e.g., after tumor removal)
-
Chronic non-healing ulcers
-
Areas where primary closure is not possible
-
Sabiston Textbook of Surgery
Types of Skin Grafts
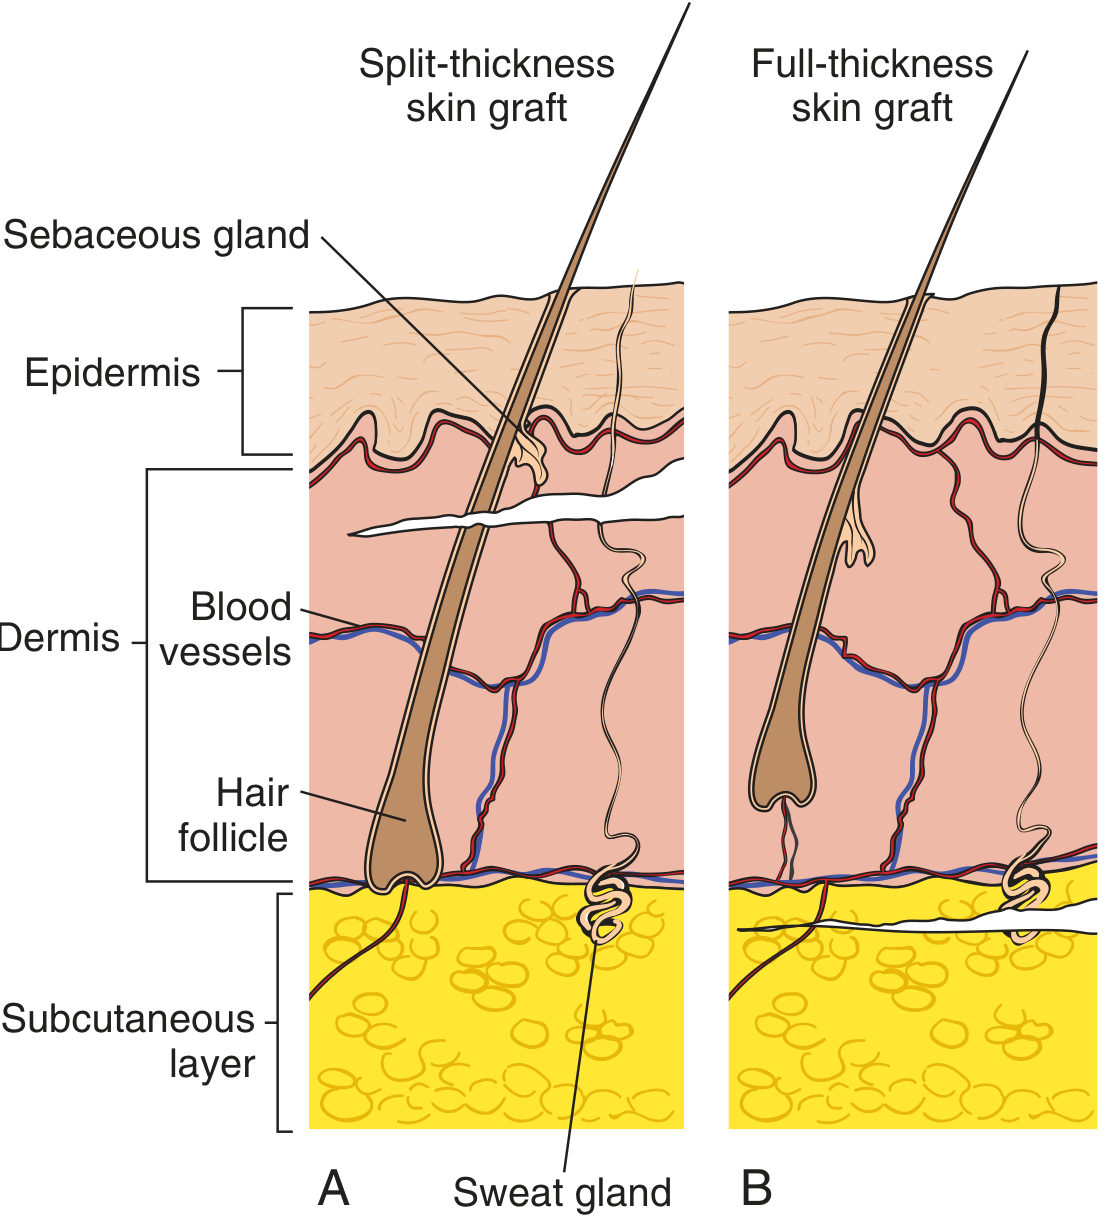
1. Split-Thickness Skin Graft (STSG)
- Contains the epidermis + part of the dermis (leaving behind deeper dermis to regenerate)
- Thickness grades:
- Thin: 0.005 - 0.010 inch
- Medium
- Thick: up to 0.015 inch
- Harvested using an electric or mechanical dermatome (set at 0.014-0.016 inch, angled 45-60 degrees)
- Can be meshed (small slits cut) to cover large areas - expansion ratios of 1:1.5, 1:2, 1:3, even up to 1:6 or 1:9
- Donor site heals on its own since part of the dermis remains
- Can cover large areas when meshed
- Less blood supply needed to survive
- Donor site heals faster
- Good for poor vascular beds
- More secondary contraction (scar shrinkage)
- Abnormal pigmentation
- More susceptible to trauma
- Poor sensory recovery
- No hair follicles (hairless graft)
2. Full-Thickness Skin Graft (FTSG)
- Contains epidermis + entire dermis
- Harvested by sharp scalpel dissection
- Donor site must be closed directly (sutured) or itself grafted
- Used for smaller defects in cosmetically important areas (face, nose, temple)
- Less secondary contraction (better cosmetic result)
- Better color and texture match
- More durable, resists trauma
- Better sensory recovery (more neurilemmal sheaths in dermis)
- Contains hair follicles
- Requires better vascular bed to survive
- More primary contraction (elastic recoil after harvest)
- Limited by donor site size
3. Composite Grafts
-
Contain two or more tissue types (e.g., skin + cartilage from the ear, or septal mucosa + cartilage)
-
Used for reconstructing composite defects such as the alar rim, ear, or eyelid
-
Scott-Brown's Otorhinolaryngology Head & Neck Surgery, Pfenninger and Fowler's Procedures for Primary Care
Skin Graft Healing ("Take")
| Stage | Timing | Mechanism |
|---|---|---|
| Graft Adherence | Immediate | Fibrin layer forms between graft and recipient bed |
| Serum Imbibition | Up to 48 hours | Graft survives by absorbing nutrients from plasma leaking from recipient capillaries; graft swells and gains weight |
| Revascularization | 48 hrs - 3 weeks | 1) Inosculation: cut vessel ends join up; 2) Revascularization: ingrowth of new vessels; 3) Neovascularization: vessels grow down basement membrane |
| Remodelling | 3 weeks - 1 year | Collagen reorganization and graft maturation |
- Scott-Brown's Otorhinolaryngology Head & Neck Surgery
Requirements for Successful Graft Take
- Wound bolsters
- Negative-pressure dressings (VAC therapy)
- Fixation with staples, surgical glue (thrombin or cyanoacrylate), or sutures
- Exposed bone, irradiated tissue, cartilage, or tendon (limited vascularity)
- Hematoma or seroma under the graft (breaks contact)
- Infection
- Movement at the graft site
- Diabetes mellitus
- Smoking
- Previous radiotherapy or chemotherapy
- Poor nutritional status
Graft Application Technique (STSG)
- Measure the defect and mark the donor site (often inner upper thigh or scalp)
- Harvest with a dermatome at 0.014-0.016 inch thickness
- Mesh the graft if needed to cover larger areas
- Apply with dermis side down on the wound bed
- Fix with staples or sutures; use low-adherent dressings (e.g., adaptic)
- Donor site is dressed separately
- Fischer's Mastery of Surgery, 8th ed.
STSG vs. FTSG - Quick Comparison
| Factor | STSG | FTSG |
|---|---|---|
| Dermis included | Partial | All |
| Donor site healing | Heals on own | Must be sutured |
| Vascularity required | Less | More |
| Primary contraction | Less | More |
| Secondary contraction | More | Less |
| Cosmesis | Poorer | Better |
| Hair growth | None | Present |
| Best use | Large areas, burns | Small cosmetic areas (face) |
Summary
Circumcision
circumcision indications complications outcomes
Circumcision
Definition
- Campbell Walsh Wein Urology, Hinman's Atlas of Urologic Surgery
Indications
In Neonates and Children
| Indication | Notes |
|---|---|
| Phimosis | Inability to retract the foreskin (pathological scarring) |
| Lichen sclerosus (LS) | Genital skin disease; rare under 5 years of age |
| Recurrent balanoposthitis | Repeated infections of glans and foreskin |
| Recurrent UTIs | Especially with abnormalities like high-grade vesicoureteral reflux |
In Adults
- Inability to retract the foreskin for intercourse
- Splitting of an abnormally tight frenulum
- Recurrent balanitis
- Paraphimosis (foreskin trapped behind glans)
- Lichen sclerosus causing phimosis
Prophylactic / Public Health
-
Strong evidence from randomized controlled trials shows circumcision reduces HIV transmission in heterosexual men, because the keratinized glanular surface is more resistant to infection. The WHO supports large-scale adolescent circumcision programs in sub-Saharan Africa.
-
Reduces risk of UTIs and other sexually transmitted infections
-
May reduce risk of penile cancer
-
Bailey and Love's Short Practice of Surgery, Smith and Tanagho's General Urology
Contraindications
- Hypospadias (abnormal urethral opening) - the foreskin may be needed for reconstruction
- Penile curvature (chordee)
- Buried penis
- Bleeding disorders (careful pre-assessment required)
Anesthesia
| Age Group | Anesthesia |
|---|---|
| Neonates | Dorsal penile nerve block (1 mL of 1-2% lidocaine without epinephrine) or EMLA cream (topical lidocaine + prilocaine); dorsal penile nerve block is superior to EMLA |
| Older infants & children | General anesthesia |
| Adults | Local, spinal, or general anesthesia |
Note: EMLA cream contains prilocaine which carries a low risk of methemoglobinemia in neonates.
Surgical Techniques
1. Sleeve (Double-Incision) Technique - Used in adults and older children
- Retract the foreskin; if fibrotic, perform a dorsal slit first
- Take down adhesions, clean smegma deposits
- Examine glans and meatus carefully for anomalies (e.g., hypospadias, megameatus) before any incision
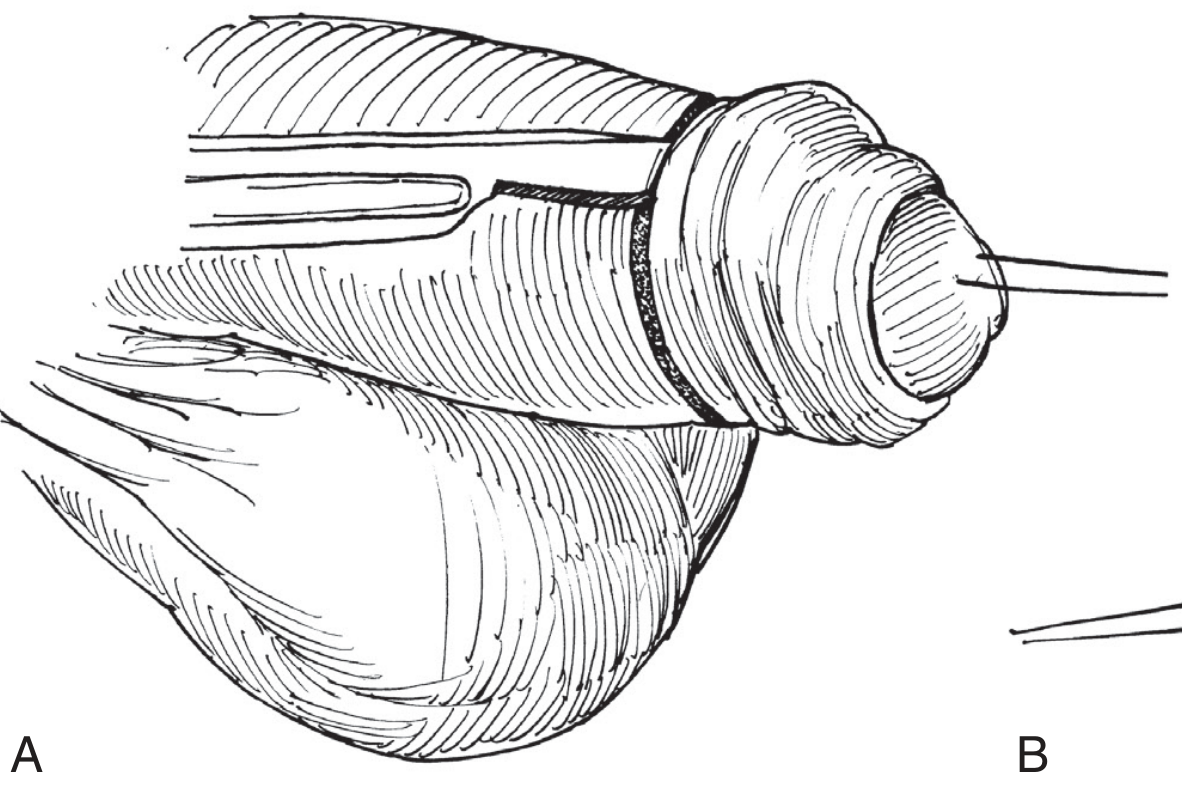
- Mark the shaft at the level of the coronal sulcus with the prepuce in place
- Make a circumferential incision at the corona using a knife
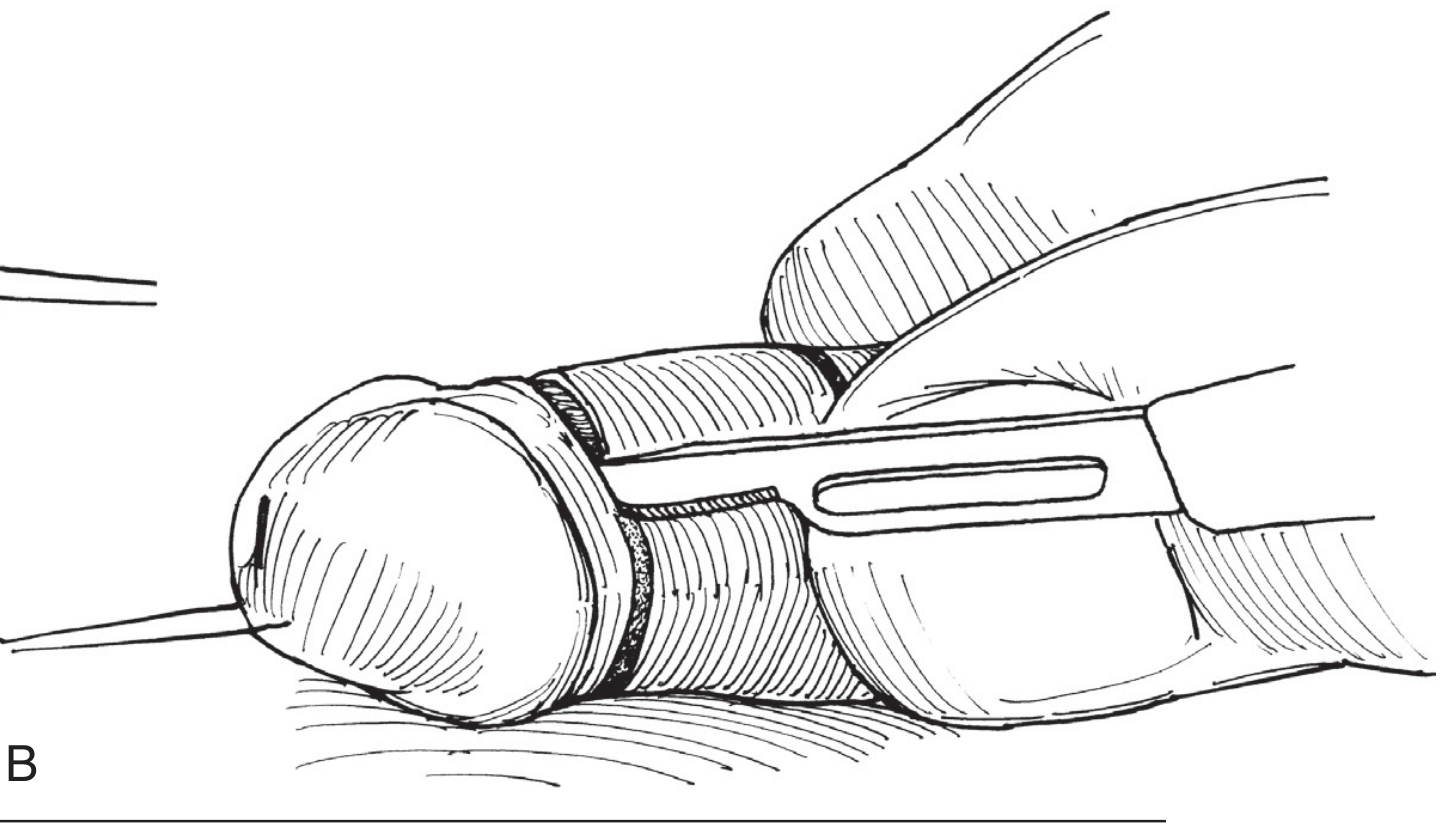
- Slit the prepuce dorsally in the midline to within 1 cm of the corona - this converts the foreskin into two flaps
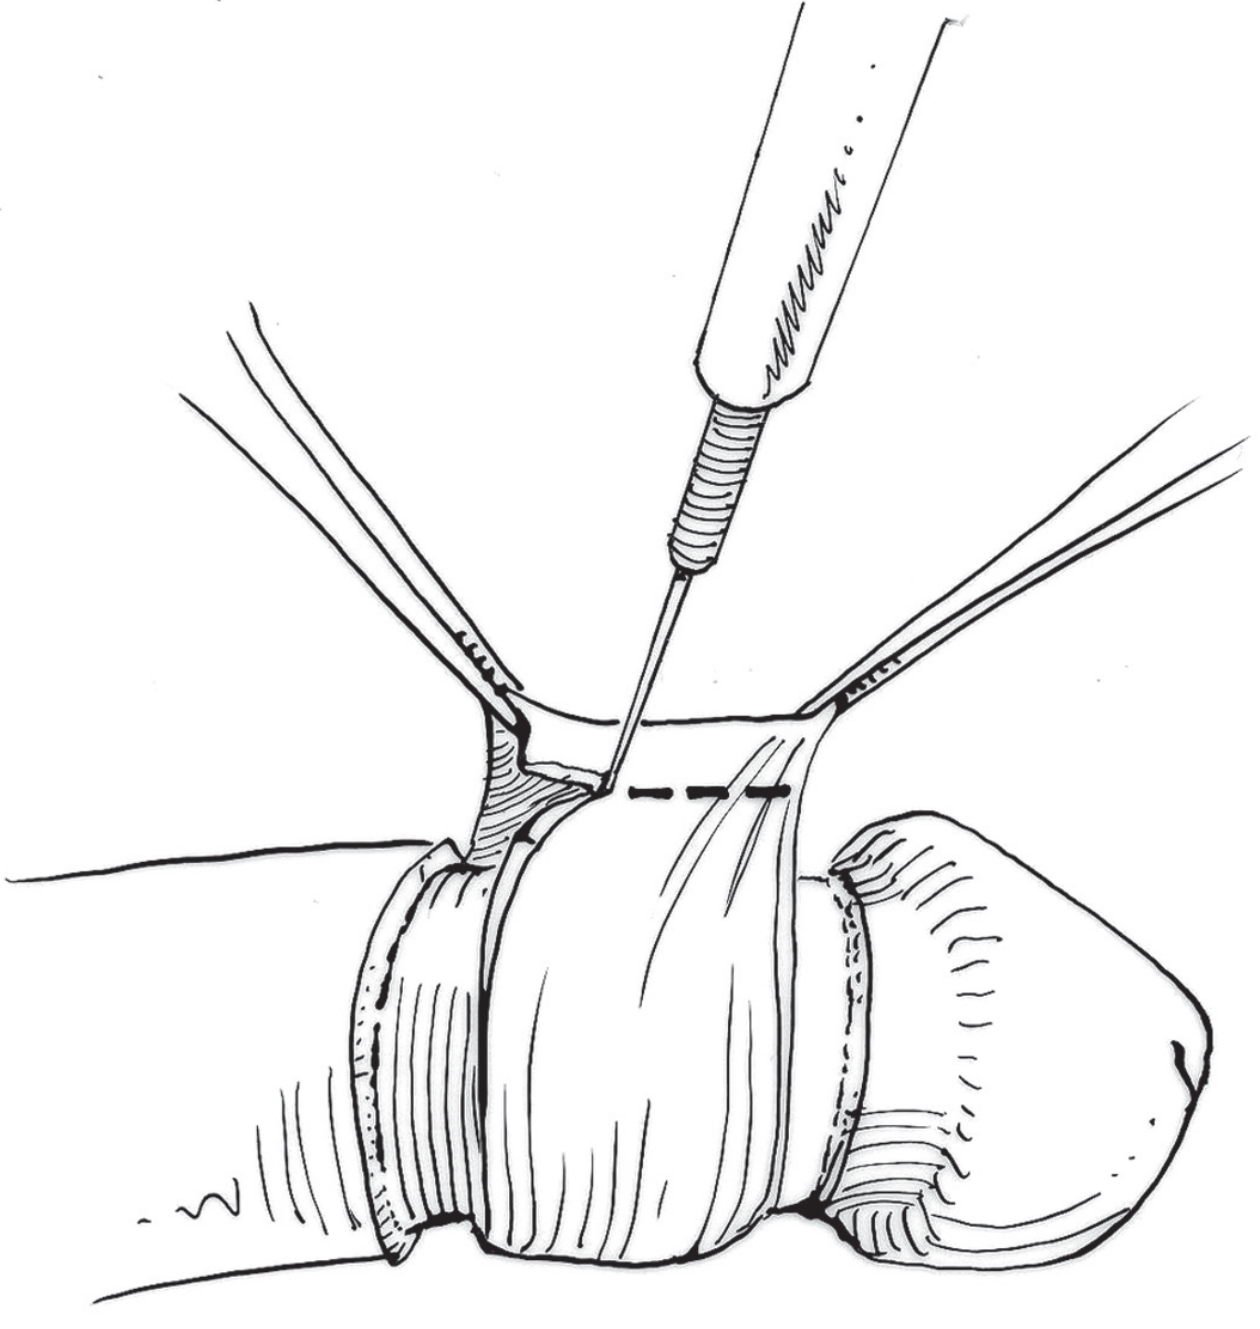
- Mark and incise the inner layer with a second circumferential incision, leaving ~0.5 cm of inner preputial skin
- Divide the frenulum carefully; secure frenular vessels with bipolar diathermy or absorbable sutures
- Approximate cut skin edges with interrupted absorbable sutures
- In cases of lichen sclerosus: send excised skin for histology
2. Gomco Clamp Technique - Neonates
- Uses the Gomco device (one of the oldest and most commonly used neonatal circumcision devices)
- Clamp sizes typically 1.1 cm or 1.3 cm for most infants
- A dorsal slit is first created, prepuce retracted, smegma cleared
- Bell of the clamp is placed over the glans and the foreskin pulled over it - the clamp compresses the tissue for hemostasis before excision
3. Other Neonatal Devices
- Mogen clamp
- Plastibell device
Alternatives to Circumcision (Foreskin-Preserving)
- Topical betamethasone ointment - daily application for 2 weeks; relaxes phimotic ring in 70-80% of cases
- Dorsal slit - incision in the dorsum of the foreskin to widen it
- Preputioplasty - surgical widening of the foreskin opening
Complications
| Complication | Details |
|---|---|
| Bleeding (most common, ~0.1%) | Usually from frenulum; managed by compression, cautery, or suture |
| Wound infection | Rare; prevented by antibiotic ointment (e.g., bacitracin) |
| Penile degloving | Excess skin removal; usually epithelializes without intervention; antibiotic ointment and warm baths |
| Insufficient excision | Asymmetric or incomplete removal; may require revision under general anesthesia |
| Excessive skin removal | Can cause penile chordee, torsion, lateral deviation; may need penile skin flaps or Z-plasty |
| Trapped penis | Cicatricial scar from excessive removal; managed with betamethasone (79% success) or surgical repair |
| Glanular adhesions / skin bridges | Common; attachments between glans and penile shaft |
| Urethral/glanular injury | Rare but serious (Fig. 44.3C in Campbell Walsh) |
- Campbell Walsh Wein Urology
Physiological Effect on the Glans
- Eliminates a favorable sanctuary for urinary tract pathogens (reducing UTI risk)
- Creates increased resistance to HIV infection
Summary
| Aspect | Key Point |
|---|---|
| Most common indication (non-medical) | Religious / cultural |
| Most common medical indication | Phimosis |
| Most common complication | Bleeding |
| Key contraindication | Hypospadias |
| HIV benefit | Proven in RCTs; WHO-endorsed |
| Preferred neonatal anesthesia | Dorsal penile nerve block |
- Hinman's Atlas of Urologic Surgery, Bailey and Love's Short Practice of Surgery, Campbell Walsh Wein Urology, Smith and Tanagho's General Urology
K
Images
What would you like regarding images?
Circumcision - Surgical Images
Step 1: Initial Incisions (Sleeve / Double-Incision Technique)
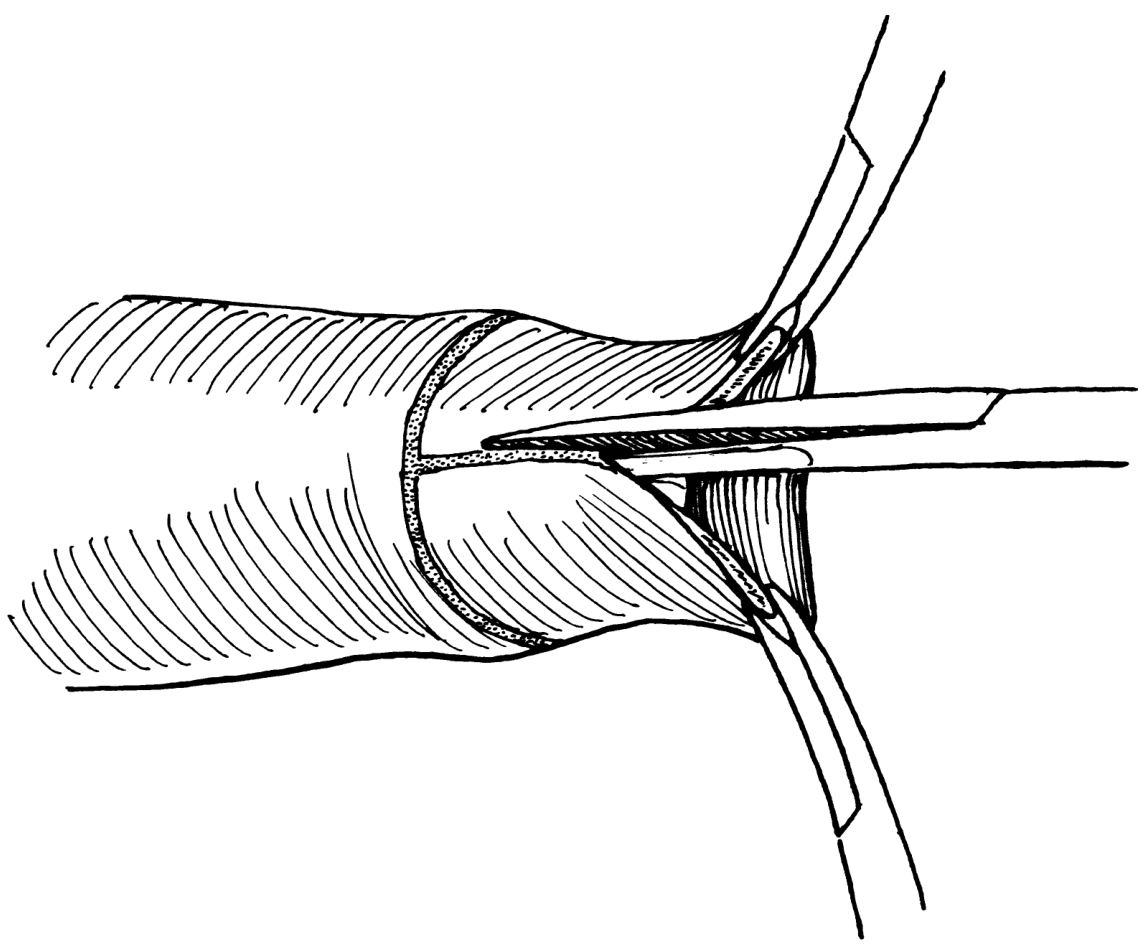
Step 2: Skin Collar Isolation and Division
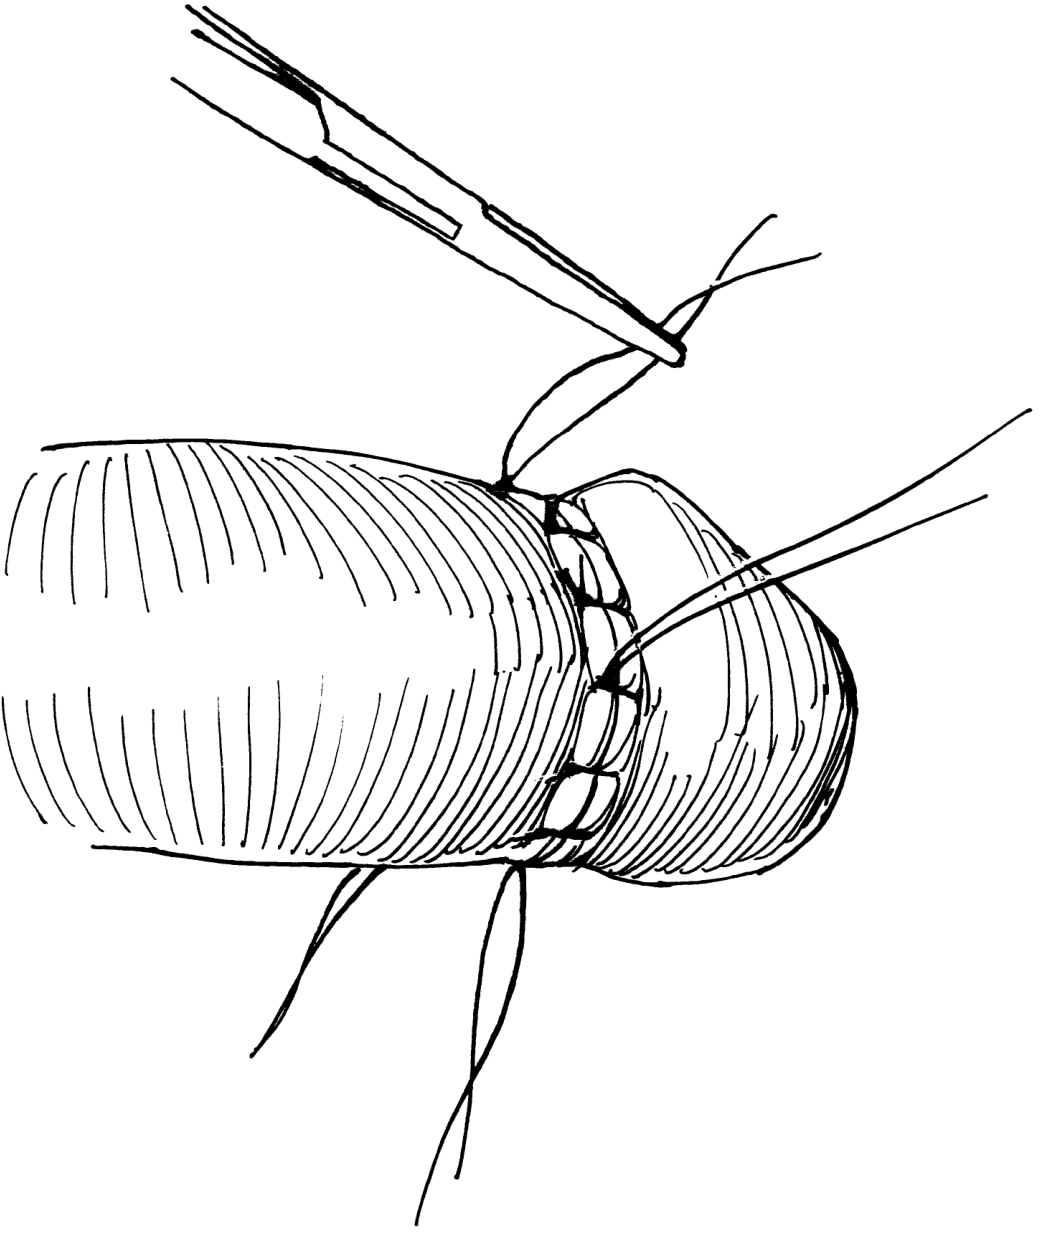
Step 3: Suturing the Skin Edges
Step 4: Suturing of the Shaft Skin (Completed)
Dorsal Slit Technique (for non-retractile foreskin)
Below elbow amputation surgery deatil
Below Elbow (Transradial) Amputation - Surgical Detail
Definition and Overview
-
The elbow joint is retained, which is essential for prosthetic function
-
Forearm rotation (pronation/supination) and elbow flexion strength are directly related to the length of the residual limb
-
It allows fitting with a myoelectric or body-powered prosthesis
-
Campbell's Operative Orthopaedics 15th Ed 2026, Miller's Review of Orthopaedics 9th Edition
Anatomy at the Level of Transection
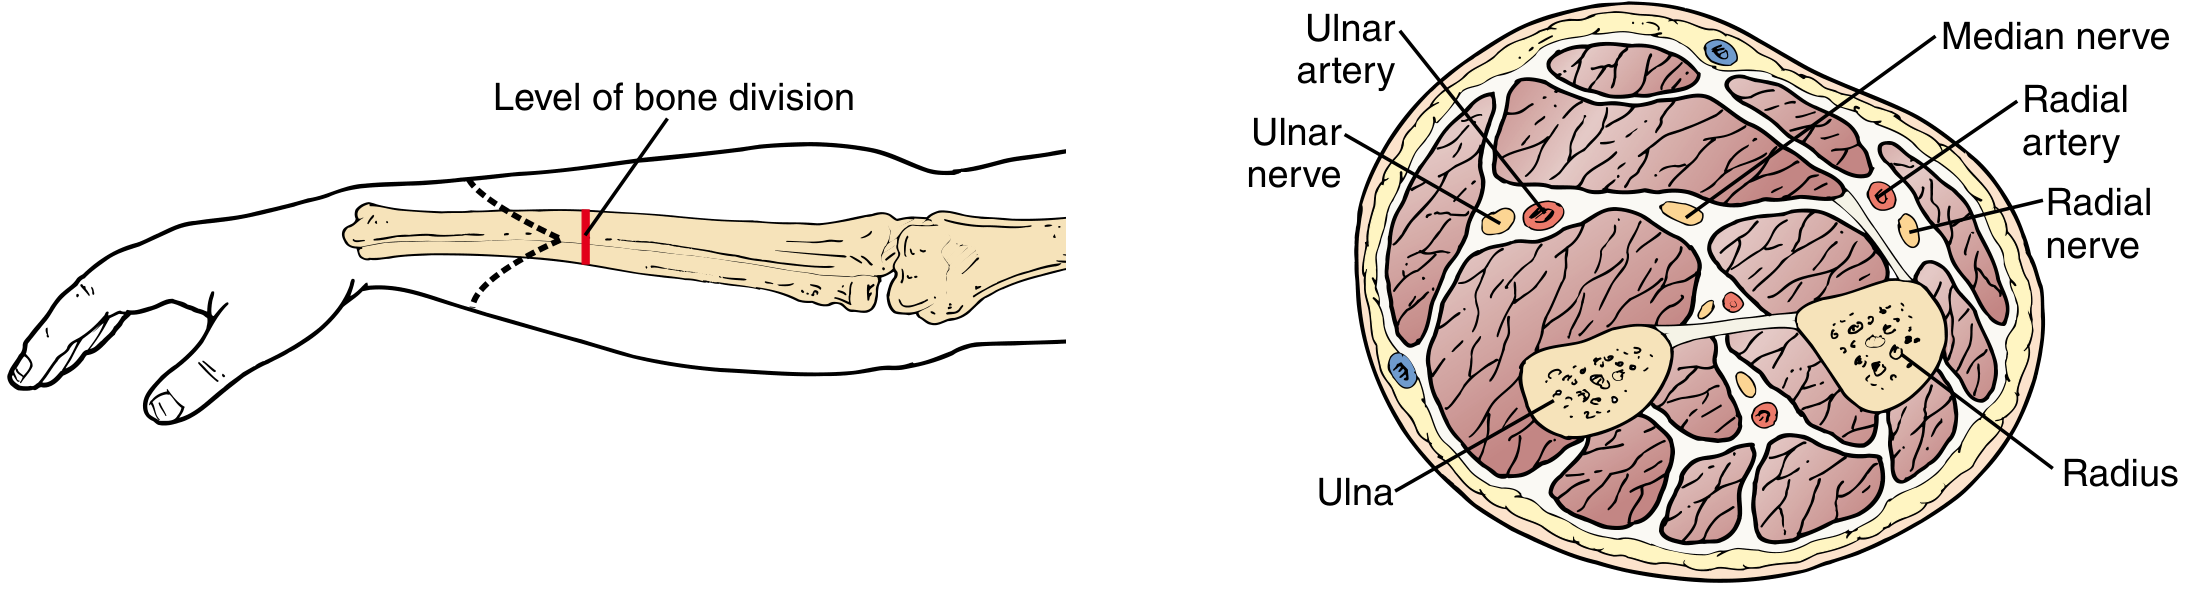
- Bones: Radius and ulna (both must be divided)
- Arteries: Radial artery and ulnar artery (both double ligated)
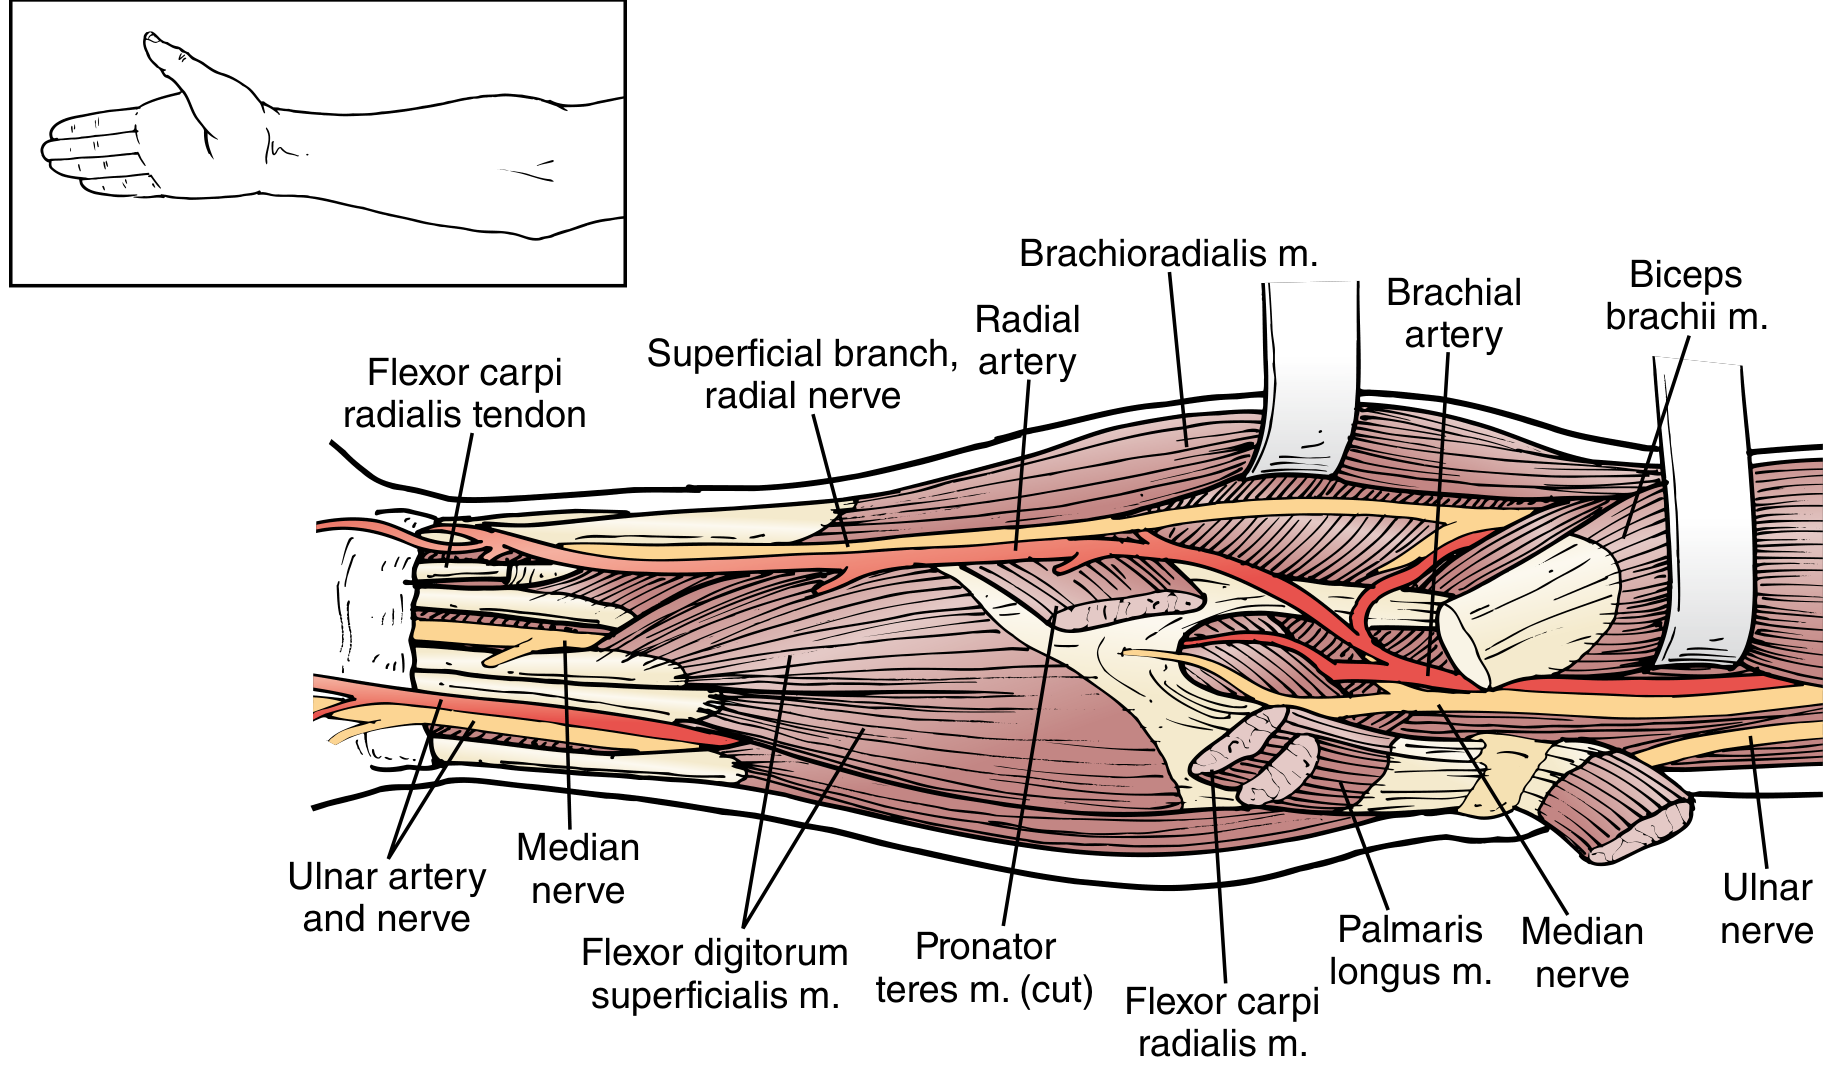
- Nerves: Median nerve, ulnar nerve, radial nerve (all sharply divided under traction)
- Muscles: Flexor and extensor compartments (used for myoplastic/myodesis closure)
Indications
- Severe trauma / crush injury to hand and distal forearm
- Malignant tumors of the hand/wrist not amenable to limb salvage
- Severe infection / gas gangrene
- Peripheral vascular disease (end-stage diabetic gangrene)
- Complete brachial plexus injury with non-functioning hand and forearm
- Congenital limb deficiency requiring surgical revision
Optimal Level of Amputation
- Allows adequate soft tissue coverage with myodesis repair
- Provides the best lever arm for prosthetic control
- Components of a myoelectric prosthesis can be hidden within the prosthetic shank
- Preserves the maximum amount of forearm rotation
A small stump distal to the elbow can be functionally better than a long above-elbow amputation. All possible length should be preserved.
Pre-operative Considerations
- Careful physical exam to assess skin viability and soft tissue coverage
- History of bleeding disorders
- Evaluation by an experienced prosthetist before surgery when possible
- Multidisciplinary team: upper extremity surgeon, prosthetist/orthotist, pain physician, rehabilitation specialists, mental health professionals
Surgical Technique (Step-by-Step)
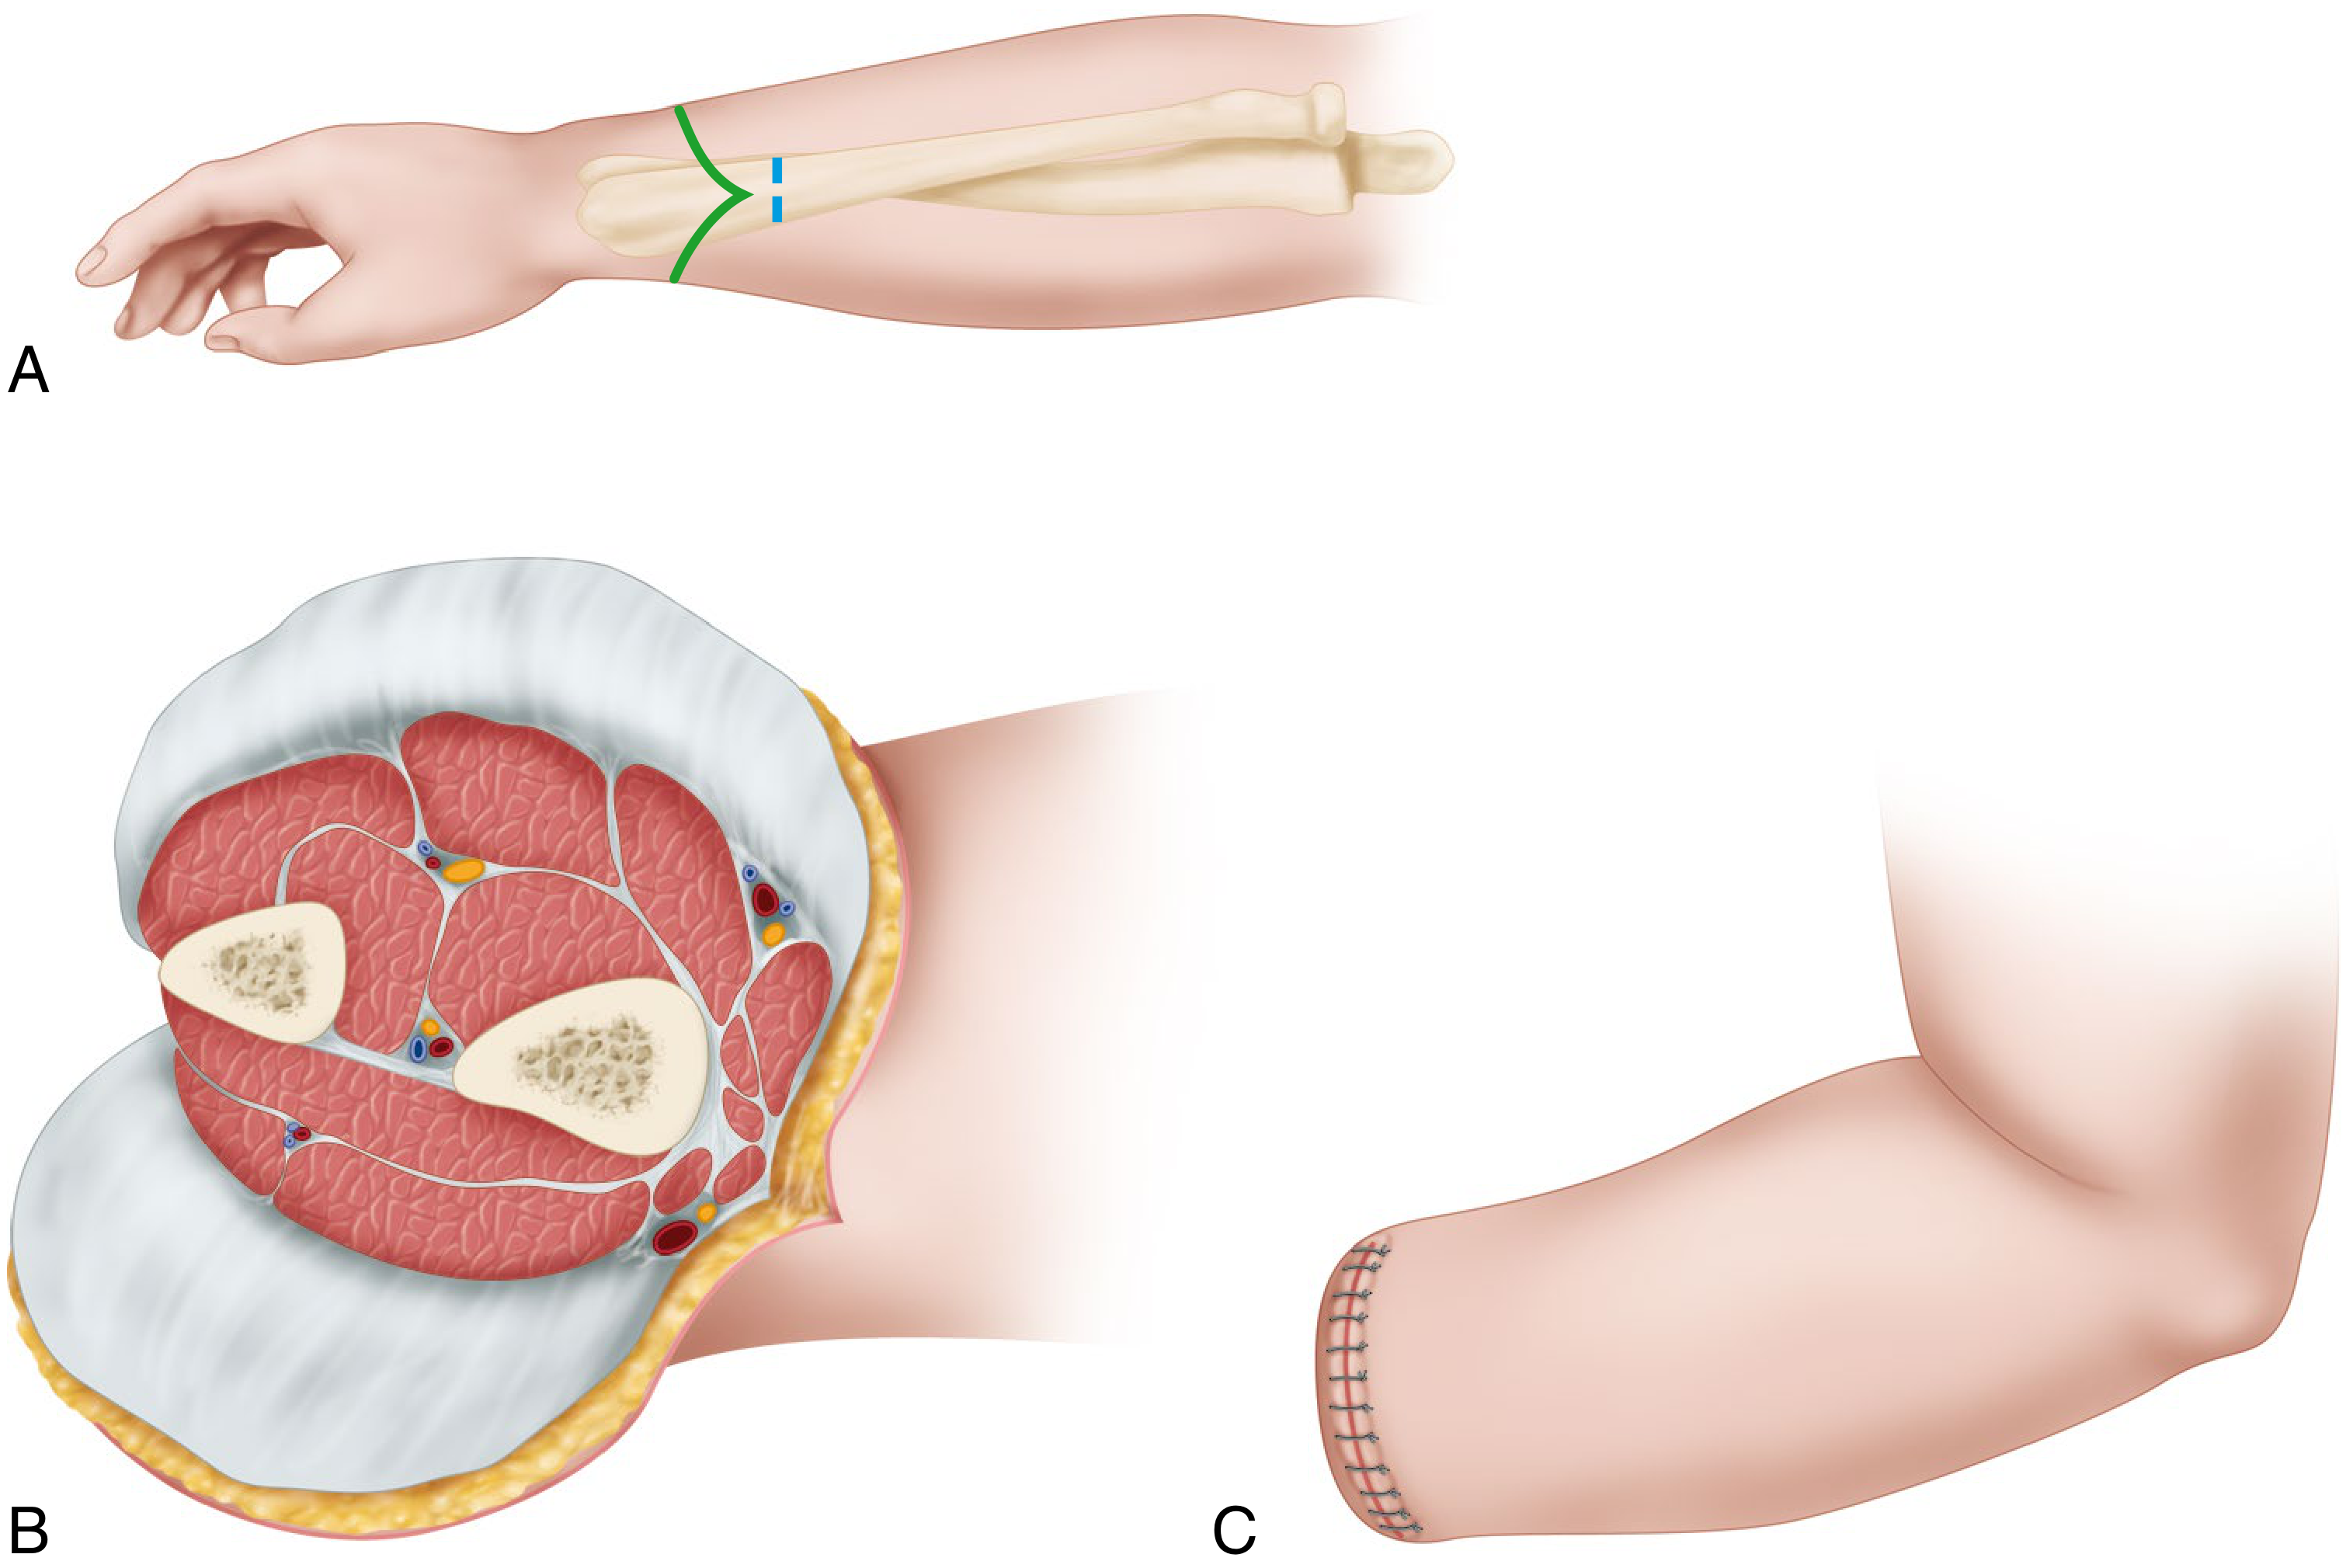
Step 1: Skin Flap Design
- Fashion equal anterior and posterior skin flaps at the intended level of bone section
- Length of each flap = approximately half the forearm diameter at that level
- If good skin is unavailable - use atypical flaps rather than amputate at a more proximal level
- Reflect the flaps with subcutaneous tissue and deep fascia proximally to the level of bone section
Step 2: Vascular Control
- Identify, double ligate, and divide the radial artery and ulnar artery proximal to the bone level
- Use permanent (non-absorbable) suture ligatures
Step 3: Nerve Division
- Identify the median nerve, ulnar nerve, and radial nerve
- Gently draw them distally and sharply transect them under traction (proximally)
- This allows nerve ends to retract well proximal to the stump end - reduces risk of painful neuroma
Step 4: Muscle Division
- Divide muscle bellies transversely, distal to the bone level so proximal ends retract to that level
- Trim all excess muscle carefully
- Myoplastic closure: Interpose muscle tissue between the radius and ulna
- Distally: use pronator quadratus
- More proximally: use one flexor + one extensor tendon (tenodese to bone to prevent painful convergence)
- For myoplastic closure: fashion an anterior flap of flexor digitorum sublimis long enough to wrap around the bone ends to the dorsal deep fascia
Step 5: Bone Division
- Divide the radius and ulna transversely approximately 2 cm proximal to the skin flap edges
- Rasp/smooth all sharp edges from bone ends
- Attempt to maintain at least 5 cm of the ulna proximally
- If a more proximal osteotomy is needed: tenodesis of the biceps tendon to the proximal ulna residual is performed (lengthens the stump functionally and enhances prosthetic fitting)
Step 6: Wound Closure
- Close the deep fascia with fine interrupted absorbable sutures
- Close the skin flaps with interrupted non-absorbable sutures
- Insert a suction drain deep to the fascia
- Apply a rigid dressing (promotes stump shaping and decreases edema)
Myodesis vs Myoplasty
| Term | Definition | Purpose |
|---|---|---|
| Myodesis | Muscle sutured directly to bone under physiologic tension | Strongest stabilization; preserves muscle length and function |
| Myoplasty | Muscle flap sutured to opposing muscle group over bone end | Provides soft tissue coverage and cushioning |
| Myofascial closure | Closure of deep fascia over muscle | Minimum standard |
Krukenberg Amputation (Special Variant)
- Converts the ulna and radius into digits to provide prehensile (pincer) function
- Useful particularly in blind bilateral amputees to provide tactile sensation
- Allows direct handling of objects without a prosthesis
Post-operative Care
| Timeframe | Action |
|---|---|
| Immediate | Rigid stump dressing; pain control; elevation |
| Within 30 days | Early temporary prosthetic fitting |
| 4-6 weeks post-op | Soft tissues healed, edema controlled - proceed with definitive prosthetic socket |
- Encourages bimanual activities
- Softens the psychological impact of limb loss
- Decreases prosthetic rejection rate
Complications
| Complication | Management |
|---|---|
| Painful neuroma | Traction neurolysis (nerve cut under tension to retract proximally); bury nerve end in muscle/bone; RPNI (regenerative peripheral nerve interface) or TMR (targeted muscle reinnervation) |
| Wound breakdown | Revision of flaps; may need skin graft |
| Phantom limb pain | Multimodal analgesia, mirror therapy, TMR |
| Stump edema | Rigid dressing, compressive shrinker sock |
| Bone overgrowth | More common in children; periosteal stripping, revision surgery |
| Skin breakdown from prosthesis | Socket refitting |
Prosthetic Options After Transradial Amputation
| Type | Mechanism | Advantages |
|---|---|---|
| Body-powered hook/hand | Harness and cable system | Durable, sensory feedback, low cost |
| Myoelectric prosthesis | EMG signals from forearm muscles control terminal device | More natural appearance, no harness needed |
| Activity-specific devices | Specialized terminal devices for sports, work | High function for specific tasks |
The myoelectric prosthesis requires the patient to be able to contract forearm muscles to generate EMG signals - this is why preserving forearm musculature with myodesis/myoplasty closure is so important.
Summary Key Points
- Preserve maximum possible length - even a short below-elbow stump is better than above-elbow amputation
- Optimal level: junction of middle and distal third of forearm
- Always double ligate vessels with permanent sutures
- Nerves cut under traction to allow proximal retraction
- Myoplastic/myodesis closure is essential for a functional stump
- Elbow retention is non-negotiable for prosthetic function
- Early prosthetic fitting (within 30 days) improves outcomes
Below elbow amputation surgery
Below Elbow (Transradial) Amputation - Quick Summary
Definition
Optimal Level
Surgical Steps (in order)
- Equal anterior + posterior skin flaps (each = ½ forearm diameter)
- Double ligate radial and ulnar arteries (permanent suture)
- Nerves (median, ulnar, radial) - cut under traction → retract proximally
- Muscles divided distally; myoplastic/myodesis closure between radius and ulna
- Radius and ulna divided transversely, edges rasped smooth (2 cm proximal to flap edges)
- Deep fascia closed with absorbable sutures; skin with interrupted non-absorbable sutures + suction drain
Key Principles
- Preserve maximum length
- Elbow must be retained for prosthetic function
- Myodesis/myoplasty = essential for good stump
- Nerves cut under traction to prevent painful neuroma
- Early prosthesis fitting within 30 days
- Images/diagrams of the procedure
- Complications in detail
- Prosthetic rehabilitation
- Krukenberg amputation
- Comparison with elbow disarticulation
Show surgical images of transradial amputation steps
transradial below elbow amputation surgical steps forearm
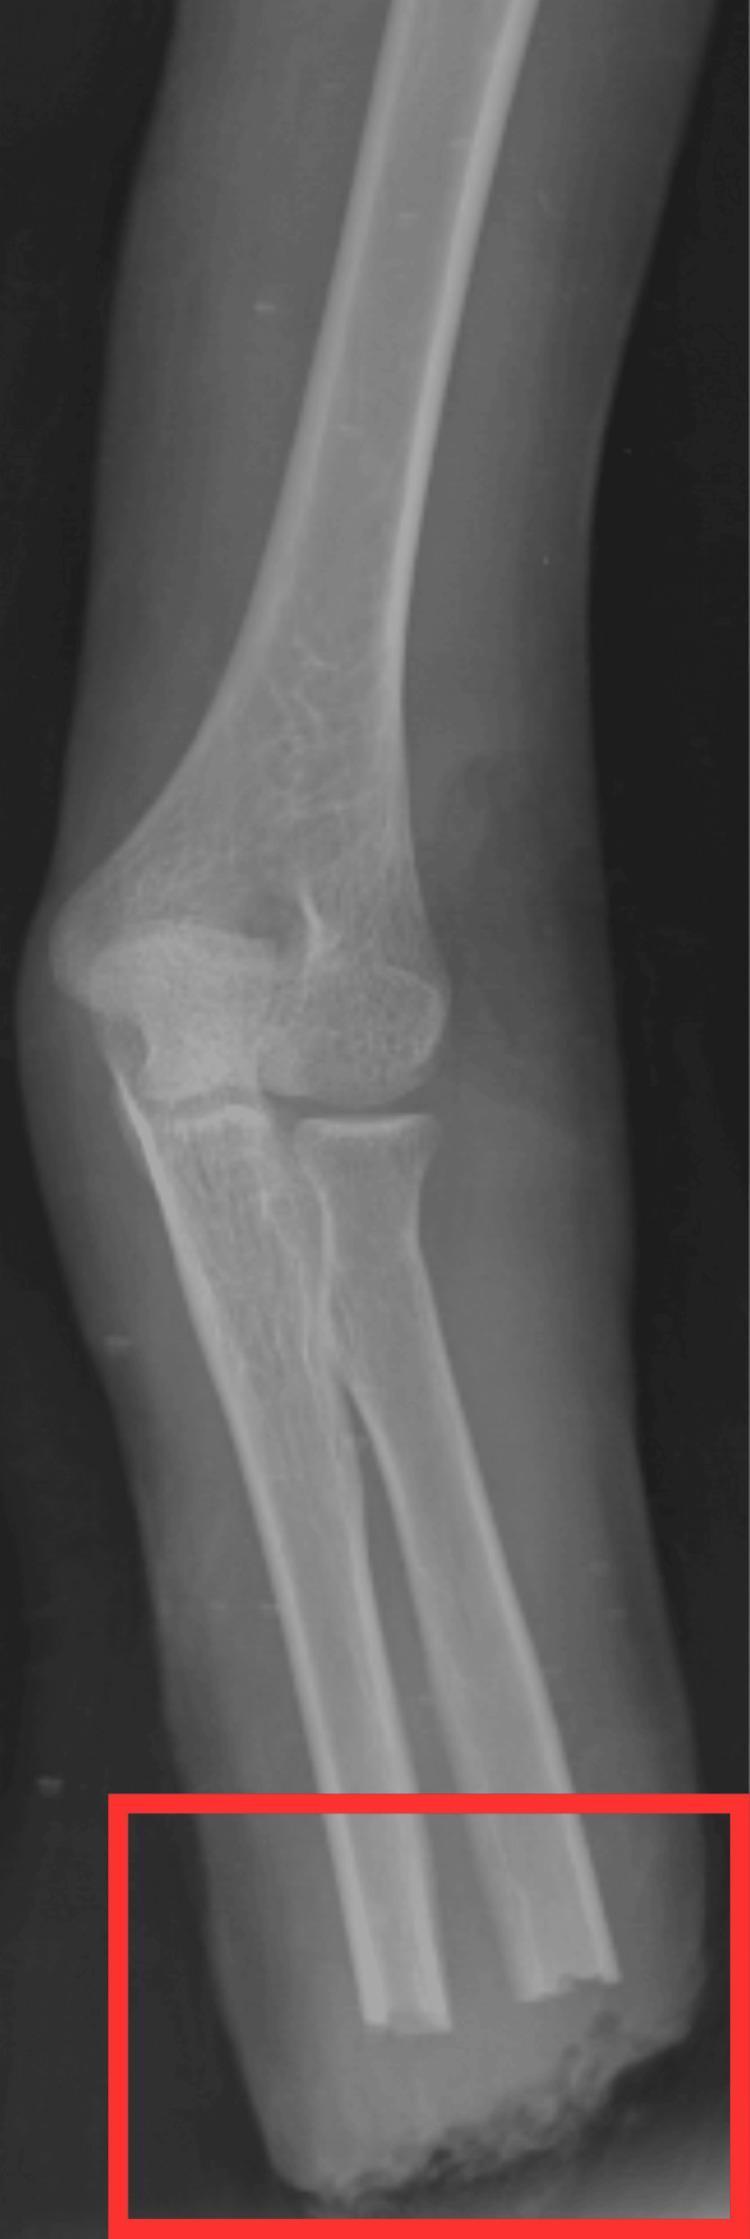
This diagnostic X-ray (radiograph) illustrates a post-operative status of a transradial amputation in an upper limb. The image captures the distal humerus, elbow joint, and the proximal portions of the radius and ulna. The elbow joint maintains its anatomical alignment. Distally, the radius and ulna are sharply and transversely truncated, demonstrating a clear surgical bone cut consistent with amputation at the mid-to-distal forearm level. A red rectangle highlights this amputation site. The bone density appears normal with visible trabecular patterns in the proximal segments. Surrounding soft tissues are visible as less radiopaque shadows, terminating abruptly at the surgical margin. There is a slight mottled appearance of the soft tissue at the distal end, likely representing post-operative edema, surgical dressing material, or inflammatory changes. This visual serves as a clinical example of post-surgical imaging for limb amputation monitoring and orthopedic evaluation.
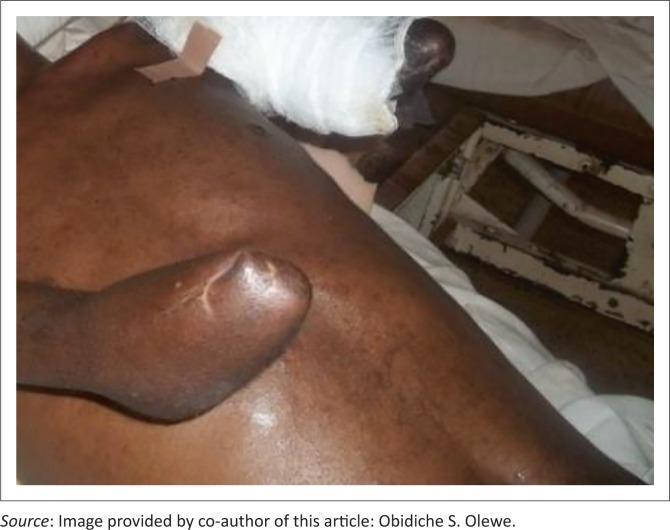
This clinical photograph shows a male patient three months post-operatively following bilateral upper limb amputations, a common sequela of severe high-voltage electrical injuries. On the patient's left side, there is an above-elbow (transhumeral) amputation; the residual limb appears well-healed with a rounded distal contour and no visible signs of acute inflammation or infection. On the patient's right side, a below-elbow (transradial) amputation is visible, currently managed with a white gauze dressing and medical tape extending toward the shoulder, suggesting ongoing wound care or protection of the surgical site. The patient is in a supine position, and the surrounding torso skin shows signs of prior trauma or healing. This image serves as a clinical example of post-amputation recovery and surgical management in the context of major limb trauma and burn rehabilitation within the specialties of orthopedic and plastic surgery.
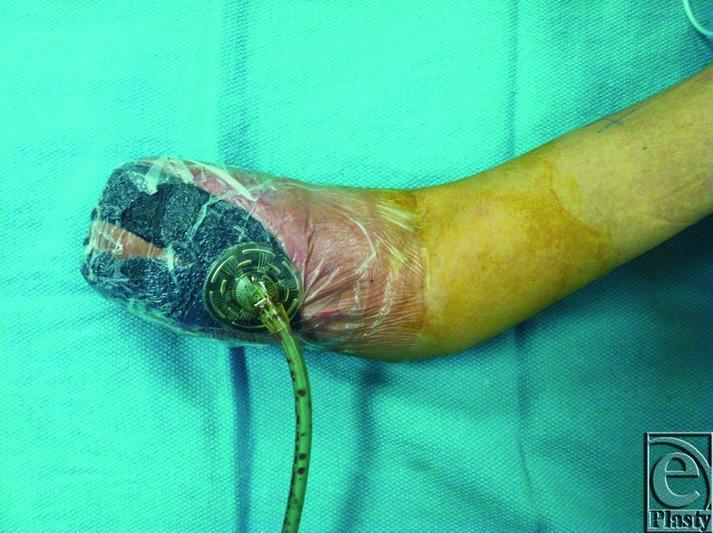
A clinical photograph of an upper extremity following a transradial mid-forearm amputation. The residual limb is shown with a vacuum-assisted closure (VAC) system in place. The distal end of the stump is covered with a black, porous polyurethane foam dressing, which is secured and airtight under a transparent adhesive drape. A circular suction port is positioned on the lateral aspect of the stump, with a translucent tube containing trace amounts of serosanguinous fluid extending from it. The skin proximal to the transparent dressing exhibits a color gradient: there is a zone of erythematous, reddish-pink inflammation immediately adjacent to the dressing, transitioning into a yellowish-tan hue, and finally returning to a standard skin tone near the elbow. This image demonstrates the management of a complex surgical site, specifically for cases of pyoderma gangrenosum where optimized immunosuppression and negative pressure wound therapy are utilized to promote healing and prevent further tissue necrosis.
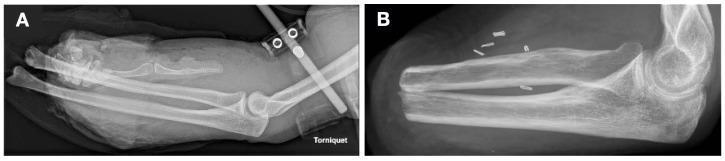
This comparative X-ray radiography series displays a human left forearm in two distinct clinical states: acute trauma and post-surgical amputation. Image A is an anteroposterior view of the forearm following a blast injury, showing significant soft tissue swelling, loss of normal tissue planes, and traumatic disarticulation at the wrist joint. A radiopaque tourniquet is visible proximally. The distal radius and ulna are present but surrounded by diffuse opacity suggesting edema and hemorrhage. Image B shows the same anatomical region five months later following a transradial amputation. The distal portions of the radius and ulna have been surgically resected, exhibiting smooth, rounded cortical margins at the amputation site. Multiple small, radiopaque metallic vessel clips are visible within the distal soft tissues. The elbow joint remains intact in both views. This comparison illustrates the transition from severe musculoskeletal trauma to the stable post-operative state of a residual limb, relevant for orthopedics and physical medicine and rehabilitation (PM&R).
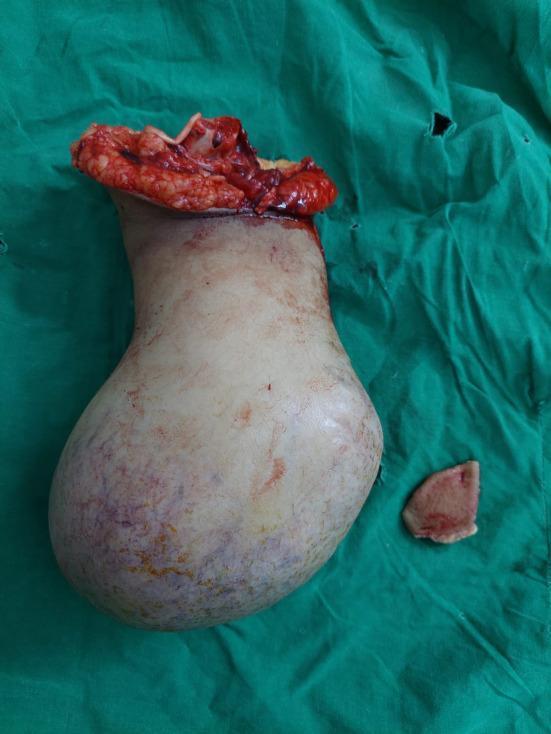
Clinical photograph of a gross surgical specimen following a below-elbow amputation for recurrent osteosarcoma. The specimen consists of an amputated limb segment, likely the forearm and distal stump, exhibiting a massive, bulbous expansion of the distal end. The skin over the enlarged area is pale, taut, and displays a mottled appearance with reddish and purplish vascular discoloration, suggesting an underlying aggressive tumor. The proximal surgical margin shows a traumatic, hemorrhagic transection site with visible subcutaneous fat, muscle tissue, and potentially bone fragments. The global appearance characterizes a localized recurrence of a high-grade bone malignancy in a limb stump. The specimen is displayed on a green sterile surgical drape, and a small, detached biopsy or tissue fragment is seen adjacent to the main mass. This image serves as a pathology specimen study of musculoskeletal oncology, illustrating the gross morphology of tumor recurrence and its impact on limb architecture.
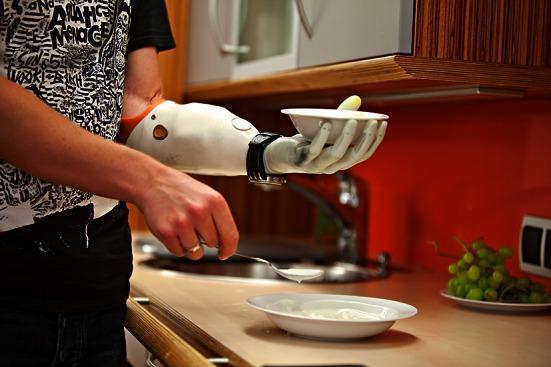
This clinical photograph demonstrates the use of an upper-limb myoelectric prosthesis during Activities of Daily Living (ADLs). The image shows a patient with a transradial (below-elbow) amputation performing a kitchen-related task. The prosthesis features a white or off-white forearm casing that fits over the residual limb, secured by a black wristband-style interface. The terminal device is an articulated prosthetic hand with anatomical finger modeling, shown here providing a stable platform and grip to hold a bowl. The patient's contralateral intact hand is using a spoon, illustrating the coordinated bimanual function and stabilization that prosthetic rehabilitation aims to achieve. Educational concepts include prosthetic fitting, functional rehabilitation post-amputation, and the integration of assistive devices into daily life. The image is relevant to orthopedic surgery, physical medicine and rehabilitation (PM&R), and occupational therapy.
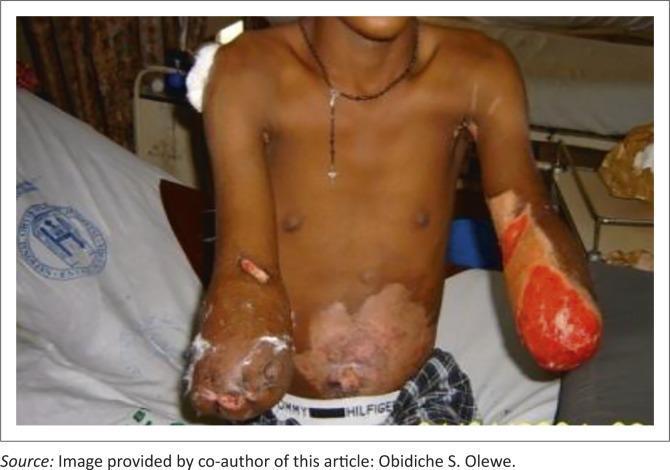
A clinical photograph of a male patient five weeks post-operative, following bilateral upper limb amputations due to high-voltage electrical injuries. The patient has a left above-elbow amputation (transhumeral) and a right below-elbow amputation (transradial). The distal ends of both stumps show active healing; the right stump exhibits significant areas of red granulation tissue and possible skin grafting sites, while the left stump shows signs of tissue repair with some visible exudate or dressing material. The anterior abdominal wall and torso display extensive depigmented and scarred patches, consistent with healed thermal or electrical flame burns covering approximately 10% of the Total Body Surface Area (TBSA). The photograph illustrates the severe musculoskeletal and dermatological consequences of electrical trauma requiring multidisciplinary surgical management, including debridement and escharectomy. This image serves as an educational resource for orthopedic surgery, plastic surgery, and burn rehabilitation units.
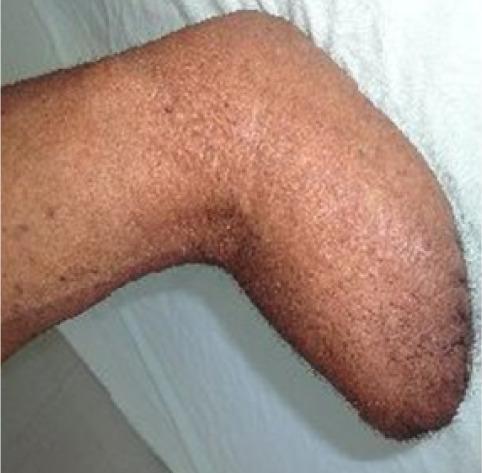
This clinical photograph displays a residual limb following a transradial (below-elbow) amputation. The stump is depicted in a flexed position, showing a healthy, well-healed surgical outcome. The residual limb exhibits a cylindrical shape with slight distal tapering and a smooth, rounded distal end, indicating appropriate soft tissue coverage and successful maturation of the stump. The skin is medium brown with a visible, slightly rough texture and distributed hair follicles. There are sporadic, small hyperpigmented macules across the surface, but no signs of inflammation, ulceration, or dehiscence at the distal end. This image serves as an educational example of a healthy, mature residual limb suitable for prosthetic fitting and weight-bearing preparation in the field of physical medicine and rehabilitation.
forearm amputation skin flap incision radius ulna bone division surgical diagram
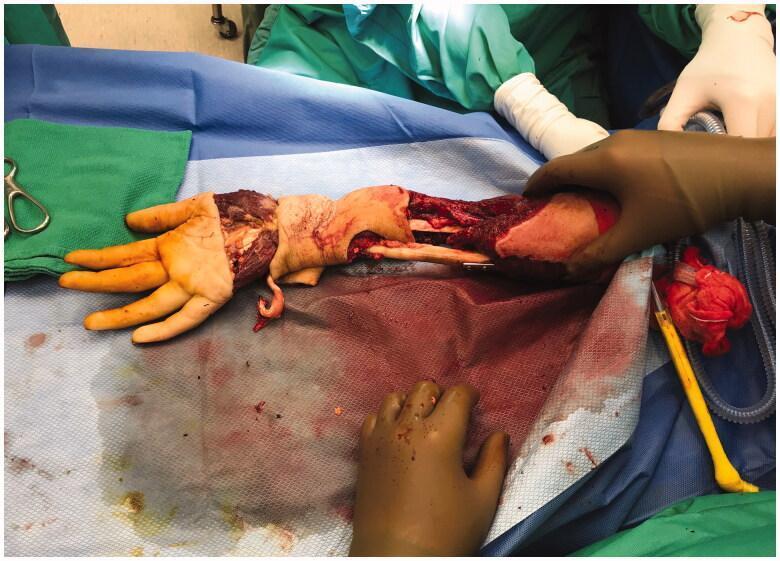
This operative photograph demonstrates the surgical 'filleting' of a right hand and forearm for the creation of a pedicled fillet flap. The image shows a transverse incision across the level of the metacarpal heads, with the soft tissue envelope (skin and subcutaneous fat) being dissected away from the underlying skeletal and deep muscular structures. Visible anatomical components include the exposed metacarpal bones, intrinsic hand musculature (interossei), and the distal radius and ulna of the forearm. A large section of the soft tissue remains connected proximally, revealing the underlying bone and deep forearm musculature. The purpose of this technique is to harvest a neurovascularly intact soft tissue flap from a non-salvageable distal extremity to provide coverage for a proximal amputation stump. The procedure highlights principles of orthopaedic oncology and reconstructive plastic surgery, specifically the use of spare parts for wound closure.
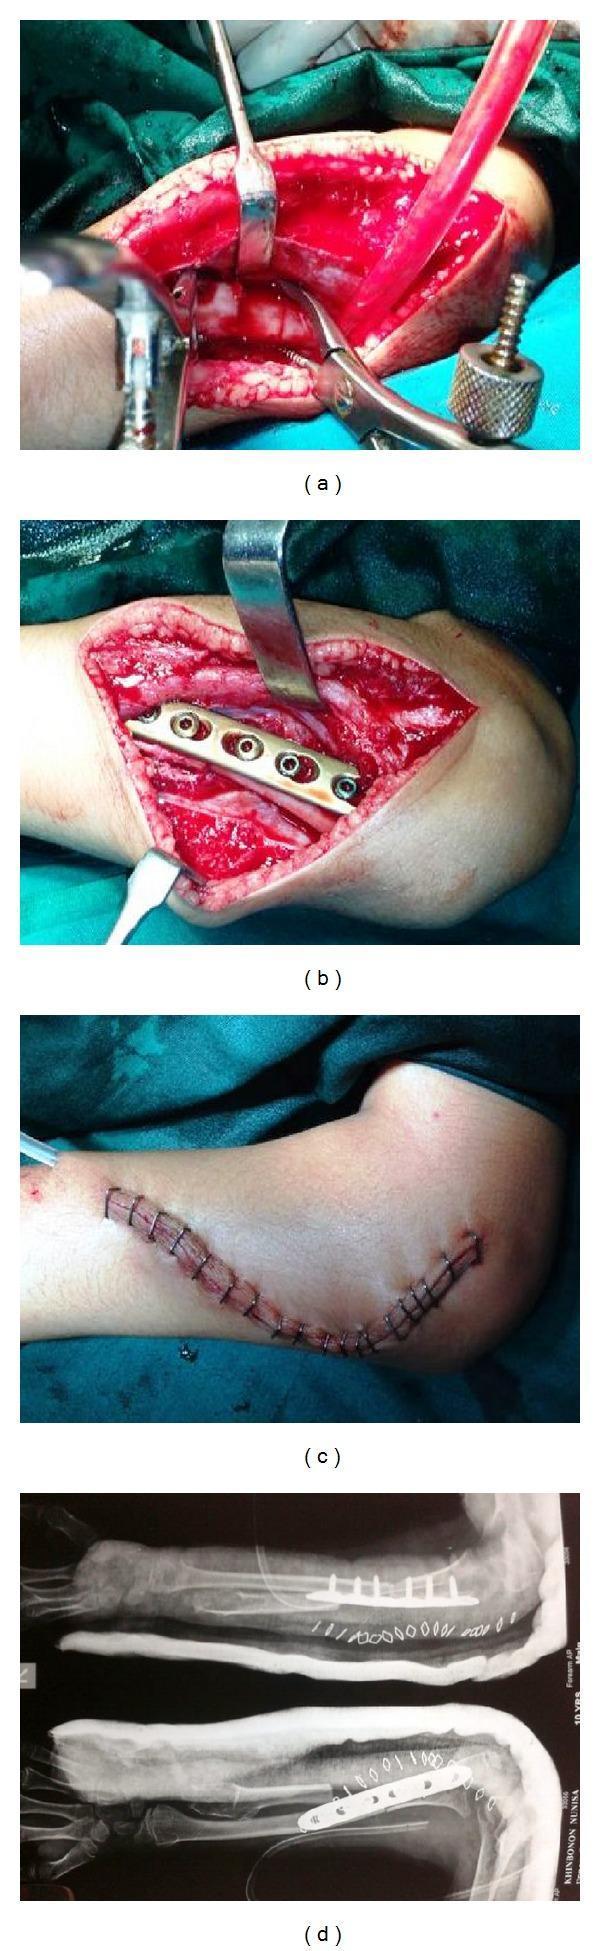
This composite educational graphic illustrates a multi-stage orthopedic surgical procedure for forearm bone reconstruction and fixation. Panel (a) shows an intraoperative clinical photograph of the surgical site with muscle retraction and use of surgical instruments to expose the radius and ulna. Panel (b) demonstrates the internal fixation phase, featuring a metallic locking compression plate secured with five screws onto a bone segment, effectively bridging a surgical osteotomy. Panel (c) shows the post-operative skin closure with a long, curvilinear incision along the dorsal-lateral forearm secured by surgical staples. Panel (d) presents postoperative anteroposterior (AP) and lateral radiographic views of the forearm. These X-rays confirm the alignment of the distal radius with the proximal ulna, showing the metallic plate and screw construct in situ. The radiographs also demonstrate the absence of the proximal radius following excision and the presence of a surgical drain. This sequence is representative of a complex reconstruction for conditions such as radial head dislocation or distal ulnar deficiency.
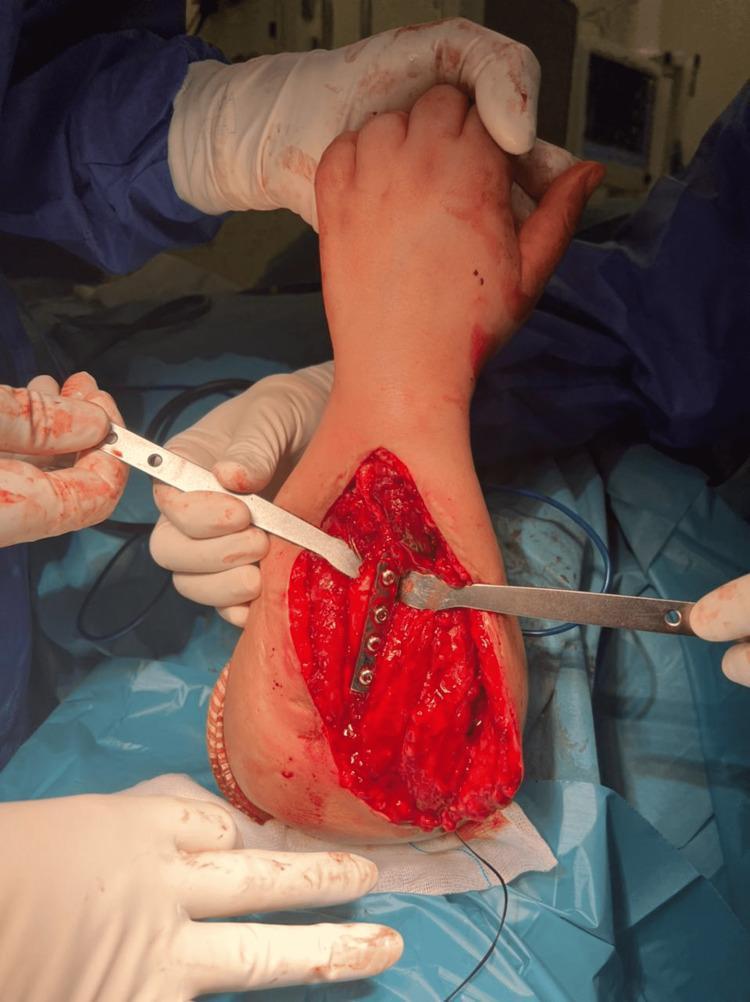
Intraoperative clinical photograph showing a single-bone forearm reconstruction. The image depicts a surgical field with an extensive longitudinal incision on the forearm. A metallic compression plate is positioned across an osteotomy site, fixating the remaining proximal ulna to the distal radius with five visible bicortical screws. The surrounding anatomy shows exposed red muscle tissue and retracted skin edges held by surgical retractors. The hand and digits are visible at the top of the frame, showing some blood staining typical of an active procedure. This visual demonstrates an osteosynthesis technique used for salvage or reconstructive procedures, such as those necessitated by hereditary multiple exostoses. The orientation shows a distal-to-proximal alignment intended to restore forearm stability and axial alignment. Blue surgical drapes and gloved hands are visible, highlighting the sterile operative environment.
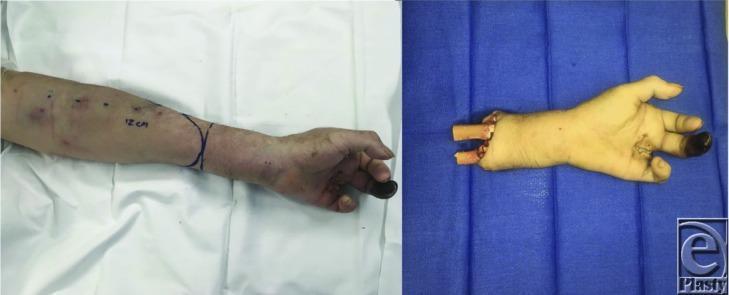
A side-by-side clinical photograph documenting surgical planning for a major upper limb amputation and the resulting specimen. The left panel shows the patient's distal forearm and hand prior to surgery. A 'fish mouth' incision line is marked in surgical ink at the mid-distal forearm, accompanied by a '12 cm' measurement. Multiple small circular markings and areas of skin mottling/discoloration are visible on the forearm, suggesting compromised vascularity. The left ring finger demonstrates clear dry gangrene with black, necrotic tissue. The right panel displays the amputated distal hand segment positioned on a blue sterile field. The specimen shows the exposed radius and ulna at the proximal resection margin. The palmar surface of the hand reveals non-healing surgical wounds and sutures at the base of the fingers, particularly near the gangrenous ring finger. This visual illustrates surgical level selection and planning in the context of peripheral vascular disease and diabetic limb complications.
Transradial Amputation - Surgical Images
Overview Diagram (Textbook)
Anatomy at the Level of Amputation (Textbook)
Surgical Planning - Clinical Photo
Intraoperative - Fillet Flap / Soft Tissue Reflection
Post-operative - Stump with VAC Dressing
Post-operative X-ray - Bone Cut
Healed Stump - Mature Residual Limb
Prosthetic Rehabilitation
Summary of Surgical Steps with Images
| Step | Action | Image |
|---|---|---|
| Pre-op | Mark fish-mouth incision at middle-distal forearm junction | Photo above |
| Step 1 | Raise equal anterior + posterior skin flaps | Diagram (Fig 20.3A) |
| Step 2 | Reflect flaps; expose and ligate radial & ulnar arteries | Diagram (Fig 20.3B) |
| Step 3 | Divide median, ulnar, radial nerves under traction | Cross-section diagram |
| Step 4 | Divide muscles; myoplastic closure between radius & ulna | Diagram |
| Step 5 | Divide radius & ulna transversely; rasp edges smooth | X-ray above |
| Step 6 | Close fascia + skin; insert suction drain | Diagram (Fig 20.3C) |
| Post-op | VAC dressing or rigid cast; early prosthetic fitting | VAC photo; healed stump |
Instruments?
surgical instruments amputation set scalpel bone saw retractor forceps
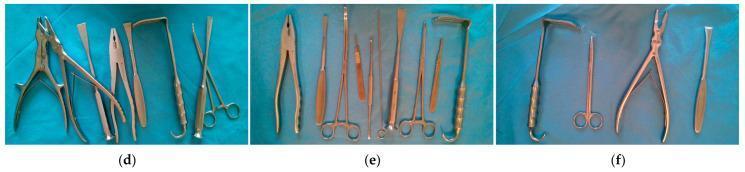
A series of three intraoperative clinical photographs (d, e, f) demonstrating various orthopedic surgical instruments arranged on a sterile blue drape to illustrate spatial configurations for medical object recognition systems. Image (d) displays a set of instruments, including bone forceps, tissue forceps, surgical clamps, and a periosteal elevator, arranged in a crossed and overlapping manner. Image (e) illustrates a densely packed but non-overlapping arrangement of tools such as multiple forceps types, surgical scissors, a thyroid retractor, and a scalpel handle. Image (f) shows a sparse, non-overlapping configuration featuring a thyroid retractor, surgical scissors, bone forceps, and a spreader. The collection highlights key morphological features of common surgical tools, emphasizing differences in head shapes, sizes (e.g., vascular forceps), and handle types used in basic orthopedic procedures. These images serve as educational examples for surgical tray organization and the development of automated instrument counting and identification algorithms in a clinical setting.
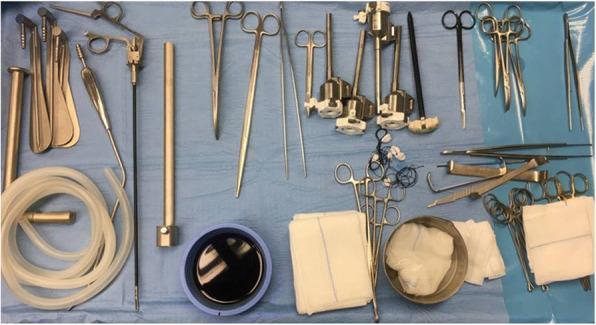
This intraoperative clinical photograph displays a comprehensive instrumentation set organized on a sterile blue drape, prepared for a thyroidectomy or a similar head and neck surgical procedure. The set combines traditional open surgical tools with specialized endoscopic equipment. Key categories of instruments visible include: (1) Dissection and Cutting: Metzenbaum scissors (short and long), a scalpel handle, and monopolar electrocautery with a long tip extension. (2) Grasping and Clamping: Various forceps including DeBakey atraumatic forceps (short and long), Klemmer tissue forceps, and Johann forceps. (3) Retraction: Farabeuf and Langenbeck wound retractors alongside a specialized modified thyroidectomy retractor (Modena retractor) designed for specific working space maintenance. (4) Minimally Invasive/Endoscopic Tools: A 30° endoscopic camera, multiple trocars, a vessel sealing device for hemostasis, and an endoscopic suction/irrigation assembly with flexible tubing. (5) Miscellaneous: Sterile gauze pads and a basin containing surgical solution. This image serves as an educational reference for perioperative nursing and surgical preparation for combined open and endoscopic neck surgery.
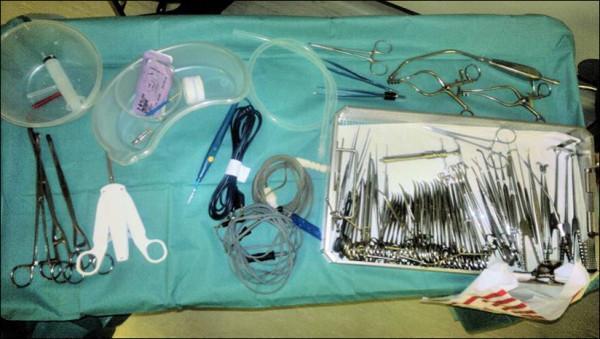
This intraoperative clinical photograph displays a surgical instrument setup on a Mayo stand draped in green sterile fabric, prepared for a thyroid or neck procedure. On the left, a circular basin contains a syringe and needles, while a kidney dish holds gauze and packaged scalpel blades. Below these, long vascular forceps and a three-pronged white self-retaining retractor are visible. The center area contains coiled electrosurgical cords, a blue bovie pen, and suction tubing. The right side features a large, rectangular tray densely packed with specialized surgical tools, including Macindoe scissors, dissection clips, various fine-tipped forceps, and clamps. Additional instruments outside the tray on the upper right include hinged retractors and slender grasping tools. The arrangement illustrates standard operating room protocol for sharp safety, using kidney dishes for transfer and organized trays for instrument management. This visual serves as an educational resource for surgical technology, perioperative nursing, and surgical residency training, emphasizing the organization and nomenclature of head and neck surgical instrumentation.
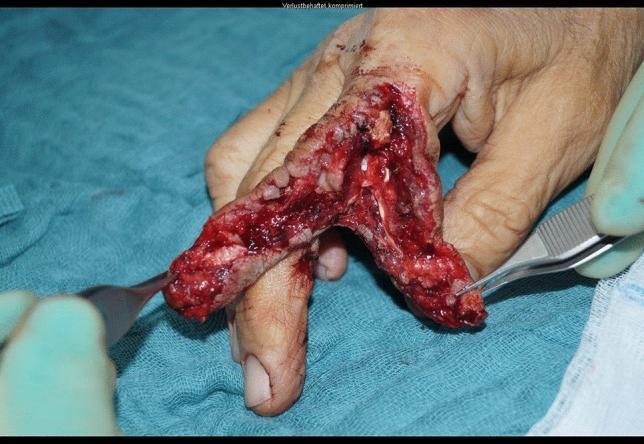
Clinical photograph of a severe traumatic injury to the index finger of a 69-year-old patient, following a circular saw accident. The image shows an extensive, longitudinal open wound and partial amputation involving the middle (P2) and distal (P3) phalanges. There is significant destruction and loss of skin, subcutaneous tissue, and deeper structures. The wound exhibits irregular, macerated edges with visible exposure of bone fragments and likely tendon or neurovascular damage. Surgical forceps and a retractor are shown manipulating the tissues to assess the extent of the damage during primary soft tissue management. The surrounding skin of the hand appears relatively intact, although localized ecchymosis and active hemorrhage are present within the injury site. This visual illustrates a high-energy hand trauma scenario that necessitates complex surgical intervention, ultimately resulting in proximal interphalangeal (PIP) joint exarticulation and stump formation.
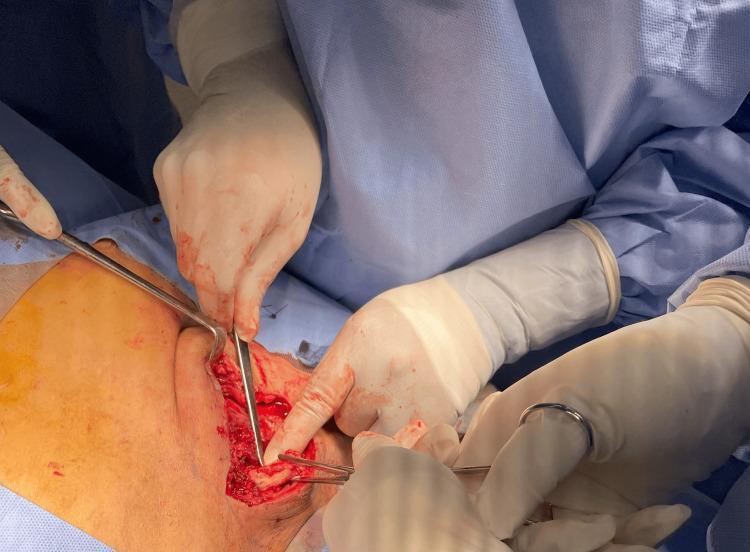
This clinical photograph shows an intraoperative view of a surgical procedure involving the right sternoclavicular joint (SCJ). The image captures an open anterior clavicle approach with exposed deep tissue and bone. Two Kocher forceps are utilized to mark and grasp the medial clavicle in preparation for resection. Additional surgical instruments, including a metal retractor and a scalpel handle, are visible within the operative field, which exhibits significant hemorrhagic staining and disrupted soft tissue consistent with active debridement for septic arthritis. The surgical team is seen wearing sterile blue gowns and light-colored surgical gloves with visible blood staining. This visual serves as an educational example of orthopedic surgical management for SCJ infection, specifically demonstrating the marking of the resection length on the medial clavicle. The image illustrates the anatomical relationship of the medial clavicle to the surrounding anterior chest wall musculature and the depth of the surgical field required for effective joint irrigation and debridement.
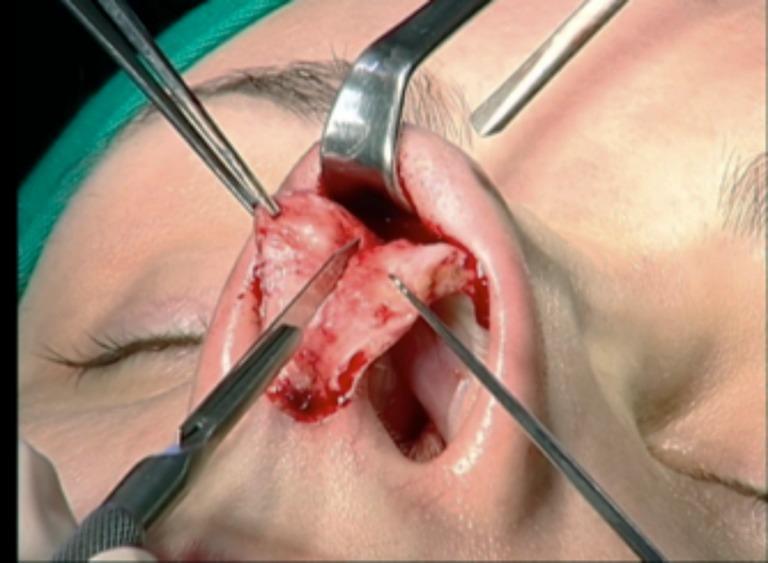
This clinical photograph captures a close-up of an open rhinoplasty procedure focusing on the exposure of the nasal septum. The surgical field demonstrates the elevation of the mucoperichondrial flap from the underlying septal cartilage, creating a sub-mucoperichondrial plane. The septum appears as a central, whitish-pink structure composed of smooth cartilage and more rigid posterior bone. Several surgical instruments are in use: a retractor is positioned superiorly to provide exposure of the osteocartilaginous dorsum, forceps are holding soft tissue edges, and a scalpel is performing a precise incision or dissection along the septal cartilage. A sharp elevator or probe is also visible, assisting in tissue manipulation. Hemorrhagic spots are present throughout the field, typical of active dissection. This image illustrates a critical stage in septal surgery, necessary for correcting deviations or harvesting graft material, such as spreader grafts, to improve the internal nasal valve and airway patency.
amputation knife Gigli saw bone rasp surgical tourniquet
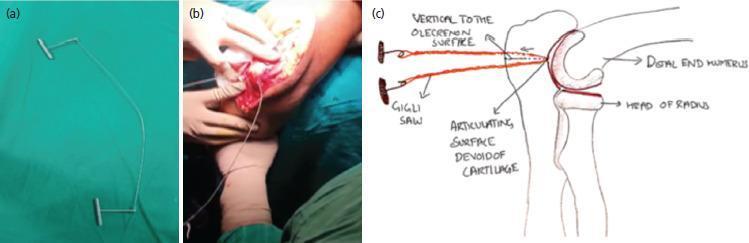
This composite image illustrates the surgical use of a Gigli saw for performing an olecranon osteotomy. Panel (a) is a photograph of the instrument itself, showing a flexible, twisted wire cable made of high-tensile stainless steel, attached to two T-shaped handles designed for a two-handed to-and-fro cutting motion. Panel (b) provides an intra-operative clinical photograph showing the surgical field of the elbow. A surgeon’s gloved hands are visible manipulating the Gigli saw, which has been passed through the soft tissue to interface with the bone. The operative area shows exposed muscle and bone with appropriate surgical retraction. Panel (c) is a labeled anatomical diagram depicting the path of the saw in relation to the distal humerus, the head of the radius, and the semilunar notch of the olecranon. The diagram highlights the 'inside-out' technique, where the saw is positioned against the articulating surface of the sigmoid notch (devoid of cartilage) and moved vertically to the surface of the olecranon to create a clean, linear osteotomy for joint exposure during distal humerus fracture fixation.
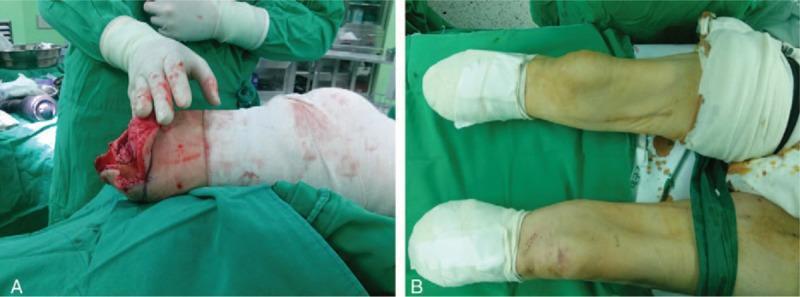
Clinical photograph in two panels (A and B) demonstrating a bilateral transtibial (below-knee) amputation procedure in a surgical setting. Panel A shows an intraoperative view of the right lower extremity during the amputation process. Visible features include exposed muscle, bone, and vascular tissues at the distal stump, with blood-stained surgical drapes and a gloved surgeon's hand stabilizing the limb. Panel B illustrates the postoperative result for both the left and right legs. Both stumps are now surgically closed and encased in clean, white pressure dressings. A green pneumatic tourniquet or Esmarch bandage is visible on the upper thigh of one limb to maintain hemostasis. Both images show the patient positioned on a green sterile surgical drape. The content illustrates the progression from an active surgical resection to the final stabilized postoperative state of bilateral residual limbs, relevant for surgical education, anesthesia management (CFSNBs), and perioperative care training.
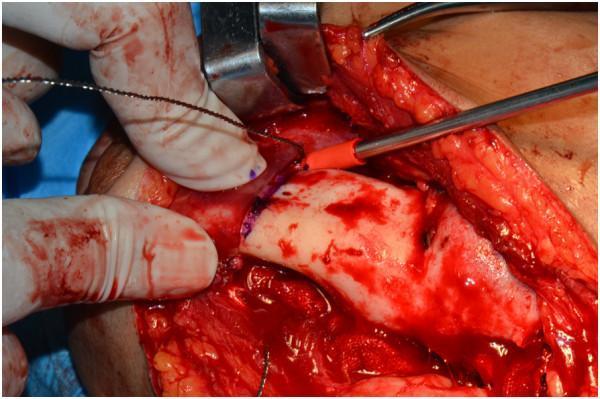
This clinical photograph captures an intraoperative view of a mandibular osteotomy procedure, a critical step in maxillofacial reconstruction or tumor resection (e.g., for ameloblastoma). The surgical field shows the exposed mandible with distinct purple ink markings on the cortical bone surface, indicating the planned osteotomy line derived from a preoperative rapid prototyping (RP) template. A surgical Gigli saw is visible on the left, positioned to initiate the bone cut along the marked path. An orange-tipped surgical instrument is also seen being applied to the inferior border of the mandible to assist in stabilization or guidance. The surrounding soft tissue is retracted, showing the submandibular surgical approach and the blood-stained operative site. This image demonstrates the clinical application of computer-aided surgical planning and template-guided osteotomy to ensure high precision in mandibular resection, facilitating accurate subsequent reconstruction with bone grafts.
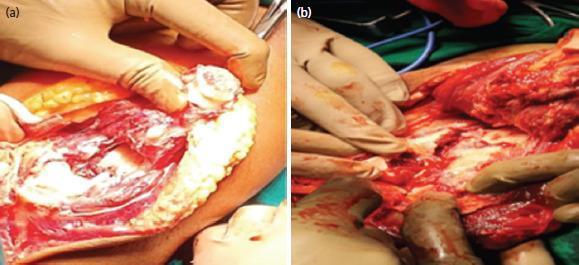
Two intra-operative clinical photographs demonstrating a surgical exposure of the distal humerus via an olecranon osteotomy using a Gigli saw. Panel (a) shows the immediate post-osteotomy state where the proximal olecranon fragment and the triceps extensor mechanism have been retracted to reveal the whitish-yellow articular surface of the distal humerus. The surgical field displays exposed reddish muscular tissue and yellow subcutaneous adipose tissue. Panel (b) illustrates the active manipulation and further dissection of the humerus for fracture visualization. Gloved hands are seen retracting the soft tissues and mobilizing the bone fragments. The images highlight a posterior approach to the elbow joint, a common technique for managing complex intra-articular distal humerus fractures to achieve anatomical reduction of the articular surface. The surgical field is moist and contains moderate blood typical of orthopedic procedures involving significant bone and soft tissue exposure.
oscillating bone saw periosteal elevator artery forceps ligation suture
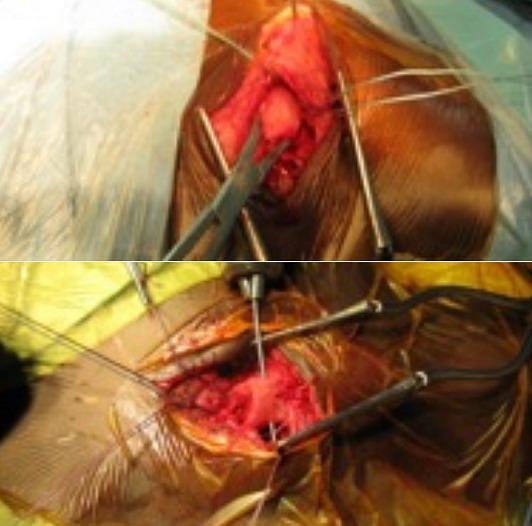
This composite clinical photograph displays two sequential stages of an osteo-periosteal suture procedure during orthopedic surgery, specifically focusing on the medial clavicle. The top panel illustrates fracture reduction using Jayle's forceps to manipulate and realign the bone fragments within an open surgical field. Retractors are positioned to provide visualization of the red, vascularized periosteal tissue and underlying bone. The bottom panel demonstrates the next stage: bone perforation using a drill bit held in a Jacobs chuck. This step facilitates the passage of non-resorbable sutures for final fixation. Multiple surgical retractors, stay sutures, and sterile adhesive drapes are visible throughout the intraoperative site. The image serves as a teaching tool for surgical techniques in managing sternoclavicular joint injuries or clavicular epiphysiolysis, highlighting the transition from anatomical reduction to mechanical preparation for internal fixation.
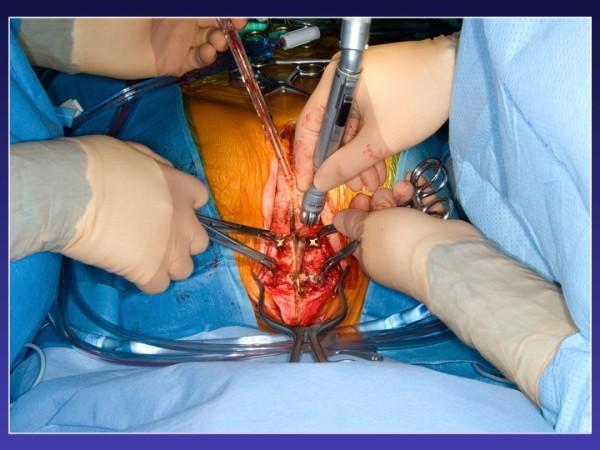
This clinical photograph captures an intraoperative view of a redo median sternotomy in a patient with previous sternal reconstruction. The surgical field demonstrates the use of an oscillating saw to perform a midline osteotomy through the sternal bone. A key feature of this procedure is the management of pre-existing horizontal titanium fixation plates. These plates, which were used for prior sternal wound reconstruction, have been cut at the midline; surgical forceps are being used to pull the plate edges upward and outward. This maneuver facilitates safer re-entry by increasing visualization and space between the oscillating saw and the underlying mediastinal structures. The surrounding surgical site is prepped with iodine-based solution and framed by sterile blue drapes. Visible instrumentation includes the oscillating saw, multiple surgical clamps/forceps for retraction, and suction tubing for fluid management. This image illustrates advanced cardiothoracic surgical techniques for managing complex sternal re-operations in the context of prior deep sternal wound infection (DSWI) and hardware fixation.
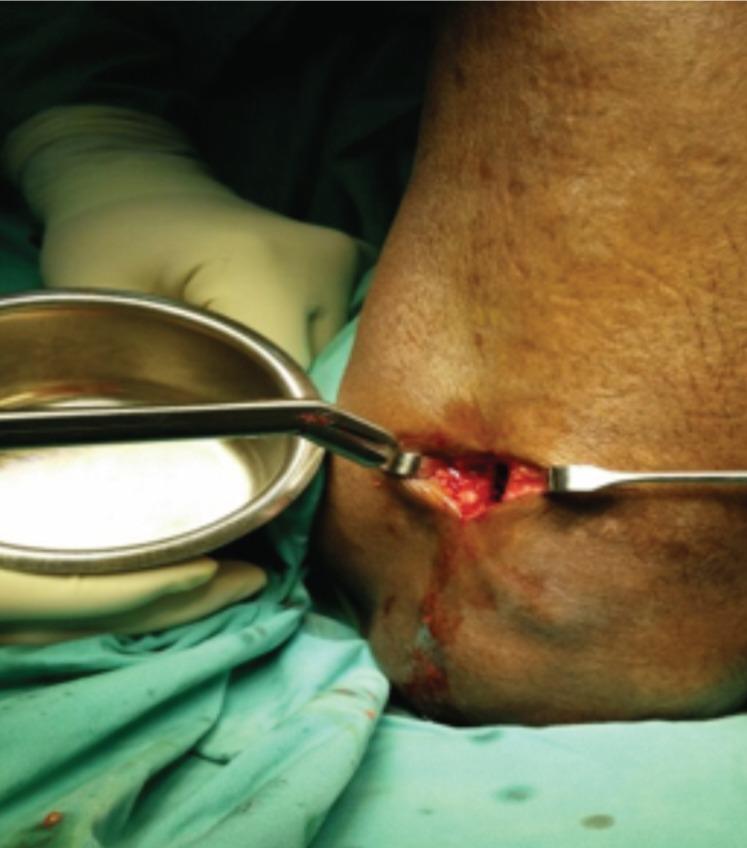
Clinical photograph illustrating an intraoperative stage of a proximal tibial bone graft harvest. The image shows a small, rectangular surgical incision on the medial aspect of the proximal tibia, approximately 2 cm below the tibial tuberosity. Within the open wound, the cortical bone window and cancellous bone are visible, with minor localized bleeding at the wound edges. A right-angled pituitary forceps is inserted into the osteotomy site to retrieve cancellous bone fragments. A periosteal elevator is positioned at the superior margin of the incision to maintain exposure. A sterile stainless steel bowl is held adjacent to the site by a gloved assistant to receive the harvested graft material. The procedure is performed under sterile conditions, indicated by green surgical drapes and latex-free surgical gloves. This visual demonstrates the medial approach for harvesting autologous bone graft from the tibia, highlighting relevant surgical instruments and anatomical landmarks for orthopedic surgery education.
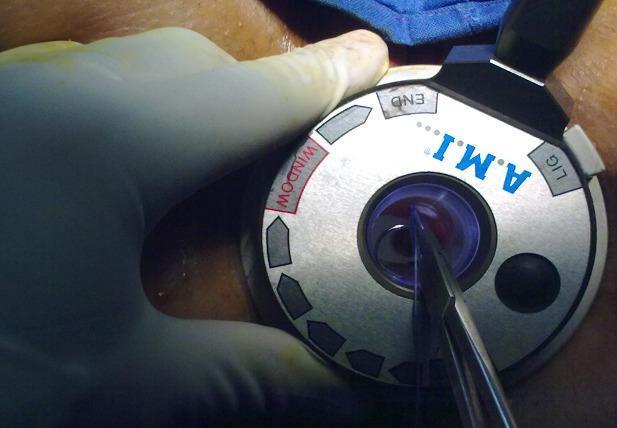
This intraoperative clinical photograph captures a Doppler-guided hemorrhoidal artery ligation (DGHAL) procedure. The primary focus is a specialized circular, silver-colored anoscope head held by a gloved hand. The device is labeled with 'A.M.I.' in blue, alongside functional markings such as 'WINDOW' in red, 'END', and 'LIG'. These indicators assist the surgeon in orienting the side window for precise arterial targeting. Through the central aperture, surgical forceps are visible manipulating a blue absorbable suture needle into the rectal mucosa. This illustrates the ligation phase of treating symptomatic hemorrhoids, where Doppler ultrasound transducers within the anoscope wall first identify arterial signals, allowing for targeted devascularization and mucopexy. The image serves as a high-fidelity educational tool for colorectal surgeons and residents, demonstrating the use of specialized proctological equipment in minimally invasive surgical interventions.
Instruments for Below Elbow Amputation Surgery
1. General Surgical Instrument Set
Instruments Listed by Surgical Step
🩹 STEP 1 - Skin Incision & Flap Raising
| Instrument | Purpose |
|---|---|
| Scalpel (No. 15 or No. 22 blade) | Circumferential skin incision for anterior/posterior flaps |
| Skin hooks / tissue forceps | Holding and retracting skin flaps |
| Metzenbaum scissors | Undermining and raising skin/subcutaneous flaps |
| Electrocautery (Bovie) | Haemostasis during skin and subcutaneous dissection |
| Surgical marking pen | Marking flap lines before incision |
🩸 STEP 2 - Vascular Control (Radial & Ulnar Arteries)
| Instrument | Purpose |
|---|---|
| Artery forceps / haemostats (Mosquito, Kelly) | Clamping radial and ulnar arteries before ligation |
| Right-angle (Mixter) clamp | Passing ligature around vessels |
| Needle holder + non-absorbable suture (e.g., 2-0 silk) | Double ligature of radial and ulnar arteries |
| Electrocautery | Controlling smaller vessels |
🧠 STEP 3 - Nerve Division (Median, Ulnar, Radial)
| Instrument | Purpose |
|---|---|
| Tissue forceps (DeBakey / Adson) | Gentle handling of nerves |
| Sharp scissors / scalpel | Clean nerve transection under traction |
| Nerve hook | Identifying and drawing nerve distally before transection |
💪 STEP 4 - Muscle Division & Myoplasty
| Instrument | Purpose |
|---|---|
| Scalpel / heavy scissors | Transverse division of muscle bellies |
| Electrocautery | Haemostasis through muscle |
| Periosteal elevator | Clearing periosteum from radius & ulna before division |
| Self-retaining retractor (Weitlaner) | Maintaining exposure of deep structures |
🦴 STEP 5 - Bone Division (Radius & Ulna)
| Instrument | Purpose |
|---|---|
| Oscillating power saw | Most common - clean transverse cut of radius and ulna |
| Gigli saw (pictured above) | Flexible wire saw; used when power saw not available; passed around bone for to-and-fro cutting |
| Amputation knife (long blade) | Division of remaining soft tissue around bones |
| Periosteal elevator | Strips periosteum 1-2 cm proximal to cut line |
| Bone rasp / file | Smoothing sharp bone edges after transection |
| Bone rongeur | Removing any bony spicules |
| Retractor (Langenbeck / ribbon) | Protecting soft tissues during bone cutting |
🩺 STEP 6 - Haemostasis & Wound Closure
| Instrument | Purpose |
|---|---|
| Suction drain (Redivac / Jackson-Pratt) | Inserted deep to fascia to prevent haematoma |
| Needle holder | Holding suture needle for closure |
| Absorbable suture (Vicryl 2-0) | Deep fascia closure |
| Non-absorbable suture (Nylon 3-0) | Interrupted skin closure |
| Tissue forceps (toothed / Adson) | Handling skin edges during closure |
| Scissors (straight, stitch scissors) | Cutting sutures |
🩸 Haemostasis / Tourniquet
| Instrument | Purpose |
|---|---|
| Pneumatic tourniquet | Applied to upper arm before incision; maintains bloodless field; released before final closure to check haemostasis |
| Esmarch bandage | Exsanguinates limb before tourniquet inflation |
Complete Instrument Checklist Summary
| Category | Instruments |
|---|---|
| Cutting | Scalpel (No.15 / No.22), Amputation knife, Metzenbaum scissors, Oscillating saw, Gigli saw |
| Bone work | Periosteal elevator, Bone rasp/file, Bone rongeur |
| Haemostasis | Electrocautery (Bovie), Artery forceps, Mosquito clamps, Kelly clamps, Tourniquet + Esmarch bandage |
| Vascular ligation | Right-angle (Mixter) clamp, Needle holder, Non-absorbable suture (silk 2-0) |
| Nerve handling | Nerve hook, DeBakey forceps, Sharp scissors |
| Retraction | Langenbeck retractors, Weitlaner self-retaining retractor, Ribbon retractor |
| Closure | Needle holder, Vicryl 2-0, Nylon 3-0, Adson forceps, Suction drain |
| Marking | Surgical pen, Ruler |
Can u create pdf for me?
- Surgical steps
- Instruments checklist
- Key anatomy
- Surgical diagrams and images
- Postoperative care and complications
I want a general Surgery handbook for me
Suggested handbook sections
- Surgical basics: asepsis, consent, fluids, nutrition, wound healing, drains, sutures, perioperative care
- Emergency surgery: shock, trauma principles, acute abdomen, bowel obstruction, perforation, GI bleeding
- Common abdominal operations: appendicectomy, hernia repair, cholecystectomy, laparotomy, bowel resection
- Gastrointestinal conditions: oesophagus, stomach, small bowel, colon, rectum, anus
- Hepatobiliary and pancreas: jaundice, gallstones, pancreatitis, liver lesions
- Breast and endocrine surgery: breast lumps, thyroid, parathyroid, adrenal basics
- Vascular and amputations: acute limb ischaemia, varicose veins, diabetic foot, amputation principles
- Skin, soft tissue, and burns: abscess, ulcers, skin grafting, wound infection, burns
- Practical procedures: catheterization, nasogastric tube, chest drain, suturing, incision and drainage, tracheostomy overview
- Operation theatre section: instruments, common suture materials, positioning, surgical safety checklist, postoperative complications
All 4 in pdf
- Student exam handbook
- Intern/resident ward handbook
- Operation theatre procedure handbook
Create one combined PDF with all four handbook sections
No generations found in stream.
We encountered an error while processing your request. Please try again or reach out to us for help.
?
Yes make a pdf
~/
mkdir -p "/tmp/workspace/general-surgery-handbook/src" "/tmp/workspace/general-surgery-handbook/output" && printf '%s\n' 'Workspace prepared'
~/general-surgery-handbook
~/general-surgery-handbook/src/create_handbook.py
from reportlab.lib import colors
from reportlab.lib.enums import TA_CENTER
from reportlab.lib.pagesizes import A4
from reportlab.lib.styles import getSampleStyleSheet, ParagraphStyle
from reportlab.lib.units import cm
from reportlab.platypus import SimpleDocTemplate, Paragraph, Spacer, PageBreak, Table, TableStyle, KeepTogether
from reportlab.pdfbase.ttfonts import TTFont
from reportlab.pdfbase import pdfmetrics
from reportlab.lib.colors import HexColor
OUT = '/tmp/workspace/general-surgery-handbook/output/General_Surgery_Handbook.pdf'
PAGE_W, PAGE_H = A4
NAVY = HexColor('#16324F')
TEAL = HexColor('#087E8B')
GOLD = HexColor('#D69E2E')
PALE = HexColor('#EAF4F6')
DARK = HexColor('#202833')
MUTED = HexColor('#5B6770')
styles = getSampleStyleSheet()
styles.add(ParagraphStyle(name='CoverTitle', parent=styles['Title'], fontName='Helvetica-Bold', fontSize=28, leading=34, textColor=NAVY, alignment=TA_CENTER, spaceAfter=12))
styles.add(ParagraphStyle(name='CoverSub', parent=styles['Normal'], fontName='Helvetica', fontSize=13, leading=19, textColor=MUTED, alignment=TA_CENTER))
styles.add(ParagraphStyle(name='H1x', parent=styles['Heading1'], fontName='Helvetica-Bold', fontSize=19, leading=24, textColor=NAVY, spaceBefore=7, spaceAfter=11))
styles.add(ParagraphStyle(name='H2x', parent=styles['Heading2'], fontName='Helvetica-Bold', fontSize=13, leading=17, textColor=TEAL, spaceBefore=9, spaceAfter=6))
styles.add(ParagraphStyle(name='Bodyx', parent=styles['BodyText'], fontName='Helvetica', fontSize=9.5, leading=14, textColor=DARK, spaceAfter=5))
styles.add(ParagraphStyle(name='Smallx', parent=styles['BodyText'], fontName='Helvetica', fontSize=8, leading=11, textColor=DARK))
styles.add(ParagraphStyle(name='Boxx', parent=styles['BodyText'], fontName='Helvetica-Bold', fontSize=9.2, leading=13, textColor=NAVY))
styles.add(ParagraphStyle(name='TOCx', parent=styles['BodyText'], fontName='Helvetica', fontSize=10, leading=18, textColor=DARK))
def P(text, style='Bodyx'):
return Paragraph(text, styles[style])
def bullet(items):
return [P('• ' + x) for x in items]
def table(headers, rows, widths=None):
data = [[P(h, 'Smallx') for h in headers]] + [[P(c, 'Smallx') for c in row] for row in rows]
t = Table(data, colWidths=widths, repeatRows=1, hAlign='LEFT')
t.setStyle(TableStyle([
('BACKGROUND',(0,0),(-1,0),NAVY), ('TEXTCOLOR',(0,0),(-1,0),colors.white),
('FONTNAME',(0,0),(-1,0),'Helvetica-Bold'), ('VALIGN',(0,0),(-1,-1),'TOP'),
('GRID',(0,0),(-1,-1),0.35,HexColor('#B8C6D0')), ('ROWBACKGROUNDS',(0,1),(-1,-1),[colors.white, PALE]),
('LEFTPADDING',(0,0),(-1,-1),6), ('RIGHTPADDING',(0,0),(-1,-1),6),
('TOPPADDING',(0,0),(-1,-1),5), ('BOTTOMPADDING',(0,0),(-1,-1),5),
]))
return t
def callout(title, text):
t=Table([[P(title + '<br/>' + text, 'Boxx')]], colWidths=[17.2*cm])
t.setStyle(TableStyle([('BACKGROUND',(0,0),(-1,-1),PALE),('BOX',(0,0),(-1,-1),0.8,TEAL),('LEFTPADDING',(0,0),(-1,-1),9),('RIGHTPADDING',(0,0),(-1,-1),9),('TOPPADDING',(0,0),(-1,-1),7),('BOTTOMPADDING',(0,0),(-1,-1),7)]))
return t
def section(title, intro=None):
flow.append(P(title, 'H1x'))
if intro: flow.append(P(intro))
def footer(canvas, doc):
canvas.saveState()
canvas.setStrokeColor(HexColor('#B8C6D0')); canvas.setLineWidth(.4)
canvas.line(1.55*cm, 1.25*cm, PAGE_W-1.55*cm, 1.25*cm)
canvas.setFont('Helvetica', 8); canvas.setFillColor(MUTED)
canvas.drawString(1.55*cm, .82*cm, 'General Surgery Handbook | Educational quick reference')
canvas.drawRightString(PAGE_W-1.55*cm, .82*cm, f'Page {doc.page}')
canvas.restoreState()
flow=[]
# Cover
flow += [Spacer(1, 4.2*cm), P('GENERAL SURGERY<br/>HANDBOOK', 'CoverTitle'), P('Combined student, ward, emergency, and operating theatre quick reference', 'CoverSub'), Spacer(1, .7*cm), callout('Purpose', 'A concise bedside and theatre reference for learners. It supports, but never replaces, senior supervision, local protocols, institutional formularies, and operative training.'), Spacer(1, 1*cm), P('Prepared September 2026', 'CoverSub'), PageBreak()]
section('How to use this handbook')
flow += bullet([
'<b>For exams:</b> use the structured differentials, definitions, and key management principles.',
'<b>On the ward:</b> begin with assessment, observations, fluid balance, drug chart, imaging, and escalation.',
'<b>In emergencies:</b> stabilize first. Apply ABCDE, gain access, obtain bloods, give appropriate resuscitation, involve seniors early, and source-control sepsis promptly.',
'<b>In theatre:</b> use the instrument and safety checklists. Procedures must be undertaken only by trained clinicians with appropriate supervision.'
])
flow.append(callout('Safety note', 'This handbook deliberately does not provide patient-specific prescriptions or substitute for protocols. Doses, antimicrobial choice, thromboprophylaxis, transfusion thresholds, imaging pathways, and consent standards must follow your hospital policy.'))
flow.append(P('Contents', 'H2x'))
contents=[
'1. Student exam handbook: foundations, acute abdomen, common surgical conditions',
'2. Intern/resident ward handbook: perioperative care, fluids, drains, escalation',
'3. Emergency surgery handbook: shock, trauma, sepsis, acute surgical presentations',
'4. Operating theatre procedure handbook: safety, instruments, sutures, core procedures',
'Appendices: checklists, common labs, postoperative complications, references'
]
for x in contents: flow.append(P(x, 'TOCx'))
flow.append(PageBreak())
# Section 1
section('1. Student exam handbook', 'High-yield frameworks for history, examination, investigation, and initial management.')
flow.append(P('The universal surgical answer structure', 'H2x'))
flow += bullet(['Assess <b>severity and stability</b> first: ABCDE, pain score, sepsis screen, urine output.', 'Clarify <b>time course</b>, site and radiation of pain, vomiting, bowel and urinary symptoms, bleeding, fever, weight loss, comorbidity, medications and prior operations.', 'Examine generally, then abdomen, groins, hernial orifices, rectum or stoma when indicated, and relevant peripheral vascular status.', 'Investigate purposefully: FBC, electrolytes/renal function, liver tests, CRP, coagulation screen, blood group and save, urinalysis, pregnancy test when relevant, ECG, imaging.', 'State a <b>working diagnosis</b>, differentials, resuscitation plan, definitive test, and need for senior/specialty input.'])
flow.append(P('Surgical principles', 'H2x'))
flow.append(table(['Topic','Key points'],[
['Asepsis','Hand hygiene, sterile field, skin preparation, timely prophylactic antibiotics when indicated, glycaemic and temperature control.'],
['Wound healing','Inflammation, proliferation, remodelling. Impaired by infection, ischaemia, diabetes, malnutrition, smoking, steroids and tension.'],
['Consent','Capacity, indication, benefits, material risks, alternatives including no treatment, and opportunity for questions. Document clearly.'],
['Nutrition','Screen early. Malnutrition raises infection and wound complication risk. Use enteral feeding when feasible; obtain dietetic input.'],
['VTE prevention','Assess thrombosis and bleeding risks on admission, after surgery, and on change of condition. Mobilize early and follow local prophylaxis policy.']
],[3.2*cm,14*cm]))
flow.append(P('Acute abdomen: high-yield differential', 'H2x'))
flow.append(table(['Pattern','Important causes','Immediate focus'],[
['Sudden severe pain','Perforation, mesenteric ischaemia, ruptured AAA, ectopic pregnancy, torsion','ABCDE, analgesia, lactate, urgent imaging and senior review.'],
['Colicky pain + vomiting','Small-bowel obstruction, biliary/renal colic','Assess dehydration, strangulation signs, imaging and decompression when indicated.'],
['Right iliac fossa pain','Appendicitis, ileitis, ovarian pathology, ectopic pregnancy','Pregnancy test where relevant, urinalysis, imaging guided by setting.'],
['Right upper quadrant pain','Biliary colic, cholecystitis, cholangitis, hepatitis','Look for fever/jaundice. Ultrasound and liver tests.'],
['Left lower quadrant pain','Diverticulitis, colitis, ureteric stone','Assess for complicated disease, sepsis and obstruction.'],
['Generalized peritonism','Perforation, ischaemia, severe pancreatitis, peritonitis','Resuscitate and obtain urgent surgical input.']
],[3.2*cm,7*cm,7*cm]))
flow.append(callout('Do not miss', 'Pain out of proportion to examination may suggest mesenteric ischaemia. Fever, jaundice and RUQ pain suggests biliary sepsis. Hypotension with abdominal/back pain in an older patient requires consideration of ruptured aneurysm.'))
flow.append(PageBreak())
section('Common general surgical conditions')
for h, items in [
('Appendicitis',['Typical migration of pain to RIF with anorexia, nausea and localized tenderness is suggestive but not universal.', 'Use clinical assessment plus bloods and imaging according to local pathway. Treat sepsis, provide analgesia and involve surgery.']),
('Bowel obstruction',['Think adhesions, hernia, malignancy, volvulus, inflammatory stricture. Ask about prior operations and hernias.', 'Red flags for strangulation: continuous severe pain, peritonism, tachycardia, fever, rising lactate, leucocytosis, metabolic acidosis.']),
('Hernia',['Assess reducibility, obstructive symptoms and skin changes. An irreducible tender hernia with obstruction or systemic features is a surgical emergency.', 'Elective repair decisions depend on type, symptoms, patient fitness and recurrence risk.']),
('Gallstone disease',['Biliary colic causes episodic postprandial RUQ/epigastric pain. Cholecystitis is persistent pain with local inflammation.', 'Cholangitis is biliary sepsis: urgent antibiotics, resuscitation and biliary drainage pathway when indicated.']),
('Acute pancreatitis',['Confirm with compatible pain and elevated pancreatic enzymes, then establish aetiology such as gallstones, alcohol, medicines or hypertriglyceridaemia.', 'Early fluids, analgesia, oxygen if needed, severity assessment, and management of complications. Antibiotics are not routine for uncomplicated disease.']),
('Diverticular disease',['Uncomplicated acute diverticulitis is commonly managed non-operatively. Complicated disease includes abscess, obstruction, fistula, perforation or generalized peritonitis.', 'CT is useful in many settings for diagnosis and complication assessment.']),
('Breast lump',['Triple assessment: clinical examination, imaging and tissue diagnosis when appropriate.', 'Treat a new persistent breast lump, nipple change, bloody discharge, or skin tethering as needing formal assessment.']),
('Thyroid nodule',['Assess compressive symptoms, thyroid function and ultrasound risk features. Tissue sampling is guided by imaging and local criteria.', 'Stridor, rapidly enlarging neck mass, or airway concern needs urgent senior review.'])
]:
flow.append(P(h, 'H2x')); flow += bullet(items)
flow.append(PageBreak())
# Section 2
section('2. Intern/resident ward handbook', 'Practical daily review, perioperative care, and when to escalate.')
flow.append(P('Daily surgical review: a reliable sequence', 'H2x'))
flow.append(table(['Domain','Questions / actions'],[
['Observations','Trend temperature, pulse, BP, respiratory rate, oxygen requirement, mental state, pain score and early-warning score.'],
['Inputs/outputs','Review oral/IV intake, urine output, drains, stoma output, NG output, vomiting and fluid balance.'],
['Wound and abdomen','Inspect dressing, erythema, discharge, tenderness, distension, peritonism and drain quality.'],
['Investigations','Review trends not single numbers: Hb, WCC, CRP, renal function, electrolytes, lactate, cultures and imaging.'],
['Plan','Diet, fluids, analgesia, antiemetics, antibiotics review, VTE plan, mobility, lines/drains, discharge goals and senior escalation.']
],[3.2*cm,14*cm]))
flow.append(P('Fluids and electrolyte essentials', 'H2x'))
flow += bullet(['Prescribe fluids for a clear purpose: <b>resuscitation, routine maintenance, replacement of losses, or redistribution</b>. Reassess frequently.', 'Measure losses: NG aspirate, stoma output, drains, urine, diarrhoea and fever. Replace according to composition and local policy.', 'Avoid both under-resuscitation and fluid overload. Watch renal function, lung signs, peripheral oedema, weight and fluid balance.', 'Seek senior input early in heart failure, advanced kidney disease, frailty, liver disease, major haemorrhage, or persistent shock.'])
flow.append(P('Drains, tubes and stomas', 'H2x'))
flow.append(table(['Device','Ward checks','Escalate urgently if'],[
['Surgical drain','Site, fixation, patency, volume, colour, odour, sudden change.','Fresh high-volume blood, bile, feculent content, purulence with sepsis, displacement.'],
['NG tube','Document indication, position verification per policy, aspirate/flush plan, output and skin care.','Respiratory distress, uncertain position, bleeding, blocked tube with vomiting/distension.'],
['Urinary catheter','Indication, urine hourly trend if unwell, obstruction, infection prevention, removal plan.','Anuria/oliguria with instability, haematuria with clots, blocked catheter and painful bladder.'],
['Stoma','Colour, perfusion, output, edema, mucocutaneous junction, appliance seal.','Dusky/black stoma, severe pain, retraction with leakage, high output with dehydration.']
],[3.2*cm,8*cm,6*cm]))
flow.append(P('Postoperative complications by time course', 'H2x'))
flow.append(table(['When','Think of'],[
['Hours','Haemorrhage, airway/respiratory compromise, inadequate analgesia, hypothermia, urinary retention.'],
['Day 1-3','Atelectasis, pneumonia, AKI, ileus, early bleeding, delirium, VTE risk.'],
['Day 3-7','Wound infection, intra-abdominal collection, anastomotic leak, line infection, DVT/PE.'],
['Later','Wound dehiscence, incisional hernia, adhesional obstruction, chronic pain, nutritional deficiency.']
],[3.2*cm,14*cm]))
flow.append(callout('Escalate now', 'Escalate to senior surgical and anaesthetic teams for new hypotension, increasing oxygen need, altered mental state, oliguria, a rising lactate, significant bleeding, peritonism, suspected anastomotic leak, or a deteriorating early-warning score.'))
flow.append(PageBreak())
# Section 3
section('3. Emergency surgery handbook', 'Initial stabilization is the first operation. Use local major haemorrhage, sepsis, trauma and transfer pathways.')
flow.append(P('ABCDE approach', 'H2x'))
flow.append(table(['Step','Actions'],[
['A - Airway','Assess patency, protect cervical spine when trauma is possible, call anaesthesia early for threatened airway.'],
['B - Breathing','Give oxygen as indicated, inspect and auscultate chest, treat immediate life threats, obtain blood gas if unwell.'],
['C - Circulation','Control external bleeding, two large-bore IV lines or alternative access, bloods including group and save, assess shock, activate major haemorrhage protocol when indicated.'],
['D - Disability','GCS/AVPU, pupils, glucose, pain, temperature and causes of altered consciousness.'],
['E - Exposure','Examine fully while preventing heat loss; reassess repeatedly.']
],[3.5*cm,13.7*cm]))
flow.append(P('Shock: recognize and act', 'H2x'))
flow += bullet(['Hypovolaemic: bleeding, dehydration, third spacing. Control loss and resuscitate.', 'Septic: infection with organ dysfunction. Cultures where feasible without delaying treatment, appropriate antimicrobials per protocol, early source control.', 'Cardiogenic/obstructive: consider MI, arrhythmia, tamponade, massive PE, tension pneumothorax. Involve senior and critical-care teams.', 'Do not be falsely reassured by a single normal BP. Tachycardia, cool peripheries, altered mentation, oliguria and raised lactate can precede hypotension.'])
flow.append(P('Sepsis and source control', 'H2x'))
flow += bullet(['Obtain cultures and relevant samples when this does not delay treatment.', 'Give antimicrobials according to local policy after considering likely source and allergy history.', 'Resuscitate and measure lactate. Reassess response and organ function.', 'Source control may mean drainage of abscess, debridement of necrotic tissue, removal of infected device, control of perforation, or biliary/urinary decompression.'])
flow.append(P('Trauma priorities', 'H2x'))
flow += bullet(['Use a structured trauma system. Treat immediate threats before diagnostic completeness.', 'Document time, mechanism, anticoagulants, tetanus status, limb neurovascular findings and prehospital interventions.', 'Open fractures: cover with sterile dressing, administer antimicrobials/tetanus prophylaxis per protocol, splint, assess vascular status and arrange orthopaedic/plastic review.', 'Limb-threatening vascular injury: hard signs include active pulsatile bleeding, expanding haematoma, bruit/thrill, distal ischaemia. Call vascular/trauma teams urgently.'])
flow.append(P('Selected emergency presentations', 'H2x'))
flow.append(table(['Presentation','First actions'],[
['GI bleed','ABCDE, two IV lines, group and crossmatch, haemodynamic resuscitation, medication review including anticoagulants, senior/endoscopy pathway.'],
['Perforated viscus','NPO, IV access and fluids, analgesia/antiemetic, antimicrobial pathway, CT if stable and appropriate, urgent surgical review.'],
['Acute limb ischaemia','Record the 6 Ps, examine contralateral limb and pulses, anticoagulation only under local/senior direction, urgent vascular input.'],
['Necrotizing soft-tissue infection','Pain out of proportion, rapidly progressive skin changes, systemic toxicity: resuscitate, broad local antimicrobial pathway, immediate senior surgical review for debridement.'],
['Testicular torsion','Time-critical surgical emergency. Urgent urology assessment; do not delay for non-essential testing.']
],[3.8*cm,13.4*cm]))
flow.append(PageBreak())
# Section 4
section('4. Operating theatre procedure handbook', 'A theatre-facing reference for safe preparation, equipment recognition and procedural principles. It is not a substitute for supervised technical training.')
flow.append(P('Before incision: team safety checklist', 'H2x'))
flow += bullet(['Confirm patient identity, procedure, site and side, consent, allergies, fasting status, pregnancy status where relevant and implants/blood requirements.', 'Review imaging, anticipated critical events, required equipment, antibiotics timing, VTE plan, positioning risks and availability of senior help.', 'Perform sign-in, time-out and sign-out using the WHO Surgical Safety Checklist or local equivalent.', 'Before leaving theatre: specimen labels, swab/needle/instrument counts, blood loss, drains/lines, postoperative destination, analgesia and escalation plan.'])
flow.append(P('Core instruments and their uses', 'H2x'))
flow.append(table(['Group','Examples','Use'],[
['Cutting','Scalpel handles and blades, Mayo/Metzenbaum scissors','Skin incision, tissue division and fine dissection.'],
['Grasping','Adson, DeBakey, toothed forceps, Allis, Babcock','Handle skin, atraumatic tissue, fascia or hollow viscera as appropriate.'],
['Clamping','Mosquito, Kelly, Crile, artery forceps, Mixter/right-angle','Haemostasis, vascular control and passing ties.'],
['Retracting','Langenbeck, Deaver, Richardson, self-retaining retractors','Expose field while avoiding excessive pressure injury.'],
['Suturing','Needle holders, clip appliers, staplers','Secure tissue, ligate vessels and close wounds.'],
['Bone work','Periosteal elevator, osteotome, oscillating saw, rongeur, rasp','Orthopaedic/amputation exposure, cutting and smoothing bone.'],
['Adjuncts','Suction, diathermy, irrigation, swabs, specimen pots','Field visibility, haemostasis, lavage and specimen handling.']
],[3.2*cm,6*cm,8*cm]))
flow.append(P('Suture selection: practical overview', 'H2x'))
flow.append(table(['Material','Typical characteristics','Common use'],[
['Absorbable braided','Good handling, predictable loss of strength, greater tissue reactivity than monofilament.','Fascia, subcutaneous closure, ligatures depending on case.'],
['Absorbable monofilament','Lower tissue drag/reactivity, can be less easy to handle.','Subcuticular closure, bowel/urogenital applications depending on product.'],
['Non-absorbable monofilament','Low tissue reactivity, durable.','Skin, vascular and retention applications according to surgery.'],
['Non-absorbable braided','Excellent handling but can harbour bacteria.','Ties and selected securement uses; avoid in contaminated fields where unsuitable.']
],[3.4*cm,7*cm,6.8*cm]))
flow.append(P('Common procedure frameworks', 'H2x'))
for h, items in [
('Incision and drainage of abscess',['Confirm collection clinically/with imaging when needed; consider diabetes, immunosuppression, anticoagulation and location.', 'Use asepsis, adequate analgesia/anaesthesia, drainage and breaking of locules under supervision, specimen when indicated, and appropriate packing/wound plan.', 'Escalate deep, perianal, facial, breast, hand, necrotizing or systemically unwell cases.']),
('Laparotomy principles',['Midline access gives broad exposure. Enter abdomen safely, explore systematically, control contamination and haemorrhage, preserve tissue where possible, achieve source control.', 'Count swabs/instruments, document findings and ensure clear postoperative plan including antibiotics, drains, ICU needs and VTE prevention.']),
('Chest drain principles',['Confirm indication and side, obtain imaging where appropriate, use sterile technique and a safe insertion zone according to local policy.', 'Secure, connect to underwater seal system, document swinging/bubbling and output. Escalate persistent air leak, sudden bleeding, respiratory deterioration or malposition concern.']),
('Transradial amputation principles',['Aim for viable soft-tissue coverage and maximum useful length while preserving elbow function.', 'Plan flaps based on tissue viability, manage vessels and nerves carefully, smooth bone ends, stabilize soft tissues and create a pain-minimizing residual limb. Early rehabilitation and prosthetic input are essential.'])
]:
flow.append(P(h, 'H2x')); flow += bullet(items)
flow.append(PageBreak())
# Appendices
section('Appendices')
flow.append(P('A. Postoperative fever: practical differential', 'H2x'))
flow.append(table(['System','Examples','Useful next steps'],[
['Respiratory','Atelectasis, pneumonia, aspiration, PE','Clinical review, oxygen requirement, chest examination, imaging/blood gas if indicated.'],
['Urinary','UTI, catheter-associated infection, retention','Urinalysis/culture if indicated, assess catheter need and bladder volume.'],
['Wound / abdomen','SSI, collection, leak, peritonitis','Inspect wound/drains, trend inflammatory markers, urgent CT/senior review if concern.'],
['Line / drug / other','Line infection, drug fever, thrombosis','Examine access sites, review medicines, cultures and imaging based on findings.']
],[3.2*cm,6*cm,8*cm]))
flow.append(P('B. Handover checklist', 'H2x'))
flow += bullet(['Who is the patient? What operation/problem? What postoperative day?', 'What is the current severity, early-warning score, oxygen requirement and code status?', 'Key findings, trends, drains/tubes/stomas and fluid balance.', 'Outstanding tasks: imaging, bloods, antibiotics review, diet, mobilization, VTE, drain removal.', 'What needs escalation overnight and which team/senior has been informed?'])
flow.append(P('C. Suggested sources for deeper study', 'H2x'))
flow += bullet(['Bailey & Love’s Short Practice of Surgery, 28th edition.', 'Sabiston Textbook of Surgery: The Biological Basis of Modern Surgical Practice.', 'Campbell’s Operative Orthopaedics, 15th edition.', 'WHO Surgical Safety Checklist and your institution’s current emergency, antimicrobial, VTE, transfusion and perioperative policies.'])
flow.append(Spacer(1,.4*cm))
flow.append(callout('Final reminder', 'Good surgery is not only a technical act. It depends on accurate diagnosis, resuscitation, timely source control, disciplined teamwork, safe perioperative care, and early rehabilitation.'))
doc = SimpleDocTemplate(OUT, pagesize=A4, rightMargin=1.55*cm, leftMargin=1.55*cm, topMargin=1.45*cm, bottomMargin=1.7*cm, title='General Surgery Handbook', author='Orris')
doc.build(flow, onFirstPage=footer, onLaterPages=footer)
print(OUT)
python "/tmp/workspace/general-surgery-handbook/src/create_handbook.py" && python -c "from pypdf import PdfReader; p='/tmp/workspace/general-surgery-handbook/output/General_Surgery_Handbook.pdf'; r=PdfReader(p); print('pages=', len(r.pages)); print('title=',r.metadata.title); print('first=',r.pages[0].extract_text()[:80])" && ls -lh "/tmp/workspace/general-surgery-handbook/output/General_Surgery_Handbook.pdf"
- Student exam handbook
- Intern/resident ward handbook
- Emergency surgery handbook
- Operating theatre procedure handbook
- Appendices with handover, postoperative fever, and reference checklists
General Surgery Handbook
PDF Document · PDF