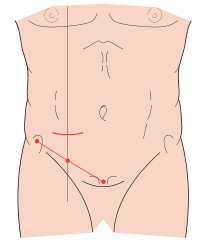
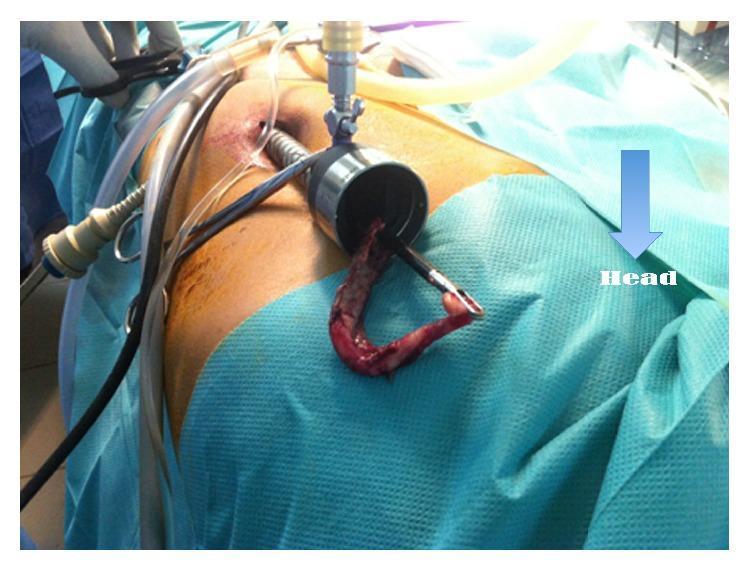
Steps of open appendectomy
Reading File
Finding Sources
Finding Sources
Reading File
Finding Sources
Reading File
Reading File
Reading File
Reading File
Searching Images
open appendectomy McBurney incision steps
I have comprehensive information. Here is the complete, step-by-step guide to open appendectomy:
Open Appendectomy — Operative Steps
Anesthesia & Positioning
- General anesthesia (regional anesthesia is an alternative)
- Supine position; consider Trendelenburg with left side down to shift bowel away from the operative field
- Foley catheter if the patient has not voided preoperatively
- Wide sterile prep from chest to pubis
Step 1 — Incision
Identify McBurney's point: the junction of the lateral and middle thirds of the line drawn from the anterior superior iliac spine (ASIS) to the umbilicus.
Two incision options:
- McBurney's (oblique/gridiron) incision — classic; skin incision runs obliquely along Langer's lines centered on McBurney's point
- Rocky-Davis (transverse) incision — same location, transverse orientation; preferred by many for cosmesis
- Lower midline laparotomy — reserved for perforated appendicitis with phlegmon or diagnostic uncertainty
Step 2 — Abdominal Wall Entry (Muscle-Splitting / Gridiron Approach)
- Incise skin and subcutaneous fat down to the external oblique aponeurosis
- Incise the external oblique in the direction of its fibers (oblique)
- Bluntly split the internal oblique in the direction of its fibers
- Bluntly split the transversus abdominis to expose the peritoneum
- Elevate the peritoneum with forceps and sharply incise it, taking care not to injure underlying bowel
This muscle-splitting (not muscle-cutting) approach minimizes denervation and bleeding — the "gridiron" technique.
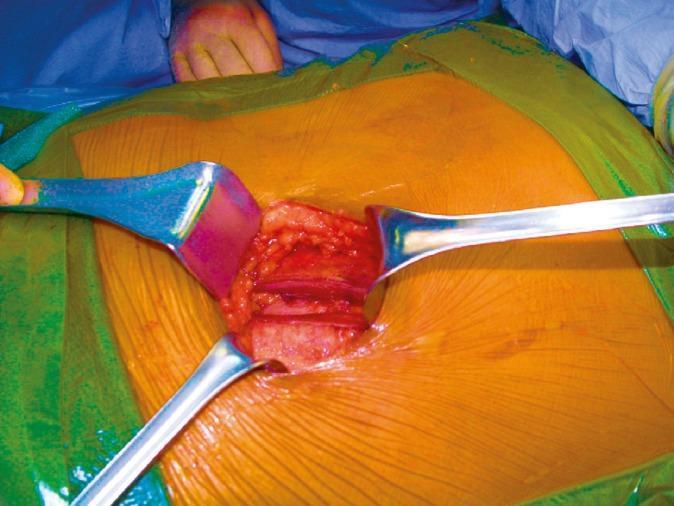
Step 3 — Identification of the Appendix
- Identify and deliver the cecum into the wound
- The appendiceal base is located at the confluence of the three taeniae coli (follow the taenia libera/anterior taenia distally if the appendix is not immediately visible)
- If the base is obscured by inflammation, trace the taeniae proximally from a clearer area
- Retrocecal appendix: mobilize the cecum by dividing the peritoneal reflection (white line of Toldt) laterally to expose the appendix from behind
- If the appendix is not found, pull up the terminal ileum and follow it to the ileocecal junction
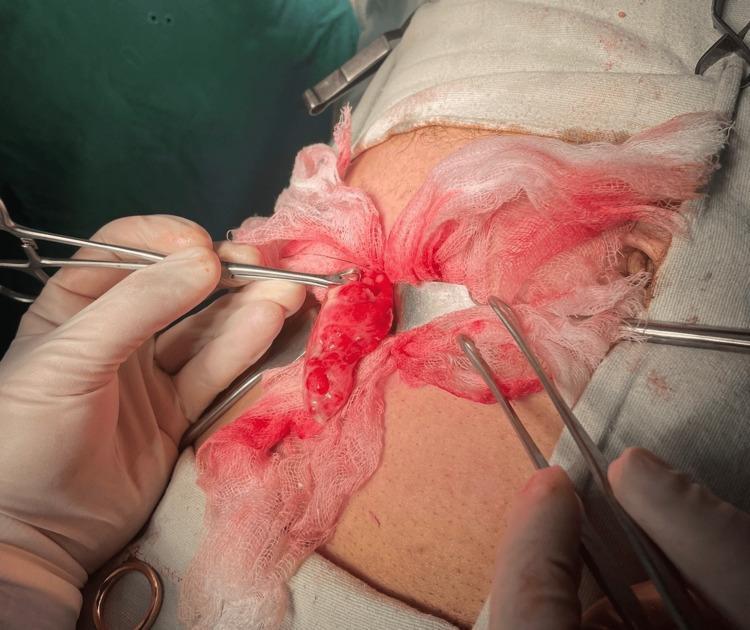
Step 4 — Mobilization of the Appendix
- Dissect the appendix free from surrounding adhesions and omentum
- Expose the mesoappendix (contains the appendiceal artery, a branch of the ileocolic artery)
Step 5 — Division of the Mesoappendix
Classic technique:
- Place Kelly clamps across the mesoappendix in successive bites
- Divide the mesoappendix between clamps
- Ligate the ends with 3-0 silk sutures (secure the appendiceal artery)
Modern alternative:
- A linear stapler (white load) or electrosurgical/energy device (LigaSure) can be used to divide the mesoappendix in a single step
Step 6 — Division and Ligation of the Appendiceal Base
- Crush the base of the appendix with a Kelly clamp, then remove the clamp (the crushed zone = CZ)
- Reapply the clamp 1 cm distal to the CZ
- Ligate the appendix at the CZ with 0-chromic catgut (or absorbable suture)
- Divide the appendix just proximal to the Kelly clamp (between ligation and clamp)
- Remove the specimen
Stump management options:
- Cauterize the stump mucosa (to prevent mucocele)
- Invaginate with a purse-string suture or Z-stitch into the cecal wall (note: current evidence does NOT support routine inversion — it is optional)
- Alternatively, a linear stapler (blue/green load) can divide the appendix at the base in one step
Step 7 — Peritoneal Irrigation & Inspection
- Irrigate the peritoneum and pelvis (especially if turbid fluid or perforation is present)
- If a normal appendix is found: inspect the terminal ileum (Meckel's diverticulum, Crohn's), cecum, sigmoid, and in females the adnexa
- Consider sending peritoneal fluid for gram stain and culture if contaminated
Step 8 — Wound Closure (Layered)
| Layer | Technique |
|---|---|
| Peritoneum + transversus abdominis | Running absorbable suture |
| Internal oblique | Interrupted absorbable sutures |
| External oblique | Interrupted absorbable sutures |
| Skin | Subcuticular running absorbable suture (primary closure) |
Special considerations:
- Perforated appendicitis: skin may be left open or loosely approximated (delayed primary closure) — recent RCT evidence shows no significant difference in SSI rates between primary and delayed closure
- Drains: routine drain placement has NOT been shown to be beneficial in multiple clinical trials for either complicated or uncomplicated appendicitis
- Fowler extension: if retraction of the appendiceal artery or unexpected bleeding occurs, extend the incision medially for better access
Key Anatomical Points to Remember
| Structure | Detail |
|---|---|
| McBurney's point | Lateral 1/3 of ASIS–umbilicus line |
| Appendiceal artery | Branch of ileocolic artery; in mesoappendix |
| Taeniae coli | Converge at appendiceal base; used to locate appendix |
| Retrocecal appendix | ~65% of cases; requires cecal mobilization |
Sources: Current Surgical Therapy 14e • Schwartz's Principles of Surgery 11e • Mulholland & Greenfield's Surgery 7e
Steps Laparoscopic appendectomy
Finding Sources
Searching Images
laparoscopic appendectomy trocar port placement technique
Reading File
Reading File
Finding Sources
Reading File
I have comprehensive data from four surgical textbooks. Here is the complete structured guide:
Laparoscopic Appendectomy — Operative Steps
Anesthesia & Preoperative Preparation
- General anesthesia (standard)
- Supine position; right arm out, left arm tucked (surgeon and assistant both stand on the patient's left)
- Bladder emptied — either by straight catheter or having the patient void immediately preoperatively
- Foley catheter considered if patient did not void
- Prep from chest/xiphoid to pubis
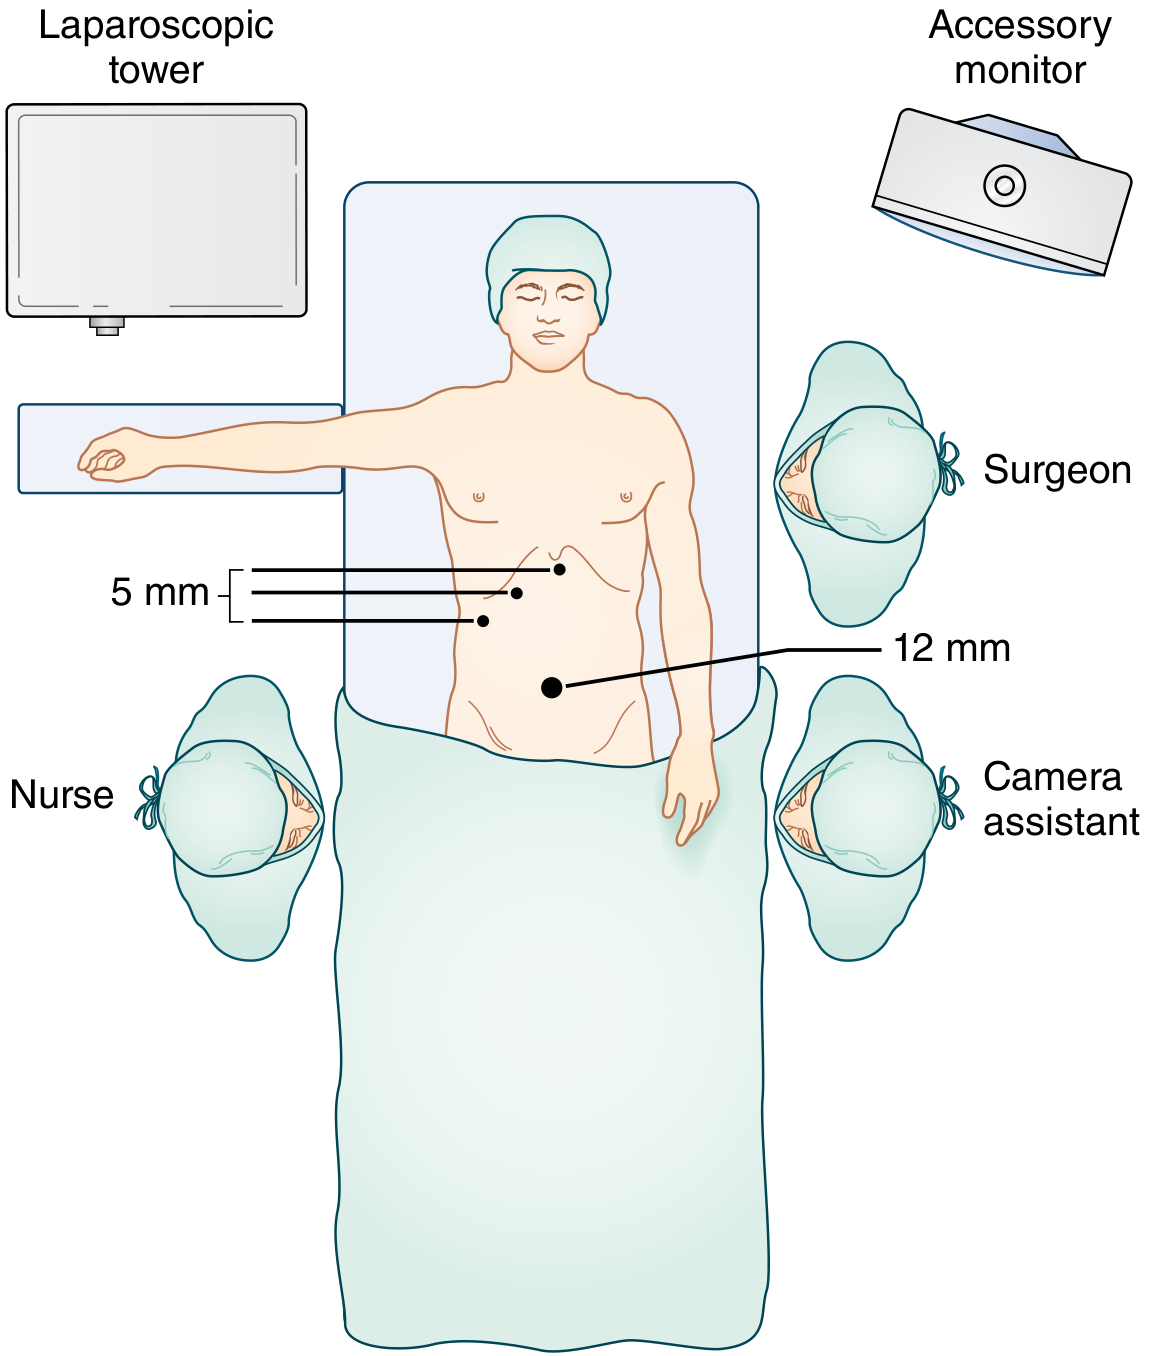
- Monitors positioned to the patient's right, facing the surgeon
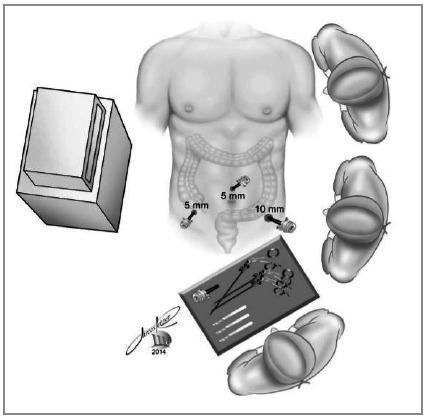
Step 1 — Peritoneal Access & Primary Port Placement
Two techniques for initial abdominal entry:
A. Veress Needle (Closed) Technique
- Make a small skin incision at the umbilicus
- Elevate the umbilicus; insert the Veress needle perpendicular to skin until two clicks felt (fascia, then peritoneum)
- Confirm entry: drop test (saline drops freely into needle)
- Insufflate CO₂ to 12–15 mmHg intra-abdominal pressure
- Withdraw Veress needle; insert 10–12 mm trocar (blind, optical, or radially expanding)
B. Hasson (Open) Technique (preferred for safety)
- Infraumbilical or supraumbilical skin incision
- Dissect to the rectus fascia
- Place two stay sutures in the fascia on either side of midline
- Incise fascia vertically; bluntly enter peritoneum with Kelly clamp
- Insert Hasson trocar under direct vision; anchor with stay sutures
- Insufflate CO₂ and confirm no entry injury
Step 2 — Port Placement (Standard 3-Port Setup)
| Port | Size | Location | Purpose |
|---|---|---|---|
| Port 1 (camera) | 10–12 mm | Umbilicus | 30° laparoscope |
| Port 2 | 5 mm | Left lower quadrant (LLQ) | Working port |
| Port 3 | 5 mm | Suprapubic or supraumbilical midline | Working port |
Alternative: third port in right upper quadrant is technically feasible. Port placement is adjusted for body habitus, age, and pregnancy.
Step 3 — Patient Repositioning & Four-Quadrant Survey
- Tilt table to Trendelenburg with left side down — gravity displaces small bowel away from the RLQ, clearing the operative field
- Perform a four-quadrant survey to rule out other intra-abdominal pathology before focusing on the appendix
Step 4 — Identification of the Appendix
- Use atraumatic graspers to follow the cecum to the convergence of the taeniae coli — the appendix invariably arises here
- Elevate the appendix toward the left upper quadrant (LUQ) to expose its base and mesoappendix
- Retrocecal appendix: divide the lateral peritoneal reflection (white line of Toldt) to mobilize the cecum and expose the appendix from behind
- Pelvic appendix: release mesenteric cecal attachments to bring it into view
- If normal appendix found: inspect terminal ileum (Meckel's, Crohn's), cecum, sigmoid, and adnexa in females
Step 5 — Creating the Mesoappendix Window
- Grasp/elevate the mesoappendix with an atraumatic grasper
- Lyse any peritoneal and omental attachments along the appendix
- Using a Maryland grasper or dissector, create a window between the mesoappendix and the cecal wall at the base of the appendix
- Dissect the full length of the appendix free so the base is clearly visualized
Step 6 — Division of the Mesoappendix (Appendiceal Artery)
Divide the mesoappendix using one of:
- Linear GI stapler (white/vascular load) — introduced through the umbilical port
- LigaSure (bipolar vessel-sealing device)
- Harmonic scalpel
- Clips + monopolar cautery
- Endoscopic clip + scissors
The appendiceal artery (branch of ileocolic artery) must be securely controlled before dividing the appendix.
Step 7 — Division of the Appendiceal Base
Standard (stapler) technique:
- Introduce a linear GI stapler (blue load, 30–45 mm) through the umbilical port
- Position across the base of the appendix (close to the cecum, clear of the ileocecal valve)
- Fire the stapler → simultaneously divides and staples both sides
Endoloop technique:
- Pass an Endoloop (0-chromic or PDS) over the appendix and cinch it down at the base
- Apply a second loop 1 cm distal
- Divide between the two loops with scissors
If the appendiceal base is nonviable or necrotic: the staple line can be taken through a small rim of cecum, provided it avoids the ileocecal valve. If cecal involvement is extensive, ileocecectomy may be required.
Step 8 — Specimen Retrieval
- Place the appendix into an endobag (retrieval bag) — mandatory if a neoplasm is suspected, to prevent port-site contamination
- Withdraw the bag through the umbilical (10–12 mm) port
- Inspect the staple line for hemostasis
Step 9 — Irrigation & Final Inspection
- Suction and irrigate the pelvis and RLQ as needed
- If turbid/purulent fluid: send sample for gram stain and culture to guide postoperative antibiotics
- Inspect the cecal staple line and mesoappendix stump for bleeding or leaks
- Reinspect the abdomen after desufflation
Step 10 — Port Removal & Wound Closure
- Remove trocars under direct vision
- 10–12 mm fascial defect: close fascia with absorbable suture (risk of port-site hernia)
- 5 mm ports: skin closure only (subcuticular absorbable suture or Steri-Strips)
- Deflate CO₂ fully before removing last port
Special Situations
| Situation | Management |
|---|---|
| Retrocecal appendix | Divide white line of Toldt; mobilize cecum medially |
| Perforated appendicitis | Careful blunt dissection to free appendix from phlegmon; convert if not progressing |
| Failure to progress | Convert to open — not a failure, a surgical judgment |
| Normal appendix found | Thorough survey: ileum, cecum, sigmoid, adnexa |
| Suspected neoplasm | Mandatory retrieval bag; send for frozen section |
Advantages of Laparoscopic vs. Open Approach
- ↓ Wound infections
- ↓ Postoperative pain
- ↓ Hospital stay
- Superior visualization of entire peritoneal cavity
- Marginally ↑ risk of intra-abdominal abscess (~35% higher odds, but absolute risk remains <10%)
Sources: Current Surgical Therapy 14e • Sabiston Textbook of Surgery • Schwartz's Principles of Surgery 11e • Mulholland & Greenfield's Surgery 7e
Steps of laparoscopic cholecystectomy
Finding Sources
Searching Images
laparoscopic cholecystectomy trocar port placement critical view of safety
Reading File
Reading File
Reading File
Searching Images
critical view of safety Calot triangle cystic duct artery dissection laparoscopic
Excellent — I have comprehensive, textbook-sourced detail from multiple references. Here is the complete operative guide:
Laparoscopic Cholecystectomy — Operative Steps
First performed by Mouret (1987); now the gold standard for symptomatic gallbladder disease. Mortality 0.1–0.5%, morbidity 2–3%.
Anesthesia & Preoperative Preparation
- General anesthesia with muscle relaxation (mandatory — CO₂ pneumoperitoneum poorly tolerated under regional)
- Supine position; one arm tucked (to allow intraoperative cholangiogram access if needed), or both arms out
- Orogastric tube to decompress the stomach and improve upper abdominal visualization
- Foley catheter if prolonged operation anticipated or critically ill patient
- Prep abdomen and lower chest widely enough to accommodate open conversion if needed
- Patient secured firmly to the table — steep reverse Trendelenburg will be required
Step 1 — Peritoneal Access & Camera Port
12 mm periumbilical port (camera port — also used for specimen extraction):
| Technique | Details |
|---|---|
| Hasson (open) | Infraumbilical incision → fascia → two stay sutures → blunt peritoneal entry → port under direct vision |
| Veress needle (closed) | Umbilicus elevated → needle inserted until two clicks → drop test → CO₂ insufflation to 12–15 mmHg → 12 mm trocar inserted |
| Optical trocar | Direct-vision entry without Veress (e.g., Optiview) |
Insert 30° laparoscope and confirm no entry injury with four-quadrant survey.
Step 2 — Working Port Placement (Standard 4-Port Setup)
| Port | Size | Location | Function |
|---|---|---|---|
| Port 1 | 12 mm | Umbilicus | Camera (laparoscope) + specimen extraction |
| Port 2 | 5 mm | Right anterior axillary line (RUQ lateral) | Assistant: elevates gallbladder fundus toward right shoulder |
| Port 3 | 5 mm | Right midclavicular line | Surgeon: grasps infundibulum/Hartmann's pouch for inferolateral retraction |
| Port 4 | 5 mm | Subxiphoid / epigastric | Surgeon: dissection, clipping, coagulation |
Alternative — "French" (modified) position: subxiphoid port for fundus retraction; 5 mm working ports in left and right upper quadrants.
Step 3 — Patient Repositioning
- Tilt to steep reverse Trendelenburg (head-up) — gravity moves bowel and omentum caudally, exposing the RUQ
- Left lateral tilt — shifts duodenum and colon away from the porta hepatis
Step 4 — Gallbladder Retraction & Initial Exposure
- Grasp the gallbladder fundus with the lateral (axillary line) grasper → retract cephalad toward the right shoulder — exposes the infundibulum and porta hepatis
- Grasp the infundibulum/Hartmann's pouch with the midclavicular grasper → retract inferolaterally — opens the triangle of Calot
Distended/inflamed gallbladder: decompress first using a laparoscopic needle aspirator, 14-gauge angiocatheter via RUQ stab incision, or direct trocar aspiration through the fundus. Prevent spillage with Endoloop.
- Peel away any adherent omentum, duodenum, or colon from the gallbladder by blunt dissection, working parallel to the gallbladder wall (not perpendicular)
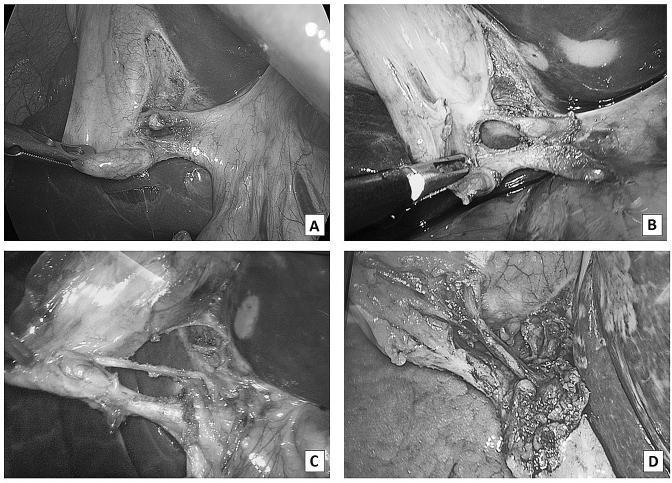
Step 5 — Dissection of the Hepatocystic Triangle (Triangle of Calot)
This is the most critical and technically demanding step.
- Incise the peritoneum on both the anterior and posterior aspects of the hepatocystic triangle
- Use a hook cautery or blunt dissector to clear all fibrofatty, areolar, and lymphatic tissue from the triangle
- Landmark: the Calot's node (node of Lund) — a lymph node overlying the cystic artery; dissection should stay on the gallbladder side of this node
- Dissect the lower third of the gallbladder off the cystic plate (gallbladder bed) from both sides
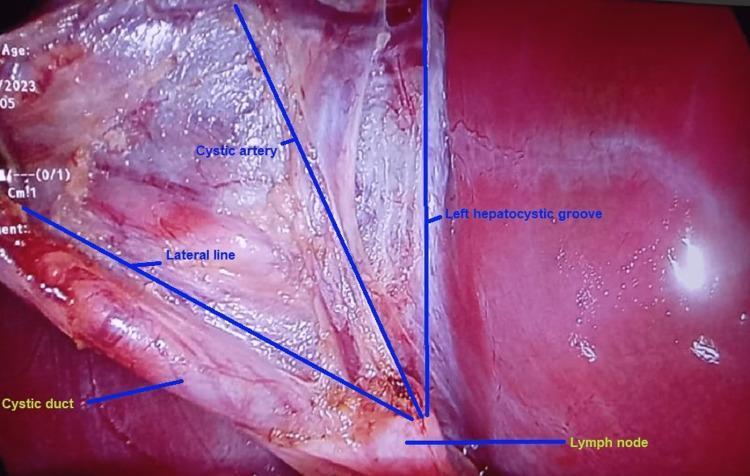
Step 6 — Critical View of Safety (CVS) ⚠️
The CVS is mandatory before clipping or cutting anything. It is the primary safeguard against bile duct injury.
CVS is achieved when ALL three criteria are met:
| Criterion | Requirement |
|---|---|
| 1. Two structures only | Only TWO structures seen entering the gallbladder |
| 2. Hepatocystic triangle cleared | All fibrofatty tissue dissected away from the triangle |
| 3. Lower gallbladder detached | Lower third of gallbladder dissected free from the liver (cystic plate visible) |
If CVS cannot be achieved: do not proceed blindly — perform intraoperative cholangiogram, consider fundus-first (dome-down) dissection, or convert to open.
Progressive dissection achieving the CVS step by step:
Step 7 — Intraoperative Cholangiogram (Selective)
Indications for IOC:
- Anatomy unclear / CVS not confidently achieved
- Suspected choledocholithiasis
- History of gallstone pancreatitis
- Aberrant biliary anatomy
Technique:
- Make a small ductotomy in the anterior wall of the cystic duct
- Insert cholangiogram catheter; inject water-soluble contrast
- Fluoroscopic imaging of the biliary tree
ICG (Fluorescent Cholangiography):
- IV indocyanine green → hepatocytes excrete it into bile → near-infrared light illuminates biliary anatomy in real time
- Available in most modern laparoscopic systems; useful before CVS is fully established
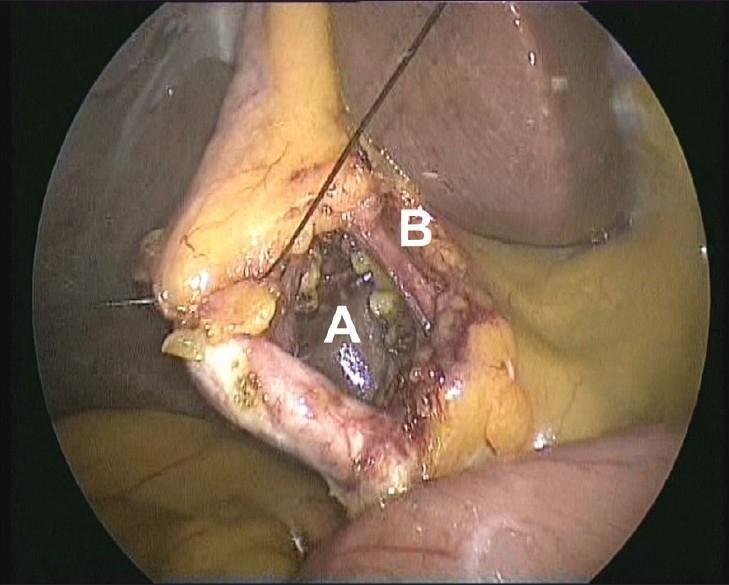
Step 8 — Clipping & Division of the Cystic Artery and Cystic Duct
Once CVS is confirmed:
- Apply two clips proximally and one clip distally on the cystic artery
- Divide the cystic artery between the clips with scissors
- Apply two clips proximally (toward common bile duct) and one clip distally (toward gallbladder) on the cystic duct
- Divide the cystic duct between the clips
Inspect clip placement — ensure clips are well clear of the common bile duct/common hepatic duct before division.
Step 9 — Gallbladder Dissection from the Liver Bed
- Use hook electrocautery to dissect the gallbladder off the cystic plate (liver bed), working from infundibulum toward fundus (or fundus-down in difficult cases)
- Venous drainage of the gallbladder is directly into the liver bed through small venules — achieve meticulous hemostasis as you go
- Keep dissection in the correct plane just deep to the gallbladder serosa
- As the fundus is freed, reinspect the cystic duct and artery clips — the superior traction now provides excellent view of the porta hepatis for a final check
Step 10 — Specimen Retrieval
- Place the gallbladder into an endobag (specimen retrieval bag)
- Withdraw bag through the umbilical (12 mm) port
- If stones are too large for direct removal: dilate the umbilical incision slightly or crush stones within the bag
- Any stones spilled must be thoroughly retrieved — retained stones cause late perihepatic/subhepatic abscesses
Step 11 — Final Inspection & Irrigation
- Inspect the liver bed, cystic pedicle clips, and porta hepatis for bleeding or bile leak
- Irrigate the RUQ and subhepatic space if contamination occurred
- Confirm all sponges and instruments accounted for
Step 12 — Port Removal & Wound Closure
| Port | Closure |
|---|---|
| 12 mm umbilical | Close fascia with absorbable suture (prevents port-site hernia) |
| 5 mm ports | Skin closure only (subcuticular absorbable or Steri-Strips) |
- Deflate CO₂ fully before removing the last port
- Local anaesthetic infiltration at port sites for postoperative analgesia
Bailout Strategies When CVS Cannot Be Achieved
| Situation | Options |
|---|---|
| Dense adhesions / acute inflammation | Fundus-first (dome-down) dissection |
| Anatomy still unclear | Intraoperative cholangiogram / ICG cholangiography |
| Significant hemorrhage or injury | Convert to open cholecystectomy (not a failure — a sound judgment) |
| Contracted gallbladder / Mirizzi syndrome | Subtotal cholecystectomy (leave posterior wall on liver bed) |
Advantages Over Open Cholecystectomy
- ↓ Postoperative pain
- ↓ Hospital stay (often day-case/same-day)
- ↓ Wound complications and hernia
- Faster return to normal activity (1–2 weeks vs. 4–6 weeks)
- Superior cosmesis
Sources: Sabiston Textbook of Surgery • Current Surgical Therapy 14e • Sleisenger & Fordtran's Gastrointestinal and Liver Disease
Steps of modified radical mastectomy
Finding Sources
Searching Images
modified radical mastectomy incision skin flap axillary dissection
Reading File
Reading File
Reading File
Reading File
Excellent — comprehensive detail from both references. Here is the complete operative guide:
Modified Radical Mastectomy (MRM) — Operative Steps
Definition & Key Distinction
MRM = Total mastectomy + Levels I & II axillary lymph node dissection (ALND), with preservation of the pectoralis major muscle.
Originally described by Patey (St Bartholomew's Hospital, London), who also removed the pectoralis minor to access Level III nodes. Modern MRM typically divides only the pectoralis minor tendon at its coracoid insertion (or retracts it) rather than removing the muscle entirely.
| Operation | Pec Major | Pec Minor | ALND Levels |
|---|---|---|---|
| MRM (Patey) | Preserved | Removed or tendon divided | I, II, III |
| MRM (Auchincloss) | Preserved | Preserved | I, II |
| Radical mastectomy (Halsted) | Removed | Removed | I, II, III |
Anesthesia & Preoperative Setup
- General anesthesia (regional thoracic paravertebral block may supplement or occasionally replace GA)
- Supine position; ipsilateral arm extended on an arm board at 90° — allows access to the axilla
- Sequential compression devices on lower limbs
- Prophylactic IV antibiotics
- Wide skin prep — chest, axilla, ipsilateral arm to the elbow, and lower neck
- Drape to accommodate open conversion access if needed
- Foley catheter optional (may remove at case end)
Anatomical Boundaries of Dissection
| Direction | Boundary |
|---|---|
| Superior | Clavicle / subclavius muscle |
| Medial | Lateral border of sternum (midline) |
| Inferior | Rectus sheath / inframammary fold (2–3 cm below) |
| Lateral | Anterior border of latissimus dorsi muscle |
PART 1 — MASTECTOMY
Step 1 — Skin Incision Planning
- Mark an elliptical (transverse-oblique) skin incision encompassing:
- The nipple-areolar complex (NAC)
- The biopsy scar (with at least 1–2 cm margins around it)
- Any skin involved by tumor
- Orientation: transverse-oblique across the breast — allows axillary access from within the same incision and favors a tension-free closure
- Avoid excessive skin resection (causes tension, wound dehiscence, delays radiation) and insufficient resection (leaves dermal lymphatics with residual disease)
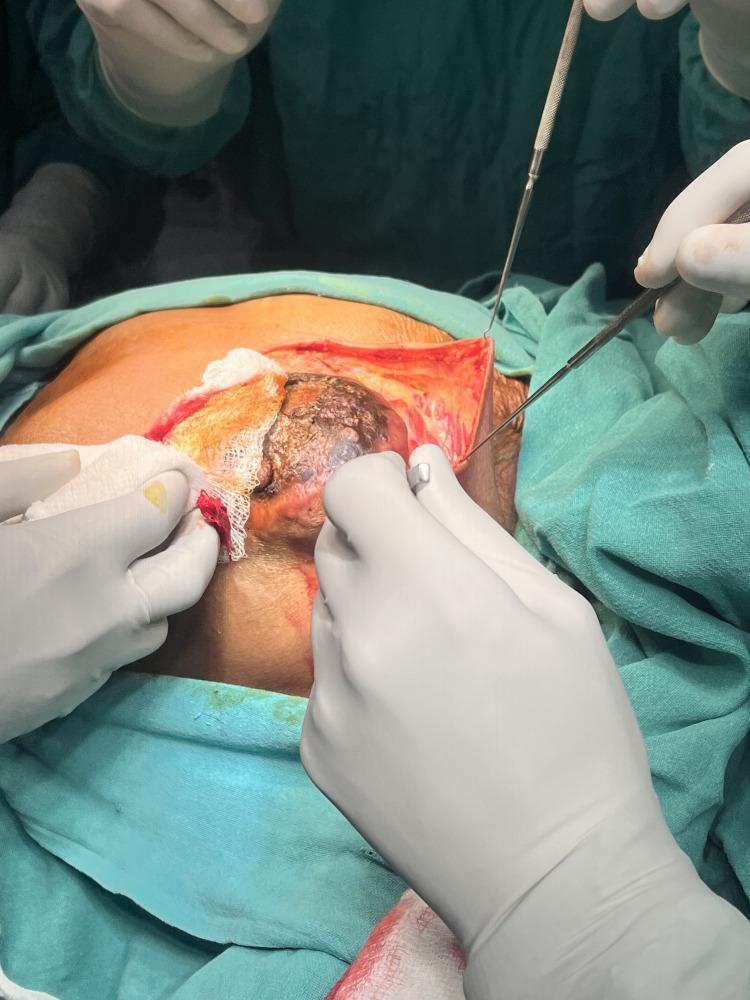
Step 2 — Elevation of Skin Flaps
- Incise through skin and subcutaneous fat
- Raise superior and inferior skin flaps in the avascular plane between breast parenchyma and subcutaneous fat
- Ideal flap thickness: 7–8 mm (skin + telasubcutanea) — too thin → skin necrosis; too thick → residual breast tissue
- Flap limits:
- Superiorly → clavicle
- Medially → lateral edge of sternum
- Inferiorly → rectus sheath / inframammary fold
- Laterally → anterior border of latissimus dorsi; include the axillary tail of Spence (superior-lateral dissection)
- Hemostasis with electrocautery throughout
Step 3 — Breast Dissection from Pectoralis Major
- Once flaps are fully raised, elevate the pectoralis major fascia along with the entire breast off the pectoralis major muscle
- Dissect in the plane between pectoralis fascia (removed with specimen) and pectoralis major muscle fibers (preserved)
- Control perforating vessels from the pectoralis with electrocautery or clips
- Along the medial border of the sternum: identify and clip/ligate the internal mammary perforators in the intercostal spaces
- At the lateral border of pectoralis major: either fully free the breast or leave the axillary tail in continuity with the axillary tissue (en bloc dissection)
PART 2 — AXILLARY LYMPH NODE DISSECTION (ALND)
Standard ALND removes Levels I and II (minimum 10 lymph nodes). Level III access requires division/removal of pectoralis minor.
Axillary Level Anatomy
| Level | Location (relative to pectoralis minor) | Lymph node groups |
|---|---|---|
| Level I | Lateral to pec minor | Lateral, subscapular, anterior (external mammary) |
| Level II | Posterior to pec minor | Central + Rotter's (interpectoral) |
| Level III | Medial to pec minor | Apical (subclavicular) |
Step 4 — Enter the Axilla: Incise Clavipectoral Fascia
- Incise the clavipectoral fascia at the lateral border of the pectoralis major muscle inferiorly
- Progress superiorly toward the apex of the axilla
- Retract pectoralis major superiorly and medially — exposes the axillary contents
Step 5 — Identify the Axillary Vein (Superior Boundary)
- Follow the anterior surface of the latissimus dorsi muscle superiorly until the axillary vein is encountered where it crosses the tendinous upper border
- The axillary vein defines the superior limit of dissection — do NOT dissect above it (severe lymphedema risk)
- Clear the vein on its anterior and inferior surfaces, clipping and dividing venous tributaries as encountered
- Beware: bifid axillary vein variants; distinguish axillary vein from thoracodorsal vein and anterior thoracoepigastric vein before ligation
Step 6 — Identify and Protect the Thoracodorsal Neurovascular Bundle
- Identified entering the axilla from a deep posterior position, approximately halfway between chest wall and latissimus muscle — in the center of the specimen
- Contains: thoracodorsal artery, vein, and nerve → supplies latissimus dorsi
- Preserve if not involved by tumor — injury → weak arm/shoulder abduction; loss of latissimus as a reconstructive option
- The anterior thoracoepigastric vein (large proximal tributary of axillary vein) must be ligated — carefully distinguish it from the thoracodorsal vein first
Step 7 — Identify and Protect the Long Thoracic Nerve (Nerve of Bell)
- Runs vertically along the medial axillary wall in the investing fascia of the serratus anterior
- Dissect the axillary specimen lateral to this nerve
- Must be preserved — injury → permanent winged scapula (serratus anterior denervation) + shoulder weakness
Step 8 — Clear Level I Lymph Nodes (Lateral to Pec Minor)
- Sweep areolar tissue at the junction of the axillary vein and the anterior edge of the latissimus dorsi — includes lateral and subscapular groups (Level I)
- Progress medially, elevating the nodal/fatty tissue inferiorly off the axillary vein
Step 9 — Clear Level II Lymph Nodes (Central Axilla)
- Continue medial dissection to clear central axillary lymph node group (Level II)
- The medial pectoral neurovascular bundle enters Rotter's space here — preserve or ligate depending on suspected nodal involvement of Rotter's nodes
- Identify intercostobrachial nerve running medial-to-lateral across the field to the inner arm — preserve if possible (sacrifice → numbness of medial upper arm)
Step 10 — Level III Access (if required — Patey modification)
- Divide the pectoralis minor tendon at its insertion on the coracoid process (shield brachial plexus with a finger during division)
- This allows dissection of the apical (Level III) lymph nodes medially up to the costoclavicular (Halsted's) ligament
- Many surgeons now divide only the tendon (leaving the muscle belly) rather than removing the entire pectoralis minor
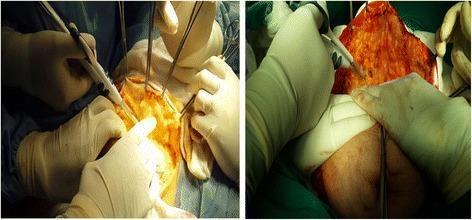
Step 11 — En Bloc Removal of Specimen
- Sweep the entire axillary nodal-fatty specimen inferiorly and divide final attachments
- Remove breast + axillary contents en bloc
- Orient the specimen for pathologic assessment (mark levels with sutures/clips)

PART 3 — CLOSURE
Step 12 — Haemostasis & Inspection
- Inspect the chest wall, pectoralis major surface, and axilla for bleeding
- Cauterise/clip any bleeders
- Confirm thoracodorsal and long thoracic nerve integrity
Step 13 — Drain Placement
- Place two closed-suction drains (Jackson-Pratt):
- One along the anterior chest wall beneath the inferior skin flap
- One in the axilla
- Retain until drainage < 30 mL/day (typically 5–10 days)
- Drains reduce seroma formation — the most common complication (~30% of cases)
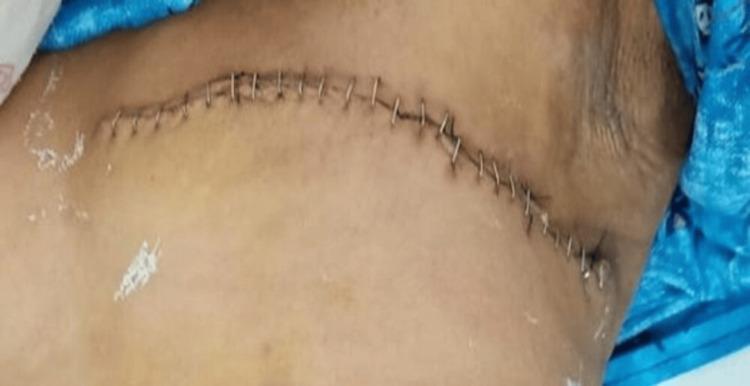
Step 14 — Wound Closure
- Approximate skin flaps in layers:
- Subcutaneous layer: interrupted absorbable sutures
- Skin: subcuticular absorbable suture or staples
- Confirm no tension on the closure; if significant skin deficit: consider latissimus dorsi myocutaneous flap for coverage
Key Nerves to Identify & Preserve
| Nerve | Course | Consequence if injured |
|---|---|---|
| Long thoracic nerve (Bell) | Vertical, medial axillary wall on serratus anterior fascia | Winged scapula, shoulder weakness |
| Thoracodorsal nerve | Posterior axilla, enters latissimus dorsi | Weak arm/shoulder abduction; loss of LD flap option |
| Intercostobrachial nerve | Horizontal, medial → lateral to inner arm | Numbness/paraesthesia of medial upper arm |
| Medial pectoral nerve | Enters pectoralis minor → pectoralis major lateral border | Atrophy of lateral pectoralis major |
Potential Pitfalls
| Pitfall | Consequence |
|---|---|
| Inadequate skin excision | Residual dermal lymphatic disease |
| Excessive skin resection | Tension on closure → dehiscence, delayed radiation |
| Failure to ligate internal mammary perforators | Haemorrhage medially |
| Dissection above axillary vein | Severe lymphoedema |
| Injury to long thoracic nerve | Permanent winged scapula |
| Mobilising long thoracic nerve into specimen | Same |
| Failing to distinguish axillary vein from thoracodorsal/thoracoepigastric veins | Major venous bleeding |
Postoperative Complications
| Complication | Rate | Notes |
|---|---|---|
| Seroma | Up to 30% | Most common; managed with drain retention or aspiration |
| Lymphoedema | ~20% (up to 50–60% with post-op radiation) | Refer early to physiotherapy; compressive sleeves |
| Wound infection | Uncommon | Usually from skin flap necrosis |
| Haemorrhage | Rare | Early wound exploration if significant |
| Winged scapula | Permanent if long thoracic nerve divided |
Sources: Current Surgical Therapy 14e • Schwartz's Principles of Surgery 11e (MD Anderson Cancer Center)
Anatomy of abdominal incisions
Your credits are exhausted. Your daily credits reset tomorrow, or you can purchase a top-up for more.
This is a shared conversation. Sign in to Orris to start your own chat.