
make note on slit lamp biomicroscopy from very basic level to advanced level in detail
Reading File
Finding Sources
Finding Sources
Searching the Web
slit lamp biomicroscopy comprehensive guide basic to advanced ophthalmology
Reading File
Reading File
Reading File
Finding Sources
Finding Sources
Reading File
Reading File
Reading File
Finding Sources
Finding Sources
Reading File
Finding Sources
Loading Image
Finding Sources
Slit Lamp Biomicroscopy: Complete Notes (Basic to Advanced)
Sources: Kanski's Clinical Ophthalmology 10th Ed., The Wills Eye Manual, Robbins Pathologic Basis of Disease, Rheumatology (Elsevier)
PART 1: INTRODUCTION AND HISTORICAL BACKGROUND
The slit lamp biomicroscope is the single most important instrument in clinical ophthalmology. It combines a binocular stereomicroscope with an adjustable, high-intensity light source that can be shaped into a narrow "slit" of light, allowing illuminated optical cross-sections of any transparent or semi-transparent ocular tissue.
Historical milestones:
- 1911 - Alvar Gullstrand introduced the first slit lamp illuminator
- 1916 - Henker combined Gullstrand's illuminator with Czapski's corneal microscope (first practical slit lamp)
- 1936 - Comberg established the co-pivotal and iso-centric relationship (modern design basis)
The slit lamp is sometimes called the "stethoscope of the eye doctor" - it is the entry point for nearly every anterior and posterior segment diagnosis.
PART 2: INSTRUMENT ANATOMY AND COMPONENTS
2.1 The Illumination System
The light source produces a variable, adjustable beam. Key controls:
- Slit width - from a pinpoint spot to a wide, diffuse beam
- Slit height - adjustable to measure lesion dimensions
- Slit angle - rotated from 0° to 180°
- Illumination intensity - rheostat controlled
- Filters - built into the illumination arm:
- Red-free (green) filter: makes red structures appear black, increasing contrast for vascular examination
- Cobalt blue filter: used with sodium fluorescein for corneal staining
- Neutral density filter: reduces glare in photophobic patients
2.2 The Observation (Microscope) System
- Binocular eyepieces (typically 10x or 12.5x magnification)
- Objective lenses - combined with eyepieces to give total magnification:
- Low: ~6x (survey / diffuse examination)
- Medium: ~16x (routine examination)
- High: ~25-40x (detailed cell-level examination)
- The system provides stereoscopic (3D) depth perception - essential for judging depth of corneal lesions and anterior chamber structures
2.3 The Mechanical Base (Slit Lamp Stand)
- Chin rest and forehead band - stabilizes the patient's head
- Joystick - allows x-y movement (forward/backward, left/right)
- Vertical adjustment knob - raises or lowers the instrument
- Locking screw - fixes the slit lamp height
- The illumination arm and microscope arm rotate around a common co-pivotal point so the light source and viewing system always remain focused on the same plane
2.4 Positioning
- Patient seated comfortably, chin in the chin rest, forehead against the headband
- Both eyes kept open
- Examiner adjusts the interpupillary distance on the eyepieces to match their own
PART 3: ILLUMINATION TECHNIQUES
This is the core skill of slit lamp biomicroscopy. Mastery of different illumination techniques allows examination of specific tissue layers and detection of specific pathologies.
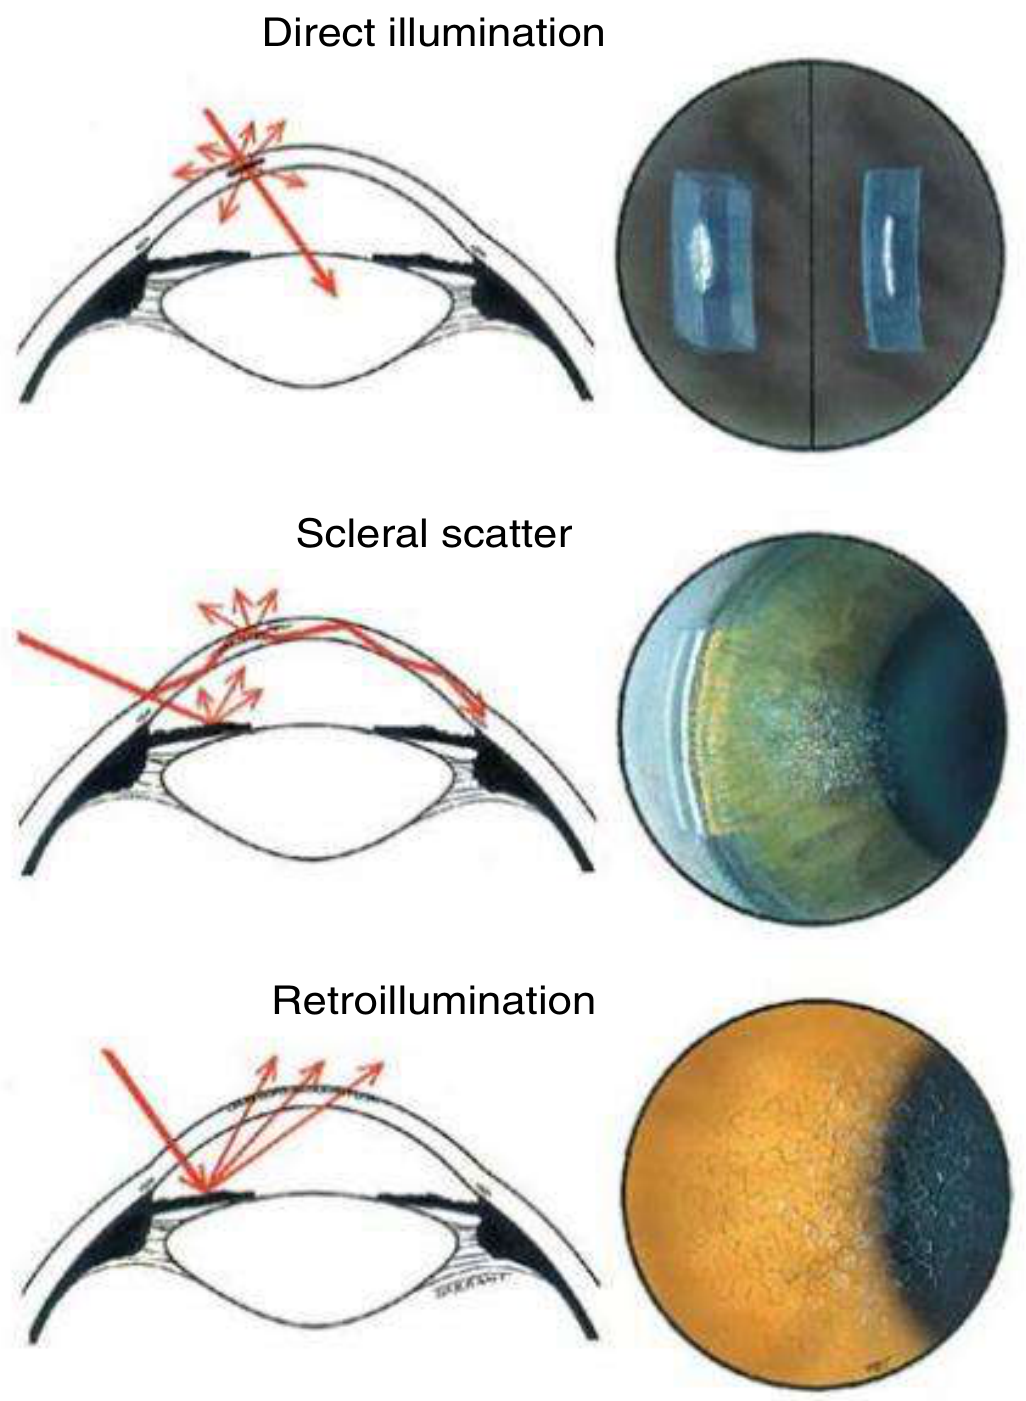
Fig. 1.27 from Kanski's Clinical Ophthalmology - Technique of slit lamp biomicroscopy of the anterior segment
3.1 Diffuse Illumination
- Setup: Wide, low-intensity beam; microscope and illumination system angled apart (~45°)
- Purpose: Initial survey examination; detect gross abnormalities of lids, conjunctiva, cornea
- Clinical uses: Lid margin disease, conjunctival injection, obvious corneal opacities, ptosis
3.2 Direct Focal Illumination (Optical Section / Parallelepiped)
This is the workhorse technique.
Parallelepiped:
- Medium-width slit beam (~2-3 mm wide)
- The beam cuts a rectangular block (parallelepiped) through the cornea
- Allows examination of epithelium, Bowman's layer, stroma, Descemet's membrane, and endothelium as distinct layers
- Used for routine corneal examination
Narrow optical section:
- Very thin slit beam
- Creates a cross-sectional "cut" through the cornea
- Moving this section across the cornea determines the exact depth of any lesion (epithelial, stromal, or endothelial)
- The height of the beam can be adjusted to measure the horizontal and vertical dimensions of a lesion
Focal beam (conical beam):
- Small, round spot of light directed into the anterior chamber
- Used to detect cells and flare (Tyndall effect - protein-rich aqueous scatters the beam)
- Grading of cells (0-4+) and flare (0-4+) quantifies anterior chamber inflammation
3.3 Scleral Scatter (Indirect Illumination)
- Setup: Slit beam is decentered laterally so light hits the limbus rather than the cornea; microscope remains focused centrally
- Mechanism: Light enters the cornea at the limbus and undergoes total internal reflection, traveling within the corneal stroma
- Any stromal opacity or cellular infiltrate scatters this internally reflected light and glows against a dark background
- Clinical uses: Subtle stromal haze, early corneal edema, corneal scars, cellular or lipid infiltration, early Fuchs' dystrophy
3.4 Retroillumination
- Mechanism: Light is reflected back from the iris (without dilation) or from the fundus (after dilation) to illuminate the cornea and lens from behind
- What it detects: Fine epithelial cysts, keratic precipitates (KPs), small corneal blood vessels (neovascularization), lens opacities, vitreous opacities
- Retroillumination from the iris = good for corneal changes
- Retroillumination from the fundus (after dilation) = good for lens and vitreous
3.5 Specular Reflection
- Setup: The angle of illumination equals the angle of observation (like looking at a mirror)
- What it shows: The corneal endothelium in specular reflection
- Clinical findings: Reduced cell density (in Fuchs' dystrophy), guttata (warty excrescences of Descemet's), pseudoguttata (reversible endothelial cell edema from inflammatory cells beneath the endothelium)
- This is the slit lamp equivalent of specular microscopy at a basic level
Summary Table: Illumination Techniques
| Technique | Beam Setup | Best For |
|---|---|---|
| Diffuse | Wide beam, ~45° | Survey, gross abnormalities |
| Parallelepiped | Medium slit | Layer-by-layer corneal exam |
| Optical section | Thin slit | Depth of corneal lesion |
| Conical beam | Small round spot | AC cells and flare |
| Scleral scatter | Beam at limbus | Subtle stromal haze |
| Retroillumination | Reflected from iris/fundus | KPs, epithelial cysts, lens opacities |
| Specular reflection | Equal incidence/reflection angle | Endothelium, guttata |
PART 4: SYSTEMATIC ANTERIOR SEGMENT EXAMINATION
The purpose of slit lamp examination of the cornea and anterior segment is to determine the position, depth, and size of any abnormality. - Kanski's Clinical Ophthalmology, p. 35
4.1 Eyelids and Adnexa
- Lid margin, meibomian gland orifices, lashes (trichiasis, distichiasis)
- Skin lesions, ptosis, lid retraction
- Lacrimal puncta
4.2 Conjunctiva
- Bulbar and palpebral conjunctiva (evert the lid for full assessment)
- Papillae vs follicles (papillae have central vascular core; follicles are avascular lymphoid aggregates)
- Chemosis, subconjunctival hemorrhage, symblepharon, pinguecula, pterygium
4.3 Cornea
Use the parallelepiped first to examine layer by layer:
- Epithelium: Erosions, edema (microcysts), dystrophies
- Bowman's layer: Subepithelial scarring
- Stroma: Infiltrates (location - superficial vs deep), scars, vascularization (superficial pannus vs deep stromal vessels), keratoconus (Fleischer ring, Vogt's striae)
- Descemet's membrane: Folds (suggests edema), ruptures (Haab's striae in buphthalmos)
- Endothelium: Use specular reflection; check for KPs, guttata, cell density loss
Fluorescein staining (with cobalt blue filter):
- Epithelial defects stain bright green
- Rose Bengal (or lissamine green) stains devitalized cells and mucus
- Pattern of staining helps diagnosis: punctate erosions (dry eye, toxicity), dendritic ulcer (herpes simplex), map/dot/fingerprint (basement membrane dystrophy)
4.4 Anterior Chamber (AC)
- Depth: Estimated visually; formally assessed by Van Herick method or gonioscopy
- Cells: Graded 0 to 4+ (grade 1 = 1-5 cells per 1 mm x 1 mm optical section, up to grade 4+ = hypopyon)
- Flare: Protein in the AC from breakdown of blood-aqueous barrier; graded 0-4+; the beam scatters in a smoke-like pattern ("Tyndall effect")
- Hypopyon: Layered white cells (pus) at the bottom of the AC - visible even without slit lamp; examine for organisms
- Hyphema: Layered blood in the AC
Van Herick Method for Angle Depth Estimation:
Using a thin, bright slit beam offset approximately 60° temporal to the oculars, the thickness of the cornea is compared to the depth of the peripheral anterior chamber:
- Grade 1: Chamber depth <1/4 corneal thickness → narrow angle, risk of closure
- Grade 2: Chamber depth = 1/4 corneal thickness → angle closure possible
- Grade 3: Chamber depth 1/4 to 1/2 corneal thickness → low risk
- Grade 4: Chamber depth ≥ corneal thickness → open angle, no closure risk
Note: Van Herick is an estimation only; formal gonioscopy is required for definitive angle assessment. - Wills Eye Manual
4.5 Iris
- Pattern, color, abnormal vessels (rubeosis iridis in ischaemic conditions)
- Posterior synechiae (iris adhering to lens capsule)
- Peripheral anterior synechiae (iris adhering to cornea/trabecular meshwork)
- Iridodonesis (trembling of iris = lens support lost)
- Transillumination defects (look with retroillumination)
4.6 Lens
Use retroillumination from the fundus (after dilation) for optimal assessment:
- Nuclear sclerosis: Yellow-brown discoloration of nucleus; graded 1-4
- Posterior subcapsular cataract (PSC): Plaque on posterior capsule, best seen on retroillumination
- Anterior subcapsular cataract: Star or shield-shaped
- Cortical cataract: Spoke-like water clefts in cortex
- Pseudoexfoliation material on anterior lens surface
- Position of intraocular lens (IOL) in pseudophakic eyes
PART 5: POSTERIOR SEGMENT EXAMINATION WITH THE SLIT LAMP
The slit lamp alone cannot visualize the posterior segment. Auxiliary lenses are required.
5.1 Non-Contact Lenses (Indirect Slit Lamp Biomicroscopy)
These give an inverted and laterally reversed image of the fundus.
| Lens | Diopter Power | Field of View | Working Distance | Magnification Correction |
|---|---|---|---|---|
| High magnification | 60 D | Posterior pole only | 13 mm | ×0.88-1.0 |
| General purpose | 78 D | Wide field | Intermediate | ×1.1 |
| Wide field | 90 D | Wide field | 7 mm | ×1.3 |
60 D lens - best for optic disc detail, macular detail (e.g., macular holes)
78 D lens - ideal general-purpose examination
90 D lens - useful when pupils are small, provides a wider view
Technique (Kanski's, p. 35):
- Slit beam width = approximately 1/4 of full round diameter
- Illumination set coaxial with the viewing system
- Magnification and light intensity at lowest settings initially
- Beam centred to pass directly through the patient's pupil
- Lens held directly in front of the cornea, just clearing the lashes, so the beam passes through its centre
- Fundus examined by moving the joystick and vertical adjustment while keeping the lens still
- Increase magnification for greater detail
- For peripheral retina: patient directed to look in the appropriate direction
5.2 Goldmann Three-Mirror Lens (Contact Lens)
The Goldmann three-mirror lens consists of four parts:
- A central lens (provides a view of the posterior pole)
- Three mirrors set at different angles:
- 73° mirror: Para-equatorial retina, equator
- 67° mirror: Equatorial and peripheral retina
- 59° mirror (gonioscopy mirror): Angle structures (used for gonioscopy)
Requires topical anaesthetic and coupling gel (e.g., hypromellose). Provides an excellent stereoscopic view of the fundus, peripheral retina, and angle.
PART 6: GONIOSCOPY
Gonioscopy is the examination of the iridocorneal angle (drainage angle) using a contact lens that neutralizes the total internal reflection at the corneal surface.
Why gonioscopy matters: The angle cannot be seen directly with any instrument because of total internal reflection at the cornea-air interface. A contact lens with a refractive index close to the cornea eliminates this.
6.1 Indirect Gonioscopy
Principle: A mirror inside the goniolens reflects angle rays at less than the critical angle, allowing them to pass through to the observer. Provides a mirror image of the opposite angle (the mirror shows the angle on the opposite side).
Goniolenses:
- Goldmann single-mirror lens - requires coupling fluid (hypromellose); classic design
- Goldmann three-mirror lens - the 59° mirror is specifically for gonioscopy
- Zeiss four-mirror lens (also Posner, Sussman) - flatter contact surface, no coupling fluid needed, used for indentation gonioscopy
Technique:
- Perform in a darkened room (ambient light affects pupil size and angle appearance)
- Slit beam: small, minimum intensity; do NOT direct through the pupil
- Instill topical anaesthetic; place coupling fluid on lens contact surface
- Patient looks upward; insert lens rapidly; patient looks straight ahead
- Examine all four quadrants systematically
- Increasing illumination after initial view helps define angle structures
- To see "over the hill" (convex iris obscuring the angle): ask patient to look toward the mirror (only slight movement)
Important pitfalls:
- Excessive pressure with non-indentation lens → narrows angle appearance (false positive for closure)
- Suction from lens → may artificially open angle
- Bright illumination before gonioscopy → dilates pupil → may open appositional closure
6.2 Indentation (Dynamic) Gonioscopy
Uses a four-mirror lens (Zeiss, Posner, or Sussman). The flat contact surface allows posterior pressure.
Technique: Gently press the lens against the cornea → forces aqueous into the angle → pushes peripheral iris posteriorly.
What it tells you:
- If angle opens with indentation → appositional closure (iris touching trabecular meshwork without adhesion) - potentially reversible
- If angle remains closed → peripheral anterior synechiae (PAS) - adhesions present, irreversible
Clinical pearl (Kanski's): Indentation gonioscopy is the gold standard to distinguish PAS from appositional closure.
6.3 Angle Grading Systems
Shaffer Grading (most common clinically):
- Grade 4: Wide open (35-45°) - closure impossible
- Grade 3: Open (25-35°) - closure unlikely
- Grade 2: Moderately narrow (20°) - closure possible
- Grade 1: Very narrow (10°) - closure probable
- Grade 0: Closed (0°)
Spaeth System: More detailed, describes iris insertion level, angular width, and iris configuration (flat/concave/convex).
Van Herick: Slit lamp estimation (non-contact, no goniolens required) - see Section 4.4 above.
PART 7: TONOMETRY AT THE SLIT LAMP
Goldmann Applanation Tonometry (GAT)
The gold standard for measuring intraocular pressure (IOP), performed directly on the slit lamp.
Principle (Imbert-Fick law): For a dry, thin, spherical membrane: pressure = force / area. The tonometer tip flattens a standardized area of 3.06 mm diameter. At this diameter, the tear film surface tension and corneal rigidity forces cancel each other out.
Technique:
- Instill fluorescein (combined with proparacaine/oxybuprocaine)
- Cobalt blue filter on the slit lamp
- Tonometer prism placed on the cornea
- View through the eyepiece shows two semicircles (mires)
- Increase dial pressure until the inner edges of the two mires just touch
- Read the pressure from the dial (multiply by 10 to get mmHg)
- Normal IOP: 10-21 mmHg
Sources of error:
- Thick cornea (e.g., after LASIK) → overestimates IOP
- Thin cornea → underestimates IOP
- Corneal edema → underestimates IOP
- Astigmatism >3D → may require axis correction (prism rotated 45°)
PART 8: ADVANCED TECHNIQUES AND ACCESSORY INVESTIGATIONS
8.1 Pachymetry (Central Corneal Thickness)
- Optical pachymetry can be performed at the slit lamp using a split image
- Ultrasound pachymetry is more common clinically (not slit lamp based)
- CCT affects IOP interpretation and is a risk factor for glaucoma progression
8.2 Fluorescein Angiography of the Anterior Segment
- Anterior segment fluorescein angiography (ASFA) can be performed with the slit lamp + cobalt blue filter + camera attachment
- Shows iris vasculature, corneal neovascularization, limbal vessels
8.3 Confocal Microscopy vs Slit Lamp
- In vivo confocal microscopy (IVCM) provides cellular-level imaging (Langerhans cells, endothelial cells, nerves)
- Beyond slit lamp capability, but slit lamp findings guide when IVCM is needed
8.4 Ultrasound Biomicroscopy (UBM)
- Uses 50 MHz ultrasound to image the posterior chamber, ciliary body, pars plana (areas not accessible to any slit lamp technique)
- Especially useful in narrow-angle assessment and ciliary body tumors
8.5 Portable / Hand-Held Slit Lamp
- Allows high-quality examination of the anterior segment in patients who cannot be positioned at a standard slit lamp (e.g., bedridden, ICU, children under anaesthesia, remote settings) - Kanski's, p. 36
- Increasingly available in emergency departments worldwide
PART 9: ANTERIOR UVEITIS - CLINICAL ASSESSMENT AT THE SLIT LAMP
The slit lamp is the definitive tool for diagnosing and grading anterior uveitis (iritis/iridocyclitis).
Key findings on slit lamp examination:
- Cells in the anterior chamber - lymphocytes and macrophages; graded 0-4+ using the conical beam technique
- Flare - protein leakage from inflamed iris vasculature; Tyndall effect in the beam; graded 0-4+
- Keratic precipitates (KPs) - inflammatory cells deposited on the posterior corneal endothelium:
- Fine/stellate KPs: Non-granulomatous uveitis (HLA-B27 associated)
- Mutton-fat KPs (large, greasy): Granulomatous uveitis (sarcoidosis, tuberculosis, Vogt-Koyanagi-Harada)
- Distribution: Lower cornea (Arlt's triangle) in most, or diffuse
- Posterior synechiae - iris adherent to anterior lens surface; seen as irregular pupil
- Hypopyon - severe inflammation with layered pus (HLA-B27, Behcet's, endophthalmitis)
- Iris nodules: Koeppe (pupil margin), Busacca (iris stroma) - both suggest granulomatous disease
- Slit-lamp examination reveals inflammatory cells in the anterior chamber. These cells may be deposited on the posterior corneal endothelium and are called keratic precipitates. - Rheumatology (Elsevier), p. block 4
PART 10: GRADING SYSTEMS USED AT THE SLIT LAMP
10.1 Anterior Chamber Cells (SUN Working Group Grading)
| Grade | Cells per 1 mm x 1 mm Field |
|---|---|
| 0 | <1 |
| 0.5+ | 1-5 |
| 1+ | 6-15 |
| 2+ | 16-25 |
| 3+ | 26-50 |
| 4+ | >50 (or hypopyon) |
10.2 Flare Grading
| Grade | Description |
|---|---|
| 0 | None |
| 1+ | Faint (barely detectable) |
| 2+ | Moderate (iris/lens details clear) |
| 3+ | Marked (iris/lens details hazy) |
| 4+ | Intense (fixed, coagulated aqueous) |
10.3 Nuclear Sclerosis (Lens) - LOCS III
| Grade | Description |
|---|---|
| 1 | Faint yellow tinge |
| 2 | Yellow |
| 3 | Deep yellow |
| 4 | Brownish (brunescent) |
10.4 Corneal Vascularization
- Superficial vessels (within epithelium/Bowman's) - pannus, usually trachoma, contact lens wear, superior limbic keratoconjunctivitis
- Deep stromal vessels - interstitial keratitis (syphilis, HSV), severe alkali burns
PART 11: CLINICAL APPLICATIONS SUMMARY
| Condition | Key Slit Lamp Finding | Technique Used |
|---|---|---|
| Corneal ulcer | Epithelial defect + stromal infiltrate | Optical section, fluorescein |
| Dry eye | Punctate epithelial erosions | Fluorescein staining |
| Fuchs' dystrophy | Guttata + reduced endothelial cell density | Specular reflection |
| Anterior uveitis | Cells, flare, KPs | Conical beam (AC), optical section |
| Acute glaucoma | Corneal edema, shallow AC | Optical section, Van Herick |
| Keratoconus | Fleischer ring, Vogt's striae | Diffuse + retroillumination |
| Cataract | Nuclear/PSC/cortical changes | Retroillumination |
| Peripheral retinal tear | Lattice, breaks | 3-mirror Goldmann lens |
| Angle closure | Narrow angle, iris bombe | Van Herick, gonioscopy |
| PAS vs appositional | Closed angle | Dynamic/indentation gonioscopy |
| Corneal foreign body | Depth of penetration | Optical section |
PART 12: PRACTICAL TIPS AND COMMON MISTAKES
- Always start with low magnification and diffuse light for a survey - don't zoom in before you've seen the whole picture.
- Cobalt blue filter + fluorescein is indispensable for corneal epithelial disease.
- Darken the room for gonioscopy and AC cell/flare assessment - ambient light affects both.
- Do not use contact goniolenses if penetrating injury is suspected, or in the presence of corneal trauma, hyphaema, or active corneal infection. - Kanski's, p. 32
- Van Herick grading is not a substitute for gonioscopy - it is a screening estimate only.
- For AC cell/flare: the conical beam (small, round) rather than a slit is the correct setup.
- Scleral scatter is the best way to detect early or subtle corneal stromal haze - do not confuse this with direct focal illumination.
- When examining the posterior segment with a non-contact lens, keep the lens still and move the joystick/slit lamp - not the lens.
- Specular reflection requires exact angle matching - the observer's eye, cornea, and light source must be co-planar.
- For red-free filter: vascular structures appear black (enhanced contrast); use for disc vessel assessment and corneal neovascularization.
Primary reference: Kanski's Clinical Ophthalmology: A Systematic Approach, 10th Edition - Chapter 1
Supporting: Wills Eye Manual (Van Herick grading), Rheumatology Elsevier (uveitis findings), Robbins Pathologic Basis of Disease (anterior segment inflammation)
More detail
Finding Sources
Finding Sources
Finding Sources
Finding Sources
Finding Sources
Finding Sources
Finding Sources
Reading File
Reading File
Reading File
Reading File
Reading File
Reading File
Searching the Web
slit lamp biomicroscopy illumination techniques optical principles detailed ophthalmology textbook
Reading Web Page
https://www.ncbi.nlm.nih.gov/books/NBK587440
Reading File
Reading File
Loading Image
Loading Image
Reading File
Loading Image
Here is the greatly expanded, more detailed version of the notes:
SLIT LAMP BIOMICROSCOPY - COMPLETE DETAILED NOTES
Basic to Advanced - Comprehensive Reference
Sources: Kanski's Clinical Ophthalmology 10th Ed., Wills Eye Manual, ROSEN's Emergency Medicine, Pfenninger & Fowler's Procedures for Primary Care, StatPearls (NIH), AAO, Rheumatology (Elsevier)
MODULE 1: HISTORICAL DEVELOPMENT AND BASIC PHYSICS
1.1 History
| Year | Event |
|---|---|
| 1911 | Alvar Gullstrand introduced the first slit lamp illuminator (Nobel Prize 1911 for optics) |
| 1916 | Henker combined Gullstrand's illuminator with Czapski's corneal microscope - first practical slit lamp |
| 1920s | Vogt refined the instrument for clinical use; described many corneal signs still named after him |
| 1936 | Comberg established the co-pivotal, iso-centric relationship (the fundamental modern design) |
| 1950s | Haag-Streit developed the 900 model - still a gold standard today |
| 1970s+ | Video documentation, digital imaging attachments |
| 2000s+ | Anterior segment OCT, confocal microscopy supplementing but not replacing slit lamp |
1.2 Why the Slit? - Optical Basis
The key principle of slit lamp optics is Tyndall scattering: when a narrow beam of light passes through a transparent medium containing particles (cells, proteins, pigment), those particles scatter the light and become visible against a dark background - exactly as sunlight entering a dusty room makes airborne particles visible. This allows:
- Individual corneal layers to be "optically sectioned" (separated by depth)
- Cells floating in otherwise clear aqueous to be detected
- Fine opacities invisible to naked eye to be visualized
The eye is the only organ in the body where you can look along the axis of a light beam passing through transparent tissue - the cornea, aqueous, lens, and vitreous are all exploited this way.
MODULE 2: INSTRUMENT COMPONENTS IN DETAIL
2.1 Two Major Designs
There are two fundamental slit lamp designs, both in widespread use:
Zeiss-type (Zeiss, Topcon, Nikon):
- Light source located at the base of the instrument
- Light travels up through the stand to the illumination head
- Generally more compact
Haag-Streit type (Haag-Streit 900 series):
- Light source located at the top of the illumination arm
- Considered by many as the gold standard for clinical use
- More stable, preferred for tonometry
2.2 The Illumination System (Köhler/Gullstrand System)
The optical system in modern slit lamps is based on the Köhler illumination system - the same principle used in 35mm slide projection but with a much shorter focal length.
Components in sequence:
- Light source - Historically Nernst lamp → Nitra lamp → arc lamp → mercury vapor → halogen lamp (most common today) → some modern units use LED. Output: 2×10 to 4×10 lux
- Condenser lenses - Two plano-convex lenses with convex surfaces facing each other; collect and focus light from the source
- Slit diaphragm - The defining feature: a variable-width aperture that creates the slit beam. Controls:
- Slit width (0 mm to full round)
- Slit height (adjustable, can be stopped down to a small square or pinpoint)
- Slit rotation (0° to 180°, allows beam to be oriented horizontally, vertically, or obliquely)
- Projection lens - Projects the focused slit image into the patient's eye plane
- Filter holder - Between the light source and the eye; holds interchangeable colored and neutral-density filters
- Anti-reflection coatings - All glass surfaces are coated; reduces light loss from 15%+ to ~1.5% per surface, giving a total brightness gain of ~20% vs. uncoated optics
Filters in detail:
| Filter | Color/Type | Uses |
|---|---|---|
| Cobalt blue | Deep blue (430-490 nm) | Fluorescein staining, Goldmann tonometry, TBUT, Seidel test |
| Red-free (green) | Green (540-560 nm) | Makes red/orange structures appear black - enhances contrast for vascular structures, nerve fibers, hemorrhages |
| Neutral density | Grey (colorless) | Reduces intensity for photophobic patients without changing color |
| Yellow (Wratten) | Yellow | Used with rose Bengal / lissamine green staining |
| Heat filter | Infrared-absorbing | Protects patient's eye from heat of halogen lamp |
2.3 The Observation System (Stereomicroscope)
Standard magnification range: 5x-40x. Most routine clinical work is done at 6x-25x.
Construction:
- Binocular eyepieces (typically 10x or 12.5x) with adjustable interpupillary distance
- Objective lens system - typically a Galilean telescope system
- Magnification changer (drum or lever) - gives preset magnification steps. Common steps: 6x, 10x, 16x, 25x, 40x
- Some Nikon and Zeiss models have a zoom system for continuously variable magnification (7x-35x range)
- The stereoscopic angle (angle between the two optical axes) gives depth perception - this is why the slit lamp reveals depth in corneal lesions that a simple torchlight cannot
Choosing magnification:
- 6-10x: Diffuse survey, lids/lashes, conjunctiva, pupil, overall anterior segment
- 10-16x: Van Herick angle estimation, corneal staining, general anterior chamber assessment
- 16-25x: Keratic precipitates, corneal detail, cell and flare in AC, lens examination
- 25-40x: Endothelium (specular reflection), fine epithelial changes, iris detail
2.4 The Mechanical System
Joystick: Controls movement in two planes:
- Tilting forward/backward: moves slit lamp toward/away from the patient (focusing)
- Moving left/right: horizontal scanning
- Rotation of joystick base: sometimes vertical height in some models
Vertical adjustment: Separate knob or lever for raising/lowering the instrument
Illumination arm rotation: The illumination arm rotates around the same pivot point as the microscope (co-focal / co-pivotal design). This means that at any angle, the beam and the viewing system remain focused on the same point in space. The scale of the angle between the two arms is marked on the instrument (typically 0-90°).
Chinrest and headband:
- Chinrest has an adjustable height (screw or lever) to bring the patient's eye level to the marked line on the upright
- Headband has a cushioned surface; patient presses forehead firmly against it throughout the examination
- Without firm head contact, fine movements of the slit lamp are wasted because the patient's eye moves
MODULE 3: PRE-EXAMINATION SETUP - STEP BY STEP
3.1 Setting Up the Instrument
- Neutralize the eyepieces: Turn each eyepiece to 0 (or use a target at optical infinity) before starting. If you have a refractive error, dial it into the eyepieces so you examine without your glasses (reduces distortion and reflections).
- Set interpupillary distance: Look through both eyepieces, adjust the binocular bar until a single circular field is seen (not two separate circles).
- Set the table height: Adjust so the patient can sit upright with chin in the rest without stooping or craning.
- Center the slit beam: With the instrument joystick centered, check that the slit beam falls in the center of the visual field.
- Start with low magnification (6-10x) and diffuse, low-intensity light for initial patient approach.
3.2 Patient Setup
- Explain the examination to the patient: "I am going to shine a bright light into your eye and look closely. Please keep both eyes open and try not to blink."
- Ask the patient to keep both eyes open at all times - blinking is natural but a reminder helps. Voluntary suppression of blink reflex is important when examining around the cornea.
- Patient's forehead firmly against the headband - loose contact causes drift.
- Chin in chin rest, adjusted so the lateral canthus is level with the marked line on the upright post.
- Instruct the patient to look straight ahead (or at a specific fixation target like the examiner's ear).
MODULE 4: ILLUMINATION TECHNIQUES - FULLY EXPANDED
This section is the heart of slit lamp biomicroscopy. The seven standard illumination techniques each exploit different optical principles.
4.1 Diffuse Illumination
Setup:
- Slit at maximum width (full round beam) or with diffusing filter inserted
- Illumination angle: 30-45° to microscope axis
- Magnification: Low (6-10x)
- Illumination intensity: Medium to high
- No decoupling of illumination and viewing arms
Optical principle: Wide-field, non-focused flood light over the surface
What you see and what you look for:
- Overall survey of lids, lashes, palpebral conjunctiva, bulbar conjunctiva, episclera, cornea
- Lid margin - meibomian gland orifices (blocked/plugged vs. clear), tylosis, anterior/posterior lid margin
- Conjunctiva: injection pattern (ciliary = deep purple ring near limbus = intraocular inflammation; conjunctival = bright red peripheral vessels = surface inflammation), chemosis, papillae, follicles
- Cornea: gross haze, large foreign bodies, obvious vascularization
- Pupil: shape, size, symmetry, relative afferent pupillary defect can be screened here
- Iris color, symmetry, obvious iris lesions (nevi, cysts, melanoma)
Key distinguishing feature - papillae vs follicles:
- Papillae: Red, velvety appearance on palpebral conjunctiva; each papilla has a central vascular core - seen in allergic conjunctivitis, blepharitis, contact lens wear
- Follicles: Pale, avascular, greyish-white elevations like grains of rice; seen in viral conjunctivitis, chlamydial infection, drug toxicity. The classic "follicular response" is follicles on the lower palpebral conjunctiva.
4.2 Direct Focal Illumination
The beam and microscope are both focused on the same point in the tissue. This is the most commonly used technique and has three important subtypes.
4.2a Parallelepiped (Standard Direct Focal Illumination)
Setup:
- Slit width: 2-4 mm (medium - not a thin optical section, not a wide diffuse beam)
- Illumination angle: 45-60° to microscope axis
- Magnification: 10-25x depending on what layer is being assessed
- The slit cuts a rectangular 3D block (parallelepiped = a six-sided figure) through the tissue
What it shows:
The slit beam enters the cornea and illuminates a rectangular block of tissue. Because of the oblique angle, you can resolve five distinct optical zones:
- Bright epithelial reflection (front surface)
- Epithelium and anterior stroma (lit zone)
- Dark zone (deep stroma, relatively transparent)
- Endothelial/Descemet reflection (back surface)
- The anterior lens surface (lit separately behind the AC)
Clinical uses:
- Routine corneal examination - looking for epithelial irregularity, stromal infiltrates, folds in Descemet's membrane
- The parallelepiped is your starting beam for every corneal examination
4.2b Optical Section (Thin Focal Section)
Setup:
- Slit width: As thin as possible (0.1-0.3 mm) - the thinnest the instrument allows
- Illumination angle: 45-60°
- Magnification: 16-25x
What it shows:
A true optical cross-section of the cornea, showing all five layers simultaneously in one view as a thin bright bar. Moving this section systematically across the cornea from limbus to limbus maps the depth of any lesion encountered.
Determining lesion depth - the critical skill:
As you move the section, the slit "cuts through" the lesion. Where the lesion interrupts the section tells you the depth:
- Interruption in the front of the slit = epithelial/Bowman's
- Interruption in the middle of the slit = stromal
- Interruption at the back of the slit = Descemet's/endothelial
The height of the beam can be reduced to measure the vertical extent of a lesion. Similarly, the length of the illuminated bar where the abnormality appears gives the horizontal extent of the lesion.
Clinical uses:
- Depth of corneal foreign body (critical before removal - must know if anterior stromal only or full-thickness)
- Depth of corneal ulcer (epithelial vs. stromal vs. Descemet's involvement - descemetocele = imminent perforation)
- Corneal thinning in keratoconus (the "cone" appears as thinning of the optical section)
- Corneal edema (stroma appears thicker and hazy)
- Post-surgical changes (Descemet's folds after AC surgery)
4.2c Conical Beam (Pinpoint Beam / AC Cell Examination)
Setup:
- Beam reduced to a small, round spot (2x1 mm or smaller) - short and narrow
- Illumination angle: 45-60° temporal and directed at the pupil (so the dark pupil acts as background)
- Magnification: 16-25x (high)
- Intensity: Maximum
- Focus the beam in the anterior chamber between the cornea and the anterior lens surface in the darkest zone
Optical principle: The bright conical shaft of light passes through the aqueous. Normal aqueous is optically empty. If cells are present, they scatter light and become visible as bright particles floating in the beam (like dust in a sunbeam - the Tyndall effect). Flare (dissolved protein) makes the entire beam hazy and milky.
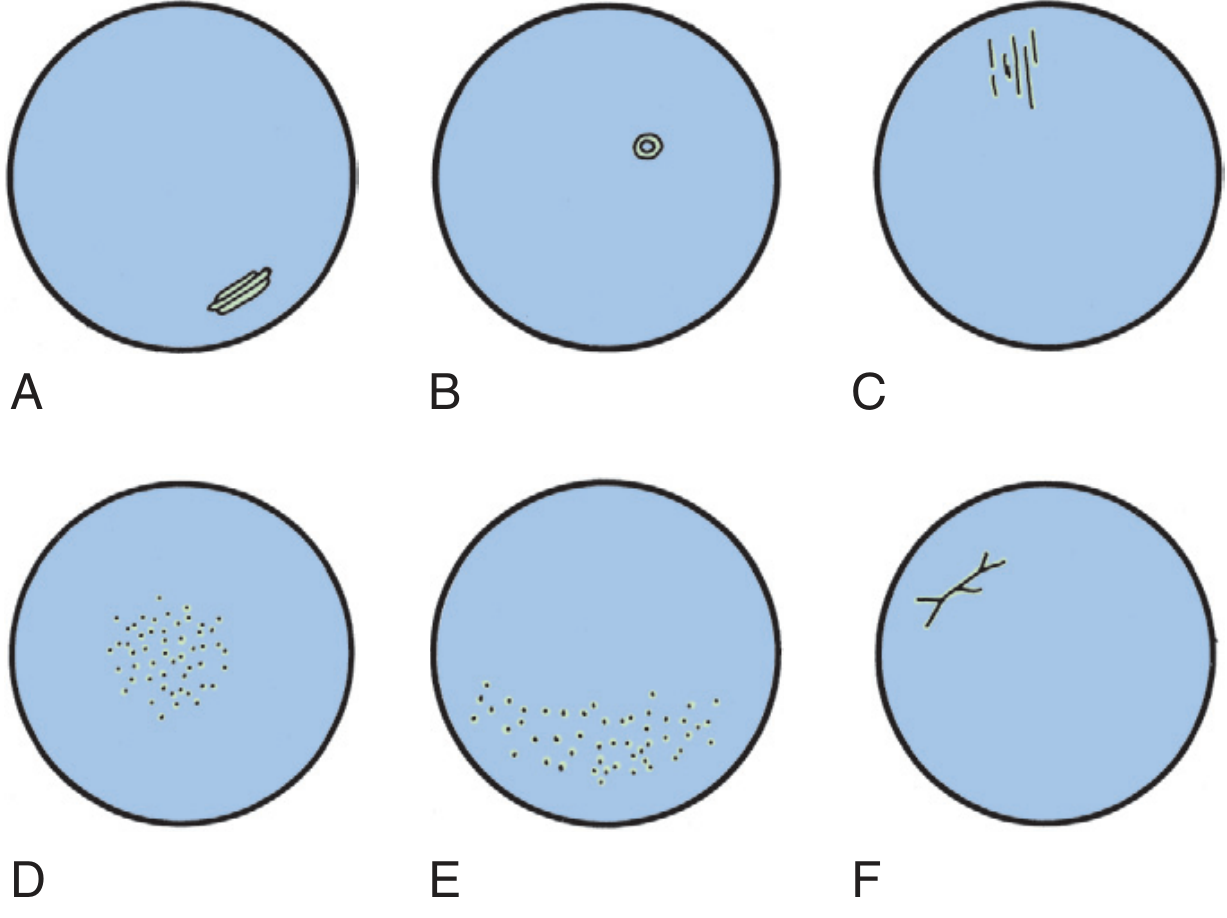
Corneal defect staining patterns: A - typical abrasion, B - around foreign body, C - conjunctival foreign body under upper lid, D - contact lens overuse, E - UV exposure, F - herpetic dendritic keratitis. (Pfenninger & Fowler)
Grading AC Cells (SUN Working Group, 2005 - universally adopted):
| Grade | Cells seen in 1 mm × 1 mm optical field |
|---|---|
| 0 | < 1 |
| 0.5+ | 1-5 |
| 1+ | 6-15 |
| 2+ | 16-25 |
| 3+ | 26-50 |
| 4+ | > 50 OR hypopyon visible |
Grading Flare:
| Grade | Description |
|---|---|
| 0 | No flare; beam invisible in AC |
| 1+ | Faint (just barely perceptible) |
| 2+ | Moderate (beam visible, iris and lens details clear) |
| 3+ | Marked (beam very visible, iris/lens details hazy) |
| 4+ | Intense (fibrinous exudate in AC; "plastic" aqueous; fixed, coagulated appearance) |
Important: Cells and flare are graded separately - they reflect different pathological processes. Cells = active cellular inflammation. Flare = breakdown of blood-aqueous barrier (can persist even when cells resolve, or can be chronic in Fuchs' heterochromic cyclitis).
4.2d Tangential (Oblique) Illumination
Setup:
- Slit beam directed at the iris or corneal surface from a very oblique angle (80-90° from the viewing axis)
- Also called "grazing illumination"
What it shows:
- Surface irregularities are dramatically highlighted by shadows. Fine elevation and depression of surfaces become visible.
- Best for iris surface topography - iris crypts, atrophy, nodules
- Fine corneal surface irregularity (used in contact lens fitting)
- Pterygium head and its relationship to Bowman's layer
4.3 Scleral Scatter (Sclerotic Scatter)
Setup:
- Decouple the illumination and viewing arms (they do NOT look at the same point)
- Direct the slit beam at the limbus (corneoscleral junction) while the microscope remains focused centrally on the cornea
- Magnification: Low (6-10x)
- Beam: Medium width
Optical principle: Light enters the corneal stroma at the limbus. Because the corneal stroma has a refractive index higher than the surrounding sclera and air, light undergoes total internal reflection and travels through the stroma from limbus to limbus like a fiber-optic cable. The normal cornea is so clear that no light escapes; it re-emerges at the opposite limbus (which glows). Any opacity, cellular infiltrate, or lipid deposit in the stroma scatters this internally traveling light and glows brightly against the dark background.
Clinical uses:
- Subtle early corneal edema - the finest stromal haze not visible with direct illumination
- Early Fuchs' endothelial dystrophy - subtle guttata and stroma changes
- Krukenberg spindle (vertical band of pigment on endothelium in pigment dispersion)
- Corneal scars - full extent mapped
- Lipid keratopathy - lipid deposits in stroma
- Map-dot-fingerprint dystrophy (epithelial basement membrane dystrophy) - this is the classic condition where sclerotic scatter reveals the full extent of the epithelial changes
- Foreign bodies not obvious on direct illumination
4.4 Retroillumination
Principle: Light is not directed at the structure being examined from the front; instead, light passes through the structure and is reflected from a deeper surface behind it, illuminating the structure from the back.
4.4a Iris Retroillumination (without dilation)
Setup: Focus the microscope on the cornea. Direct the beam so it passes through the cornea and reflects off the iris. The corneal abnormalities are now lit from behind by the reflected light off the iris.
What it detects:
- Keratic precipitates (KPs): Appear as dark or translucent spots against the bright orange-yellow reflected iris glow
- Corneal vesicles, bullae (bullous keratopathy)
- Corneal vascularization - fine blood vessels show up
- Epithelial edema - fine microcysts
- Corneal guttata (Fuchs') - dark "holes" against lit background
- Fine deposits on posterior corneal surface
4.4b Fundal Retroillumination (with dilation, Red Reflex Technique)
Setup: Dilate the pupil. Align the slit beam to pass through the pupil and reflect off the fundus (retina). The lens (and vitreous) are then back-lit by the red fundal reflex.
What it detects:
- Posterior subcapsular cataract (PSC) - the most dramatic - appears as a dark plaque against the red reflex
- Nuclear sclerosis - overall haze and coloration
- Cortical spokes and water clefts
- Vitreous opacities and floaters
- Iris transillumination defects - holes in the iris (pigment dispersion syndrome, pseudoexfoliation, trauma, rubeosis)
- IOL position in pseudophakic eyes
4.5 Specular Reflection
Principle: When light strikes a polished, mirror-like surface at a critical angle (equal angle of incidence and reflection), a specular (mirror-image) reflection occurs. This shows the surface features of the reflecting layer itself.
Setup:
- The illumination beam angle must equal the angle of observation - examiner's eye, beam, and corneal surface all in the same plane
- This is typically achieved at 40-60° illumination angle
- Magnification: 25-40x (highest)
- Narrow-medium slit
What it shows:
The corneal endothelium is the main target. Normal endothelial cells appear as a mosaic of hexagonal cells (like honeycomb). Abnormalities:
- Guttata (Fuchs' dystrophy): Irregular dark spots against the hexagonal mosaic; represent warty excrescences of Descemet's membrane that displace and destroy cells
- Pseudoguttata: Similar appearance but due to inflammatory cells adsorbed on the endothelial surface or reversible endothelial edema; resolves with treatment - important not to confuse with true guttata
- Reduced cell density (polymegethism = variable cell size; pleomorphism = variable cell shape) - sign of stressed endothelium
- Keratic precipitates - aggregates on endothelium
- Corneal epithelial surface can also be examined by specular reflection (looking at the air-tear film interface)
Tear film by specular reflection: The oily layer of the tear film creates colorful interference fringes (like oil on water) when examined this way. A disrupted or absent lipid layer shows chaotic fringes or no fringes - seen in meibomian gland dysfunction.
4.6 Indirect Illumination (Adjacent Focus)
Setup:
- Slit beam focused adjacent to the area of interest (not on it directly)
- Viewing arm focused on the area to be examined
- Beam angle: 30-45° to the viewing arm
- Beam width: Moderate
Optical principle: Light from the illuminated area scatters and illuminates adjacent structures from the side, creating a bright zone next to a dark zone. Structures are seen by lateral scatter rather than direct illumination.
Clinical uses:
- Corneal infiltrates (especially subtle ones) - they appear bright against the dark background of the adjacent zone
- Corneal microcysts and vacuoles
- Epithelial cells and their arrangement
- Used when direct focal illumination creates too much glare for comfortable examination
4.7 Oscillating Illumination of Koeppe (Special Technique)
Setup: The slit beam is oscillated rapidly back and forth (or manually swept).
Use: Sometimes used to distinguish fixed from mobile particles in the AC, though this is rarely practiced in routine clinics. More of historical interest.
MODULE 5: SYSTEMATIC ANTERIOR SEGMENT EXAMINATION - STRUCTURE BY STRUCTURE
5.1 Lid Margin Examination
The lid margin is examined with diffuse illumination then tangential illumination for detail.
What to assess:
- Anterior lid margin (lash line): Lash position (trichiasis = inward-turning lashes, distichiasis = extra row of lashes), cylindrical dandruff (collarettes of Demodex infestation), crusting (seborrhoeic or staphylococcal blepharitis)
- Posterior lid margin (meibomian gland orifices): Normal = round, clear orifices with clear oil expression. Abnormal = plugged/blocked orifices, toothpaste-like secretions, telangiectasia of the lid margin
- Lid margins themselves: Thickening, ulceration (malignancy?), notching, tylosis (thickened lid from chronic inflammation)
- Puncta: Size (stenosed or enlarged), ectropion of punctum, patency
Evert the upper lid (always): Upper tarsal conjunctiva is examined for papillae, follicles, giant papillae (contact lens patients), scarring, foreign bodies embedded under the lid. This step is mandatory; many corneal erosions are caused by tarsal plate foreign bodies invisible without lid eversion.
5.2 Conjunctiva
Assessment pattern - work systematically:
- Bulbar conjunctiva (temporal first - most surface area visible)
- Limbal area (limbal follicles, Trantas dots in vernal keratoconjunctivitis, pannus)
- Lower palpebral conjunctiva (evert lower lid)
- Upper palpebral conjunctiva (double eversion if needed for superior fornix)
Key findings:
| Finding | Pattern | Diagnosis |
|---|---|---|
| Papillae (large, cobblestoning) | Upper tarsal plate | Giant papillary conjunctivitis (VKC, CL wear) |
| Follicles (lower tarsal plate) | Lower palpebral | Viral/chlamydial/drug toxicity |
| Ciliary injection | Ring around limbus, deep purple/red | Intraocular inflammation or corneal pathology |
| Conjunctival injection | Peripheral, bright red | Surface inflammation |
| Chemosis | Edema of bulbar conjunctiva | Allergy, thyroid disease, cavernous sinus thrombosis |
| Subconjunctival hemorrhage | Flat, red patch | Trauma, Valsalva, spontaneous (hypertension, bleeding disorder) |
| Symblepharon | Conjunctiva adhering to cornea | Cicatricial conjunctivitis (SJS, OCP, chemical burn) |
| Pinguecula | Yellowish nasal/temporal limbal lesion | UV degeneration (no invasion of cornea) |
| Pterygium | Wing-shaped growth from limbus onto cornea | UV degeneration (invades cornea - this is the distinction from pinguecula) |
5.3 Cornea - Layer by Layer Examination
Examination sequence: Diffuse → Parallelepiped → Optical section → Scleral scatter → Retroillumination → Specular reflection (for endothelium last)
Epithelium (5 cell layers, 50 μm total)
- Fluorescein staining reveals epithelial defects: use cobalt blue filter + fluorescein strip (moisten and touch to lower fornix)
- Intact epithelium does not take up fluorescein
- Staining patterns (memorize these):
| Pattern | Likely Diagnosis |
|---|---|
| Central patch abrasion | Traumatic corneal abrasion |
| Around central opacity | Foreign body halo |
| Superior horizontal band | Conjunctival foreign body under upper lid (evert!) |
| Diffuse punctate (inferior 1/3) | Dry eye, blepharitis (exposed zone) |
| Diffuse punctate (all zones) | Drug toxicity (especially preservatives), UV exposure |
| Dendritic ulcer (branching) | Herpes simplex keratitis (HSK) |
| Geographic ulcer (large, amoeboid) | Advanced HSK, Acanthamoeba |
| Circular ring infiltrate | Acanthamoeba keratitis (pathognomonic) |
Rose Bengal / Lissamine Green staining: Stains devitalized or poorly protected epithelial cells (not just absent cells). Use for dry eye assessment (interpalpebral staining pattern in dry eye), and to reveal the full extent of dendritic lesions in HSK.
Tear Break-Up Time (TBUT): With cobalt blue filter and fluorescein, observe the tear film without blinking. Normal TBUT > 10 seconds. < 5 seconds = unstable tear film (aqueous or lipid deficiency dry eye).
Bowman's Layer (12 μm, acellular)
- Cannot regenerate if destroyed
- Subepithelial scarring appears as grey-white haze just under epithelium
- Subepithelial infiltrates in epidemic keratoconjunctivitis (adenoviral) appear as discrete fine grey dots at Bowman's level, persisting for months after active infection
Stroma (500 μm - 90% of corneal thickness)
The largest layer; most pathology happens here.
Normal stroma: Grey-white with oblique parallelepiped, optically transparent with thin optical section
Abnormal findings:
- Infiltrate (focal opacity): Look for depth and density
- Superficial peripheral = marginal keratitis (staph hypersensitivity) - sterile, responds to steroids
- Central + dense + epithelial defect = corneal ulcer (infectious until proven otherwise)
- Deep stromal + vascularized = interstitial keratitis (syphilis, HSV, TB, Lyme)
- Edema (increased stroma thickness and haze): Look for folds in Descemet's (indicates significant edema) - Haab's striae (horizontal/curvilinear folds from congenital glaucoma)
- Vascularization:
- Superficial: Fine, bright red vessels in Bowman's/superficial stroma (pannus) - trachoma, contact lens, rosacea
- Deep: Salmon-pink ghost vessels deep in stroma - healed interstitial keratitis (syphilis) - Hutchinson's triad
- Keratoconus signs (all seen best with optical section):
- Fleischer ring: Iron deposit ring at the cone base (in epithelium) - best seen with red-free filter
- Vogt's striae: Fine vertical stress lines in deep stroma and Descemet's - disappear with gentle pressure on globe
- Corneal thinning: Optical section shows the cone as an area of dramatically thinned cornea
- Munson's sign: Seen externally - cone indents lower lid on downgaze (not a slit lamp finding but clinically associated)
Descemet's Membrane (10 μm, secreted by endothelium)
- Normally: smooth, thin, barely visible as a bright line at back of optical section
- Folds: Indicate stromal edema (pushing from in front)
- Ruptures (Haab's striae): Horizontal or concentric breaks from stretching in congenital glaucoma - permanent, treated like a scar
- Descemetocele: Hernia of Descemet's through a corneal ulcer - the optical section shows extreme thinning with a "bulge" of only Descemet's remaining - surgical emergency
- Duplication (rare): In Peter's anomaly, cornea-iridocorneal adhesions
Endothelium (single cell layer, ~500,000 cells total, non-regenerating)
Examined with specular reflection at highest magnification.
- Normal cell density: 2500-3000 cells/mm² in young adults; >2000 cells/mm² is required for corneal clarity
- Below 500 cells/mm²: Decompensation likely → bullous keratopathy
- Guttata (Fuchs' dystrophy): Warty collagen deposits on Descemet's that displace endothelial cells; appear as dark holes in the specular reflection mosaic
- Keratic precipitates (KPs): Aggregates of inflammatory cells/fibrin deposited on the endothelium
KP Morphology and Diagnosis - Expanded:
| KP Type | Appearance | Significance |
|---|---|---|
| Fine/stellate | Small, white, star-shaped | Non-granulomatous uveitis (HLA-B27, juvenile idiopathic arthritis) |
| Mutton-fat | Large, greasy, irregular | Granulomatous uveitis (sarcoidosis, tuberculosis, VKH, sympathetic ophthalmia) |
| Old pigmented | Flat, pigmented, irregular margin | "Burnt out" old uveitis; usually non-granulomatous |
| Keratic precipitates on endothelium distribution - Arlt's Triangle | Lower 1/3 of cornea; triangular arrangement with apex at pupil | Convection currents in AC carry cells to lower cornea |
| Diffuse (all endothelium) | Scattered throughout | Fuchs' heterochromic cyclitis (also in herpes) |
| Linear (Khodadoust line) | Band of KPs moving centripetally | Allograft endothelial rejection (slit lamp EMERGENCY - must treat immediately with intensive steroids) |
5.4 Anterior Chamber
Depth assessment:
Normal central AC depth = 2.5-3.5 mm. Assessed by:
- Clinical estimation with optical section - compare corneal thickness to AC depth
- Van Herick method - see full detail below
- Formal measurement - A-scan ultrasound, Scheimpflug imaging (Pentacam), or AS-OCT
Van Herick Method - Detailed Technique:
- Set slit lamp beam to thin, bright slit beam
- Angle: approximately perpendicular to the temporal corneal surface (illumination offset ~60° temporal to the oculars)
- Magnification: 6-10x
- Position: Look at the peripheral anterior chamber, just inside the temporal limbus
- Compare the width of the dark space (peripheral AC) to the thickness of the cornea (lit section):
| Grade | AC / Cornea Ratio | Angle Assessment | Action |
|---|---|---|---|
| Grade 1 | < 1/4 corneal thickness | Narrow; risk of closure HIGH | Formal gonioscopy; avoid mydriasis; consider prophylactic iridotomy |
| Grade 2 | = 1/4 corneal thickness | Angle closure POSSIBLE | Formal gonioscopy required |
| Grade 3 | 1/4 to 1/2 corneal thickness | Angle closure UNLIKELY | Monitor |
| Grade 4 | ≥ corneal thickness | OPEN angle; no closure risk | Routine |
Caution: Van Herick overestimates angle width in plateau iris configuration. Never use it as a substitute for gonioscopy. - Kanski's, p. 50; Wills Eye Manual
Other AC findings:
- Hyphema: Blood layering inferiorly. Grade by percentage of AC filled:
- Grade 1: < 1/3
- Grade 2: 1/3 to 1/2
- Grade 3: 1/2 to near total
- Grade 4: Total (8-ball hyphema, black/dark)
- Microhyphema: RBCs in AC but no layered blood
- Hypopyon: White pus layer inferiorly. Seen in HLA-B27 uveitis (especially Behcet's, ankylosing spondylitis), infectious endophthalmitis, severe fungal corneal ulcer
- Fibrin: Stringy or sheet-like material in AC - seen in severe acute uveitis, post-operative inflammation
- AC foreign body: Metallic (denser, may have rusting), glass (difficult to see - use oblique illumination), copper (chalcosis - bright), iron (siderosis)
- Depth inequality between eyes: Asymmetric shallow AC may indicate subluxed lens (Marfan's, trauma), ciliary body mass, or uveal effusion
5.5 Iris
Examination sequence: First diffuse, then narrow slit for cross-section, then retroillumination.
Normal iris: Dark iris shows less detail than blue/grey iris. Crypts, collarette (minor arterial circle ridge), radial furrows.
Abnormal findings:
| Finding | Description | Significance |
|---|---|---|
| Posterior synechiae (PS) | Iris adhering to anterior lens capsule | Past/present uveitis; after trauma. Seen as irregular pupil that fails to dilate; pigment on lens |
| Peripheral anterior synechiae (PAS) | Iris adhering to cornea or trabecular meshwork | Angle-closure glaucoma, neovascular glaucoma, uveitis with seclusio pupillae |
| Iris bombe | Iris billowing forward due to PS occluding pupil (seclusion pupillae) | Iris bombe → secondary angle-closure; emergency PI needed |
| Rubeosis iridis (NVI) | Abnormal vessels at pupil margin → growing toward angle | Diabetic retinopathy, CRVO, CRAO, ocular ischemic syndrome. These vessels run randomly, not radially |
| Iris nodules | Koeppe (pupil margin) / Busacca (stroma) | Both = granulomatous uveitis (sarcoid, TB, lepra, VKH) |
| Transillumination defects | Bright red spots/spokes through iris on retroillumination | Pigment dispersion syndrome (radial mid-peripheral spokes); pseudoexfoliation; trauma; HSV iritis |
| Iridodonesis | Trembling of iris with eye movement | Subluxed or absent lens (zonular weakness) - Marfan, trauma, homocystinuria |
| Heterochromia | Two different colored irides OR sectors | Fuchs' heterochromic cyclitis (lighter eye affected), Horner's (lighter eye - if congenital), trauma, siderosis |
| Iris cysts | Oval translucent structures | Epithelial implantation (post-trauma/surgery), iris stromal cysts, pseudoexfoliation |
5.6 Lens
Examination sequence: Use retroillumination from fundus (after dilation) as the primary technique. Supplement with oblique illumination.
Normal lens: Biconvex, ~9mm equatorial diameter, ~4mm AP thickness. Central nucleus surrounded by cortex, enclosed in elastic capsule.
Nuclear changes (graded by color/density):
| Grade | Color | Description |
|---|---|---|
| 1+ (NS1) | Faint yellow tinge | Just perceptible yellowing of nucleus |
| 2+ (NS2) | Yellow | Clear yellow |
| 3+ (NS3) | Deep yellow/amber | Deep coloration |
| 4+ (NS4) | Brown/brunescent | Very dense; fundus view may be difficult |
The nucleus appears as the central bright zone on retroillumination; color graded here.
Cortical cataract:
- Spoke-like, wedge-shaped opacities radiating from equator toward center
- Water clefts (clear liquid between cortical lamellae) appear as dark empty spaces on retroillumination
- Cuneiform cortical = common in elderly; often peripherally located and doesn't affect vision significantly until central
Posterior Subcapsular Cataract (PSC):
- Located on the posterior capsule surface just in front of the posterior pole
- Best seen on retroillumination - appears as a dark, granular or spiderweb-like plaque
- Causes significant glare and near vision loss even when small, because it is at the nodal point of the eye and directly in the pupil axis during reading (miosis brings the PSC squarely into the light path)
- Associated with: corticosteroid use (systemic or inhaled), diabetes, posterior uveitis, radiation
Anterior Subcapsular Cataract:
- Star-shaped or shield-shaped opacity on anterior capsule
- Associated with: atopic dermatitis, trauma (rosette cataract), electric shock, radiation, Wilson's disease (sunflower cataract)
Rosette cataract: Spoke-like pattern on posterior cortex or subcapsular layer - classic after blunt trauma (coup effect on lens)
Pseudoexfoliation material on lens:
- Greyish-white fibrillar material on anterior lens capsule; three-zone pattern:
- Central disc (behind pupil)
- Clear intermediate zone (wiped off by pupillary movement)
- Peripheral granular zone
- Associated with angle pigmentation, glaucoma, weakened zonules (risk during cataract surgery)
Lens position:
- Subluxation: Partial zonular disruption; lens decentered; iridodonesis; visible lens equator on dilated examination; may see vitreous in AC
- Dislocation (luxation): Complete zonular disruption; lens in vitreous or AC
5.7 Seidel Test (Detection of Corneal/Scleral Perforation)
Setup: Undiluted fluorescein (or concentrated fluorescein strip moistened and touched to ocular surface). Cobalt blue filter. Observe the suspected leakage site.
Interpretation:
- Negative Seidel: Static fluorescein pattern; no flow
- Positive Seidel: Dark (aqueous) stream diluting and sweeping the bright fluorescein downstream - classic sign of full-thickness corneal/scleral penetration
- Seen in: penetrating trauma, post-operative wound leak, thin filtering bleb, corneal perforation from ulcer
MODULE 6: GONIOSCOPY - COMPLETE DETAIL
6.1 Anatomy of the Iridocorneal Angle
The drainage angle contains five main structures, identified from anterior to posterior during gonioscopy. Memorize this sequence - "Schwalbe Sees The Spur Carefully":
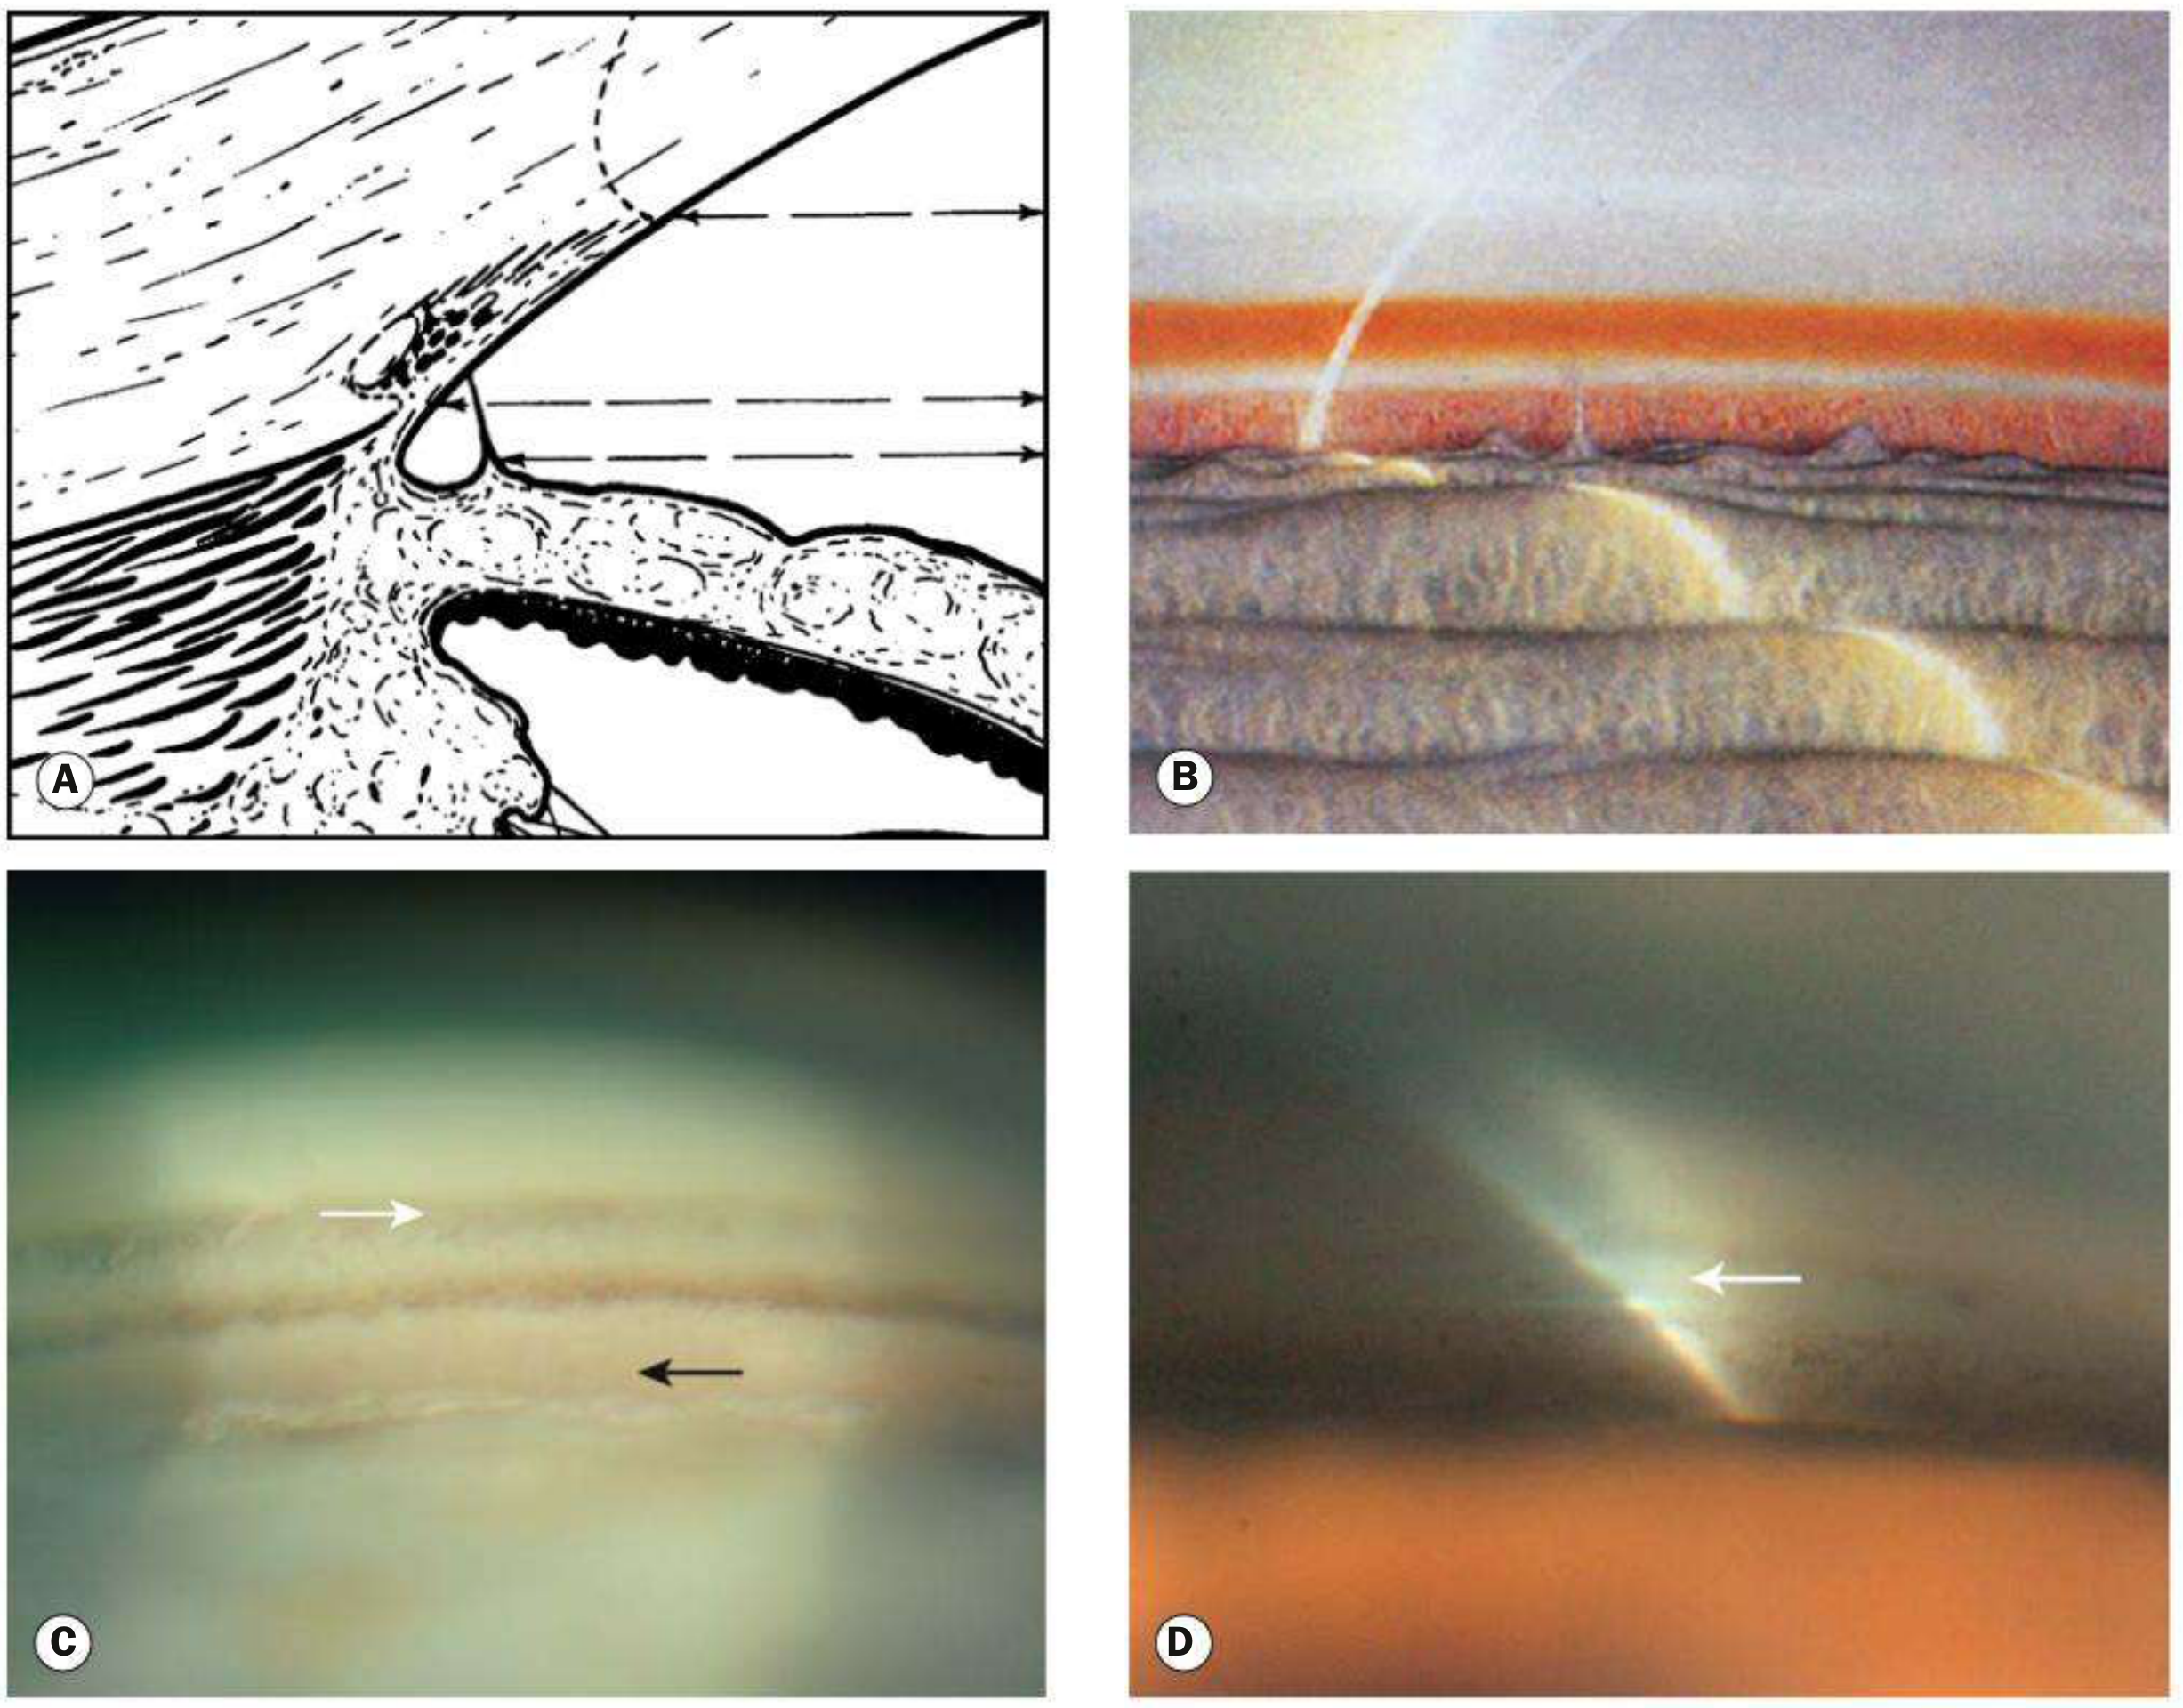
Normal angle structures from Kanski's Clinical Ophthalmology. C: White arrow = Schwalbe line; black arrow = ciliary body
| Structure | Appearance | Key Facts |
|---|---|---|
| Schwalbe line (SL) | Whitish, variably pigmented fine line | Anterior termination of Descemet's membrane; anterior limit of trabeculum. May be pigmented (Sampaolesi line = pigment deposits anterior to or on SL - sign of pigment dispersion or pseudoexfoliation). Double-line configuration possible. Located using the corneal wedge technique |
| Trabecular meshwork (TM) | 600 μm wide band. Two zones: anterior = whitish, non-functional; posterior = grey-blue, functional (pigmented) | Aqueous humor drainage. Pigmentation increases with age (most marked inferiorly). Patchy pigmentation in narrow angle = sign of intermittent angle contact |
| Schlemm's canal | Slightly darker line deep to posterior trabeculum (not always visible) | The main aqueous drainage channel. Blood in canal = raised episcleral venous pressure, carotid-cavernous fistula, low IOP, or iatrogenic from gonioscopy pressure |
| Scleral spur | Narrow whitish band, yellows with age | Most anterior scleral projection; attachment point of longitudinal ciliary muscle. Key landmark - everything anterior = trabecular, everything posterior = supraciliary |
| Ciliary body band (CBB) | Pink/brown/slate grey band | Width varies: wider in myopes, narrower in hyperopes. Very wide CBB may indicate posterior iris insertion (trauma, plateau iris) |
Additional angle features:
- Angle recess: The posterior "dip" of the iris as it inserts into the ciliary body. Widened in traumatic angle recession (risk of glaucoma years later)
- Iris processes: Normal tenuous strands of anterior iris surface extending to the scleral spur (~1/3 of normal eyes, most in children and brown eyes). Not to be confused with PAS (which are thicker, extend more anteriorly, and are pathological)
- Pigment on trabeculum: Graded 0-4+ (Scheie pigment grading):
- 0 = no pigment
- 1+ = faint pigment on posterior trabeculum only
- 2+ = moderate pigment on posterior trabeculum
- 3+ = dense pigment on posterior trabeculum + some anterior
- 4+ = dense pigment entire TM + Schwalbe line (Sampaolesi = classic for pseudoexfoliation and pigment dispersion)
- Corneal wedge technique for finding Schwalbe line: Using a narrow slit beam, two distinct corneal surface reflections are seen - one from the outer (anterior) corneal surface and one from the inner (posterior) surface. The outer reflection arcs across the corneoscleral limbus and meets the inner reflection at the Schwalbe line (the apex of the "wedge"). This is the most reliable way to locate an inconspicuous Schwalbe line.
6.2 Angle Grading Systems - Comprehensive
Shaffer Grading (Most Clinically Used)
| Grade | Angle Width | Structures Visible | Risk |
|---|---|---|---|
| 4 | 35-45° | All structures including CBB | Closure impossible |
| 3 | 25-35° | Down to scleral spur | Closure unlikely |
| 2 | 20° | Down to trabeculum only | Closure possible |
| 1 | 10° | Schwalbe line ± top of TM | Closure probable |
| 0 | 0° | Iridocorneal contact; nothing visible | Closed |
Spaeth Grading (Most Detailed)
Describes THREE separate features:
- Angular approach (angle in degrees): A (40°), B (30°), C (20°), D (10°), E (0°)
- Iris insertion level: A (posterior to scleral spur), B (scleral spur), C (trabeculum), D (Schwalbe line), E (anterior to Schwalbe line)
- Peripheral iris curvature: r (regular/flat), s (steep/convex iris = plateau), q (queer/concave iris = PDS)
Scheie Classification
- Grade 0: All angle structures visible (wide open)
- Grade I: Ciliary body not visible
- Grade II: Posterior trabeculum and scleral spur not visible
- Grade III: Only Schwalbe line visible
- Grade IV: No angle structures visible (closed)
Note: In Scheie's ORIGINAL system, a higher number = NARROWER angle (opposite to what most clinicians intuitively think). This causes frequent confusion. Most modern practice uses Shaffer.
6.3 Gonioscopy Technique - Full Protocol
Non-Indentation (Static) Gonioscopy:
Pre-procedure:
- Perform in a darkened room - ambient light will dilate the pupil, artificially opening appositionally closed angles
- Have a low, small, minimum intensity beam ready - do not shine through the pupil (causes pupillary constriction changes)
- Instill topical anaesthetic (e.g., proxymetacaine 0.5%)
Procedure (Goldmann single-mirror lens):
- Instill coupling fluid (hypromellose 0.3%) onto concave contact surface of lens
- Ask patient to look upward
- Insert the goniolens rapidly (to prevent coupling fluid loss) and patient looks straight ahead
- Begin examination with minimum beam and low illumination
- Examine all four quadrants systematically: superior, inferior, nasal, temporal
- To see each quadrant: rotate the lens so the mirror reflects that quadrant
- Increase illumination gradually after initial view to better define structures
- If iris convexity prevents viewing the angle ("over the hill"): ask patient to look slightly toward the mirror (small movement only - excessive movement distorts and may open an appositional closure)
- Record findings: grade each quadrant, note PAS, pigmentation, NVI, vessels, foreign bodies
Critical errors to avoid:
- Excessive pressure with non-indentation lens → artifactually narrows the angle (falsely makes open angles look narrow)
- Bright room light → dilates pupil → may open appositional closures (falsely reassuring)
- Suction on cornea → may artificially open the angle
- Tilting of the lens → creates reflections and distortion
Indentation (Dynamic) Gonioscopy:
Lenses used: Zeiss four-mirror prism, Posner lens, Sussman lens (all have contact surface flatter than cornea = no coupling fluid needed + allows posterior pressure)
Technique: After static examination, gently press the goniolens directly posteriorly against the cornea.
What happens:
- Aqueous is forced into the angle by the slight rise in IOP from indentation
- The peripheral iris is pushed backward
- If only appositional closure → angle opens, structures become visible (Fig. 1.50 from Kanski's shows this)
- If synechial closure (PAS) → angle remains closed despite indentation
Grading of synechiae: During indentation, record the clock hours of closed angle and the level of PAS insertion. "360° PAS to Schwalbe line" = worst prognosis. "PAS to trabeculum only" = still some functional drainage possible.
MODULE 7: GOLDMANN APPLANATION TONOMETRY - COMPLETE DETAIL
7.1 Physical Principle (Imbert-Fick Law)
The Goldmann tonometer is based on P = F/A (Imbert-Fick principle for ideal sphere):
- P = intraocular pressure
- F = force applied to flatten the surface
- A = area of flattening
The human eye is NOT an ideal sphere - two forces complicate this:
- Corneal rigidity (resists flattening) → would cause overestimation
- Surface tension of tear meniscus (pulls prism toward cornea) → would cause underestimation
At a flattening diameter of exactly 3.06 mm, these two errors cancel each other out, making the measurement accurate. This is the fundamental genius of Goldmann's design.

Goldmann tonometry: the prism flattens a 3.06 mm diameter circle. The double-prism creates two semicircular mires from the fluorescein-stained tear meniscus.
7.2 The Prism
The tonometer tip is a double prism that splits the image into two halves (superior and inferior). The fluorescein-stained tear meniscus at the edge of the flattened zone appears as two green semicircular arcs (mires), one above and one below.
Mire interpretation:
- Too thick mires: Too much fluorescein → mire width > 10% of arc diameter → overestimates IOP (fluorescein pushes prism away)
- Too thin mires: Too little fluorescein → underestimates IOP
- Correct: Mire width ~10% of total arc diameter; mires roughly symmetric
The endpoint: The inner margins of the two semicircles just touch:
___
/ \ ← upper mire
( )
\___/
___
/ \ ← lower mire
( )
\___/
← inner margins touching = correct endpoint
Reading: Dial reading × 10 = IOP in mmHg. So a dial reading of 1.6 = 16 mmHg.
7.3 Technique Step by Step
- Instill proxymetacaine 0.5% (topical anaesthetic) + fluorescein into lower fornix
- Cobalt blue filter on slit lamp; illumination at maximum intensity directed at 60°
- Dial preset to 1 (= 10 mmHg)
- Patient: forehead firmly on headband, looking straight ahead, breathe normally
- Advance the prism to just touch the corneal apex (forward movement with joystick)
- Switch to viewing through the eyepieces
- See two green semicircles; check mire thickness and centration
- Rotate dial slowly until inner margins of mires just touch = the endpoint
- Read the dial and multiply by 10 = IOP in mmHg
- Repeat for confirmation; average if two readings differ by >2 mmHg
7.4 Sources of Error - In Detail
| Error | Effect | How to Correct |
|---|---|---|
| Too much fluorescein | Thick mires → overestimates IOP | Use smaller fluorescein strip, allow excess to drain |
| Too little fluorescein | Thin mires → underestimates IOP | Add more fluorescein |
| Finger pressure on globe | Raises IOP spuriously | Do not touch eyelids; retract gently only |
| Lid squeezing | Raises IOP | Ask patient to relax; do exam faster |
| Thyroid myopathy / restricted EOM | Raises IOP on upgaze | Measure in primary gaze only |
| Thick cornea (CCT > 520 μm) | Overestimates IOP | Apply correction formula; CCT >640 = significant overestimate |
| Thin cornea (CCT < 520 μm) | Underestimates IOP | Post-LASIK corneas: true IOP often higher than measured |
| Normal tension glaucoma (NTG) | IOP measured "normal" 10-21 but optic nerve damage occurs | Consider 24h IOP monitoring, corneal hysteresis measurement |
| Corneal edema | Decreases corneal rigidity → underestimates IOP | Note corneal status; consider non-contact tonometry |
| High astigmatism (> 3D) | Mires distorted (oval, not semicircular) | Rotate prism 45° to the axis of astigmatism |
Central corneal thickness (CCT) and IOP:
- GAT assumes CCT = 520 μm as normal
- For every 10 μm above 520: IOP overestimated by ~0.3-0.5 mmHg
- Post-LASIK/PRK: cornea is thinner by the ablated depth; IOP significantly underestimated
- Normal CCT range: 530-570 μm in most populations; thinner in some East Asian populations
Tonometer disinfection: 2% sodium hypochlorite (dilute bleach) is effective against adenovirus and herpes simplex. Isopropyl alcohol wipes (70%) do NOT provide adequate protection against viral infections. Disposable prism caps are increasingly used. The prism may swell and crack with repeated chemical disinfection, potentially causing corneal abrasion.
7.5 Other Forms of Tonometry at the Slit Lamp
Perkins tonometer: Hand-held version of Goldmann - used for patients who cannot sit at slit lamp (bed-bound, supine, under anaesthesia). Uses same Imbert-Fick principle and halogen illumination with built-in cobalt blue filter.
Tonopen: Handheld electronic applanation tonometer. Less accurate than GAT but useful for quick screening and when slit lamp unavailable.
Non-contact tonometer (NCT / "air puff"): Air pulse deforms cornea; corneal deformation detected by optical system. Useful for screening; no topical anaesthetic needed; infection risk minimal. Less accurate than GAT at higher IOPs.
Ocular Response Analyser (ORA): Measures corneal hysteresis - the difference between the pressure at which the cornea buckles inward vs. springs back. A low corneal hysteresis is associated with glaucoma progression risk independently of IOP.
Rebound tonometer (iCare): Small probe tip briefly contacts cornea; rebound deceleration used to calculate IOP. No anaesthetic needed; useful in children and patients with corneal pathology. Good accuracy for screening.
MODULE 8: POSTERIOR SEGMENT SLIT LAMP EXAMINATION - LENSES AND TECHNIQUE
8.1 Optical Principles of Non-Contact Indirect Slit Lamp Biomicroscopy
When a condensing lens is placed in front of the eye:
- It creates a real, inverted, magnified aerial image of the fundus in the working space between the lens and the examiner
- This image is stereoscopic (3D)
- The examiner views this aerial image through the slit lamp's microscope system
- The image is upside down and mirror-reversed compared to direct ophthalmoscopy
- Key: Move the joystick/slit lamp to scan the fundus, not the lens
8.2 Non-Contact Lens Comparison - Full Details
| Feature | 60 D Lens | 78 D Lens | 90 D Lens |
|---|---|---|---|
| Working distance | 13 mm | ~10 mm | 7 mm |
| Field of view | Narrow (posterior pole only) | Intermediate (~60°) | Wide (~74°) |
| Magnification (image vs. fundus) | High | Intermediate | Low |
| Image quality | Best | Very good | Good |
| Pupil size needed | Must be dilated | Dilated preferred | Can work with smaller pupils |
| Correction factor (disc size) | ×0.88-1.0 | ×1.1 | ×1.3 |
| Best for | Disc assessment, macular hole, CSME | General fundus | Peripheral retina, screening |
Correction factor for disc size: Because each lens has different angular magnification, a disc that appears a certain size through the 78 D appears larger through the 90 D. The correction factor converts the apparent measured disc size back to the true disc size.
Technique (expanded):
- Dilate the pupil (minimum 3.5 mm needed, ideally 5-7 mm)
- Set slit beam to ~1/4 round diameter, coaxial illumination
- Low magnification (6-10x) and low-medium intensity to start
- Center the beam through the undilated pupil axis
- Hold lens with thumb and index finger, flat surface facing patient, 1-2 mm in front of cornea (just clearing lashes)
- Rest back of hand on patient's brow/cheek for stability (crucial for fine detail)
- Keep the lens still - navigate by moving the joystick
- Start with disc, then macula (ask patient to look at the light briefly), then arcades, then periphery
- For peripheral retina: patient looks in direction of area being examined
8.3 Goldmann Three-Mirror Contact Lens - Full Details
Parts of the Goldmann three-mirror lens:
| Part | Mirror Angle | Area Visualized |
|---|---|---|
| Central lens (no mirror) | - | Posterior pole (central retina, optic disc, macula) - ~30° field |
| Large trapezoidal mirror | 73° | Para-equatorial retina, equatorial zone |
| Rectangular mirror | 67° | Equatorial and peripheral retina |
| Small semicircular (D-shaped) mirror | 59° | Extreme periphery, pars plana, AND iridocorneal angle (gonioscopy) |
How to navigate: Rotate the lens bodily to view different quadrants. The mirror shows the retina opposite to the mirror's position (a mirror facing up shows inferior retina).
Requires:
- Topical anaesthetic
- Coupling fluid (hypromellose, carbomer, or methylcellulose)
- Dilated pupil for retinal work (not needed for gonioscopy with the small mirror)
Advantages over non-contact lenses:
- Better view of extreme periphery
- Can perform laser treatment with the lens in place
- Allows scleral indentation through the lens
- Can visualize pars plana and vitreous base
Disadvantages:
- Contact required (infection risk, patient discomfort, contraindicated with corneal pathology)
- Slower to apply
- Cannot be used in suspected penetrating injury
MODULE 9: SLIT LAMP IN SPECIFIC DISEASE CONTEXTS
9.1 Herpes Simplex Keratitis (HSK) - Slit Lamp Assessment
Primary (epithelial):
- Dendritic ulcer: branching epithelial defect with terminal buds; stains bright green with fluorescein; terminal bulbs stain with rose Bengal
- Amoeboid/geographic: larger, irregular; late presentation or recurrent
- Key finding: Live virus infects epithelial cells → Rose Bengal staining of living infected cells; fluorescein stains the ulcer base only
Stromal (disciform):
- Central disc of stromal edema; Descemet's folds
- Minimal or absent epithelial defect (immunological, not viral)
- Keratic precipitates on endothelium (posterior corneal surface)
- Khodadoust line: Band of KPs sweeping across endothelium = sign of allograft rejection (post-corneal transplant)
Neurotrophic complications: Reduced corneal sensation → repeated erosions → persistent epithelial defects. Check with a wisp of cotton to test corneal sensation before attributing any chronic epithelial defect to HSK.
9.2 Acanthamoeba Keratitis - Slit Lamp Findings
- Ring infiltrate: Near-pathognomonic ring of stromal infiltrate (immune ring) surrounding the infected zone
- Extreme pain out of proportion to signs (early stage)
- Pseudodendrites: Branching, but without the terminal bulbs of HSV (important distinction)
- Radial keratoneuritis: Inflammation along corneal nerves (best seen with optical section and high magnification) - early, pathognomonic sign
9.3 Uveitis - Full Slit Lamp Classification
Anatomical classification (SUN Working Group, 2005):
- Anterior uveitis: AC cells + flare predominant; ± KPs on endothelium
- Intermediate uveitis: Vitreous cells (snowballs, snowbanking) predominant; minimal AC cells
- Posterior uveitis: Retinitis, choroiditis, vasculitis; needs posterior segment examination
- Pan-uveitis: All segments involved
Activity markers on slit lamp:
- Active disease: AC cells ≥ 0.5+, active KPs (round, white, fluffy), posterior synechiae forming, vitreous haze
- Inactive disease: No cells, no flare (or trace), old flat pigmented KPs, established PS that are not forming new
Specific conditions:
| Condition | Distinctive Slit Lamp Finding |
|---|---|
| HLA-B27 (AS, Reiter's, IBD) | Fine KPs, brisk cells, fibrin, hypopyon; often unilateral |
| Sarcoidosis | Mutton-fat KPs, Koeppe/Busacca nodules, "string of pearls" on AC endothelium |
| Fuchs' Heterochromic Cyclitis | Diffuse fine stellate KPs on ENTIRE endothelium (not just inferior), NO synechiae, heterochromia; rubeosis, vitreous floaters |
| Juvenile Idiopathic Arthritis (JIA) | Band keratopathy (calcium at Bowman's layer - seen at 3 and 9 o'clock initially); quiet looking eye despite inflammation |
| Behcet's Disease | Mobile hypopyon (shifts with patient position change), brisk AC reaction, bilateral |
| Vogt-Koyanagi-Harada (VKH) | Mutton-fat KPs, bilateral, diffuse choroidal thickening (posterior segment); sunset fundus in chronic phase |
| Posner-Schlossman Syndrome | Very high IOP with minimal inflammation; fine KPs; corneal edema |
9.4 Fluorescein Staining Tests at the Slit Lamp
Tear Break-Up Time (TBUT):
- Instill fluorescein
- Ask patient to blink once, then keep eyes open
- With cobalt blue filter at medium-low magnification, observe the tear film for dry spots (dark holes in the green fluorescein film)
- Time from last blink to first dry spot = TBUT
- Normal: > 10 seconds. Borderline: 5-10 s. Abnormal: < 5 s
- Non-invasive TBUT (NITBUT) measured on tear film without instilling fluorescein - done on Keratograph/Oculus instruments
Seidel Test:
- Saturate a fluorescein strip; touch to tear meniscus at the suspected site
- Cobalt blue filter, no-touch magnification
- Normal: fluorescein static
- Positive: dark (clear aqueous) stream dilutes and carries fluorescein downstream - rivulet sign
- Always perform in suspected globe penetration, post-surgical wound leak, thin bleb assessment
MODULE 10: SPECIAL ADVANCED TECHNIQUES
10.1 Central Corneal Thickness (CCT) Estimation at the Slit Lamp
Optical (split image) pachymetry using the slit lamp is now rarely performed as ultrasound and AS-OCT are more accurate and reproducible. However, rough estimation is possible:
- A thin cornea (< 500 μm) = stroma appears narrow on the optical section at high magnification
- Post-LASIK: Significantly thinner, with a visible interface between the flap and the bed (seen as a thin bright line in the mid-stroma with optical section)
10.2 Corneal Endothelial Cell Density - Slit Lamp vs. Specular Microscope
Specular reflection at the slit lamp (highest magnification, 25-40x) gives a qualitative view of endothelial cells but cannot reliably count cells.
Specular microscopy (dedicated instrument, 200-400x): True quantitative cell count (cells/mm²), morphometric analysis (coefficient of variation, percent hexagonality).
Confocal microscopy (IVCM): Cellular-level imaging in vivo; resolves individual keratocytes, Langerhans cells, corneal nerve fibers, endothelial cell nuclei. The slit lamp directs you to when to refer for IVCM, but cannot perform it.
10.3 Anterior Segment OCT (AS-OCT) - Relationship to Slit Lamp
AS-OCT (Visante, Cirrus AS, Heidelberg Anterion) provides cross-sectional images of the anterior segment with micron-level resolution. The slit lamp examination guides clinical decision-making and directs the OCT scan, while OCT provides quantitative measurements:
- Precise AC depth and angle measurements
- Corneal pachymetry map
- Epithelial thickness mapping
- Aqueous drainage angle imaging without contact
10.4 Photography and Documentation
Most modern slit lamps accept a camera mount between the microscope and eyepieces. A beamsplitter diverts part of the light to the camera.
Key principles for slit lamp photography:
- Anterior segment: Flash synchronized with the slit lamp illumination; focal depth limited
- Retroillumination photography: Fundus flash through dilated pupil provides the background
- Use the same illumination technique clinically and photographically for consistent documentation
- Document baseline before treating; repeat at follow-up with identical settings
MODULE 11: CLINICAL REASONING AT THE SLIT LAMP
11.1 Decision Framework for a Complete Examination
START: Diffuse illumination survey
→ Lids/lashes (evert upper lid)
→ Conjunctiva
→ Cornea gross
CORNEAL DETAIL:
Fluorescein + cobalt blue → epithelial map
Parallelepiped → layer-by-layer
Optical section → depth of lesion
Scleral scatter → stromal haze
Specular reflection → endothelium
ANTERIOR CHAMBER:
Conical beam (high mag, dark room) → cells/flare
Van Herick → angle estimate
IRIS:
Diffuse + tangential → nodules, atrophy, NVI
Retroillumination → transillumination defects
LENS:
Oblique parallelepiped → nuclear sclerosis grade
Retroillumination (dilated) → PSC, cortical, subluxation
POSTERIOR SEGMENT (if indicated):
Non-contact 78D lens → disc, macula, vessels
Three-mirror → peripheral retina, angle (gonioscopy mirror)
IOP:
Goldmann applanation tonometry (always at end to avoid inducing reflex tearing)
11.2 Emergency Slit Lamp Findings Requiring Immediate Action
| Finding | Urgency | Action |
|---|---|---|
| Positive Seidel test | EMERGENCY | Cover with shield; ophthalmology immediately; nothing topical |
| Descemetocele | EMERGENCY | Surgical intervention same day |
| Corneal ring ulcer (Acanthamoeba suspect) | URGENT (same day) | Corneal scraping + cultures; intensive anti-amoebic therapy |
| Hypopyon in post-op eye | EMERGENCY | Endophthalmitis until proven otherwise; vitreous biopsy and intravitreal antibiotics |
| Khodadoust line (corneal graft rejection) | URGENT (same day) | Intensive topical and systemic corticosteroids |
| Acute angle closure (corneal edema + shallow AC) | EMERGENCY | Lower IOP urgently; laser PI when media clears |
| Rubeosis iridis (NVI) | URGENT | Same day posterior segment evaluation; treat underlying ischemia |
| Iris bombe with seclusion pupillae | URGENT | Laser peripheral iridotomy ASAP to break pupillary block |
MODULE 12: COMPREHENSIVE QUICK-REFERENCE TABLES
12.1 Slit Lamp Technique Master Reference
| Technique | Beam | Angle | Mag | Best For |
|---|---|---|---|---|
| Diffuse | Wide, diffuse | 30-45° | 6-10x | Survey, lids, conjunctiva |
| Parallelepiped | Medium (2-4mm) | 45-60° | 10-25x | Corneal layers, routine |
| Optical section | Very thin (0.1-0.3mm) | 45-60° | 16-25x | Lesion depth |
| Conical beam | Short, narrow round | 45-60° to pupil | 16-25x | AC cells, flare (Tyndall) |
| Tangential | Medium | 80-90° | 16-25x | Surface topography, iris |
| Scleral scatter | Medium (at limbus) | Decouple arms | 6-10x | Subtle stromal haze |
| Retroillumination - iris | Reflected from iris | - | 10-16x | KPs, corneal cysts, neo |
| Retroillumination - fundus | Reflected from retina | Through dilated pupil | 10-16x | PSC, cortical, iris TID |
| Specular reflection | Medium | Matching angles | 25-40x | Endothelium, guttata |
12.2 Corneal Staining Patterns
| Staining Pattern | Fluorescein | Rose Bengal | Diagnosis |
|---|---|---|---|
| Central abrasion | + bright green | + (devitalized cells) | Traumatic abrasion |
| Dendritic | + branching with terminal buds | + (infected cells) | HSV keratitis |
| Ring | + | ± | Acanthamoeba keratitis |
| Punctate - inferior | Fine dots, inferior | ± | Exposure keratopathy, dry eye |
| Punctate - diffuse | Fine dots everywhere | + | Drug toxicity, UV keratitis |
| Horizontal band | Superior | ± | Tarsal plate foreign body (evert lid!) |
| Pseudodendrites | + (but no terminal buds) | + | Acanthamoeba, healing abrasion, medicamentosa |
12.3 KP Quick Diagnosis Guide
| KP Type | Distribution | Significance | Associated Features |
|---|---|---|---|
| Fine, stellate | Arlt's triangle | Non-granulomatous | HLA-B27, JIA, Fuchs' HCC |
| Mutton-fat | Arlt's triangle | Granulomatous | Sarcoid, TB, VKH, Sympathetic ophthalmia |
| Diffuse, fine | All endothelium | Fuchs' HCC (heterochromic iridocyclitis) | Heterochromia, no synechiae, vitreous floaters, rubeosis |
| Khodadoust line | Moving band | Endothelial allograft rejection | Post-keratoplasty; treat URGENTLY |
| Old pigmented | Arlt's triangle | Resolved uveitis | Irregular, flat, dark |
Primary Reference: Kanski's Clinical Ophthalmology: A Systematic Approach, 10th Edition - Chapter 1 (Slit Lamp Biomicroscopy of the Anterior Segment, Posterior Segment, Tonometry, Gonioscopy)
Supporting References: Wills Eye Manual (angle grading, Van Herick); ROSEN's Emergency Medicine (ED slit lamp use); Pfenninger & Fowler's Procedures (fluorescein staining patterns); Rheumatology Elsevier (uveitis findings); StatPearls NIH (components, illumination techniques); AAO YO Info (technique guide)
In more detail with reasoning, why does it happen, how does it happen
Finding Sources
Finding Sources
Finding Sources
Finding Sources
Reading File
Finding Sources
Finding Sources
Reading File
Finding Sources
Finding Sources
Reading File
Searching the Web
slit lamp optics physics why cornea transparent total internal reflection gonioscopy Tyndall effect aqueous cells flare mechanism
Finding Sources
Finding Sources
Loading Image
Loading Image
Searching the Web
why keratic precipitates form Arlt triangle convection currents aqueous humor anatomy explanation
Searching the Web
why cornea has no blood vessels avascular mechanism IOP gonioscopy critical angle total internal reflection physics explanation
Loading Image
SLIT LAMP BIOMICROSCOPY - THE "WHY AND HOW" NOTES
Deep Mechanistic Understanding: From Physics to Pathology
Sources: Kanski's Clinical Ophthalmology 10th Ed., Histology: A Text and Atlas (Pawlina), AAO Principles of Gonioscopy, Wills Eye Manual, EyeWiki, Review of Ophthalmology, StatPearls
SECTION 1: WHY THE SLIT LAMP WORKS - THE UNDERLYING PHYSICS
1.1 Why Can We See Anything at All Through a Transparent Eye?
The eye appears transparent - the cornea, aqueous, lens, and vitreous all look clear. If you shine a simple torch at it, you see reflections and a vague glow. So how does the slit lamp make individual tissue layers visible?
The answer is Tyndall Scattering (a.k.a. the Tyndall Effect).
When a narrow beam of light travels through a medium that contains small particles (cells, protein aggregates, collagen fibers, lipid droplets), the particles scatter the light sideways - some of it toward the observer's eye. The observer sees those particles as bright points against a dark background, even though they are completely invisible in normal room lighting.
The classic everyday analogy: when sunlight enters a dusty room through a crack, you see the beam and every dust particle floating in it. In normal diffuse room light, those same dust particles are invisible. The slit lamp does exactly this to the eye - it creates a searchlight in an otherwise dark background.
The physics: Particles scatter light when their diameter is comparable to or smaller than the wavelength of light. In the corneal stroma, collagen fibrils are ~23 nm in diameter - small enough that they scatter light by Rayleigh scattering. In the aqueous, inflammatory cells (~10 μm), protein molecules, and pigment granules scatter light by Mie scattering. Both mechanisms make particles visible when a concentrated beam is used.
Why the beam must be narrow: A wide, diffuse beam illuminates everything uniformly. The signal (scattered light from particles) gets lost in the noise (reflected light from everywhere). A narrow slit creates a high signal-to-noise ratio by concentrating all the light energy into one thin plane, so anything in that plane scatters intensely while the surrounding tissue is dark.
1.2 Why Is the Cornea Normally Transparent? - The Molecular Basis
This is one of the most elegant facts in anatomy. The cornea is 90% collagen (stroma) - and yet it is completely clear, while other collagen-rich tissues (sclera, dermis, tendons) are white and opaque.
The reason is strictly geometric: the size and spacing of collagen fibrils.
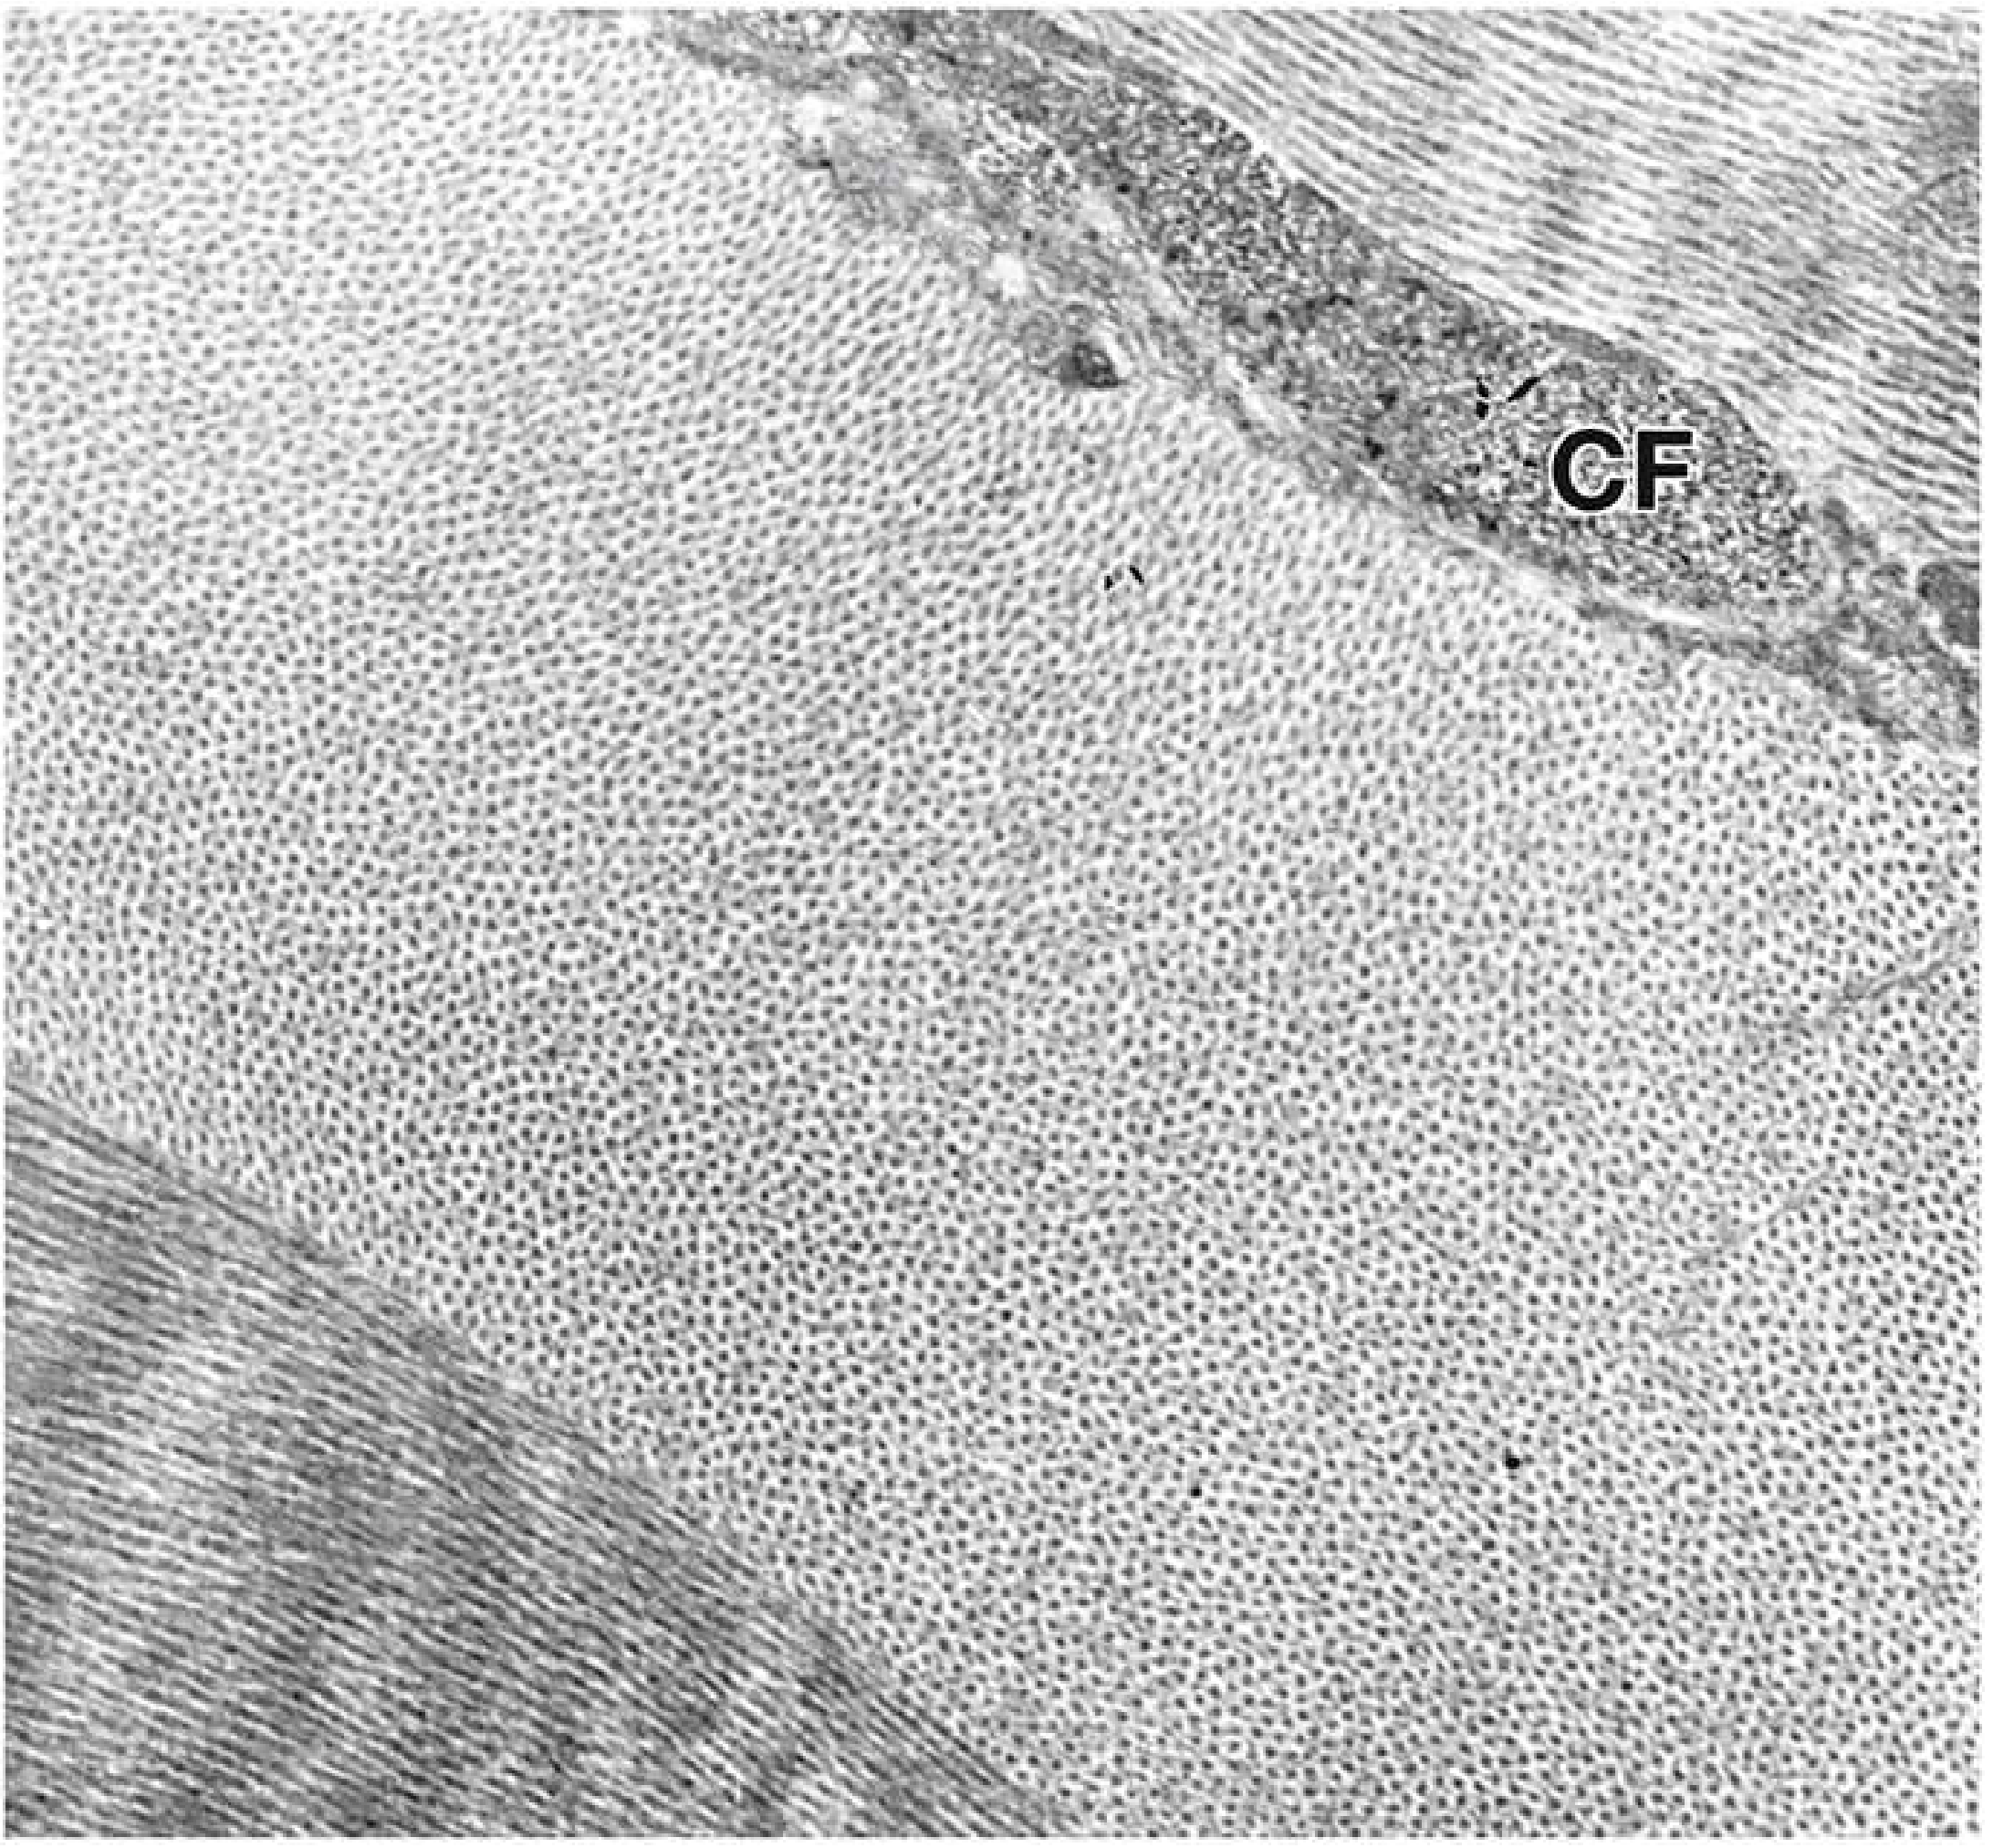
EM of corneal stroma - lamellae at right angles to each other, fibrils uniformly 23 nm diameter. (Histology: A Text and Atlas, Pawlina)
The mechanism:
- Corneal stromal collagen fibrils are all exactly 23 nm in diameter (type I collagen fibrils, regulated by type V collagen and the proteoglycans lumican and decorin)
- They are spaced uniformly, with inter-fibril gaps of <200 nm (less than half the wavelength of visible light, which is ~400-700 nm)
- When the spaces between particles are smaller than λ/2, destructive interference occurs between scattered wavefronts from adjacent fibrils - the scattered rays cancel each other out in all directions except forward
- Result: essentially all light passes straight through (transmission), and none is scattered sideways - the tissue appears clear
The sclera, by contrast:
- Has collagen fibrils of irregular diameter (ranging from 25-230 nm) and irregular spacing
- No destructive interference between scatterings → light scatters in all directions → sclera appears white and opaque
- Histology: A Text and Atlas, Pawlina - "The opacity of the sclera, like that of other dense connective tissues, is primarily attributable to the irregularity of its [collagen] fibrils"
Why is this clinically critical?
Any condition that disrupts the regular spacing or uniform diameter of corneal collagen fibrils → corneal haze/opacity:
- Edema: Water enters the stroma, expands the inter-fibril spaces beyond λ/2 → scattering → haze (seen as grey cloudiness on optical section)
- Scarring: Healing fibroblasts (myofibroblasts) lay down irregular collagen (type III instead of type I/V) → permanently irregular spacing → permanent scar opacity
- Keratoconus: Abnormal collagen metabolism, reduced type I collagen, aberrant lamellar organization → increasing irregular spacing → progressive haze and thinning
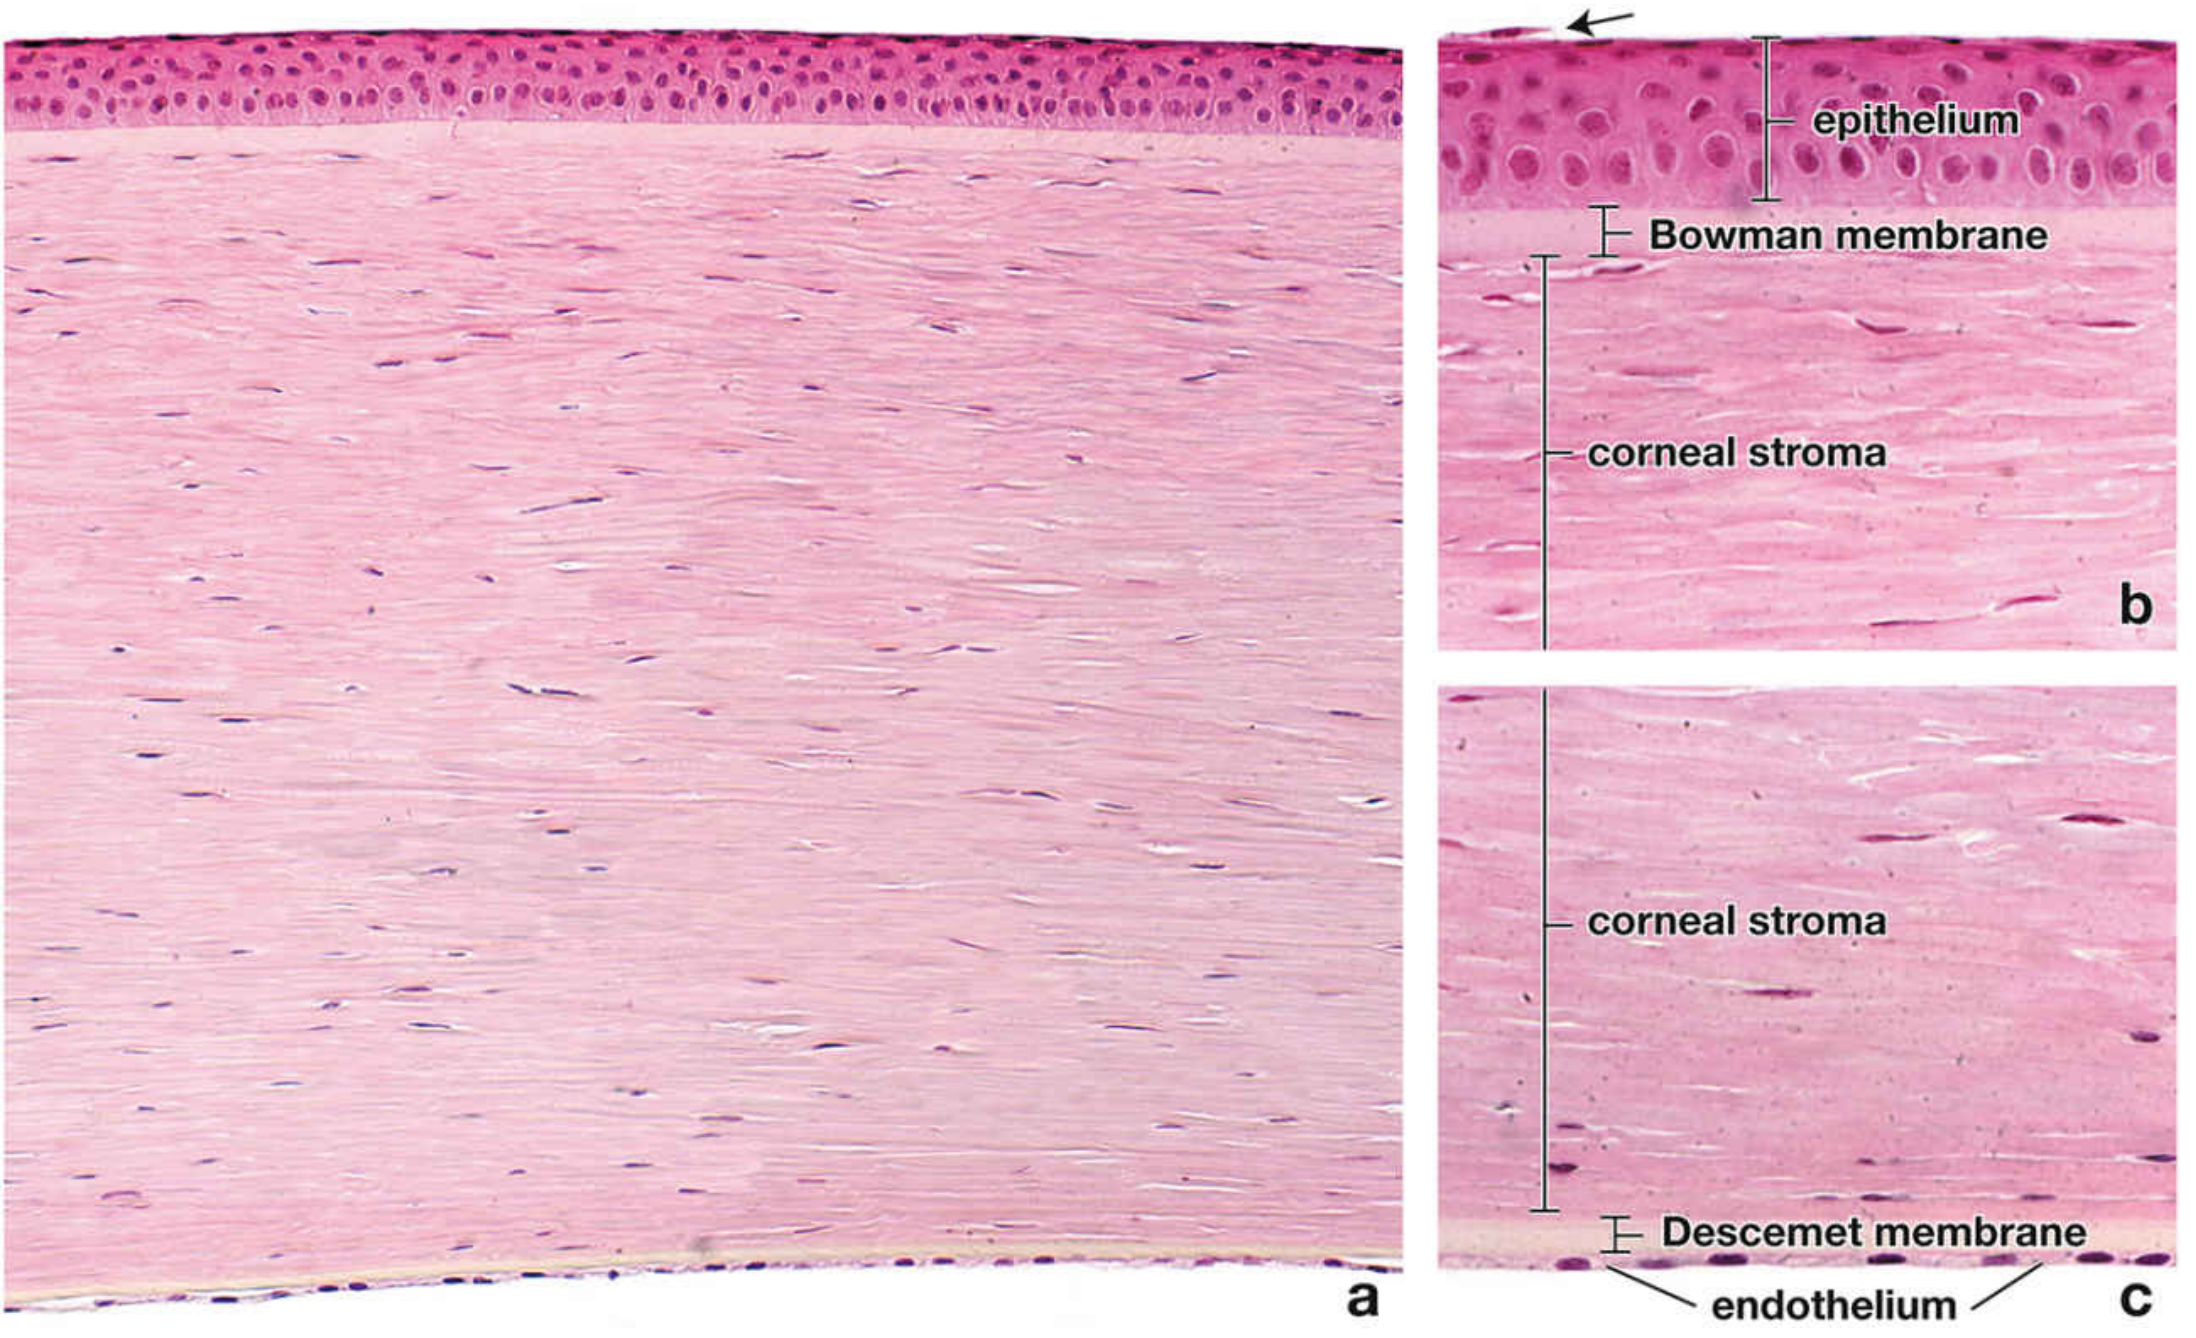
Full-thickness corneal section (H&E, ×140). The layered architecture enables the optical sectioning principle of the slit lamp. (Histology: A Text and Atlas, Pawlina)
1.3 Why Corneal Edema Appears Hazy on the Slit Lamp - The Chain of Events
Step 1 - Cause: The endothelium is damaged (Fuchs' dystrophy, trauma, intraocular surgery, severe inflammation, high IOP) OR the epithelium is stripped (contact lens overwear, chemical burn).
Step 2 - What normally prevents edema: The corneal stroma is slightly dehydrated relative to its equilibrium state. Left alone in a test tube, corneal stroma would absorb water and swell to ~3x its normal thickness (the proteoglycans have high osmotic potential). The endothelium prevents this by actively pumping ions (Na+/K+) out of the stroma into the aqueous, drawing water with them by osmosis. This is an energy-requiring process (Na+/K+-ATPase, located on the lateral plasma membranes of endothelial cells) that runs continuously. The endothelium has many mitochondria precisely to power this pump. - Histology: A Text and Atlas, Pawlina, p. 2385
Step 3 - When the pump fails: Water enters stroma by the osmotic gradient (proteoglycan-driven). The inter-fibril spaces expand beyond λ/2. The glycosaminoglycans that normally separate the fibrils are leached out by the swelling. The regular arrangement is disrupted → light scatters → stroma appears cloudy on slit lamp.
Step 4 - What you see at the slit lamp: On the optical section, the stroma appears thicker than normal and grey/white rather than optically clear. Descemet's membrane shows folds (undulations) because the swollen stroma is pushing it from in front. Epithelial bullae form when excess fluid accumulates beneath the epithelium → microcysts → macrobullae → bullous keratopathy.
Step 5 - Why it's irreversible when severe: Once the stroma swells beyond a certain point, the proteoglycans are physically displaced, collagen fibrils aggregate in the swollen areas, and permanent focal opacities form even after the swelling resolves. - Histology, Pawlina, p. 2384
1.4 Why Bowman's Layer Doesn't Regenerate - The Clinical Consequence
Bowman's layer is an acellular, condensed zone of randomly arranged collagen fibrils at the very front of the stroma. It has no cells within it (unlike the cellular stroma with keratocytes), so when it is destroyed:
- There are no resident cells to rebuild it
- Epithelial cells (which sit on top) cannot synthesize the specific type of condensed collagen matrix that makes up Bowman's
- Keratocytes from the adjacent stroma produce a fibrotic scar instead - irregular collagen = permanent subepithelial opacity/haze
This is why recurrent corneal erosions (from Bowman's disruption in map-dot-fingerprint dystrophy or trauma) leave visible subepithelial haze, and why herpes stromal keratitis leaves permanent anterior stromal scars.
1.5 Why Descemet's Membrane Does Regenerate (Unlike Bowman's)
Descemet's is the basal lamina of the endothelium - secreted continuously by the living endothelial cells above it. As long as the endothelium is alive, it keeps secreting Descemet's material. This is why:
- Descemet's thickens with age (endothelium keeps making it throughout life → becomes 8-12 μm in older adults vs. 3-4 μm at birth)
- After trauma or descemetocele repair, the endothelium (if preserved) can regenerate Descemet's
- The guttata of Fuchs' dystrophy are actually abnormal collagen nodules secreted by dysfunctional endothelial cells onto the Descemet's surface - the endothelial cells are secreting abnormal extracellular matrix instead of normal Descemet's collagen
SECTION 2: THE OPTICAL SECTION - WHY IT SHOWS LAYERS
2.1 Why a Thin Beam Resolves Corneal Depth
The slit lamp uses stereoscopic (binocular) viewing - two eyepieces separated by the interpupillary distance (~60-65 mm). Each eye views the slit-lit tissue from a slightly different horizontal angle. This creates parallax (the same principle that gives you depth perception in everyday life).
When a thin optical section cuts through the cornea at 45-60°:
- The anterior bright line (epithelial surface reflection) and posterior bright line (endothelial reflection) are separated in space
- Because of binocular parallax, the examiner's visual system calculates the depth difference between these two lines automatically
- Any lesion interrupting the section at a specific depth is placed in 3D space relative to these reference lines
Why the angle matters: If the beam were perpendicular to the cornea (0°), the front and back reflections would overlap. At 45-60°, they are displaced horizontally enough to separate them clearly and enable depth localization. Too oblique (>75°) and the section becomes so elongated that vertical resolution is lost.
The "5 zones" of the parallelepiped and why they appear as they do:
- Bright anterior surface reflection (air/tear film/epithelium interface) - a refractive index change from 1.00 (air) to 1.376 (cornea) = partial reflection visible as a bright line
- Lit epithelial zone - scattering from nuclei of epithelial cells, cytoplasmic organelles; epithelial cells are not perfectly transparent; this zone appears slightly granular or refractile
- Dark stromal zone - the deep stroma is the most transparent part of the cornea (most uniform collagen spacing, least cellular structures to scatter); appears nearly black
- Posterior stromal/endothelial zone - slightly brighter due to keratocytes and back-scattering
- Bright posterior surface reflection - cornea/aqueous interface (refractive index change from 1.376 to 1.336) = another partial reflection
Why a corneal scar appears WHITE on the optical section:
The myofibroblasts in the healing scar produce irregular (type III) collagen with variable fibril diameter and spacing - the same physical reason as why the sclera is white. Fibril spacing exceeds λ/2 → scattering → white appearance against the dark normal stroma on either side.
SECTION 3: WHY SCLERAL SCATTER WORKS - FIBER OPTIC PRINCIPLE
3.1 Total Internal Reflection in the Corneal Stroma
Light entering the cornea at the limbus undergoes total internal reflection because:
- The refractive index of the corneal stroma (n = 1.376) is higher than that of the surrounding aqueous humor (n = 1.336) AND higher than that of air (n = 1.00)
- Snell's Law: n₁ × sin(θ₁) = n₂ × sin(θ₂)
- When θ₁ exceeds the critical angle (θc), no refracted ray can exist; all light reflects back internally
- The critical angle between cornea and aqueous: θc = arcsin(1.336/1.376) = arcsin(0.971) ≈ 76°
- For cornea-air: θc = arcsin(1.00/1.376) = arcsin(0.727) ≈ 46.5°
When the slit beam is directed at the limbus, much of the light hits the corneal-scleral interface at an angle greater than 46.5° → trapped inside the cornea and travels by total internal reflection from limbus to limbus, like light in a fiber-optic cable.
Why the normal cornea doesn't glow: The collagen structure is so uniform and the interfaces so clean that almost no light leaks out sideways during this limbus-to-limbus transit.
Why an opacity glows: Any disruption of the regular collagen lattice (infiltrate, edema, scar, foreign body, cellular debris) acts as a scattering center - it intercepts the internally reflected light and redirects some of it out of the cornea toward the observer. The opacity glows against the dark background of the normal cornea.
Clinical insight: This is why scleral scatter detects things invisible by direct illumination. When you use direct illumination, you see whatever scatters the beam directly - and a very subtle early haze may not scatter enough to be visible. With scleral scatter, the entire cornea acts as a waveguide concentrating all the illuminating energy through the tissue simultaneously - even tiny scatter centers accumulate enough scattered energy to be visible.
SECTION 4: WHY GONIOSCOPY REQUIRES A CONTACT LENS - THE PHYSICS OF TOTAL INTERNAL REFLECTION AT THE ANGLE
4.1 Why You Cannot See the Drainage Angle Without a Goniolens
This is a purely optical problem. Light rays leaving the iridocorneal angle travel outward through the aqueous, then hit the cornea-air interface.
The geometry:
- The critical angle between cornea (n=1.376) and air (n=1.00) = 46.5°
- Light from the drainage angle strikes the cornea at approximately 90° minus the angle of incidence = a very shallow angle relative to the corneal surface
- In a normal eye, the peripheral anterior chamber angle is located at the limbus, which means light from the angle hits the cornea-air interface at a very oblique angle (much greater than 46.5° from the normal to the interface)
- This exceeds the critical angle → total internal reflection → all the light bounces back into the eye and none reaches the examiner's eye → the angle is invisible
In numbers: Light from the angle structures arrives at the cornea/air interface at approximately 70-80° from the surface (i.e., only 10-20° from the critical angle normal condition), well beyond the 46.5° critical angle → 100% of light is internally reflected. - AAO Principles of Gonioscopy
Why only eyes with keratoconus occasionally show the angle directly: In keratoconus, the cornea is so steep and ectatic that the geometry changes - the angle between angle-origin light and the corneal surface may occasionally fall below the critical angle, allowing some light to escape. This is an exception that proves the rule.
4.2 How the Goniolens Solves This
The goniolens works by eliminating the cornea-air interface:
- It places a contact lens (or coupling fluid) with a refractive index close to the cornea (n ≈ 1.457 for glass, or n ≈ 1.336 for coupling fluid) directly on the corneal surface
- The critical angle for the new interface (cornea/lens or cornea/fluid) is dramatically reduced because the difference in refractive indices is tiny
- Light that previously hit the cornea-air interface at 70° (and was totally reflected) now hits a cornea-lens interface where the critical angle is ~80° (cornea/glass) or even higher for cornea/similar-index fluid → light passes through and reaches the observer
For indirect goniolenses (Goldmann):
Instead of eliminating the interface, a mirror inside the lens intercepts the emerging light and redirects it toward the examiner. The mirror is angled so that angle-derived light that exits through the side of the lens (after being redirected away from the cornea-air interface problem) reaches the examiner's eye. This is why the mirror gives you the OPPOSITE angle - you're looking at the reflection of the angle 180° away.
For direct goniolenses (Koeppe):
A dome-shaped lens is placed on the cornea. The dome geometry ensures that light from the angle always strikes the lens surface at near-perpendicular angles (well below the critical angle) → direct, non-reflected view.
SECTION 5: WHY SPECULAR REFLECTION SHOWS THE ENDOTHELIUM
5.1 The Physics of the Specular Zone
When light hits any polished surface at the angle of incidence = angle of reflection, a specular (mirror-like) reflection occurs. For the slit lamp:
- The corneal endothelium is a flat, smooth single-cell layer with a distinct refractive index boundary (corneal stroma n=1.376 on one side; aqueous humor n=1.336 on the other)
- At a specific illumination angle (typically ~30-40° from the surface normal), the reflection from the endothelium exactly matches the viewing angle
- In this zone, you see the endothelial surface itself (the mirror-image of the cell borders)
Why you see hexagons: Each endothelial cell has a distinct lateral boundary (the cell-cell junction). The cells themselves scatter very little light - the cell interior appears bright (the flat surface reflects toward you). The cell junctions (where cells touch) are elevated edges and scatter light differently - they appear as dark lines. The result is a mosaic of bright hexagons separated by dark lines - the classic endothelial specular reflection image.
Why the zone is small: The specular reflection only works over a very small area where the angle of incidence exactly matches the angle of reflection. Move the beam even slightly, and you are no longer in the specular zone. The examiner has to search for this zone by carefully adjusting both the illumination and viewing angles simultaneously.
Why guttata appear as dark spots on specular reflection:
Guttata (in Fuchs' dystrophy) are warty protrusions of abnormal collagen on Descemet's membrane that push the overlying endothelial cells upward and sideways. This elevates the reflecting surface locally, so light from those spots reflects in a different direction - away from the examiner's eye. Those spots appear dark (no reflection reaching the observer) = "excrescences" or "drop-like" shadows.
Why pseudoguttata look similar to guttata initially:
Inflammatory cells adhered to the back of the endothelium also displace the reflecting surface. The underlying mechanism is different (cells vs. collagen nodules) but the optical effect is the same - displaced specular reflection = dark spots. However, pseudoguttata disappear when inflammation resolves (cells leave), while true guttata are permanent (collagen deposits don't dissolve).
SECTION 6: WHY AQUEOUS HUMOR IS NORMALLY OPTICALLY EMPTY - AND WHAT CHANGES IN INFLAMMATION
6.1 The Normal Aqueous Humor
Normal aqueous humor has the following composition:
- 99.9% water
- Glucose, ascorbate, amino acids, electrolytes - all in low molecular weight form
- Protein: < 0.5 mg/mL (compare: plasma has ~70 mg/mL protein, 140x more concentrated)
This extremely low protein concentration is maintained by the blood-aqueous barrier (BAB), which consists of:
- Posterior BAB: Tight junctions (zonulae occludentes) between the non-pigmented epithelial cells of the ciliary body - controls what passes from the ciliary body into the posterior chamber
- Anterior BAB: Tight junctions between iris endothelial cells and iris stromal vessels - prevents plasma proteins from leaking from iris vessels into the AC
Because protein molecules are large (IgG is ~150 kDa), they are kept OUT of the aqueous by these tight junctions. No protein = no light scattering particles → aqueous appears completely black when the conical beam passes through it.
Why the aqueous is protein-poor and not just water: The composition of aqueous is actively maintained by the ciliary epithelium. It has higher ascorbate than plasma (antioxidant function for the lens and trabecular meshwork), higher Na+ than plasma, and very little protein (to allow maximum transparency).
6.2 Why Cells Appear in the Anterior Chamber During Inflammation
The chain of events:
- An inflammatory stimulus (infection, autoimmune reaction, trauma, surgical injury) activates the uveal tract (iris, ciliary body)
- Activated uveal macrophages, mast cells, and endothelial cells release pro-inflammatory mediators: prostaglandins (PGE2, PGI2), histamine, bradykinin, leukotrienes, interleukins (IL-1, IL-6, TNF-α)
- These mediators act on the tight junctions of the iris blood vessel endothelium (anterior BAB) and on the tight junctions of the ciliary epithelium (posterior BAB), loosening them - this is called "breakdown of the blood-aqueous barrier"
- When tight junctions loosen → plasma proteins leak into the aqueous → protein concentration rises dramatically
- Simultaneously, the loose junctions allow white blood cells (neutrophils, lymphocytes, monocytes) to migrate from iris and ciliary body vessels into the aqueous
- These cells and proteins are now floating in the anterior chamber
What you see at the slit lamp (conical beam):
- The conical beam enters the AC. Normally it passes through optically empty fluid and you see only two reflections: one bright stripe from the posterior cornea surface, one from the anterior lens surface. The space between is black (see diagram from ROSEN's Emergency Medicine below)
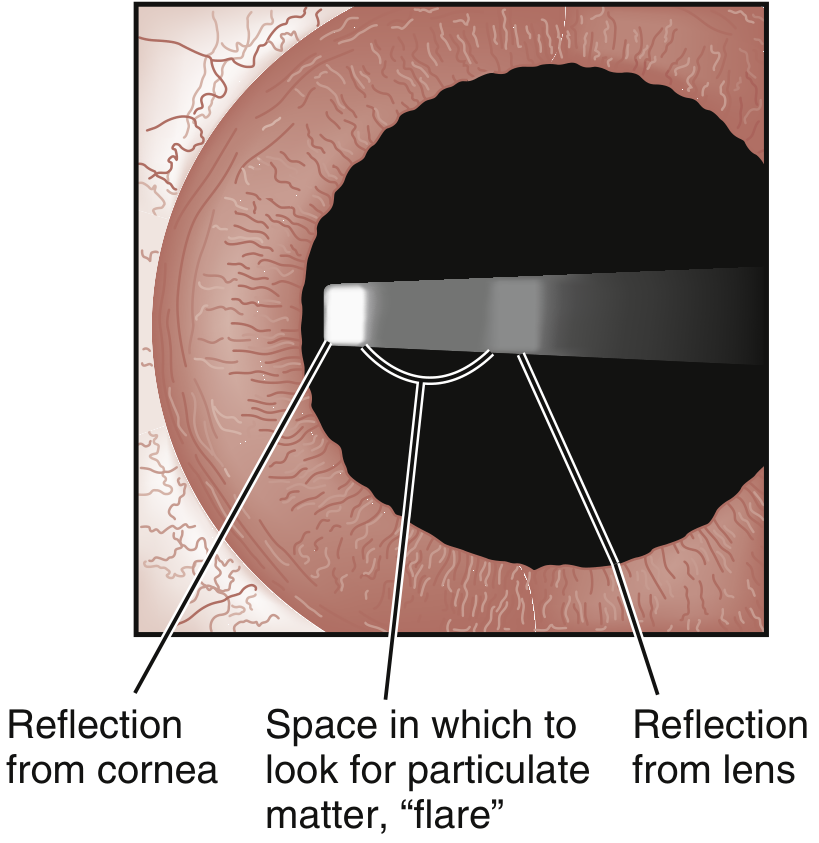
The dark zone between corneal and lens reflections - this is the space to examine for cells and flare with the conical beam. (ROSEN's Emergency Medicine)
- In uveitis, the proteins in the aqueous scatter the beam: the entire beam becomes visible as a foggy shaft of light (like a car headlight in fog) = FLARE
- Individual cells are large enough (7-15 μm in diameter) to scatter the beam as bright white dots = CELLS (seen as floating, moving specks)
Why cells and flare can be dissociated:
- Active cells = active cellular invasion = ongoing inflammation
- Persistent flare without cells = the tight junctions haven't fully recovered yet even though the cells have gone (proteins clear slowly from aqueous); OR chronic, smoldering low-grade leakage; OR established hypersecretion in long-standing disease (Fuchs' heterochromic cyclitis has persistent flare from chronic mild BAB disruption, even without active cells)
6.3 Why Keratic Precipitates Form and Why They Form in Arlt's Triangle
The formation mechanism:
- In the inflamed anterior chamber, white blood cells (especially macrophages and epithelioid cells in granulomatous disease) become coated with fibrin and other adhesion molecules as the protein-rich aqueous makes them sticky
- These sticky cells settle on the corneal endothelium (the only posterior surface available - the back surface of the cornea, which is the coldest surface in the eye)
- Once one cell adheres, it attracts more via adhesion molecules and fibrin bridges → clusters form = KPs
Why the inferior cornea specifically (Arlt's Triangle):
Two physical forces explain the triangular distribution:
Force 1 - Gravity:
Cells floating in the aqueous settle downward by gravity toward the inferior AC. They accumulate more densely in the lower half of the chamber.
Force 2 - Convection currents:
The corneal surface is cooled by the ambient air temperature. The inferior cornea is typically 0.5-1.0°C cooler than the superior cornea (which is protected by the upper eyelid and its deeper vasculature). Warm aqueous near the iris rises, cools as it approaches the cornea, then sinks along the inferior corneal surface - a thermal convection current circulating from iris → superior cornea → inferior cornea → iris again.
This convection current sweeps cells toward the inferior corneal endothelium and deposits them there. The triangular shape (apex at pupil, base at inferior limbus) reflects the geometry of this convection flow path - cells carried down the central endothelium, spreading outward as they slow near the base.
Why mutton-fat KPs are large:
Granulomatous inflammation involves macrophages and epithelioid cells rather than the lymphocytes seen in non-granulomatous disease. Macrophages are large cells (~15-20 μm diameter, vs. lymphocytes at 7-10 μm). Multiple macrophages and epithelioid cells cluster together with fibrin → large, greasy-appearing masses = "mutton-fat" KPs. Their greasy appearance reflects the lipid-rich cytoplasm of macrophage aggregates.
Why old KPs look different:
As inflammation resolves, macrophages stop arriving. Existing KPs:
- Lose their cells as the cells die or migrate
- Leave behind fibrin and collagen deposits
- These deposits undergo pigmentation by melanin from iris pigment that was liberated during inflammation
- The result: flat, dark brown, "pepper-like" pigmented KPs = sign of old/resolved inflammation
- They may permanently damage the endothelium at their site, leaving a faint "halo" visible on specular reflection
SECTION 7: WHY FLUORESCEIN STAINS CORNEAL DEFECTS AND NOT INTACT EPITHELIUM
7.1 The Chemistry of Fluorescein
Fluorescein is a hydrophilic (water-soluble) fluorescent dye. Under cobalt blue illumination (430-490 nm excitation), it emits bright yellow-green light (520 nm emission wavelength).
Why it doesn't stain intact epithelium:
The corneal epithelium has:
- Tight junctions (zonulae occludentes) between superficial epithelial cells, creating an epithelial barrier
- A hydrophobic glycocalyx coating the epithelial surface - this lipid/glycoprotein layer actively repels the hydrophilic fluorescein molecule
Why it stains damaged areas:
When epithelium is absent (abrasion, ulcer, erosion), the underlying stroma is exposed. The stroma is hydrophilic (proteoglycans are highly water-attracting). Fluorescein diffuses into the stroma and accumulates there. Even cells with disrupted tight junctions (not completely absent) allow fluorescein to penetrate and pool.
Why rose Bengal stains differently:
Rose Bengal (or its better-tolerated replacement, lissamine green) stains devitalized cells - cells that are still present but have lost their protective mucin glycocalyx. Such cells lose their ability to exclude the dye. This is why:
- In dry eye: mucin-deficient cells on the exposed interpalpebral zone stain with rose Bengal even without overt fluorescein staining (cells present but unhealthy)
- HSV dendrites: The cells are being killed by viral replication; they stain with rose Bengal while still in place, before they fully desquamate
7.2 Why the Cobalt Blue Filter Makes Fluorescein Glow Dramatically
Fluorescein absorbs maximally at 490 nm (blue) and emits at 520 nm (green). When the cobalt blue filter selectively transmits 430-490 nm blue light:
- Any area without fluorescein appears completely dark (the blue light is absorbed by tissue, not returned)
- Any area with fluorescein absorbs the blue and emits bright green → appears fluorescent yellow-green against a black background
- The contrast ratio is enormous - this is why even tiny epithelial defects (pinpoint erosions invisible in white light) become clearly visible
The Seidel Test - the same principle applied to perforation detection:
When the cornea is perforated, aqueous humor leaks out. Aqueous contains no fluorescein. When fluorescein is applied:
- The concentrated fluorescein at the wound edges appears bright
- The aqueous stream flowing out dilutes the fluorescein (replacing concentrated dye with protein-poor clear fluid) → creates a dark rivulet (clear aqueous) streaming through the bright fluorescein
- This dark stream against bright fluorescein = positive Seidel = active perforation
SECTION 8: WHY DISEASES PRODUCE THEIR SPECIFIC SLIT LAMP APPEARANCES - MECHANISTIC ANALYSIS
8.1 Fuchs' Endothelial Dystrophy - Why the Slit Lamp Shows What It Does
The disease mechanism:
Fuchs' is caused by mutations in genes affecting the endothelial cell (most commonly TCF4, SLC4A11, ZEB1). Dysfunctional endothelial cells:
- Secrete abnormal extracellular matrix onto Descemet's membrane → warty collagen nodules (guttata) accumulate
- These guttata physically push and crowd endothelial cells → cells spread out to cover the guttata → cells lose their hexagonal shape (pleomorphism) and become variable in size (polymegethism)
- Eventually cell density falls below the critical threshold (~500 cells/mm²) → pump failure → stromal edema → epithelial bullae
What the slit lamp shows and why:
- Specular reflection: Dark spots (guttata) - the nodules reflect light away from the observer (as explained in Section 5.2)
- Stromal haze (optical section): When edema develops, collagen fibril spacing is disrupted → grey-white cloudiness of the stroma
- Epithelial bullae (retroillumination/slit): Fluid accumulates beneath the epithelium (the basal cells lose adhesion as fluid separates them from Bowman's); thin-walled bullae form → appear as blisters
- Descemet's folds (optical section): Swollen stroma pushes inward on the relatively rigid Descemet's → it buckles into folds visible on the optical section
- Scleral scatter: Early subtle endothelial changes (barely visible directly) produce enough forward scatter to be visible → earliest detection method
Progression of symptoms with pathology:
- Early morning blur: Overnight, the eyelids are closed → tear film can't evaporate → cornea slightly more hydrated than during the day → edema slightly worse in the morning → blur
- As disease progresses: Edema persists through the day → persistent blur
- Late stage: Bullae rupture → acute pain (exposed corneal nerves) → corneal scarring → permanent opacity
8.2 Keratoconus - Why the Optical Section Reveals the Cone
The pathological basis:
Keratoconus involves:
- Degradation of type I collagen (reduced cross-linking - lysyl oxidase/LOX enzyme deficiency, increased matrix metalloproteinases breaking down collagen)
- Loss of stromal keratocytes in the cone area (apoptosis triggered by chronic oxidative stress, possibly from eye-rubbing generating mechanical shear)
- The surviving stroma is structurally weakened → the normal IOP (typically 10-21 mmHg) progressively deforms and stretches the thinned region into a cone
Why the thinning is central-inferior:
The mechanical stress of the IOP acts on the cornea non-uniformly. The inferior-central area of the cornea is thinnest in most people physiologically. Any structural weakness (genetic predisposition to abnormal collagen) is expressed first here. Eye-rubbing preferentially stresses the lower cornea mechanically.
What the slit lamp optical section shows and why:
- Stromal thinning: The optical section (cutting through the cornea) shows the thin bright bar of the corneal section becoming narrower at the apex of the cone. A normal cornea is ~540 μm thick; advanced KC may be 150-200 μm at the apex.
- Vogt's striae: As the stroma thins and the posterior cornea is placed under tension, the collagen lamellae at the posterior stroma are stretched. They form fine vertical stress lines parallel to the direction of maximum stretching. These appear as fine, parallel lines in the deep stroma on high-magnification direct illumination. They disappear when you press gently on the globe (momentarily relieving the tension = reducing IOP pressure causing the stretch) - this disappearance on pressure is diagnostic.
- Fleischer ring: Iron deposits (hemosiderin) in the epithelial basal cells at the base of the cone. Why iron accumulates here: the cone protrudes anteriorly, and the tear film flows around and pools at the base of the cone. Iron from the tear film (ferritin, lactoferrin) accumulates where tears are slowest/most turbulent. Best seen with red-free (green) filter - the iron appears black.
8.3 Herpetic Dendritic Ulcer - Why It Has Its Characteristic Shape
Viral pathology:
HSV-1 infects the corneal epithelial cells, replicates, and lyses them. The virus travels along the branches of the trigeminal nerve (corneal nerves run radially and branch). The infection spreads:
- Along nerve branches → branching pattern follows nerve anatomy → dendritic (tree-like) shape
- Terminal bulbs: The virus pools at the nerve endings at the tips of the dendrites → cells here are densely infected and swell before lysing → terminal bulbs (swollen tips of the dendritic ulcer)
Why terminal bulbs are the KEY distinguishing sign:
- Acanthamoeba pseudodendrites: The amoeba also kills epithelial cells in a branching pattern, but it doesn't follow nerve branches precisely - the pattern is more irregular, and there are NO terminal bulbs
- Healing corneal abrasions: Can occasionally produce irregular epithelial maps that vaguely resemble dendrites, but NO terminal bulbs
What you see on the slit lamp with fluorescein:
- Bright green branching line (the ulcer base = denuded stroma taking up fluorescein)
- Slightly raised edges (swollen infected cells around the ulcer edge - these stain with rose Bengal, not fluorescein)
- Terminal bulbs at the tips
8.4 Why Posterior Synechiae Form in Uveitis - The Biomechanical Reason
Normal state: The pupil margin of the iris rests very lightly against the anterior lens capsule - there is a thin aqueous film between them, constantly renewed by aqueous flowing from the posterior chamber through the pupil.
Why inflammation causes PS:
- Inflammation → fibrin exudate in the aqueous (BAB breakdown, as above)
- Fibrin deposits between the iris pupil margin and the anterior lens capsule
- Fibrin is highly adhesive (it is the body's emergency glue - the same molecule in blood clot formation)
- If inflammation is uncontrolled, fibrin bridges the iris-lens gap and polymerizes into a permanent adhesion
- The iris is now stuck to the lens = posterior synechiae
What you see on the slit lamp:
- Irregular pupil shape (the iris is "tethered" to the lens at multiple points, so it can't dilate symmetrically)
- When dilating drops are instilled, the pupil dilates asymmetrically, remaining held at the points of adhesion (creating "scalloped" or "tethered" dilation pattern - looks like spokes of a wheel held at points)
- Pigment deposits on the anterior lens capsule where the iris was adherent (iris pigment epithelium leaves a "footprint")
Why PS cause blindness if untreated (the cascade):
PS at the pupil margin → if they extend 360° around the entire pupil → aqueous produced in the posterior chamber cannot flow forward through the pupil (this is called seclusion pupillae) → aqueous accumulates behind the iris → pushes the iris forward = iris bombe → the bulging iris blocks the trabecular meshwork → secondary angle-closure glaucoma → raised IOP → optic nerve damage → blindness.
8.5 Why Blood Settles in the AC as a Hyphaema - Fluid Dynamics
The physics:
Blood in the AC (hyphema) layers by gravity because red blood cells (~7 μm diameter, ~1.1 g/cm³ density) are slightly denser than aqueous humor (~1.003 g/cm³).
Rate of settling: In a still aqueous (patient sitting upright), RBCs settle at a rate governed by Stokes' law:
- Settling velocity = (2r²(ρ₁-ρ₂)g) / (9η)
- Where r = cell radius, ρ = density difference, g = gravity, η = viscosity of aqueous
- RBCs settle within hours, forming the classic horizontal fluid level
Why hyphema is dangerous:
- Blood staining of cornea: Free hemoglobin (from lysed RBCs) enters the corneal stroma via the endothelium, particularly if IOP is elevated (driving fluid + hemoglobin forward) or if the endothelium is damaged. Hemoglobin breaks down to hemosiderin deposits in the stroma = permanent rust-brown corneal staining (visible on optical section as brown discoloration of stroma).
- Rebleed (2-5 days): The initial clot is resorbed by fibrinolysis around day 2-5. If the damaged vessel hasn't fully healed by then, it bleeds again at clot lysis → second bleed often larger (the vessels are more dilated from the first bleed).
- Trabecular meshwork obstruction: RBCs clog the trabecular meshwork pores → raised IOP → glaucoma.
8.6 Rubeosis Iridis (Iris Neovascularization) - Why New Vessels Grow and Why They're Dangerous
The ischemia-VEGF cascade:
- Retinal ischemia (diabetic retinopathy, CRVO, CRAO, ocular ischemic syndrome) → hypoxic retinal cells produce and release VEGF (Vascular Endothelial Growth Factor)
- VEGF diffuses anteriorly through the vitreous → aqueous → anterior chamber
- VEGF is a potent signal for blood vessel endothelial cells to proliferate and migrate (it was originally called "VPF" - Vascular Permeability Factor)
- Iris vessel endothelial cells respond by sprouting new vessels across the iris surface
Why rubeosis vessels look abnormal on slit lamp:
Normal iris vessels run radially from the pupil margin outward, following the radial structure of the iris stroma. Rubeosis vessels are driven by a chemical gradient (VEGF diffusing from the posterior segment) rather than by developmental architecture, so they grow randomly in multiple directions, crossing the normal radial vessels. This random directionality is the key slit lamp diagnostic feature.
Why they cause catastrophic angle closure:
The new vessels grow across the iris surface → into the drainage angle → the proliferating vascular endothelium and fibrovascular membrane contract → pulls the iris forward into the angle → obliterates the trabecular meshwork → neovascular glaucoma (very high IOP, very difficult to control). This is one of the most devastating end-stage complications of ischemic retinal disease.
SECTION 9: THE GOLDMANN TONOMETER - WHY THE PHYSICS WORKS
9.1 Why Corneal Rigidity and Tear Film Tension Cancel at 3.06 mm
The Imbert-Fick law for an ideal sphere: P = F/A
But the human cornea is NOT an ideal sphere. Two corrections are needed:
Correction 1 - Corneal rigidity (R): The cornea resists deformation (it has elastic stiffness). To flatten the cornea, you need extra force beyond what the IOP requires → overestimates IOP if uncorrected.
The extra force needed = R (stiffness), and by engineering analysis: R = 8πE×h³/(9(1-ν²)×r²), where E = elastic modulus, h = corneal thickness, ν = Poisson's ratio, r = flattening radius.
Correction 2 - Tear film surface tension (S): The tear meniscus at the edge of the tonometer prism creates a capillary force that pulls the prism toward the cornea. This means you need less applied force to achieve flattening → underestimates IOP if uncorrected.
Surface tension force = 2πr×T (where T = surface tension of the tear film ≈ 40 mN/m)
The elegant cancellation: At a flattening diameter of exactly 3.06 mm (radius = 1.53 mm), the mathematics work out so that the overestimation from corneal rigidity exactly equals the underestimation from surface tension:
R = S when r = 1.53 mm
Therefore P(measured) = F/A with NO correction needed at this exact flattening area. This is the genius of the Goldmann design - instead of applying two corrections, he found the exact flattening diameter where no correction is needed at all.
9.2 Why Corneal Thickness Changes the Reading (and the Consequence for Normal Tension Glaucoma)
If the cornea is thicker than the assumed 520 μm:
- A thicker cornea has greater elastic stiffness (R is proportional to h³ - i.e., rigidity scales with the cube of thickness)
- The excess stiffness is no longer balanced by the tear film tension (which doesn't change with corneal thickness)
- Net effect: extra force is needed to flatten → IOP overestimated
If the cornea is thinner than 520 μm (as in post-LASIK, normal tension glaucoma patients):
- Less stiffness → the tear film tension overcompensates → less force needed to flatten → IOP underestimated
- This is clinically critical in NTG: the optic nerve is damaged at seemingly "normal" IOP (10-18 mmHg), but the actual IOP is higher than measured because the thin, compliant cornea (or perhaps very low corneal hysteresis) is underestimating the true IOP
9.3 Why the Mires Are Split Into Two Semicircles (and Not One Circle)
The Goldmann prism is a double prism - two prisms placed base-to-base. This splits the optical field into two halves:
- Upper half: The image is displaced upward
- Lower half: The image is displaced downward
- When the flattened fluorescent tear meniscus ring exactly has a diameter of 3.06 mm, each prism half shows exactly one semicircle of the ring
- The inner margins of these two semicircles touch precisely when the flattening area is exactly 3.06 mm
Why split prism design rather than one prism?
A single prism would show a circle, and you'd have to precisely measure the diameter of the flattened circle (which would require calibrated reticles and is technically difficult). The double prism design converts a diameter measurement into an alignment task (inner edges touch/separate) - much easier and more precise to judge visually.
SECTION 10: WHY THE SLIT LAMP CANNOT SEE THE ANGLE - AND WHY GOLDMANN TONOMETRY CAN BE SPURIOUSLY HIGH
10.1 The Van Herick Estimation - Why It Works and Why It Fails
Why it works (mechanistically):
The peripheral anterior chamber depth is determined by:
- The axial length and curvature of the lens (a large lens = shallower AC)
- The iris-lens relationship (pupillary block pushes iris forward = shallow AC)
- The angle of the iridocorneal angle
By measuring the ratio of peripheral AC depth to corneal thickness, you indirectly assess all three factors. A deep peripheral AC = the iris lies well behind the cornea = the angle is open. A shallow peripheral AC = iris is being pushed forward (by pupillary block or by a large lens) = angle is narrow.
Why it fails in plateau iris:
In plateau iris configuration, the ciliary processes are anteriorly rotated and physically support the peripheral iris forward (like a shelf), keeping it close to the trabecular meshwork. The CENTRAL AC may be normal depth and the Van Herick may grade the angle as Grade 3-4 (safe) - but the peripheral angle is actually dangerously narrow due to the shelf of ciliary processes holding the iris up. Gonioscopy reveals the true angle anatomy.
SECTION 11: INTEGRATED CLINICAL REASONING - PUTTING THE MECHANISMS TOGETHER
11.1 The Uveitis Cascade - From Stimulus to Slit Lamp Sign
Stimulus (infection/autoimmune/trauma)
↓
Uveal macrophage/mast cell activation
↓
Prostaglandins, histamine, cytokines (IL-1, TNF-α)
↓
Blood-aqueous barrier breakdown
↙ ↘
Protein leaks into AC WBCs migrate into AC
(plasma proteins: IgG, IgM, (neutrophils, lymphocytes,
fibrinogen, complement) macrophages)
↓ ↓
FLARE on conical beam CELLS on conical beam
(protein scatters light) (cells scatter as bright dots)
↓ ↓
Fibrin deposits (sticky) Cells adhere to corneal
↓ endothelium
Combined with cells ↓
↓ KERATIC PRECIPITATES
Fibrin + cells in AC (inferior, Arlt's triangle by
= HYPOPYON if severe gravity + convection currents)
↓
Fibrin bridges iris to lens
↓
POSTERIOR SYNECHIAE
↓ (if 360°)
Seclusion pupillae
↓
IRIS BOMBE
↓
Secondary angle closure → raised IOP → GLAUCOMA
11.2 The Corneal Edema Cascade
Endothelial damage
(Fuchs, surgery, trauma, infection)
↓
Na+/K+ ATPase pump fails
↓
Stroma absorbs water (proteoglycan osmotic drive)
↓
Inter-fibril spacing > λ/2 of visible light
↓
Destructive interference of scattered wavefronts FAILS
↓
Light scatters laterally → STROMAL HAZE
(grey cloudiness on optical section; scleral scatter shows subtle early haze)
↓ (continued swelling)
Descemet's membrane folds
(swollen stroma pushes it → buckling → folds on optical section)
↓
Subepithelial fluid accumulation
↓
Epithelial microcysts → BULLAE
(bullous keratopathy = late stage)
↓
Bullae rupture → exposed corneal nerves → ACUTE PAIN
↓ (scarring)
Irregular collagen (type III) laid by myofibroblasts
↓
Permanent SCAR (irregular fibril spacing, permanent haze)
Primary reference for molecular anatomy: Histology: A Text and Atlas with Correlated Cell and Molecular Biology, Pawlina - Chapter 24 (Corneoscleral Coat), particularly pp. 2380-2386
Kanski's Clinical Ophthalmology 10th Edition - Chapter 1 (illumination techniques, tonometry, gonioscopy)
AAO Principles of Gonioscopy (total internal reflection and critical angle)
EyeWiki - Arlt's Triangle (convection current mechanism)
Review of Optometry - Tyndall effect and illumination techniques
This is a shared conversation. Sign in to Orris to start your own chat.