
Contracture pelvis by Dutta obtrestic
Dutta obstetrics contracture pelvis types diagonal conjugate management
https://dokumen.pub/dc-duttas-textbook-of-obstetrics-includi…
https://www.slideshare.net/slideshow/contracted-pelvis-24540…
contracted pelvis types inlet outlet midpelvis obstetrics diagram
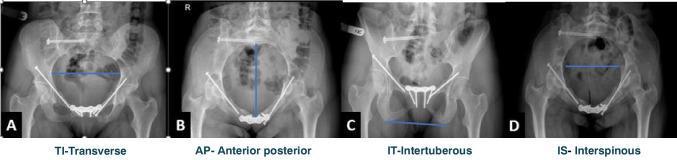
A series of four postoperative anteroposterior, inlet, and outlet pelvic X-rays demonstrating radiographic pelvimetry measurements using the Colcher-Sussman technique. The images show a pelvis with orthopedic hardware, including sacroiliac screws and pubic symphysis plating, indicating prior surgical fixation. Frame A (Transverse Inlet Diameter) shows a horizontal blue line representing the widest diameter of the pelvic inlet between the iliopectineal lines. Frame B (Anteroposterior Distance) illustrates a vertical midline from the anterior pubic symphysis to the sacrum on an inlet view. Frame C (Intertuberous Distance) depicts a transverse line at the pelvic outlet between the inferior margins of the ischial tuberosities. Frame D (Interspinous Distance) shows the mid-pelvic transverse diameter measured between the ischial spines. These diagnostic images are used in orthopedics and obstetrics to assess pelvic dimensions and symmetry following pelvic ring fractures and surgical reconstruction.
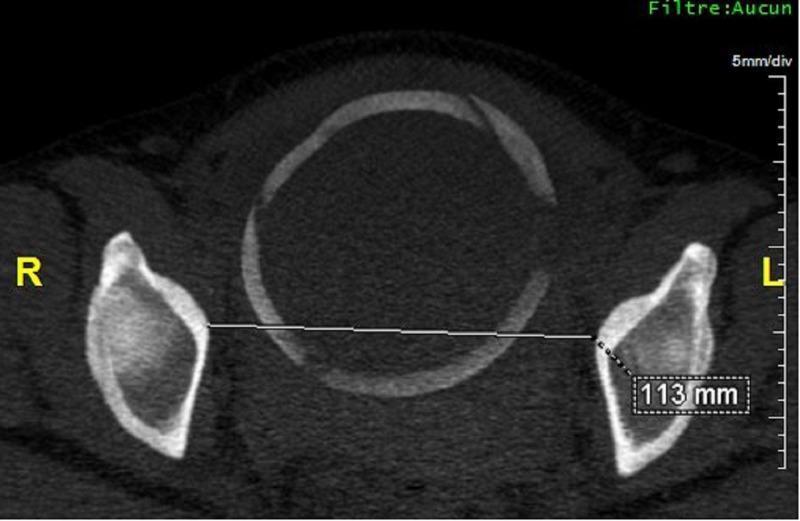
This diagnostic image is an axial Maximum Intensity Projection (MIP) reconstruction from a computed tomography (CT) scanopelvimetry. It provides a cross-sectional view of the female pelvic inlet and outlet for obstetric assessment. The central feature is the sacrum, appearing as an oval bony ring, flanked laterally by the iliac and ischial bones of the pelvis. Orientation is clearly marked with 'R' for the patient's right and 'L' for the patient's left. A linear measurement is demonstrated using a horizontal calliper line connecting the inner margins of the ischial bones. This line measures the median transverse diameter, which is annotated with a numerical value of 113 mm. Technical metadata in the upper right corner indicates a scale of '5mm/div' and the absence of a digital filter ('Filtre: Aucun'). This imaging modality is primarily used in clinical obstetrics to evaluate for pelvic narrowing and assess the adequacy of the birth canal for vaginal delivery.
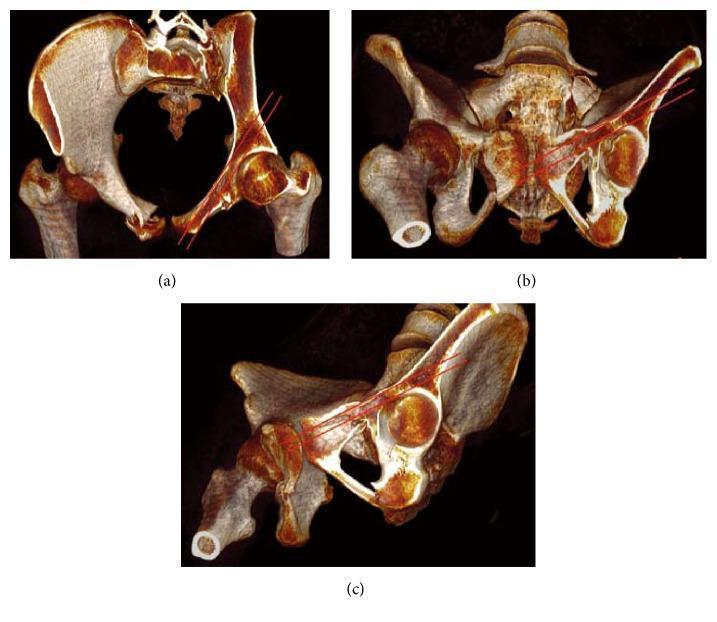
This medical illustration consists of three panels (a, b, and c) showing 3D-rendered diagnostic images of the human pelvis, used to demonstrate orthopedic surgical planning. The panels present different fluoroscopic-style views: (a) Pelvic inlet view, (b) Pelvic outlet view, and (c) Obturator outlet view. Each image features a volume-rendered model of the bony pelvis, including the ilium, ischium, pubis, and the proximal femur with the acetabulum. Overlaid on the right side of the pelvis are parallel red lines illustrating the 'osseous corridor' for an anterior column acetabular screw. The lines represent the precise intraosseous trajectory from the gluteus medius eminence above the acetabulum, extending through the superior pubic ramus toward the pubic tubercle. This diagram serves as an educational guide for surgeons to visualize screw placement for acetabular fracture fixation, highlighting the safe anatomical pathway to avoid cortical penetration or articular surface violation.
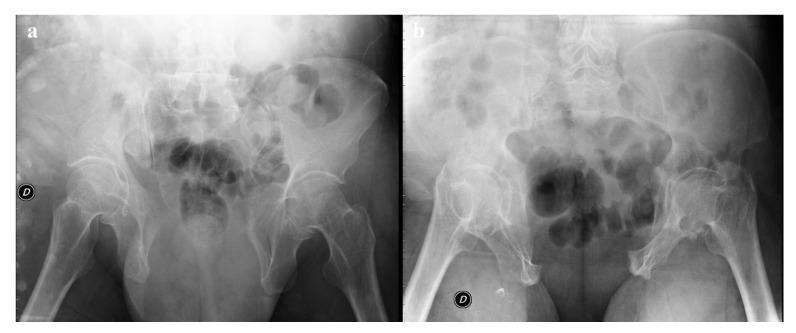
Two anteroposterior plain radiographs of the human pelvis demonstrating specific trauma-focused projections: (a) an outlet view and (b) an inlet view. The images reveal a significant disruption of the anterior pelvic ring, characterized by a pubic symphysis diastasis measuring approximately 5.2 cm. In the inlet view (b), there is also visible anterior widening of the left sacroiliac (SI) joint, indicating a disruption of the posterior pelvic arch. These radiographic findings are consistent with an unstable pelvic ring injury, likely an Anteroposterior Compression (APC) Type II or III injury according to the Burgess-Young classification system. The outlet view specifically assists in evaluating craniocaudal displacement and sacral morphology, while the inlet view highlights the anteroposterior translation and rotational deformity of the hemipelvis. These projections are critical in orthopedic trauma for assessing pelvic stability and planning surgical fixation.
Contracted Pelvis - DC Dutta's Textbook of Obstetrics
Definition
- Inlet: Obstetric conjugate (OC) < 10 cm, OR transverse diameter < 12 cm
- Midpelvis: Interspinous diameter < 9.5 cm
- Outlet: Intertuberous diameter < 8 cm (bituberous < 8 cm)
Classification
A. According to the Plane Involved
| Plane | Contracted When |
|---|---|
| Inlet contraction | OC < 10 cm or transverse < 12 cm |
| Midpelvic contraction | Interspinous diameter < 9.5 cm |
| Outlet contraction | Intertuberous (bituberous) < 8 cm |
| Generally contracted pelvis | All planes uniformly reduced |
B. According to Degree of Contraction (Inlet)
| Degree | True Conjugate | Clinical Significance |
|---|---|---|
| Minor | 9-10 cm | Minor disproportion; spontaneous vaginal delivery often possible |
| Moderate | 8-9 cm | Moderate disproportion |
| Severe | 6-8 cm | Marked disproportion |
| Extreme (Absolutely contracted) | < 6 cm | Vaginal delivery impossible even after craniotomy; bimastoid diameter (7.5 cm) cannot be crushed |
C. According to Pelvic Architecture (Caldwell-Moloy Classification)
- Gynaecoid - Normal female pelvis; inlet is round/oval
- Android - Male-type; narrowed fore-pelvis, funnel-shaped; worst for labour
- Anthropoid - Oval AP inlet; long AP, narrow transverse
- Platypelloid - Flat pelvis; short AP, wide transverse
Causes (Etiology)
General Causes
- Nutritional: Rickets (most common historically), osteomalacia
- Hormonal: Delayed puberty, pituitary disorders
Spinal Causes
- Scoliosis, kyphosis, kyphoscoliosis
- Spondylolisthesis (forward slip of L5 on S1 - reduces AP diameter of inlet)
- Lumbar lordosis
Pelvic Causes
- Rickets - causes flat (platypelloid) pelvis
- Osteomalacia - causes beak-shaped pelvis (triradiate)
- Pelvic tumors or exostoses
- Paget's disease
Lower Limb Causes
- Dislocation of one or both hips
- Atrophy of one or both lower limbs
- Hip joint disease (causing asymmetric/oblique contraction)
- Coxalgic pelvis
Pelvic Measurements (Key Conjugates)
| Diameter | Measurement | Normal Value |
|---|---|---|
| True (anatomical) conjugate | Upper inner border of symphysis to sacral promontory | 11 cm |
| Obstetric conjugate | Most prominent inner point of symphysis to sacral promontory | 10 cm (minimum safe = 10 cm) |
| Diagonal conjugate | Lower border of symphysis to sacral promontory | 12 cm |
| Obstetric conjugate from DC | DC - 1.5 to 2 cm | ~10 cm |
The diagonal conjugate (DC) is the only AP diameter measurable clinically. The obstetric conjugate is computed as DC - 1.5 to 2 cm depending on symphysis height, thickness, and inclination.
Asymmetrical (Obliquely Contracted) Pelvis
Mechanism of Labor in Contracted Pelvis (Vertex)
With Inlet Contraction:
- The head may be deflexed or malpositioned at the brim
- Asynclitism (lateral tilting of head) occurs to negotiate the brim - anterior asynclitism (Naegele) or posterior asynclitism (Litzmann)
- Caput succedaneum forms but is not excessively large
- Once the head negotiates the brim, the cavity and outlet usually pose no problem
With Midpelvic/Outlet Contraction:
- Arrest of descent at the midpelvis
- Persistent occiput posterior or transverse position
- Deep transverse arrest is common
- Obstructed labor with risk of uterine rupture
Diagnosis of Contracted Pelvis
Antenatal
- History: Past obstetric history, nutritional deficiencies, rickets, limb/spinal deformity
- General examination: Height < 145 cm (suspect contracted pelvis), body build, spinal/limb deformities
- Abdominal examination: Non-engagement of head at term in primigravida (floating head sign), prominent lower pole of fetus
Clinical Pelvimetry
- Intercristal diameter: 28 cm
- Interspinous diameter: 26 cm
- External conjugate (Baudelocque's diameter): 20 cm
- Palpate forepelvis - check if round or V-shaped
- Measure diagonal conjugate - normally cannot reach the sacral promontory (> 12.5 cm). If felt, pelvis is contracted. Subtract 1.5 cm to get OC
- Note any sacral promontory protrusion
- Height, thickness, inclination of symphysis
- Shape and inclination of sacrum
- Ischial spines - if both can be touched simultaneously by two fingers, interspinous diameter ≤ 9.5 cm (inadequate)
- Sacrosciatic notch - if sacrospinous ligament < 2.5 finger breadths, notch is narrow
- Subpubic angle - normally admits 2 fingers (90°); < 90° is narrow
- Bituberous diameter - fist test (< 8 cm = contracted)
Radiological Pelvimetry
- CT pelvimetry (lowest radiation, most accurate) or MRI
- Lateral X-ray (Colcher-Sussman technique)
- Used when clinical findings are borderline or after failed trial labor
Diagnosis of Cephalopelvic Disproportion (CPD)
At the Brim:
- Non-engagement of head at term (primigravida)
- Floating head in early labor
- Munro-Kerr test: With patient in lithotomy, examiner's hand presses the fetal head into the pelvis while the other hand feels per abdomen - if head does not enter brim, disproportion likely
- Muller's test / Muller-Hillis maneuver: Fundal pressure applied; if head does not descend into the pelvis, CPD suggested
During Labor:
- Failure of engagement/descent despite good contractions
- Prolonged labor
- Excessive caput and molding
- Bandl's ring formation (pathological retraction ring - ominous sign of impending rupture)
Effects of Contracted Pelvis on Pregnancy and Labor
| Phase | Effects |
|---|---|
| Pregnancy | Unstable lie, malpresentation, non-engagement at term |
| Labor - mother | Prolonged labor, uterine dysfunction, obstructed labor, uterine rupture, fistula formation (VVF, RVF), PPH, sepsis |
| Labor - fetus | Birth asphyxia, intracranial hemorrhage, stillbirth |
Management
Management of Inlet Contraction
- Allow spontaneous labor; vaginal delivery usually possible
- Careful monitoring
-
Induction of labor - 2-3 weeks before EDD in selected multigravida with minor-moderate contraction and previous history of difficult vaginal delivery
-
Elective Cesarean Section at term - Indications:
- Major degree of inlet contraction
- Moderate contraction + unfavorable factors (elderly primigravida, precious baby, malpresentation, poor obstetric history, fetal macrosomia)
- OC < 7.5 cm (absolute indication)
-
Trial of Labor - For borderline cases (OC 8.5-10 cm)
Trial of Labor (Dutta)
- OC between 8.5 and 10 cm (borderline pelvis)
- Vertex presentation, well-flexed
- Average-sized fetus (estimated < 3.5 kg)
- No other complication
- Facilities for immediate CS available
- Informed consent
- Spontaneous onset of labor preferred
- Continuous monitoring (FHR, uterine contractions)
- ARM (artificial rupture of membranes) when head is at or near the brim
- Watch for: descent of head, cervical dilation, fetal condition
- Maximum time allowed: 12-18 hours of active labor (some texts say up to 6-8 hours after full dilation)
- Arrest of descent despite good contractions
- Fetal distress
- Bandl's ring formation
- Excessive molding
- No progress after adequate trial
Midpelvic and Outlet Disproportion
- Midpelvic contraction (interspinous < 9.5 cm): Deep transverse arrest - may attempt assisted vaginal delivery (ventouse/forceps) if head is low; otherwise CS
- Outlet contraction alone (bituberous < 8 cm): Symphysiotomy (rarely done today) or CS; Schuchardt incision may give extra room
Pelvimetry: Normal Values Summary (Dutta)
| Diameter | Normal |
|---|---|
| Obstetric conjugate | ≥ 10 cm |
| Diagonal conjugate | ≥ 12 cm |
| Transverse inlet | ≥ 12 cm |
| Interspinous (midpelvis) | ≥ 10 cm |
| Intertuberous (outlet) | ≥ 8 cm |
| Subpubic angle | 90°-100° |
- Diagonal conjugate is the only clinically measurable AP diameter (DC - 1.5 to 2 cm = obstetric conjugate)
- Absolutely contracted pelvis: OC < 6 cm - even craniotomy won't help (bimastoid = 7.5 cm)
- Floating head at term in primigravida = suspect contracted pelvis until proven otherwise
- Bandl's ring = danger sign of impending uterine rupture in obstructed labor
- Trial of labor is for OC 8.5-10 cm with vertex, average fetus, no complications
- Rickets → flat (platypelloid) pelvis; Osteomalacia → triradiate/beak pelvis; Spondylolisthesis → reduced AP inlet
Shoulder dystocia
shoulder dystocia maneuvers McRoberts suprapubic pressure obstetrics diagram
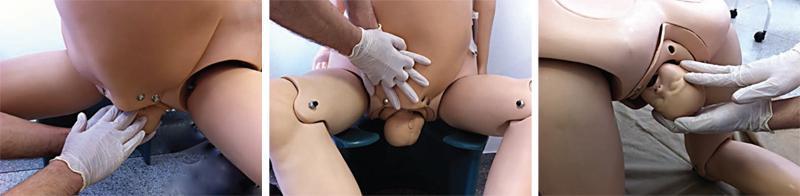
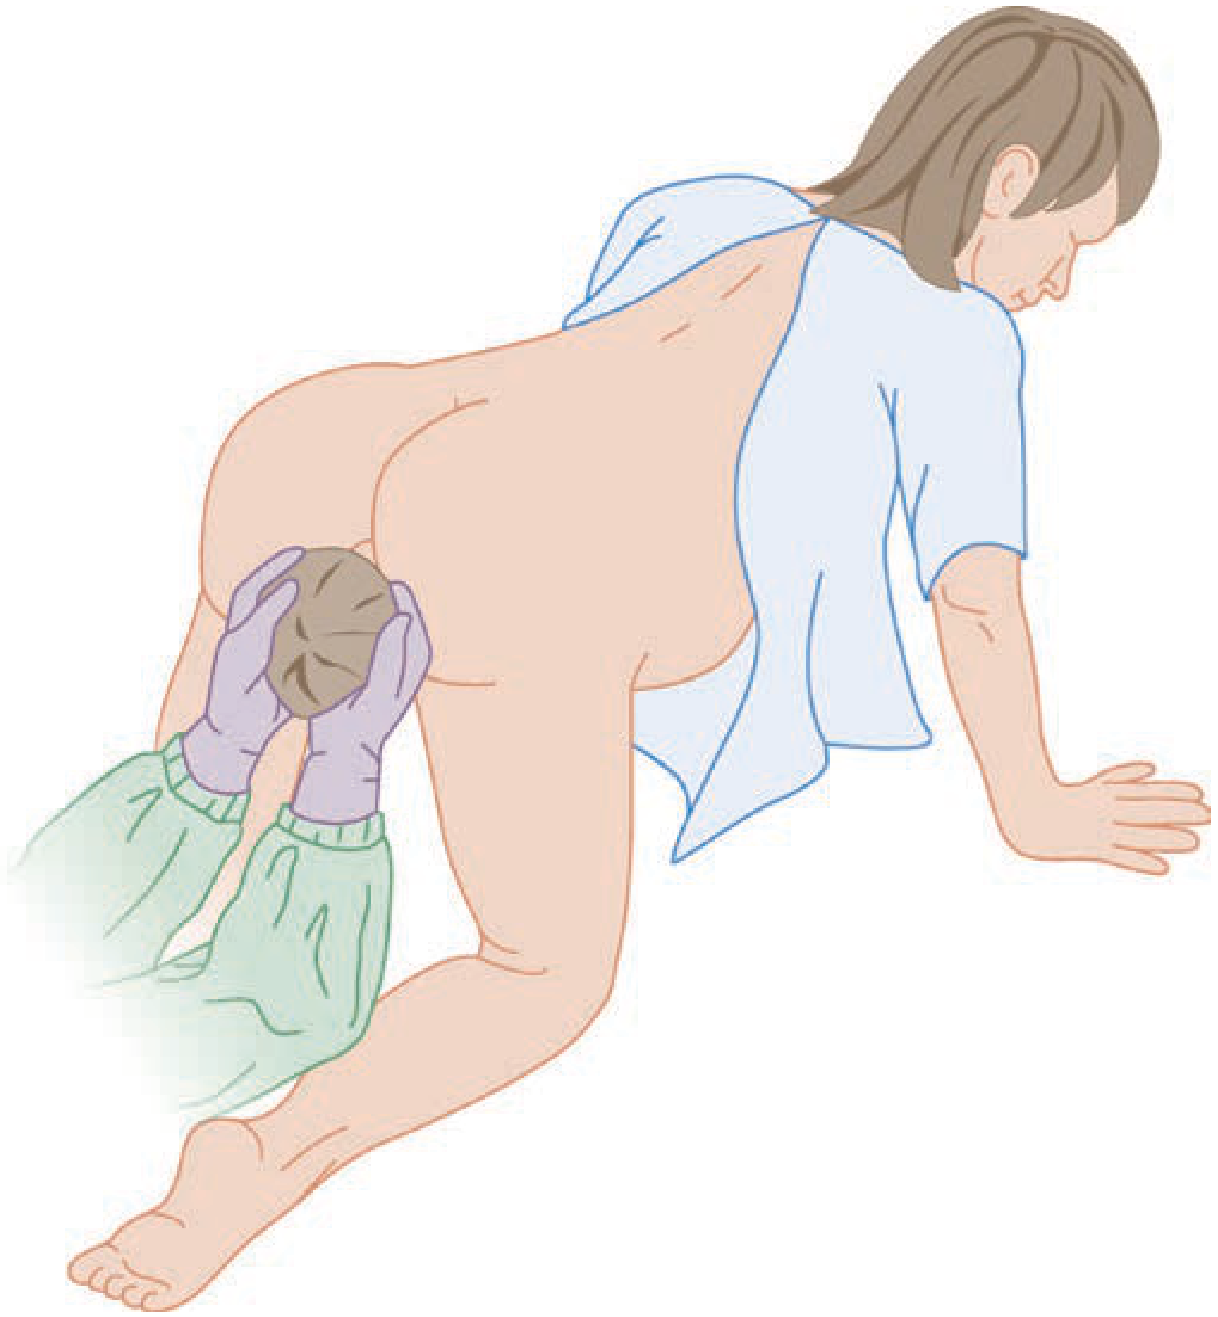
This sequence of three clinical photographs uses an anatomical birthing simulator to demonstrate maneuvers for resolving shoulder dystocia. The first image illustrates a modified McRoberts maneuver in an upright, augmented squat position, showing hyperflexion of the lower limbs to widen the pelvic diameter. The second image depicts the application of suprapubic pressure (Rubin I maneuver), where a gloved healthcare provider applies inferomedial pressure with flat hands on the maternal lower abdomen to facilitate fetal shoulder adduction and descent. The third image displays the 'all-fours' or Gaskin maneuver, where the parturient is repositioned on hands and knees to utilize gravity and increase sacral space. The sequence follows the 'A SAÍDA' mnemonic for managing obstetric emergencies. These materials are intended for medical education in obstetrics and midwifery to teach the clinical sequencing of external maneuvers when standard cephalic delivery is impeded by fetal shoulder impaction against the maternal symphysis pubis.
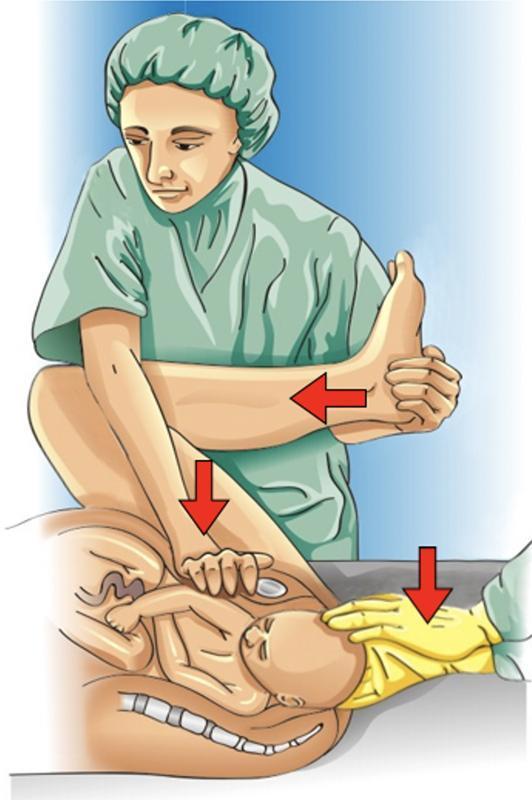
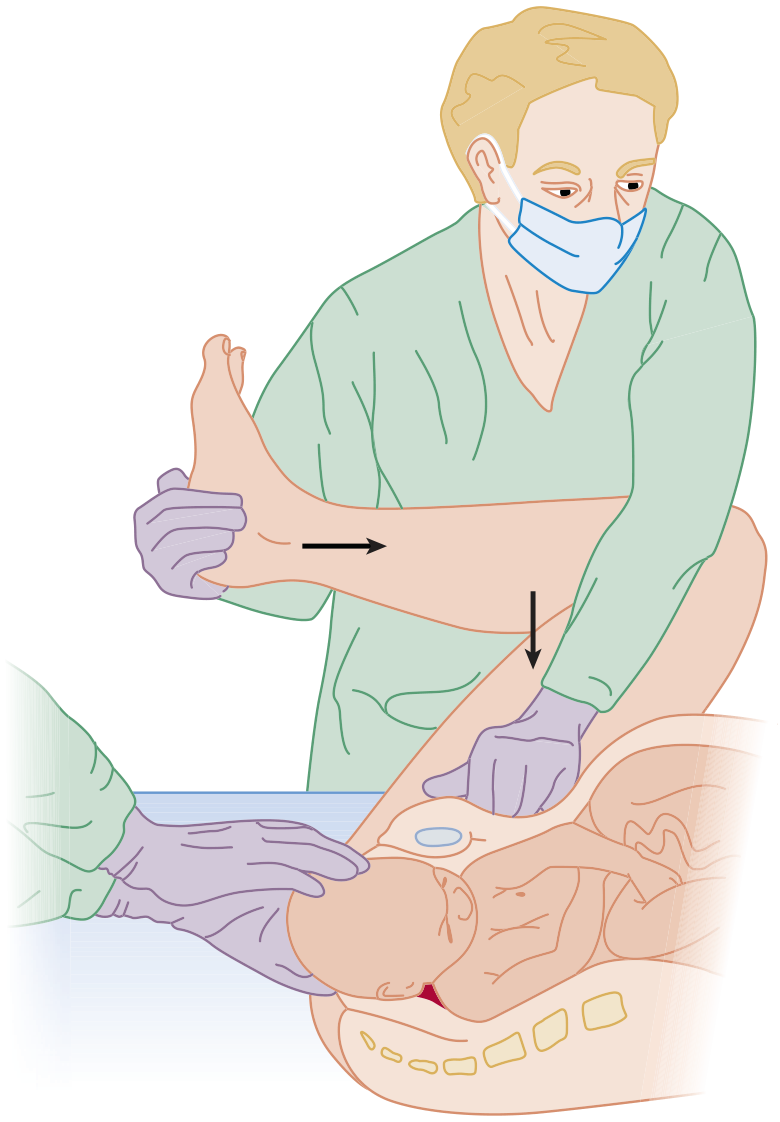
This medical illustration depicts the simultaneous application of the McRoberts maneuver and Rubin I maneuver to resolve shoulder dystocia during childbirth. The diagram shows the maternal pelvis in a sagittal cross-section with the fetus in a cephalic presentation. The McRoberts maneuver is demonstrated by the hyperflexion of the maternal thighs against the abdomen, indicated by a red arrow pointing toward the mother's chest; this action flattens the sacral promontory and rotates the symphysis pubis cephalad. Simultaneously, the Rubin I maneuver is illustrated by an assistant applying firm suprapubic pressure in an inferomedial direction (indicated by a vertical red arrow) to encourage the impaction of the anterior fetal shoulder to resolve. A third red arrow indicates the clinician applying gentle downward traction on the fetal head. The illustration serves as an educational tool for obstetric emergencies, highlighting the vector of forces and maternal positioning required to increase the functional diameter of the pelvis and facilitate delivery of the impacted shoulder.
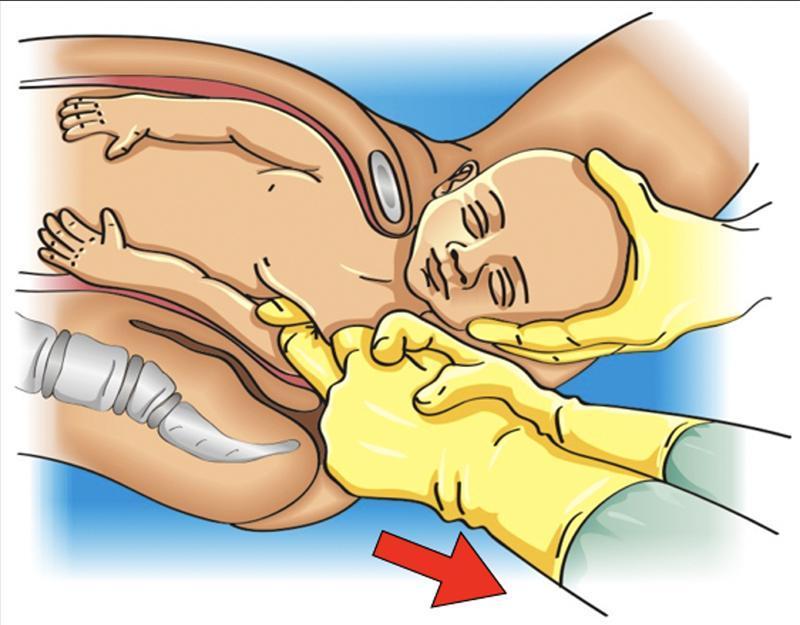
This medical illustration depicts the Menticoglou maneuver, a specialized obstetric technique used to resolve shoulder dystocia by delivering the posterior shoulder. The fetus is shown in the birth canal with the head partially delivered. The clinician's hands, wearing yellow gloves, are performing axillary traction. The middle fingers of both hands are interlaced within the fetal posterior axilla (axillary cavus) to gain a secure grip. A red arrow indicates the application of inferior traction force directed along the maternal sacral curvature. This maneuver aims to facilitate the descent of the posterior shoulder, thereby reducing the biacromial diameter and allowing the impacted anterior shoulder to dislodge from the maternal pubic symphysis. The diagram serves as an educational tool for emergency obstetric management, highlighting hand placement and the mechanical vector required to resolve impaction when primary maneuvers like McRoberts or Rubin I have failed.
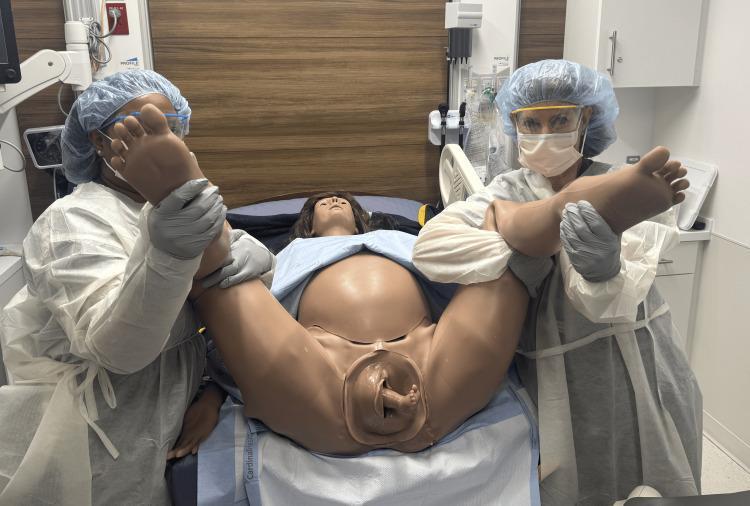
This clinical photograph displays a high-fidelity obstetric patient simulator (Victoria S2200) being used to demonstrate the McRoberts maneuver in a dorsal lithotomy position. The simulator is positioned on a delivery bed with the legs hyperflexed toward the abdomen to rotate the pelvis cephalad and flatten the lumbar spine, a technique primarily utilized to manage shoulder dystocia or facilitate breech deliveries. Two clinical staff members in full personal protective equipment (gowns, masks, caps, and face shields) are manually supporting the simulator's legs in the hyperflexed position. At the vaginal opening, the simulator demonstrates a footling breech presentation, with a single fetal foot visible emerging from the birth canal. This visual serves as an educational tool for medical training in emergency obstetrical maneuvers, highlighting the anatomical positioning necessary to optimize the pelvic outlet and the visualization of complex fetal presentations during vaginal delivery.
Shoulder Dystocia
Definition
- Incidence: 0.24% to 2% of all vaginal deliveries
- Rises to 5-7% when birth weight > 4500 g (macrosomia)
- 50% of cases occur with normal-weight fetuses - making prediction and anticipation essential
Pathophysiology
Risk Factors
| Antepartum | Intrapartum |
|---|---|
| Fetal macrosomia (birth weight > 4000 g) | Prolonged first stage of labor |
| Diabetes mellitus (GDM or pre-gestational) | Prolonged second stage of labor |
| Previous shoulder dystocia | Operative vaginal delivery (forceps/vacuum) |
| Obesity (pre-pregnancy weight > 180 lb) | Arrest disorders |
| Excessive maternal weight gain | |
| Post-term pregnancy | |
| Advanced maternal age |
Important: In 50% of cases, no risk factors are identified - shoulder dystocia is truly unpredictable in half of all cases.
Recognition / Warning Signs
- Prolonged second stage of labor
- Turtle sign - after delivery of the head, it retracts tightly against the perineum (head "turtles" back)
- Routine downward traction on the delivered head fails to deliver the anterior shoulder
- Head may retract between contractions even before full delivery
Complications
Maternal
- Postpartum hemorrhage (uterine atony)
- Perineal lacerations (4th degree - disruption of anal sphincter and rectal mucosa)
- Vaginal lacerations
- Uterine rupture (rare)
Fetal / Neonatal
| Complication | Notes |
|---|---|
| Brachial plexus injury (Erb palsy) | C5-C6 roots; most common; occurs in 10-20% of shoulder dystocia cases |
| Klumpke palsy | C8-T1 roots; less common |
| Humeral/clavicular fracture | Often intentional (deliberate clavicle fracture to resolve dystocia) |
| Phrenic nerve injury | |
| Birth asphyxia / hypoxia | From umbilical cord compression and delayed delivery |
| Death | From prolonged hypoxia |
Note: Brachial plexus injury can also involve the posterior arm, occur with normal deliveries, and even occur in utero from malposition - it does not always imply excessive traction by the provider.
Management - Sequential Maneuvers
| Letter | Step |
|---|---|
| H | Call for Help |
| E | Evaluate for Episiotomy (does not directly relieve bony dystocia, but creates room for internal maneuvers) |
| L | Legs - McRoberts maneuver |
| P | Pressure - suprapubic pressure |
| E | Enter - internal rotational maneuvers |
| R | Remove the posterior arm |
| R | Roll the patient (Gaskin maneuver) |
Step 1 - McRoberts Maneuver
- Hyperflexion of maternal thighs sharply onto the abdomen, knees held as widely apart as possible
- Mechanism: Flattens the lumbosacral lordosis, removes the sacral promontory as obstruction, rotates the symphysis pubis cephalad, increases the functional AP diameter of the inlet
- Simultaneously apply suprapubic pressure
- McRoberts + suprapubic pressure together resolves ~50% of shoulder dystocias
Suprapubic Pressure (Rubin I)
- Apply firm, downward and lateral pressure just above the pubic symphysis (CPR-style with flat/clenched hands)
- Direction: inferomedial - push the anterior fetal shoulder toward the fetal chest (adduction)
- Apply for 1-2 minutes
- NEVER apply fundal pressure - it pushes the shoulder further into the pelvis
Step 2 - Internal Rotational Maneuvers (require episiotomy)
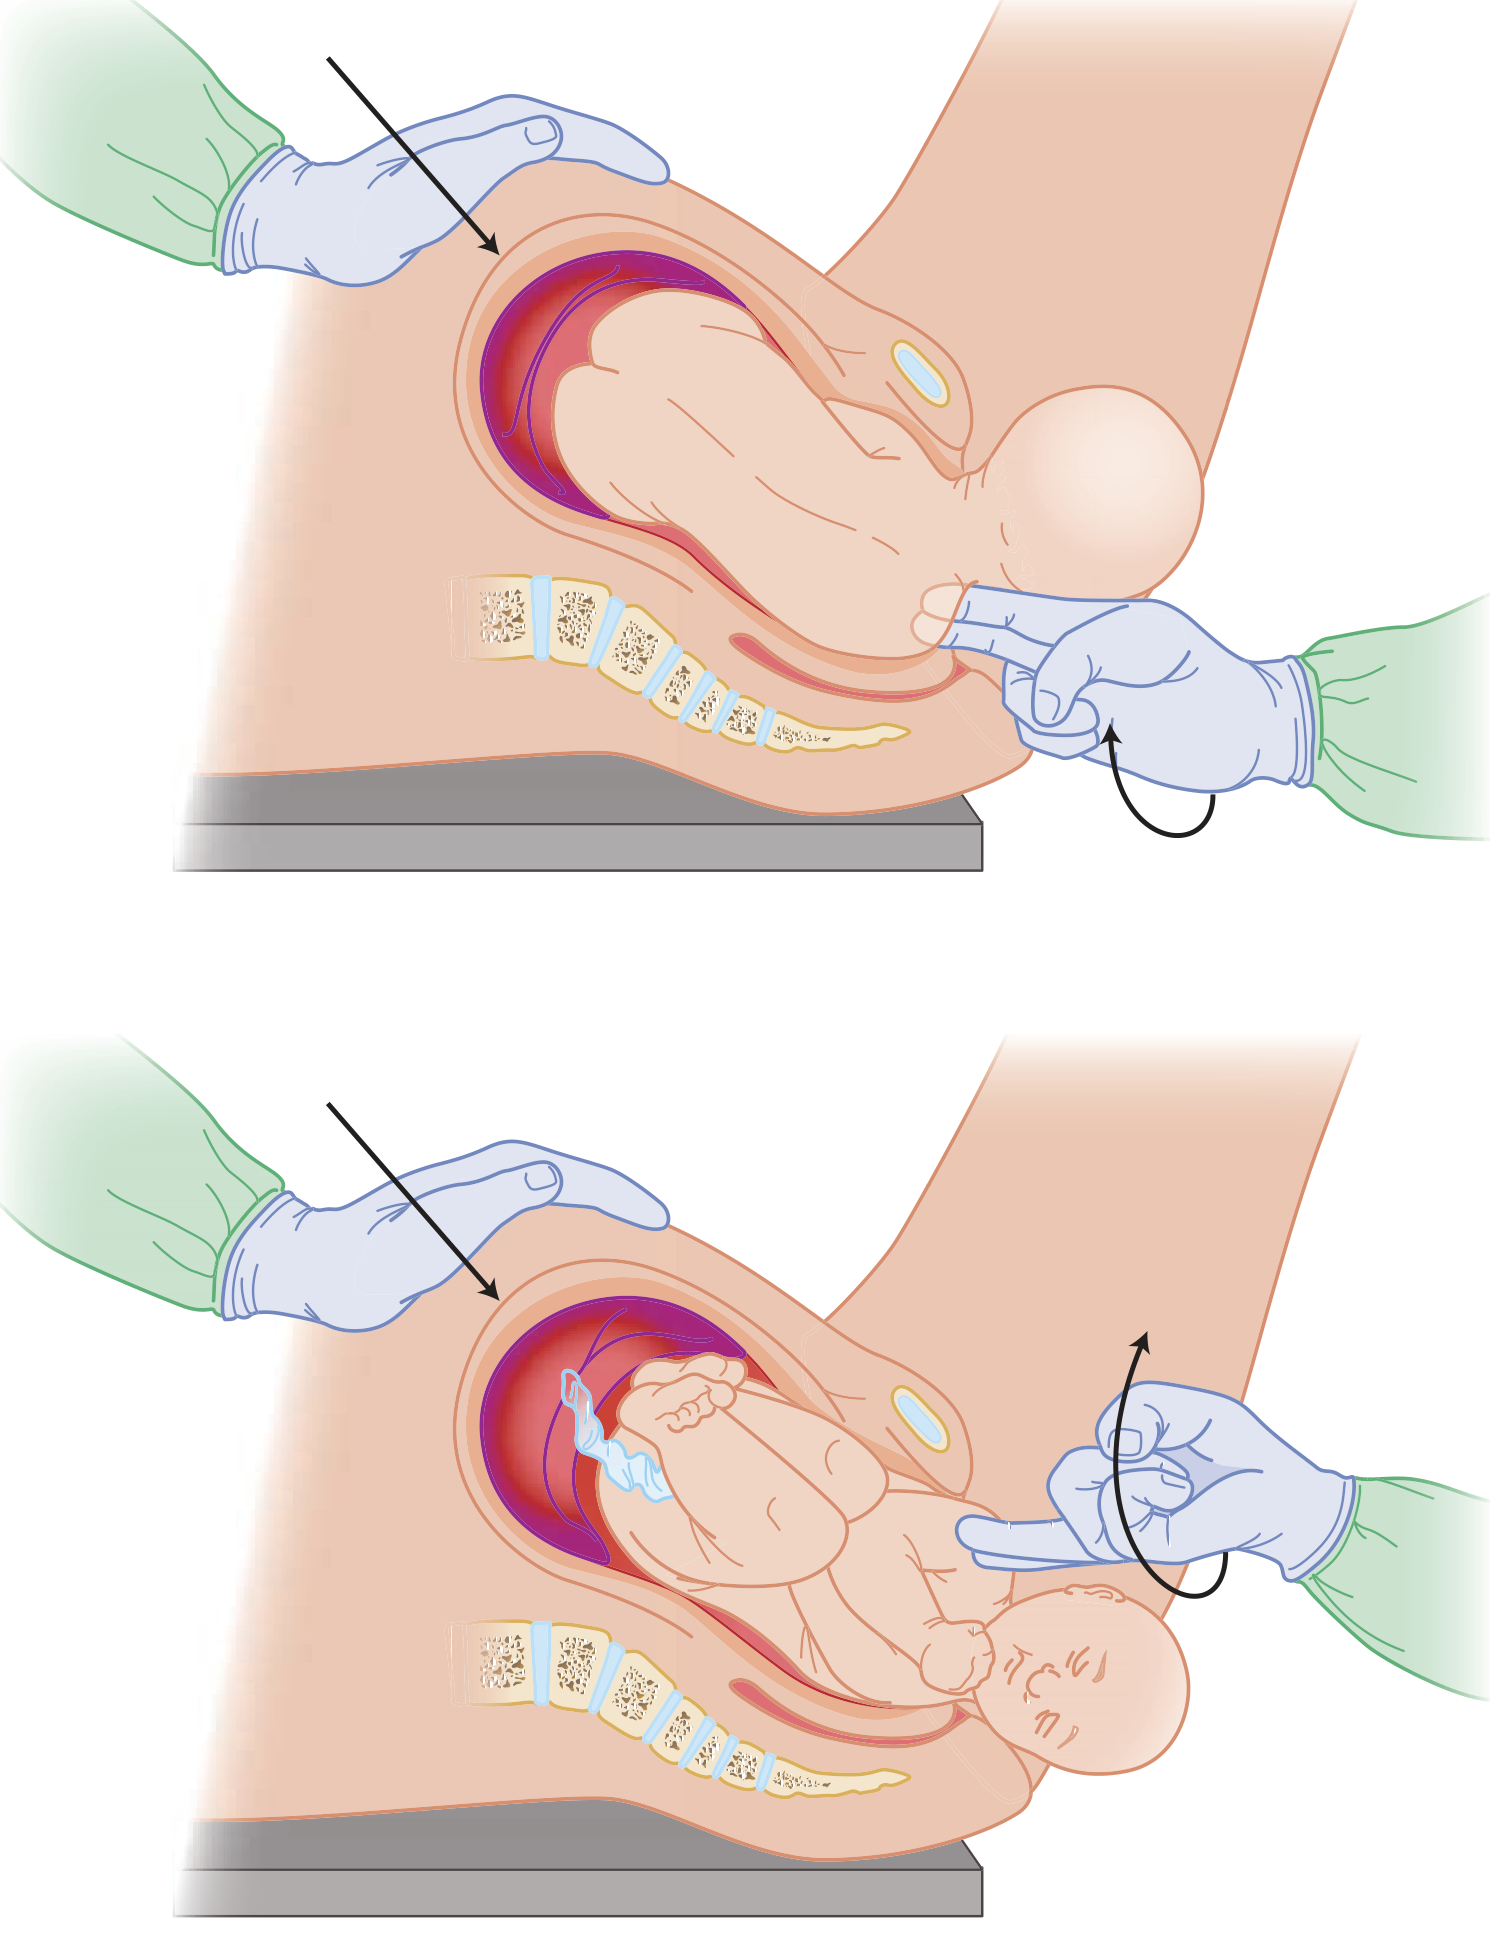
- Insert fingers behind the posterior shoulder (most accessible)
- Push it toward the fetal chest (adduction) - this rotates the shoulders into the oblique diameter
- More effective than the Woods maneuver
- Insert fingers in front of the posterior shoulder
- Push it toward the fetal back (abduction) - screw-like rotation
- Combined with Rubin II = Rubin-Woods (double setup) for 180° rotation
- Rotate in the opposite direction if Woods fails
Step 3 - Delivery of the Posterior Arm
- Insert hand posteriorly into the vagina
- Identify the posterior arm, flex the elbow, sweep the arm across the fetal chest
- Deliver the posterior arm first - this reduces the biacromial diameter
- Highest success rate of all individual maneuvers
- May result in humeral fracture (acceptable - consistently remediable, preferable to brachial plexus injury)
Step 4 - Gaskin Maneuver (All-Fours Position)
- Roll the mother onto hands and knees
- Apply gentle downward traction on the fetal head ("go with gravity")
- Mechanism: Uses gravity to dislodge the posterior shoulder; increases posterior pelvic space by 1-2 cm; may allow spontaneous delivery of the posterior shoulder
- Success rate ~80% in reports
- Difficult if IV lines/monitors in place or mother is exhausted
Last Resort / Heroic Maneuvers
| Maneuver | Description |
|---|---|
| Zavanelli maneuver | Replace the fetal head back into the uterus, followed by emergency cesarean section |
| Intentional clavicle fracture | Deliberate fracture of the anterior clavicle to reduce biacromial diameter; clavicle fracture heals well |
| Symphysiotomy | Division of the symphysis pubis (rarely performed in modern obstetrics) |
| Abdominal rescue | Hysterotomy + vaginal push-up of shoulder (modified Zavanelli) |
What NOT To Do
- No fundal pressure - forces shoulder deeper into pelvis
- No excessive downward traction on head - causes brachial plexus injury
- No lateral neck flexion - stretches brachial plexus
Prevention
- Elective cesarean section recommended if:
- EFW > 4500 g in diabetic mother (ACOG recommendation)
- EFW > 5000 g in non-diabetic mother
- Previous shoulder dystocia with recurrence risk factors
- Note: ~1000 cesarean sections would be needed to prevent one permanent injury - prophylactic CS is not justified for macrosomia alone in most cases
Key High-Yield Points (Exam Focus)
- Turtle sign = hallmark warning of shoulder dystocia
- NEVER apply fundal pressure
- McRoberts + suprapubic pressure = first-line combination, resolves 50% of cases
- Posterior arm delivery = highest individual success rate
- Gaskin (all-fours) = simple and effective when feasible (~80% success)
- Zavanelli = last resort before hysterotomy
- Erb palsy (C5-C6) = most common brachial plexus injury; 80-90% recover fully
- 50% of shoulder dystocia cases have NO identifiable risk factors
- Do NOT perform forceps rotation - worsens impaction