
Abg sampling
arterial blood gas ABG radial artery puncture technique
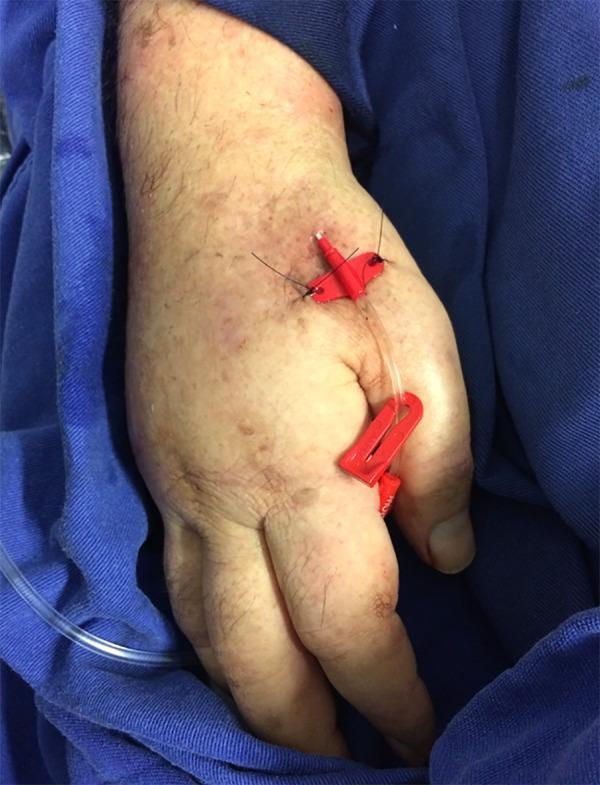
Clinical photograph of a 20-G arterial catheter inserted into the right radial artery via a distal puncture approach in the anatomical snuffbox (radial fossa). The image shows a clear catheter tube running along the dorsal aspect of the hand. The insertion site is stabilized by a red fixation device that is sutured to the skin with dark, non-absorbable thread. An additional red clip further secures the distal portion of the catheter near the thumb. The patient's hand displays fair, freckled skin with signs of aging, such as thinning and prominent dorsal veins. This image demonstrates the clinical application of the Seldinger technique for distal radial artery cannulation, a site used for invasive arterial blood pressure monitoring and blood gas sampling. The procedure is shown post-fixation, highlighting the specific anatomical landmarks of the dorsal hand used for this alternative arterial access point.
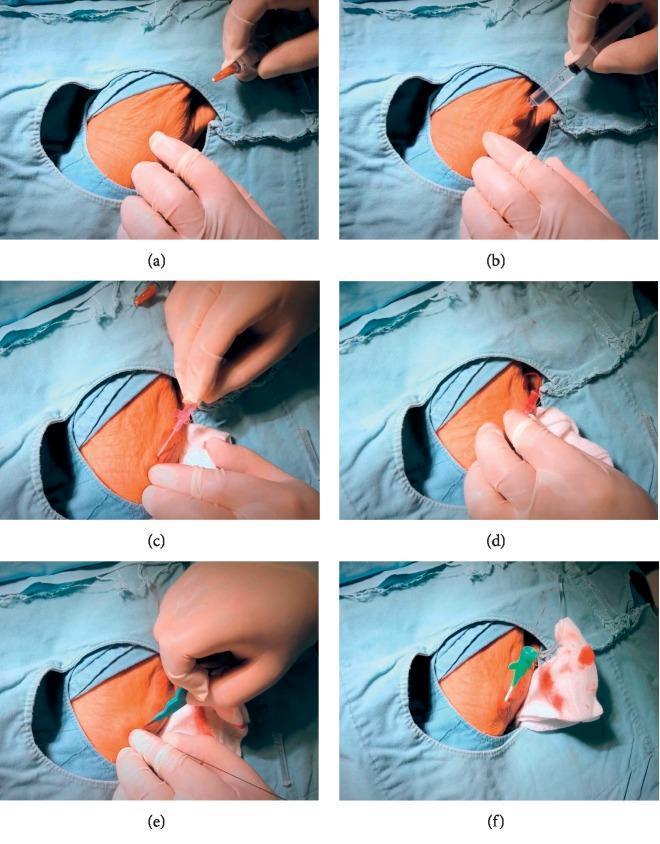
A series of six clinical photographs (a-f) documenting the step-by-step procedural technique for distal radial artery access in the first intermetacarpal space of the hand. (a) Identification and confirmation of the arterial pulse at the vertex between the long extensor tendon and the second metacarpal. (b) Administration of local anesthetic (lidocaine) using a fine-gauge syringe. (c) Arterial puncture using a micropuncture needle or cannula-over-needle at a shallow angle (<30 degrees), showing immediate blood return. (d) Successful stabilization of the needle following arterial entry. (e) Execution of a small skin incision with a surgical scalpel to facilitate the introduction of the vascular sheath over a guide wire, which is visible in the foreground. (f) Final placement of a 6 Fr introducer sheath in situ, secured with gauze for hemostasis. This sequence illustrates the distal radial access technique, commonly used in interventional cardiology and radiology to reduce vascular complications and improve patient comfort compared to traditional wrist access.
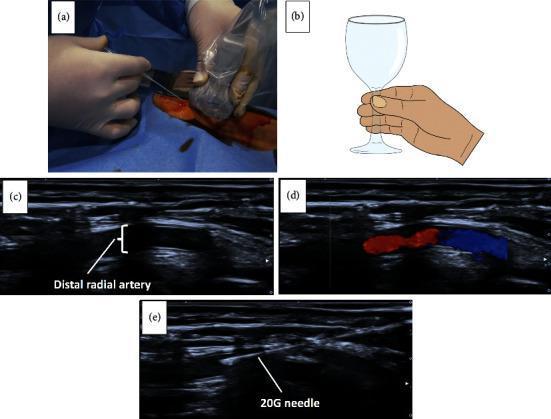
This composite figure illustrates ultrasound-guided distal radial artery (dTRA) puncture, a technique used for coronary angiography or intervention. Panel (a) is a clinical photograph showing the procedural setup with a 20G needle held at a 30-45° angle relative to a sterile-sheathed ultrasound transducer placed on the patient's hand. Panel (b) provides an anatomical diagram illustrating the 'wineglass' grip technique for stable transducer handling. Panels (c), (d), and (e) present diagnostic ultrasound images in the long-axis view. Panel (c) shows the anechoic lumen of the distal radial artery. Panel (d) utilizes Color Doppler imaging to demonstrate arterial blood flow, represented by red and blue signals. Panel (e) depicts the real-time needle advancement, with the 20G needle appearing as a hyperechoic linear structure entering the vessel lumen. The series demonstrates the transition from physical setup to real-time vessel identification and guided vascular access, highlighting the use of long-axis visualization to enhance procedural success and safety in distal transradial access.
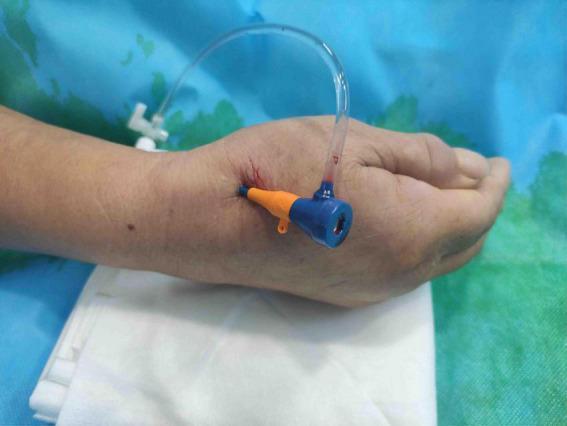
A clinical photograph depicting a 7F thin-walled arterial sheath inserted into the distal radial artery, specifically via the anatomical snuffbox of the hand. The patient's hand is resting in a palm-down or neutral position. The visible medical equipment includes a multi-colored (blue and orange) hub at the insertion site, featuring a central port for catheter access. A clear, flexible side-arm tube is connected to the hub, showing a trace amount of blood, which is typical during vascular access. The puncture site shows minor localized erythema and a small amount of dried blood, consistent with recent percutaneous insertion using the Seldinger technique. This visual demonstrates the distal transradial approach (dTRA), an alternative access point for coronary angiography and percutaneous coronary intervention (PCI) that aims to reduce the risk of proximal radial artery occlusion.
Arterial Blood Gas (ABG) Sampling
What is ABG?
| Parameter | Normal Range |
|---|---|
| pH | 7.35 - 7.45 |
| PaCO2 | 35 - 45 mmHg |
| PaO2 | 80 - 100 mmHg |
| HCO3- | 21 - 27 mEq/L |
| SaO2 | 95 - 100% |
Indications
- Obtain ABG for acid-base and ventilatory status assessment
- Respiratory failure, COPD exacerbation, metabolic emergencies (DKA, sepsis)
- Monitoring response to mechanical ventilation or oxygen therapy
- Frequent blood sampling in critically ill patients
- Monitoring during major surgery with fluid shifts or blood loss
- Diagnostic angiography / therapeutic embolization
- Cardiac arrest (to assess resuscitation response)
Contraindications
- Inadequate circulation at the site
- Raynaud's syndrome or Buerger's disease
- Full-thickness burns overlying the site
- Infected or damaged skin at site
- Anticoagulation / coagulopathy (use with caution; avoid after thrombolysis unless essential)
- Previous surgery in the area
- Atherosclerosis
- Inadequate collateral flow (abnormal modified Allen test)
- Partial-thickness burns
Site Selection
- Easy to palpate and puncture
- Has no adjacent vein or nerve (lowers risk of venous blood contamination or nerve damage)
- Has good collateral circulation via the ulnar artery
- Radial artery (first choice)
- Dorsalis pedis / posterior tibial
- Brachial artery - poor collateral circulation; use only if no other option
- Femoral artery - avoid for routine sampling
- Ulnar artery - preserve for collateral backup; use only if necessary
Modified Allen Test - Before radial puncture, compress both radial and ulnar arteries, ask the patient to clench and open the fist until the palm blanches, then release the ulnar artery only. Normal refill (hand flushes pink in <6 seconds) confirms adequate collateral circulation. Abnormal result is a relative contraindication.
Equipment
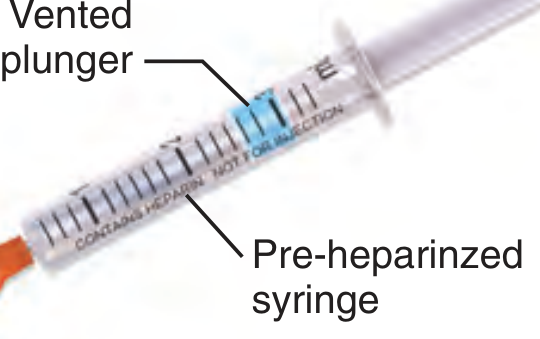
- Pre-heparinized ABG syringe (dry lithium heparin preferred; contains a vented plunger that allows air to escape automatically as blood fills)
- 22- to 23-gauge needle (or 25-gauge in neonates)
- Antiseptic (chlorhexidine/alcohol)
- Gauze and bandage
- Local anesthetic (lidocaine 1% optional, especially if conscious patient)
- Ice slurry container for transport
Technique (Radial Artery Puncture)
- Position: Extend the wrist ~30-60° (dorsiflexed), supported from below with a rolled towel or pad.
- Palpate the radial pulse with the index and middle fingers of the non-dominant hand.
- Clean the site with antiseptic; allow to dry.
- Local anesthesia (optional but recommended in awake patients): infiltrate ~0.5 mL of lidocaine 1% intradermally. This prevents pain-induced hyperventilation, which can falsely normalize PaCO2.
- Needle insertion: Hold the pre-heparinized ABG syringe at 30-45° angle to the skin, bevel up, directed against arterial flow (proximally).
- Advance slowly until pulsatile blood appears - the vented-plunger syringe self-fills (~1-3 mL adequate).
- Withdraw the needle swiftly and immediately apply firm pressure for a minimum of 5 minutes (10 minutes if on anticoagulants).
- Remove all air bubbles immediately - expel any air and cap the syringe.
- Label and transport: place on ice slurry if analysis will be delayed >5 minutes; analyse within 30 minutes.
Sample Handling - Sources of Error
| Error Source | Effect | Prevention |
|---|---|---|
| Delay >20 min at room temp | PaO2 falls (leukocyte metabolism consumes O2) | Place on ice; analyse ASAP |
| Air bubble in syringe | PaO2 equilibrates to air (~150 mmHg); PaCO2 falls | Expel all air immediately after sampling |
| Excess heparin | PaCO2 lowered by ~16% (dilutional); slight rise in PO2 | Use dry lithium heparin syringes; collect ≥2 mL blood |
| Venous admixture | PO2 falsely low, PaCO2 falsely high | Confirm pulsatile flow before collecting |
| Hyperventilation from pain | PaCO2 falsely normalized, slightly alkalemic pH | Use local anesthesia |
- Miller's Anesthesia, 10e
Complications
- Hematoma formation (most common)
- Bleeding
- Infection
- Arterial thrombosis or embolism
- Ischemia of distal limb (rare)
- Arteriovenous fistula formation
- Pseudoaneurysm formation
- Compression neuropathy from expanding hematoma
Interpreting the ABG
Step-by-step approach:
- <7.35 = Acidosis
-
7.45 = Alkalosis
- Elevated (>45) + acidosis = Respiratory acidosis
- Low (<35) + alkalosis = Respiratory alkalosis
- Low (<21) + acidosis = Metabolic acidosis
- High (>27) + alkalosis = Metabolic alkalosis
- Acute respiratory acidosis: HCO3- rises ~1 mEq/L per 10 mmHg rise in PaCO2
- Chronic respiratory acidosis: HCO3- rises ~3.5-5 mEq/L per 10 mmHg rise in PaCO2
- Metabolic acidosis: PaCO2 falls by ~1.2x the fall in HCO3- (Winter's formula: expected PaCO2 = 1.5×HCO3- + 8 ± 2)
- A-a gradient = PAO2 - PaO2
- Normal ~10 mmHg (increases slightly with age)
- Elevated A-a gradient suggests intrinsic lung pathology (V/Q mismatch, shunt, diffusion defect)
- Normal A-a gradient with hypercapnia suggests reduced ventilatory drive or extrapulmonary cause
Special Considerations
- Venous blood gas: All parameters except PO2 are clinically useful and can replace ABG in some settings (venous pH correlates closely with arterial pH; venous PCO2 is ~5 mmHg higher).
- Hypothermia: Use alpha-stat management (analyse at 37°C) in adult cardiac surgery; pH-stat (temperature-corrected) preferred in pediatric DHCA procedures.
- Continuous ABG monitoring: Indwelling arterial catheters allow beat-to-beat pressure measurement plus repeated sampling without multiple punctures - indicated in critical illness, major surgery, hemodynamic instability.