
Arterial line placement procedure
arterial line placement radial artery catheterization procedure
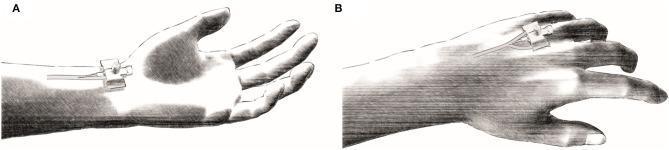
A two-panel medical illustration demonstrating the anatomical sites for invasive vascular catheterization. Panel A (Arterial Catheter): Shows the placement of an arterial line in the radial artery. The insertion point is located on the volar (palmar) surface of the wrist, proximal to the thenar eminence. The catheter is secured with a specialized transparent adhesive dressing and reinforcement strips, with the pressure monitoring tubing extending proximally along the forearm. Panel B (Venous Catheter): Depicts the cannulation of the dorsal venous network (rete venosum dorsale manus) on the back of the hand. The venous catheter is shown inserted into a superficial vein over the metacarpals, secured with a similar fixation device and adhesive tape, with the line running proximally toward the wrist. These procedures are typically performed for continuous invasive pressure monitoring and repeated blood gas analysis (BGA) in clinical research or critical care settings. The illustration highlights standard aseptic securement techniques and regional anatomy pertinent to anesthesia and intensive care medicine.
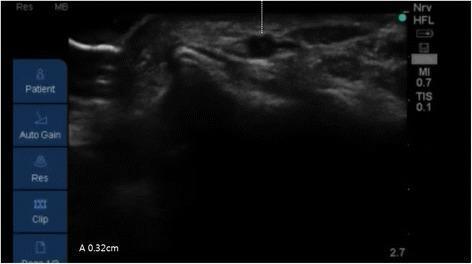
This diagnostic ultrasound image demonstrates a cross-sectional (short-axis) view of the radial artery at the wrist, captured during a vascular access procedure. The primary focus is the measurement of the arterial depth from the skin surface. The radial artery appears as a hypoechoic (dark), pulsatile circular structure surrounded by heterogeneous soft tissue. A vertical dotted caliper line extends from the epidermal surface to the superficial outer wall of the vessel. The measurement displayed in the lower-left corner (A 0.32 cm) quantifies this depth. Technical parameters are visible on the periphery, including a high-frequency linear (HFL) probe setting, a Mechanical Index (MI) of 0.7, and a Thermal Index (TIS) of 0.1. This visualization is essential for ultrasound-guided radial artery catheterization, helping the clinician determine the optimal angle of needle insertion and trajectory for successful cannulation. The image illustrates key landmarks in anesthesiology and vascular imaging, specifically focusing on superficial vascular anatomy and real-time procedural planning.
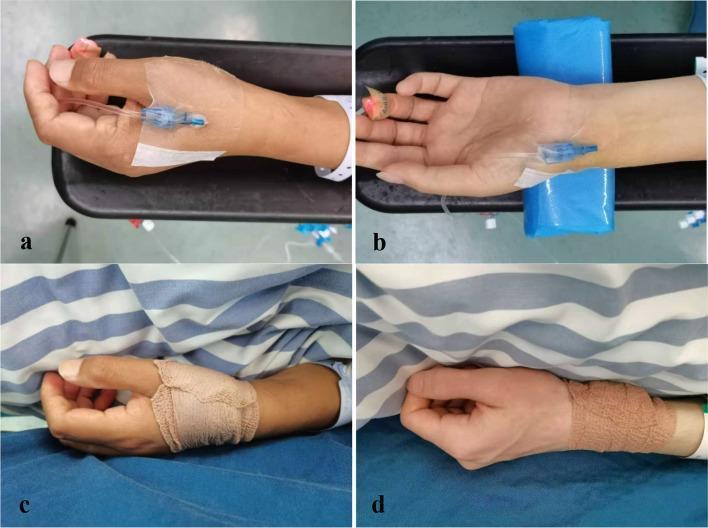
This composite clinical photograph illustrates two different sites for arterial catheterization and subsequent postoperative hemostasis. Panels (a) and (c) demonstrate the distal radial artery (dRA) approach. In panel (a), a 22-gauge catheter is inserted at the anatomical snuffbox on the dorsal side of the hand, secured with a transparent adhesive dressing and connected to a pressure transducer line. Panel (c) shows the same site post-removal, wrapped in an elastic compression bandage covering the snuffbox and base of the thumb for hemostasis. Panels (b) and (d) demonstrate the conventional forearm radial artery (RA) approach. Panel (b) shows the catheter inserted proximally to the radial styloid process on the volar aspect of the wrist, with the arm stabilized on a blue support. Panel (d) shows the corresponding post-procedure hemostasis using an elastic wrap around the wrist. The image serves as a clinical comparison between distal and proximal radial access points in anesthesiology and perioperative care, highlighting the distinct anatomical landmarks and bandaging techniques required for each.
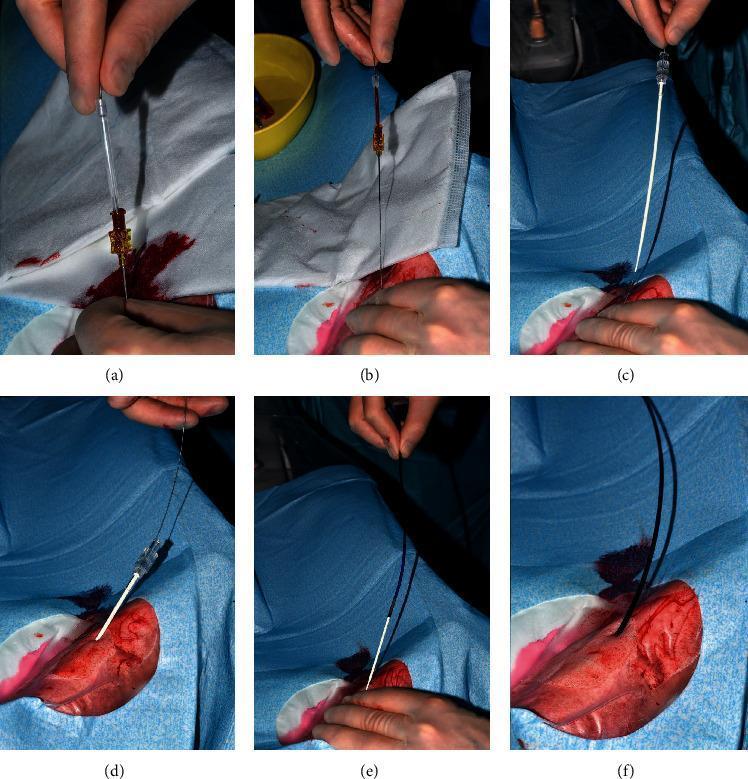
A series of six clinical photographs (a-f) documenting a surgical procedure for direct sheathless guide catheter (SHGC) insertion via the radial artery. The images illustrate a sequential Seldinger-based technique: (a) initial arterial access with a 20G needle followed by the introduction of a 0.025" Silverway guidewire; (b) withdrawal of the needle leaving the guidewire in situ; (c) introduction of a short 15cm dilator over the wire to prepare the tract; (d) the short dilator fully advanced into the radial artery; (e) advancement of the sheathless Hyperion guide catheter, pre-loaded with a long internal dilator, over the guidewire; and (f) the final positioning of the SHGC within the artery. The visual sequence emphasizes the transition from primary access to catheter placement without the use of a traditional introducer sheath, reducing the arterial puncture diameter. The clinical context is interventional cardiology, specifically transradial coronary catheterization, demonstrating the specialized hardware and procedural flow required for sheathless access to minimize vascular complications.
arterial line placement procedure steps technique 2024
Arterial Line (Intra-arterial Cannulation) - Procedure
Indications
- Continuous BP monitoring in hemodynamically unstable patients (shock, major surgery, vasopressor/vasodilator infusions)
- Inaccurate or unobtainable cuff pressures (vasoconstriction, morbid obesity, burns)
- Labile or accelerated hypertension requiring MAP monitoring (e.g., post-stroke cerebral perfusion pressure targets)
- Frequent arterial blood gas sampling (avoids repeated punctures)
- Cardiac output measurement by dye dilution
Contraindications
- Inadequate collateral circulation distal to the site (failed modified Allen test, abnormal Doppler/pulse oximetry)
- Significant injury to the same extremity that may compromise distal perfusion
- Hypercoagulable states
- Coagulopathy / anticoagulation therapy
- Severe atherosclerosis at the chosen site
- Local infection or burns at the insertion site
- Raynaud's phenomenon or thromboangiitis obliterans
- Prior surgery or trauma to the chosen extremity
Equipment
- Over-the-needle catheter (20-gauge for radial, 18-gauge for femoral)
- Transducer setup and pressure tubing
- Sterile gloves, drapes, antiseptic solution
- Lidocaine 1% (local anesthetic)
- Arm board with gauze roll (for radial approach)
- Suture or securement device
- Sterile transparent dressing
Pre-Procedure Assessment: Modified Allen Test
- Compress both radial and ulnar arteries until the hand blanches.
- Release ulnar pressure only.
- Normal (negative test): Hand flushes pink within 7 seconds - safe to proceed.
- Abnormal (positive test): Flush time >15 seconds - choose another site.
Procedure Steps
Radial Artery (Most Common)
- Position the patient and yourself comfortably.
- Dorsiflex the wrist ~30 degrees over a gauze roll taped to a dorsal arm board. Supinate and slightly externally rotate. Tape fingers and forearm to the arm board to immobilize.
- Palpate the radial artery and locate the point of maximal pulsation, ~1/2 to 1 inch proximal to the wrist crease.
- Prepare the skin aseptically (chlorhexidine preferred).
- Inject a small wheal of 1% lidocaine intradermally to minimize discomfort and reduce arterial spasm. Use minimal volume to avoid anatomic distortion.
- Drape the area with sterile towels.
- Hold the catheter-over-needle hub like a pencil in your dominant hand, bevel up.
- Immobilize the artery with 2-3 fingers of the non-dominant hand.
- Insert the needle at a 30-degree angle to the skin, directed along the long axis of the artery toward the pulsation.
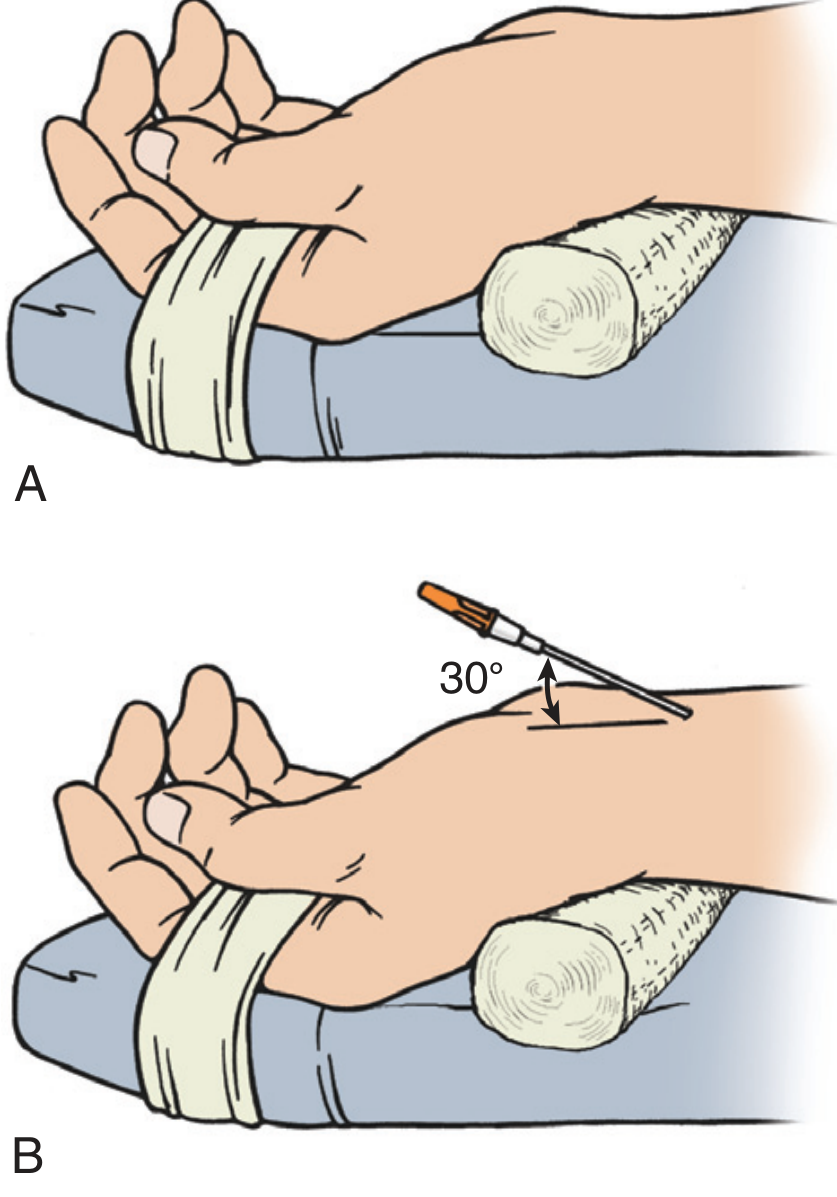
- Advance slowly. A flash of pulsatile bright red blood in the hub confirms arterial entry.
- Lower the angle slightly and advance the needle an additional 1-2 mm to ensure the catheter tip is fully within the lumen.
- Hold the needle steady and advance the plastic catheter off the needle into the artery.
- Withdraw the needle while occluding the artery with proximal finger pressure to prevent blood loss.
- Connect to the pre-flushed pressure transducer tubing. Confirm a pulsatile arterial waveform on the monitor.
- Suture the catheter in place or use a commercial securement device.
- Apply a sterile transparent dressing.
- Zero the transducer at the level of the phlebostatic axis (4th intercostal space, mid-axillary line).
Femoral Artery
- Patient supine, leg straight and slightly externally rotated.
- Insert needle at a 45-degree angle to skin, directed cephalad, 2-5 cm distal to the inguinal ligament at the inguinal crease (lateral to femoral vein, medial to femoral nerve - "NAVEL" landmark).
- After flash, lower angle to 20-30 degrees before advancing the catheter.
- Caution: Avoid puncturing proximal to the inguinal ligament (risk of retroperitoneal hematoma). Higher infection risk due to groin proximity.
Dorsalis Pedis Artery
- Palpate on the dorsum of the foot between the 1st and 2nd metatarsals.
- Technique similar to radial cannulation.
- Confirm posterior tibial collateral flow before use.
Seldinger Technique (Alternative)
- Puncture artery with needle, confirm blood flash.
- Insert guidewire through the needle.
- Remove needle while holding wire.
- Thread catheter over wire into artery.
- Remove wire. Confirm waveform.
Ultrasound Guidance
- Use high-frequency linear probe.
- Short-axis (transverse) view for initial vessel identification and depth measurement.
- Long-axis (in-plane) view allows real-time needle tip visualization during insertion.
- Reduces first-attempt failure and complication rates.
Post-Procedure Care
- Keep insertion site visible and unobstructed for inspection.
- Label all lines "ARTERIAL" clearly to prevent inadvertent IV injection.
- Flush system with continuous pressurized saline (300 mmHg pressure bag).
- Assess distal perfusion (capillary refill, color, temperature, pulse oximetry) at regular intervals.
- Document and monitor for complications.
Complications
| Complication | Notes |
|---|---|
| Thrombosis / occlusion | Most common; usually resolves on removal |
| Hematoma | Apply firm pressure x 5 min after removal |
| Distal ischemia / necrosis | Most serious; requires immediate removal |
| Infection / sepsis | Sterile technique essential; replace every 5-7 days per protocol |
| Arterial spasm | Minimize with lidocaine and slow, gentle insertion |
| Retroperitoneal hematoma | Femoral site complication from proximal puncture |
| Accidental arterial injection | Label lines clearly; use check valves |
| Air embolism | Careful attention during setup and sampling |
Removal
- Apply firm pressure immediately on removal - 5 minutes for radial, 10-15 minutes for femoral.
- Verify distal pulses and perfusion after hemostasis.
- Apply pressure dressing.
- Instruct patient to report coldness, pallor, numbness, or tingling.