
Casting and splinting question and answers based on KMTC explain further
Reading File
Now let me search the medical library for casting and splinting content, and also search for KMTC-related materials in parallel.
Finding Sources
Finding Sources
Searching the Web
KMTC casting and splinting notes Kenya Medical Training College
Now let me read the main casting and splinting content from the textbook and also get the KMTC exam questions.
Reading File
Reading File
Reading Web Page
https://www.studocu.com/row/document/kenya-medical-training-…
Let me now get the core casting and splinting procedures content from the Roberts and Hedges Clinical Procedures textbook (Emergency Medicine) which has the most comprehensive section.
Finding Sources
Reading File
Reading File
Reading File
Reading File
Reading File
I now have enough comprehensive content to produce a detailed KMTC-style Q&A on casting and splinting. Let me compile the full answer.
Casting and Splinting - Q&A Based on KMTC (Orthopaedic and Trauma Medicine)
Below is a comprehensive question-and-answer guide covering the core KMTC casting and splinting curriculum, drawn from authoritative clinical references used in orthopaedic and trauma medicine training.
SECTION 1: DEFINITIONS AND BASIC CONCEPTS
Q1. Define a cast and differentiate it from a splint.
A:
- A cast is a circumferential rigid immobilization device that completely surrounds the extremity. It provides maximum immobilization but does not accommodate swelling.
- A splint (backslab) is a non-circumferential immobilization device that covers only part of the extremity's circumference. It is preferred in acute injuries because it accommodates swelling, reducing the risk of compartment syndrome.
Key rule: Splints are preferred in the acute/emergency setting; casts are used for definitive management once swelling has subsided.
Q2. What are the indications for casting?
A:
- Fracture immobilization (definitive management)
- Post-operative immobilization
- Correction of deformities (e.g., congenital talipes equinovarus)
- Protection of soft tissue repairs (tendon/ligament)
- Immobilization after closed reduction of fractures
Q3. What are the indications for splinting?
A:
- Acute fractures (especially where swelling is expected)
- Sprains and strains
- Dislocations (after reduction)
- Tendon and ligament injuries
- Infections of the hand/extremity requiring periodic wound inspection
- Pre-operative stabilization
- As a temporary measure before definitive casting
Q4. List the contraindications to casting.
A:
- Compartment syndrome or suspected compartment syndrome
- Severe/uncontrolled swelling
- Open or infected wounds (relative contraindication - splinting preferred)
- Vascular compromise
- Burns over the affected area
- Skin conditions that may worsen under a cast (e.g., active dermatitis)
SECTION 2: MATERIALS
Q5. What materials are used in casting and splinting? Compare plaster of Paris (POP) with fiberglass.
A:
| Property | Plaster of Paris (POP) | Fiberglass |
|---|---|---|
| Chemical basis | Calcium sulfate hemihydrate | Polyurethane-coated glass fibers |
| Setting time | 3-8 minutes (varies by grade) | 3-5 minutes |
| Strength | Less strong | 2x stronger than POP |
| Weight | Heavier | Lighter |
| Cost | Cheaper | More expensive |
| Water resistance | Not water-resistant | More water-resistant |
| Radiolucency | Less radiolucent | More radiolucent |
| Moldability | Excellent (best for molding) | Good but less moldable than POP |
| Heat production | Higher | Lower |
KMTC exam tip: POP is preferred for initial molding and reductions due to its superior moldability. Fiberglass is preferred for long-term, ambulatory casts.
Q6. Describe the layers of a cast/splint from inside outward.
A:
- Stockinette - cotton tubular material placed directly on skin; provides a smooth base and protects skin at the edges
- Cast padding (Webril/cotton wool) - soft padding layer to protect bony prominences and cushion the extremity; applied in overlapping circular fashion
- Casting/splinting material - POP or fiberglass
- Elastic bandage (crepe/Ace bandage) - used over splints to secure them; NOT used tightly over casts
Q7. How many layers of plaster should be used in upper vs. lower limb splints?
A:
- Upper extremity splints: 8 layers of plaster
- Lower extremity splints: 12-15 layers of plaster (up to 20 layers in obese patients)
- More layers = more strength, but also more heat generated and more weight/discomfort.
Using more than 12 sheets significantly increases burn risk, especially with hot dipping water or extra-fast-setting plaster. - Roberts and Hedges' Clinical Procedures in Emergency Medicine
SECTION 3: PRINCIPLES OF APPLICATION
Q8. Describe the step-by-step procedure for applying a plaster of Paris backslab (splint).
A:
Step 1 - Prepare the patient
- Explain the procedure; cover clothing to protect from water and plaster.
- Remove rings, watches, and jewelry from the affected extremity.
Step 2 - Apply stockinette
- Roll stockinette over the extremity, extending 5-8 cm beyond the intended cast margins on both ends.
Step 3 - Apply padding (Webril)
- Wrap cast padding from distal to proximal in a spiral manner, overlapping each layer by 50%.
- Apply extra padding over bony prominences (malleoli, olecranon, fibular head, heel).
Step 4 - Prepare the plaster
- Cut the appropriate number of plaster strips to the required length.
- Submerge completely in cool, clean water (approximately 24°C) until bubbling stops.
- Remove and gently squeeze (do NOT wring) to remove excess water - aim for wet and sloppy consistency.
- Smooth the wet plaster on a flat surface to laminate the layers.
Step 5 - Apply the splint
- Position the splint over the padding.
- Fold back the stockinette ends to cover the plaster edges.
- Secure with elastic bandage wrapped distal to proximal.
Step 6 - Mold
- Mold with the palms of the hands (never fingers - to avoid pressure ridges).
- Position the extremity in the correct anatomical/functional position.
- Complete all molding before the plaster reaches a creamy (critical period) consistency.
Step 7 - Post-splint check (FACTS)
- F - Function (movement of fingers/toes)
- A - Arterial pulse
- C - Capillary refill
- T - Temperature of skin
- S - Sensation
Q9. Why should cool water be used when wetting plaster?
A:
Plaster of Paris undergoes an exothermic reaction (releases heat) when it sets. Using hot water or water above 40°C dramatically increases heat production and the risk of thermal burns underneath the cast/splint. Room temperature water (~24°C) provides a safe and workable setting time without increased burn risk. Also, reusing water that already contains dissolved plaster accelerates the reaction and increases heat - always use fresh water.
Q10. What is the "critical period" in plaster application and why is it important?
A:
The critical period is the phase during which plaster transitions from a wet, moldable state to a thick, creamy consistency just before full hardening. Any movement or manipulation of the splint after this period disrupts the crystalline network of calcium sulfate molecules being formed, greatly weakening the final strength of the splint. Therefore, all molding and positioning must be completed before the critical period.
SECTION 4: SPECIFIC SPLINTS AND CASTS
Q11. Describe the posterior leg splint (backslab). What are its indications, position, and construction?
A:
Indications:
- Ankle sprains
- Stable ankle/distal tibia-fibula fractures
- Achilles tendon injuries
- Foot fractures
Position of the ankle: 90 degrees of dorsiflexion (neutral position)
Construction:
- Use 4- or 6-inch wide plaster strips
- Extend from the plantar surface of the metatarsal heads along the posterior aspect of the leg to just below the fibular head
- Apply 15-20 layers if partial weight bearing is expected
- Easiest application: patient prone with knee flexed at 90° and ankle at 90°
Q12. What is a U-splint (stirrup/sugar-tong splint)? When is it used?
A:
The U-splint (also called stirrup or leg sugar-tong) is applied by laying wet plaster across the plantar surface of the foot between the calcaneus and metatarsal heads, with the sides extending up both the medial and lateral aspects of the lower leg. It is secured in a figure-of-eight configuration around the ankle.
Indications: Ankle fractures and injuries where mediolateral stability is needed. It can be combined with a posterior splint for maximum stability.
Q13. Describe the volar wrist splint. What is its indication and the position of immobilization?
A:
Indications:
- Carpal fractures (e.g., non-displaced scaphoid fracture)
- Wrist sprains
- Wrist tendinopathies (e.g., de Quervain's)
- Distal radius fractures (non-displaced)
Position: Wrist in 10-20 degrees of extension (slight dorsiflexion), forearm neutral
Construction:
- Apply from the mid-palm to the proximal forearm
- 8 layers of plaster
- Secure with elastic bandage
Q14. Describe the position of function for the hand. When is it used?
A:
The position of function (also called the wineglass position) is used for short-term hand/finger splinting (7-14 days):
- Wrist: 10-20 degrees of extension
- MCP joints: 50-60 degrees of flexion
- PIP and DIP joints: 5-10 degrees of flexion (slight flexion)
- Thumb: abducted away from the palm
For longer immobilization, use the intrinsic-plus position to prevent flexion contractures:
- MCP joints: 90 degrees of flexion
- IP joints: fully extended
Q15. What is a thumb spica splint? What are its indications?
A:
A thumb spica splint immobilizes the thumb and wrist, incorporating the thumb in a position of slight abduction.
Indications:
- Scaphoid fracture (suspected or confirmed)
- Skier's thumb (gamekeeper's thumb - ulnar collateral ligament injury)
- Thumb fractures and dislocations
- De Quervain's tenosynovitis
SECTION 5: COMPLICATIONS
Q16. List the complications of casting and splinting.
A:
Early complications:
- Thermal burns - from exothermic plaster reaction, especially with hot water or thick splints
- Compartment syndrome - from circumferential casting when swelling is present; presents with the 5 P's (Pain, Pallor, Pulselessness, Paraesthesia, Paralysis)
- Pressure sores/skin breakdown - from inadequate padding over bony prominences
- Neurovascular compromise - from tight application
Late complications:
5. Pressure ulcers and skin breakdown - from prolonged immobilization
6. Infection/bacterial and fungal - moist warm environment under cast
7. Contact dermatitis - especially with formaldehyde/melamine resins in plaster; presents as pruritic papulovesicular rash
8. Joint stiffness - invariable consequence of immobilization
9. Muscle atrophy - from disuse during immobilization
10. Deep vein thrombosis (DVT) - particularly in lower limb casts
11. Pruritus - leads patients to insert objects under cast, causing skin maceration and foreign bodies
Q17. What is compartment syndrome? How does it relate to casting?
A:
Compartment syndrome occurs when pressure within a closed muscle compartment rises to a level that impairs perfusion of tissues. Circumferential casts prevent the soft tissue from expanding outward as swelling occurs, leading to increased intracompartmental pressure.
Signs and symptoms (5 P's):
- Pain - disproportionate to injury, worsened by passive stretch of muscles in the compartment
- Pressure - tight, tense feeling
- Paraesthesia - tingling/numbness (early nerve ischaemia)
- Pallor - pale skin
- Pulselessness/Paralysis - late signs indicating serious ischaemia
Management:
- Immediately bivalve or remove the cast
- Elevation of the extremity (but NOT above heart level - this reduces arterial flow)
- Emergency fasciotomy if compartment pressure > 30 mmHg or within 30 mmHg of diastolic BP
Q18. How can thermal burns from plaster be prevented?
A:
- Use cool, clean water (~24°C) - never hot water
- Do not use more than 12 layers of plaster
- Avoid extra-fast-setting plaster where possible
- Do not place pillows, blankets, or other insulating materials around the extremity while the plaster is setting
- Use fresh water for each patient - do not reuse
- Allow the extremity to set in open air
SECTION 6: SPECIFIC TYPES OF CASTS
Q19. Name and describe the common types of casts used in orthopaedics.
A:
| Cast Type | Description | Common Indications |
|---|---|---|
| Below-elbow (short arm) cast | Wrist to just below elbow | Distal radius fractures, carpal fractures |
| Above-elbow (long arm) cast | Wrist to above elbow | Elbow fractures, forearm fractures, Monteggia/Galeazzi |
| Thumb spica | Wrist + thumb immobilized | Scaphoid fracture, UCL injury |
| Short leg cast | Below knee to metatarsal heads | Ankle fractures, foot fractures |
| Long leg cast | Above knee to foot | Tibia fractures, knee injuries |
| Cylinder cast | Mid-thigh to above ankle, knee only | Knee injuries, quadriceps repair |
| Hip spica | Hip and thigh | Femur fractures in children |
| Minerva cast | Head and trunk | Cervical spine injuries (historical) |
| Shoulder spica | Shoulder and arm | Shoulder injuries, post-operative |
Q20. What is the difference between a short arm cast and a long arm cast? When would you choose each?
A:
| Feature | Short Arm Cast | Long Arm Cast |
|---|---|---|
| Extent | Below elbow to palm | Above elbow to palm |
| Joints immobilized | Wrist only | Wrist and elbow |
| Used for | Distal radius fractures (stable), carpal fractures | Radial/ulnar shaft fractures, Monteggia/Galeazzi, elbow fractures, unstable distal radius fractures |
The long arm cast prevents forearm rotation (pronation/supination) which is important for fractures of the radial/ulnar shafts.
SECTION 7: CAST REMOVAL AND CARE
Q21. How is a cast removed safely?
A:
- A cast saw (oscillating saw) is used - it cuts hard cast material but does NOT cut skin because it oscillates rather than rotates
- The saw is run along each side of the cast
- A cast spreader is then used to open the cast
- Bandage scissors are used to cut through the padding
- Always hold the cast saw at an angle and move it in a series of short strokes, lifting completely off the skin between strokes
Q22. What patient education should be given after applying a cast or splint?
A:
- Elevate the limb above the level of the heart for 24-48 hours to reduce swelling
- Do not get the cast wet (POP) - use a waterproof cover when bathing
- Do not insert objects under the cast to scratch itches
- Report immediately if: increasing pain, numbness, tingling, pallor, coldness, or difficulty moving fingers/toes
- Keep the cast clean and dry
- Return for follow-up as advised
- Do not bear weight unless instructed to do so
- The cast may feel warm as it sets - this is normal
SECTION 8: IMMOBILIZATION PERIODS
Q23. What are the recommended immobilization periods for common conditions?
A:
| Condition | Approximate Immobilization Period |
|---|---|
| Contusions | 1-3 days |
| Abrasions | 1-3 days |
| Soft tissue injuries/sprains | 3-14 days |
| Stable undisplaced fractures | 3-6 weeks |
| Scaphoid fracture (confirmed) | 6-12 weeks |
| Distal radius fracture | 4-6 weeks |
| Ankle fracture | 6-8 weeks |
| Tibial shaft fracture | 8-12 weeks |
- Roberts and Hedges' Clinical Procedures in Emergency Medicine; Pfenninger and Fowler's Procedures for Primary Care
SECTION 9: SHORT-ANSWER AND MCQ STYLE
Q24. What is the FACTS check after splint application?
A:
- F - Function (active movement of fingers/toes)
- A - Arterial pulse
- C - Capillary refill (<2 seconds)
- T - Temperature of skin
- S - Sensation
Q25. Why should the elastic bandage NOT be applied too tightly over a cast/splint?
A:
A tightly applied elastic bandage can convert a partial (non-circumferential) splint into a functionally circumferential one, preventing accommodation of swelling and predisposing to compartment syndrome. The bandage should be applied with only enough tension to hold the splint in place.
Q26. What is "bivalving" a cast?
A:
Bivalving means cutting the cast longitudinally on both sides (medial and lateral) to split it into two halves. This converts a circumferential cast into a non-circumferential device, relieving pressure and accommodating swelling. It is the immediate first step when compartment syndrome is suspected in a casted limb.
Q27. What is a coaptation splint and when is it used?
A:
A coaptation splint (also called a U-slab for the humerus) is a U-shaped plaster splint applied to the upper arm. It extends from the axilla, down the medial aspect of the arm, around the elbow, and back up the lateral aspect.
Indications:
- Humeral shaft fractures (as initial immobilization)
- It is often replaced by a functional brace after 10-14 days once the initial swelling subsides
Q28. What is a functional brace?
A:
A functional brace (e.g., Sarmiento brace for humeral shaft fractures) is a prefabricated or custom brace that allows some controlled movement at adjacent joints while still providing fracture support. It uses hydraulic pressure from surrounding muscles to assist fracture alignment and union, and allows earlier mobilization of joints compared to full casting.
Q29. MCQ: A patient presents with a suspected scaphoid fracture with normal X-rays. What is the appropriate initial management?
A: Thumb spica splint immobilization.
The scaphoid has poor blood supply (particularly the proximal pole). Even when X-rays appear normal, a clinically suspected scaphoid fracture (tenderness in the anatomical snuffbox) should be immobilized with a thumb spica splint and the patient referred for MRI or CT for confirmation. Failure to immobilize risks avascular necrosis of the proximal pole and non-union.
Q30. MCQ: The MOST important step to ensure adequate immobilization after applying a plaster splint is:
A: Molding the wet plaster to conform to the anatomy.
Molding is the most important and most frequently overlooked step. It ensures the splint conforms to the body's contours, provides three-point fixation for fractures, and prevents the splint from shifting. Molding must be completed using the palms (not fingers) before the plaster enters the critical period.
This Q&A covers the full scope of the KMTC Certificate and Diploma in Orthopaedic and Trauma Medicine casting and splinting curriculum. Key references:
- Roberts and Hedges' Clinical Procedures in Emergency Medicine, Chapter 50
- Pfenninger and Fowler's Procedures for Primary Care, Chapter on Casting and Splinting
- Rockwood and Green's Fractures in Adults, 10th ed.
Search for clinical images showing proper cast/splint application techniques
Finding Sources
Searching the Web
proper cast splint application technique clinical images orthopaedic
Good - I have image URLs from the web search AND I know the textbook (Roberts & Hedges) has clinical images. Let me fetch all of them in parallel.
Loading Image
Loading Image
Loading Image
Loading Image
Finding Sources
Excellent - great images already retrieved. Now let me fetch the textbook's own clinical diagrams for specific splint types.
Loading Image
Loading Image
Loading Image
Loading Image
All the key clinical images are now retrieved. Here is the full visual guide:
Clinical Images: Proper Cast and Splint Application Techniques
All images below are sourced directly from Roberts and Hedges' Clinical Procedures in Emergency Medicine (the primary reference for casting/splinting procedures in trauma and orthopaedic training).
1. Plaster Splint Application - Alternative (Sandwich) Method
(Sugar-tong / any plaster backslab)
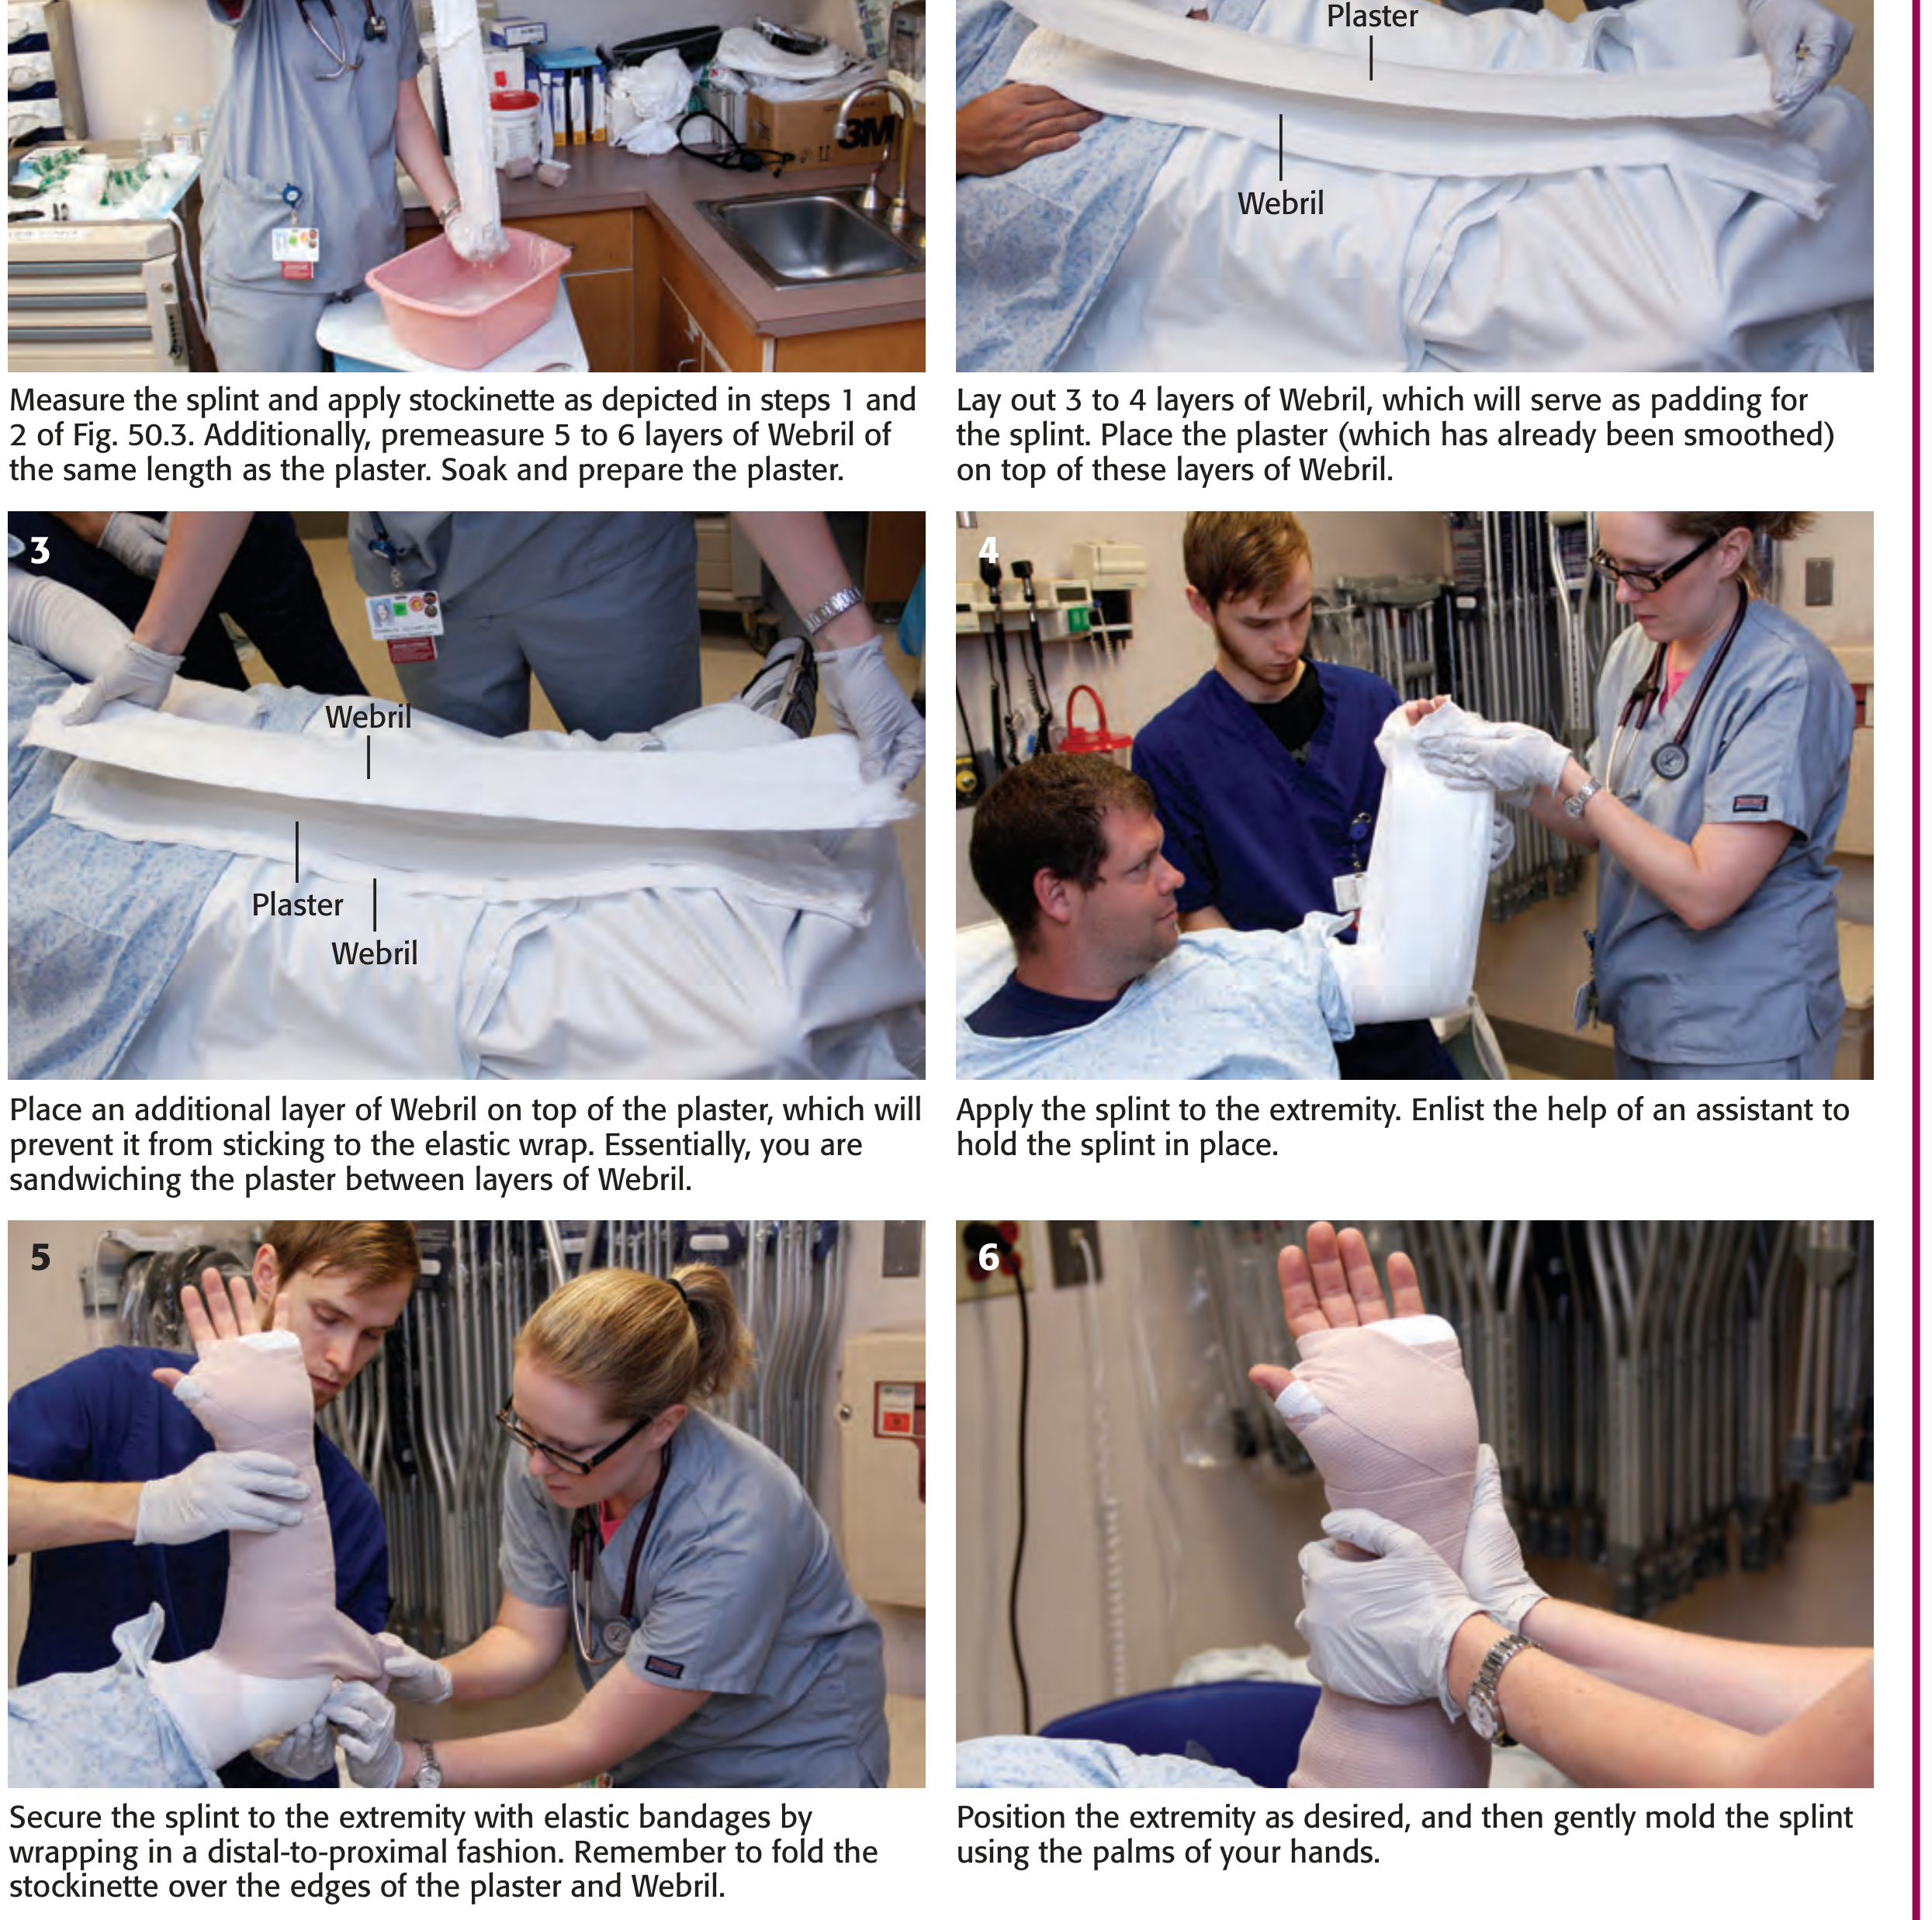
What this shows: The "sandwich" technique - Webril padding is layered below and above the plaster slab (3-4 layers bottom, plaster in middle, 1-2 layers on top). This is the preferred method when significant swelling is anticipated, as the Webril wraps alongside the plaster rather than circumferentially around the limb.
Key steps visible:
- Step 1-2: Soak plaster, measure Webril to same length; lay 3-4 Webril layers flat, place smoothed plaster on top
- Step 3: Add final Webril layer on top (plaster is "sandwiched")
- Step 4: Apply whole assembly to extremity with assistant holding
- Step 5: Secure with elastic bandage distal to proximal, fold stockinette over edges
- Step 6: Mold with palms only - position the extremity, gently mold to body contours
2. Prefabricated Fiberglass Splint Application - 10-Step Guide
(Volar wrist splint shown)
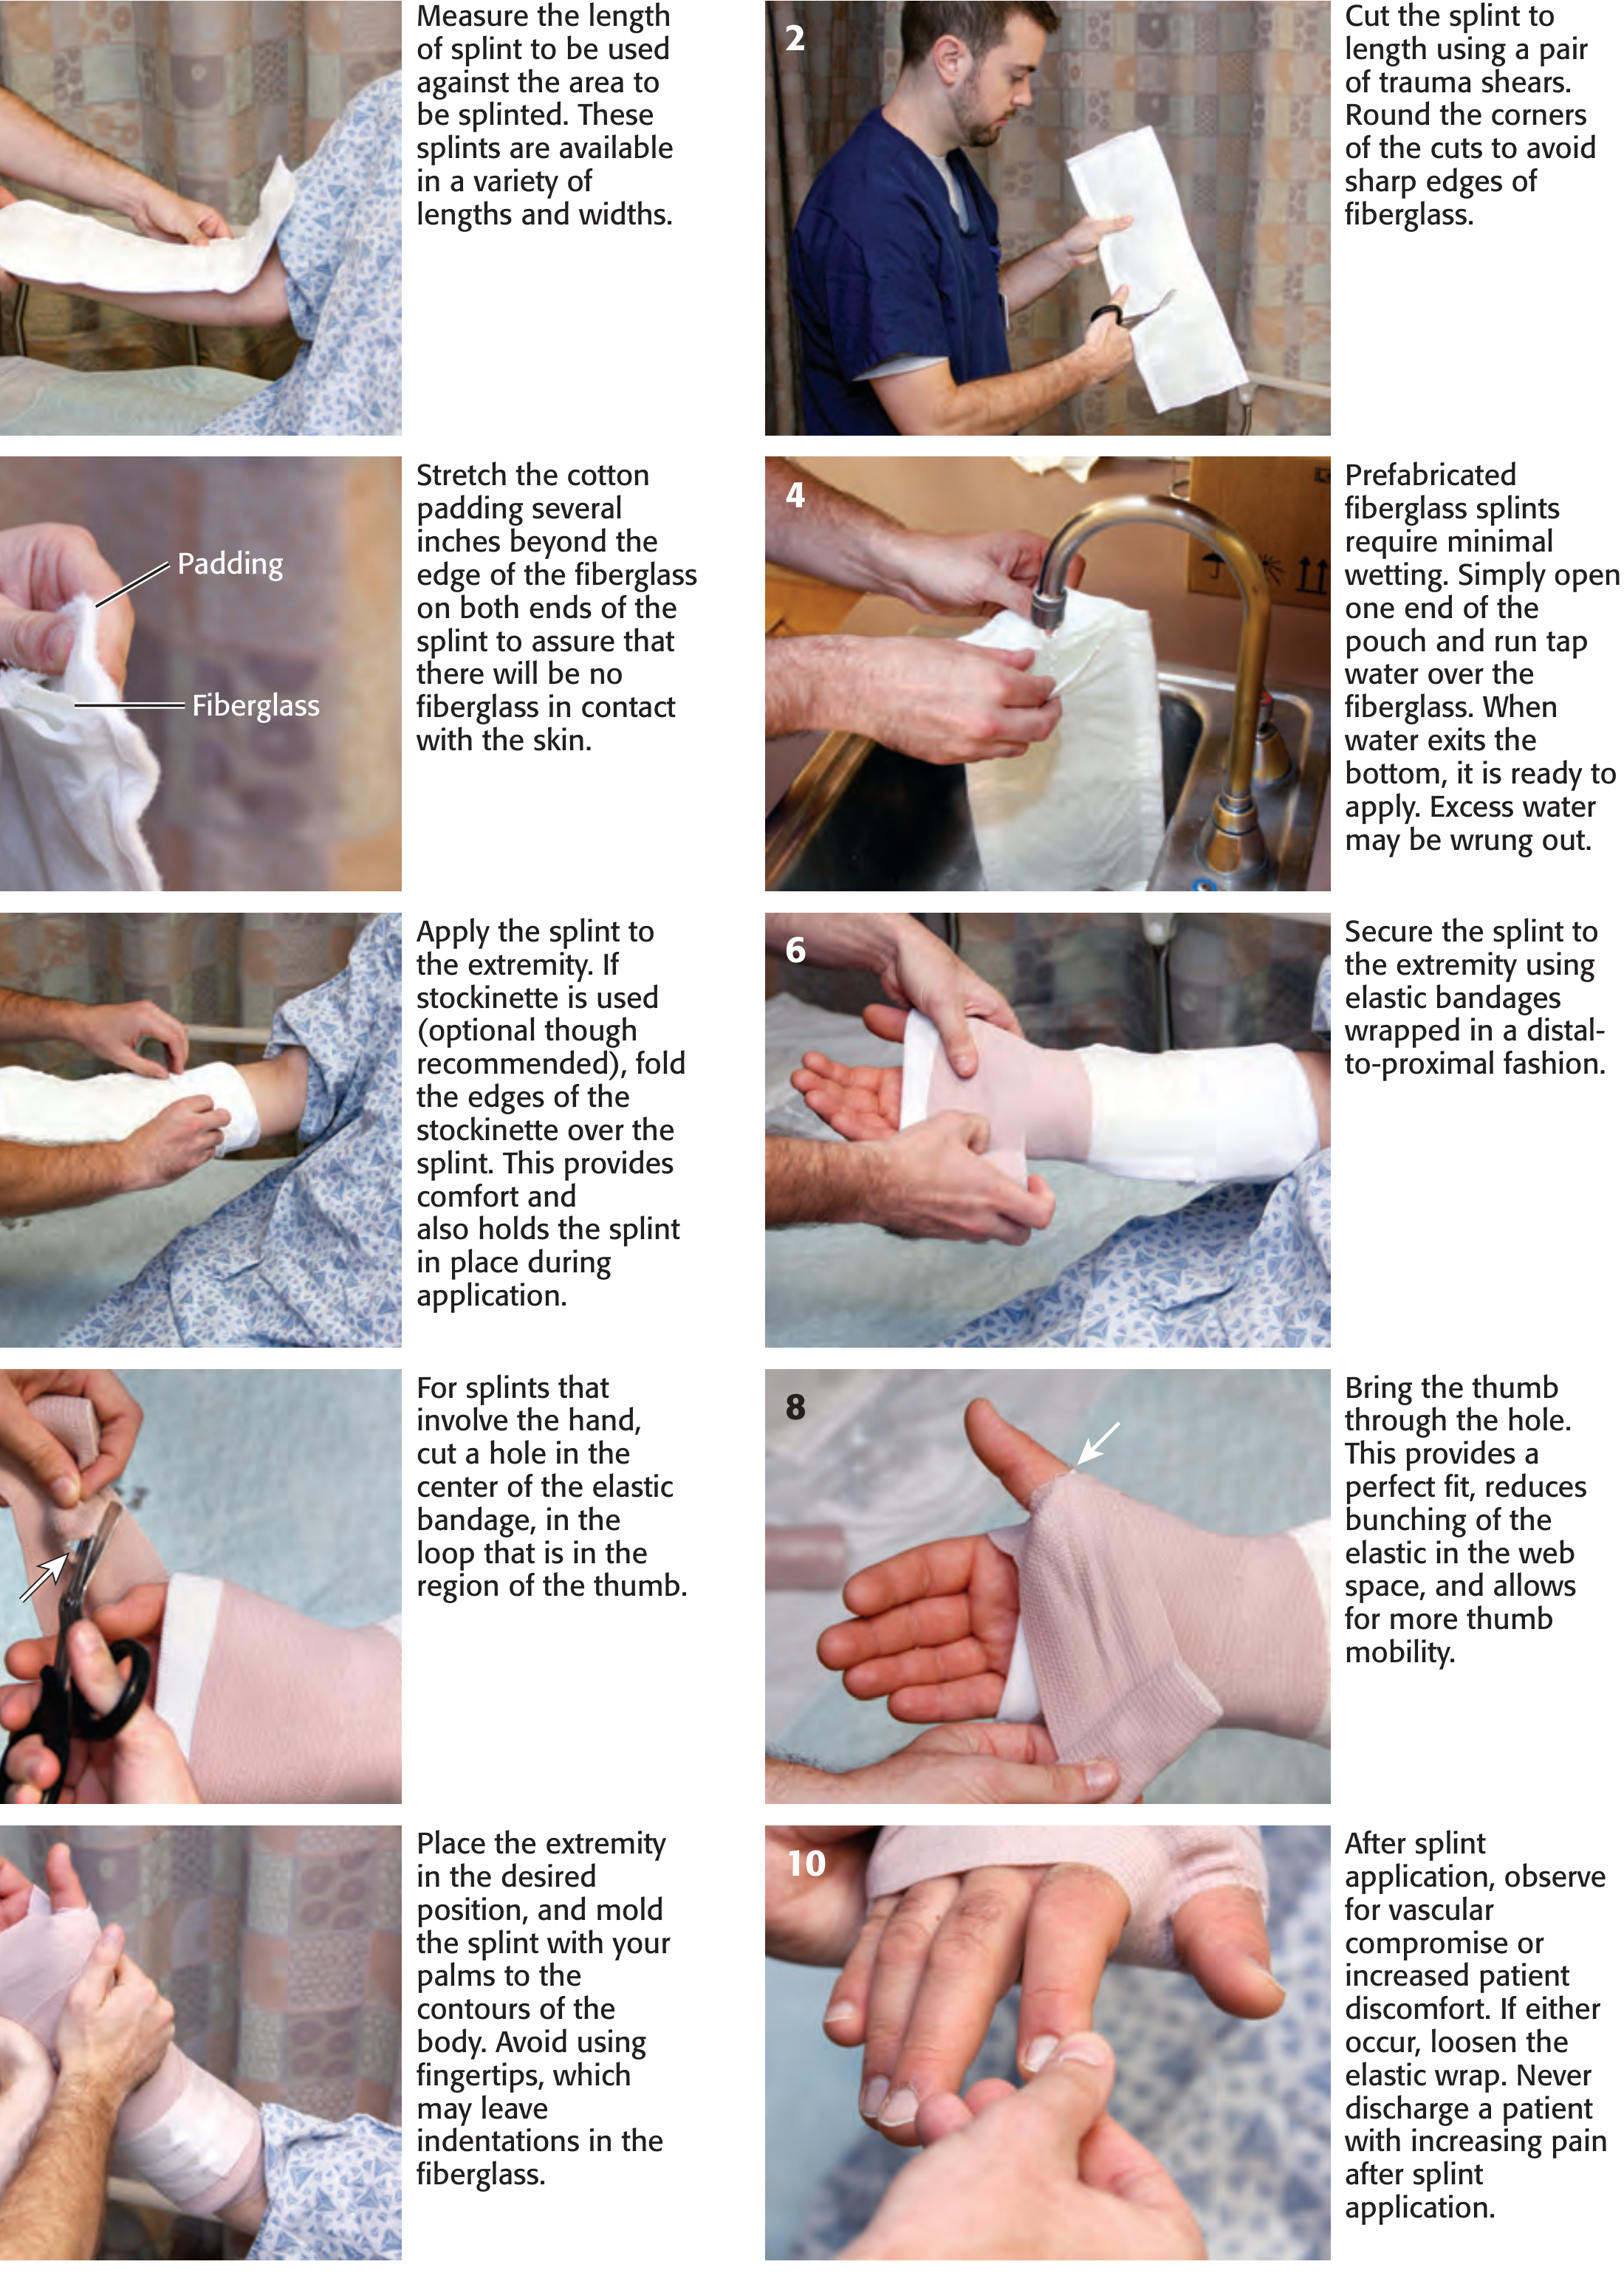
What this shows (10 steps):
- Measure splint length against the area to be splinted
- Cut to length with trauma shears - round the corners to avoid sharp fiberglass edges
- Stretch cotton padding several inches beyond fiberglass on both ends (no fiberglass contacts skin)
- Wet the fiberglass: run tap water over it until water exits the bottom; wring out excess
- Apply to extremity; fold stockinette edges over splint to hold in place
- Secure with elastic bandage wrapped distal to proximal
- For hand splints: cut a hole in the elastic bandage at the thumb loop region
- Bring thumb through the hole - reduces bunching in web space, allows thumb mobility
- Position extremity in desired position and mold with palms (not fingertips - avoids pressure ridges)
- Post-splint check: observe for vascular compromise or increasing pain; loosen elastic if either occurs
3. Lower Extremity Splint - Clinical Application
(Posterior leg/ankle splint)

What this shows:
- Top left: Measuring plaster strip length against the limb
- Top right: Applying the stockinette with the foot incorporated and toes left exposed
- Bottom left: Applying/smoothing the plaster slab over the padding
- Bottom right: Securing with elastic bandage, ankle maintained at 90 degrees (neutral position)
Key teaching point: The ankle must be held at 90° throughout application. The easiest way is the prone position with the knee flexed at 90° - gravity naturally maintains ankle dorsiflexion.
4. Long Arm Cast - Step-by-Step
(Stockinette → Padding → Cast tape)

The 3 layers clearly shown:
- Apply stockinette - rolled over the entire length of the extremity, extending beyond cast margins
- Apply padding (Webril) - overlapping spiral wrap, extra layers over bony prominences
- Apply cast tape - circumferential wrapping, distal to proximal
5. Hand Position of Function (Wineglass Position)
(For hand and finger splinting)
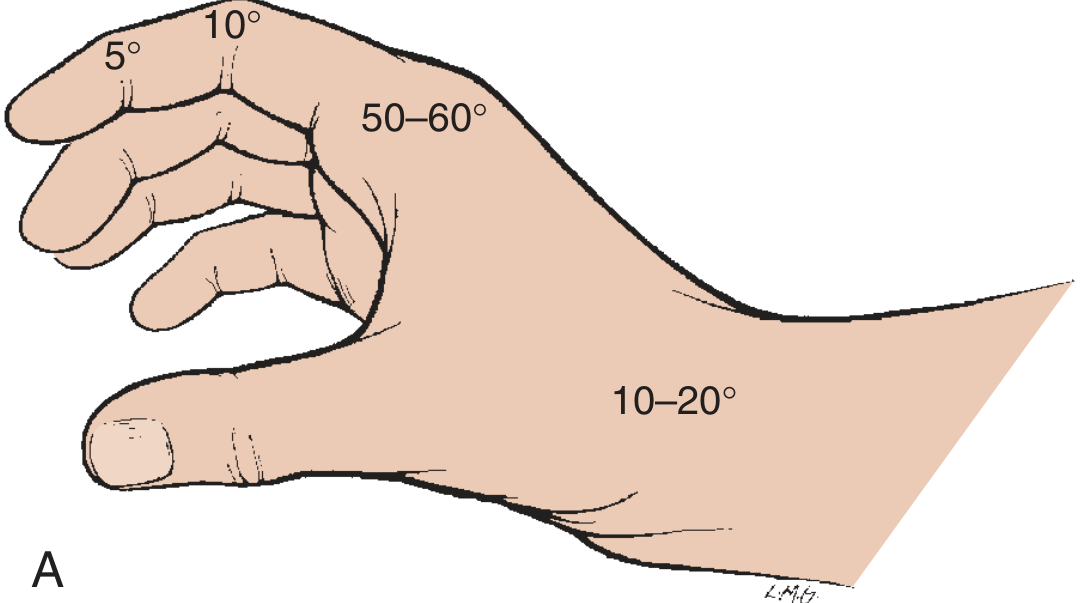
Angles to memorize for KMTC:
| Joint | Position |
|---|---|
| Wrist | 10-20° extension |
| MCP joints | 50-60° flexion |
| PIP/DIP joints | 5-10° flexion |
| Thumb | Abducted from palm |
This is the "wineglass position" - safe for short-term immobilization (7-14 days). For longer immobilization, use the intrinsic-plus position (MCP 90°, IP joints extended).
6. U-Splint (Stirrup / Sugar-Tong) - Ankle
(With pre- and post-reduction X-rays)
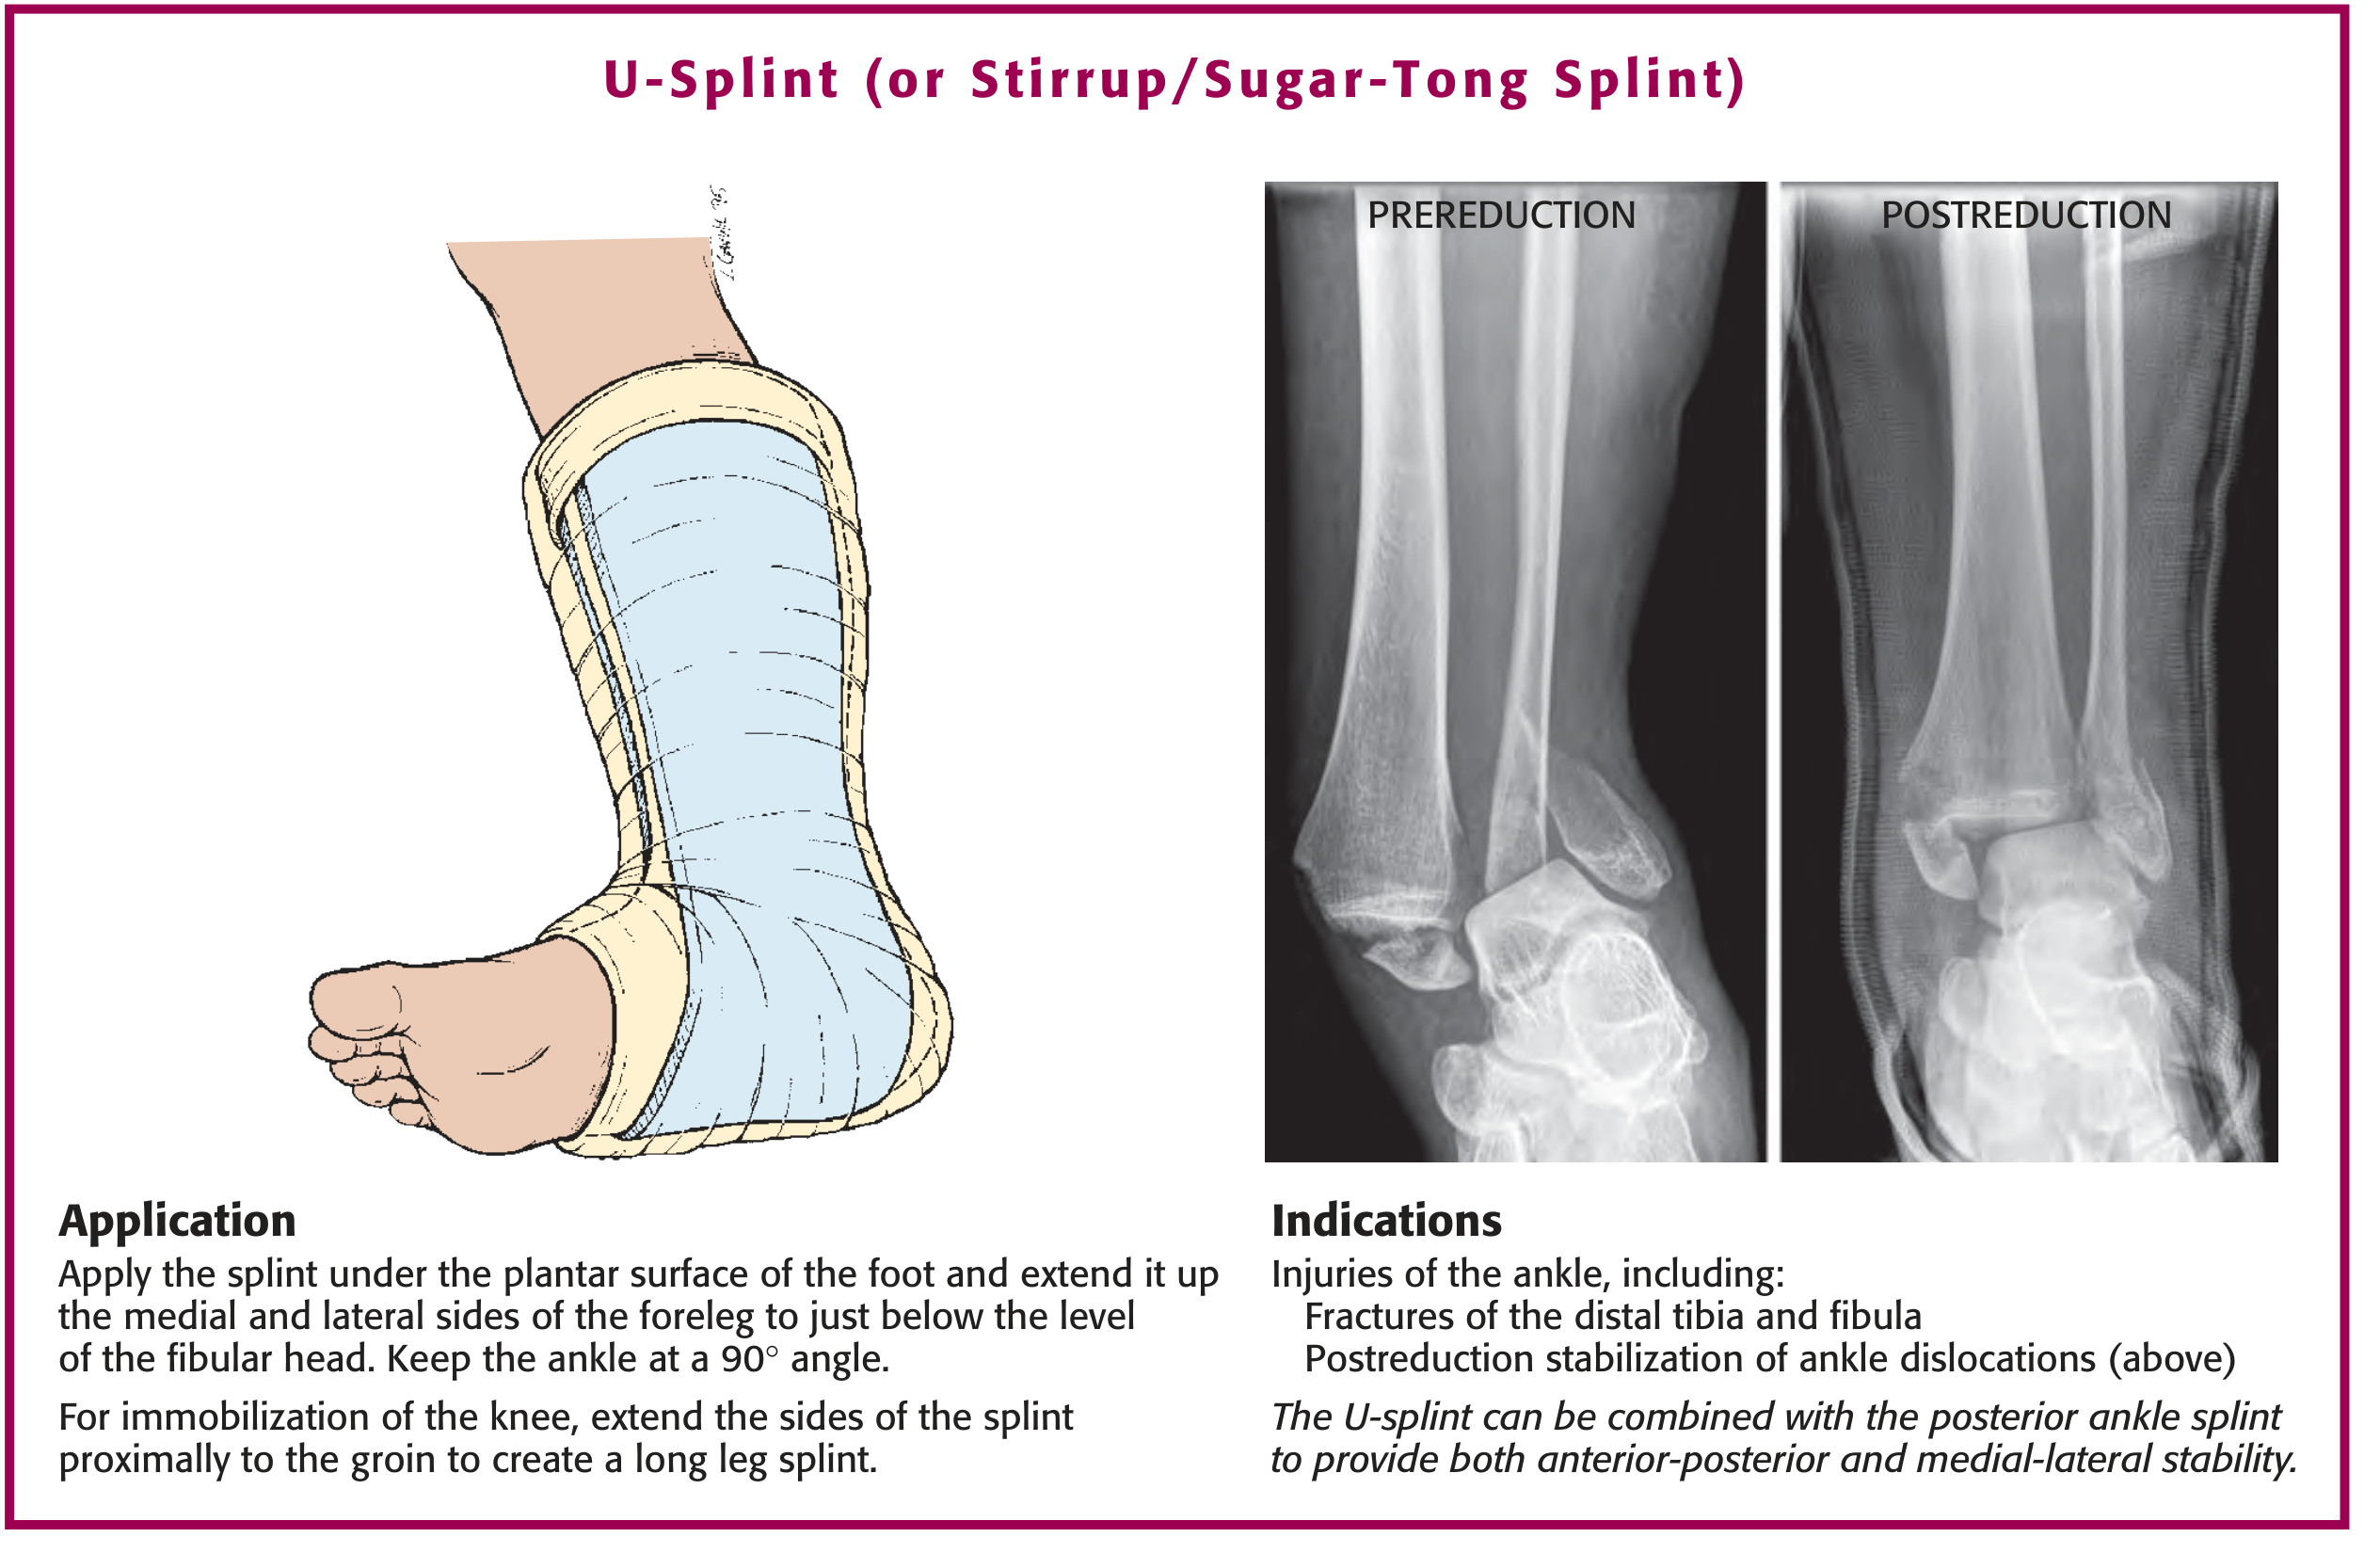
What this shows:
- Left: Diagram of U-splint placement - runs under the plantar surface of the foot and extends up both the medial and lateral sides of the lower leg to just below the fibular head
- Right: Pre- and post-reduction X-rays showing ankle dislocation - confirms this splint is used for post-reduction stabilization of ankle dislocations and distal tibia/fibula fractures
- Key point: Ankle held at 90°; U-splint can be combined with a posterior splint for both AP and mediolateral stability
7. Clinical Orthopaedic Setting - Cast/Splint Rooms

What this shows: Cast saw (oscillating saw) being used in a clinical setting. Note how the cast saw is used at the side of the cast, not pressed flat - this reduces risk of skin burns. A cast spreader is used after cutting to open the cast for removal or bivalving.
Summary: Key Visual Teaching Points
| Step | What to Look For |
|---|---|
| Stockinette | Should extend 5 cm beyond cast margins; folded back to cover edges |
| Padding | Spiral wrap overlapping 50%; extra layers at bony prominences (malleoli, heel, olecranon) |
| Plaster wetting | Submerge fully, wait for bubbles to stop, squeeze gently (not wring) |
| Molding | Use palms only - never fingertips; mold before critical period |
| Elastic bandage | Distal to proximal; no undue tension; hole cut for thumb if needed |
| Post-application | Leave fingertips/toes exposed; check FACTS (Function, Arterial pulse, Capillary refill, Temperature, Sensation) |
- Roberts and Hedges' Clinical Procedures in Emergency Medicine, Chapter 50 (Splinting Techniques)
Find recent KMTC exam questions on casting and splinting for practice
Searching the Web
KMTC orthopaedic trauma medicine casting splinting exam questions past papers
Searching the Web
KMTC certificate diploma orthopaedic FQE casting splinting questions answers 2023 2024
I found real KMTC FQE (Final Qualifying Examination) papers. Let me extract the content from those sources in parallel.
Reading Web Page
https://www.cliffsnotes.com/study-notes/16932264
Reading Web Page
https://www.dknowledge.co.ke/orth.html
Finding Sources
I found a live KMTC CAT (Continuous Assessment Test) platform and the FQE paper structure. The Scribd casting paper and the dknowledge CAT links are gold. Let me get more from the medical library on exam-relevant clinical scenarios.
Finding Sources
Finding Sources
I have all the content needed. Now I'll compile a comprehensive, KMTC-style exam practice paper with verified Q&A, based on the actual FQE format (MCQ + True/False + SAQ + LAQ) that I retrieved from the real KMTC FQE papers and CAT platform.
KMTC Casting & Splinting - Exam Practice Paper
Based on the actual KMTC FQE format (Certificate & Diploma in Orthopaedic Plaster Technology / Orthopaedic & Trauma Medicine)
Format mirrors the real KMTC FQE: Section 1 = MCQ | Section 2 = True/False | Section 3 = Short Answer | Section 4 = Long Answer
The live KMTC CAT quizzes run weekly every Tuesday on dknowledge.co.ke - check there for active online tests.
SECTION ONE: MULTIPLE CHOICE QUESTIONS (MCQs)
Choose the single best response. [30 marks - 2 marks each]
1. Which of the following is the primary reason for using a splint rather than a cast in the acute phase of a fracture?
a) Splints are easier to apply
b) Splints allow for swelling and prevent compartment syndrome
c) Splints are cheaper than casts
d) Splints provide stronger immobilization
✅ Answer: b)
Splints are non-circumferential and accommodate swelling. A circumferential cast applied over a swollen limb can cause compartment syndrome.
2. What is the correct water temperature for wetting plaster of Paris?
a) 10°C (cold water)
b) 24°C (room temperature)
c) 40°C (warm water)
d) 60°C (hot water)
✅ Answer: b)
Room temperature water (~24°C) provides a workable setting time and does not increase the risk of thermal burns. Water approaching 40°C significantly increases burn risk.
3. How many layers of plaster are recommended for a lower extremity splint in an average adult?
a) 4-6 layers
b) 8 layers
c) 12-15 layers
d) 20-25 layers
✅ Answer: c)
Upper limb = 8 layers; lower limb = 12-15 layers. More layers are required in the lower limb due to greater weight-bearing forces.
4. A patient presents with a suspected scaphoid fracture. The X-ray is normal. What is the correct initial management?
a) Discharge with analgesia and review in 2 weeks
b) Apply a volar wrist splint only
c) Apply a thumb spica splint and arrange MRI/CT
d) Apply a long arm cast
✅ Answer: c)
The scaphoid has poor vascularity. Even with a normal X-ray, clinical suspicion (anatomical snuffbox tenderness) warrants a thumb spica splint and advanced imaging (MRI) to rule out occult fracture.
5. During plaster application, what is the "critical period"?
a) The time when the patient should not move after the splint is applied
b) The phase when the plaster transitions from liquid to a thick creamy consistency - after which manipulation weakens the splint
c) The first 24 hours after cast application when swelling is highest
d) The time required for full drying of the plaster (24-72 hours)
✅ Answer: b)
Any movement of the plaster after the critical period disrupts the crystalline calcium sulfate network, permanently weakening the splint.
6. Which mnemonic is used to describe the post-splint neurovascular check?
a) ABC
b) AVPU
c) FACTS
d) SAMPLE
✅ Answer: c)
Function, Arterial pulse, Capillary refill, Temperature, Sensation.
7. A patient in a below-elbow cast develops severe pain, pallor, and paraesthesia. What is the IMMEDIATE action?
a) Administer IV morphine and observe
b) Elevate the limb above the heart
c) Bivalve or remove the cast immediately
d) Order an X-ray to check fracture alignment
✅ Answer: c)
These signs indicate compartment syndrome. The immediate action is to bivalve or remove the cast to relieve pressure. Delay risks permanent ischaemic muscle damage (Volkmann's contracture).
8. When applying an elastic bandage over a splint, the correct direction of wrapping is:
a) Proximal to distal
b) Distal to proximal
c) Either direction is acceptable
d) Circular only, not spiral
✅ Answer: b)
Wrapping distal to proximal promotes venous return and prevents distal oedema.
9. Which of the following is the correct position of function for the hand during short-term splinting?
a) Wrist neutral, MCP joints 30°, fingers straight
b) Wrist 10-20° extension, MCP 50-60°, IP joints 5-10° flexion, thumb abducted
c) Wrist 45° flexion, MCP 90°, IP joints straight
d) Wrist extended 30°, all fingers fully extended
✅ Answer: b)
This is the "wineglass/position of function" - safe for 7-14 days of immobilization.
10. Which cast is used for immobilization of a humeral shaft fracture?
a) Hanging cast / coaptation splint (U-slab)
b) Sugar-tong splint
c) Cylinder cast
d) Shoulder spica
✅ Answer: a)
The coaptation splint (humeral U-slab) extends from the axilla, down the medial arm, around the elbow, and up the lateral arm. It is replaced by a functional brace (Sarmiento brace) at 10-14 days.
11. Which of the following is NOT a complication of casting?
a) Compartment syndrome
b) Thermal burns
c) Deep vein thrombosis
d) Faster fracture healing
✅ Answer: d)
Faster fracture healing is NOT a complication - it is a goal. All others (compartment syndrome, burns, DVT) are recognized complications of casting.
12. What is the purpose of applying stockinette before a cast?
a) To increase cast strength
b) To absorb excess plaster
c) To protect skin at cast edges and provide a smooth inner surface
d) To act as a splint in itself
✅ Answer: c)
Stockinette protects the skin from sharp cast edges and is folded back over the edges to provide a smooth, comfortable finish.
13. The U-splint (stirrup splint) for the ankle is indicated for:
a) Quadriceps tendon repair
b) Ankle fractures and post-reduction stabilization of ankle dislocations
c) Knee ligament injuries
d) Achilles tendon repair only
✅ Answer: b)
The U-splint runs under the plantar foot and up both sides of the lower leg, providing mediolateral stability. It is ideal for ankle fractures and post-reduction stabilization.
14. Fiberglass casts are preferred over POP casts for long-term use because:
a) They are cheaper and more available in Kenya
b) They are stronger, lighter, and more water-resistant
c) They produce less heat during application
d) They do not require padding
✅ Answer: b)
Fiberglass is approximately twice as strong as plaster, significantly lighter, and more radiolucent - making it preferred for ambulatory (walking) casts. POP remains preferred for initial molding after fracture reduction.
15. When is a long arm cast preferred over a short arm cast?
a) Isolated distal radius fracture in an adult
b) Carpal fractures only
c) Forearm shaft fractures (radius/ulna) requiring prevention of forearm rotation
d) All wrist fractures
✅ Answer: c)
The long arm cast immobilizes the elbow and prevents forearm rotation (pronation/supination), which is necessary for radial/ulnar shaft fractures and Monteggia/Galeazzi fracture-dislocations.
SECTION TWO: TRUE OR FALSE
Mark T (True) or F (False) for each statement. [20 marks - 2 marks each]
| # | Statement | Answer |
|---|---|---|
| 1 | Plaster of Paris is calcium sulfate dihydrate | F - It is calcium sulfate hemihydrate; it becomes dihydrate when it sets |
| 2 | Extra-fast-setting plaster produces more heat and increases burn risk | T |
| 3 | Molding a splint should be done using the fingertips for precision | F - Use palms only; fingertips create ridges and pressure points |
| 4 | A cast should always be applied immediately after acute fracture reduction | F - A splint should be used first to allow swelling; a cast is applied once swelling resolves |
| 5 | The ankle should be positioned at 90° when applying a posterior leg splint | T |
| 6 | Reusing plaster dipping water increases heat production and setting speed | T |
| 7 | Bivalving a cast converts it from circumferential to non-circumferential to relieve pressure | T |
| 8 | A thumb spica splint immobilizes only the thumb and not the wrist | F - It immobilizes both the thumb AND the wrist |
| 9 | Fiberglass is more moldable than plaster of Paris | F - POP is superior for molding; fiberglass is stronger and lighter |
| 10 | Patients should be instructed to insert objects under the cast if they feel itching | F - This can cause skin maceration, infection, and retained foreign bodies |
SECTION THREE: SHORT ANSWER QUESTIONS (SAQs)
Answer ALL questions. [30 marks - 6 marks each]
SAQ 1. List SIX complications of casting and briefly describe each.
Answer:
- Compartment syndrome - Increased pressure in muscle compartments from swelling constrained by a circumferential cast; can cause permanent ischaemia if not relieved
- Thermal burns - From exothermic plaster setting reaction, especially with hot water, thick plaster (>12 layers), or insulating pillows during setting
- Pressure sores/skin breakdown - From inadequate padding over bony prominences (malleoli, olecranon, heel)
- Infection - Bacterial/fungal growth in the warm, moist, dark environment under the cast; toxic shock syndrome has been rarely reported
- Joint stiffness - Invariable consequence of prolonged immobilization; ranges from mild to severe contracture
- DVT (Deep Vein Thrombosis) - Particularly in lower limb casts due to immobility and venous stasis
(Other acceptable answers: dermatitis/contact allergy, muscle atrophy, disuse osteoporosis, pruritus leading to skin injury)
SAQ 2. Describe the procedure for applying a posterior leg (below-knee) splint.
Answer:
- Prepare patient - Explain procedure; remove footwear and socks; protect clothing
- Apply stockinette - Roll over the entire foot and lower leg, extending beyond intended margins
- Apply padding (Webril) - Distal to proximal spiral wrap; extra layers at heel, malleoli, and fibular head
- Prepare plaster - Cut 4-6 inch strips to appropriate length (from metatarsal heads to fibular head posteriorly); use 12-15 layers; submerge in cool water, remove when bubbling stops, squeeze gently
- Smooth plaster - Lay flat on surface and laminate; remove wrinkles
- Apply to limb - Position on posterior leg; fold stockinette back over edges
- Secure - Wrap with elastic bandage distal to proximal
- Position and mold - Maintain ankle at 90° (neutral dorsiflexion); mold with palms around malleoli and heel
- Post-check (FACTS) - Verify circulation, sensation, movement of toes; instruct on elevation and signs of complications
SAQ 3. Differentiate between a cast and a splint under the following headings: definition, circumferentiality, indications, advantages, disadvantages.
Answer:
| Feature | Cast | Splint (Backslab) |
|---|---|---|
| Definition | Circumferential rigid immobilization device enclosing the entire limb | Non-circumferential (partial) immobilization device covering one surface |
| Circumferentiality | Complete (360°) | Partial (typically 50-75% of circumference) |
| Main indication | Definitive management of stable fractures once swelling has resolved | Acute injuries where swelling is expected; temporary immobilization |
| Advantages | Maximum immobilization; protects fracture from all directions | Accommodates swelling; reduces compartment syndrome risk; allows wound access |
| Disadvantages | Cannot accommodate swelling; higher compartment syndrome risk | Less rigid; may shift; requires patient compliance |
SAQ 4. What patient education (discharge instructions) should be given after applying a plaster cast?
Answer:
- Elevation - Keep the limb elevated above heart level for 48 hours to reduce swelling
- Keep dry - Do not wet the cast (for POP); use a waterproof cover/plastic bag when bathing
- No foreign objects - Never insert objects (pencils, sticks) under the cast to relieve itching
- Warning signs - Return to hospital IMMEDIATELY if: increasing pain, numbness/tingling, pale/cold fingers or toes, difficulty moving fingers/toes, foul smell, or visible cast damage
- Activity restriction - Do not bear weight unless specifically told to do so
- Normal sensations - The cast may feel warm as it sets and may have a mild odour - these are normal
- Follow-up - Return on the specified date for repeat X-ray and cast check
- Cast care - Do not trim or modify the cast yourself
SAQ 5. State FIVE differences between Plaster of Paris and Fiberglass as casting materials.
Answer:
| Property | Plaster of Paris (POP) | Fiberglass |
|---|---|---|
| Strength | Less strong | ~2x stronger than POP |
| Weight | Heavier | Lighter |
| Moldability | Excellent - superior for molding post-reduction | Good but less moldable |
| Water resistance | Not water-resistant (dissolves when wet) | Water-resistant |
| Radiolucency | Less radiolucent (obscures X-ray detail) | More radiolucent (better X-ray visualization) |
| Cost | Cheaper - preferred in low-resource settings | More expensive |
| Heat | More heat produced during setting | Less heat produced |
| Use | Initial application, fracture reduction, molding | Long-term ambulatory casts |
SECTION FOUR: LONG ANSWER QUESTION (LAQ)
Answer ONE question. [20 marks]
LAQ: A 25-year-old male is brought to the orthopaedic ward following a road traffic accident. He has a closed fracture of the distal radius (right hand, dominant). Describe:
(a) How you would assess this patient (5 marks)
(b) How you would apply a below-elbow backslab (10 marks)
(c) The complications to watch for and how to prevent them (5 marks)
Answer:
(a) Assessment [5 marks]
- History - Mechanism of injury, time of injury, hand dominance, allergies, tetanus status, last meal (if surgery anticipated)
- General examination - Vital signs, level of consciousness, ABCDE approach (check for other injuries)
- Local examination of the wrist:
- Look - Deformity ("dinner fork deformity" in Colles' fracture), swelling, bruising, skin integrity (open wound?)
- Feel - Tenderness at fracture site, neurovascular status (radial pulse, capillary refill <2 sec, sensation in median/ulnar/radial nerve territories)
- Move - Range of motion (limited by pain), finger movement
- Radiological assessment - X-ray wrist (AP and lateral views) to confirm fracture type, displacement, and involvement of articular surface
- Document - Baseline neurovascular status before immobilization
(b) Application of Below-Elbow Backslab [10 marks]
Materials needed: Stockinette, Webril cast padding, POP (4-inch width), water basin, elastic bandage, scissors, gloves
Procedure:
- Explain the procedure to the patient; obtain consent; cover clothing
- Remove rings, watches, and jewelry from the right hand
- Apply stockinette from knuckles to mid-forearm, extending 5 cm beyond each end of the intended splint
- Apply Webril padding in a distal-to-proximal spiral wrap (50% overlap each turn); apply extra layers at wrist and bony prominences
- Prepare POP strips - cut 4-inch wide strips to appropriate length (from metacarpal heads to 2 cm below elbow); prepare 8 layers
- Wet plaster - Submerge fully in cool clean water (~24°C); wait for bubbling to stop; remove and gently squeeze to wet/sloppy consistency (do NOT wring)
- Smooth plaster on a flat surface to laminate layers and remove wrinkles
- Apply to volar (palm) surface of forearm; fold back stockinette edges to cover plaster margins
- Secure with elastic bandage wrapped distal to proximal without undue tension; tape down metal clips
- Position and mold - Hold wrist in 10-20° of extension (functional position); mold splint with palms along the contour of the forearm; maintain position until plaster hardens
- Post-splint FACTS check: Function (finger movement), Arterial pulse (radial), Capillary refill (<2 sec), Temperature, Sensation
- Instruct patient on elevation, signs of complications, and follow-up date (typically 1 week for repeat X-ray)
(c) Complications and Prevention [5 marks]
| Complication | Prevention |
|---|---|
| Compartment syndrome | Use a splint (not full cast) acutely; ensure elastic bandage is not tight; educate patient to report increasing pain/numbness |
| Thermal burns | Use cool water (~24°C); do not exceed 8 layers; never use insulating pillows during setting |
| Pressure sores | Adequate Webril padding; extra layers over bony prominences; smooth plaster (no ridges) |
| Infection | Clean wounds before application; keep cast dry; use removable splint if regular wound inspection needed |
| Median nerve injury | Avoid extreme wrist flexion; immobilize in functional position; check median nerve sensation (thumb, index, middle finger) before and after |
| Joint stiffness | Minimize immobilization period; begin finger/elbow ROM exercises from day one; early physiotherapy referral |
QUICK REVISION TABLE - High-Yield KMTC Facts
| Topic | Key Fact |
|---|---|
| Water temp for POP | ~24°C (room temperature) |
| Upper limb layers | 8 layers |
| Lower limb layers | 12-15 layers |
| Max layers before burn risk | >12 layers |
| Post-splint check | FACTS |
| Ankle position in posterior splint | 90° (neutral) |
| Position of function (wrist) | 10-20° extension |
| Position of function (MCP) | 50-60° flexion |
| Thumb spica indication | Scaphoid fracture, UCL injury |
| Coaptation splint | Humeral shaft fracture |
| Compartment syndrome sign | Pain on passive stretch (earliest) |
| Immediate Rx of compartment | Bivalve/remove cast |
| POP setting reaction | Exothermic (produces heat) |
| Cast vs splint - acute setting | Splint preferred (accommodates swelling) |
Note on Actual KMTC Exam Papers: The Certificate FQE Casting Paper 1 is available on Scribd (subscription required). The KMTC Department of Orthopaedics also runs weekly CAT quizzes on dknowledge.co.ke every Tuesday - the Casting and Splinting CAT links are active mid-day each week. Real past papers are available via KMTC Library Catalogue and at kenyaplex.com (paid notes, 55 pages, KES 180).
This is a shared conversation. Sign in to Orris to start your own chat.