Stepwise examination of reflexes with images or videos
Reading File
Finding Sources
Finding Sources
Searching the Web
stepwise reflex examination technique clinical neurology deep tendon reflexes
Reading File
Finding Sources
Finding Sources
Finding Sources
Finding Sources
Reading Web Page
https://med.stanford.edu/stanfordmedicine25/the25/tendon.htm…
Reading File
Reading File
Searching the Web
reflex examination YouTube video biceps brachioradialis triceps patellar ankle jerk technique site:youtube.com OR site:nejm.org OR site:meded.ucsf.edu
Loading Image
Finding Sources
Loading Image
Reading File
Loading Image
Loading Image
Loading Image
I now have all the material needed for a comprehensive, well-illustrated guide. Here is the full stepwise examination:
Stepwise Examination of Reflexes
Reflex testing is one of the most localizing parts of the neurological exam - it distinguishes upper motor neuron (UMN) from lower motor neuron (LMN) lesions, identifies the spinal cord level affected, and helps detect subclinical neurological disease.
Step 1 - Equipment & Patient Positioning
Equipment needed: Reflex (Taylor/Queen Square) hammer. The weight and swing of the hammer matter - a sharp, brisk flick of the wrist delivers more reliable strikes than a slow tap.
Patient positioning:
- Relaxed - muscle tension will suppress reflexes
- The tested muscle should be positioned midway between full contraction and full extension
- Expose the limbs for direct tendon access
- Compare both sides sequentially for each reflex
Key rule: Aim for the smallest stimulus that elicits a reflex, NOT the maximal possible hit. Grading is about threshold, not amplitude.
Step 2 - Reinforcement (Jendrassik Maneuver)
When reflexes appear absent or diminished, use reinforcement to unmask them:
- Upper limbs: Ask the patient to clench the teeth, or hook the flexed fingers of both hands together and pull hard apart (Jendrassik maneuver proper)
- Lower limbs: Hook flexed fingers of both hands together and pull apart while you test the Achilles; alternatively ask patient to clench fists
- Why it works: Voluntary contraction of distant muscles temporarily increases gamma motor neuron activity, lowering the reflex threshold
Step 3 - Deep Tendon Reflexes (DTRs)
These are the muscle stretch (myotatic) reflexes. Test them in a logical sequence - upper limbs first, then lower.
3A. Biceps Reflex - C5, C6
| Position | Elbow flexed ~90°, forearm supinated, resting on patient's thigh or examiner's forearm |
| Technique | Place your thumb firmly over the biceps tendon in the antecubital fossa. Strike your thumb with the hammer |
| Normal response | Elbow flexion |
| Root tested | C5 (primarily), C6 |
| Absent = LMN | C5/C6 root, musculocutaneous nerve |
| Exaggerated = UMN | Corticospinal tract lesion above C5 |
3B. Brachioradialis Reflex - C5, C6
| Position | Forearm resting loosely, in slight pronation, on patient's thigh |
| Technique | Strike the brachioradialis tendon at the distal radius (radial side, ~5 cm above wrist) |
| Normal response | Forearm flexion ± slight radial deviation |
| Root tested | C5, C6 |
| Inverted reflex | If the brachioradialis fails to contract but finger flexors contract instead, this "inverted brachioradialis reflex" suggests a lesion at C5-C6 with UMN release of lower levels |
3C. Triceps Reflex - C6, C7
| Position | Elbow flexed ~90°, arm supported by examiner or hanging loosely across abdomen |
| Technique | Strike the triceps tendon just above the olecranon |
| Normal response | Elbow extension |
| Root tested | C7 (primarily), C6 |
Video reference: Upper Extremity Reflexes (YouTube - MSK Medicine)

3D. Finger Flexor Reflex (Trömner / Hoffmann) - C8, T1
Hoffmann's Sign:
- Hold the patient's middle finger loosely and flick the fingernail downward
- Positive: Thumb flexes and adducts (flexion of IP joint)
- Indicates heightened reflexes in the finger flexor muscles, suggesting a UMN lesion above C8
Trömner Sign:
- Flick the middle finger upward (from below)
- Same interpretation as Hoffmann's
3E. Patellar Reflex (Knee Jerk) - L3, L4
| Position | Sitting: knee bent at ~90°, legs hanging freely. Supine: support the knee in ~30-45° flexion by placing your arm under the popliteal fossa |
| Technique | Strike the patellar tendon just below the patella sharply |
| Normal response | Knee extension (quadriceps contraction) |
| Root tested | L3, L4 |
Absent patellar reflex = likely L4 root lesion, femoral neuropathy, or diabetic neuropathy. Hyperactive = UMN lesion above L3.
3F. Achilles Reflex (Ankle Jerk) - S1, S2
| Position | Knee flexed, foot in slight dorsiflexion. Can be tested: (a) seated with legs dangling, (b) supine with knee bent and externally rotated ("frog-leg"), (c) patient kneeling on a chair - Achilles tendon exposed |
| Technique | Dorsiflex the ankle slightly with one hand to put tendon on mild stretch; strike the Achilles tendon |
| Normal response | Plantar flexion of the foot |
| Root tested | S1 (primarily) |
| Clinical pearl | The Achilles reflex is the most commonly lost reflex in L5-S1 disc herniation and peripheral neuropathy (e.g., diabetes) |
Video reference: Deep Tendon Reflex Exam (YouTube)
Step 4 - Reflex Grading Scale
| Grade | Description |
|---|---|
| 0 | Absent - no response even with reinforcement |
| 1+ | Trace/hyporeflexic - seen only with reinforcement |
| 2+ | Normal |
| 3+ | Brisk - increased but no clonus |
| 4+ | Hyperactive with non-sustained clonus |
| 5+ | Sustained clonus |
0 and 4+/5+ are abnormal. 1+, 2+, and 3+ are normal unless asymmetrical or there is a dramatic disparity between upper and lower limbs (which suggests a spinal cord lesion).
Documenting reflexes - the Stick Figure Method:
A quick, universally understood documentation method is the stick figure, with reflex grades written at the joints:
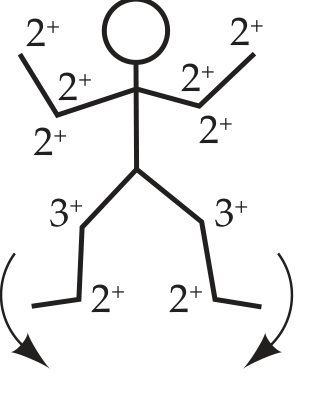
Fig: A normal stick figure. Upper limb reflexes 2+, patellar 3+, Achilles 2+, plantar arrows pointing downward = flexor.
Step 5 - Cutaneous / Superficial Reflexes
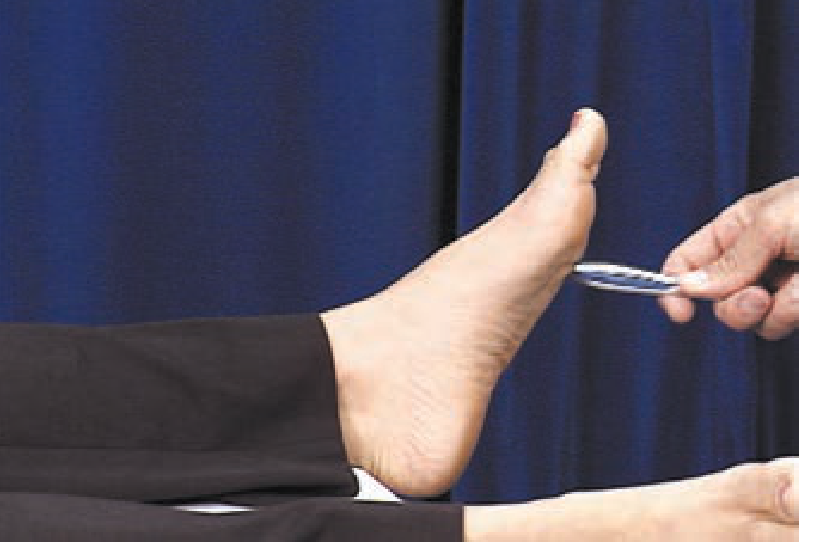
5A. Plantar Reflex (Babinski Test)
Technique:
- Use a blunt object (tongue blade handle, end of a pen, or key)
- Stroke the lateral sole from the heel, forward toward the small toe, then arc medially toward the big toe
- Apply firm, continuous pressure - not too light (ticklish withdrawal) and not painful
Responses:
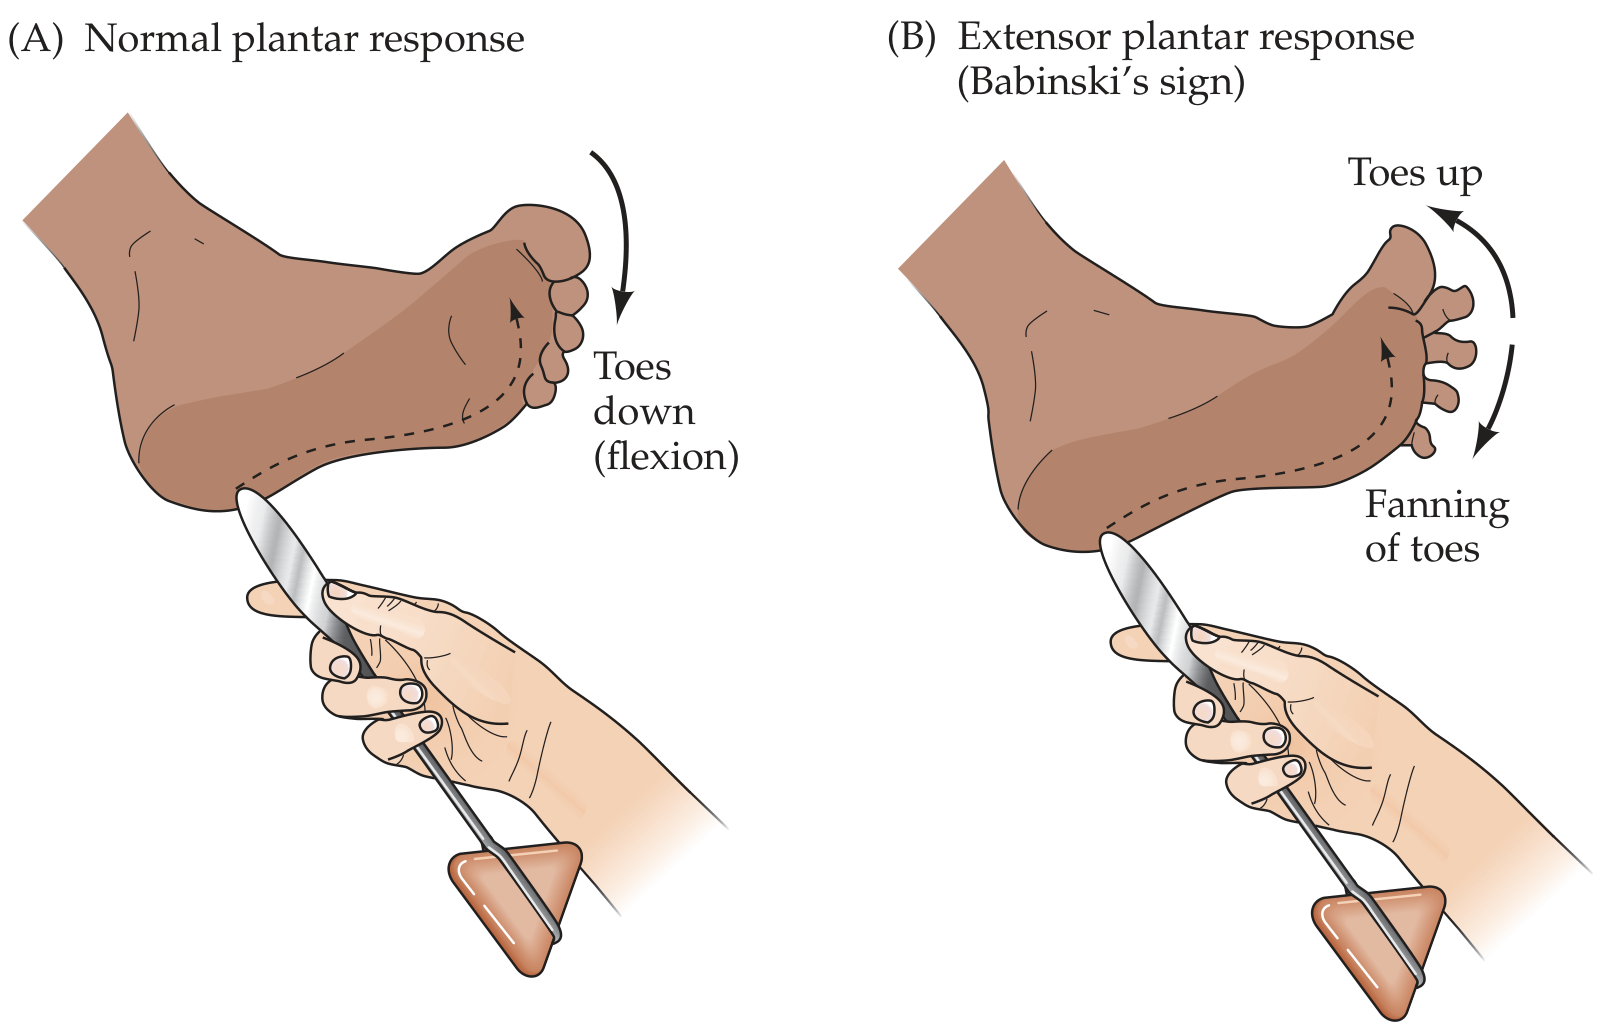
Fig: (A) Normal plantar response - toes flex downward. (B) Extensor plantar response / Babinski's sign - great toe extends up, other toes fan outward.
| Response | Interpretation |
|---|---|
| Flexor (toes curl down) | Normal in adults |
| Extensor (Babinski sign) | UMN lesion above S1 level |
| Silent (no movement) | If one side silent while other is downgoing, the silent side is abnormal |
Important caveat (Harrison's 22e): Despite its fame, Babinski's reliability for UMN weakness is limited. Tests of tone, strength, and stretch reflexes are more reliable overall.
Alternative elicitation techniques (when plantar withdrawal interferes):
- Oppenheim: stroke firmly down the tibia
- Gordon: squeeze the calf muscle
- Chaddock: stroke under the lateral malleolus
- Schafer: squeeze the Achilles tendon
5B. Abdominal Reflexes - T9 to T12
- Stroke each quadrant of the abdomen diagonally toward the umbilicus with a sharp object (e.g., wooden end of a cotton swab)
- Normal: Umbilicus pulls toward the stimulated quadrant
- Absent: UMN lesion (lost when corticospinal input is disrupted)
- Clinical use: Preservation of upper (T9) but loss of lower (T12) abdominal reflex localizes a lesion between T9-T12
5C. Cremasteric Reflex - L1, L2
- Stroke the upper inner thigh in males
- Normal: Ipsilateral elevation of the testicle
- Absent: L1-L2 root lesion, femoral nerve lesion, or UMN lesion above L1
5D. Anal (Perianal) Reflex - S2, S3, S4
- Scratch the perianal skin with a blunt pin
- Normal: Contraction of the external anal sphincter ("anal wink")
- Test when: Suspected spinal cord injury or cauda equina syndrome
Step 6 - Clonus Testing
Test when reflexes are hyperactive (3+ or 4+):
Ankle clonus:
- With the knee extended, grasp the foot and sharply dorsiflex the ankle
- Maintain upward pressure
- Sustained repetitive oscillations = pathological clonus = UMN lesion
- 1-2 beats = may be normal in anxious patients
- Asymmetric sustained clonus is always abnormal
Patellar clonus:
- Grasp the patella between thumb and forefinger
- Push sharply distally and hold
- Sustained oscillations = pathological
Step 7 - Primitive / Frontal Release Signs
Seen with frontal lobe pathway disease (e.g., dementia, bilateral UMN lesions):
| Sign | Elicitation | Response |
|---|---|---|
| Grasp reflex | Stroke between thumb and index finger of the patient's palm | Forced grasping of examiner's hand |
| Suck reflex | Lightly touch center of lips with tongue blade | Sucking movement |
| Root reflex | Touch corner of lips | Patient turns lips toward stimulus |
| Palmomental reflex | Scratch palm diagonally | Ipsilateral contraction of mentalis (chin) muscle |
Releasing the grasp reflex: stroke the back of the patient's hand - this often causes release.
Summary Table: DTRs, Root Levels & Localization
| Reflex | Spinal Roots | LMN (Absent) | UMN (Exaggerated) |
|---|---|---|---|
| Biceps | C5, C6 | C5/C6 root or musculocutaneous nerve | Cord lesion above C5 |
| Brachioradialis | C5, C6 | C5/C6 | Above C5 |
| Triceps | C6, C7 | C7 root or radial nerve | Above C6 |
| Finger flexors | C8, T1 | C8/T1 | Above C8 |
| Patellar | L3, L4 | L3/L4 root or femoral nerve | Above L3 |
| Achilles | S1, S2 | S1 root or sciatic/tibial nerve | Above S1 |
Recommended Video Resources
- Deep Tendon Reflex Exam - Complete Upper & Lower (YouTube) - biceps, brachioradialis, triceps, patellar, Achilles
- Upper Extremity Reflexes (MSK Medicine) - excellent close-up technique
- Deep Tendon Reflexes Nursing Head-to-Toe (YouTube) - nursing assessment format
- Stanford Medicine 25 - Reflex Exam - interactive online guide with video clips
Sources: Harrison's Principles of Internal Medicine 22e (2025); Neuroanatomy through Clinical Cases 3e (Blumenfeld); Adams and Victor's Principles of Neurology 12e; Neuroanatomy through Clinical Cases 3e, Table 3.6.
This is a shared conversation. Sign in to Orris to start your own chat.