Central venous catheterization over view
Reading File
Finding Sources
Searching Images
central venous catheterization anatomy approach
Reading File
Reading File
Reading File
Reading File
Loading Image
Loading Image
Loading Image
Here is a comprehensive overview of central venous catheterization (CVC) drawn from authoritative sources.
Central Venous Catheterization — Overview
Definition
Central venous catheterization involves introducing a catheter into a large central vein so that its tip lies within the thoracic venous system, typically at the superior vena cava (SVC)–right atrial junction.
Indications
| Category | Examples |
|---|---|
| Hemodynamic monitoring | CVP monitoring, central venous O₂ saturation (ScvO₂) |
| Resuscitation | High-volume/high-flow resuscitation, shock management |
| Drug administration | Caustic agents, vasopressors, total parenteral nutrition (TPN) |
| Access | Poor peripheral veins, emergency venous access |
| Specialized procedures | Transvenous cardiac pacing, pulmonary artery catheter insertion, hemodialysis, plasmapheresis |
| Sampling | Repetitive blood sampling |
ScvO₂ monitoring: Normal ScvO₂ >60%. A low value suggests inadequate oxygen delivery (low CO, low Hb, low SaO₂, or high consumption). An elevated ScvO₂ (>80%) suggests shunting or impaired cellular utilization (e.g., cyanide poisoning).
— Morgan and Mikhail's Clinical Anesthesiology, 7e
Contraindications
Absolute/strong:
- Infection overlying the insertion site
- Confirmed thrombosis in the target vessel
- Superior vena cava syndrome
Relative:
- Coagulopathy / anticoagulation / thrombolytic therapy
- Distortion of landmarks (trauma, congenital anomaly)
- Tumors or valve vegetations at risk of embolization
- Morbid obesity
- Uncooperative patient
- Prior vessel injury or procedures at the site
Access Sites and Anatomy
1. Internal Jugular Vein (IJV)
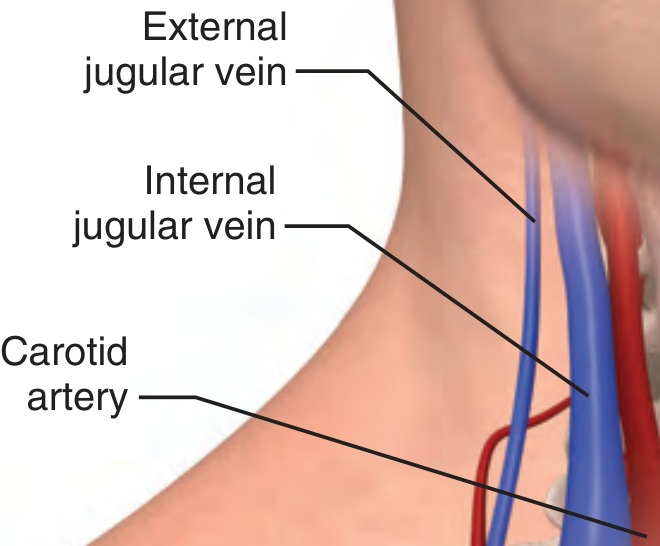
- Lies lateral to the carotid artery in the upper neck, but nearly directly above it at the level of the clavicle
- Anatomic landmark: the triangle formed by the two heads of the SCM and the clavicle — the IJ vein lies at the apex
- Right IJ is preferred — straighter path to the SVC/right atrium, lower risk than left side (which carries higher risk of pleural effusion and chylothorax)
- Needle directed toward the ipsilateral nipple at 30° to skin, just lateral to the carotid pulse
2. Subclavian Vein (SCV)
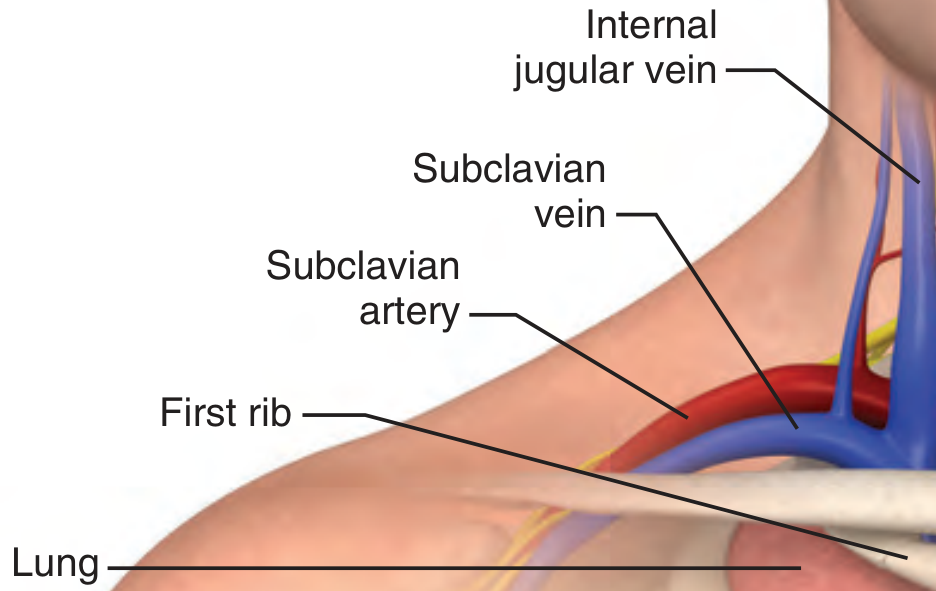
- Runs parallel to and anterior to the subclavian artery, just caudal to the clavicle
- The cupula of the lung lies just caudad to these structures
- Landmarks: sternal notch, medial third of the clavicle, SCM
- Needle kept nearly parallel to the clavicle to avoid artery and lung
- Higher risk of pneumothorax during insertion, but lowest infection risk for long-term lines
3. Femoral Vein

- Contained within the femoral triangle: inguinal ligament (superior), sartorius (lateral), adductor longus (medial) — mnemonic SAIL
- Lateral-to-medial relationship: Nerve, Artery, Vein, Empty space, Lymphatics — mnemonic NAVEL
- Easiest anatomy; safest in patients with coagulopathy or in cardiac arrest
- Highest infection risk for long-term use; avoid distal to inguinal ligament (artery rotates over vein)
4. External Jugular Vein
- Superficial and easily visible, but the acute angle at its junction with the great veins makes central access technically unreliable.
Cannulation Techniques
Three techniques exist; the Seldinger technique is used for the vast majority of CVCs:
| Technique | Description |
|---|---|
| Catheter over needle | Similar to peripheral IV |
| Catheter through needle | Requires large-bore needle stick |
| Seldinger (wire-guided) | Needle → guidewire → dilator → catheter; standard of care |
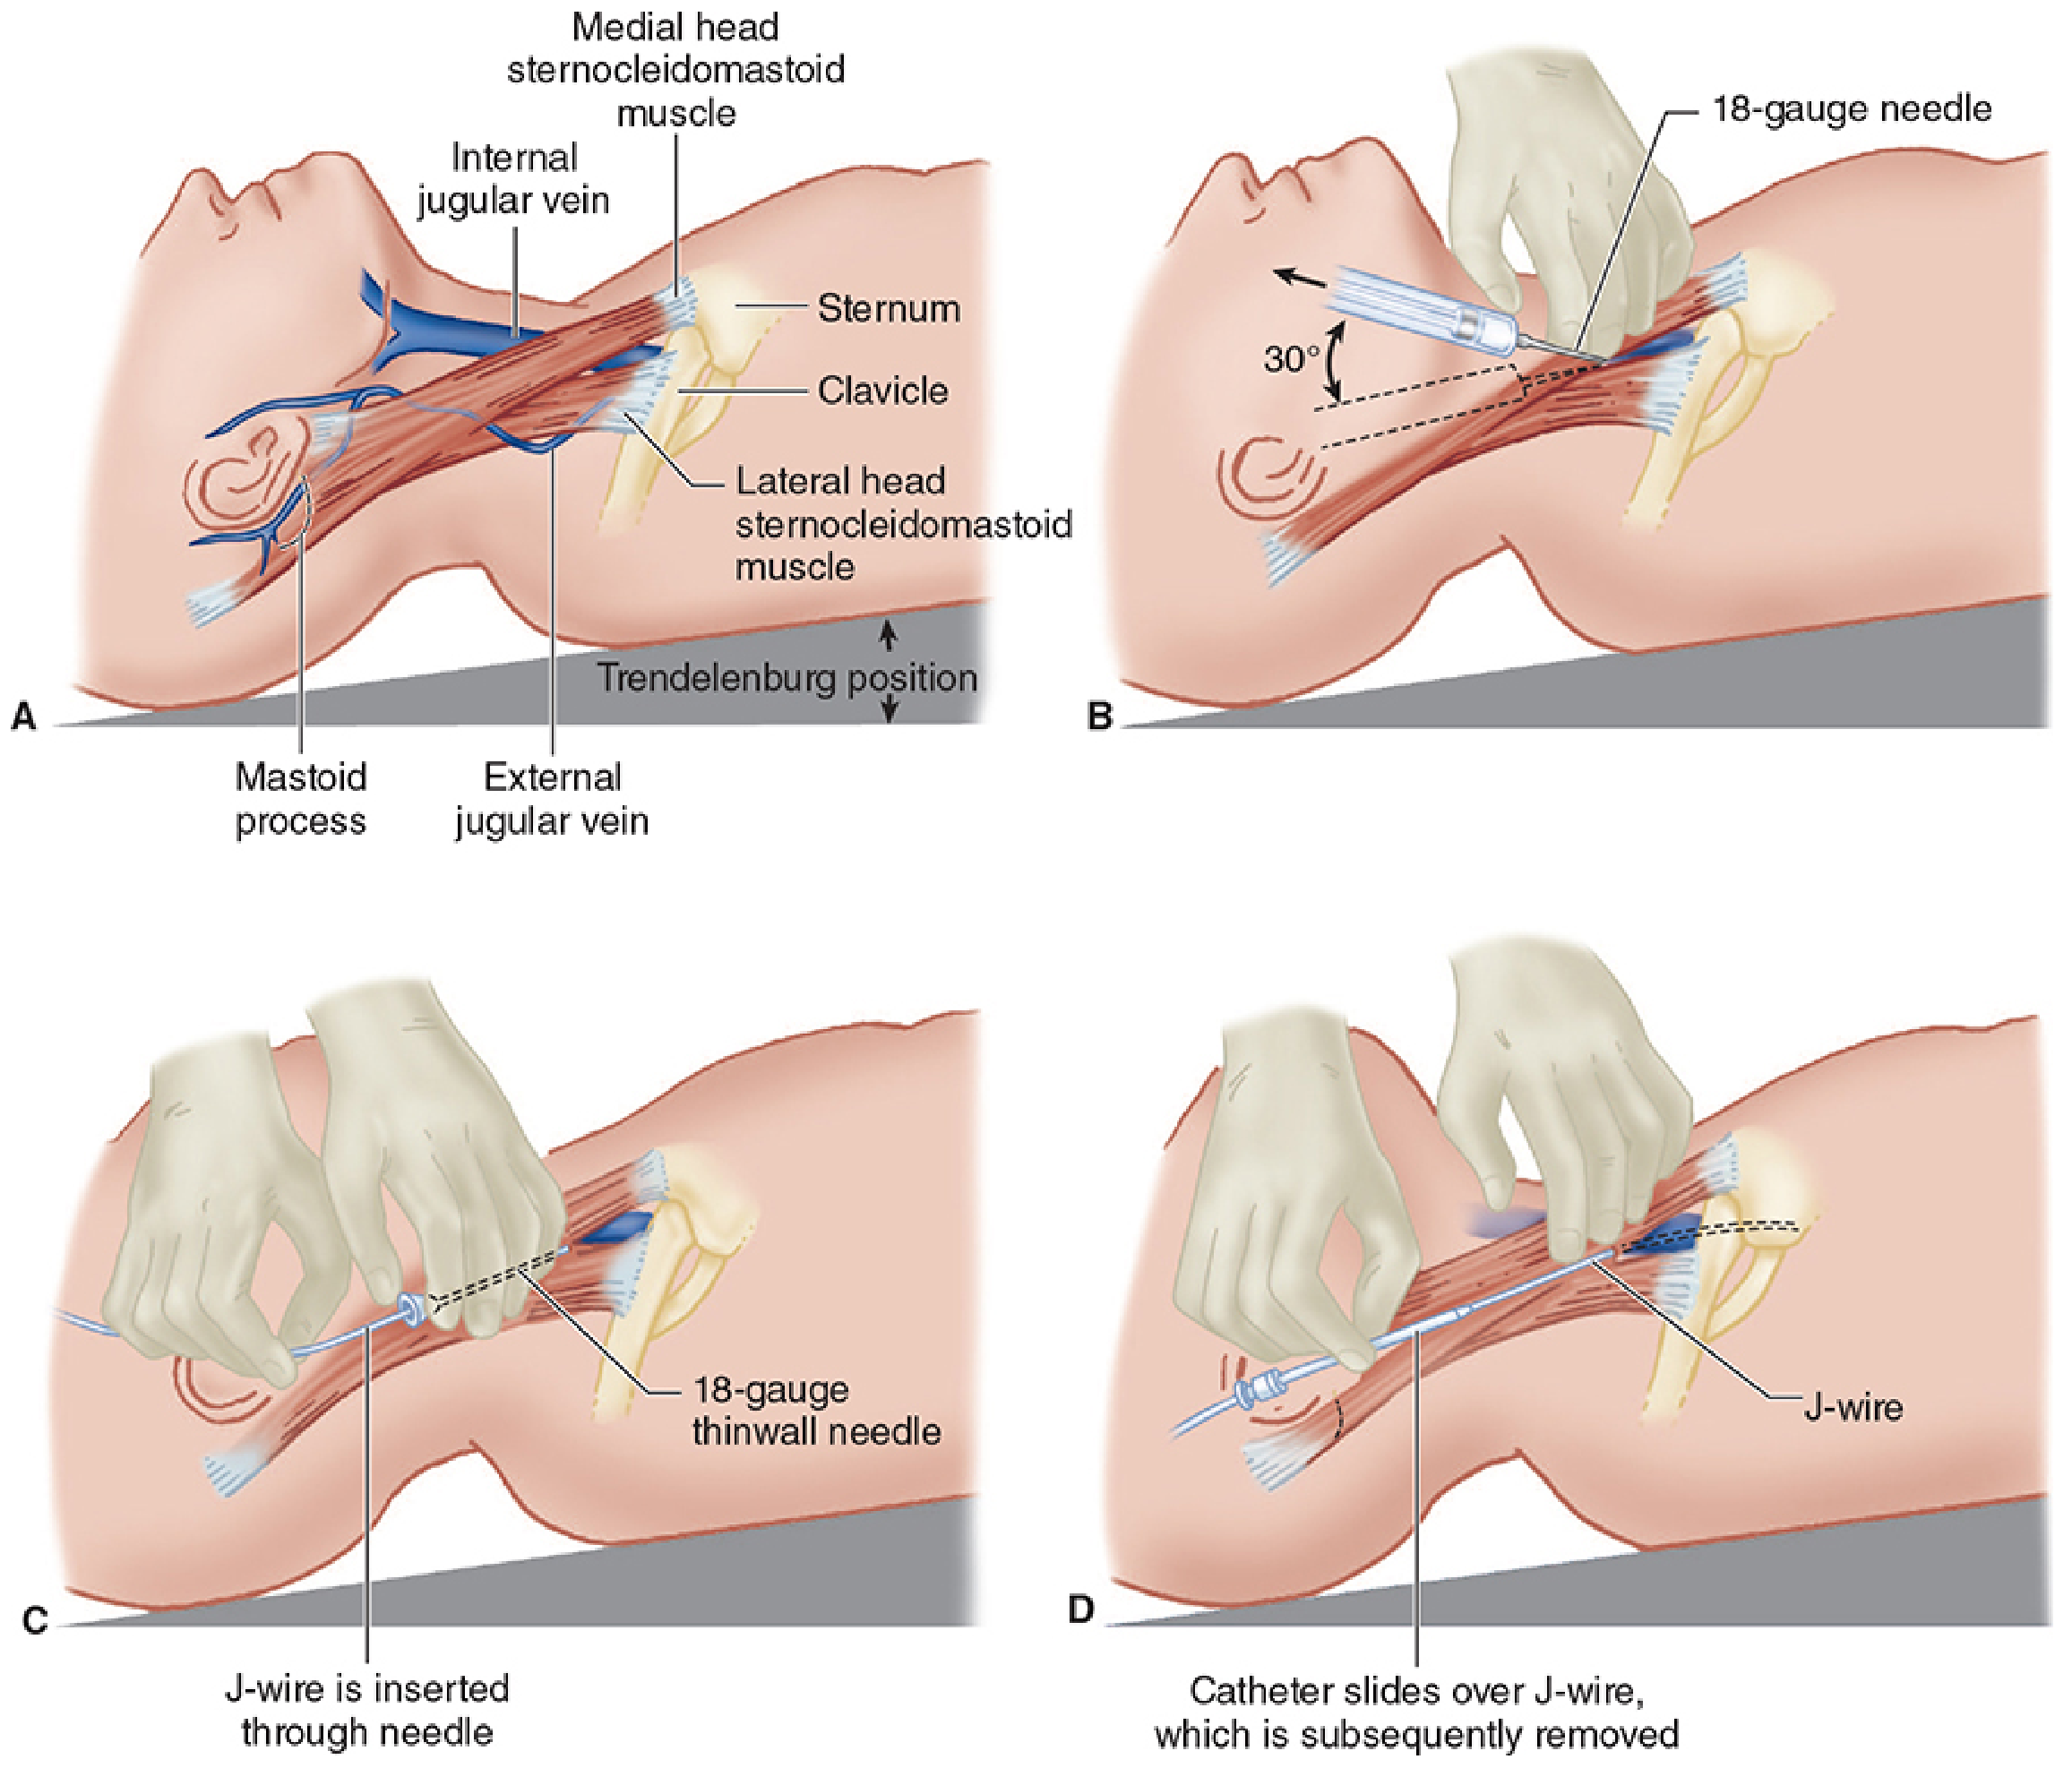
Seldinger Technique — Key Steps (IJ Example)
- Position: Trendelenburg (distends vein, reduces air embolism risk)
- Sterile prep: Full aseptic technique — scrub, sterile gloves, gown, mask, hat, chlorhexidine/alcohol skin prep, sterile drapes
- Locate vein: Ultrasound guidance strongly recommended (mandatory at many institutions)
- Local anesthesia: 25-gauge needle at the apex of the SCM triangle
- Venipuncture: 18-gauge thin-wall needle toward ipsilateral nipple at 30°, aspirating
- Confirm venous blood (pressure transduction or color/pulsatility)
- Guidewire: Advance through needle; confirm position with ultrasound; never lose control of external wire tip
- Dilator: Advance over wire after nicking skin with No. 11 blade
- Catheter: Flush all ports; advance over wire; remove wire; occlude hub to prevent air aspiration until tubing connected
- Secure and dress; confirm tip position with chest X-ray
The catheter tip should lie at or just above the SVC–right atrial junction. It must not be allowed to migrate into the heart chambers.
Catheter Tip Position
- Optimal: Superior vena cava, just above or at the RA junction
- CVP measurement: read at end-expiration
- Spontaneous ventilation → inspiration decreases CVP
- Controlled ventilation → inspiration increases CVP
Site Comparison Summary
| Feature | Internal Jugular | Subclavian | Femoral |
|---|---|---|---|
| Ease of access | Moderate | Moderate | Easy |
| Pneumothorax risk | Low–moderate | Highest | None |
| Infection risk (long-term) | Moderate | Lowest | Highest |
| Compressibility if arterial hit | Yes | No | Yes |
| Use in coagulopathy | Caution | Avoid | Preferred |
| Use in cardiac arrest | Difficult | Difficult | Preferred |
Complications
Immediate (procedural)
- Arterial puncture and hematoma — most common; carotid cannulation can cause stroke/airway compromise
- Pneumothorax — subclavian > IJ; absent with femoral
- Hemothorax
- Air embolism — prevented by Trendelenburg position and occluding hub
- Cardiac dysrhythmia — from wire/catheter irritating the right atrium or ventricle
- Nerve injury
Delayed
- Catheter-related bloodstream infection (CRBSI) — femoral > IJ > subclavian
- Thrombosis
- Catheter misplacement / migration
- Pleural effusion / chylothorax — left-sided approaches
Ultrasound Guidance
Real-time ultrasound is strongly recommended (mandated by many institutions) for IJ cannulation and increasingly for other sites. It:
- Confirms vessel position and patency
- Identifies anatomic variants
- Reduces arterial puncture rate
- Confirms guidewire placement in vein before dilation
Sources: Roberts and Hedges' Clinical Procedures in Emergency Medicine | Morgan and Mikhail's Clinical Anesthesiology, 7e
Explain different types of Central line catheterization. Technique techniques.
Reading File
Finding Sources
Finding Sources
Reading File
Reading File
Reading File
Reading File
Reading File
Reading File
Reading File
Searching Images
Seldinger technique central venous catheter guidewire steps diagram
Loading Image
Loading Image
I now have comprehensive material to write a thorough, well-illustrated response.
Types of Central Line Catheterization — Techniques
Central lines are categorized by catheter type/configuration and by insertion approach/site. Both dimensions matter clinically.
Part 1: Types of Central Venous Catheters
1. Non-Tunneled Central Venous Catheter (CVC)
- The standard "central line" — placed percutaneously at bedside
- Single, double, or triple lumen (most common: triple-lumen)
- Tip terminates at the SVC–RA junction
- Short-to-medium term use (days to a few weeks)
- Access sites: internal jugular (IJ), subclavian (SCV), femoral
- Highest infection risk of all CVC types if left long-term
2. Tunneled Central Venous Catheter
- Catheter is threaded through a subcutaneous tunnel from the exit site (usually below the clavicle on the anterior chest wall) to the venous entry site
- Contains a Dacron cuff that anchors in the tunnel and provides a barrier to ascending infection
- Designed for long-term use (months to years) — hemodialysis, chemotherapy, TPN
- Examples: Hickman, Broviac, Groshong, Permcath (for dialysis)
- Requires fluoroscopy for optimal tip positioning; inserted in OR or dedicated procedure room
3. Implanted Port (Port-a-Cath / TIVAP — Totally Implantable Venous Access Port)
- Reservoir port implanted completely subcutaneously (usually anterior chest wall); no external component
- Accessed through the skin with a non-coring (Huber) needle
- Lowest infection rate for long-term access
- Used for intermittent therapy: chemotherapy, blood transfusions, long-term antibiotics
- Requires surgical placement and removal
4. PICC Line (Peripherally Inserted Central Catheter)
- Inserted via a peripheral vein (basilic, cephalic, or brachial veins at/above the antecubital fossa) — tip advances to the SVC
- Length: 50–60 cm; diameter 2–7 Fr; single or double lumen
- Two catheter end configurations:
- Open-ended (e.g., Intracath): requires daily flushing with heparinized saline
- Valved (e.g., Groshong valve): prevents blood back-flow; flushed as infrequently as once weekly
- No surgical placement required; can be placed at bedside or outpatient
- Used for prolonged antibiotics, TPN, chemotherapy; medium-to-long-term
- For hyperosmolar infusates (TPN, vesicants), tip must be in SVC (flow ~2000 mL/min for dilution)
- Easily removed: withdraw from vein, apply pressure
5. Midline Catheter
- Superficial vein insertion (antecubital fossa), tip terminates near the axillary vein (~20 cm)
- Not a true central catheter — does not enter the central circulation
- Cannot be used for TPN, vasopressors, or hyperosmolar solutions
- Short-to-medium term peripheral access; higher thrombosis risk if tip exceeds axillary vein
Part 2: Insertion Site Approaches and Techniques
The Universal Technique: Seldinger (Wire-Guided) Method
The overwhelming majority of CVCs are placed using the Seldinger technique. This applies to IJ, subclavian, and femoral approaches alike.
Steps:
- Patient in Trendelenburg position (distends veins, reduces air embolism)
- Full sterile technique: chlorhexidine prep, sterile drape, gown, gloves, mask, hat
- Local anesthesia at entry point (25-gauge needle)
- Locate vein with ultrasound (strongly recommended; mandatory at many institutions)
- Venipuncture with 18-gauge thin-wall needle; aspirate with negative pressure until blood returns
- Confirm venous placement (non-pulsatile dark blood; pressure transduction)
- Advance J-wire through needle — never force; maintain grip at all times
- Remove needle over wire while gripping wire
- Skin nick with No. 11 blade at wire entry site
- Dilator advanced over wire (several cm) to dilate tract; then removed
- Catheter flushed, advanced over wire; wire protrudes from distal port — confirm grip before advancing
- Remove wire; occlude hub with thumb until tubing connected (prevents air embolism)
- Secure catheter with sutures; sterile dressing
- Confirm tip position with chest X-ray
Approach 1: Internal Jugular Vein (IJ) — Three Sub-Approaches
The central approach is most commonly used. All three sub-approaches use the same Seldinger method.
| Sub-approach | Insertion Point | Angle | Direction |
|---|---|---|---|
| Central | Apex of the triangle formed by the two SCM heads and clavicle | 30° to skin | Toward ipsilateral nipple |
| Anterior | Medial edge of SCM, 2–3 fingerbreadths above clavicle | 30–45° | Toward ipsilateral nipple |
| Posterior | Posterior (lateral) edge of SCM, midway between mastoid process and clavicle | 45° | Toward suprasternal notch |
Central approach technique detail:
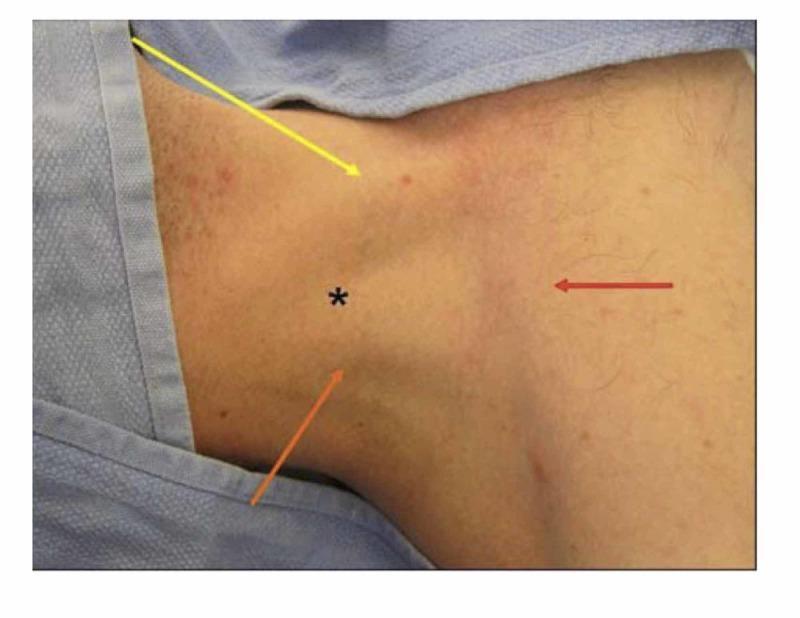
- Palpate the carotid artery — use three fingers lightly to identify its course; the IJ lies just lateral
- Prolonged deep carotid palpation compresses and shrinks the IJ — avoid this
- Scout needle (22-gauge, 3 cm) first to locate vein, then introduce 18-gauge needle along same path
- Ultrasound: clearly distinguish IJ from carotid (IJ is compressible, larger, non-pulsatile)
Posterior approach note: The external jugular vein crosses the posterolateral SCM border and serves as a surface landmark. Puncture just at this crossing; advance needle under the belly of the SCM. Vein typically reached at 7 cm depth.
Right IJ preferred because it provides a straight anatomic path to the SVC and right atrium — advantageous for pacemaker wire insertion and CVP monitoring.
Failure rates:
- Junior practitioner (landmark technique): ~19.4%
- Experienced clinician: 5–10%
- Serious complications: ~1%
Approach 2: Subclavian Vein (SCV) — Infraclavicular vs. Supraclavicular
Infraclavicular approach (most common):
- Patient supine; place a small roll between the scapulae; head turned slightly contralateral
- Identify the junction of the medial and middle thirds of the clavicle
- Insert needle just inferior to the clavicle at this junction; advance parallel to the clavicle
- Aim toward the sternal notch
- Keep needle nearly parallel to clavicle — this avoids the subclavian artery (posterior) and lung (caudal)
- Vein usually encountered at 3–4 cm depth
Supraclavicular approach:
- Insert needle above the clavicle at the angle between the posterior SCM and the clavicle
- Aim toward the contralateral nipple at a shallow angle (~15°)
- Preferred during CPR (minimal interference with chest compressions)
- Can be performed in sitting/orthopneic patients
- Left SCV is preferred for pacemaker placement and CVP monitoring (more direct route to SVC)
Key point: The subclavian vein is non-compressible — if the artery is punctured, it cannot be controlled by direct pressure. This site carries the highest pneumothorax risk but the lowest infection and DVT risk for long-term catheters.
Approach 3: Femoral Vein
- Patient supine; leg slightly abducted and externally rotated
- Identify the femoral pulse — vein lies medial to the artery (NAVEL mnemonic)
- Insert needle 1–2 cm medial to femoral pulse, 1–2 cm below the inguinal ligament
- Advance at 30–45° angle, caudally, aspirating continuously
- Caution: >2 cm below the inguinal ligament — the artery may rotate over the vein; use ultrasound
- Contraindicated in ambulatory patients requiring central access (high DVT and infection risk)
Best use cases: Coagulopathic patients (artery is compressible), cardiac arrest, when neck/chest anatomy is inaccessible.
Part 3: Tunneled Catheter — Specific Technique
For hemodialysis and long-term access (Nephrology textbook):
- Micropuncture technique used — 18–22 gauge needle to minimize vein trauma (vs. standard 15-gauge)
- Fluoroscopy available; micropuncture wire inserted to SVC first
- Micropuncture dilator exchanges small wire for a standard guidewire
- Exit site selected inferior to the clavicle, sufficiently lateral to avoid catheter kink
- Subcutaneous tunnel created from the exit site to the venous entry site using a tunneling device
- Catheter (24–28 cm, double-lumen) attached to tunneling device and pulled through tunnel
- Catheter inserted over guidewire through the vein; for split-tip catheters, wire passes through both ports
- Fluoroscopy confirms tip at the SVC–RA junction; arterial port faces away from atrial wall
- All ports flushed with saline and locked with heparin; catheter hubs capped
Part 4: Ultrasound Guidance — Standard of Care
Real-time ultrasound is now strongly recommended (and mandated by many centers) for IJ cannulation, and increasingly for subclavian and femoral access.
Two scanning planes:
- Short axis (cross-sectional): Visualizes IJ and carotid side-by-side; confirms compressibility of vein
- Long axis: Needle visualized along its entire length — reduces inadvertent deep penetration
Subclavian ultrasound:
- Supraclavicular probe position: vessels seen in long axis (7.5–10 MHz transducer)
- Infraclavicular probe: vessels seen in cross-section; pleura visible as an echogenic sliding line deep to vessels
Confirmation steps with ultrasound:
- Confirm guidewire in vein (not artery) before dilation
- After catheter placement, confirm tip position in SVC (can use TEE in OR setting)
Summary Comparison Table
| Catheter Type | Access Site | Duration | Key Feature |
|---|---|---|---|
| Non-tunneled CVC | IJ / SCV / Femoral | Days–weeks | Bedside, immediate access |
| Tunneled CVC | IJ / SCV | Months–years | Dacron cuff, lowest infection for long-term |
| Implanted port | SCV / IJ | Years | Fully subcutaneous, lowest infection overall |
| PICC | Basilic/Cephalic → SVC | Weeks–months | No chest access needed, outpatient placement |
| Midline | Antecubital → Axillary | Days–weeks | Peripheral only, not for TPN/vasopressors |
Sources: Roberts and Hedges' Clinical Procedures in Emergency Medicine | Morgan and Mikhail's Clinical Anesthesiology, 7e | Comprehensive Clinical Nephrology, 7th Edition
This is a shared conversation. Sign in to Orris to start your own chat.