
5Give me a very detailed well explained contents for the topic light Microscopy and Tissue Preparation Covering each and every contents and concepts in step by step
Reading File
Now let me search the medical library for comprehensive content on light microscopy and tissue preparation.
Finding Sources
Finding Sources
Finding Sources
Finding Sources
Finding Sources
Finding Sources
Excellent - I found the primary histology textbooks. Let me now read the comprehensive content from both Histology textbooks.
Reading File
Reading File
Reading File
Reading File
Reading File
Reading File
Reading File
Reading File
I now have rich content from both textbooks. Let me fetch some key images to include in the answer.
Loading Image
Reading File
I now have comprehensive content from both major histology textbooks. Let me compile the detailed, well-structured answer.
Light Microscopy and Tissue Preparation - Complete Guide
Sources: Histology: A Text and Atlas with Correlated Cell and Molecular Biology (Ross & Pawlina); Junqueira's Basic Histology: Text and Atlas, 17e
PART 1: OVERVIEW AND INTRODUCTION TO HISTOLOGY
Histology (from Greek: histos = tissue; logia = science) is the scientific study of the microscopic structure of tissues and organs. It is also called microscopic anatomy. Modern histology is not merely descriptive - it incorporates aspects of molecular and cell biology to describe how cellular organization relates to function.
The central challenge students face is understanding how a two-dimensional (2D) image on a glass slide relates to the three-dimensional (3D) structure it came from. This is why understanding tissue preparation is as important as understanding the microscope itself.
PART 2: TISSUE PREPARATION - STEP BY STEP
The entire process of preparing a tissue for light microscopy involves the following sequential steps. This workflow converts living tissue into a stable, transparent, thin slice that can be examined under a microscope.
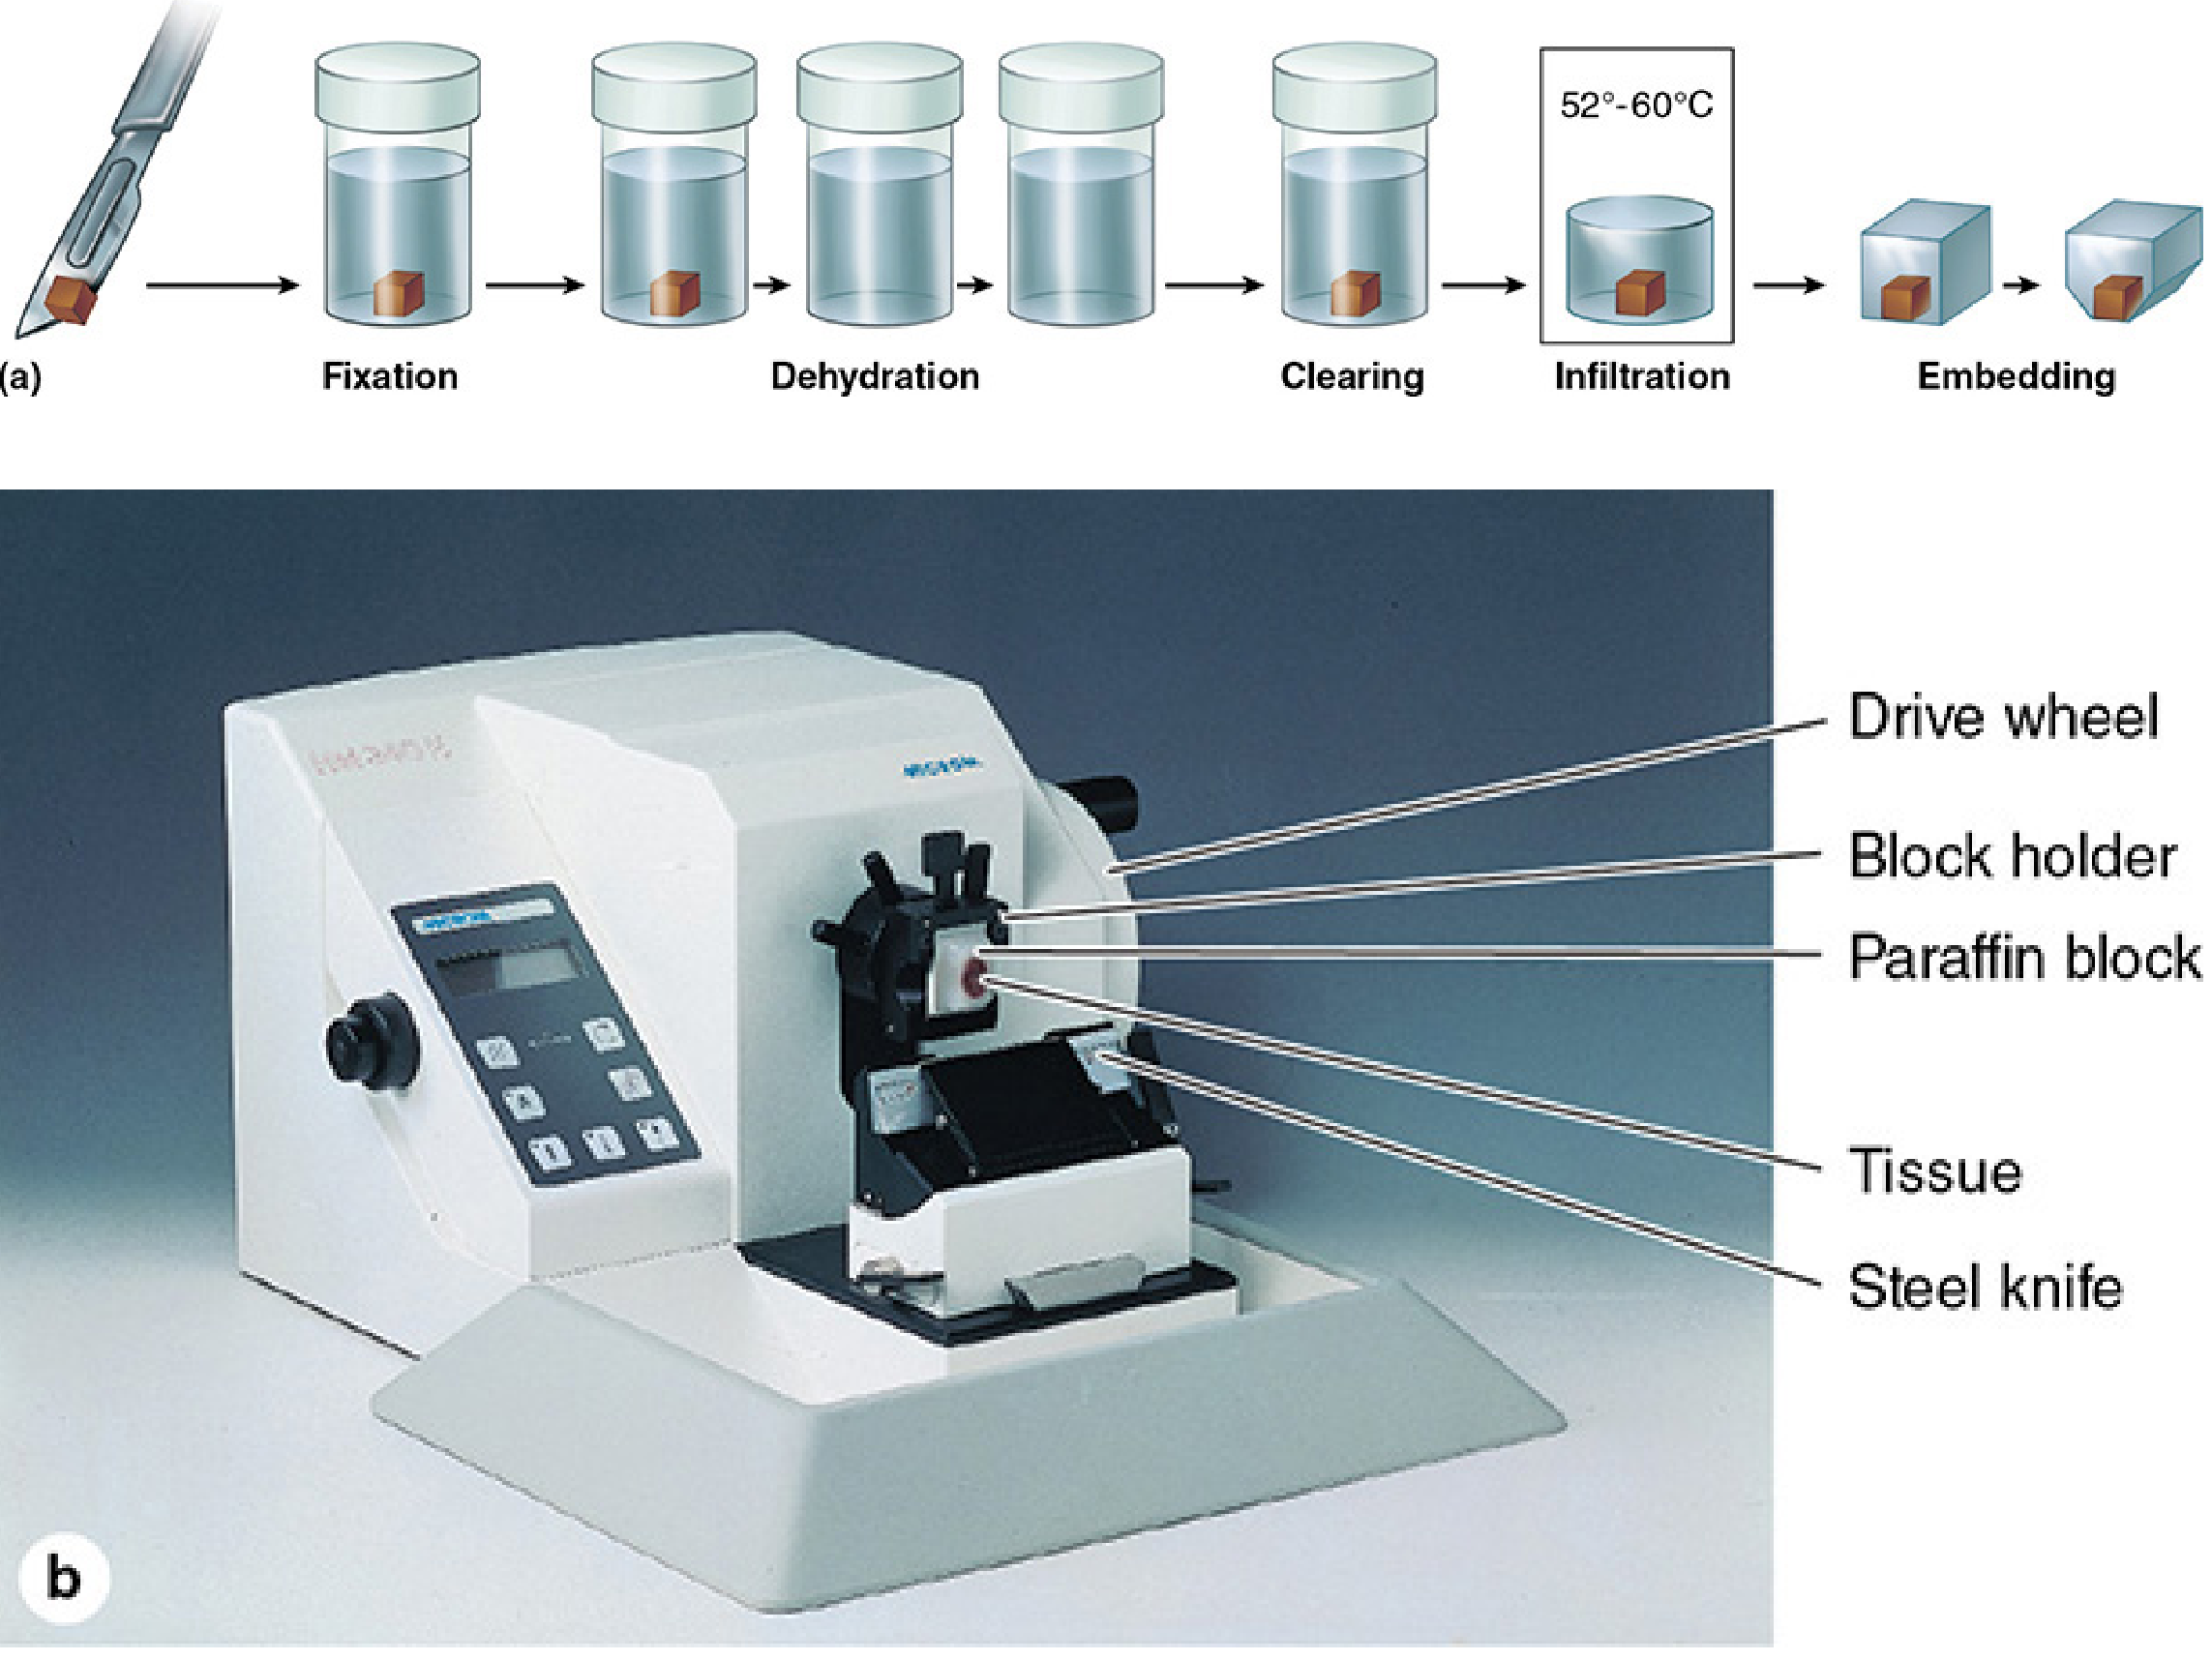
Figure: Steps in tissue preparation for light microscopy, from fixation through embedding, and the microtome used for sectioning (Junqueira's Basic Histology, 17e)
STEP 1: TISSUE SAMPLING / SPECIMEN COLLECTION
Before any processing, a piece of tissue must be obtained. This can be:
- A biopsy (small tissue sample removed during surgery or a medical procedure)
- An autopsy sample (from a post-mortem examination)
- An experimental animal tissue
Key principle: Tissue must be processed as quickly as possible after removal from the body. Without immediate intervention, autolysis (self-digestion by intracellular enzymes) and putrefaction begin immediately.
Organs are usually cut into small fragments before fixation. This is not random - small size is necessary so that fixative can fully diffuse through the tissue and reach all cells. For large organs, fixatives are introduced via blood vessels (vascular perfusion), allowing rapid fixation throughout.
STEP 2: FIXATION
Definition: Fixation is the process of preserving tissue structure and preventing degradation by placing tissue in chemical solutions called fixatives that stabilize or cross-link proteins and inactivate degradative enzymes and microorganisms.
Purpose of Fixation
- Prevents autolysis (enzymatic self-destruction of cells)
- Prevents putrefaction (bacterial decomposition)
- Stabilizes proteins, lipids, and carbohydrates in place
- Hardens tissue slightly, making it easier to handle and section
- Cross-links proteins to maintain structural integrity
The Most Common Fixative: Formalin
10% Neutral Buffered Formalin (NBF) - a buffered isotonic solution of 37% formaldehyde - is the most widely used fixative for routine light microscopy. It works by reacting with the amine groups (-NH2) of proteins, forming methylene bridges between adjacent protein chains (cross-linking). This prevents proteolysis and preserves cell architecture.
- Formalin is inexpensive, penetrates tissue readily, and gives good morphological preservation
- It does NOT preserve lipids well (lipids are lost during subsequent dehydration and clearing steps in organic solvents)
- Fixation time: typically a few hours to overnight for small biopsies
Other Fixatives
| Fixative | Primary Use | Mechanism |
|---|---|---|
| Glutaraldehyde | Electron microscopy | Cross-links proteins; more complete fixation than formalin |
| Osmium tetroxide | Electron microscopy (lipids) | Preserves AND stains cellular lipids and membranes |
| Bouin's fluid | Gynecologic tissues, small biopsies | Picric acid + formalin + acetic acid; good nuclear detail |
| Carnoy's fluid | Glycogen preservation | Alcohol-based; immediate fixation |
| Zenker's fluid | Cytologic detail | Heavy metal-based |
For electron microscopy, glutaraldehyde-treated tissue is then immersed further in buffered osmium tetroxide, which preserves and stains cellular lipids along with proteins, providing the "ultrastructural" detail required.
Clinical Tip - Formalin & Biopsy Time: Tissue fixation in formalin for longer than 24 hours will likely reduce the yield of high-molecular-weight nucleic acid, which matters for molecular diagnostic tests performed on pathology specimens. (Henry's Clinical Diagnosis and Management by Laboratory Methods)
STEP 3: DEHYDRATION
After fixation, tissue contains water. Most embedding media (especially paraffin) are not miscible with water, so the water must be completely removed before embedding.
Process:
- Tissue is placed in a graded series of ethanol (alcohol) solutions of increasing concentration: 50% → 70% → 80% → 90% → 95% → 100% (absolute alcohol)
- Each step gradually removes more water from the tissue
- The tissue ends in 100% anhydrous ethanol, which removes essentially all water
- The series is graded to prevent osmotic shock and distortion of tissue architecture
Why graded? If tissue is placed directly into absolute alcohol, the sudden osmotic shift would cause severe cell shrinkage and distortion. A step-by-step increase minimizes this artifact.
STEP 4: CLEARING
After dehydration, the tissue is in 100% ethanol. Paraffin is not miscible with ethanol, so a transitional solvent is needed.
Clearing agents are organic solvents that are miscible with both alcohol and paraffin. Common clearing agents include:
- Xylene (xylol) - most common
- Toluene
- Chloroform
- Cedarwood oil
The clearing agent replaces the ethanol in the tissue. Importantly, as it infiltrates the tissue, it gives the tissue a translucent or "clear" appearance - hence the name "clearing." This transparency indicates complete removal of ethanol.
Note: Clearing agents also dissolve lipids, which is why lipid-rich structures are lost in routine H&E preparation.
STEP 5: INFILTRATION (IMPREGNATION)
The cleared tissue is placed in melted paraffin in an oven at 52-60°C. This temperature:
- Keeps paraffin in liquid form
- Evaporates the clearing solvent (e.g., xylene)
- Allows gradual infiltration of paraffin into the tissue spaces
Paraffin slowly fills all spaces previously occupied by water, alcohol, and clearing agent. Complete infiltration ensures the tissue will be supported uniformly during sectioning.
For electron microscopy, the infiltrating medium is epoxy resin (e.g., Epon, Araldite) rather than paraffin. Plastic embedding avoids the higher temperatures needed with paraffin, helping avoid tissue distortion.
STEP 6: EMBEDDING
After full infiltration, the tissue is placed in a small mold with fresh melted paraffin and allowed to cool and harden at room temperature. This creates a solid paraffin block with the tissue at its center, oriented correctly for sectioning.
Good orientation during embedding is critical - for example, a tubular structure should be embedded so it can be cut in either cross-section or longitudinal section as required.
STEP 7: SECTIONING (MICROTOMY)
The hardened paraffin block is trimmed to expose the tissue, then mounted in a precision instrument called a microtome for cutting thin sections.
The Microtome
A microtome (shown above in the figure) is a precision cutting instrument that:
- Holds the paraffin block in a block holder
- Has a sharp steel knife (or disposable steel blade)
- Advances the tissue block by a precisely controlled distance (typically 1-10 μm per step) each turn of the drive wheel
- Cuts a uniform thin section of tissue at each pass
Section thickness for light microscopy: typically 3-10 micrometers (μm). To put this in context, 1 μm = 1/1000 mm. Human red blood cells are approximately 7-8 μm in diameter.
After cutting, the sections (which curl off the knife as a "ribbon") are:
- Floated on a warm water bath to flatten and unfold
- Picked up on a glass slide
- Allowed to dry and adhere to the slide
- Placed in an oven to ensure firm adhesion and melt away any residual paraffin
For electron microscopy: An ultramicrotome with a glass or diamond knife cuts sections less than 1 μm thick (usually 50-100 nm) from resin-embedded tissue.
STEP 8: DEPARAFFINIZATION AND REHYDRATION
Before staining, the paraffin must be removed and the tissue rehydrated because most stains are water-based solutions that cannot penetrate paraffin.
Steps:
- Deparaffinization - sections are dipped in xylene to dissolve the paraffin
- Rehydration - sections are passed back through graded ethanol series (100% → 95% → 90% → 70% → water), the reverse of dehydration
- Tissue is now ready for aqueous staining solutions
STEP 9: STAINING
Unstained tissue sections are nearly colorless and transparent. Staining introduces colored compounds that differentially bind to tissue components, creating the contrast needed to distinguish structures.
The Standard Stain: Hematoxylin and Eosin (H&E)
H&E is the most widely used stain in histology and surgical pathology. Nearly all student slide sets and the majority of photomicrographs in histology textbooks use H&E-stained sections.
Hematoxylin (a basic dye):
- Derived from the logwood tree Haematoxylin campechianum
- Binds to acidic (negatively charged) tissue components - primarily nucleic acids (DNA in chromatin, RNA in nucleoli and ribosomes)
- Stains these structures blue to purple (basophilic)
- Structures that stain with basic dyes are called basophilic
Eosin (an acidic dye):
- Binds to basic (positively charged) tissue components - primarily proteins (cytoplasm, extracellular fibers)
- Stains these structures pink to red (eosinophilic / acidophilic)
- Structures that stain with acidic dyes are called eosinophilic or acidophilic
What you see in H&E:
| Structure | H&E Color | Reason |
|---|---|---|
| Cell nucleus (chromatin) | Purple/blue | DNA and histones are basophilic |
| Nucleolus | Dark blue/purple | rRNA is strongly basophilic |
| Cytoplasm (general) | Pink | Cytoplasmic proteins are eosinophilic |
| Muscle fibers | Deep pink/red | Abundant myosin/actin proteins |
| Collagen fibers | Pink | Abundant basic amino groups |
| Red blood cells | Bright red/orange | Hemoglobin is strongly eosinophilic |
| Bone matrix | Pink | Mineralized collagenous matrix |
| Cartilage matrix | Purple/blue-gray | Sulfated glycosaminoglycans are basophilic |
The Ionic Basis of Staining
The primary chemical interaction between dyes and tissue is electrostatic:
- Basic dyes (like hematoxylin) carry a net positive charge and bind to negatively charged tissue components (phosphate groups of nucleic acids, sulfate groups of glycosaminoglycans)
- Acidic dyes (like eosin) carry a net negative charge and bind to positively charged tissue components (amino groups of proteins)
Basophilic structures include:
- Heterochromatin and nucleoli (ionized phosphate groups in nucleic acids)
- Ergastoplasm (rough ER) due to ionized phosphate groups in ribosomal RNA
- Extracellular cartilage matrix (ionized sulfate groups of glycosaminoglycans)
Acidophilic structures include:
- Most cytoplasmic filaments (especially muscle cell myofibrils)
- Most intracellular membranous components and cytoplasm
- Most extracellular fibers (primarily due to ionized amino groups)
STEP 10: COVERSLIPPING (MOUNTING)
After staining, the slide is dehydrated again (to remove water-based stain background), cleared in xylene, and a thin glass coverslip is applied on top with a clear, refractive-index-matched adhesive (mounting medium). This:
- Protects the stained tissue from mechanical damage
- Prevents drying and oxidation
- Provides a flat, optically clear surface for microscopic observation
Total time from fixation to observation: 12 hours to 2.5 days, depending on tissue size, embedding medium, and staining method.
PART 3: SPECIAL TISSUE PREPARATION METHODS
A. Frozen Sections
In surgical pathology, results are sometimes needed during an operation before the patient is closed (e.g., to check if a tumor margin is clear). The standard paraffin process takes too long.
Cryostat technique:
- Fresh tissue (not chemically fixed, or briefly fixed) is placed on a metal chuck
- Rapidly frozen in liquid nitrogen or dry ice - this simultaneously preserves cell structure AND makes the tissue hard enough to section
- Placed in a cryostat - a microtome housed inside a freezer cabinet maintained at -20°C to -30°C
- Sections are cut, placed on slides, briefly fixed (often in cold acetone), and stained rapidly
- Results are available within 10-30 minutes
Frozen sections preserve lipids (useful for demonstrating fat with Sudan dyes) and some antigens better than formalin/paraffin processing, but morphological quality is slightly inferior to routine paraffin sections. (Junqueira's Basic Histology, 17e)
B. Plastic (Resin) Embedding
Used when:
- Very thin sections are needed (for electron microscopy)
- Better morphological preservation is required at high resolution
- Hard tissues like bone or teeth are studied
Common resins: Epon, Araldite, Spurr's resin, LR White
Advantages over paraffin:
- Sections can be cut 0.5-1 μm thick ("semi-thin" or "survey" sections) and stained with toluidine blue for superior light microscopy detail
- Avoids high temperatures needed for paraffin (less distortion)
- Essential for transmission electron microscopy (sections <100 nm)
PART 4: SPECIAL STAINING PROCEDURES
A. Periodic Acid-Schiff (PAS) Reaction
What it stains: Polysaccharides, glycoproteins, glycolipids, basement membranes - any tissue component rich in carbohydrate (sugar) groups.
Mechanism:
- Periodic acid oxidizes the C-C bonds of adjacent hydroxyl groups (-OH) in hexose sugars, generating aldehyde groups
- The Schiff reagent (bleached basic fuchsin) reacts with these aldehydes to form a distinctive magenta/purple-red color
Uses:
- Demonstrating glycogen in hepatocytes and muscle cells
- Identifying mucus in goblet cells and mucous glands
- Highlighting basement membranes beneath epithelia (important in renal pathology)
- Identifying reticular fibers in connective tissue
- Detecting fungal cell walls in infections
The Feulgen Reaction: A modification of PAS that specifically stains DNA by using mild hydrolysis (1N HCl at 60°C) to selectively expose deoxyribose aldehydes. Used to quantify DNA content by microspectrophotometry.
B. Masson's Trichrome
What it stains: Collagen fibers (blue or green) vs. muscle (red). Used to assess fibrosis.
C. Gomori Reticulin Stain (Silver Impregnation)
What it stains: Reticular (type III collagen) fibers appear black against pale pink background.
Mechanism: Silver ions deposit on reticular fibers. Used for liver architecture, lymph node framework, tumors.
D. Mallory Stain (Aniline Blue)
Uses three acidic dyes:
- Aniline blue → stains collagen
- Acid fuchsin → stains ordinary cytoplasm and nuclei
- Orange G → stains red blood cells
E. Sudan Dyes (Lipid Stains)
- Sudan III, Sudan IV, Sudan Black B, Oil Red O
- Lipid-soluble dyes that dissolve in tissue lipids → stain fat droplets orange-red to black
- Requires frozen sections (paraffin processing dissolves lipids)
- Used to diagnose metabolic diseases with intracellular lipid accumulation
F. Metachromatic Staining
Some basic dyes (notably toluidine blue and crystal violet) change color when binding to certain tissue components. This "color shift" from blue to purple or red is called metachromasia.
Mechanism: When polyanions (sulfated or phosphorylated) in tissue concentrate dye molecules close enough together, dye molecules form dimeric or polymeric aggregates with different light absorption than individual molecules.
Metachromatic structures:
- Cartilage matrix (sulfated glycosaminoglycans) → purple-red with toluidine blue
- Mast cell granules (heparin) → purple-red
- Rough ER of plasma cells → purple-red
G. Immunocytochemistry (Immunohistochemistry, IHC)
This is one of the most powerful tools in modern histopathology and research.
Principle: Uses specific antibodies to detect and localize proteins, peptides, or other antigens within tissue sections with very high specificity.
Steps (basic direct and indirect methods):
- Tissue section is deparaffinized and rehydrated
- Antigen retrieval - heat or enzyme treatment to unmask antigens that were cross-linked by formalin fixation
- Blocking of non-specific binding sites
- Application of primary antibody (specific for the antigen of interest)
- In the indirect method: application of secondary antibody conjugated to an enzyme (e.g., peroxidase or alkaline phosphatase) or fluorescent dye
- Visualization: enzyme converts a colorless substrate into a visible colored precipitate (brown DAB product for peroxidase), or fluorescence is directly viewed
Applications:
- Identifying tumor type (e.g., cytokeratin for carcinoma, CD20 for B-cell lymphoma)
- Detecting hormone receptors (ER/PR in breast cancer)
- Identifying infectious agents (viral antigens, bacteria)
- Localizing intracellular proteins in research
PART 5: LIGHT MICROSCOPY - THE INSTRUMENT AND ITS PRINCIPLES
A. The Compound Bright-Field Microscope
The bright-field microscope is the standard instrument used in histology. It uses ordinary (white) light transmitted through the stained tissue section.
Components and Their Functions
Illumination System:
- Light source - typically a tungsten-halogen or LED lamp providing bright, even illumination
- Condenser - a lens beneath the stage that collects and focuses light from the lamp onto the specimen; the condenser's numerical aperture (NA) affects both resolution and contrast
Magnification System (Optical Train):
- Objective lens - the most important lens; sits close to the specimen and provides primary magnification and resolution. Available in multiple magnifications:
- 4x (scanning) - used for overview
- 10x (low power) - general survey
- 20x (medium power) - detailed survey
- 40x (high power) - cellular detail
- 100x (oil immersion) - fine cellular detail (requires immersion oil to maximize NA)
- Eyepiece (ocular) - typically 10x, further magnifies the image from the objective; the observer looks through this
Total magnification = objective power × eyepiece power
(e.g., 40x objective × 10x eyepiece = 400x total magnification)
Resolution and Numerical Aperture
Resolution is the ability to distinguish two closely spaced objects as separate points. It is the most important optical property of a microscope (more important than magnification alone - "empty magnification" increases size but not detail).
Resolving power of the unaided eye: approximately 0.1 mm (100 μm) - two objects must be at least this far apart to be seen as separate.
Resolving power of a light microscope: approximately 0.2 μm (200 nm) at best - about 500 times better than the naked eye.
Resolution is determined by:
- Wavelength (λ) of light used (shorter wavelength = better resolution; visible light ranges 400-700 nm)
- Numerical aperture (NA) of the objective lens - a dimensionless number expressing the light-gathering ability: NA = n × sin(θ), where n = refractive index of medium between lens and specimen, θ = half-angle of the cone of light collected
Resolution formula: d = λ / (2 × NA), where d = minimum resolvable distance
This is why oil immersion objectives (100x) use immersion oil (refractive index ~1.515, similar to glass) instead of air (refractive index 1.0) - it increases NA and therefore improves resolution.
B. Phase-Contrast Microscopy
Principle: Converts differences in refractive index (and thus light phase shifts) between cellular structures into differences in brightness/contrast.
Advantage: Allows observation of living, unstained cells in culture. Structures that are nearly invisible in bright-field microscopy (like organelles in living cells, cell division in real-time) become visible as bright or dark halos.
Mechanism:
- Light passing through dense cellular structures is slowed (phase-shifted) compared to light through the surrounding medium
- The phase-contrast microscope contains special optical elements (an annular ring in the condenser and a phase plate in the objective) that convert this phase difference into amplitude (brightness) differences visible to the eye
Uses: Observing live cells in culture, studying cell motility and division, examining unstained bacteria.
C. Fluorescence Microscopy
Principle: Uses ultraviolet (UV) or short-wavelength visible light to excite fluorescent molecules (fluorophores) within tissue. These excited molecules then emit light at a longer wavelength (lower energy), which is detected.
Types of fluorescence:
- Autofluorescence - some tissue structures fluoresce naturally (e.g., elastin, collagen, porphyrins)
- Fluorescent dyes - DAPI (stains DNA blue), propidium iodide (red DNA stain), FITC (green), rhodamine (red)
- Immunofluorescence - antibodies conjugated to fluorophores detect specific proteins
- GFP (Green Fluorescent Protein) - genetically encoded fluorescent tags enable visualization of proteins in living cells
Applications: Immunofluorescence in clinical pathology (e.g., identifying immune deposits in kidney biopsies), localization of intracellular proteins, live-cell imaging.
D. Confocal Scanning Laser Microscopy (CSLM)
The standard light microscope collects light from the entire depth of a section simultaneously, causing out-of-focus blur. Confocal microscopy eliminates this problem.
Principle:
- A laser beam is focused to a very small, single point in the specimen (rather than illuminating the whole field at once)
- A pinhole in front of the detector blocks light from above and below the focal plane - only light from the exact focal point passes through
- The laser scans the specimen systematically to build an image
- The computer assembles the data into an "optical section" - a sharp image of a single thin plane
Advantage: By collecting optical sections at multiple focal planes through the specimen, a full 3D reconstruction of the tissue can be made. This gives unsurpassed morphological information without physical sectioning. Extremely useful for thick specimens, tissue clearing, and 3D imaging of intact organs.
E. Polarizing Microscopy
Principle: Two polarizing filters are placed in the light path - one below the specimen (the polarizer) and one above (the analyzer), with their planes of polarization at 90° to each other. When no specimen is present, no light passes through (dark field).
Birefringence: Certain substances with highly organized, repetitive molecular structure (crystalline materials, or oriented macromolecules) can rotate the plane of polarized light. These birefringent materials appear as bright objects against the dark background.
Birefringent structures in tissue:
- Collagen fibers (appear bright yellow-orange with sirius red staining)
- Myosin filaments (A bands of striated muscle)
- Microtubules of mitotic spindle
- Actin filaments
- Cellulose (plant cell walls)
- Calcium oxalate crystals and urate crystals (gout diagnosis)
- Amyloid (apple-green birefringence with Congo red staining)
Clinical use: Identifying urate crystals in synovial fluid (gout), amyloid deposits in tissue, and assessing collagen orientation.
F. Nomarski (Differential Interference Contrast, DIC) Microscopy
Principle: Uses polarized light split by a prism into two beams traveling slightly different paths through the specimen. Recombined beams generate interference patterns that highlight differences in refractive index.
Result: Produces a pseudo-3D, shadow-cast image of unstained living cells with excellent surface detail and no halos (unlike phase-contrast). Excellent for observing cell surface features, chromosome morphology, and thick specimens.
PART 6: SUPER-RESOLUTION MICROSCOPY
A major limitation of conventional light microscopy is the diffraction limit - structures closer together than ~200 nm cannot be resolved as separate (Abbe's diffraction limit). Super-resolution techniques break this barrier.
A. STED (Stimulated Emission Depletion) Microscopy
- Uses two lasers: an excitation laser (creates a fluorescent spot) and a donut-shaped depletion laser (suppresses fluorescence except at the very center)
- Effectively reduces the fluorescent spot to a nanometer-scale point
- Resolution: 30-80 nm
B. STORM / PALM (Single-Molecule Localization Microscopy)
- Uses photoswitchable fluorophores that can be individually activated and then imaged
- By localizing the precise center of each single molecule's emission over many acquisition cycles, a super-resolution image is built
- Resolution: 20-30 nm
C. SIM (Structured Illumination Microscopy)
- Uses patterned (grid-like) illumination rather than uniform illumination
- Mathematical processing of multiple images taken at different pattern orientations reveals information about structures below the diffraction limit
- Resolution approximately 2x better than conventional (~100 nm)
PART 7: EXPANSION MICROSCOPY (ExM)
A revolutionary technique that physically expands the tissue specimen itself rather than relying solely on optical improvements.
Process:
- Tissue is embedded in a swellable polyacrylate polymer (like a contact lens material)
- Proteins are anchored to the polymer network
- The specimen is treated to break protein cross-links
- The polymer network absorbs water and expands uniformly - typically 4-4.5x linear expansion (equivalent to a 4.5x improvement in resolution)
- The expanded, optically transparent specimen is imaged with a conventional fluorescence microscope
Result: Structures that were too close together to resolve are now physically pulled apart and can be visualized with standard optics. Linear expansion of 4.5x gives resolution of ~60-70 nm with a conventional microscope.
Iterative ExM (iExM): Two rounds of expansion can expand specimens up to 20 times, achieving ~25 nm resolution with conventional fluorescence microscopy.
Expansion Pathology (ExPath): Protocols have been adapted to work on routine H&E slides from surgical pathology archives, converting standard paraffin sections into ExM-compatible preparations. This allows optical microscopy to diagnose conditions that previously required electron microscopy.
PART 8: ELECTRON MICROSCOPY (EM) - For Comparison
While not "light" microscopy, EM is closely related and understanding it helps place light microscopy in context.
Primary advantage: The wavelength of an electron beam is approximately 1/2000th that of visible light, increasing resolution by a factor of 1000.
Resolution of EM: ~0.2 nm (vs. 200 nm for light microscopy)
Transmission Electron Microscopy (TEM)
- Analogous to bright-field light microscopy but uses electrons instead of light
- Sections must be ultra-thin (50-100 nm) cut with glass or diamond knives on an ultramicrotome
- Heavy metals (osmium, uranium, lead) are used as "stains" because electrons interact with electron-dense atoms
- Image formed by differential electron transmission through the specimen
Scanning Electron Microscopy (SEM)
- Images the surface of specimens
- Specimens are coated with a thin layer of metal
- An electron beam scans the surface and secondary electrons emitted are detected
- Produces dramatic 3D surface images
- Resolution ~3-20 nm
Tissue Preparation for EM vs. Light Microscopy
| Step | Light Microscopy | Electron Microscopy |
|---|---|---|
| Fixative | 10% Formalin | Glutaraldehyde + Osmium tetroxide |
| Embedding | Paraffin | Epoxy resin (Epon, Araldite) |
| Sectioning | Microtome, steel blade, 3-10 μm | Ultramicrotome, glass/diamond blade, 50-100 nm |
| Section support | Glass slide | Copper grid |
| "Staining" | Hematoxylin & Eosin (aqueous dyes) | Uranium acetate + Lead citrate (heavy metals) |
| Observation | Transmitted light | Transmitted electrons (TEM) or secondary electrons (SEM) |
PART 9: VIRTUAL MICROSCOPY
Modern histology education increasingly uses virtual microscopy - the conversion of stained tissue preparations into high-resolution digital images that can be viewed on a computer, tablet, or mobile device.
Process:
- A whole slide scanner photographs a stained glass slide at high magnification in a grid pattern
- The images are stitched together computationally into a single very large file
- Software allows virtual "navigation" of the slide at any magnification
Advantages:
- Students can access slides from anywhere, any time
- No physical slide damage or breakage
- Multiple users can view the same slide simultaneously
- Annotation and teaching features available
- Integrated with digital pathology and AI-based diagnostic tools
PART 10: SUMMARY TABLE - KEY CONCEPTS AT A GLANCE
| Concept | Key Facts |
|---|---|
| Hematoxylin | Basic dye, stains acidic structures (nucleus, RER) - purple/blue |
| Eosin | Acidic dye, stains basic structures (cytoplasm, collagen) - pink/red |
| Formalin fixation | 10% NBF, cross-links proteins via amine groups, standard routine fixative |
| Dehydration | Graded ethanol series, removes water for paraffin infiltration |
| Clearing | Xylene or toluene - bridges alcohol and paraffin |
| Paraffin embedding | 52-60°C infiltration, allows microtome sectioning at 3-10 μm |
| Frozen sections | Rapid (<30 min) intraoperative diagnosis, cryostat, preserves lipids |
| PAS reaction | Stains carbohydrates and glycoproteins magenta (periodic acid + Schiff reagent) |
| Metachromasia | Color shift (blue → purple/red) with toluidine blue; shows sulfated polyanions |
| Resolution (LM) | ~0.2 μm; governed by wavelength and numerical aperture |
| Phase contrast | Visualizes living unstained cells by converting phase shifts to contrast |
| Fluorescence | UV excitation; used for immunofluorescence, live cell imaging |
| Confocal | Pinhole + laser scan = optical sectioning + 3D reconstruction |
| Polarizing | Detects birefringent structures (collagen, amyloid, urate crystals) |
| STED | Super-resolution; 30-80 nm using depletion laser |
| Expansion microscopy | Physical expansion of specimen; 60-70 nm resolution with conventional optics |
| TEM | Electron beam; resolution 0.2 nm; glutaraldehyde + osmium fixation; resin embedding |
Sources: Histology: A Text and Atlas With Correlated Cell and Molecular Biology (Ross & Pawlina, 9e); Junqueira's Basic Histology: Text and Atlas, 17e. Both are comprehensive authoritative references for all concepts above.
This is a shared conversation. Sign in to Orris to start your own chat.