TRANSFER TECHNIQUE HOW TO DO PROPERLY WITH ASSESSMENT
Reading File
Finding Sources
Finding Sources
Finding Sources
Finding Sources
Finding Sources
Searching Images
patient transfer technique bed to wheelchair nursing
Loading Image
Loading Image
Here is a comprehensive guide on Transfer Techniques — how to perform them properly, with the full pre-transfer assessment.
Patient Transfer Technique: Proper Procedure & Assessment
PART 1: PRE-TRANSFER ASSESSMENT
Before any transfer, a thorough assessment must be completed. This determines the safest method and level of assistance needed.
1. Assess the Patient
| Assessment Area | Key Questions |
|---|---|
| Cognition | Can the patient understand and follow instructions? Is there confusion, dementia, or altered LOC? |
| Weight-bearing status | Full weight-bearing (FWB), partial (PWB), non-weight-bearing (NWB)? |
| Muscle strength | Upper and lower extremity strength — can they push up or support themselves? |
| Balance | Sitting balance (poor/fair/good)? Standing balance? |
| Pain | Any pain that limits movement? Location, severity (0–10 scale)? |
| Skin integrity | Presence of wounds, pressure injuries, drains, or fragile skin that may be disrupted? |
| Lines and tubes | IV lines, urinary catheters, oxygen, drainage tubes — secure before transfer |
| Orthostatic hypotension | Dangling the patient first (sitting at edge of bed) before standing — watch for dizziness |
| History of falls | Fall risk score (e.g., Morse Fall Scale); note previous transfer-related incidents |
| Dominant side | For hemiplegic/hemiparetic patients — which side is stronger? |
| Fear/Anxiety | Patient confidence and cooperation level |
2. Assess the Environment
- Clear the path — remove obstacles, furniture, cords
- Bed height — adjust to the correct height (hips level or slightly lower than knee height of the nurse when standing)
- Locks engaged — lock wheels on the bed AND wheelchair/commode/stretcher
- Footrests removed — on wheelchair, swing away or remove footrests
- Non-slip footwear — patient wearing shoes or non-slip socks
3. Assess Equipment Needs
| Level of Dependence | Recommended Equipment |
|---|---|
| Independent | No assist needed; standby for safety |
| Minimal assist (< 25% help) | Gait belt, 1 caregiver |
| Moderate assist (25–50%) | Gait belt + 2 caregivers, or assistive device |
| Maximum assist (50–75%) | Mechanical lift (sit-to-stand), 2 caregivers |
| Total dependence / non-cooperative | Full-body mechanical/hydraulic lift + sling |
PART 2: TYPES OF TRANSFERS
A. Assisted Stand-Pivot Transfer (Most Common)
Indications: Patient has some weight-bearing capacity and can follow directions.
Steps:
- Explain the procedure to the patient — gain informed consent and cooperation
- Position the wheelchair at a 30–45° angle to the bed, on the patient's stronger side; lock wheels, remove footrests
- Raise the bed to a position where patient's feet are flat on the floor when sitting at the edge
- Dangle the patient — assist to sitting position at the edge of the bed; wait 1–2 minutes, assess for dizziness or orthostatic hypotension
- Apply a gait belt around the patient's waist (over clothing, snug — you should fit 2 fingers under the belt)
- Instruct the patient to place feet flat on the floor, shoulder-width apart; lean forward ("nose over toes") to shift weight
- Position yourself — stand slightly to the side and in front, with your knees bent, back straight, one foot forward (wide base of support)
- Grasp the gait belt from underneath with both hands (never grab the patient's arms or clothing)
- On count of three — patient pushes up from the bed, caregiver lifts using legs (not back)
- Pivot together — patient pivots feet toward the wheelchair; caregiver pivots simultaneously
- Lower the patient — instruct patient to reach back and feel the seat, then lower slowly; caregiver bends knees to lower
- Position in wheelchair — ensure hips are back, feet on footrests, arms on armrests
B. Sliding Board (Lateral Transfer)
Indications: Non-weight-bearing patients who have good arm strength (e.g., spinal cord injury, amputees).
Steps:
- Position both surfaces at the same height; lock all wheels
- Remove armrest closest to destination
- Patient leans away from board; slide the board under the thigh (not under the ischium)
- Patient places one hand on the board and one hand on the destination surface
- Patient performs a series of push-ups and lateral scoots across the board
- Remove board once transfer is complete
C. Mechanical/Hydraulic Lift Transfer
Indications: Total dependence, morbid obesity, uncooperative patients, safety concerns, caregiver injury prevention.
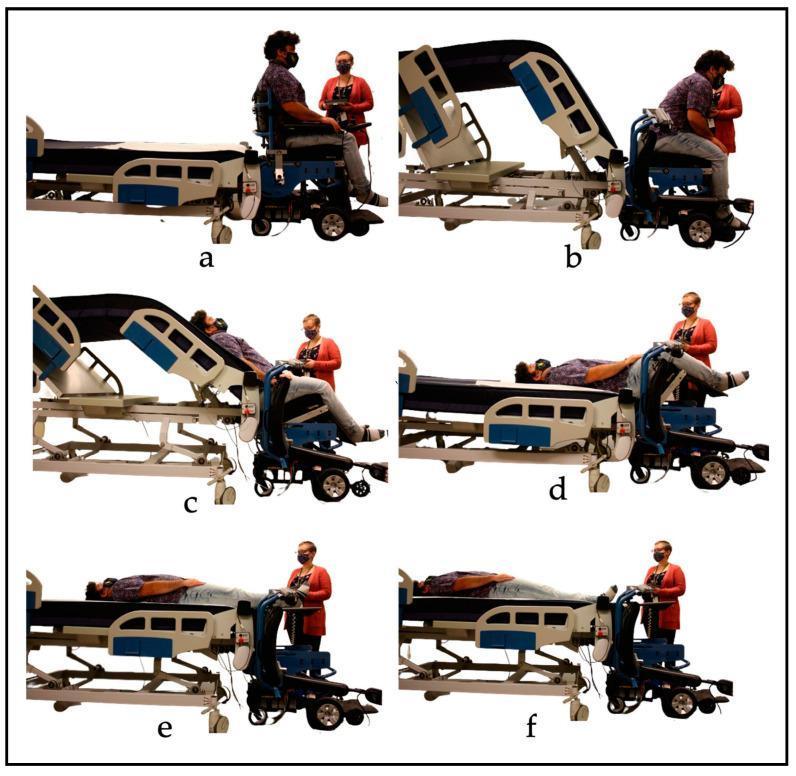
Powered Patient Transfer System — 6 stages (a–f): wheelchair to bed transfer with synchronized controls and conveyor sheet
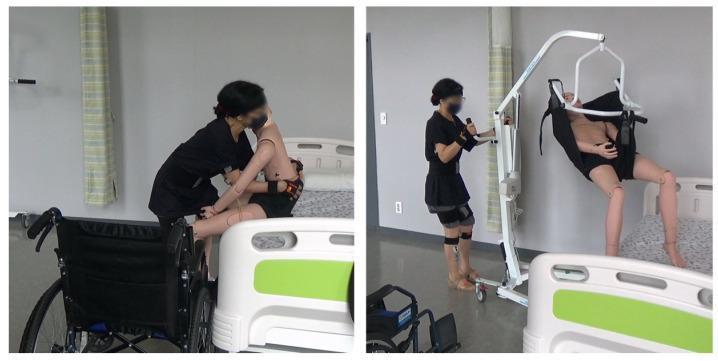
Manual transfer (left) vs. mechanical lift (right): note neutral caregiver posture with mechanical lift, reducing musculoskeletal injury risk
Steps:
- Select the correct sling size — check manufacturer's guidelines
- Roll patient to insert sling — ensure sling is centered under patient's body (from shoulders to thighs)
- Attach sling loops to lift hooks — shorter loops for head, longer loops for legs
- Raise the lift slightly — check all attachments before fully lifting
- Raise patient fully, ensuring comfort and stability
- Roll lift to destination; lower patient slowly
- Remove sling after proper positioning; document
D. Two-Person Lift / Logroll Transfer (Supine to Supine — Stretcher)
Indications: Spinal precautions, unconscious patients, ICU transfers.
Steps:
- Three or more staff positioned on the same side of the patient
- Use a slide sheet/draw sheet under the patient
- On count, all staff roll/lift and slide patient simultaneously
- Maintain spinal alignment throughout (especially head-neck-spine)
- For spinal injury: one person dedicated to manual in-line stabilization of the head
PART 3: BODY MECHANICS FOR CAREGIVERS
| Principle | Action |
|---|---|
| Wide base of support | Feet shoulder-width apart, one foot forward |
| Low center of gravity | Bend at the knees, not the waist |
| Neutral spine | Keep back straight; avoid twisting |
| Keep load close | Patient close to your body before lifting |
| Pivot, don't twist | Turn feet, not the torso |
| Communicate | Always use a count ("1, 2, 3 — lift") |
PART 4: POST-TRANSFER ASSESSMENT
After the transfer is completed:
- Check patient positioning — correct alignment, no pressure on bony prominences
- Reassess vital signs if applicable (especially after first mobilization post-surgery or bed rest)
- Check all lines and tubes — confirm nothing was dislodged
- Ask about pain or discomfort — 0–10 pain scale
- Observe skin at friction contact points
- Document — method used, number of caregivers, patient tolerance, any adverse events
KEY SAFETY PRINCIPLES
- Never transfer alone if there is any doubt about patient stability
- Never lift by the arms of a patient — risk of shoulder dislocation
- Always use a gait belt for stand-pivot transfers
- Never rush — take time to communicate and set up properly
- Know your ergonomic limits — if the patient is too heavy for manual transfer, use equipment
- Reassess before every transfer — patient condition can change
The safest transfers are achieved through thorough pre-assessment, proper equipment selection, good body mechanics, and clear communication with the patient and team.
STEP STEP ASSESS ASIA SCALLE
Reading File
Finding Sources
Finding Sources
Searching Images
ASIA impairment scale spinal cord injury neurological classification worksheet
Reading File
Loading Image
Loading Image
Reading File
Reading File
Reading File
Now I have all the information needed for a comprehensive, step-by-step ASIA scale assessment guide.
ASIA Impairment Scale (AIS) — Step-by-Step Assessment
Full name: International Standards for Neurological Classification of Spinal Cord Injury (ISNCSCI)
Developed by: American Spinal Injury Association (ASIA) & ISCOS
Best timing: Complete within 72 hours of injury
THE ISNCSCI WORKSHEET
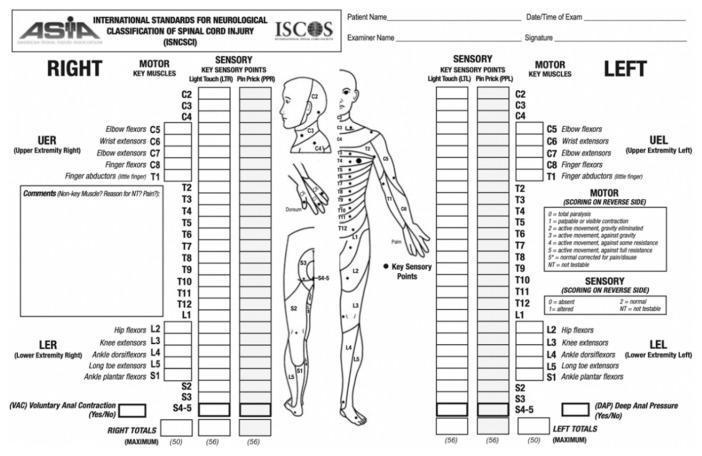
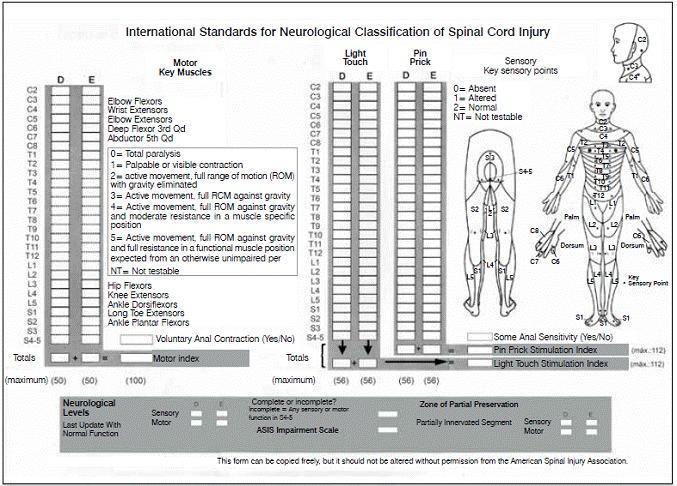
The official ISNCSCI worksheet: motor key muscles (left/right), sensory key points (light touch + pin prick), dermatome map, and scoring totals
BEFORE YOU BEGIN — PREPARATION
- Position patient supine for testing (standard position)
- Explain each test to the patient before performing it
- Test right and left sides independently
- Record results directly on the ISNCSCI worksheet
- Mark NT (Not Testable) if a limb is immobilized, amputated, severely painful, or has contracture >50% ROM
- Mark with asterisk (*) if a non-SCI condition affects the score (e.g., peripheral nerve injury, fracture)
STEP 1 — SENSORY EXAMINATION
Test 28 key dermatome points bilaterally (C2 → S4-5).
Two Modalities Tested at Each Point:
| Modality | Tool | How to Test |
|---|---|---|
| Light Touch (LT) | Cotton wisp or fingertip | Brush lightly across the key sensory point |
| Pin Prick (PP) | Safety pin / sharp object | Apply sharp end; patient distinguishes sharp vs. dull |
Sensory Scoring Scale (each point):
| Score | Meaning |
|---|---|
| 0 | Absent — no sensation detected |
| 1 | Altered — decreased, impaired, or hypersensitivity |
| 2 | Normal — same as a normal reference area (usually face/cheek) |
| NT | Not testable |
Key Sensory Points (C2 → S4-5):
| Level | Landmark |
|---|---|
| C2 | Occipital protuberance |
| C3 | Supraclavicular fossa |
| C4 | Top of acromioclavicular joint |
| C5 | Lateral antecubital fossa |
| C6 | Thumb (dorsal surface) |
| C7 | Middle finger (dorsal surface) |
| C8 | Little finger (dorsal surface) |
| T1 | Medial antecubital fossa |
| T2 | Apex of axilla |
| T3–T12 | Follow intercostal/abdominal landmarks |
| T10 | Umbilicus |
| T12 | Inguinal ligament (midpoint) |
| L1 | Half-distance between T12 and L2 |
| L2 | Anterior-medial thigh |
| L3 | Medial femoral condyle |
| L4 | Medial malleolus |
| L5 | Dorsum of foot at 3rd MTP joint |
| S1 | Lateral heel |
| S2 | Popliteal fossa midpoint |
| S3 | Ischial tuberosity |
| S4-5 | Perianal area (combined zone) |
Maximum sensory score: 112 for LT + 112 for PP = 224 total
Sacral Sparing — Special Tests at S4-5:
| Test | Method | Record |
|---|---|---|
| Deep Anal Pressure (DAP) | Examiner inserts gloved finger into rectum, applies pressure | Yes / No |
| Voluntary Anal Contraction (VAC) | Ask patient to squeeze rectum around examiner's finger | Yes / No |
STEP 2 — MOTOR EXAMINATION
Test 10 key muscle groups bilaterally (5 upper extremity + 5 lower extremity).
Motor Grading Scale (MRC Scale, 0–5):
| Grade | Meaning |
|---|---|
| 0 | Total paralysis |
| 1 | Palpable or visible contraction only |
| 2 | Active movement, full ROM — gravity eliminated |
| 3 | Active movement, full ROM — against gravity |
| 4 | Active movement, full ROM — against gravity and moderate resistance |
| 5 | Normal — full ROM against gravity and full resistance |
| NT | Not testable |
Key Muscle Groups:
| Level | Muscle | Movement |
|---|---|---|
| C5 | Elbow flexors (biceps, brachialis) | Elbow flexion |
| C6 | Wrist extensors (ECRL, ECRB) | Wrist extension |
| C7 | Elbow extensors (triceps) | Elbow extension |
| C8 | Finger flexors (FDP — middle finger) | Finger flexion |
| T1 | Finger abductors (ADM — little finger) | Finger abduction |
| L2 | Hip flexors (iliopsoas) | Hip flexion |
| L3 | Knee extensors (quadriceps) | Knee extension |
| L4 | Ankle dorsiflexors (tibialis anterior) | Ankle dorsiflexion |
| L5 | Long toe extensors (EHL) | Great toe extension |
| S1 | Ankle plantar flexors (gastrocnemius/soleus) | Ankle plantarflexion |
Maximum motor score: 50 (upper) + 50 (lower) = 100 total
STEP 3 — DETERMINE SENSORY LEVELS (Right & Left)
The Sensory Level = the most caudal intact dermatome with a score of 2/2 for both LT and PP, with all levels above also scoring normal.
- Determine separately for Right and Left
- Record as e.g., Sensory Level R: C6, L: C7
STEP 4 — DETERMINE MOTOR LEVELS (Right & Left)
The Motor Level = the lowest key muscle with a grade ≥ 3/5, provided all muscles above it are graded 5/5.
- Determine separately for Right and Left
- In thoracic levels (T2–L1) where no key muscles exist → motor level = sensory level (if testable motor above is normal)
STEP 5 — DETERMINE NEUROLOGICAL LEVEL OF INJURY (NLI)
NLI = the most cephalad (highest) of all four levels (R sensory, L sensory, R motor, L motor)
This is the single level used to describe the injury (e.g., "C5 complete SCI").
STEP 6 — DETERMINE COMPLETE vs. INCOMPLETE
Ask three questions about S4-5:
| Finding | Meaning |
|---|---|
| VAC = No AND all S4-5 sensory = 0 AND DAP = No | → COMPLETE injury |
| Any of the above is preserved | → INCOMPLETE injury |
This is called sacral sparing — any preserved function at S4-5 = incomplete.
STEP 7 — DETERMINE AIS GRADE (A–E)
Follow this decision tree:
Is the injury COMPLETE? (No sacral sparing)
  ↓ YES → AIS = A

Is the injury Motor Complete?
(VAC = No AND no motor function >3 levels below motor level)
  ↓ YES → AIS = B (sensory preserved below NLI, not motor)

Are ≥ HALF the key muscles below NLI graded ≥ 3?
  ↓ NO → AIS = C
  ↓ YES → AIS = D

Are ALL segments normal (and prior deficit documented)?
  → AIS = E
AIS Grade Summary:
| Grade | Name | Definition |
|---|---|---|
| A | Complete | No sensory OR motor function at S4-5 |
| B | Sensory Incomplete | Sensation preserved below NLI including S4-5; NO motor function below NLI |
| C | Motor Incomplete | Motor preserved below NLI; < half of key muscles below NLI graded ≥ 3 |
| D | Motor Incomplete | Motor preserved below NLI; ≥ half of key muscles below NLI graded ≥ 3 |
| E | Normal | Sensation and motor normal in all segments (in known prior SCI patient) |
ND (Not Determinable): Used when levels or grade cannot be determined from exam results.
STEP 8 — ZONE OF PARTIAL PRESERVATION (ZPP)
- Only used in complete injuries (AIS A) where VAC = No AND DAP = No AND S4-5 sensory = 0
- ZPP = dermatomes and myotomes caudal to the NLI that retain partial innervation
- Record ZPP for sensory (R/L) and motor (R/L)
- If sacral sparing is present → ZPP is not applicable (NA)
QUICK REFERENCE SUMMARY TABLE
| Step | Task |
|---|---|
| 1 | Test 28 sensory points bilaterally — LT and PP (score 0/1/2) + DAP & VAC |
| 2 | Test 10 key muscle groups bilaterally (score 0–5) |
| 3 | Determine Sensory Level R & L (most caudal intact dermatome) |
| 4 | Determine Motor Level R & L (lowest muscle ≥ 3/5 with all above = 5/5) |
| 5 | Determine NLI = most cephalad of all 4 levels |
| 6 | Complete or Incomplete? (sacral sparing at S4-5) |
| 7 | Assign AIS Grade A / B / C / D / E |
| 8 | Document Zone of Partial Preservation (AIS A only) |
— Rockwood and Green's Fractures in Adults, 10th ed. 2025
This is a shared conversation. Sign in to Orris to start your own chat.