
What is use of sutherland tap in snake bite
The Sutherland pressure immobilization technique (often called the "Sutherland bandage" or pressure immobilization bandage) is a first-aid method used in snakebite management to slow the spread of venom through the lymphatic system.
Searching sources...
Reading File
Searching the Web
Sutherland pressure immobilization technique snakebite first aid
Finding Sources
Finding Sources
Reading File
Reading File
Reading File
Reading File
Here is a thorough answer based on authoritative textbook sources:
Sutherland's Pressure Immobilization Technique in Snakebite
The Sutherland pressure immobilization (PI) technique - also called the pressure bandage with immobilization (PBI) - is a first-aid method for snakebite developed by Australian toxinologist Struan Sutherland. It is the only evidence-based first-aid technique shown to reduce venom spread in clinical research.
The Core Principle
Venom from most Australian snakes (elapids) is injected subcutaneously and travels via the lymphatic system, not the bloodstream, to reach systemic circulation. The technique works by:
- Applying firm, sustained circumferential pressure over the bite site and the entire limb
- This pressure (~50-70 mmHg) is enough to arrest lymphatic flow but does NOT obstruct arterial or venous blood flow
- Combined with strict limb immobilization (splinting), this traps the venom at the bite site
- The venom can be contained locally for many hours, buying time to reach hospital and receive antivenom
How to Apply It
- Do not wash the bite - residual venom on skin helps identify the snake species (venom detection kit)
- Apply a firm elastic bandage directly over the bite site first
- Extend the bandage to cover the entire limb (similar pressure to a sprain bandage - firm but not tourniquet-tight)
- A single finger should be passable under the bandage (not too tight, not too loose)
- Splint the limb rigidly - walking accelerates systemic envenomation even when bandaged
- Keep the patient as still as possible and transport to hospital
- Do NOT remove the bandage until antivenom is available and being infused - if the patient deteriorates on removal, reapply immediately
Indications (When to Use It)
| Situation | Recommendation |
|---|---|
| Australian elapids (taipan, brown snake, tiger snake, death adder) | Strongly recommended |
| Coral snake / other neurotoxic elapid bites | Recommended |
| Sea snake bites | Recommended |
| Kraits, non-necrotic cobras | Recommended |
| Viper/pit viper bites (crotaline) | Generally discouraged |
| Spitting cobras / locally necrotic snakes | Use with caution or avoid |
Why It Is Avoided in Viper Bites
- Viper venom contains procoagulant and necrotoxic enzymes that cause severe local tissue destruction
- Compressing these toxins in a confined space worsens local tissue necrosis and increases risk of compartment syndrome
- When a tourniquet/band is released, a clot from procoagulant venom can enter circulation and cause embolism
- Indian venomous snakes (vipers, cobras) mostly have cytotoxic venoms - making compression potentially harmful
- P.C. Dikshit Textbook of Forensic Medicine and Toxicology, p. 498
Important Distinctions
| Feature | Pressure Immobilization Bandage | Tourniquet |
|---|---|---|
| Arterial flow | Preserved | Occluded (dangerous) |
| Lymphatic flow | Arrested | Arrested |
| Venous flow | Minimally restricted | Fully occluded |
| Distal pulses | Present | Absent |
| Risk of ischemia | Low | High |
Tourniquets are contraindicated in snakebite because they obstruct arterial flow and cause ischemia.
When to Remove the Bandage
Remove only in hospital once antivenom is being administered. As per Tintinalli's Emergency Medicine: "Once antivenom is infusing, remove the pressure bandage so that antivenom can reach the envenomed area. There is no evidence that venom is inactivated by being trapped at the bite site."
Limitations and Controversies
- The technique requires correct application - too loose and it fails; too tight and it causes harm
- Outside Australia, the evidence is less clear because snake species and venom types differ
- Indian/Asian cobra and viper bites, which are most common in South Asia, are generally not suited to this technique
- Most experts agree: get to a hospital fast - first aid should not delay antivenom administration
Sources: Tintinalli's Emergency Medicine (A Comprehensive Study), pp. 2768-2922; P.C. Dikshit Textbook of Forensic Medicine and Toxicology, p. 498; Goldman-Cecil Medicine; PMC evidence review (Avau et al., 2016)
Can you give me anatomical picture of lymphatic drainage of leg
Searching the medical library for anatomical images of lymphatic drainage of the leg.
Finding Sources
Reading File
Reading File
Loading Image
Loading Image
Here are two detailed anatomical images from Imaging Anatomy: Text and Atlas, Volume 3 showing the lymphatic drainage of the leg:
Fig. 14.3 - Medial Group: Main Superficial Lymphatic Drainage of the Lower Limb
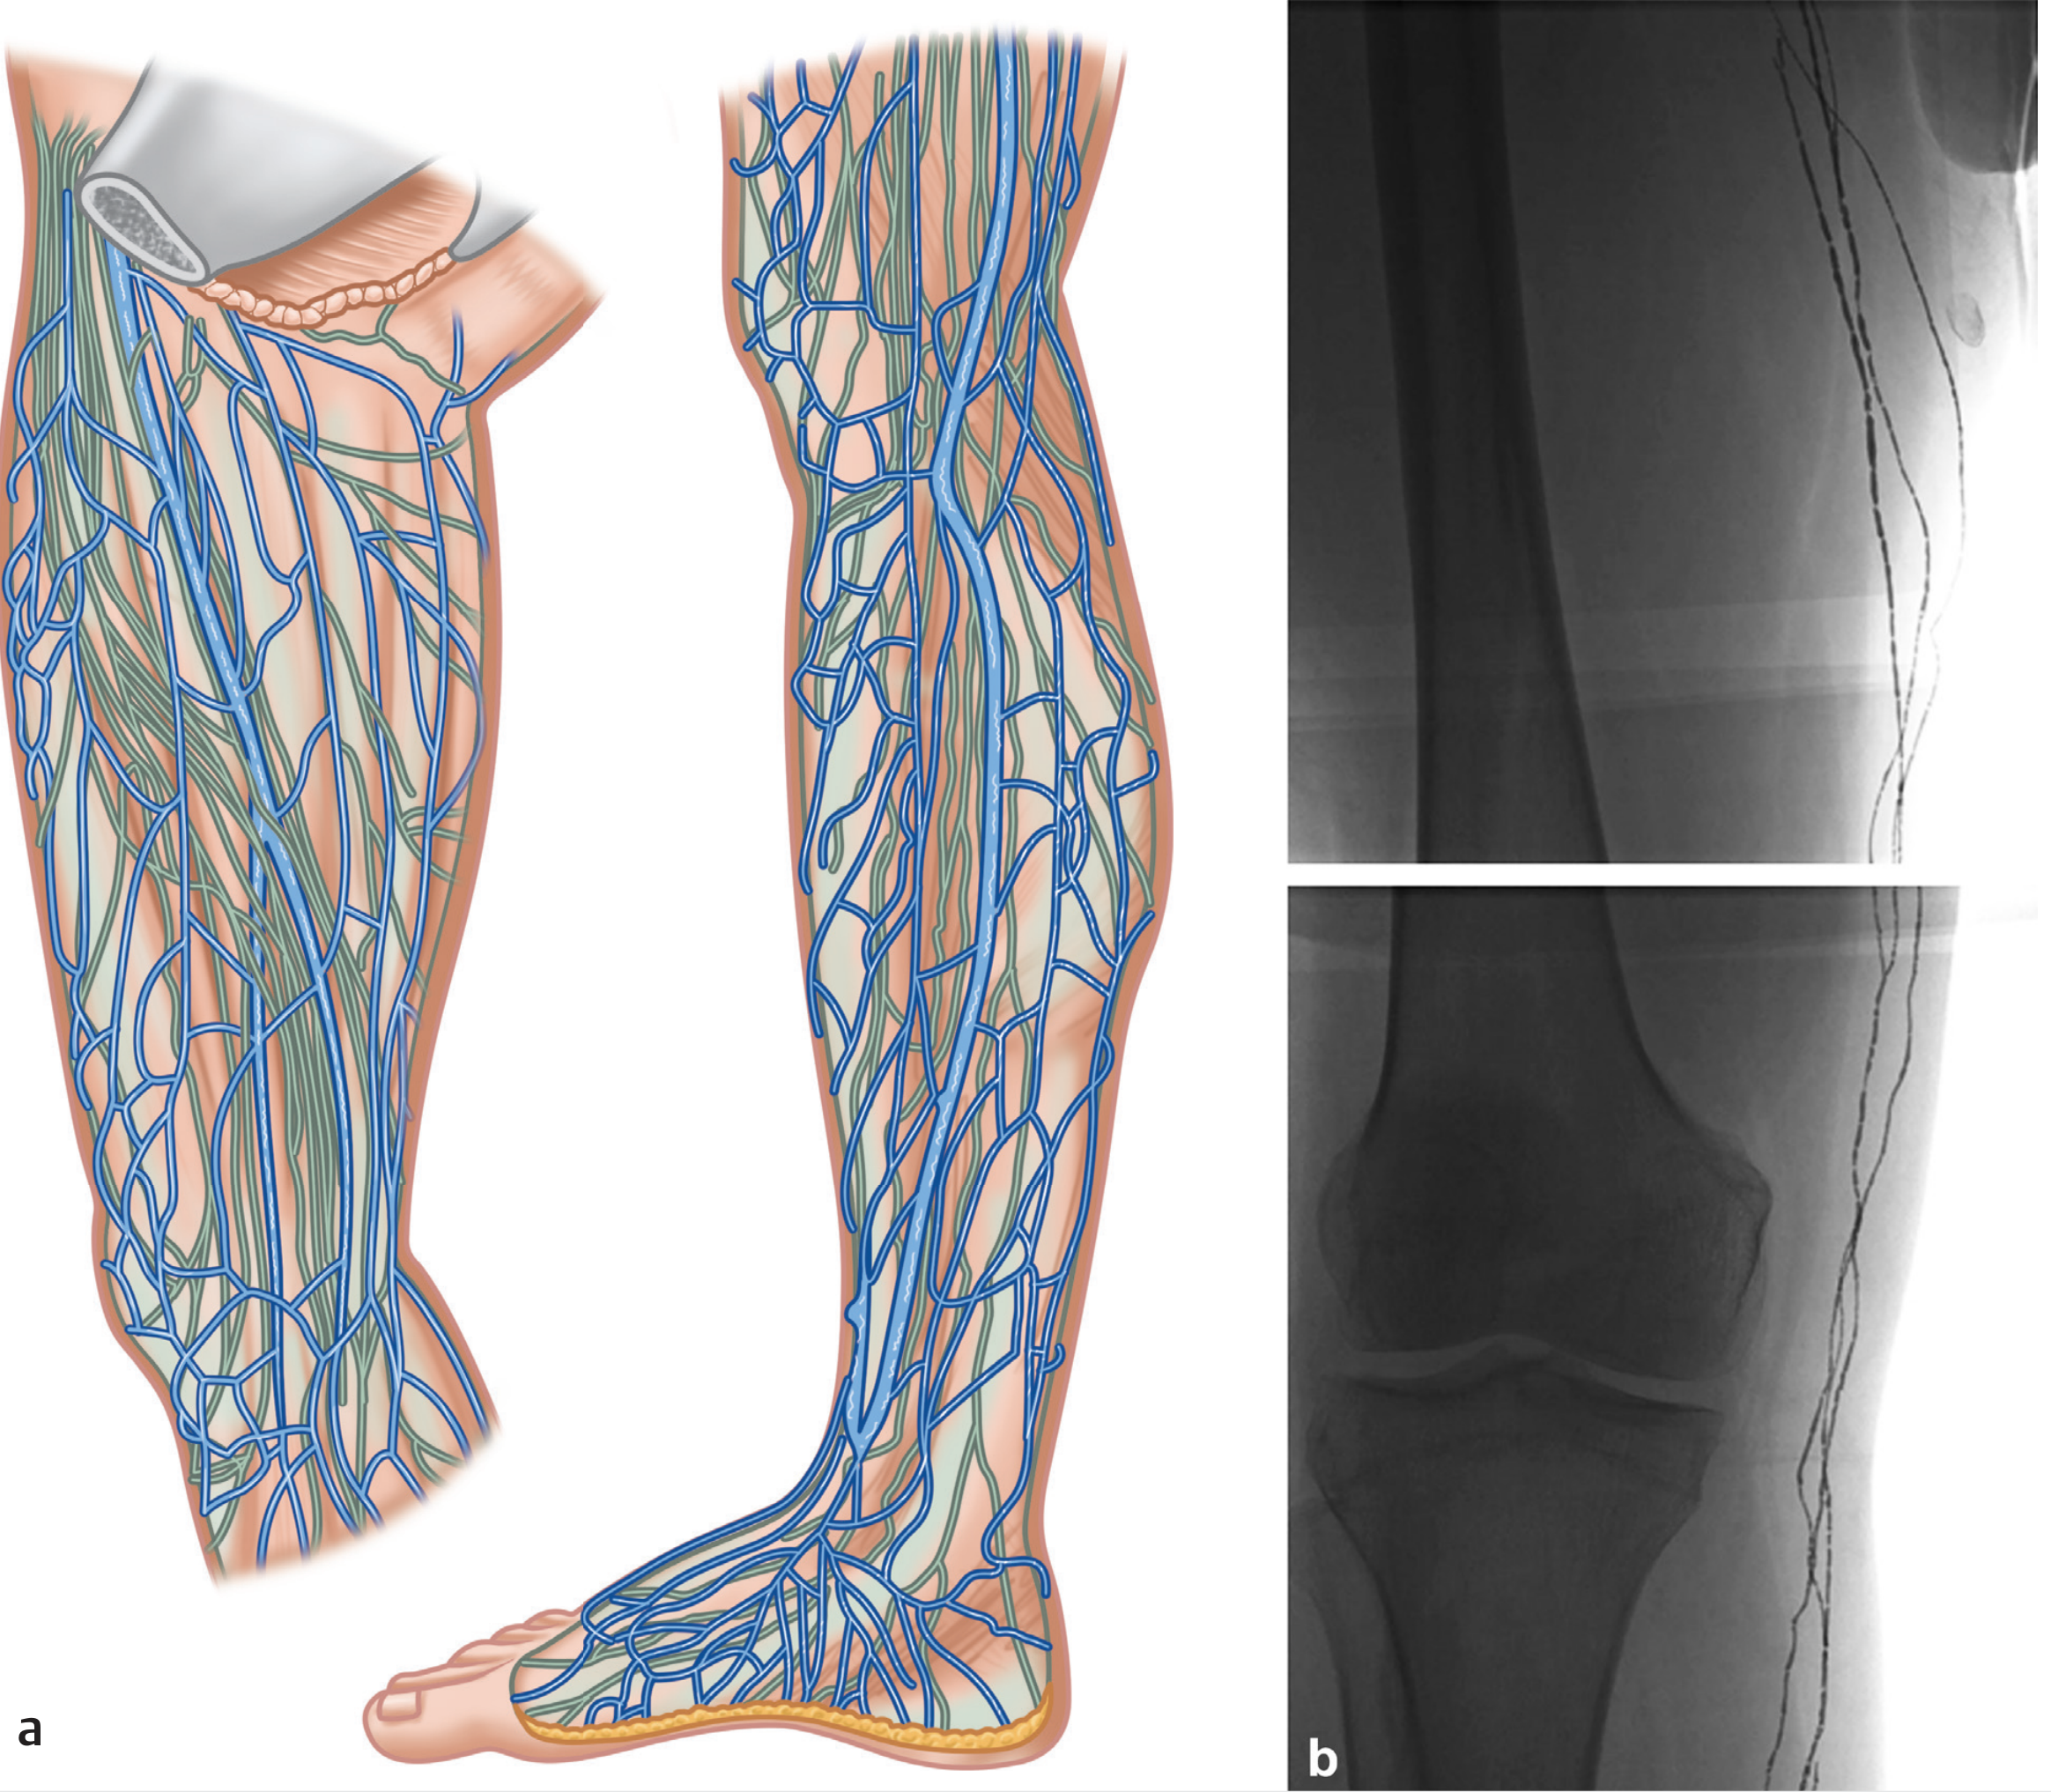
(a) Illustration showing the medial (blue) and lateral (green) superficial lymphatic collector vessels of the leg and foot.
(b) Contrast lymphangiography X-ray showing the same vessels in vivo at the leg and knee level.
- The medial group (blue, main collectors) begins at the tips of the toes and the medial sole, drains to the dorsal foot, ascends the medial aspect of the leg along the great saphenous vein (GSV), converges just below the knee, and ascends the medial thigh to the superficial inguinal lymph nodes
- The lateral group (green, fewer vessels) follows the small saphenous vein, ascends the posterior leg to the popliteal lymph nodes, and may then continue to inguinal nodes
Fig. 14.2 - CT Lymphography: Superficial Collectors in Relation to Fascial Layers
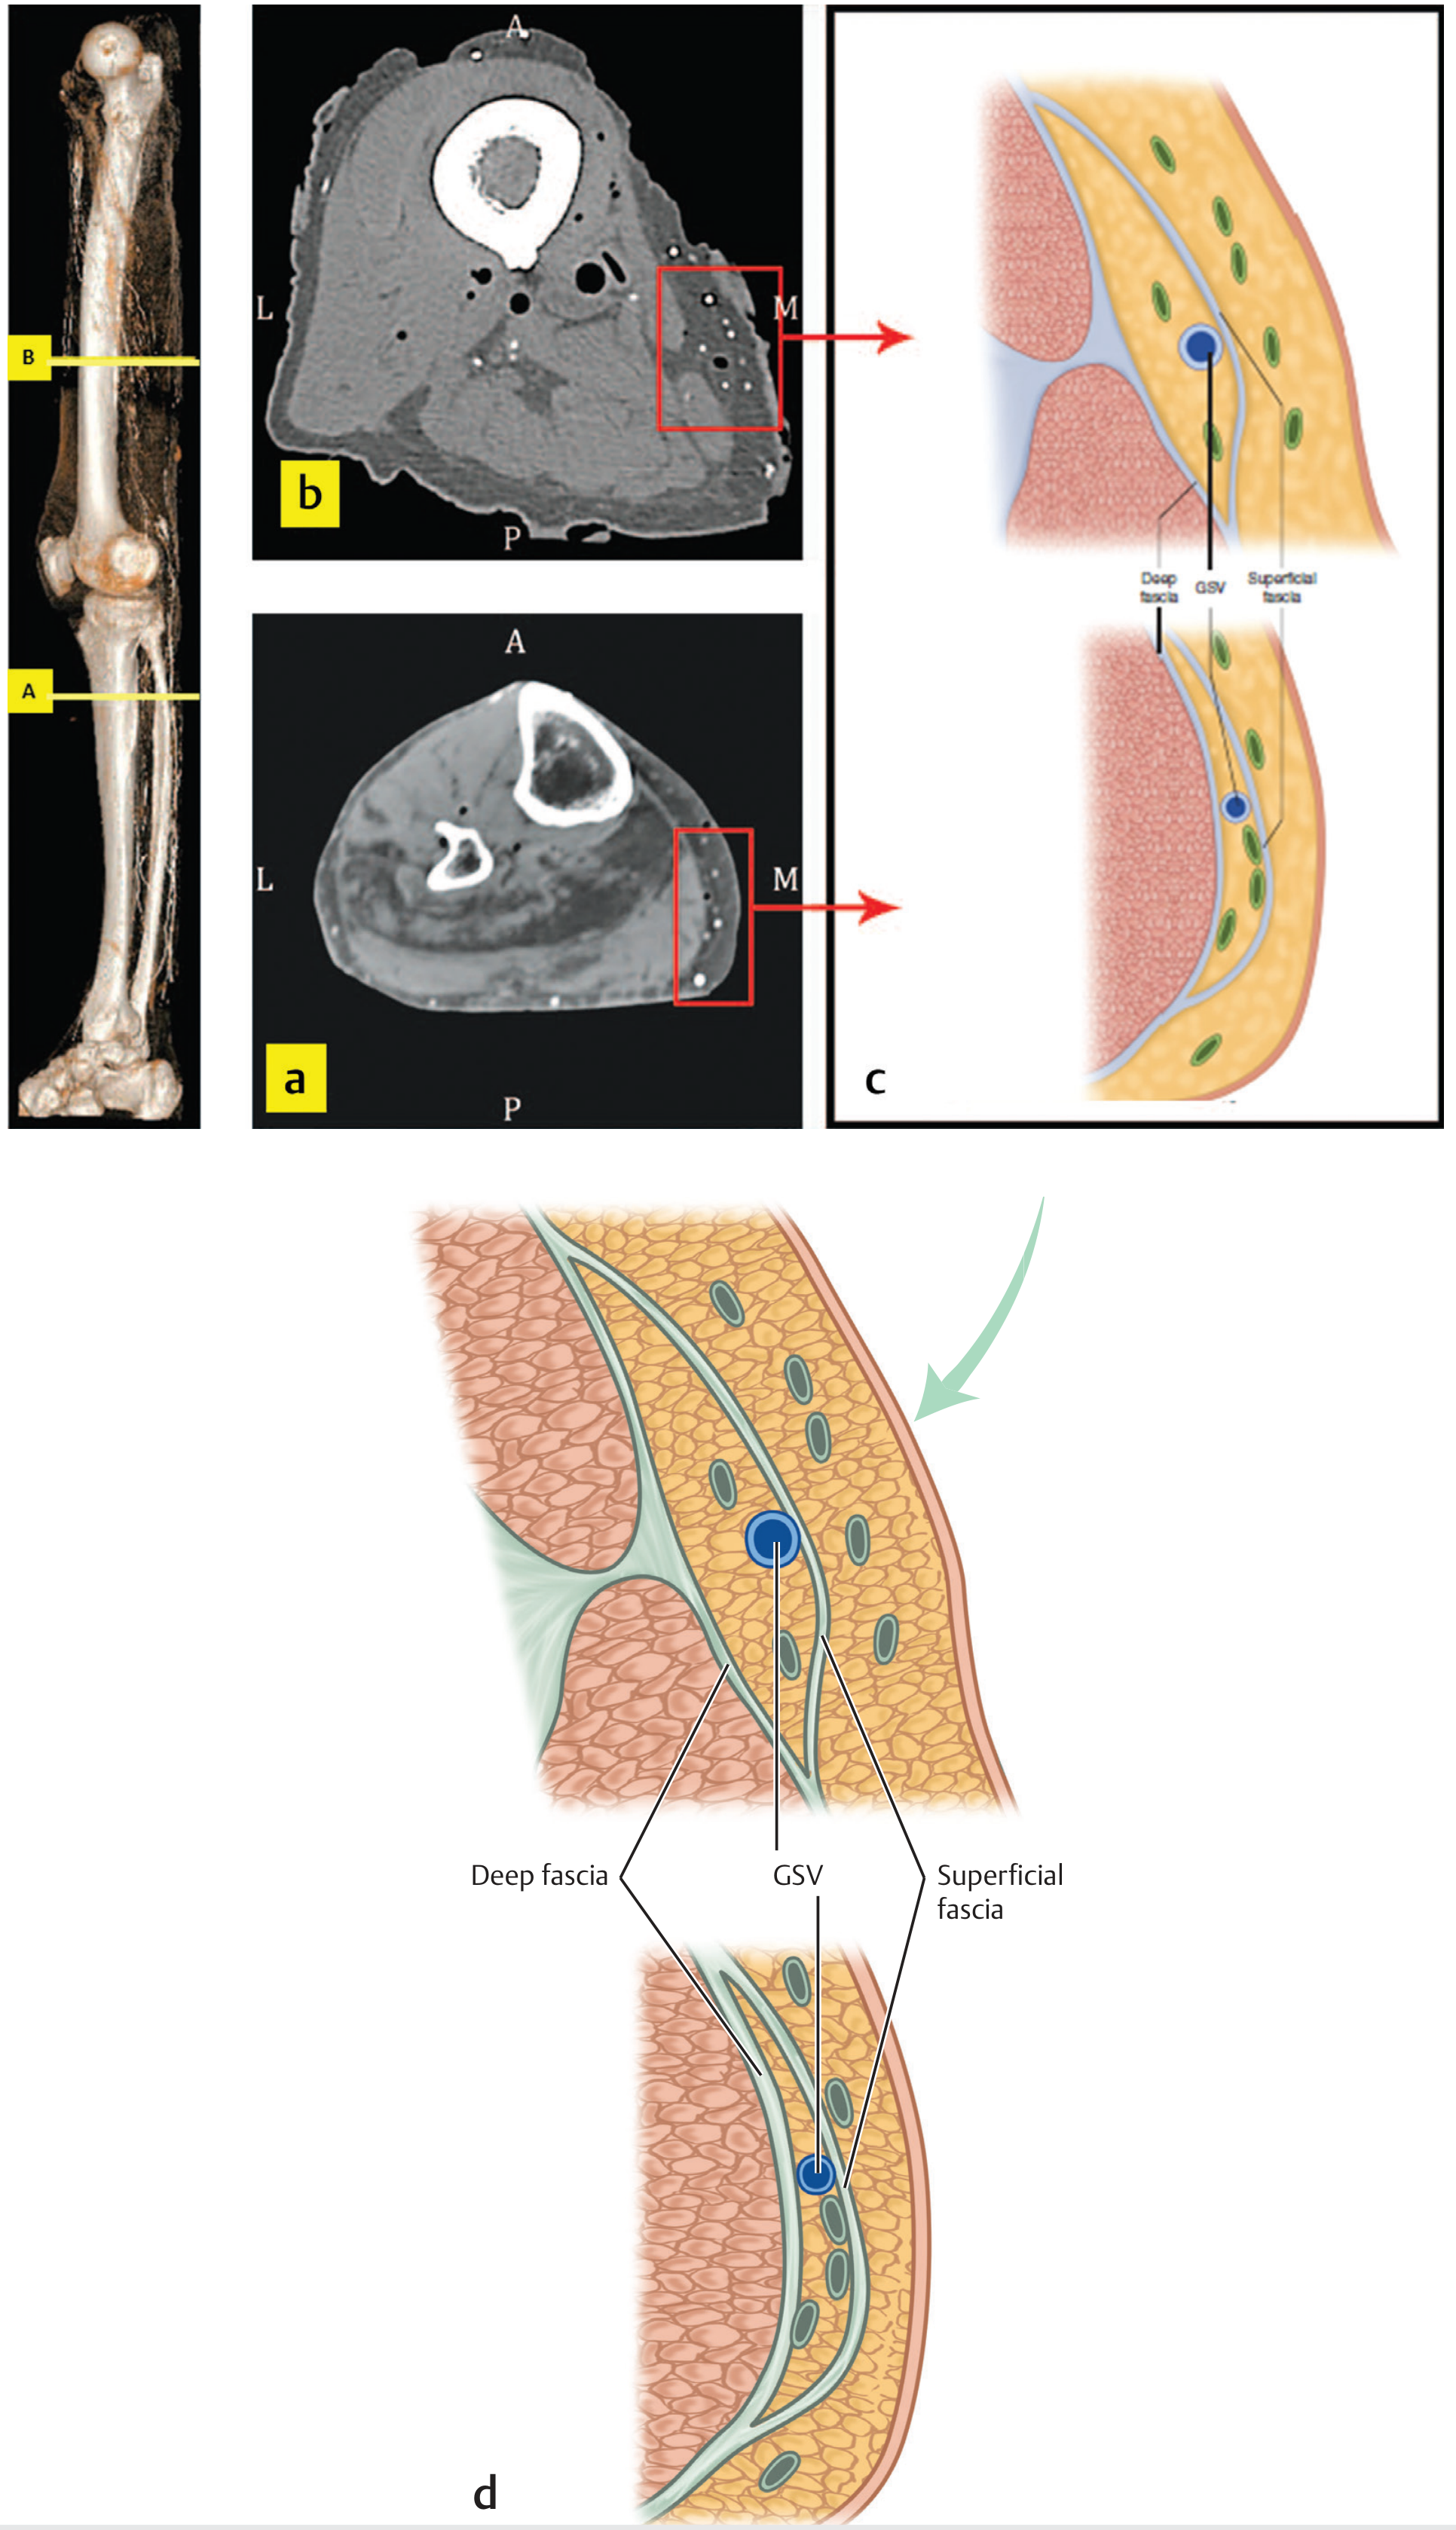
This figure shows cross-sectional CT lymphography at different levels of the leg, alongside a diagram illustrating:
- Lymphatic collectors lie superficial and deep to the superficial fascia
- They run in close proximity to the GSV (Great Saphenous Vein) within the subcutaneous fat, between the deep fascia and superficial fascia
Summary of Lymphatic Drainage of the Leg
| System | Vessels | Course | Drains Into |
|---|---|---|---|
| Superficial - Medial group | 3-14 channels | Along GSV, medial leg to thigh | Superficial inguinal nodes |
| Superficial - Lateral group | 1-4 channels | Along small saphenous vein, posterior leg | Popliteal nodes (then inguinal) |
| Deep lymphatics | 3 trunks (anterior tibial, posterior tibial, peroneal) | Along deep blood vessels | Deep popliteal nodes → deep inguinal nodes |
This anatomy directly explains why the Sutherland pressure immobilization technique works - by applying firm bandage pressure equivalent to ~50-70 mmHg, it arrests flow in these superficial lymphatic collectors, trapping elapid venom at the bite site.
Source: Imaging Anatomy Text and Atlas Volume 3, Bones, Joints, Vessels and Nerves, Chapter 14
This is a shared conversation. Sign in to Orris to start your own chat.