Now I have all the detail needed from Harrison's (22e) and Adams & Victor's. Let me compose the full, exhaustive step-by-step guide.
MOTOR EXAMINATION IN NEUROLOGY — COMPLETE STEP-BY-STEP DETAIL
━━━━━━━━━━━━━━━━━━━━━━━━━━━━
STEP 1 — INSPECTION (LOOK BEFORE YOU TOUCH)
━━━━━━━━━━━━━━━━━━━━━━━━━━━━
Inspection is the most undervalued component. It costs nothing and reveals everything — a skilled examiner can localise a lesion before touching the patient.
1A. PREPARATION FOR INSPECTION
Before you begin:
- Ensure the room is well-lit — fasciculations are invisible in dim light
- Ask the patient to undress to underwear so all four limbs and trunk are visible
- Position the patient comfortably supine initially, then seated
- Stand back at least 1–2 metres for a panoramic view first
- Tell the patient: "I am going to look at your muscles before I test them. Please stay relaxed."
1B. INSPECT THE WHOLE BODY POSTURE FIRST
Look at the patient's resting posture from the foot of the bed:
| What You See | What It Means |
|---|
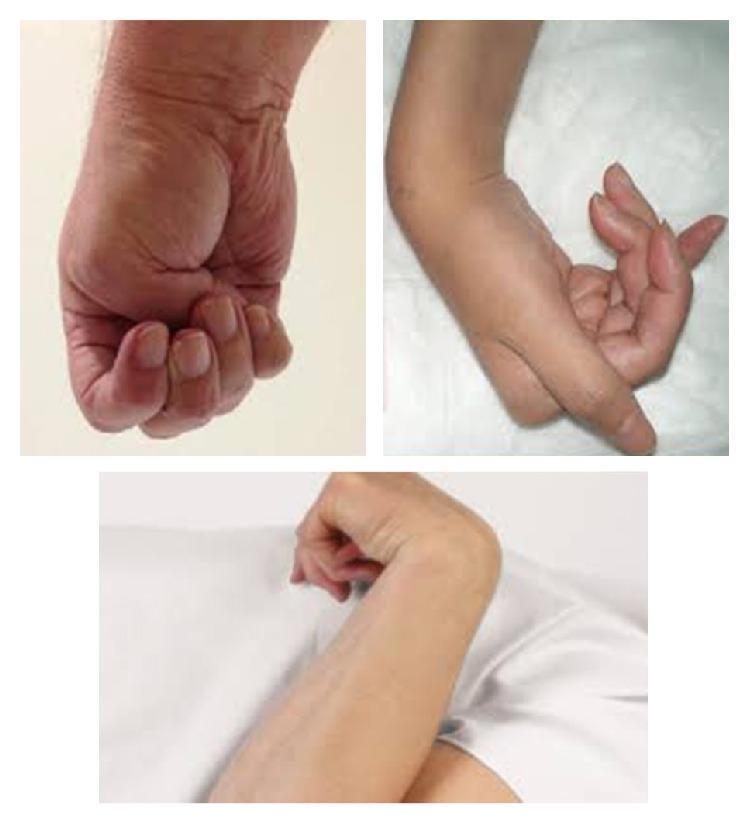
| One arm flexed at elbow and wrist, leg extended and internally rotated | Established UMN (cortical or capsular) hemiplegia — posture of spasticity |
| Both legs extended and stiff, arms drawn in | Bilateral UMN — paraplegia or quadriplegia |
| Limb lying externally rotated and floppy | LMN lesion or acute UMN (flaccid phase) |
| Flexed, stooped posture at rest | Parkinson's disease / extrapyramidal disorder |
| Head tilted, asymmetric shoulder height | Torticollis, scoliosis, muscle imbalance |
1C. INSPECT FOR MUSCLE WASTING (ATROPHY)
Work systematically: proximal → distal, both sides.
Technique:
- Compare the same muscle group on both sides simultaneously
- Look for hollowing, loss of normal contour, prominent bony landmarks
Specific areas to examine:
| Body Part | What to Look For | How to Identify |
|---|
| Thenar eminence (thumb base) | Flattening — median nerve or C8/T1 | Compare thumb base bulk bilaterally |
| Hypothenar eminence (little finger) | Wasting — ulnar nerve or C8/T1 | Look at medial palm contour |
| Dorsal interossei | Guttering between metacarpals | Ask patient to fan fingers; look at dorsal hand |
| Forearm muscles | Asymmetric bulk | Compare circumference of both forearms |
| Biceps/triceps | Hollowing of upper arm | Compare upper arm contour |
| Deltoid | Flat, square shoulder contour | Compare shoulder fullness |
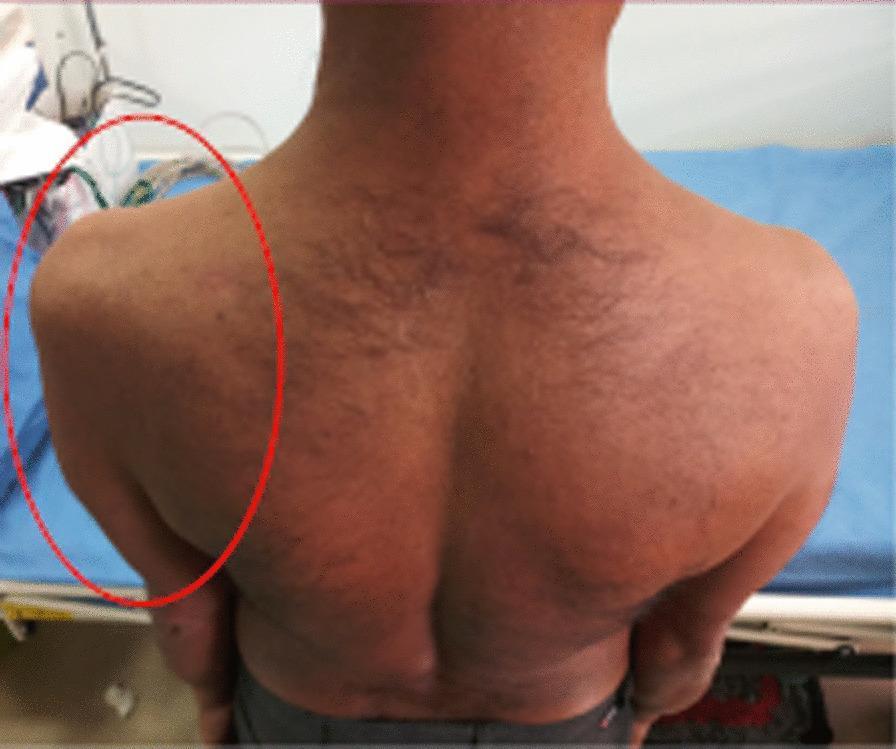
| Supraspinatus/infraspinatus | Hollowing above/below spine of scapula | View from behind |
| Quadriceps | Hollowing above patella | Compare thighs with legs straight |
| Calf (gastrocnemius) | Loss of normal rounded calf bulk | Compare both calves |
| Small muscles of foot | Intrinsic wasting | Look at dorsum of foot; arching |
| Tongue | Atrophy, wrinkled surface | Ask patient to open mouth — inspect at rest |
| Temporalis/masseter | Temporal hollowing, flat cheek | Look at face in good light |
Grading wasting: Document as mild, moderate, or severe. Note whether it is focal (single nerve or root), distal (peripheral neuropathy), proximal (myopathy), or hemibody (UMN).
Significance:
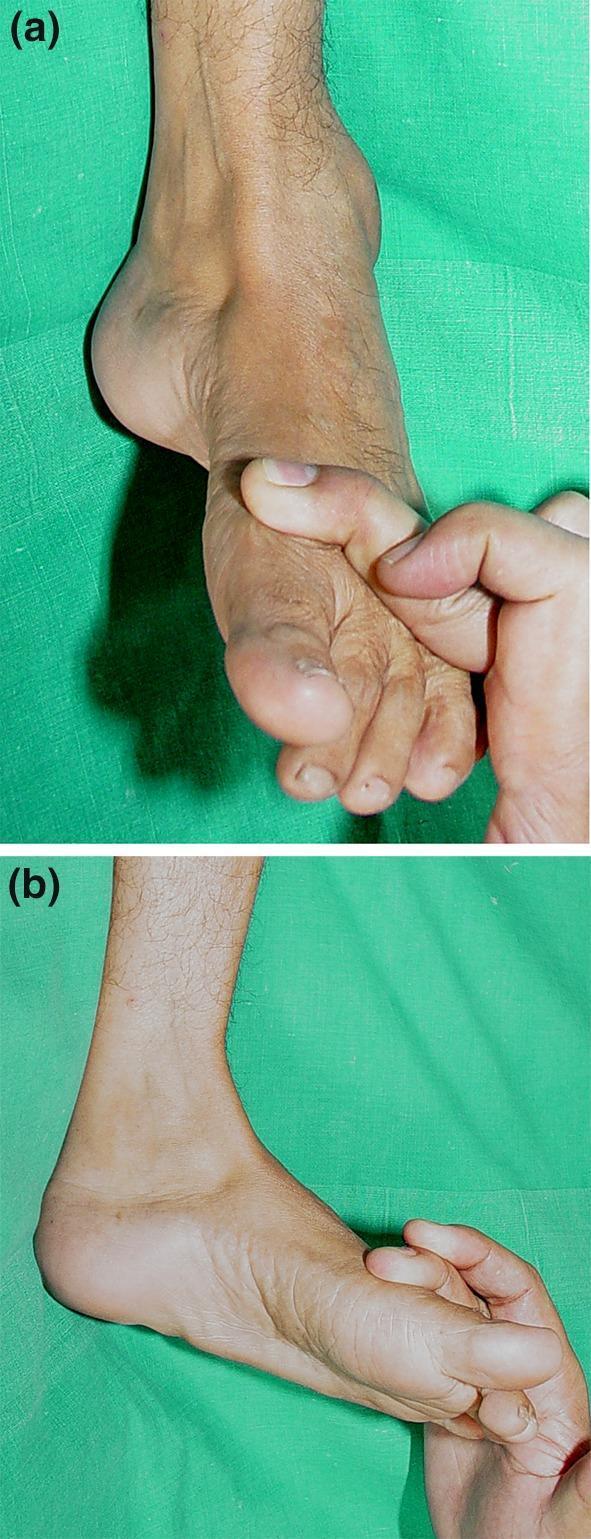
- Significant wasting = LMN lesion (nerve, root, anterior horn cell) or primary muscle disease
- UMN lesions produce only mild disuse atrophy over months — never the severe hollowing of a LMN lesion
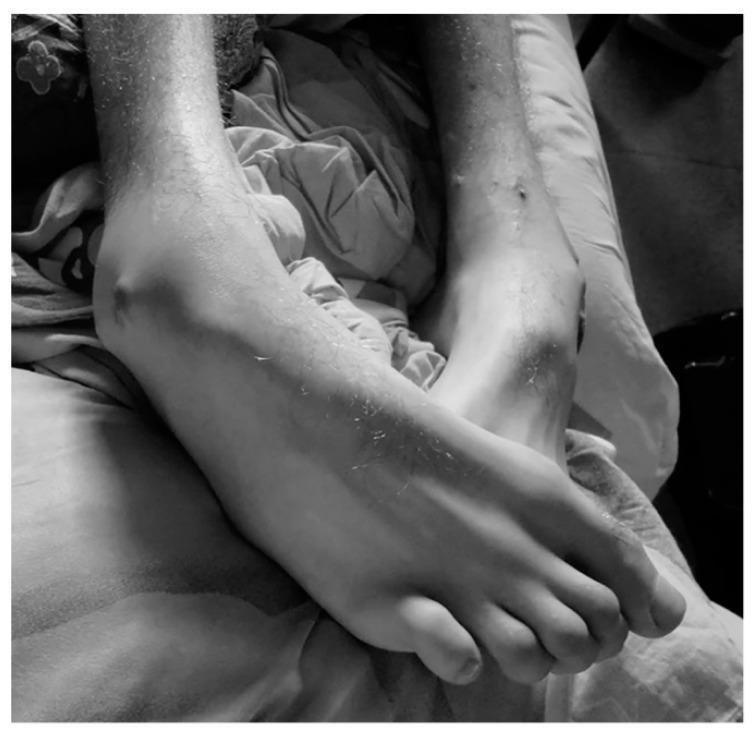
Severe bilateral lower limb muscle wasting with prominent bony landmarks — chronic LMN / denervation pattern
Left shoulder girdle wasting with loss of deltoid, supraspinatus, infraspinatus — LMN/plexus lesion
1D. INSPECT FOR FASCICULATIONS
What they are: Spontaneous, random, brief twitches of a motor unit visible under the skin — caused by denervation hypersensitivity of anterior horn cells or motor axons.
How to observe:
- The patient must be completely at rest and the room must be well-lit (tangential lighting helps)
- Watch each muscle group for at least 15–30 seconds before moving on
- Ask the patient not to contract the muscle — fasciculations appear at rest
- Gently tapping a muscle may provoke fasciculations if denervation is present
Where to look specifically:
- Tongue (ask patient to rest tongue on floor of mouth — do NOT protrude, as movement mimics fasciculations)
- Thenar/hypothenar eminences
- Deltoid
- Quadriceps (large, easy to see)
- Calf
| Finding | Significance |
|---|
| Fasciculations alone (no weakness, no wasting) | Benign fasciculation syndrome — very common |
| Fasciculations + wasting + weakness | LMN pathology — motor neurone disease (ALS), radiculopathy, peripheral neuropathy |
| Tongue fasciculations | Bulbar LMN involvement — ALS, progressive bulbar palsy |
Key rule: Fasciculations are never seen in pure UMN lesions.
1E. INSPECT FOR INVOLUNTARY MOVEMENTS
Observe with the patient at rest, maintaining a posture, and during voluntary movement.
| Involuntary Movement | When It Occurs | Description | Cause |
|---|
| Resting tremor | At rest, disappears with movement | Pill-rolling, 4–6 Hz, one hand | Parkinson's disease |
| Postural/action tremor | When holding posture (arms outstretched) | Fine, 8–12 Hz | Essential tremor, physiological, thyrotoxicosis |
| Intention tremor | During voluntary movement, worsens near target | Coarse, oscillating | Cerebellar lesion (ipsilateral) |
| Chorea | Continuous, random, flowing | Brief, irregular, dance-like limb jerks | Huntington's, Sydenham's, drugs |
| Athetosis | Slow, writhing | Continuous, sinuous twisting of distal limbs | Basal ganglia lesion |
| Hemiballismus | Sudden, flinging | Violent, high-amplitude proximal flinging | Contralateral subthalamic nucleus lesion |
| Myoclonus | Brief shock-like jerks | At rest or with movement | Cortical, subcortical, spinal causes |
| Tics | Suppressible, stereotyped | Repetitive semi-purposeful movements | Tourette's syndrome, habit |
| Dystonia | Sustained twisting posture | Prolonged abnormal posture | Focal or generalised dystonia |
1F. INSPECT THE SKIN, JOINTS, AND DEFORMITIES
| What to Look For | Significance |
|---|
| Scars / surgery scars | Nerve trauma, previous decompression |
| Pressure sores / calluses | Chronic immobility, loss of sensation |
| Joint deformities / contractures | Chronic spasticity, disuse |
| Pes cavus (high arch) | Hereditary motor/sensory neuropathy (Charcot-Marie-Tooth) |
| Hammer toes | Long-standing intrinsic wasting |
| Café-au-lait spots / neurofibromas | Neurofibromatosis |
| Skin rash over knuckles (Gottron's papules) | Dermatomyositis |
━━━━━━━━━━━━━━━━━━━━━━━━━━━━
STEP 2 — MUSCLE TONE
━━━━━━━━━━━━━━━━━━━━━━━━━━━━
2A. PRINCIPLES
- Tone = the resistance of a muscle to passive stretch at rest
- It reflects the integrity of the reflex arc + supraspinal control
- The patient must be completely relaxed — actively distract them during testing
- Move joints at varying speeds and in unpredictable directions to prevent voluntary assistance
2B. UPPER LIMB TONE — STEP BY STEP
Step 1 — Wrist pronation/supination:
- Support the patient's forearm with one hand
- Hold the patient's hand with your other hand as if shaking hands
- Pronate and supinate the wrist repeatedly at varying speeds
- Feel for resistance throughout the range
Step 2 — Wrist flexion/extension:
- Cup the patient's hand
- Flex and extend the wrist passively, varying speed
- Normal: slight springy resistance throughout
Step 3 — Elbow flexion/extension:
- Support the forearm and flex/extend the elbow
- Do this at different speeds — spasticity is velocity-dependent
Step 4 — Shoulder movement:
- Hold the upper arm and gently internally/externally rotate and abduct
- Useful for detecting shoulder rigidity in Parkinson's
2C. LOWER LIMB TONE — STEP BY STEP
Step 1 — Leg roll test:
- Patient lies supine, legs extended
- Place both hands on the thigh and briskly roll the leg internally and externally
- Watch the foot — it should oscillate freely
- In spasticity, the foot does not oscillate freely and moves rigidly with the leg
Step 2 — Knee lift test (Harrison's method):
- Place both hands behind the patient's knee
- Rapidly lift the knee off the table
- Observe the heel:
- Normal: heel drags along the table surface for a variable distance before lifting
- Increased tone (spasticity): heel lifts immediately with the knee — no drag
- Decreased tone (flaccidity): heel stays on the table even as you lift fully
Step 3 — Ankle tone / clonus:
- With the knee slightly flexed, place your hand under the ankle
- Dorsiflex the foot rapidly and sustain the stretch
- Sustained rhythmic beats = clonus — indicates UMN lesion (corticospinal tract damage)
- Count the beats — more than 5 sustained beats = pathological clonus
Step 4 — Patellar clonus:
- Patient lies flat with leg extended
- Push the patella sharply downward and hold
- Rhythmic patellar oscillation = patellar clonus — UMN sign
2D. TYPES OF ABNORMAL TONE — DETAILED
| Type | Feel | Distribution | Velocity-Dependent | Cause |
|---|
| Spasticity | Initial resistance then sudden "give" (clasp-knife) | Flexors (UL), Extensors (LL) | Yes — worse with fast movement | Corticospinal tract lesion |
| Lead-pipe rigidity | Constant, uniform resistance in all directions throughout range | Flexors = Extensors | No | Extrapyramidal (Parkinson's) |
| Cogwheel rigidity | Ratchet-like interruptions superimposed on rigidity | As above | No | Parkinson's (rigidity + tremor) |
| Paratonia (Gegenhalten) | Variable, unpredictable — patient seems to resist your movements despite instruction | Any distribution | Irregular | Frontal lobe disease, dementia |
| Flaccidity / hypotonia | No resistance; limb feels heavy, floppy | Diffuse or segmental | N/A | LMN, peripheral nerve, cerebellar, acute UMN (spinal shock) |
To bring out cogwheel rigidity: Ask the patient to move the opposite hand (e.g., open and close it) while you assess the tested wrist — this "reinforcement" makes subtle cogwheeling much more apparent. — Harrison's Principles of Internal Medicine, 22e
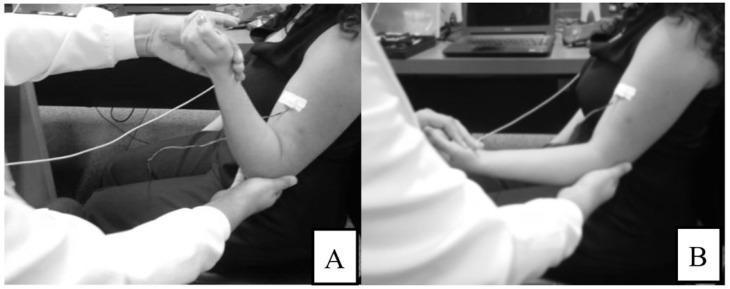
Passive elbow movement to assess spasticity using Modified Ashworth Scale methodology
━━━━━━━━━━━━━━━━━━━━━━━━━━━━
STEP 3 — MUSCLE POWER (STRENGTH)
━━━━━━━━━━━━━━━━━━━━━━━━━━━━
3A. PRINCIPLES
- Always isolate the muscle being tested — stabilise the proximal joint
- Apply resistance in the direction opposing the movement
- Ask for maximum effort: "Push as hard as you can — don't let me move you"
- Palpate the contracting muscle while testing — confirms effort and contraction quality
- Compare left vs. right at each level
- Grade using the MRC Scale
3B. MRC POWER GRADING — DETAILED
(Harrison's Principles of Internal Medicine, 22e)
| Grade | Clinical Meaning | Practical Test |
|---|
| 5 | Full power — normal | Resists maximal examiner effort |
| 4+ | Movement against strong resistance | Slightly less than normal |
| 4 | Movement against moderate resistance | Some weakness but functional |
| 4− | Movement against mild resistance | Noticeably weak |
| 3 | Movement against gravity but not against any resistance | Can lift limb fully off table |
| 2 | Movement with gravity eliminated (horizontal plane) | Cannot lift against gravity; test lying flat |
| 1 | Flicker or trace of contraction — no joint movement | Barely palpable contraction |
| 0 | No contraction whatsoever | Nothing palpable |
3C. PRONATOR DRIFT TEST — SCREEN FOR UMN WEAKNESS
This is the single most useful screening test for upper limb pyramidal weakness.
How to perform:
- Ask the patient to hold both arms fully outstretched, palms facing upward (supinated), parallel to the floor
- Ask them to close their eyes
- Hold this position for 10 seconds
- Watch carefully for any:
- Pronation of the forearm (palm turns down)
- Downward drift of the entire arm
- Finger flexion
What you see:
| Finding | Significance |
|---|
| Pronation + downward drift, asymmetric | Pyramidal (UMN) weakness on that side |
| Upward drift | Proprioceptive or sensory loss (posterior column) |
| Bilateral symmetrical drift | Functional / non-organic, or cerebellar |
| No drift | Screen is negative for pyramidal weakness |
"Testing for pronator drift is an extremely useful method for screening upper limb weakness." — Harrison's, 22e
3D. UPPER LIMB POWER — STEP-BY-STEP MUSCLE TESTING
Test in this order: proximal → distal
Shoulder Abduction (C5, Axillary nerve)
- Position: Patient seated, arm at 90° abduction
- Your hand: Place on the lateral upper arm
- Command: "Hold your arm up — don't let me push it down"
- Resistance: Push the arm downward toward the side
Shoulder Adduction (C6–C7, Pectoral nerve)
- Position: Arm at 90° abduction
- Command: "Push your arm into your side — don't let me pull it out"
- Resistance: Pull the arm outward
Elbow Flexion (C5–C6, Musculocutaneous nerve — Biceps)
- Position: Elbow at 90°, forearm supinated
- Your hand: Grasp the wrist
- Command: "Bend your elbow — don't let me straighten it"
- Resistance: Pull the forearm downward (extending the elbow)
Elbow Extension (C7, Radial nerve — Triceps)
- Position: Elbow at 90°, forearm pronated
- Command: "Straighten your arm — don't let me bend it"
- Resistance: Push the forearm upward (flexing the elbow)
Wrist Extension (C6–C7, Radial nerve)
- Position: Forearm pronated, fist loosely closed
- Command: "Cock your wrist back — don't let me push it forward"
- Resistance: Push the dorsum of the hand into flexion
Wrist Flexion (C7–C8, Median/Ulnar nerve)
- Command: "Flex your wrist — don't let me pull it back"
- Resistance: Push the palm into extension
Finger Extension (C7, Posterior interosseous nerve)
- Position: Fingers extended at MCP joints
- Command: "Keep your fingers straight — don't let me bend them"
- Resistance: Push fingers into flexion at MCP joints
Finger Flexion (C8, Median/Ulnar nerve)
- Command: "Squeeze my fingers as hard as you can"
- Insert two fingers into the patient's fist — assess grip strength
Finger Abduction / Interossei (T1, Ulnar nerve)
- Position: Hand flat on a surface, fingers extended
- Command: "Spread your fingers apart — don't let me push them together"
- Resistance: Push middle and index finger together
Thumb Opposition (T1, Median nerve — Thenar muscles)
- Command: "Touch your little finger with your thumb — keep them together"
- Try to pull the thumb away from the little finger
3E. LOWER LIMB POWER — STEP-BY-STEP MUSCLE TESTING
Hip Flexion (L1–L2, Femoral nerve — Iliopsoas)
- Position: Patient supine, hip flexed to 30°
- Command: "Lift your leg off the bed — don't let me push it down"
- Resistance: Push the thigh downward
Hip Extension (S1, Inferior gluteal nerve — Gluteus maximus)
- Position: Patient supine, leg flat
- Command: "Push your heel down into the bed — don't let me lift your leg"
- Or: prone — "Lift your straight leg off the bed"
Hip Abduction (L4–L5, Superior gluteal nerve — Gluteus medius)
- Position: Supine, legs flat
- Command: "Push your leg out to the side — don't let me push it in"
- Resistance: Push the lateral thigh inward
Hip Adduction (L2–L3, Obturator nerve)
- Command: "Squeeze your legs together — don't let me pull them apart"
Knee Extension (L3–L4, Femoral nerve — Quadriceps)
- Position: Seated or supine with knee at 90°
- Command: "Straighten your knee — don't let me bend it"
- Resistance: Push the lower leg into flexion
Knee Flexion (S1, Sciatic nerve — Hamstrings)
- Position: Prone or supine with knee slightly flexed
- Command: "Bend your knee — don't let me straighten it"
- Resistance: Pull the lower leg into extension
Ankle Dorsiflexion (L4–L5, Deep peroneal nerve — Tibialis anterior)
- Command: "Pull your foot up toward you — don't let me push it down"
- Resistance: Push down on the dorsum of the foot
- Weakness = footdrop, steppage gait
Ankle Plantarflexion (S1–S2, Tibial nerve — Gastrocnemius/Soleus)
- Command: "Push your foot down like pressing a pedal — don't let me pull it up"
- Resistance: Push upward on the sole
- Also test: can the patient stand on tiptoe on each foot in turn?
Great Toe Extension (L5, Deep peroneal nerve — Extensor hallucis longus)
- Command: "Pull your big toe up — don't let me push it down"
- Resistance: Push the big toe into plantarflexion
3F. RECOGNISING WEAKNESS PATTERNS
| Pattern | Description | Localisation |
|---|
| Pyramidal / UMN pattern | Upper limb: extensors weak > flexors. Lower limb: flexors weak > extensors | Corticospinal tract (cortex, capsule, cord) |
| Proximal > distal weakness | Difficulty rising from chair, lifting arms overhead | Myopathy, muscular dystrophy |
| Distal > proximal weakness | Wrist/finger drop, footdrop | Peripheral neuropathy |
| Single nerve distribution | Follows anatomical territory of one nerve exactly | Mononeuropathy |
| Dermatomal / myotomal | Follows a nerve root distribution | Radiculopathy |
| Bulbar weakness | Facial, tongue, palatal, swallowing | Motor neurone disease, brainstem |
━━━━━━━━━━━━━━━━━━━━━━━━━━━━
STEP 4 — DEEP TENDON REFLEXES (DTRs)
━━━━━━━━━━━━━━━━━━━━━━━━━━━━
4A. PRINCIPLES
- The patient must be relaxed — contracted muscles abolish reflexes
- Use a proper tendon hammer (Babinski or Queen Square hammer)
- Strike the tendon (not the muscle belly) with a brisk, relaxed wrist flick
- Assess the smallest stimulus needed to elicit the reflex, not the maximum response
- Always compare left vs. right at each level
- If absent, use Jendrassik manoeuvre before concluding the reflex is truly absent
4B. JENDRASSIK MANOEUVRE (Reinforcement)
For lower limbs:
- Ask the patient to interlock their fingers of both hands and pull them apart vigorously
- While they are pulling — strike the tendon
- This reduces cortical inhibition and unmasks suppressed reflexes
For upper limbs:
- Ask the patient to clench their teeth or clench the opposite fist
4C. REFLEX GRADING SCALE
(Harrison's Principles of Internal Medicine, 22e)
| Grade | Description |
|---|
| 0 | Absent — even with reinforcement |
| 1+ | Present but diminished |
| 2+ | Normal |
| 3+ | Brisk — possibly pathological (assess in context) |
| 4+ | Clonus — definitely pathological |
4D. UPPER LIMB REFLEXES — HOW TO ELICIT EACH
Biceps Reflex (C5, C6)
- Patient's arm relaxed, elbow at 90° flexion, forearm slightly pronated (resting on your arm)
- Place your thumb firmly over the biceps tendon (in the antecubital fossa)
- Strike your thumb with the hammer — not the patient directly
- Normal response: Biceps contracts → elbow flexion + slight supination
- Absent: C5/C6 lesion
- Exaggerated: UMN lesion above C5
Supinator (Brachioradialis) Reflex (C5, C6)
- Patient's arm relaxed, elbow at 90°, forearm in mid-pronation (thumb up)
- Strike the radial border of the forearm 4–5 cm above the wrist
- Normal response: Forearm flexion + slight supination
- Inverted supinator reflex: No contraction here but fingers flex → C5/C6 root lesion with intact C8 reflex arc — significant for cord lesion at C5/C6
Triceps Reflex (C6, C7)
- Support the patient's arm with elbow at 90° flexion, arm hanging freely
- Strike the triceps tendon directly above the olecranon
- Normal response: Elbow extension
- Absent: C7 lesion
Finger Flexor Reflex (C8, T1)
- Hold the patient's hand with their fingers slightly flexed over your fingers
- Strike the dorsal surface of your fingers
- Normal: Slight finger flexion
- Exaggerated: Pathological — Hoffmann's sign equivalent; UMN
- Hoffmann's sign: Flick the middle fingernail downward and release — thumb and index finger flex involuntarily = UMN sign
4E. LOWER LIMB REFLEXES — HOW TO ELICIT EACH
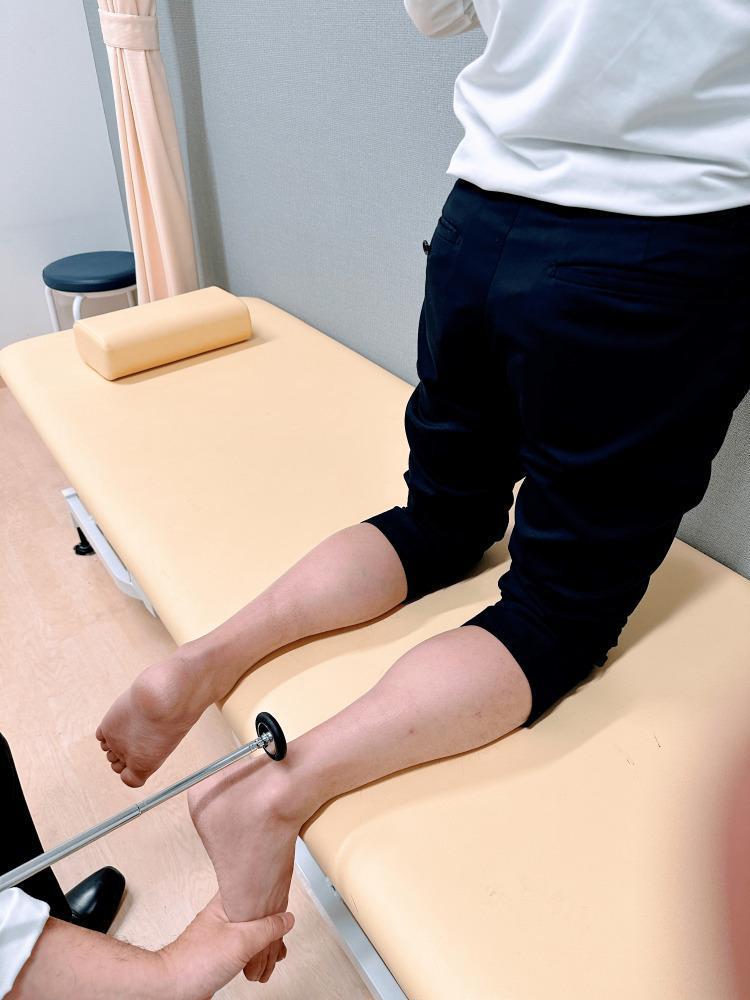
Knee (Patellar) Reflex (L3, L4)
Method 1 — Seated:
- Patient sits with legs hanging freely at 90° off the bed edge
- Strike the patellar tendon just below the patella with a brisk swing
- Normal: Knee extension (quadriceps contraction)
Method 2 — Supine:
- Support the knee with your non-dominant arm underneath, creating a 30° knee flex
- Strike the patellar tendon
- Watch for quadriceps contraction and knee extension
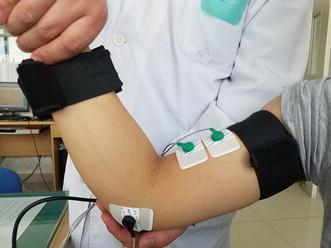
Patellar reflex with Jendrassik reinforcement — knee at 90°, feet clear of floor
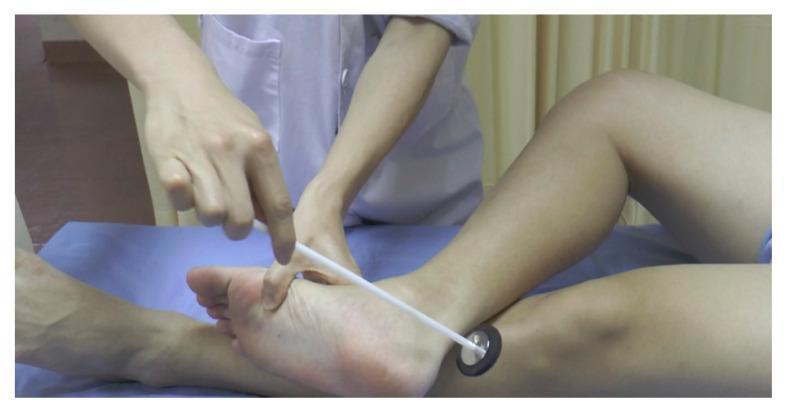
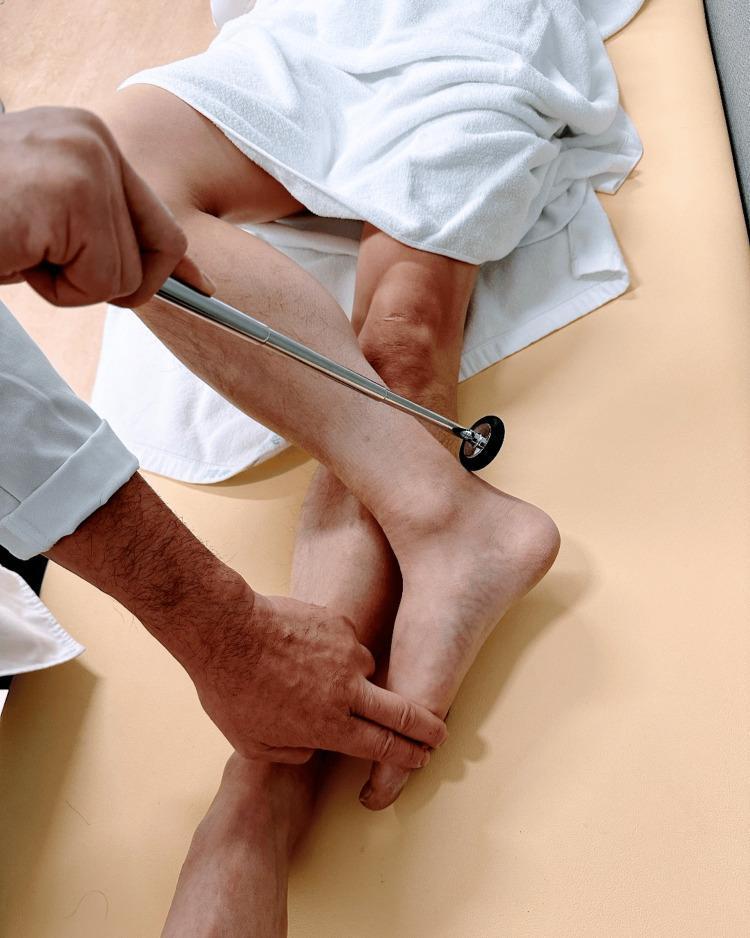
Ankle (Achilles) Reflex (S1, S2)
Method 1 — Kneeling position (preferred):
- Ask the patient to kneel on the examination couch with feet hanging over the edge
- Slightly dorsiflex the foot to put the tendon under mild tension
- Strike the Achilles tendon directly, above the heel
Method 2 — Supine, figure-4:
- Cross the tested leg over the opposite shin ("figure-4")
- Gently dorsiflex the foot
- Strike the Achilles tendon
Method 3 — Supine, knee supported:
- Flex the hip and knee, let the leg fall laterally
- Apply passive dorsiflexion, then strike
Normal: Plantarflexion of the foot
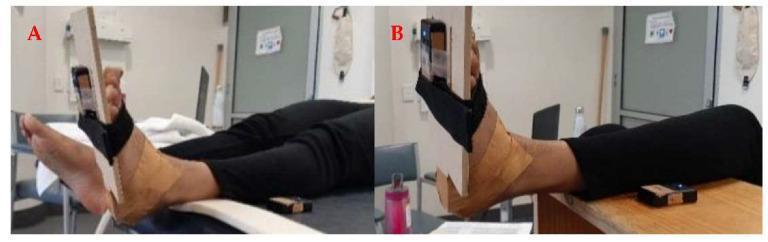
Achilles reflex in figure-4 position with passive dorsiflexion — S1/S2
4F. CUTANEOUS (SUPERFICIAL) REFLEXES
Plantar Reflex / Babinski Sign
- Position the patient's leg in external rotation, knee slightly flexed
- Warn the patient: "I'm going to stroke the sole of your foot — it may feel uncomfortable"
- Use the blunt handle of the hammer or a key
- Apply firm, continuous pressure from the lateral heel, along the lateral sole, then curve medially toward the ball of the foot under the toes
- The stroke should take 2–3 seconds — not too fast, not too slow
| Response | Name | Meaning |
|---|
| Toes curl down (plantarflex) | Flexor plantar response | Normal in adults |
| Big toe extends upward + other toes fan out | Extensor response = Babinski sign | UMN lesion (corticospinal tract above S1) |
| Equivocal / withdrawal | Record as such | Not diagnostic |
Abdominal Reflexes (T7–T12)
- With the patient supine, use a pointed object to stroke from the lateral abdomen toward the midline in each quadrant
- Normal: Umbilicus moves toward the quadrant stroked
- Absent unilaterally above umbilicus (T8–T9) but present below: Spinal cord lesion at T8–T9
- Absent ipsilaterally: UMN lesion above that level
- Absent in obesity and post-abdominal surgery — not always pathological
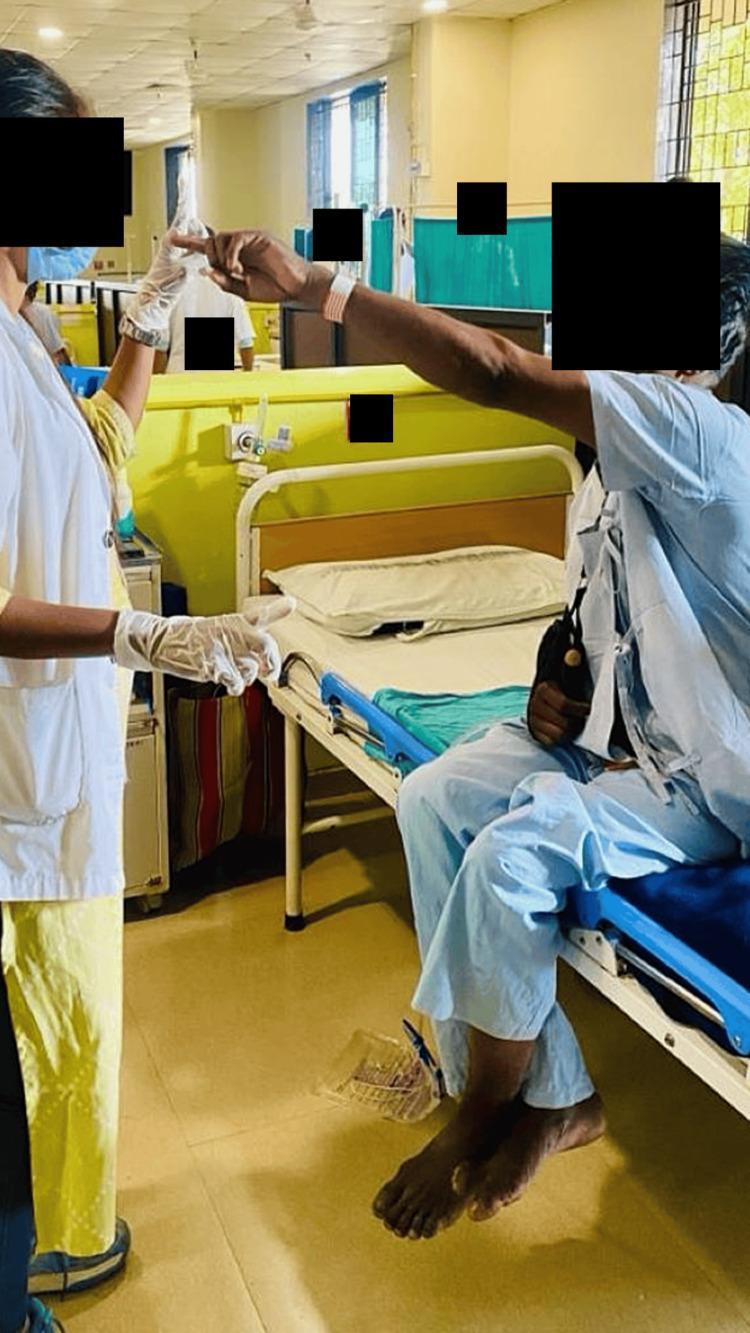
4G. PRIMITIVE REFLEXES (Frontal Release Signs)
Present in normal infants, reappear in frontal lobe disease / diffuse cortical damage:
| Reflex | How to Elicit | Positive Response | Significance |
|---|
| Grasp reflex | Stroke the patient's palm between thumb and index with your fingers | Patient involuntarily grabs your fingers | Frontal lobe disease |
| Suck reflex | Touch the centre of the lips with a tongue blade | Sucking movement | Bilateral frontal disease |
| Palmomental reflex | Briskly scratch the thenar eminence diagonally | Ipsilateral chin mentalis muscle contracts | Frontal/corticobulbar disease |
| Snout reflex | Tap the philtrum (above upper lip) | Pursing of lips | Frontal disease |
━━━━━━━━━━━━━━━━━━━━━━━━━━━━
STEP 5 — COORDINATION
━━━━━━━━━━━━━━━━━━━━━━━━━━━━
5A. PRINCIPLES
- Coordination tests the cerebellar system (vermis = truncal/gait; hemispheres = limb)
- Only meaningful if the patient has adequate power (MRC ≥ 3) and adequate sensation
- Weakness and sensory loss cause incoordination that is NOT cerebellar — always interpret in context
5B. UPPER LIMB COORDINATION
Finger-to-Nose Test
Step-by-step:
- Hold your index finger at the patient's arm's length away, slightly off-centre
- Ask: "Touch the tip of your nose with your index finger, then touch my finger — and keep going back and forth"
- After several cycles, move your finger to a new position without warning
- The patient must reach accurately to the new position each time
- Observe for:
- Dysmetria: Past-pointing (overshooting) or under-shooting the target
- Intention tremor: Tremor that increases as the finger approaches the target (absent at rest)
- Decomposition of movement: Movement breaks into jerky segments
Rapid Alternating Movements (Dysdiadochokinesia)
Method 1:
- Ask the patient to tap the back of one hand alternately with the palm and dorsum of the other hand as rapidly as possible
- Observe for rhythm, regularity, and speed
Method 2:
- Ask the patient to tap their index finger to the thumb repeatedly at speed
- Compare both hands
Abnormal: Slow, irregular, clumsy alternation = dysdiadochokinesia → cerebellar hemisphere lesion (ipsilateral)
5C. LOWER LIMB COORDINATION
Heel-Knee-Shin Test
Step-by-step:
- Patient lies supine, legs flat
- Ask: "Lift your right heel and place it on your left knee"
- Then: "Now slide your heel smoothly down your shin toward your ankle"
- Return to start and repeat several times
- Observe for:
- Accuracy of placing heel on knee
- Smoothness of sliding down the shin (should be in a straight line)
- Deviations / wobbling off the shin
- Slowing of initiation
Normal: Smooth, controlled, straight line heel slide
Abnormal (cerebellar): Wobbly, irregular, deviates off the shin
Foot Tapping
- Ask patient to tap the foot (heel on floor, foot tapping up and down) as fast and regularly as possible
- Compare both sides — unilateral slowing = ipsilateral cerebellar or contralateral UMN
5D. CEREBELLAR SIGNS SUMMARY
| Sign | Test | Cerebellar Feature |
|---|
| Dysmetria | Finger-nose, heel-knee-shin | Ipsilateral hemisphere |
| Intention tremor | Finger-nose | Ipsilateral hemisphere |
| Dysdiadochokinesia | Rapid alternating movements | Ipsilateral hemisphere |
| Ataxic gait | Tandem walking, watching gait | Vermis (midline) |
| Truncal ataxia | Sitting balance, Romberg-like | Vermis |
| Nystagmus | Ocular examination | Vestibulocerebellum / brainstem |
| Dysarthria | Speech assessment | Cerebellar connections |
━━━━━━━━━━━━━━━━━━━━━━━━━━━━
STEP 6 — GAIT AND BALANCE
━━━━━━━━━━━━━━━━━━━━━━━━━━━━
6A. PRINCIPLES
Gait integrates the entire neurological system — cerebellar, pyramidal, extrapyramidal, sensory, vestibular, and musculoskeletal. Always test gait even if the patient needs minimal assistance.
6B. HOW TO ASSESS GAIT — STEP BY STEP
Environment: A corridor of at least 6–10 metres. Ensure safety — walk alongside the patient.
Step 1 — Normal walking:
- Ask the patient to walk to the end of the corridor and back
- Observe from behind initially, then from the side
- Assess:
- Stride length (normal vs. short steps)
- Base width (narrow normal vs. wide-based)
- Arm swing — normally symmetrical
- Posture — upright vs. stooped
- Rhythm and regularity
- Turning — normal vs. turns en bloc (Parkinson's)
- Foot clearance — does the foot drag? Does the toe drop?
Step 2 — Heel walking:
- Walk on heels down the corridor
- Tests L4/L5 (tibialis anterior — dorsiflexion)
- Inability = footdrop / L5 weakness
Step 3 — Tiptoe walking:
- Walk on tiptoes
- Tests S1 (gastrocnemius — plantarflexion)
- Inability = S1 weakness
Step 4 — Tandem walking (heel-to-toe):
- Walk in a straight line placing each foot directly in front of the other
- This is the most sensitive test for cerebellar ataxia (small abnormalities not visible in normal walking)
- Patient holds arms out if needed for balance
Step 5 — Romberg Test:
- Ask the patient to stand with feet together, arms by their sides
- Observe stability with eyes open first
- Then ask the patient to close their eyes
- Stand close to prevent falls
| Result | Meaning |
|---|
| Stable with eyes open AND closed | Normal |
| Unstable with eyes OPEN | Cerebellar or vestibular problem (visual compensation fails to help) |
| Stable eyes open, unstable eyes closed (positive Romberg) | Proprioceptive / dorsal column loss — patient relies on vision to compensate |
Important: A positive Romberg is NOT a cerebellar test — it is a sign of sensory ataxia (posterior column / peripheral nerve proprioception failure). Cerebellar ataxia is present with eyes OPEN and does not worsen dramatically on closing.
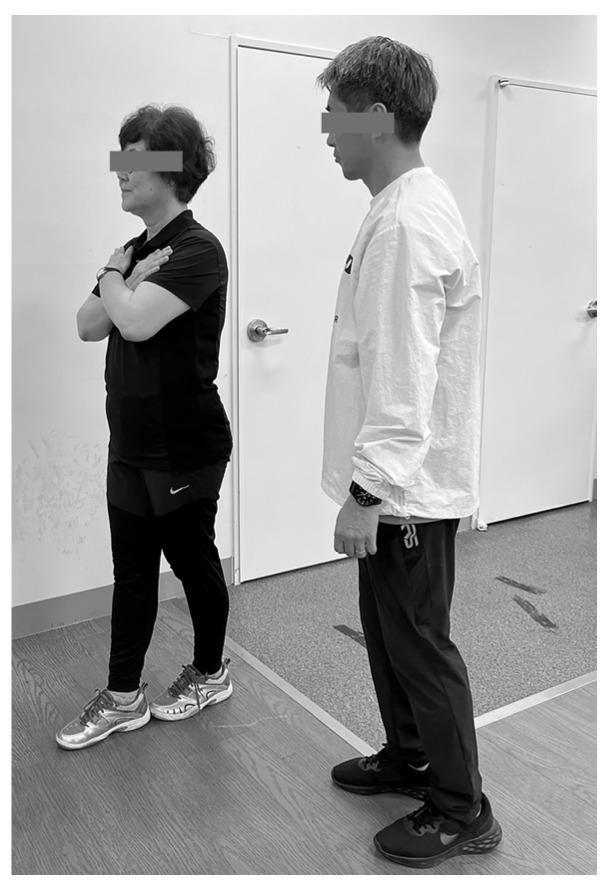
Sharpened Romberg — tandem stance with arms crossed, examiner standing behind for safety
6C. SPECIFIC GAIT PATTERNS — DETAILED RECOGNITION
1. Hemiplegic Gait (UMN — unilateral)
- What you see: Affected arm held flexed and adducted; affected leg extended and stiff, swings in a semicircle outward (circumduction) to clear the floor
- Arm swing: Absent on affected side
- Cause: Contralateral cortical or capsular lesion, stroke
2. Spastic ("Scissor") Gait (UMN — bilateral)
- What you see: Both legs stiff, adducted, knees brush against each other ("scissors"), short shuffling steps on tiptoe
- Cause: Bilateral UMN — bilateral cortical lesions, cervical myelopathy, cerebral palsy
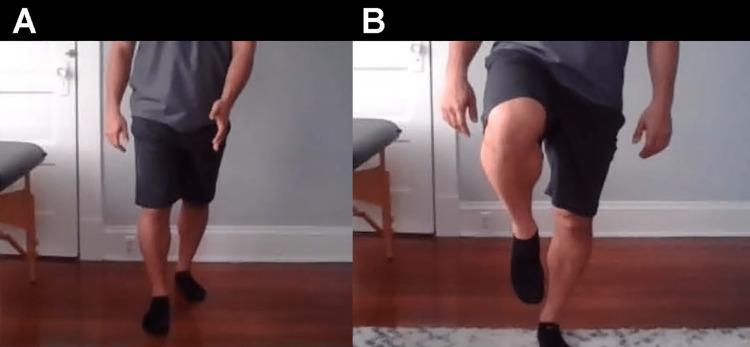
3. Steppage (Footdrop) Gait (LMN)
- What you see: Exaggerated hip and knee flexion to lift the foot off the ground; foot slaps down on landing; toe drags otherwise
- Cause: L4/L5 radiculopathy, common peroneal nerve palsy, Charcot-Marie-Tooth
Steppage gait — high knee lift to compensate for ankle dorsiflexion weakness / footdrop
4. Waddling Gait (Proximal muscle weakness)
- What you see: Trunk sways side-to-side; "duck-like"; pelvis drops on the unsupported side (Trendelenburg sign)
- Cause: Proximal myopathy (muscular dystrophy), hip girdle weakness
5. Parkinsonian Gait (Extrapyramidal)
- What you see:
- Stooped posture, head and trunk flexed forward
- Shuffling, very small steps (marche à petit pas)
- Reduced/absent arm swing bilaterally
- Festination: Progressively faster, shorter steps — patient accelerates involuntarily
- Start hesitation: Difficulty initiating movement
- Freezing: Feet appear glued to the floor, especially in doorways
- Turning en bloc: Cannot pivot; turns in multiple small steps
- Cause: Parkinson's disease, Parkinson-plus syndromes
6. Cerebellar (Ataxic) Gait
- What you see: Wide-based, unsteady, staggering — patient sways erratically; like a drunk person
- Not improved by opening eyes (unlike sensory ataxia)
- Difficulty or impossible with tandem walking
- Cause: Cerebellar vermis lesion (alcohol, MS, tumour, stroke)
7. Sensory Ataxic Gait (Posterior column)
- What you see: Wide-based, stamping / high-stepping gait; patient watches the floor; markedly worse in the dark or with eyes closed
- Cause: Posterior column lesion (B12 deficiency, tabes dorsalis, sensory neuropathy)
8. Antalgic Gait (Pain-related)
- Rapid transfer of weight off the painful limb; shortened stance phase on affected side
━━━━━━━━━━━━━━━━━━━━━━━━━━━━
INTEGRATION TABLE — UMN vs LMN vs CEREBELLAR
━━━━━━━━━━━━━━━━━━━━━━━━━━━━
| Feature | UMN Lesion | LMN Lesion | Cerebellar |
|---|
| Wasting | Mild (disuse) | Severe, early | None |
| Fasciculations | Absent | Present | Absent |
| Tone | Spasticity (clasp-knife) | Flaccidity | Hypotonia |
| Power | Pyramidal pattern weakness | Focal / distal / proximal | Normal or mild |
| Reflexes | Hyperreflexia | Hyporeflexia / absent | Normal or diminished |
| Plantar response | Extensor (Babinski +) | Flexor or absent | Flexor |
| Coordination | Affected only by weakness | Affected only by weakness | Severely impaired |
| Gait | Hemiplegic / spastic | Steppage / waddling | Wide-based ataxic |
Sources: Harrison's Principles of Internal Medicine, 22e; Textbook of Family Medicine, 9e; Adams and Victor's Principles of Neurology, 12e; Bradley and Daroff's Neurology in Clinical Practice