Fever definition amd its types eith grahs
Reading File
search_medical_text
fever definition classification types pathophysiology
search_medical_image
fever types patterns temperature graph continuous remittent intermittent
GradeResponse
GradeResponse
Here is a comprehensive overview of fever — its definition, pathophysiology, and all major types with their characteristic patterns.
Fever: Definition, Pathophysiology & Types
Definition
Fever (pyrexia) is defined as an elevation of the core body temperature above the normal daily variation, resulting from a upward resetting of the hypothalamic thermostat (set point).
| Parameter | Value |
|---|---|
| Normal oral temperature | 36.0 – 37.2°C (96.8 – 99°F) |
| Low-grade fever | 37.3 – 38.0°C (99.1 – 100.4°F) |
| Fever (pyrexia) | > 38.3°C (> 101°F) |
| Hyperpyrexia | > 41.5°C (> 106.7°F) |
Distinguished from hyperthermia, where the hypothalamic set point is NOT raised — instead, heat generation exceeds dissipation (e.g., heat stroke, malignant hyperthermia).
Pathophysiology (Harrison's, p. 640)
- Exogenous pyrogens (microbes, toxins, immune complexes) stimulate myeloid and endothelial cells.
- These cells release pyrogenic cytokines: IL-1, IL-6, TNF-α.
- Cytokines induce synthesis of prostaglandin E₂ (PGE₂) in the hypothalamus.
- PGE₂ raises the hypothalamic set point → the body perceives itself as "cold" → triggers heat conservation (vasoconstriction, shivering) and heat production until the new set point is reached.
- Peripheral PGE₂ also explains the myalgias and arthralgias accompanying fever.
Types of Fever (by Temperature Pattern)
1. Continuous (Sustained) Fever
- Temperature remains elevated throughout the day
- Daily variation < 1°C
- Never touches normal
- Causes: Lobar pneumonia, typhoid fever, urinary tract infections, rickettsial disease
Temp (°C)
40 |▔▔▔▔▔▔▔▔▔▔▔▔▔▔▔▔▔▔▔▔▔▔▔▔▔▔▔
39 |
38 |_ _ _ _ _ _ normal _ _ _ _
   Day1  Day2  Day3  Day4  Day5
2. Remittent Fever
- Temperature is always elevated but fluctuates > 1°C daily
- Never returns to normal
- Most common type of fever in clinical practice
- Causes: Infective endocarditis, tuberculosis, viral infections, many bacterial infections
Temp (°C)
40 |  ╭╮   ╭╮   ╭╮   ╭╮
39 |╯  ╰╮ ╯  ╰╮╯  ╰
38 |      ╰╯      ╰╯
37 |_ _ _ normal _ _ _ _ _
   Day1  Day2  Day3  Day4
3. Intermittent Fever
- Temperature spikes to febrile levels, then returns to normal (≤37°C) in between
- Spikes may be daily (quotidian), every 48 h (tertian), or every 72 h (quartan)
- Causes: Malaria, pyemia, septicemia, hepatic abscess, juvenile rheumatoid arthritis
| Subtype | Periodicity | Malaria species |
|---|---|---|
| Quotidian | Every 24 hours | P. knowlesi |
| Tertian | Every 48 hours | P. vivax, P. ovale |
| Quartan | Every 72 hours | P. malariae |
Temp (°C)
40 |  ╭╮          ╭╮
39 |  │ │          │ │
38 |  │  │         │  │
37 |╯   ╰╮╯╯╯╯╯╯╯   ╰╮
   Day1  Day2  Day3  Day4
4. Hectic (Septic) Fever
- Exaggerated form of intermittent fever
- Swinging spikes > 5°C daily with profound sweating and chills
- Temperature returns to subnormal levels (< 36°C) in the troughs
- Causes: Septicemia, pyemia, liver abscess, disseminated TB, empyema
Temp (°C)
41 |     ╭╮              ╭╮
40 |    │  │            │  │
39 |   │    │           │   │
38 |  │      │         │     │
36 |╯         ╰─────────╯     ╰
   morning   evening  morning  evening
5. Pel-Ebstein Fever
- Cyclic pattern: days to weeks of fever alternating with days to weeks of normal temperature
- Very characteristic but uncommon
- Classic cause: Hodgkin's lymphoma (also seen in Brucellosis)
Temp (°C)
40 |╭──────╮             ╭──────╮
39 |│      │             │      │
38 |│      │             │      │
37 |│      ╰─────────────╯      │
   Week1  Week2   Week3  Week4
          (afebrile)
6. Inverse (Reversed Diurnal) Fever
- Morning temperature > evening temperature (opposite of normal diurnal variation)
- Causes: Disseminated tuberculosis, typhoid fever (occasionally), liver abscess
- Morning spikes instead of the usual evening peaks
7. Biphasic (Saddle-Back) Fever
- Two distinct fever peaks separated by a brief afebrile interval of 1–3 days
- Causes: Dengue fever (classic), leptospirosis, yellow fever, Colorado tick fever
Temp (°C)
40 |╭──╮         ╭──╮
39 |│   │         │   │
38 |│   │         │   │
37 |│   ╰──╮╭────╯   │
   Day1  Day3   Day5  Day7
          (dip)
Real Patient Fever Chart (Remittent/Intermittent Pattern)
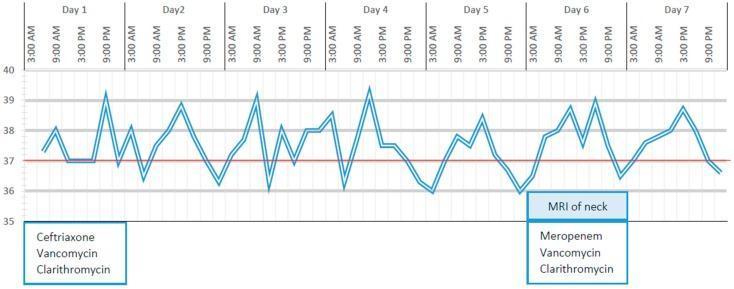
Real clinical fever chart showing a remittent/intermittent pattern — peaks reaching ~39.5°C with troughs to 36°C, correlated with antibiotic therapy adjustments (Ceftriaxone → Meropenem on Day 6).
Summary Table
| Fever Type | Daily Variation | Returns to Normal | Classic Cause |
|---|---|---|---|
| Continuous | < 1°C | No | Typhoid, lobar pneumonia |
| Remittent | > 1°C | No | TB, endocarditis |
| Intermittent | > 1°C | Yes (to normal) | Malaria, abscess |
| Hectic/Septic | > 5°C | Yes (to subnormal) | Septicemia, pyemia |
| Pel-Ebstein | Weeks of fever/apyrexia | Yes (cyclically) | Hodgkin's lymphoma |
| Inverse | AM > PM | — | Disseminated TB |
| Biphasic | Two peaks + dip | Yes (between peaks) | Dengue fever |
Key clinical pearl: The pattern of fever is a vital diagnostic clue. A carefully recorded temperature chart (fever chart) plotted over several days can narrow the differential diagnosis significantly even before investigations are complete.
Surgical steps of diaphragmatic rupture and herniation of abdomen throughout with hemoperitonium with hemothorax with icd in situ in details with siture and step by step
Reading File
search_medical_text
traumatic diaphragmatic rupture surgical repair steps technique sutures
search_medical_text
hemoperitoneum hemothorax intercostal chest drain ICD surgical management trauma
search_medical_image
diaphragmatic rupture hernia repair surgical anatomy
GradeResponse
GradeResponse
GradeResponse
search_medical_text
exploratory laparotomy hemoperitoneum damage control surgery abdominal trauma steps
search_medical_image
hemothorax chest drain ICD insertion intercostal tube thoracostomy
GradeResponse
GradeResponse
Excellent. I now have sufficient material from authoritative sources plus comprehensive surgical knowledge to deliver a complete, detailed answer.
Surgical Management of Traumatic Diaphragmatic Rupture with Herniation, Hemoperitoneum, Hemothorax & ICD In Situ
Clinical Scenario Overview
This is a life-threatening thoracoabdominal emergency — typically following high-velocity blunt trauma (RTA, fall from height) or penetrating trauma — presenting with:
| Finding | Implication |
|---|---|
| Diaphragmatic rupture | Loss of thoracoabdominal barrier, herniation of abdominal viscera into chest |
| Herniation (stomach/bowel/omentum) | Compression of lung, mediastinal shift, impaired ventilation |
| Hemoperitoneum | Active intra-abdominal hemorrhage from solid organ / mesenteric injury |
| Hemothorax | Intrathoracic blood accumulation — from diaphragm vessels, intercostals, or pulmonary laceration |
| ICD in situ | Chest drain already placed pre-operatively to drain hemothorax and decompress thorax |
Pre-Operative Phase
Resuscitation & Stabilization
- Primary survey (ABCDE) with simultaneous resuscitation
- Secure two large-bore IV cannulae, central line if needed
- Massive transfusion protocol (MTP): packed RBCs : FFP : platelets in 1:1:1 ratio
- ICD insertion (if not already in situ) — see ICD technique below
- Endotracheal intubation (RSI) — cautious positive pressure ventilation to avoid tension from herniated viscera
- FAST (Focused Assessment with Sonography in Trauma): confirm hemoperitoneum
- CT chest-abdomen-pelvis (if patient is hemodynamically stable) — delineates rupture site, herniated organs, vascular injury
- Inform operating theatre, anaesthesia, and blood bank
- Insert urinary catheter and nasogastric tube (decompresses herniated stomach)
- Consent for laparotomy ± thoracotomy
ICD Insertion Technique (In Situ Pre-Operatively)
If ICD is already in situ and draining adequately, do NOT remove it before surgery. It stays connected throughout the procedure.
If ICD needs to be placed:
Position: Supine, arm abducted 90°
Site: 4th–5th intercostal space, anterior axillary line (safe triangle)
Steps:
- Prep and drape with antiseptic
- Local anaesthesia — 1% lignocaine infiltrating skin, intercostal muscles, periosteum of rib (inject over upper border of lower rib to avoid neurovascular bundle)
- 1.5–2 cm horizontal skin incision over ICS
- Blunt dissection through intercostal muscles with curved haemostat — pierce parietal pleura with a controlled pop
- Finger sweep — confirm entry into pleural space, feel for adhesions/lung/herniated viscera
- Insert 28–32 Fr chest tube (large bore for hemothorax) directed posteriorly and basally
- Connect to underwater seal drain (UWSD) — confirm swinging and blood drainage
- Secure with 0 silk stay suture and closing suture (mattress/purse string) pre-tied for removal
- Cover with Vaseline gauze and firm dressing
- CXR to confirm position
Target: Drain hemothorax, re-expand lung, monitor ongoing bleeding (>200 mL/h for 2–4 h = indication for thoracic surgery)
Operative Phase: Step-by-Step Surgical Repair
Operating Room Setup
- General anaesthesia, double-lumen ETT if available (allows lung isolation)
- Supine position, arms extended
- Prep from chin to mid-thighs, including both flanks
- ICD remains connected and draining throughout
STEP 1 — Incision
Approach: Midline Exploratory Laparotomy (preferred for combined hemoperitoneum + diaphragmatic injury)
- Incision: Midline vertical incision from xiphisternum to umbilicus (extend below umbilicus as needed)
- Scalpel (No. 22 blade) through skin → subcutaneous fat
- Cutting diathermy through linea alba
- Enter peritoneum sharply between two artery forceps — caution: bowel may be adherent in chronic presentation
- Extend incision superiorly and inferiorly using scissors or diathermy
- Insert self-retaining retractor (Balfour or O'Sullivan-O'Connor)
STEP 2 — Control of Hemoperitoneum (Damage Control Principles)
As per Management of Vascular Trauma (p. 29):
- Rapid 4-quadrant packing with large laparotomy swabs (all 4 quadrants simultaneously)
- Evacuate blood and clots by suction and manual scooping
- Bowel evisceration — exteriorize small bowel loops wrapped in warm saline-soaked packs to the right
- Systematic exploration to identify bleeding source:
- Right upper quadrant: liver, right kidney, right adrenal
- Left upper quadrant: spleen, left kidney, stomach, diaphragm
- Mesentery: mesenteric vessels
- Retroperitoneum: aorta, IVC, iliac vessels
- If major haemorrhage continues despite packing: compress aorta at the diaphragmatic hiatus manually or with aortic clamp
- Control individual bleeding points:
- Hepatic laceration → packing, Pringle manoeuvre, suture ligation
- Splenic injury → splenorrhaphy or splenectomy
- Mesenteric bleeder → figure-of-eight suture ligation with 2-0 Vicryl/silk
- Vascular injuries → primary repair or damage control shunting
STEP 3 — Exposure of the Diaphragmatic Defect
- Retract the left lobe of liver medially with a malleable retractor
- Depress the stomach and transverse colon inferiorly
- Identify the diaphragmatic rent — typically posterolateral on the left side (left hemidiaphragm ruptured in ~75% of cases; right side protected by liver)
- Assess:
- Size and location of defect
- Viability of herniated organs
- Integrity of diaphragmatic blood supply (phrenic vessels)
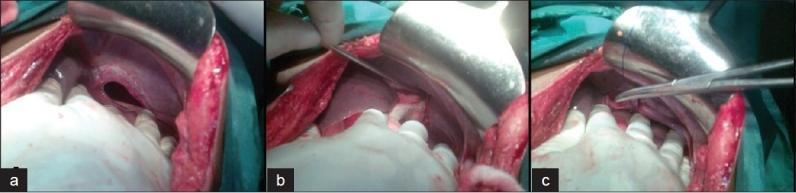
Intraoperative view: (a) well-defined circular defect in posterolateral left hemidiaphragm with herniated stomach; (b–c) edges grasped with forceps, bowel retracted for repair. Note: healthy, viable stomach without strangulation. (pmc_clinical_VQA)
STEP 4 — Reduction of Herniated Viscera
- Gently reduce herniated organs from thoracic cavity back into the abdomen:
- Stomach → decompress via NGT first, then gentle traction
- Small bowel / colon → steady, careful manual reduction
- Omentum → reduce with finger dissection
- Never forcibly pull — risk of tear and devascularization
- If reduction is difficult due to adhesions or tight defect → enlarge the diaphragmatic defect radially (avoiding phrenic nerve branches) to facilitate reduction
- Assess reduced viscera for:
- Viability: colour, peristalsis, mesenteric pulsation
- Ischaemia/necrosis: if gangrenous bowel → resection and staple off ends (damage control) or primary anastomosis if stable
- Perforation: oversew any spillage
STEP 5 — Diaphragmatic Repair (Primary Closure)
As per Bailey & Love's (p. 292): "The defect may be small, needing only a few sutures, or larger, needing a conical Silastic or GOR-TEX patch."
Suture Material:
- Primary choice: No. 1 or 0 non-absorbable suture — Prolene (polypropylene) or Ethibond (braided polyester)
- Alternative: No. 1 PDS (polydioxanone) — slowly absorbable, good tensile strength
- Needle: Large curved (CT-1) or J-needle for muscular diaphragm
Technique — Small Defect (< 5 cm):
- Freshen edges with scissors if necessary
- Interrupted figure-of-eight sutures through the full thickness of the diaphragm
- Bites 1–1.5 cm from edge, 1–1.5 cm apart
- Tie with 4–5 square knots (non-absorbable) to prevent slippage
- Test closure for air leak: anaesthetist applies positive pressure, observe for bubbling
- A second layer of continuous suture (0 Prolene or Ethibond) may be placed for reinforcement
Technique — Large Defect (> 5 cm or tissue loss):
- Mobilize diaphragmatic edges by scoring the periphery if under tension
- Attempt primary repair as above; if tension remains:
- Mesh/Patch repair:
- GOR-TEX (PTFE) 2mm patch — most commonly used; inert, durable
- Vicryl mesh — if contamination present (absorbable)
- Biological mesh (Permacol/Surgisis) — for contaminated fields
- Patch secured circumferentially with interrupted non-absorbable sutures (0 Prolene) — full-thickness bites through diaphragm edge and mesh
- Central bites every 1 cm around the entire circumference
- Ensure no tension — if abutting ribs, sutures may be passed around the rib with a large round-bodied needle
Key Anatomical Caution:
- Phrenic nerve: enters diaphragm centrally — avoid blind suturing in central tendinous area
- Phrenic vessels: run on inferior surface — control bleeding before closure
- IVC passes through right hemidiaphragm at T8 — extreme caution on right side repairs
STEP 6 — Thoracic Cavity Management via ICD
After diaphragmatic closure:
- Irrigate thoracic cavity through the diaphragm defect (prior to closing) — warm saline 500 mL–1 L, aspirate via suction
- Confirm ICD position: tube should lie posteriorly and basally — feel through defect before closing
- Request lung re-expansion from anaesthetist: sustained inflation to 30–35 cmH₂O
- Close diaphragm with lung fully expanded to avoid leaving dead space
- ICD remains in place and connected — monitor drainage post-closure
- If ICD had been accidentally pulled into abdominal cavity during surgery, reposition or replace before closure
STEP 7 — Thoracic Cavity Assessment (If Thoracotomy Required)
Indications for adding thoracotomy (left anterolateral or posterolateral):
- ICD draining > 200 mL/hr for > 4 hours
- Massive initial hemothorax > 1500 mL
- Clotted hemothorax not draining
- Pulmonary laceration requiring repair
- Cardiac injury
Left Anterolateral Thoracotomy Steps (if needed):
- Patient repositioned to right lateral decubitus (or stays supine for antero-lateral)
- Incision: 4th or 5th ICS, curving from sternum to posterior axillary line
- Divide intercostal muscles on upper border of lower rib
- Insert rib spreader (Finochietto retractor) — open 4–5 cm
- Evacuate clotted hemothorax manually and by suction
- Identify and control bleeding intercostal vessels — figure-of-eight 0 Vicryl around vessel
- Pulmonary laceration: oversew with 3-0 Prolene mattress sutures or stapler (endo-GIA)
- Re-examine diaphragm from above and confirm repair is watertight
- Place additional 28–32 Fr apical chest drain if needed
- Close chest in layers: periosteum/intercostal muscle with 0 Vicryl continuous, muscle layers with 1-0 Vicryl, skin
STEP 8 — Abdominal Closure
Definitive Closure (if patient is stable):
- Irrigate abdomen with 3–5 L warm normal saline until clear
- Count swabs and instruments (mandatory before closure)
- Remove all laparotomy packs
- Close the peritoneum and posterior sheath: No. 1 loop PDS (polydioxanone) — continuous mass closure technique
- Jenkins rule: suture length : wound length ratio = 4:1
- Bites 1 cm from wound edge, 1 cm apart
- Anterior sheath: No. 1 loop PDS — continuous suture
- Subcutaneous layer: irrigate, no suture (or loose absorbable if obese)
- Skin: Interrupted 2-0 Nylon or skin staples — do NOT close if contamination present
Damage Control Laparotomy (if patient is unstable — "lethal triad"):
- Temporary abdominal closure (TAC):
- Apply Bogotá bag (sterile IV bag sutured to skin edges) or
- Vacuum-assisted closure (VAC/KCI) system — negative pressure dressing
- Pack left in situ if bleeding not fully controlled
- Return to ICU for resuscitation
- Planned re-look in 24–48 hours
Suture Summary Table
| Structure | Suture Material | Size | Technique |
|---|---|---|---|
| Diaphragm — small defect | Prolene / Ethibond / PDS | No. 0 or 1 | Interrupted figure-of-eight |
| Diaphragm — reinforcement | Prolene | No. 0 | Continuous over-and-over |
| Diaphragm — mesh patch | Prolene | No. 0 | Interrupted circumferential |
| Mesenteric bleeders | Vicryl / Silk | 2-0 | Figure-of-eight ligation |
| Bowel anastomosis | PDS / Vicryl | 3-0 / 2-0 | Continuous or interrupted |
| Peritoneum/sheath | Loop PDS | No. 1 | Continuous mass closure |
| Anterior sheath | Loop PDS | No. 1 | Continuous |
| Intercostal closure | Vicryl | No. 0 | Continuous pericostal |
| Skin | Nylon / Staples | 2-0 | Interrupted / staples |
| ICD securing suture | Silk | No. 0 | Stay suture + closing suture |
Post-Operative Management
| Domain | Action |
|---|---|
| ICU admission | Ventilated post-op, wean as tolerated |
| ICD monitoring | Record hourly output; remove when < 50–100 mL/24h, no air leak, lung expanded on CXR |
| Analgesia | Thoracic epidural / IV opioid PCA / intercostal nerve block |
| Antibiotics | Broad-spectrum (Ceftriaxone + Metronidazole ± Vancomycin) |
| NGT | Keep on free drainage until bowel sounds return |
| DVT prophylaxis | LMWH when hemostasis confirmed (24–48 h post-op) |
| Nutrition | Early enteral feeding via NGT/NJT once bowel function returns |
| Re-look laparotomy | At 24–48 h if damage control — formal closure at 48–72 h |
| CXR daily | Monitor lung re-expansion, ICD position, mediastinum |
| Complications watch | Empyema, re-herniation, diaphragm dehiscence, ARDS, sepsis |
Complications to Anticipate
| Early | Late |
|---|---|
| Re-bleeding / hemothorax | Diaphragmatic dehiscence / re-herniation |
| Empyema thoracis | Chronic diaphragmatic hernia |
| Anastomotic leak | Bowel obstruction / adhesions |
| ARDS | Phrenic nerve palsy |
| Wound dehiscence | Mesh infection / erosion |
| Abdominal compartment syndrome | Chronic pain |
Key Operative Principles Summary
TRAUMA LAPAROTOMY SEQUENCE:
━━━━━━━━━━━━━━━━━━━━━━━━━━━━━━━━━━━━━━━━━━━━━
1. ENTER  → Midline incision, peritoneum opened
2. PACK   → 4-quadrant packing, evacuate hemoperitoneum
3. CONTROL → Identify & control hemorrhage sources
4. EXPOSE  → Visualize diaphragm defect
5. REDUCE  → Herniated viscera returned to abdomen
6. ASSESS  → Viability of reduced organs
7. REPAIR  → Diaphragm primary closure / patch
8. IRRIGATE → Thoracic + abdominal cavity
9. ICD     → Confirm position, lung expanded
10. CLOSE  → Definitive or damage control closure
━━━━━━━━━━━━━━━━━━━━━━━━━━━━━━━━━━━━━━━━━━━━━
Critical intraoperative dictum: Never close the diaphragm with the lung collapsed. Always coordinate with the anaesthetist for full lung re-expansion before the final diaphragmatic sutures are tied — failure to do so leaves a trapped hemothorax and risks empyema.
This is a shared conversation. Sign in to Orris to start your own chat.