
Dynamic pip extension orthosis
dynamic PIP extension orthosis proximal interphalangeal joint flexion contracture
"proximal interphalangeal" AND "extension orthosis" AND "flexion contracture"
https://www.handsurgeryresource.net/taxonomy/term/812
I wmat diagram
A clear medical diagram of a Dynamic PIP Extension Orthosis (Capener splint style) on a human finger. Show a side-view and a dorsal-view of the orthosis applied to the proximal interphalangeal (PIP) joint. Label the following parts: thermoplastic base secured over MP joints, outrigger wire frame, rubber band traction, finger sling at middle phalanx, DIP joint stabilizer strap, and the PIP joint being stretched into extension. Include a small inset showing the direction of extension force with an arrow. Clean anatomical illustration style with clear labels and a white background.
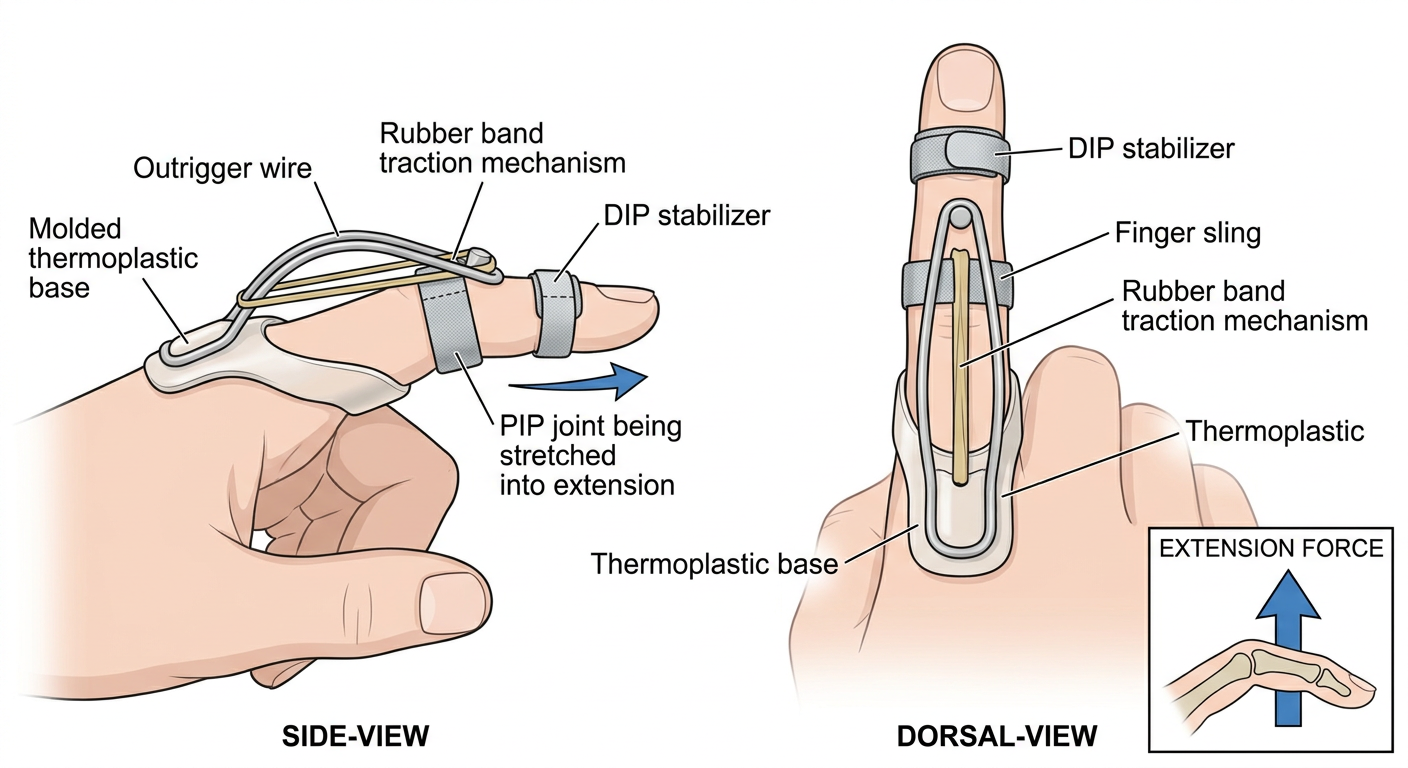
- Thermoplastic base - anchors over the MP joints for stability
- Outrigger wire/frame - projects dorsally to redirect the traction force
- Rubber band traction - provides the low-load, prolonged extension force
- Finger sling - sits at the middle phalanx, transferring the pull to the PIP joint
- DIP stabilizer strap - holds the DIP joint in a neutral position
- Extension force arrow - shows the direction of stretch on the PIP joint
Hand based functional orthosis diagram
A detailed medical diagram of a Hand-Based Functional Orthosis (resting hand splint / functional position splint) shown from multiple views: dorsal view, palmar view, and lateral side view. The orthosis covers the hand and fingers but NOT the forearm. Show the hand positioned in the functional (intrinsic plus) position: wrist in slight extension 20-30 degrees, MP joints flexed 60-70 degrees, IP joints slightly flexed, thumb in palmar abduction and opposition. Label all key anatomical landmarks and orthosis components: thermoplastic shell on palmar surface, thumb post/opponens bar, finger trough supporting all four fingers, C-bar maintaining first web space, MP joint support, wrist support edge at distal palmar crease, and Velcro straps. Include a small inset diagram showing the correct functional hand position angles. Clean anatomical illustration, white background, professional medical textbook style with clear annotation lines and labels.
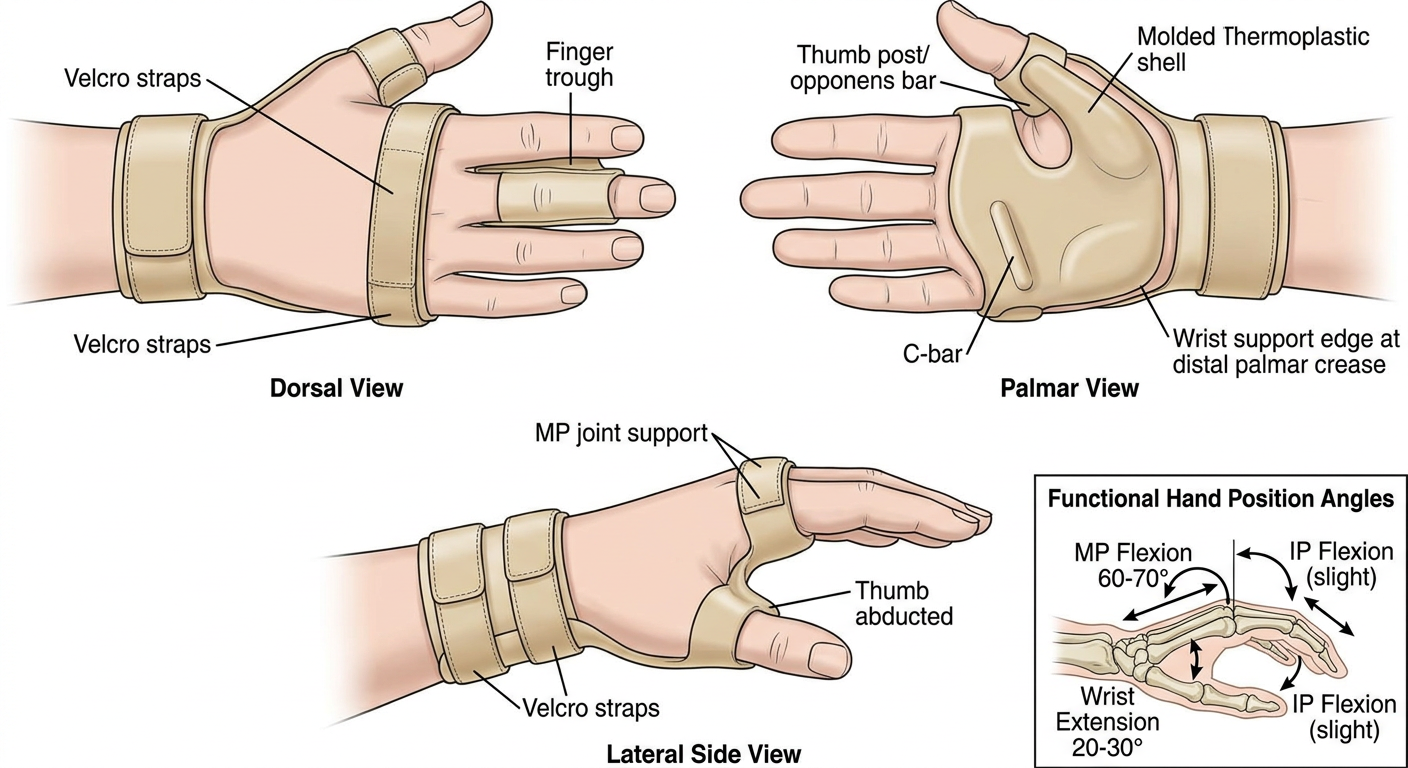
| Joint | Position |
|---|---|
| Wrist | 20-30° extension |
| MP joints | 60-70° flexion |
| IP joints | Slight flexion (near extension) |
| Thumb | Palmar abduction + opposition |
- Thermoplastic palmar shell - extends from distal palmar crease to fingertips
- C-bar - maintains the first web space to prevent thumb adduction contracture
- Thumb post / opponens bar - positions thumb in palmar abduction
- Finger trough - supports all four fingers in correct alignment
- MP joint support - prevents hyperextension
- Velcro straps - secures the orthosis at the hand dorsum
Elbow wrist hand orthoses and shoulder elbow wrist hand orthoses diagram
A detailed medical diagram of an Elbow-Wrist-Hand Orthosis (EWHO) shown from lateral and posterior views on a human upper limb. The orthosis extends from just above the elbow to the fingertips. Show the elbow positioned at 90 degrees flexion, wrist in 20-30 degrees extension, MP joints in 60-70 degrees flexion, fingers supported, and thumb in palmar abduction. Label all components clearly: elbow cuff with medial and lateral uprights, hinged elbow joint mechanism, forearm trough, wrist support, palmar shell, finger trough, thumb post, C-bar for first web space, and Velcro straps. Show a side inset indicating joint angles. Professional medical textbook illustration style, clean white background, clear annotation lines and labels.
A detailed medical diagram of a Shoulder-Elbow-Wrist-Hand Orthosis (SEWHO) shown from anterior and lateral views on a full human upper extremity. The orthosis extends from the shoulder/axilla down to the fingertips. Show the shoulder in 30 degrees abduction and slight flexion, elbow at 90 degrees flexion, forearm in neutral/slight supination, wrist in 20-30 degrees extension, and hand in functional position with thumb abducted. Label all components clearly: shoulder cap/cuff with axillary pad, shoulder joint mechanism allowing abduction, humeral cuff, elbow hinge joint, forearm trough, wrist support, palmar shell, finger trough, thumb post, C-bar, and Velcro straps. Include small inset diagram showing correct joint angles at each level. Professional medical textbook illustration style, clean white background, clear annotation lines and labels.
1. Elbow-Wrist-Hand Orthosis (EWHO)
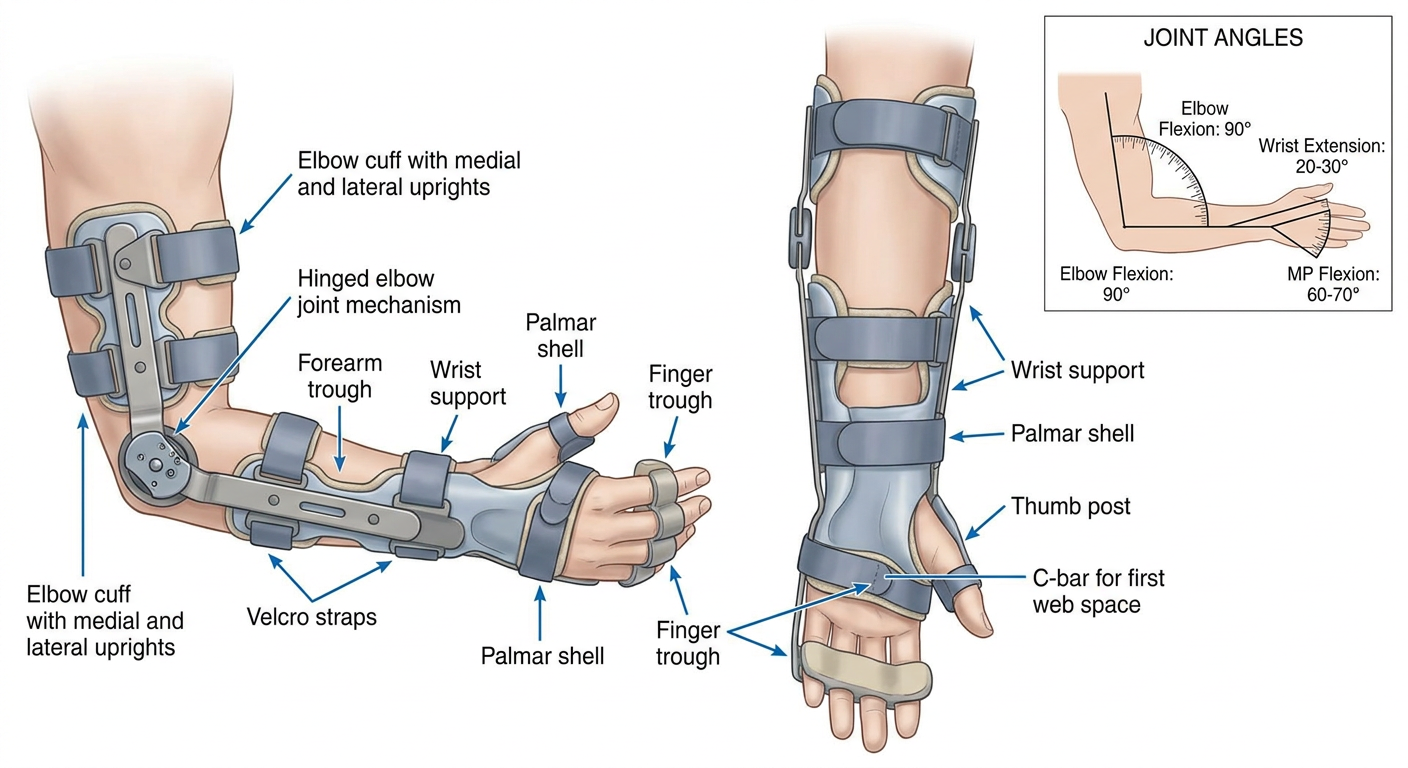
- Elbow cuff with medial and lateral uprights
- Hinged elbow mechanism - set at 90° flexion (adjustable)
- Forearm trough - supports the forearm in neutral/supination
- Wrist support - holds wrist at 20-30° extension
- Palmar shell + finger trough - maintains functional hand position
- C-bar + thumb post - prevents first web space contracture
- Velcro straps at multiple levels for secure fit
2. Shoulder-Elbow-Wrist-Hand Orthosis (SEWHO)
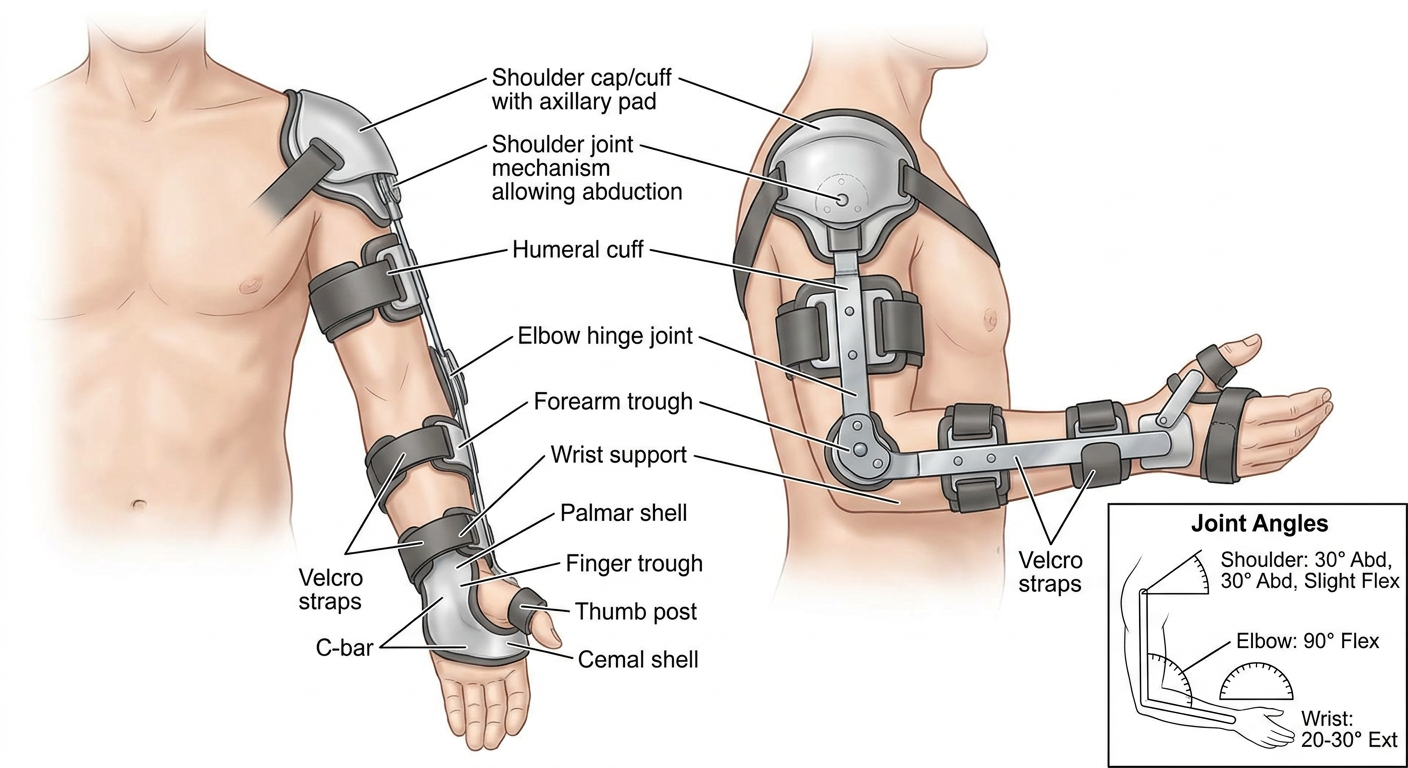
- Shoulder cap/cuff with axillary pad for pressure distribution
- Shoulder joint mechanism - allows controlled abduction (30°) and flexion
- Humeral cuff - encircles the upper arm
- Elbow hinge - set at 90° flexion
- Forearm trough
- Wrist support, palmar shell, finger trough, C-bar, thumb post
- Velcro straps at shoulder, arm, forearm, hand levels
| Joint | Position |
|---|---|
| Shoulder | 30° abduction, slight flexion |
| Elbow | 90° flexion |
| Forearm | Neutral to slight supination |
| Wrist | 20-30° extension |
| Hand | Functional (intrinsic-plus) |
Shoulder sling and shoulder immobilizer
A detailed medical diagram of a Shoulder Sling shown from anterior (front) view on a human torso and arm. Show a simple triangular arm sling made of fabric. The forearm rests in the sling at 90 degrees elbow flexion, forearm supported horizontally across the body, with the knot tied at the side of the neck (not at the back). Label all components clearly: neck strap (with padding at neck), forearm pouch/cradle, elbow pocket supporting the elbow, open hand end allowing finger movement, body strap going around torso (if present). Show correct positioning: elbow at 90 degrees, wrist slightly elevated above elbow level, fingers visible and free. Include a close-up inset of the neck knot placement and wrist elevation. Professional medical illustration style, clean white background, clear annotation lines and labels.
A detailed medical diagram of a Shoulder Immobilizer (arm immobilizer with body strap) shown from anterior and posterior views on a human torso. The device holds the arm firmly adducted against the body with elbow at 90 degrees flexion. Label all components clearly: padded shoulder strap over opposite shoulder, axillary pad between arm and chest wall, arm cuff securing upper arm to torso, forearm cuff holding forearm, abdominal strap securing the arm to the waist/torso, thumb loop or wrist cuff, and Velcro closures. Show the arm in adduction and internal rotation, elbow at 90 degrees. Compare side-by-side: LEFT panel shows shoulder sling (simple support, allows some movement), RIGHT panel shows shoulder immobilizer (full restriction, arm bound to body). Include a small anatomy inset showing why immobilization is needed - glenohumeral joint. Professional medical textbook illustration style, clean white background, clear annotation lines and labels.
1. Shoulder Sling
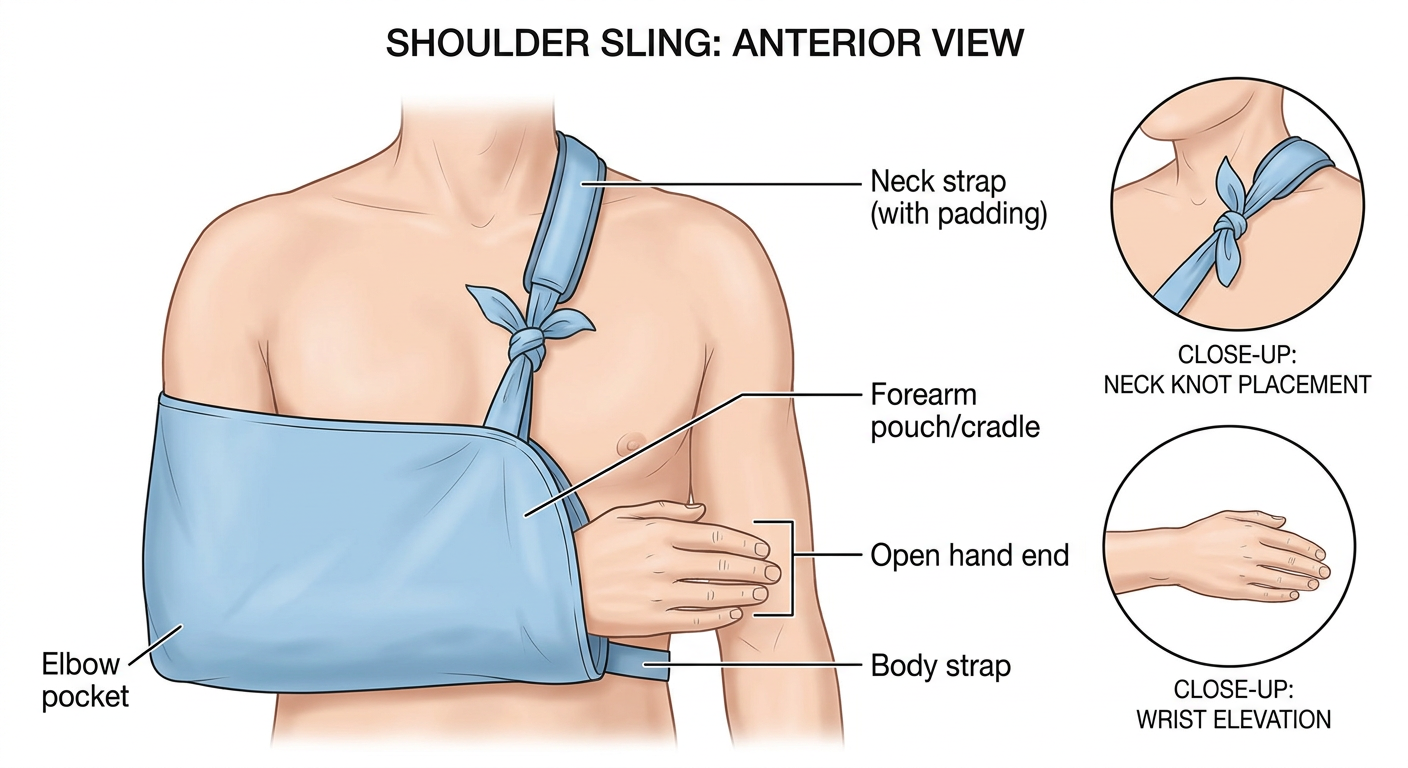
- Neck strap - padded to prevent skin irritation, knot placed at the side (not midline) to avoid pressure on cervical spine
- Forearm pouch/cradle - supports the full length of the forearm
- Elbow pocket - prevents the elbow from slipping out
- Open hand end - keeps fingers free for movement and monitoring circulation
- Elbow at 90° flexion
- Wrist slightly elevated above elbow level to reduce distal swelling
- Fingers free and visible
2. Shoulder Immobilizer
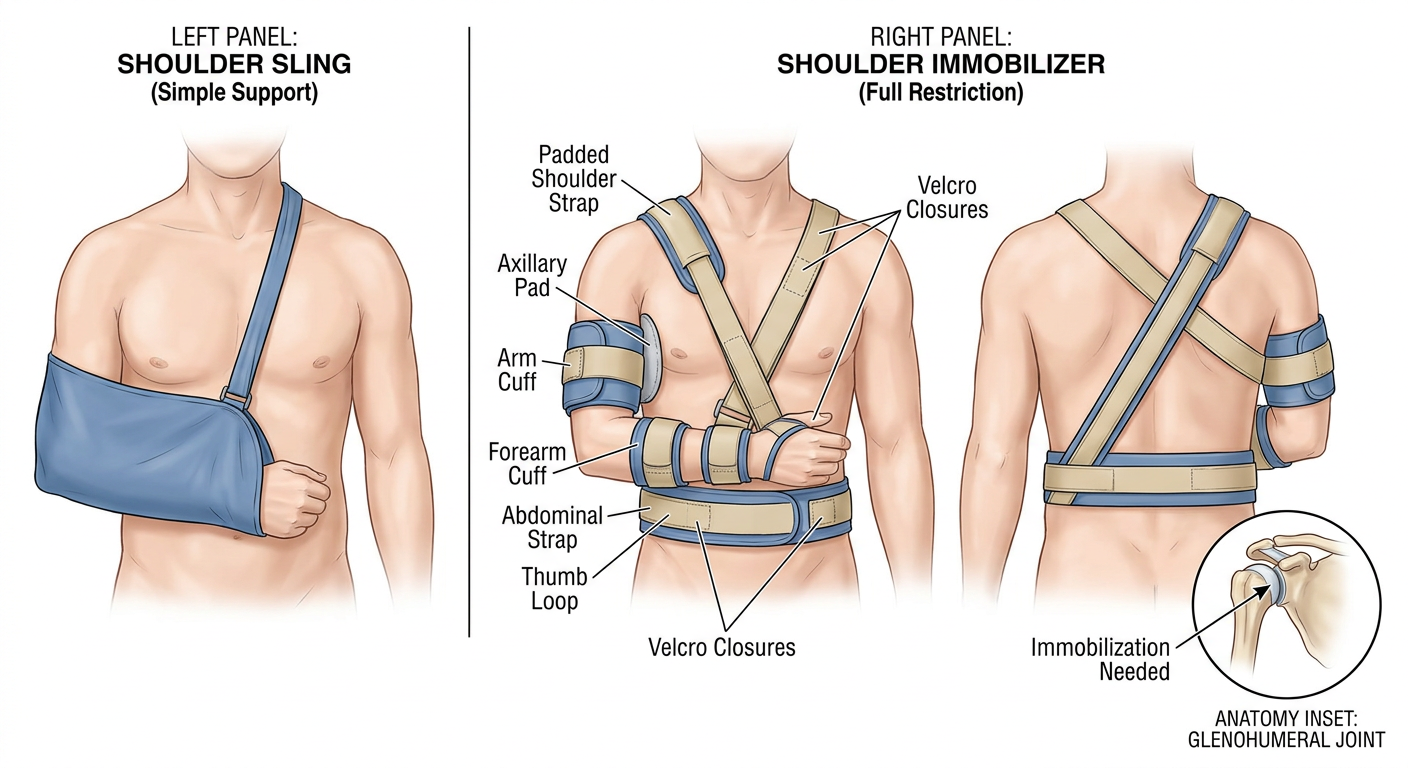
- Shoulder/axillary strap - goes over the opposite shoulder
- Axillary pad - positioned between the arm and chest wall for comfort
- Upper arm cuff - binds the humerus firmly to the torso
- Forearm cuff - secures the forearm
- Abdominal/waist strap - wraps around the torso, restricting all shoulder movement
- Wrist cuff / thumb loop - additional distal stabilization
- Velcro closures throughout for adjustability
Key Differences
| Feature | Shoulder Sling | Shoulder Immobilizer |
|---|---|---|
| Movement restriction | Partial (gravity-eliminated) | Full (arm bound to body) |
| Shoulder motion | Some allowed | None - fully restricted |
| Indications | Minor injuries, post-op support, stroke | Shoulder dislocation (post-reduction), surgical repair (Bankart, rotator cuff), humeral shaft fractures |
| Wear duration | Short-term, daytime | Prolonged, day and night |
| Complexity | Simple fabric sling | Multi-strap system |