
GIVE ME PRACTICAL TIPS AND USEFULL TECHNIQUES WHICH ARE PRACTICED TO INSIRT PAEDIATRIC IV CANULA
practical tips inserting paediatric IV cannula techniques 2024
https://dontforgetthebubbles.com/twelve-tips-to-placing-a-we…
paediatric IV cannula insertion sites hand dorsum scalp vein
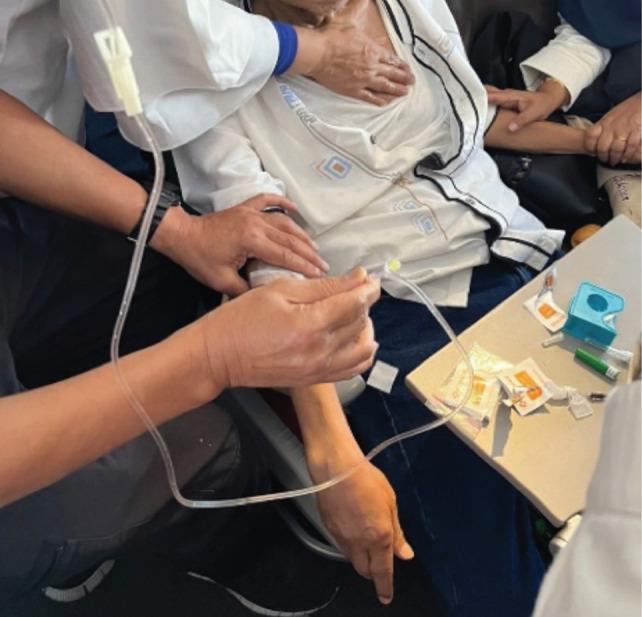
This clinical photograph captures a procedural scene of an intravenous (IV) cannulation and infusion being performed on a patient in a non-clinical environment, specifically an airplane cabin during a medical emergency. The image shows the insertion of an IV cannula into the patient's antecubital vein of the right arm, which is secured with white adhesive bandages. Clear plastic IV tubing with a visible drip chamber is connected to the cannula, facilitating the administration of normal saline and glucose. Two responders are visible: one in a white coat palpating the patient's upper chest/shoulder area, and another assisting by stabilizing the patient's arm and managing the infusion line. A small tray table in the foreground contains discarded medical supplies, including adhesive tape, alcohol swab wrappers, and a syringe. The photograph illustrates the clinical challenges of emergency medical intervention in confined spaces, emphasizing vascular access techniques for treating metabolic crises like diabetic emergencies in transit.
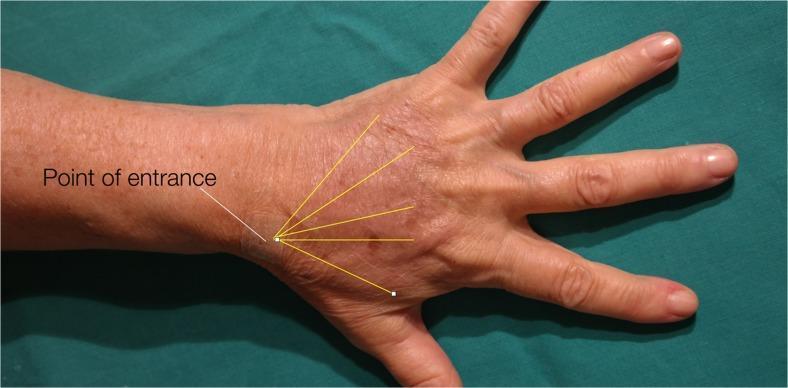
This clinical photograph illustrates the surgical planning for hand rejuvenation via fat grafting (lipofilling). The image shows the dorsum of an aged hand, characterized by skin flaccidity, fine rhytids (wrinkles), loss of subcutaneous fat volume, and visible extensor tendons and dorsal veins. A single 'Point of entrance' is labeled at the level of the distal wrist/proximal metacarpal region. Radiating from this point are several yellow overlay lines that represent the intended vector pathways for cannula insertion and fat distribution. These lines fan out across the dorsal metacarpal spaces toward the base of each digit and the thumb, following the anatomical distribution where volume restoration is needed. The educational focus is on the procedural technique for uniform fat placement in the aesthetic and reconstructive treatment of the senile hand, demonstrating a centralized injection port to minimize trauma while maximizing coverage.
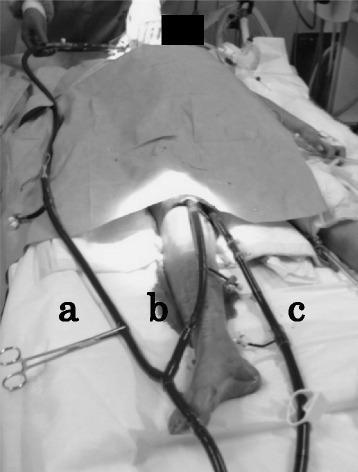
A clinical photograph illustrating a patient in a supine position undergoing Venoarterial-Venous Extracorporeal Membrane Oxygenation (VAV ECMO). The image highlights the configuration of three primary cannulas: (a) a return cannula inserted into the right internal jugular vein for cephalic/right atrial oxygenated blood delivery; (b) a return cannula inserted into the right femoral artery for systemic support; and (c) a large-bore drainage cannula inserted into the right femoral vein to collect deoxygenated blood for the extracorporeal circuit. Visible external components include medical-grade reinforced tubing, surgical clamps used for flow control, and transparent dressings at the femoral insertion sites. This setup demonstrates a transitional or hybrid ECMO configuration typically utilized when both cardiac and advanced respiratory support are required concurrently. The medical professional's hand near the upper junction indicates active monitoring or adjustment of the circuit branch. The arrangement exemplifies high-acuity critical care management of cardiogenic shock and respiratory failure.
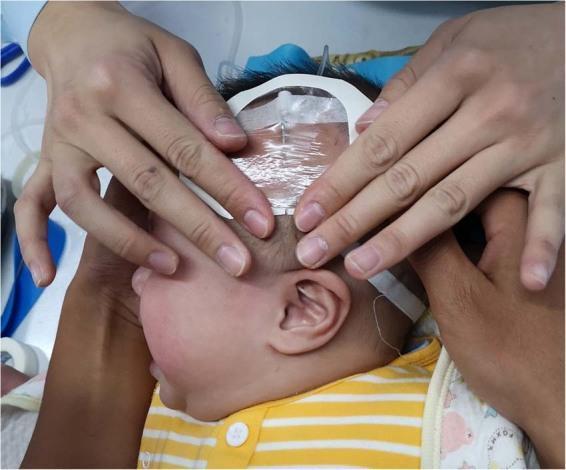
This clinical photograph demonstrates a scalp indwelling needle (SIAI) procedure for intravenous access in an infant. The infant is positioned in a lateral recumbent profile. A peripheral IV catheter is inserted into a superficial scalp vein, secured with a transparent adhesive semi-permeable dressing that allows for continuous monitoring of the insertion site. The dressing is further reinforced with white medical tape around its perimeter. Multiple hands are visible: one set of hands is providing manual stabilization of the infant's head to prevent movement, while another set of hands (likely the clinician's) is carefully smoothing the adhesive dressing to ensure a secure seal. This image illustrates pediatric procedural medicine, specifically focusing on vascular access techniques in neonates and infants where peripheral limb access may be difficult. The educational focus is on the correct placement, stabilization, and sterile dressing application for scalp vein cannulation.
https://www.cahs.health.wa.gov.au/~/media/HSPs/CAHS/Document…

Practical Tips & Techniques for Paediatric IV Cannula Insertion
1. PREPARATION - Set Up for Success
- Tourniquet
- Skin prep (chlorhexidine 1%/alcohol 70% for >27 weeks; povidone-iodine 10% for <27 weeks gestation)
- Correctly sized cannula (see gauge guide below)
- Extension set - pre-filled and primed
- Leukostrips / sterile transparent dressing
- Appropriately sized arm splint/board
- Tape strips pre-cut and ready to grab
"No one minds if you wait for a particular piece of kit if the procedure goes seamlessly. Everyone remembers the mess when you need that one piece you didn't get." - Don't Forget the Bubbles
2. CANNULA SIZE SELECTION
| Age Group | Recommended Gauge |
|---|---|
| Neonates / babies | 24G (yellow) |
| Infants / toddlers | 22G (blue) |
| School-age children | 20G (pink) or 22G |
| Adolescents | 18G (green) or 20G |
3. SITE SELECTION BY AGE
Neonates & Infants (not yet walking)
- Dorsum of hand - preferred first site
- Dorsum of foot - treat as "upside-down hand"; often easier since feet move less than hands
- Scalp veins - excellent fallback in neonates; prominent, accessible, and visible
- Antecubital fossa - last resort; joint flexion risks dislodgement
Toddlers & Older Children
- Back of hand (metacarpal veins) - first choice
- Antecubital fossa - accessible but requires two-splint stabilisation
- Saphenous vein at the ankle - reliable when arms fail
- Scalp veins - only viable in infants under 12 months
4. VEIN VISUALISATION TECHNIQUES
- Tourniquet application - apply proximal to the selected site; gentle pressure is sufficient in neonates
- Warm compress / warm soak - soak the limb in warm water for 3-5 minutes or apply a warm towel; causes venodilation and makes veins more prominent
- Gravity dependency - hang the limb down for 30-60 seconds before insertion
- Transillumination - shine a bright light or dedicated transillumination device through the dorsum of the hand; veins appear as dark shadows. Very useful in chubby infants
- Vein finder (infrared/near-infrared device) - projects a vein map on the skin surface; significantly improves first-attempt success in difficult access
- Ultrasound guidance - for children with difficult IV access, ultrasound has been shown in randomised trials to significantly reduce time to access and total attempts (Tintinalli's Emergency Medicine)
5. NEEDLE INSERTION TECHNIQUE - Step by Step
- Stabilise the vein - use your non-dominant hand to apply gentle skin traction distally, stretching the skin to anchor the vein
- Bevel UP - ensure the needle bevel faces upward at all times
- Angle of insertion:
- Neonates/infants: 10-15 degrees - almost flat to the skin (veins are very superficial; too steep = blow through)
- Older children: 15-30 degrees
- Watch for flashback - blood entering the chamber confirms intravascular placement
- Advance 1-2 mm further after flashback - ensures the catheter tip is fully within the lumen, not just the needle tip
- Withdraw the needle while advancing the cannula - thread the plastic catheter smoothly into the vein
- Release tourniquet before removing needle
- Apply occlusive pressure above the cannula tip while attaching the extension set - prevents blood loss
- Flush with 1 mL syringe (small syringe = lower pressure, safer for fragile veins) to confirm patency
6. SCALP VEIN CANNULATION (Neonates/Infants)
- Use a 24G or 26G butterfly needle
- Insert at 20-30 degree angle, bevel up, along the direction of blood flow (toward the heart)
- An assistant holds the head steady - do NOT rely on restraint alone
- Clean with antiseptic; allow to dry fully before inserting
- Secure with transparent dressing reinforced with tape
- Apply a protective dome cover over the site to prevent accidental dislodgement
7. IMMOBILISATION & SECURING
- Use a splint/armboard for every child under 10 years old
- Three-point contact to the board: proximal limb, joint, and distal limb
- Position the splint so the wrist is immobilised (board ends at MCP joint or fingertips depending on cannula site)
- For antecubital fossa: use two perpendicular splints to prevent rotation
- Apply leukostrips across the hub of the cannula (sterile, do not contaminate the insertion site)
- Cover with transparent occlusive dressing - must allow visual inspection of the site at all times
- Loop and tape the extension tubing away from the insertion site to absorb accidental traction
- Attach the trailing extension set to the splint/board as a strain relief
8. TEAM ROLES - Assign Before You Start
| Role | Person |
|---|---|
| Cuddler / emotional support | Parent |
| Distractor | Parent or play therapist |
| Tourniquet controller & limb stabiliser | Nurse |
| Cannulator | Doctor/nurse |
| Taper / assistant | Nurse |
- If you think you need 4 people, get 5
- Listen to the experienced paediatric nurses in the room - their advice is invaluable
- Position yourself comfortably - kneeling on a pillow gives a broad, stable base and lets you tape from multiple angles
9. PAIN MANAGEMENT & DISTRACTION (Non-pharmacological)
- EMLA cream or Ametop gel - apply at least 45-60 minutes before procedure; dramatically reduces pain
- Oral sucrose (24%) - 0.5-1 mL on a pacifier 2 minutes before; proven analgesic in neonates and infants up to 4 months
- Pacifier/non-nutritive sucking - combined with sucrose for neonates
- Swaddling - wrap neonates snugly before and during procedure; reduces physiologic stress
- Distraction techniques - bubbles, videos on a phone/tablet, toys for older children
- Therapeutic toys (Comfie-type) - a 2024 RCT (Akgul et al., Journal of Pediatric Nursing) showed soft comfort toys during neonatal IV insertion reduced crying time by nearly half and improved oxygen saturation and heart rate stability
- Parental presence - reduces anxiety in both child and clinician; brief the parent on what to expect
10. ASEPTIC TECHNIQUE - Non-Negotiable
- Perform hand hygiene before and after
- Don sterile gloves
- For >27 weeks gestation: chlorhexidine 1%/alcohol 70% - wait at least 30 seconds to dry
- For <27 weeks gestation: povidone-iodine 10% - wait 60 seconds then wipe off with sterile saline (chemical burns risk in extremely premature skin)
- Do NOT touch the cleaned site again without sterile equipment
- All extension sets and fluids must be prepared aseptically
11. SPECIAL SITUATIONS
Difficult Access / Multiple Failed Attempts
- After 2 failed attempts by one clinician, escalate to a more experienced inserter
- Consider ultrasound-guided insertion as the next step
- Consider intraosseous (IO) access if the child is critically ill and IV access is unobtainable - IO can be placed in patients of any age and can deliver all resuscitation fluids and drugs (Miller's Anesthesia)
- For long-term access needs (>5-7 days), discuss escalation to PICC line
The Chubby Baby / Obese Child
- Use transillumination - veins invisible on surface are visible with backlight
- Foot veins are often easier than hand in obese infants
- Ultrasound guidance is particularly valuable here
The Terrified/Combative Child
- Pause if the situation becomes unsafe from a needlestick perspective
- De-escalate, add extra hands, and resume
- Never proceed with an unsafe situation - a missed cannula is far better than a needlestick injury
- Consider procedural sedation/anxiolysis (midazolam intranasal) for extremely anxious children if clinical situation permits
12. DOCUMENTATION & LABELLING
- Label the cannula with date and time of insertion
- Document the gauge, site, number of attempts, and who inserted
- Schedule a review of the site every shift
- Replace cannula if dressing becomes wet, soiled, or lifted
- Monitor for signs of infiltration, phlebitis, and infection at every patient contact
Quick Reference Summary
| Step | Key Action |
|---|---|
| Prepare | All equipment ready before approaching child |
| Size | 24G neonates, 22G infants, 20-22G children |
| Site | Hand > foot > scalp (infants) > antecubital |
| Visualise | Warm compress, gravity, transillumination, USS |
| Insert | 10-15° neonates, 15-30° children, bevel up |
| Secure | Splint + leukostrips + transparent dressing |
| Pain | EMLA + sucrose + distraction |
| Escalate | 2 failed attempts = senior help or USS/IO |
Search for clinical images of difficult paediatric IV access challenges
difficult paediatric IV access failed cannulation infant
This clinical photograph demonstrates a scalp indwelling needle (SIAI) procedure for intravenous access in an infant. The infant is positioned in a lateral recumbent profile. A peripheral IV catheter is inserted into a superficial scalp vein, secured with a transparent adhesive semi-permeable dressing that allows for continuous monitoring of the insertion site. The dressing is further reinforced with white medical tape around its perimeter. Multiple hands are visible: one set of hands is providing manual stabilization of the infant's head to prevent movement, while another set of hands (likely the clinician's) is carefully smoothing the adhesive dressing to ensure a secure seal. This image illustrates pediatric procedural medicine, specifically focusing on vascular access techniques in neonates and infants where peripheral limb access may be difficult. The educational focus is on the correct placement, stabilization, and sterile dressing application for scalp vein cannulation.
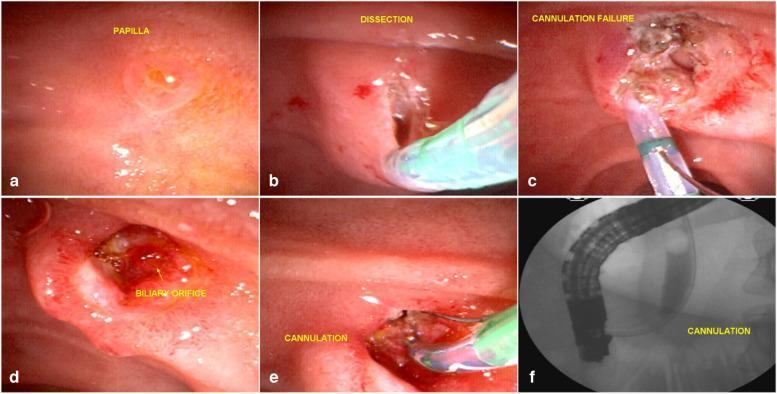
This composite figure illustrates a two-stage Endoscopic Retrograde Cholangiopancreatography (ERCP) procedure involving an endoscopic fistulotomy (EFP) to manage a difficult biliary cannulation. Image (a) presents the initial endoscopic view of a small, undisturbed major duodenal papilla. Images (b) and (c) document an unsuccessful primary attempt, showing the dissection of the infundibulum using a needle-knife (fistulotome) with longitudinal incisions, followed by failed cannulation attempts characterized by mucosal trauma and localized hemorrhage. Image (d) displays the same site six days later; the inflammatory response has subsided, and the biliary fistula orifice is clearly demarcated by green-gold bile staining. Image (e) demonstrates successful cannulation of the common bile duct (CBD) via the mature fistula using a sphincterotome and guide wire. The final panel (f) is a fluoroscopic radiogram confirming deep cannulation of the biliary tree with contrast agent opacifying the CBD. This series serves as an educational example of the 'precut' fistulotomy technique and the clinical utility of a delayed second-look approach for achieving biliary access.
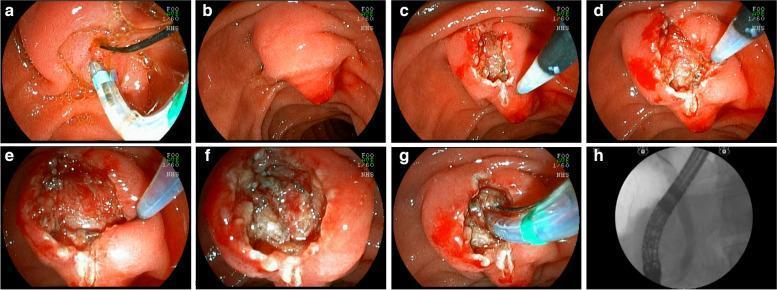
A series of eight panels (a-h) comprising seven endoscopic photographs and one fluoroscopic image, illustrating the steps of an Enlarged Fistulotomy of the Papilla (EFP) during Endoscopic Retrograde Cholangiopancreatography (ERCP). Panel (a) shows a failed initial cannulation attempt with a guide wire. Panel (b) depicts the endoscopic repositioning to visualize the papillary infundibulum. Panels (c) and (d) demonstrate a needle-knife fistulotome performing a wide longitudinal incision from the transverse crease followed by lateral incisions. Panels (e) and (f) highlight the exposure of the submucosa and identification of the muscular sphincter fibers, which are carefully sectioned to reveal the common bile duct (CBD) mucosa. Panel (g) shows successful cannulation of the exposed CBD. The final panel (h) is a fluoroscopic radiograph (cholangiogram) confirming deep cannulation and contrast distribution within the biliary tree. The sequence illustrates a surgical alternative for difficult biliary access, emphasizing the dissection of anatomical layers from the mucosal surface to the muscularis propria of the papilla.
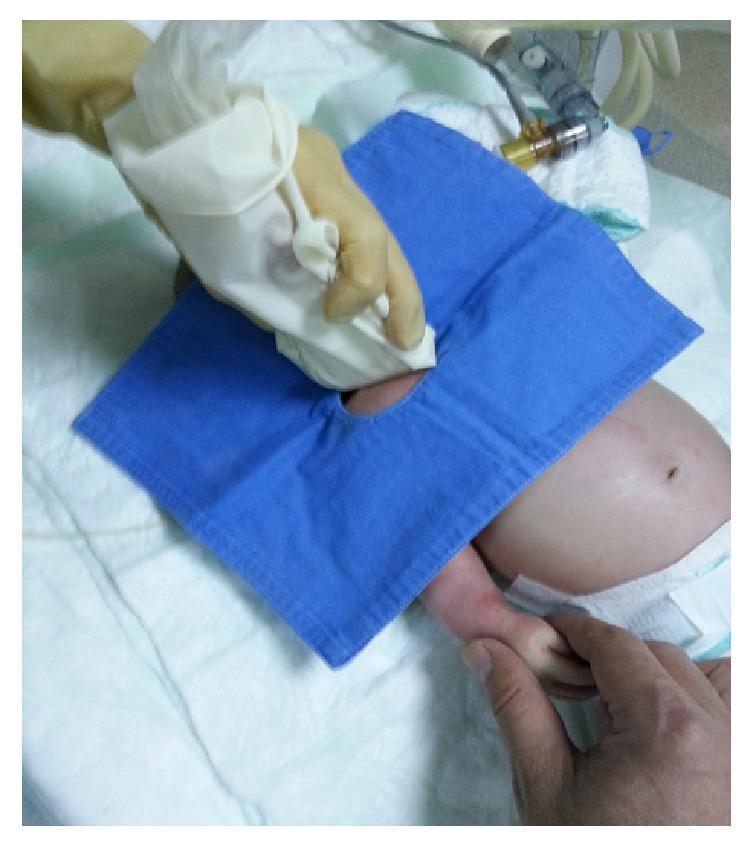
This clinical photograph demonstrates the setup for an ultrasound-guided vascular access procedure, specifically a supraclavicular approach for subclavian vein (SCV) cannulation in a neonate. The patient is in a supine position with the head rotated toward the contralateral side. The target area is draped with a blue sterile fenestrated surgical sheet. A high-frequency linear ultrasound transducer, encased in a sterile cover, is held by a practitioner using a gloved hand at the supraclavicular region. A second individual is seen stabilizing the infant's right arm, pulled caudally to optimize exposure of the thoracic inlet and subclavian vessels. Key clinical elements include the maintenance of an aseptic field and the specific ergonomics required for pediatric central venous catheterization. This visual serves as a procedural guide for real-time ultrasound guidance in neonates with difficult peripheral access or anatomical challenges such as a short neck or edema.
This clinical photograph captures a procedural scene of an intravenous (IV) cannulation and infusion being performed on a patient in a non-clinical environment, specifically an airplane cabin during a medical emergency. The image shows the insertion of an IV cannula into the patient's antecubital vein of the right arm, which is secured with white adhesive bandages. Clear plastic IV tubing with a visible drip chamber is connected to the cannula, facilitating the administration of normal saline and glucose. Two responders are visible: one in a white coat palpating the patient's upper chest/shoulder area, and another assisting by stabilizing the patient's arm and managing the infusion line. A small tray table in the foreground contains discarded medical supplies, including adhesive tape, alcohol swab wrappers, and a syringe. The photograph illustrates the clinical challenges of emergency medical intervention in confined spaces, emphasizing vascular access techniques for treating metabolic crises like diabetic emergencies in transit.
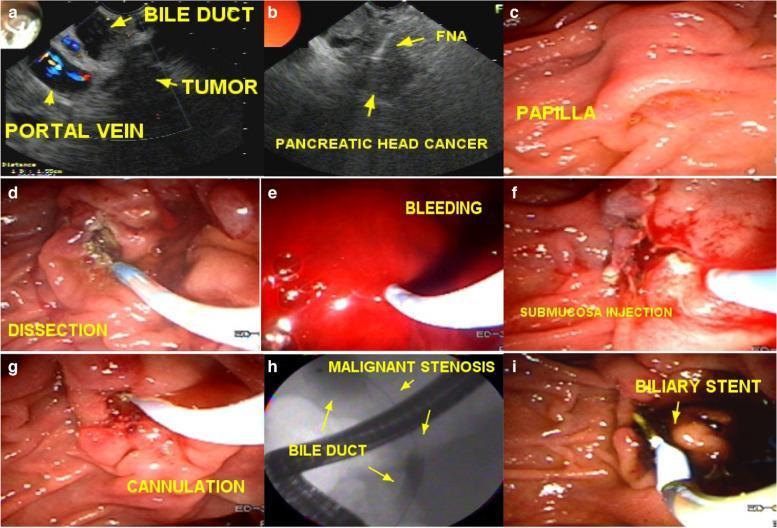
This composite figure illustrates the management of a malignant biliary obstruction using Endoscopic Retrograde Cholangiopancreatography (ERCP) and Enlarged Fistulotomy of the Papilla (EFP). Panels (a) and (b) provide Endoscopic Ultrasound (EUS) views identifying a pancreatic head tumor and Fine Needle Aspiration (FNA) for diagnostic confirmation. Panels (c) through (g) represent endoscopic views of the duodenum, showing the Major Duodenal Papilla. The sequence documents a failed initial cannulation attempt (c), followed by wide fistulotomy and dissection (d). Intraoperative bleeding (e) is managed via submucosal injection and coagulation (f). Panel (g) shows successful cannulation of the common bile duct two days post-initial attempt once the fistular orifice is clearly identified. Fluoroscopic imaging (h) visualizes a guidewire traversing a malignant stenosis within the bile duct. The final endoscopic frame (i) demonstrates the successful placement of a biliary stent across the papilla. The image serves as a clinical guide for advanced endoscopic techniques used in oncology and gastroenterology when standard biliary access is difficult.
intraosseous access child emergency vascular
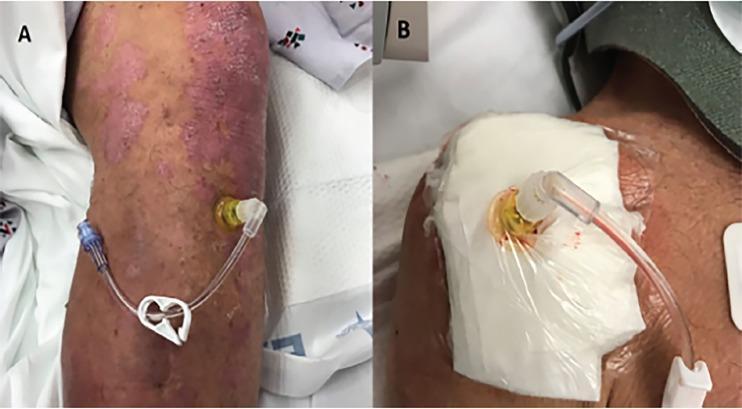
Clinical photographs of emergency intraosseous (IO) vascular access in a patient. Panel A shows a 45 mm IO needle inserted into the left proximal tibia. The surrounding skin exhibits diffuse, erythematous plaques and a scaly, textured surface, suggestive of a pre-existing dermatologic condition like psoriasis. The IO needle is connected to flexible tubing with a blue Luer-lock connector and a white plastic flow-control clamp. Panel B displays a second 45 mm IO needle inserted into the right proximal humerus. The insertion site is stabilized with a large, white absorbent dressing secured by a transparent adhesive film. Some serosanguinous drainage is visible at the needle base under the film. The image illustrates the clinical application of IO access in scenarios where intravenous stabilization is challenging, while highlighting potential complications or site-specific considerations such as underlying skin pathology or the need for securement in different anatomical locations (tibia vs. humerus).
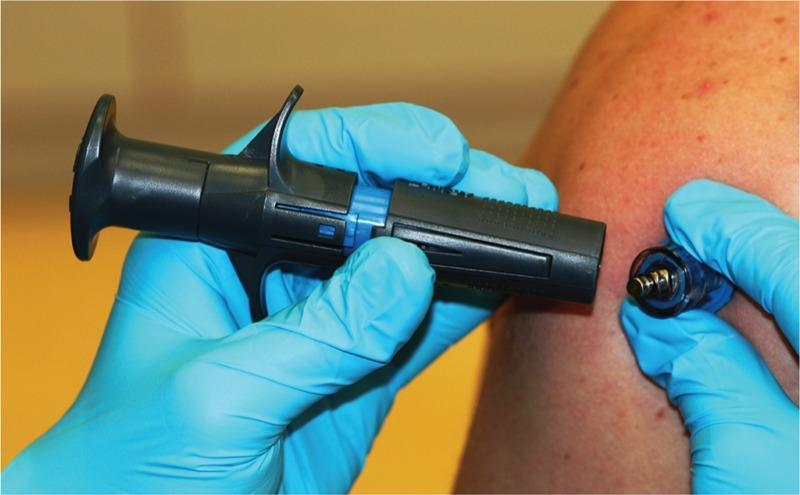
This procedural photograph illustrates the components and handling of a New Intraosseous (NIO) adult access device, a semi-automatic, spring-loaded tool used for emergency vascular access. The primary device body is shown in a clinician's gloved hand, featuring a dark gray cylindrical handle with distinct fin-like protrusions for ergonomic grip and a blue-colored internal trigger mechanism. To the right, the distal needle assembly is held against a patient's skin (likely at the humeral head). This assembly consists of a metallic 15-gauge stainless steel cannula surrounded by a visible compression spring and housed within a translucent blue plastic stabilizer. The design is engineered for controlled depth insertion into bone marrow, typically at the proximal tibia or humeral head, when traditional intravenous access is unattainable. The image serves as an educational guide for emergency medical procedures, emphasizing the hardware's structural safety features and the technique for preparing the device for rapid intraosseous cannulation in adult patients.
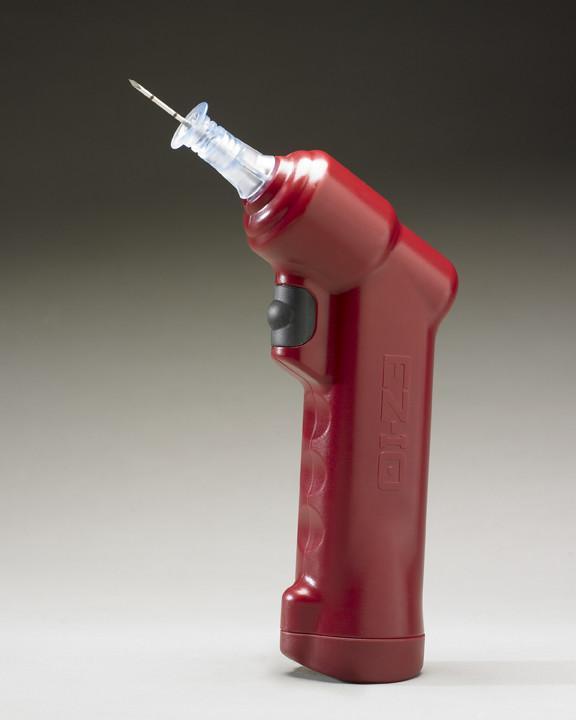
A clinical photograph of the EZ-IO® battery-powered intraosseous (IO) vascular access driver. The device is a handheld, ergonomic power driver featuring a burgundy or dark red plastic casing with molded finger grips and the 'EZ-IO' logo embossed on the handle. A black trigger switch is positioned on the inner neck of the handle for activation. At the distal end, a clear plastic hub is attached, which secures a 15-gauge stainless steel needle (cannula). The needle tip is beveled, designed for piercing cortical bone to establish rapid vascular access in emergency or critical care settings. This device is used when intravenous (IV) access is difficult or impossible, allowing for the infusion of fluids and medications directly into the bone marrow cavity. It is a critical tool in emergency medicine, trauma, and resuscitation, providing a reliable alternative to central venous catheterization with a faster insertion time.
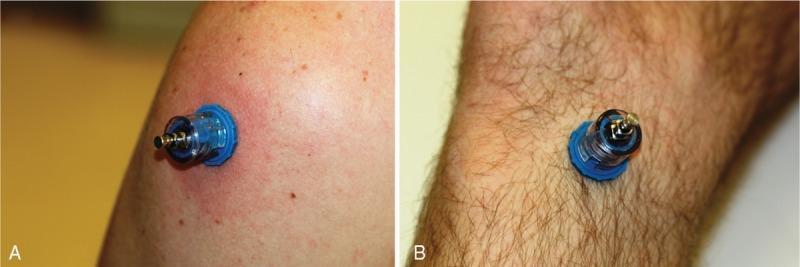
This composite clinical photograph illustrates the application of a New Intraosseous (NIO) device at two common anatomical landmarks for emergency vascular access. Image A displays the device inserted into the proximal tibia of an adult subject. The insertion site shows a circular blue stabilizer base flush against the skin, with the semi-automatic 15-gauge stainless steel cannula housing visible. A localized area of erythema is present around the puncture site, suggesting a typical inflammatory response or mild irritation. Image B shows the same device deployed into the humeral head. The device architecture is consistent across both sites, featuring the blue needle stabilizer and integrated trigger mechanism. The skin in Image B exhibits more prominent hair follicles and lacks the erythema seen in the tibial site. These images demonstrate the clinical utility of spring-loaded IO devices in providing rapid, semi-automatic access to the medullary cavity when peripheral intravenous access is unobtainable. The visual comparison highlights the versatility of the device for different cortical bone densities and anatomical locations, such as the upper arm and lower leg, in a simulated or actual emergency medical scenario.
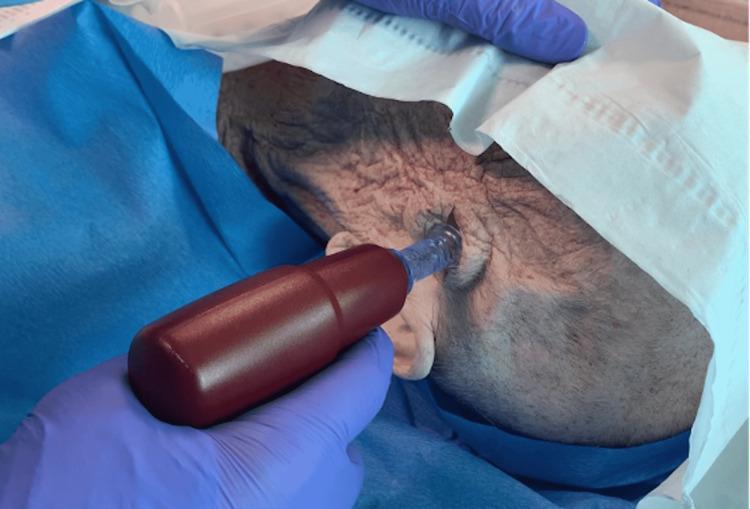
A clinical photograph demonstrating a surgical procedure for an emergency burr hole using an intraosseous (IO) vascular access system on a human scalp. The image shows a gloved hand holding a maroon-handled power driver with an attached clear plastic needle hub. The needle is inserted perpendicularly through a pre-cut cranial-to-caudal incision in the temporal region of the scalp. The patient's scalp is shaved and prepped with a sterile solution, with blue and white surgical drapes defining the sterile field. The needle is positioned to penetrate the skull, intended for the evacuation of an intracranial hemorrhage. This technique illustrates a novel application of IO technology in neurosurgical emergencies to achieve rapid decompression when traditional equipment may be unavailable. The procedure is performed under sterile conditions following identification of anatomical landmarks or CT confirmation.
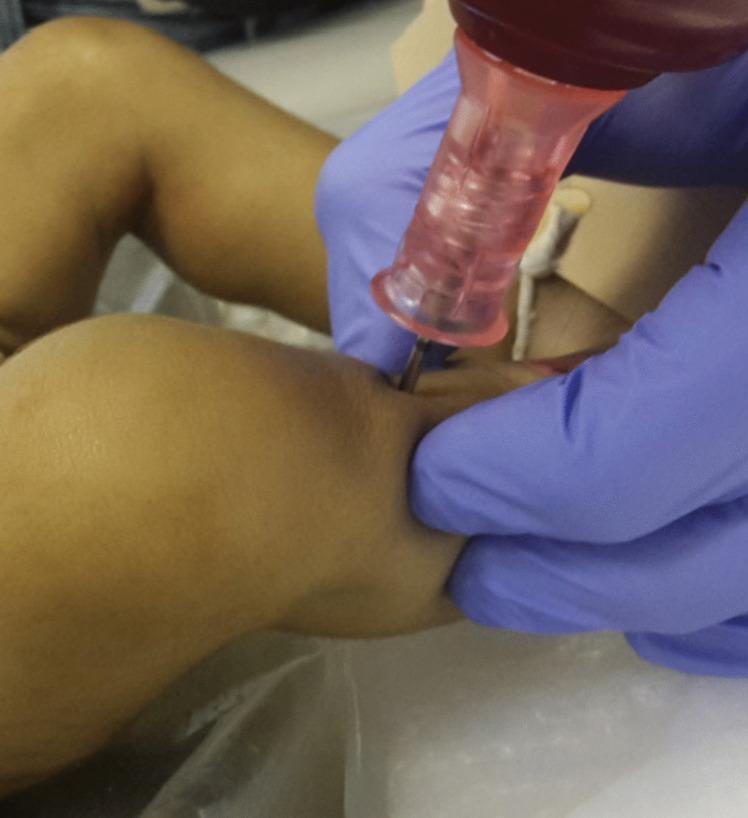
This procedural photograph demonstrates the establishment of intraosseous (IO) access in the proximal tibia of a pediatric patient, likely in a postmortem or emergency clinical setting. The image shows a close-up view of a lower extremity with gloved hands performing the procedure. One hand, in a blue medical glove, stabilizes the calf to provide counter-pressure, while the other hand operates a mechanical bone drill (specifically an EZ-IO® system). The device features a dark red power driver attached to a pink translucent needle set. The needle is seen penetrating the skin at the anterior-medial aspect of the proximal tibia, just distal to the tibial tuberosity, which is the standard landmark for IO insertion to reach the marrow cavity. This visual serves to illustrate the correct anatomical positioning, perpendicular angle of insertion, and stabilization technique required for rapid vascular access when intravenous routes are unavailable. The context relates to postmortem computed tomography angiography (PMCTA) preparation.
ultrasound guided IV cannulation paediatric vein
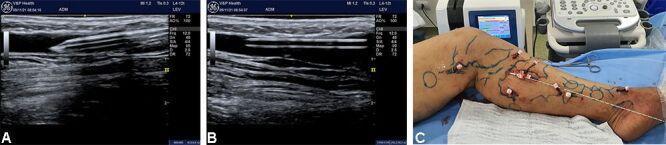
This composite figure illustrates a multi-puncture technique for the endovenous laser treatment of the great saphenous vein (GSV) and its tributaries. Panels A and B are longitudinal B-mode ultrasound images demonstrating ultrasound-guided cannulation. A No. 16 IV catheter appears as a linear, hyperechoic (bright) structure being advanced into the anechoic (dark) lumen of the target vein. The needle's trajectory and entry point are clearly visualized relative to the vessel wall. Panel C is a clinical photograph of a lower limb in a surgical setting. The skin is marked with blue topographical lines indicating the anatomical course of varicose tributaries and the GSV. Multiple percutaneous access points are visible along these markings, each equipped with a secured catheter hub (white/red). The limb is positioned on sterile blue drapes with medical equipment, including an ultrasound console and laser generator, visible in the background. This visual serves to educate on the perioperative steps of venous thermal ablation using a multiple-puncture access strategy.
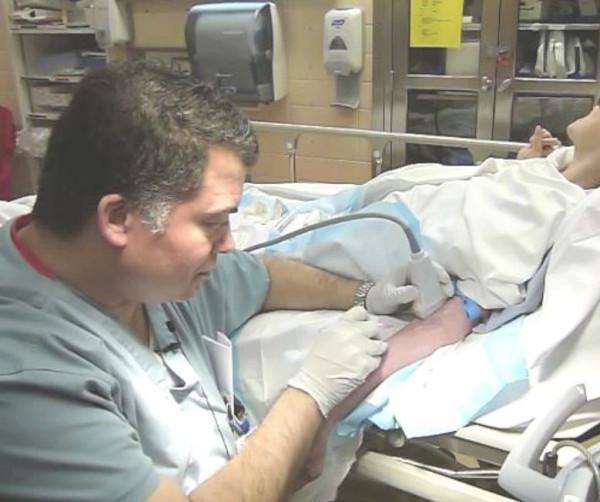
Clinical photograph of a procedural intervention in an emergency department or clinical setting, demonstrating ultrasound-guided intravenous (IV) catheter placement. A clinician, wearing non-sterile medical gloves, is shown performing the procedure on a patient's antecubital region. The image illustrates the long-axis (longitudinal) approach, where a high-frequency linear array ultrasound probe is held parallel to the course of the target brachial vein to visualize the needle's trajectory and vessel entry in real-time. A blue tourniquet is applied to the patient's upper arm to facilitate venous distension. The environment includes standard medical infrastructure, such as a hospital bed, blue drapes, and bedside supplies. This procedural image highlights clinical best practices for difficult vascular access, emphasizing the use of point-of-care ultrasound (POCUS) to improve first-attempt success rates and reduce complications associated with peripheral cannulation in the antecubital fossa.
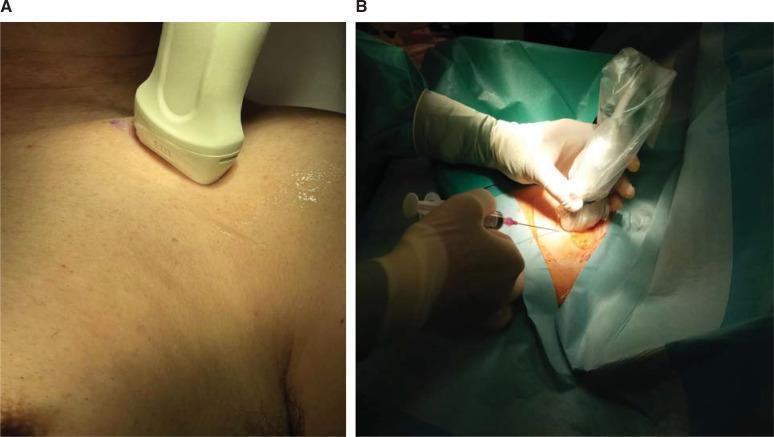
Two-panel clinical photograph demonstrating the technical setup for ultrasound-guided axillary vein cannulation. Panel A (left) shows a close-up of a linear ultrasound transducer positioned on the patient's upper chest/infraclavicular region. The probe is oriented in a transverse (short-axis) plane, perpendicular to the longitudinal axis of the underlying axillary neurovascular bundle, with visible acoustic gel at the skin interface. Panel B (right) depicts the sterile procedural setup. The patient is draped with green surgical sheets, and the clinician, wearing sterile gloves, holds the ultrasound transducer enclosed in a transparent sterile protective sheath. Simultaneously, a needle attached to a syringe is being advanced toward the target vessel using an out-of-plane approach. The images illustrate the ergonomic and spatial relationship between the transducer and needle during central venous access, emphasizing sterile technique and probe positioning for visualization of the axillary artery and vein.
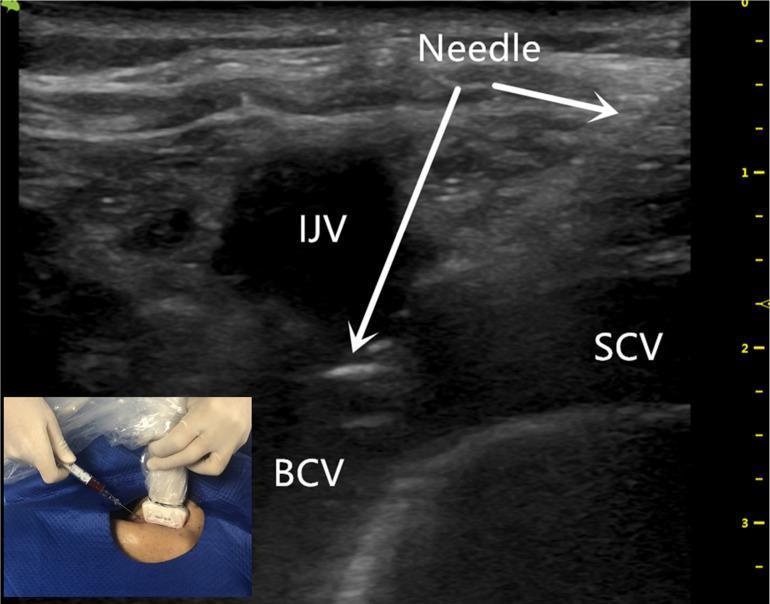
Diagnostic ultrasound image demonstrating the anatomy and procedure for ultrasound-guided central venous cannulation via the brachiocephalic vein (BCV). The primary B-mode image shows the BCV in a longitudinal view, characterized as a large hypoechoic (anechoic) vascular lumen in the lower portion of the frame. Superior and adjacent to it are the internal jugular vein (IJV), appearing as a dark circular structure, and the subclavian vein (SCV). A hyperechoic needle is visualized using an in-plane approach, entering from the upper right at an oblique angle. The needle tip, indicated by a white arrow, is clearly positioned within the lumen of the BCV, confirming successful vascular access. An inset clinical photograph illustrates the corresponding physical positioning of the ultrasound transducer and the syringe/needle on the patient's neck/supraclavicular region. This visual is intended for medical training in anesthesiology and emergency medicine, specifically for performing safe, real-time guided vascular access to minimize complications like pneumothorax or arterial puncture.
neonatal scalp vein cannulation infant IV access
This clinical photograph demonstrates a scalp indwelling needle (SIAI) procedure for intravenous access in an infant. The infant is positioned in a lateral recumbent profile. A peripheral IV catheter is inserted into a superficial scalp vein, secured with a transparent adhesive semi-permeable dressing that allows for continuous monitoring of the insertion site. The dressing is further reinforced with white medical tape around its perimeter. Multiple hands are visible: one set of hands is providing manual stabilization of the infant's head to prevent movement, while another set of hands (likely the clinician's) is carefully smoothing the adhesive dressing to ensure a secure seal. This image illustrates pediatric procedural medicine, specifically focusing on vascular access techniques in neonates and infants where peripheral limb access may be difficult. The educational focus is on the correct placement, stabilization, and sterile dressing application for scalp vein cannulation.
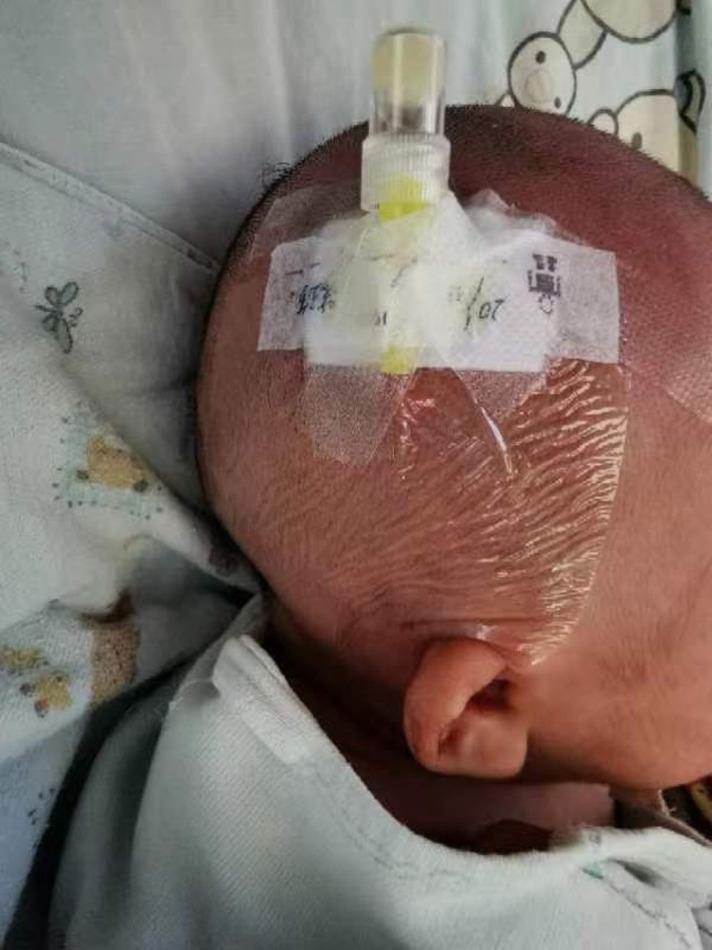
This clinical photograph shows a close-up of a pediatric scalp demonstrating the securement and fixation of a scalp vein indwelling needle (peripheral intravenous catheter). The device is inserted into the right superficial temporal vein of an infant, whose right ear and shaved scalp with fine stubble are visible in the frame. The catheter hub is constructed of transparent plastic with a yellow-capped proximal Luer lock connector. To ensure stability, the hub is anchored to the skin using white, opaque medical adhesive tape strips applied in a criss-cross pattern. A large, transparent semi-permeable adhesive film (Tegaderm-style dressing) is applied over the entire insertion site and tape, providing a sterile barrier and further reinforcing the device. The background shows patterned pediatric bedding, suggesting a hospital ward environment. This image serves as an educational example of standard procedural fixation techniques for neonatal and infant intravenous access to prevent accidental dislodgement or catheter fracture.
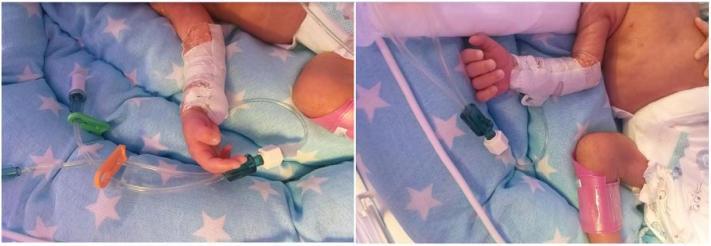
Content Type: Clinical Photograph (procedural). This image depicts a neonatal Peripherally Inserted Central Catheter (PICC) placement in a preterm infant. The photograph shows the infant's forearm with a catheter inserted into the basilic vein. The insertion site is secured with a specialized, non-woven white IV fixing bandage and covered by a clear transparent dressing to allow for site monitoring. The distal end of the Arrowg+ard Blue Advance™ PICC is visible exiting the bandage, connected to multiple IV administration set components, including clear lumen tubing with green and orange needleless connectors/ports. The infant is positioned on a blue patterned blanket within a Neonatal Intensive Care Unit (NICU) setting. This visual illustrates the standard procedural fixation and external assembly of a PICC line for long-term intravenous access in neonates requiring intensive care for conditions such as respiratory distress or preterm complications.
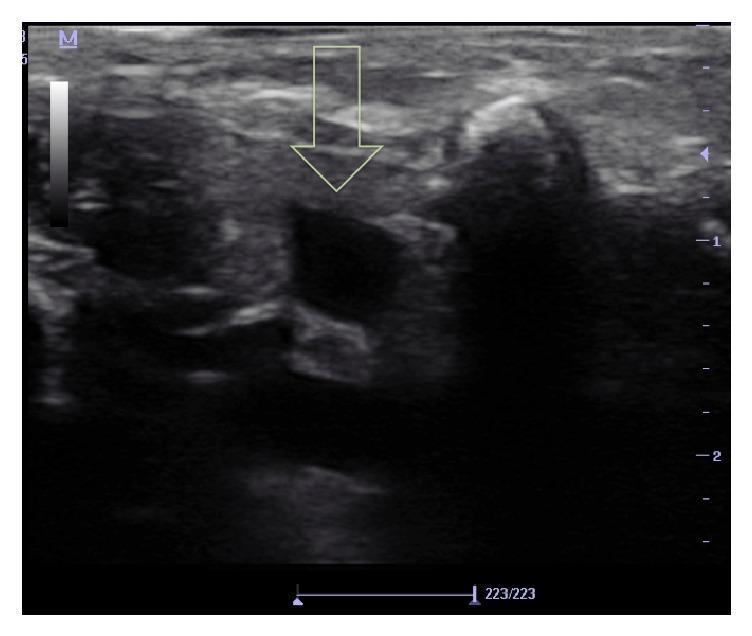
This diagnostic ultrasound image captures a transverse cross-sectional view of the supraclavicular region in a neonate, specifically for the purpose of central venous cannulation. The primary focus is the subclavian vein (SCV), indicated by a yellow arrow. The SCV appears as a prominent, anechoic, oval-to-circular structure in the center of the frame, signifying its fluid-filled lumen. Immediately posterior and lateral to the vein are heterogenous soft tissues and the hyperechoic borders of the subclavian artery. The imaging displays depth markers on the right vertical axis, indicating a shallow field appropriate for neonatal anatomy, and a grayscale calibration bar on the top left. This visual serves as a procedural guide for real-time ultrasound-guided vascular access, demonstrating the supraclavicular approach which is utilized when anatomical challenges like edema or a short neck limit access to the internal jugular vein. The moderate resolution allows for the differentiation of the target vessel from surrounding musculoskeletal landmarks and deeper pleural surfaces, which are critical for avoiding complications such as pneumothorax.
peripheral IV infiltration extravasation paediatric complication
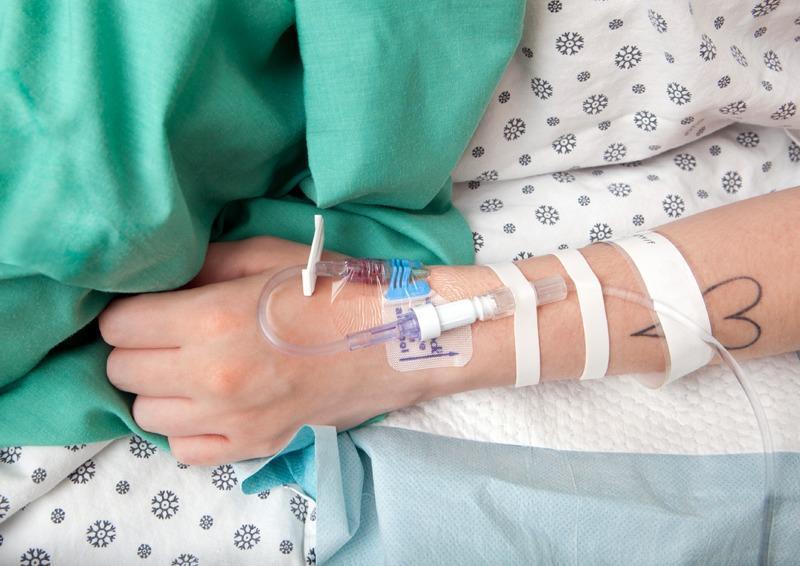
A clinical photograph depicting an intravenous (IV) catheterization on a patient's left forearm in an acute care or obstetric setting. The peripheral IV catheter is inserted and secured with a transparent semi-permeable film dressing over the insertion site, allowing for continuous visual monitoring of the site for signs of phlebitis or infiltration. The IV extension set is further stabilized using three strips of white medical adhesive tape across the forearm to prevent accidental dislodgement. The setup includes a blue slide clamp and a needleless connector capped with a white protective cover. A small amount of dark fluid, consistent with blood flashback, is visible within the clear hub and extension tubing. The patient is positioned on hospital bedding with a snowflake-patterned sheet and a green surgical gown or drape. This procedural image demonstrates standard clinical practice for vascular access and securement in managing complications such as gestational diabetes or preeclampsia.
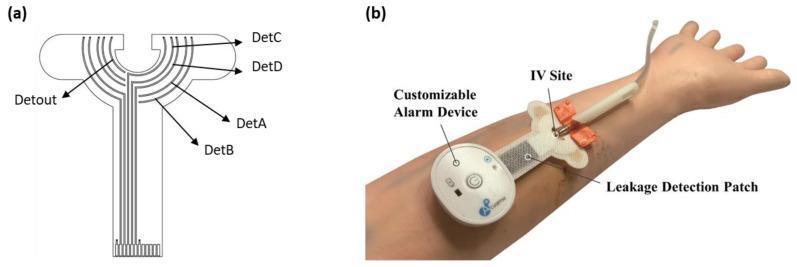
This figure illustrates the design and testing of a wearable medical sensor for detecting fluid leakage (extravasation or infiltration) during intravenous (IV) therapy or hemodialysis. (a) Is a schematic diagram showing the layout of a flexible, T-shaped sensor patch. It features a multi-ring architecture with concentric, semi-circular sensing conductive lines labeled Detout, DetA, DetB, DetC, and DetD. This cross-ring design is engineered to detect liquid spreading in any direction from a central point. (b) Is a clinical photograph showing an in vitro experimental setup on a prosthetic human arm. The leakage-detection patch is applied over the inner forearm, distal to a secured IV site. A customizable, circular electronic alarm device containing a Bluetooth module and buzzer is connected to the sensor's stem. The setup demonstrates how the device integrates with standard IV securement dressings to provide real-time monitoring of blood or infusate leakage, aiming to improve patient safety and clinical response times in dialysis and infusion nursing.
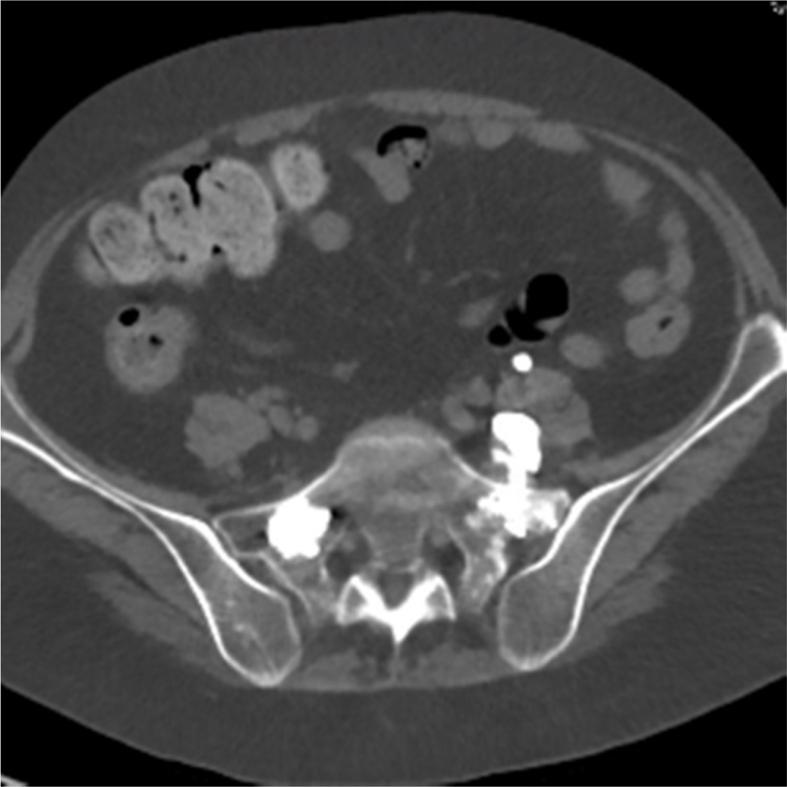
This diagnostic image is an axial computed tomography (CT) scan of the lumbosacral spine, performed without contrast. It demonstrates a common complication of percutaneous sacroplasty: cement extravasation. The high-density (radiopaque) polymethyl methacrylate (PMMA) cement is clearly visible bilaterally within the sacral ala. On the left side, there is significant extravasation of the cement material anterior to the left sacral ala. The leaked material appears as irregular, clustered hyperdense masses situated in the ventral epidural space and along the anatomical course of the left L5 nerve root. The extravasation is also in close proximity to the posterior aspect of the left iliopsoas muscle and deep to the iliac vasculature. Other visible structures include the vertebral body, bilateral iliac bones, and peripheral loops of bowel. This image serves as an educational example of iatrogenic cement leakage and its potential to cause radiculopathy or secondary inflammation of surrounding soft tissues following spinal augmentation procedures.
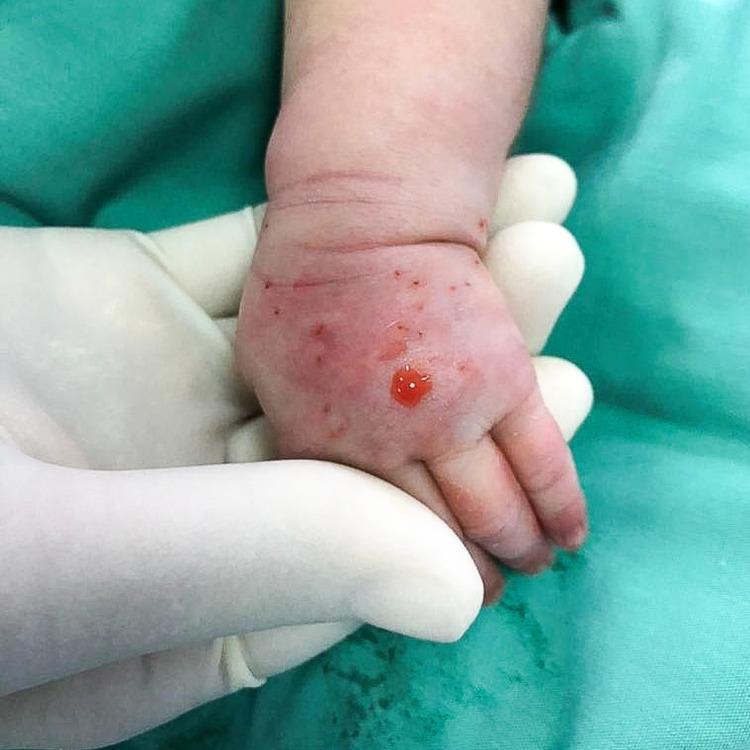
This clinical photograph displays the dorsum of the left hand of a neonate, illustrating an intravenous (IV) extravasation injury. The anatomical region from the metacarpophalangeal joints to the distal forearm exhibits significant diffuse erythema and non-pitting edema. Multiple small, punctate red marks are visible across the dorsal surface, consistent with repeated venipuncture attempts. A central, larger puncture site shows an accumulation of bright red serosanguinous fluid, suggesting recent cannulation or saline flush-out therapy. Despite the dorsal swelling, the visible fingers appear pink and well-perfused, indicating preserved distal circulation. This image serves as an educational example of neonatal skin injury following IV infiltration of a vesicant or irritant solution, highlighting the clinical signs of early-stage extravasation including inflammatory changes and tissue distention.
transillumination vein finder infant hand
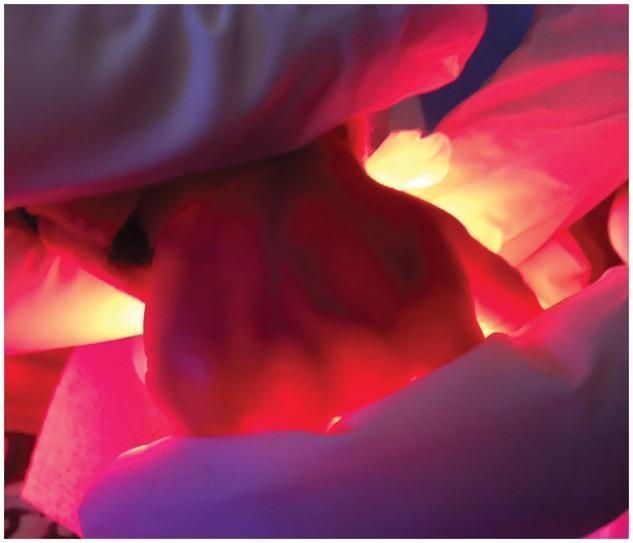
This clinical photograph demonstrates the technique of transillumination on a neonatal hand within a Neonatal Intensive Care Unit (NICU) setting. A red LED light source is applied to the dorsal or palmar surface, causing the translucent tissues of the infant's hand to glow with a vivid red hue. This high-contrast illumination significantly enhances the visualization of deep anatomical structures, specifically the superficial venous network, which appears as dark, linear shadows against the bright background. The hand is being stabilized by a healthcare provider wearing sterile clinical gloves, reflecting infection control protocols during the procedure. This visual illustrates a low-cost diagnostic or procedural aid used to facilitate peripheral intravenous access (cannulation) or arterial sampling in neonates by improving vein localization. The background shows blurred clinical equipment, consistent with an incubator environment. The image serves as an educational example of how specific light wavelengths can be utilized to improve visibility of vascular anatomy in small pediatric patients.
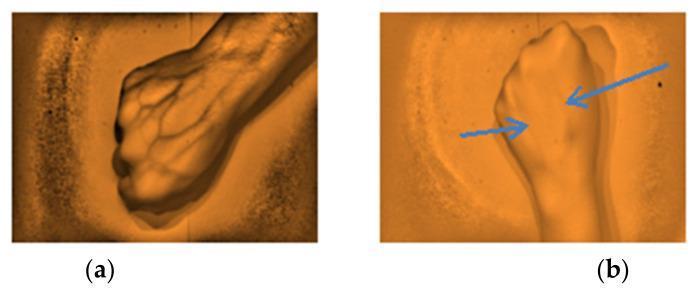
Two diagnostic images (a and b) demonstrating the efficacy of a near-infrared (NIR) vein finder on the dorsal hand. The images utilize a 960 nm wavelength to capitalize on the high absorption of deoxyhemoglobin, creating contrast between darker venous structures and lighter surrounding tissue. Image (a) represents a 'highly visible' result, showing a clear, branching network of superficial veins with sharp definition and high contrast across the metacarpal region and wrist. Image (b) shows a 'visible' result where the venous structures, indicated by blue arrows, are present but appear with lower contrast and less distinct boundaries, potentially due to variations in subcutaneous tissue thickness, vein depth, or skin pigmentation. This comparison illustrates the clinical application of transillumination and reflected light principles in facilitating venipuncture and peripheral intravenous access by mapping subcutaneous vascular patterns in real-time.
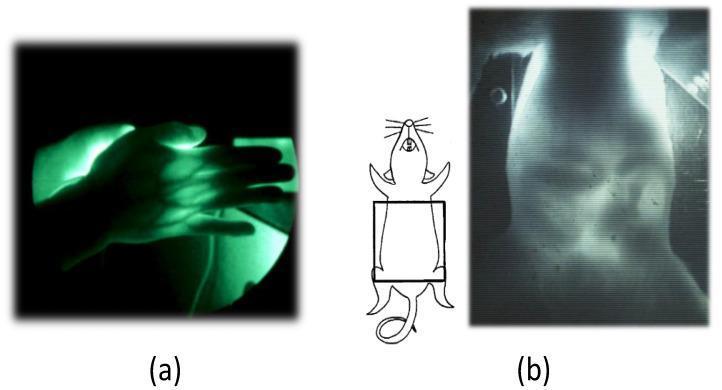
This composite diagnostic image demonstrates Near-Infrared Transillumination (NIR-TI) imaging applied to human and animal subjects. Image (a) shows an adult human hand where NIR light reveals a complex peripheral vein network. The vessels appear as dark, thick, curvilinear structures against the high-contrast back-illumination of the surrounding soft tissue. The image illustrates varying degrees of vessel sharpness, with shallower veins appearing crisp and deeper-seated vessels exhibiting increased blurring due to photon scattering. Image (b) presents a transillumination view of a rat abdomen, accompanied by a schematic diagram indicating the anatomical region of interest. The NIR-TI capture allows for the visualization of internal abdominal structures, including shadows corresponding to the intestines. This modality utilizes the biological spectral window to penetrate thick tissues, enabling real-time monitoring of physiological processes like intestinal peristalsis without exogenous contrast agents. The educational focus is on the principles of light absorption by hemoglobin and the application of transillumination for non-invasive subsurface imaging and potential 3D structural reconstruction.
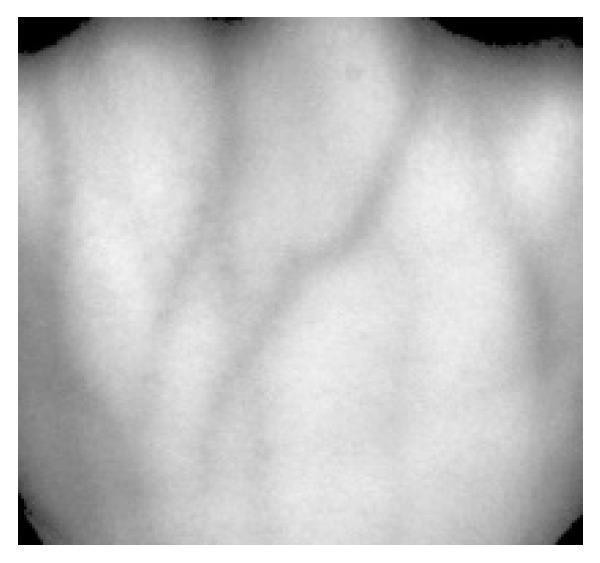
This clinical diagnostic image shows a gray-normalized region of interest (ROI) of a human dorsal hand vein network, captured using infrared (IR) light source imaging. The visual demonstrates the subcutaneous venous pattern, where veins appear as dark, branching longitudinal structures against a lighter, normalized background representing skin and subcutaneous tissue. The image highlights the superficial venous anatomy of the dorsum of the hand, specifically illustrating the interconnectivity and morphology of the veins. The texture is characterized by a soft, blurred appearance typical of near-infrared transillumination or reflectance imaging, which utilizes the light-absorption properties of deoxygenated hemoglobin to map vascular structures through the skin. This type of imaging is medically significant for vascular access, biometrics, and the study of peripheral venous distribution and variations.
Clinical Images: Difficult Paediatric IV Access Challenges
1. Scalp Vein Cannulation in Infants
Infant in lateral position. Peripheral catheter inserted into a superficial scalp vein, secured with transparent semi-permeable dressing reinforced with white tape. Two clinicians visible - one stabilising the head, one applying the dressing. Classic technique when peripheral limb access has failed.
Cannula inserted into the right superficial temporal vein. Hub secured with criss-cross white tape strips, then covered with transparent adhesive film. Yellow-capped Luer lock connector visible. This is the correct fixation technique for scalp vein cannulas.
2. Transillumination & Near-Infrared Vein Visualisation
Red LED light source applied to the neonatal hand. The translucent infant tissue glows brightly while veins appear as dark, linear shadows - making invisible veins visible. A low-cost, practical technique used routinely in NICUs. Gloved hand stabilises the limb.
Two-panel comparison using 960 nm wavelength NIR imaging. Panel (a) = ideal "highly visible" vein map with clear branching network. Panel (b) = "visible" result with lower contrast due to deeper veins or skin pigmentation. This illustrates why NIR vein finders vary in performance depending on patient factors.
3. Ultrasound-Guided Vascular Access
Clinician using a high-frequency linear probe in long-axis (longitudinal) orientation over the antecubital region. Blue tourniquet applied to upper arm. Real-time visualisation of needle entry into the brachial vein. This technique reduces failed attempts significantly in difficult access patients.
Neonatal supraclavicular approach for subclavian vein access. Sterile fenestrated drape. High-frequency linear probe in sterile cover. Assistant pulling the right arm caudally to optimise exposure. Used when all peripheral access has failed in neonates with anatomical challenges (short neck, oedema).
Transverse B-mode ultrasound of the supraclavicular region. Subclavian vein (yellow arrow) appears as a prominent anechoic (dark) oval structure. Depth markers confirm shallow field appropriate for neonatal anatomy. Differentiates the vein from the adjacent subclavian artery.
4. Neonatal PICC Line
Preterm infant in NICU. PICC line inserted into the basilic vein at the forearm. Non-woven IV fixation bandage secures the entry site; transparent dressing allows site monitoring. Arrowg+ard Blue Advance PICC with multiple lumen connectors (green and orange needleless ports). This is the preferred route when prolonged IV access is needed.
5. Complications: Extravasation / Infiltration Injury
Dorsum of a neonate's left hand. Significant diffuse erythema and non-pitting oedema from MCP joints to distal forearm. Multiple punctate red marks from repeated venipuncture attempts. Central larger puncture site with serosanguinous fluid. Fingers remain pink (distal circulation preserved). This is a classic early-stage IV infiltration/extravasation injury - a sentinel reminder of why minimal attempts and correct technique matter.
6. Intraosseous (IO) Access - The Rescue Option
EZ-IO power driver (red handle, pink translucent needle set) inserting into the anterior-medial proximal tibia, just distal to the tibial tuberosity. Blue-gloved hand stabilising the calf for counter-pressure. Correct angle: perpendicular to the bone. Used when all IV attempts have failed in a critically ill child - all resuscitation fluids and drugs can be given via this route.
Panel A: NIO (New Intraosseous) device at proximal tibia - blue stabiliser base flush with skin, erythema visible around insertion site. Panel B: Same device at humeral head. Both sites are standard IO landmarks. Only one attempt per bone is recommended to avoid complications.
Summary Table of Images Found
| # | Topic | Clinical Relevance |
|---|---|---|
| 1-2 | Scalp vein cannulation | Fallback in neonates when limb access fails |
| 3-4 | Transillumination / NIR | Visualising invisible veins in chubby infants |
| 5-6 | Ultrasound guidance | After 2 failed attempts - peripheral and central |
| 7 | USS neonatal anatomy | Understanding target vessel on ultrasound |
| 8 | PICC line | Long-term access when short-term PIVC inadequate |
| 9 | Extravasation injury | Complication to recognise and prevent |
| 10-11 | Intraosseous access | Life-saving rescue when all IV access fails |
Create a quick reference guide (PDF) on difficult paediatric IV access troubleshooting
ls -la /tmp/workspace/ 2>/dev/null || echo "workspace empty or missing"
mkdir -p /tmp/workspace/paed-iv-guide
~/paed-iv-guide/generate_pdf.py
from reportlab.lib.pagesizes import A4
from reportlab.lib import colors
from reportlab.lib.units import mm, cm
from reportlab.lib.styles import getSampleStyleSheet, ParagraphStyle
from reportlab.lib.enums import TA_CENTER, TA_LEFT, TA_JUSTIFY
from reportlab.platypus import (
SimpleDocTemplate, Paragraph, Spacer, Table, TableStyle,
HRFlowable, KeepTogether
)
from reportlab.platypus import PageBreak
from reportlab.lib.colors import HexColor
import os
OUTPUT_PATH = "/tmp/workspace/paed-iv-guide/Paediatric_IV_Access_Quick_Reference.pdf"
# ── Colour palette ──────────────────────────────────────────────────────────
NAVY = HexColor("#1B3A6B")
TEAL = HexColor("#0D7C8F")
AMBER = HexColor("#E07B00")
RED_DARK = HexColor("#C0392B")
GREEN = HexColor("#1A7A4A")
LIGHT_BG = HexColor("#EFF6FA")
ALT_ROW = HexColor("#D6EBF4")
WHITE = colors.white
BLACK = colors.black
GREY = HexColor("#555555")
LIGHT_GREY = HexColor("#F2F2F2")
ORANGE_LIGHT = HexColor("#FFF3E0")
RED_LIGHT = HexColor("#FDECEA")
GREEN_LIGHT = HexColor("#E8F5E9")
TEAL_LIGHT = HexColor("#E0F4F7")
W, H = A4 # 210 x 297 mm
# ── Document ─────────────────────────────────────────────────────────────────
doc = SimpleDocTemplate(
OUTPUT_PATH,
pagesize=A4,
leftMargin=14*mm, rightMargin=14*mm,
topMargin=12*mm, bottomMargin=14*mm,
title="Difficult Paediatric IV Access – Quick Reference Guide",
author="Clinical Reference",
)
# ── Styles ───────────────────────────────────────────────────────────────────
styles = getSampleStyleSheet()
def S(name, **kw):
return ParagraphStyle(name, **kw)
cover_title = S("CoverTitle", fontSize=26, textColor=WHITE, alignment=TA_CENTER,
fontName="Helvetica-Bold", leading=32, spaceAfter=4)
cover_sub = S("CoverSub", fontSize=13, textColor=HexColor("#B8D8E8"),
alignment=TA_CENTER, fontName="Helvetica", leading=18)
cover_tag = S("CoverTag", fontSize=9, textColor=HexColor("#90C0D0"),
alignment=TA_CENTER, fontName="Helvetica-Oblique")
sec_head = S("SecHead", fontSize=11, textColor=WHITE, fontName="Helvetica-Bold",
leading=16, alignment=TA_LEFT, spaceAfter=0)
sub_head = S("SubHead", fontSize=9.5, textColor=NAVY, fontName="Helvetica-Bold",
leading=13, spaceBefore=4, spaceAfter=2)
body = S("Body", fontSize=8.5, textColor=BLACK, fontName="Helvetica",
leading=12, spaceAfter=2)
body_j = S("BodyJ", fontSize=8.5, textColor=BLACK, fontName="Helvetica",
leading=12, alignment=TA_JUSTIFY, spaceAfter=2)
bullet = S("Bullet", fontSize=8.5, textColor=BLACK, fontName="Helvetica",
leading=12, leftIndent=10, bulletIndent=2, spaceAfter=1)
small = S("Small", fontSize=7.5, textColor=GREY, fontName="Helvetica",
leading=10)
warn = S("Warn", fontSize=8.5, textColor=RED_DARK, fontName="Helvetica-Bold",
leading=12)
ok = S("OK", fontSize=8.5, textColor=GREEN, fontName="Helvetica-Bold",
leading=12)
table_hdr = S("TH", fontSize=8, textColor=WHITE, fontName="Helvetica-Bold",
leading=11, alignment=TA_CENTER)
table_cell = S("TC", fontSize=8, textColor=BLACK, fontName="Helvetica",
leading=11, alignment=TA_LEFT)
table_cell_c = S("TCC", fontSize=8, textColor=BLACK, fontName="Helvetica",
leading=11, alignment=TA_CENTER)
footer_s = S("Footer", fontSize=7, textColor=HexColor("#888888"),
alignment=TA_CENTER, fontName="Helvetica-Oblique")
def section_header(text, color=TEAL):
"""Coloured full-width section banner."""
t = Table([[Paragraph(text, sec_head)]], colWidths=[W - 28*mm])
t.setStyle(TableStyle([
("BACKGROUND", (0,0), (-1,-1), color),
("TOPPADDING", (0,0), (-1,-1), 5),
("BOTTOMPADDING", (0,0), (-1,-1), 5),
("LEFTPADDING", (0,0), (-1,-1), 8),
("RIGHTPADDING", (0,0), (-1,-1), 8),
("ROUNDEDCORNERS", [4]),
]))
return t
def info_box(lines, bg=TEAL_LIGHT, border=TEAL):
"""Coloured info / tip box."""
content = [Paragraph(l, body) for l in lines]
t = Table([content], colWidths=[W - 28*mm])
t.setStyle(TableStyle([
("BACKGROUND", (0,0), (-1,-1), bg),
("BOX", (0,0), (-1,-1), 1.5, border),
("TOPPADDING", (0,0), (-1,-1), 6),
("BOTTOMPADDING", (0,0), (-1,-1), 6),
("LEFTPADDING", (0,0), (-1,-1), 8),
("RIGHTPADDING", (0,0), (-1,-1), 8),
("VALIGN", (0,0), (-1,-1), "TOP"),
]))
return t
def two_col(left_items, right_items, left_bg=LIGHT_BG, right_bg=ORANGE_LIGHT,
left_border=TEAL, right_border=AMBER, col_ratio=(0.5, 0.5)):
"""Two-column coloured box."""
usable = W - 28*mm
cw = [usable * col_ratio[0] - 2*mm, usable * col_ratio[1] - 2*mm]
left_p = [Paragraph(i, body) for i in left_items]
right_p = [Paragraph(i, body) for i in right_items]
inner = Table(
[[Table([[p] for p in left_p], colWidths=[cw[0]-4], style=TableStyle([
("LEFTPADDING", (0,0),(-1,-1),4),
("RIGHTPADDING", (0,0),(-1,-1),4),
("TOPPADDING", (0,0),(-1,-1),3),
("BOTTOMPADDING", (0,0),(-1,-1),3),
("BACKGROUND", (0,0),(-1,-1), left_bg),
("BOX", (0,0),(-1,-1),1, left_border),
]]),
Table([[p] for p in right_p], colWidths=[cw[1]-4], style=TableStyle([
("LEFTPADDING", (0,0),(-1,-1),4),
("RIGHTPADDING", (0,0),(-1,-1),4),
("TOPPADDING", (0,0),(-1,-1),3),
("BOTTOMPADDING", (0,0),(-1,-1),3),
("BACKGROUND", (0,0),(-1,-1), right_bg),
("BOX", (0,0),(-1,-1),1, right_border),
]),
]],
colWidths=cw, style=TableStyle([
("VALIGN", (0,0),(-1,-1),"TOP"),
("LEFTPADDING", (0,0),(-1,-1),0),
("RIGHTPADDING", (0,0),(-1,-1),0),
])
)
return inner
# ─────────────────────────────────────────────────────────────────────────────
# PAGE CALLBACKS
# ─────────────────────────────────────────────────────────────────────────────
def on_first_page(canvas, doc):
canvas.saveState()
# Deep navy gradient-like header band
canvas.setFillColor(NAVY)
canvas.rect(0, H - 58*mm, W, 58*mm, fill=1, stroke=0)
# Teal accent stripe
canvas.setFillColor(TEAL)
canvas.rect(0, H - 61*mm, W, 3*mm, fill=1, stroke=0)
canvas.restoreState()
def on_later_pages(canvas, doc):
canvas.saveState()
# Slim header bar
canvas.setFillColor(NAVY)
canvas.rect(0, H - 12*mm, W, 12*mm, fill=1, stroke=0)
canvas.setFillColor(WHITE)
canvas.setFont("Helvetica-Bold", 8)
canvas.drawString(14*mm, H - 8*mm, "DIFFICULT PAEDIATRIC IV ACCESS – QUICK REFERENCE GUIDE")
canvas.setFont("Helvetica", 8)
canvas.drawRightString(W - 14*mm, H - 8*mm, f"Page {doc.page}")
# Slim footer bar
canvas.setFillColor(TEAL)
canvas.rect(0, 0, W, 8*mm, fill=1, stroke=0)
canvas.setFillColor(WHITE)
canvas.setFont("Helvetica-Oblique", 7)
canvas.drawCentredString(W/2, 2.5*mm,
"For clinical use by trained healthcare professionals only. Always follow local policy and escalate appropriately.")
canvas.restoreState()
# ─────────────────────────────────────────────────────────────────────────────
# BUILD CONTENT
# ─────────────────────────────────────────────────────────────────────────────
story = []
# ══════════════════════════════════════════════════════════════════════════════
# COVER BLOCK (sits inside the navy header band painted by on_first_page)
# ══════════════════════════════════════════════════════════════════════════════
story.append(Spacer(1, 10*mm))
story.append(Paragraph("DIFFICULT PAEDIATRIC IV ACCESS", cover_title))
story.append(Paragraph("Quick Reference & Troubleshooting Guide", cover_sub))
story.append(Spacer(1, 3*mm))
story.append(Paragraph("Cannula Selection · Site Choice · Vein Visualisation · Escalation Pathway · Complications", cover_tag))
story.append(Spacer(1, 18*mm))
# ══════════════════════════════════════════════════════════════════════════════
# SECTION 1 – CANNULA SIZE & SITE SELECTION
# ══════════════════════════════════════════════════════════════════════════════
story.append(section_header("1. CANNULA SIZE & SITE SELECTION BY AGE"))
story.append(Spacer(1, 3*mm))
gauge_data = [
[Paragraph("Age Group", table_hdr), Paragraph("Gauge", table_hdr),
Paragraph("Colour", table_hdr), Paragraph("1st Choice Site", table_hdr),
Paragraph("Fallback Site", table_hdr)],
[Paragraph("Preterm neonate", table_cell), Paragraph("26G", table_cell_c),
Paragraph("Violet", table_cell_c), Paragraph("Dorsum of hand or foot", table_cell),
Paragraph("Scalp vein", table_cell)],
[Paragraph("Term neonate / infant", table_cell), Paragraph("24G", table_cell_c),
Paragraph("Yellow", table_cell_c), Paragraph("Dorsum of hand or foot", table_cell),
Paragraph("Scalp vein / antecubital", table_cell)],
[Paragraph("Infant – toddler (1–3 yr)", table_cell), Paragraph("22G", table_cell_c),
Paragraph("Blue", table_cell_c), Paragraph("Dorsum of hand", table_cell),
Paragraph("Antecubital / saphenous", table_cell)],
[Paragraph("Pre-school / school age", table_cell), Paragraph("22–20G", table_cell_c),
Paragraph("Blue / Pink", table_cell_c), Paragraph("Dorsum of hand / forearm", table_cell),
Paragraph("Antecubital", table_cell)],
[Paragraph("Adolescent", table_cell), Paragraph("20–18G", table_cell_c),
Paragraph("Pink / Green", table_cell_c), Paragraph("Antecubital / forearm", table_cell),
Paragraph("Dorsum of hand", table_cell)],
]
gauge_table = Table(gauge_data,
colWidths=[38*mm, 16*mm, 20*mm, 52*mm, 48*mm],
repeatRows=1)
gauge_table.setStyle(TableStyle([
("BACKGROUND", (0,0), (-1,0), NAVY),
("BACKGROUND", (0,1), (-1,1), LIGHT_BG),
("BACKGROUND", (0,2), (-1,2), WHITE),
("BACKGROUND", (0,3), (-1,3), LIGHT_BG),
("BACKGROUND", (0,4), (-1,4), WHITE),
("BACKGROUND", (0,5), (-1,5), LIGHT_BG),
("GRID", (0,0), (-1,-1), 0.5, HexColor("#AACCDD")),
("TOPPADDING", (0,0), (-1,-1), 4),
("BOTTOMPADDING", (0,0), (-1,-1), 4),
("LEFTPADDING", (0,0), (-1,-1), 5),
("RIGHTPADDING", (0,0), (-1,-1), 5),
("VALIGN", (0,0), (-1,-1), "MIDDLE"),
]))
story.append(gauge_table)
story.append(Spacer(1, 2*mm))
story.append(Paragraph(
"<b>Key fact:</b> A 24G in an infant delivers flow equivalent to two 18G cannulas in an adult. "
"Neonatal veins lie very superficially – insert at 10–15° to avoid 'blowing through'.",
small))
story.append(Spacer(1, 4*mm))
# ══════════════════════════════════════════════════════════════════════════════
# SECTION 2 – STEP-BY-STEP TECHNIQUE
# ══════════════════════════════════════════════════════════════════════════════
story.append(KeepTogether([
section_header("2. STEP-BY-STEP INSERTION TECHNIQUE"),
Spacer(1, 3*mm),
]))
steps = [
("<b>PREPARE</b>", "Assemble all equipment BEFORE approaching the child. "
"Pre-cut tape strips. Prime extension set. Lay items left-to-right in order of use. "
"Apply EMLA/Ametop ≥45 min prior if planned procedure."),
("<b>PAIN RELIEF</b>", "Neonates: oral sucrose 0.5–1 mL on pacifier 2 min before. "
"All ages: topical anaesthetic, distraction, parental comfort/cuddle. "
"Swaddle neonates snugly."),
("<b>ASSIGN ROLES</b>", "You need ≥5 people: (1) Cuddler/parent, (2) Distractor, "
"(3) Tourniquet controller + limb stabiliser, (4) Cannulator, (5) Taper/assistant. "
"<i>Get one more person than you think you need.</i>"),
("<b>SITE & VEIN</b>", "Inspect ALL appropriate sites first before committing. "
"Apply tourniquet, dangle limb 30–60 s, apply warm compress 3–5 min. "
"Use transillumination or NIR vein finder for chubby infants."),
("<b>SKIN PREP</b>", "Chlorhexidine 1%/alcohol 70% (>27 wk): allow 30 s to dry. "
"Povidone-iodine 10% (<27 wk): allow 60 s, then wipe off with sterile saline. "
"Do NOT re-touch the cleaned area."),
("<b>INSERTION</b>", "Stabilise vein with non-dominant hand – gentle distal traction. "
"Bevel UP. Angle: 10–15° neonates, 15–30° older children. Advance until flashback. "
"Then advance 1–2 mm further before threading the cannula off the needle."),
("<b>CANNULATE</b>", "Withdraw needle while smoothly advancing the plastic catheter. "
"Release tourniquet. Apply occlusive finger pressure above cannula tip. "
"Attach primed extension set. Dispose of needle immediately into sharps bin."),
("<b>FLUSH & CHECK</b>", "Flush with 1 mL syringe (low pressure). Confirm free flow, "
"no resistance, no swelling. Attach IV line."),
("<b>SECURE</b>", "Apply leukostrips across hub. Cover with transparent occlusive dressing "
"(site must remain visible). Apply splint for ALL children <10 yr – three-point contact. "
"Loop and tape extension tubing to splint as strain relief."),
("<b>DOCUMENT</b>", "Label: date, time, gauge, site, inserter. Record number of attempts. "
"Review site every shift. Escalate to PICC if PIVC needed >5–7 days."),
]
step_rows = []
for i, (hd, txt) in enumerate(steps, 1):
num_para = Paragraph(f"<b>{i}</b>", ParagraphStyle("Num", fontSize=10,
textColor=WHITE, fontName="Helvetica-Bold", alignment=TA_CENTER, leading=14))
num_cell = Table([[num_para]], colWidths=[8*mm],
style=TableStyle([("BACKGROUND",(0,0),(-1,-1),TEAL),
("TOPPADDING",(0,0),(-1,-1),4),("BOTTOMPADDING",(0,0),(-1,-1),4),
("LEFTPADDING",(0,0),(-1,-1),0),("RIGHTPADDING",(0,0),(-1,-1),0),
("VALIGN",(0,0),(-1,-1),"MIDDLE")]))
row_bg = LIGHT_BG if i % 2 == 0 else WHITE
step_rows.append([num_cell,
Paragraph(hd, sub_head),
Paragraph(txt, body_j)])
steps_table = Table(step_rows, colWidths=[10*mm, 30*mm, W - 28*mm - 42*mm],
style=TableStyle([
("GRID", (0,0),(-1,-1), 0.3, HexColor("#CCDDEE")),
("BACKGROUND", (0,0),(-1,-1), WHITE),
("ROWBACKGROUNDS",(0,0),(-1,-1), [WHITE, LIGHT_BG]),
("TOPPADDING", (0,0),(-1,-1), 5),
("BOTTOMPADDING", (0,0),(-1,-1), 5),
("LEFTPADDING", (0,0),(-1,-1), 4),
("RIGHTPADDING", (0,0),(-1,-1), 4),
("VALIGN", (0,0),(-1,-1), "TOP"),
]))
story.append(steps_table)
story.append(Spacer(1, 4*mm))
# ══════════════════════════════════════════════════════════════════════════════
# SECTION 3 – VEIN VISUALISATION TECHNIQUES
# ══════════════════════════════════════════════════════════════════════════════
story.append(KeepTogether([
section_header("3. VEIN VISUALISATION TECHNIQUES"),
Spacer(1, 3*mm),
]))
viz_data = [
[Paragraph("Technique", table_hdr), Paragraph("How to Use", table_hdr),
Paragraph("Best For", table_hdr), Paragraph("Availability", table_hdr)],
[Paragraph("Warm compress", table_cell),
Paragraph("Warm towel or soak limb in warm water 3–5 min", table_cell),
Paragraph("All ages", table_cell), Paragraph("Always available", table_cell)],
[Paragraph("Gravity dependency", table_cell),
Paragraph("Hang limb below heart level for 30–60 s before insertion", table_cell),
Paragraph("All ages", table_cell), Paragraph("Always available", table_cell)],
[Paragraph("Transillumination (LED)", table_cell),
Paragraph("Shine bright red LED through dorsum of hand; veins appear dark", table_cell),
Paragraph("Neonates / chubby infants", table_cell), Paragraph("Most NICUs/paed wards", table_cell)],
[Paragraph("NIR vein finder", table_cell),
Paragraph("Projects real-time vein map on skin using 960 nm infrared", table_cell),
Paragraph("Infants, chubby children, dark skin", table_cell), Paragraph("Specialist centres", table_cell)],
[Paragraph("Ultrasound (POCUS)", table_cell),
Paragraph("High-frequency linear probe; long-axis approach preferred; real-time needle guidance", table_cell),
Paragraph("Difficult access; after 2 failed attempts", table_cell), Paragraph("ED / PICU / skilled clinician", table_cell)],
[Paragraph("Scalp vein (neonates)", table_cell),
Paragraph("Scalp veins prominent; shave hair if needed; 24–26G butterfly; insert 20–30°", table_cell),
Paragraph("Neonates <6 months when limb access fails", table_cell), Paragraph("Always available", table_cell)],
]
viz_table = Table(viz_data, colWidths=[36*mm, 55*mm, 45*mm, 38*mm], repeatRows=1)
viz_table.setStyle(TableStyle([
("BACKGROUND", (0,0), (-1,0), TEAL),
("ROWBACKGROUNDS",(0,1), (-1,-1), [WHITE, LIGHT_BG]),
("GRID", (0,0), (-1,-1), 0.4, HexColor("#AACCDD")),
("TOPPADDING", (0,0), (-1,-1), 4),
("BOTTOMPADDING", (0,0), (-1,-1), 4),
("LEFTPADDING", (0,0), (-1,-1), 5),
("RIGHTPADDING", (0,0), (-1,-1), 5),
("VALIGN", (0,0), (-1,-1), "TOP"),
]))
story.append(viz_table)
story.append(Spacer(1, 5*mm))
# ══════════════════════════════════════════════════════════════════════════════
# SECTION 4 – TROUBLESHOOTING COMMON PROBLEMS
# ══════════════════════════════════════════════════════════════════════════════
story.append(KeepTogether([
section_header("4. TROUBLESHOOTING COMMON PROBLEMS", color=AMBER),
Spacer(1, 3*mm),
]))
problems = [
("No flashback after insertion",
"• Needle may be through the vein – withdraw slowly while watching for blood\n"
"• Vein may be too small – try applying gentle distal finger pressure to fill vein\n"
"• Check tourniquet is still applied and tight enough\n"
"• Re-angle: too steep → pull back and lower the angle"),
("Flashback then loss of flow",
"• Cannula tip may have slipped out – advance gently 1–2 mm\n"
"• Check for kinking at the hub\n"
"• Small fibrin clot – try aspirating with 1 mL syringe\n"
"• If no improvement: remove and try fresh site"),
("Swelling on flushing (infiltration)",
"• STOP flushing immediately\n"
"• Remove cannula, apply gentle pressure\n"
"• Elevate limb; document site and size of swelling\n"
"• If vesicant drug infiltrated: treat per extravasation protocol urgently"),
("Rolling/mobile veins",
"• Apply firm distal skin traction to anchor vein\n"
"• Use non-dominant thumb to stretch skin in direction away from insertion\n"
"• Approach at slightly steeper angle to penetrate moving vein faster"),
("Chubby infant – veins not visible",
"• Use transillumination or NIR vein finder\n"
"• Try foot veins – often more accessible than hands in obese infants\n"
"• Use ultrasound guidance\n"
"• Scalp veins visible regardless of body habitus in neonates"),
("Child fighting / uncooperative",
"• Add more people – assign a dedicated stabiliser per limb\n"
"• If needlestick risk: STOP, de-escalate, return with additional hands\n"
"• Consider intranasal midazolam for procedural anxiolysis if appropriate\n"
"• Never proceed in an unsafe situation"),
("Repeated failure (>2 attempts)",
"• ESCALATE immediately to more experienced clinician\n"
"• Activate USS-guided access or specialist vascular access team\n"
"• If critically unwell: proceed to INTRAOSSEOUS access without further delay"),
]
for prob, sol in problems:
prob_p = Paragraph(f"<b>⚠ {prob}</b>", ParagraphStyle("ProbH", fontSize=8.5,
textColor=RED_DARK, fontName="Helvetica-Bold", leading=12))
sol_lines = [Paragraph(line.strip(), body) for line in sol.strip().split('\n') if line.strip()]
sol_cell = [sol_lines[i] for i in range(len(sol_lines))]
row = Table([[prob_p, sol_cell[0] if len(sol_cell)==1 else
Table([[s] for s in sol_cell],
colWidths=[W-28*mm-40*mm-6],
style=TableStyle([("TOPPADDING",(0,0),(-1,-1),1),
("BOTTOMPADDING",(0,0),(-1,-1),1),
("LEFTPADDING",(0,0),(-1,-1),0),
("RIGHTPADDING",(0,0),(-1,-1),0)]))]],
colWidths=[40*mm, W-28*mm-44*mm],
style=TableStyle([
("BACKGROUND", (0,0),(0,0), RED_LIGHT),
("BACKGROUND", (1,0),(1,0), WHITE),
("BOX", (0,0),(-1,-1), 0.5, HexColor("#E8BBBB")),
("INNERGRID", (0,0),(-1,-1), 0.3, HexColor("#E8BBBB")),
("TOPPADDING", (0,0),(-1,-1), 5),
("BOTTOMPADDING", (0,0),(-1,-1), 5),
("LEFTPADDING", (0,0),(-1,-1), 6),
("RIGHTPADDING", (0,0),(-1,-1), 6),
("VALIGN", (0,0),(-1,-1), "TOP"),
]))
story.append(row)
story.append(Spacer(1, 1.5*mm))
story.append(Spacer(1, 4*mm))
# ══════════════════════════════════════════════════════════════════════════════
# SECTION 5 – ESCALATION PATHWAY (flowchart-style table)
# ══════════════════════════════════════════════════════════════════════════════
story.append(KeepTogether([
section_header("5. ESCALATION PATHWAY", color=RED_DARK),
Spacer(1, 3*mm),
]))
esc_steps = [
("ATTEMPT 1", TEAL, WHITE,
"Standard peripheral IV attempt by primary clinician\n"
"Optimise vein visualisation: warm compress, tourniquet, gravity, transillumination"),
("ATTEMPT 2", TEAL, WHITE,
"If attempt 1 fails: try alternative site (foot, scalp, other hand)\n"
"Consider NIR vein finder if available"),
("ESCALATE", AMBER, BLACK,
"After 2 failed attempts by one clinician → call senior / more experienced inserter\n"
"Activate ultrasound guidance (POCUS-guided peripheral or central access)\n"
"Refer to paediatric vascular access specialist team if available"),
("CRITICALLY ILL?", RED_DARK, WHITE,
"If child is in shock, cardiac arrest, or critically deteriorating at ANY stage:\n"
"→ INTRAOSSEOUS (IO) access immediately – do NOT delay for more IV attempts\n"
"All drugs and fluids can be given IO. Place at proximal tibia (EZ-IO)."),
("LONG-TERM NEED", NAVY, WHITE,
"If IV access required >5–7 days:\n"
"→ Discuss PICC line insertion (sterile technique, ultrasound-guided)\n"
"→ Document plan at daily ward round"),
]
for label, bg, fg, text in esc_steps:
label_style = ParagraphStyle("EscLabel", fontSize=9, textColor=fg,
fontName="Helvetica-Bold", alignment=TA_CENTER, leading=13)
text_style = ParagraphStyle("EscText", fontSize=8.5, textColor=BLACK,
fontName="Helvetica", leading=12)
row = Table([[Paragraph(label, label_style),
Paragraph(text.replace('\n', '<br/>'), text_style)]],
colWidths=[28*mm, W-28*mm-32*mm],
style=TableStyle([
("BACKGROUND", (0,0),(0,0), bg),
("BACKGROUND", (1,0),(1,0), LIGHT_GREY if bg != RED_DARK else RED_LIGHT),
("BOX", (0,0),(-1,-1), 1, bg),
("INNERGRID", (0,0),(-1,-1), 0.5, HexColor("#CCCCCC")),
("TOPPADDING", (0,0),(-1,-1), 6),
("BOTTOMPADDING", (0,0),(-1,-1), 6),
("LEFTPADDING", (0,0),(-1,-1), 7),
("RIGHTPADDING", (0,0),(-1,-1), 7),
("VALIGN", (0,0),(-1,-1), "MIDDLE"),
]))
story.append(row)
story.append(Spacer(1, 1*mm))
story.append(Spacer(1, 4*mm))
# ══════════════════════════════════════════════════════════════════════════════
# SECTION 6 – INTRAOSSEOUS ACCESS
# ══════════════════════════════════════════════════════════════════════════════
story.append(KeepTogether([
section_header("6. INTRAOSSEOUS (IO) ACCESS – WHEN IV HAS FAILED", color=RED_DARK),
Spacer(1, 3*mm),
]))
io_left = [
"<b>Indications</b>",
"• Critically ill child where IV access unobtainable",
"• >2 failed IV attempts in shocked/arrested child",
"• Any resuscitation scenario requiring immediate access",
"",
"<b>Preferred Sites</b>",
"• Proximal tibia (1st choice in children): 2 cm distal to tibial tuberosity, anteromedial surface",
"• Distal tibia: 3 cm proximal to medial malleolus",
"• Proximal humerus: for adolescents/adults",
"• Distal femur: alternative in small infants",
]
io_right = [
"<b>Technique (EZ-IO)</b>",
"• Identify landmark; clean skin",
"• Insert needle perpendicular to bone",
"• Drill until 'give' / decreased resistance felt",
"• Remove stylet; confirm by aspiration of marrow",
"• Flush 5–10 mL normal saline (confirm free flow, no extravasation)",
"• Secure with dressing; use pressure bag for infusion",
"",
"<b>Pain during infusion</b>",
"• Give 0.5 mg/kg 2% lidocaine IO (max 40 mg) then 10 mL saline flush",
]
story.append(two_col(io_left, io_right, left_bg=RED_LIGHT, right_bg=ORANGE_LIGHT,
left_border=RED_DARK, right_border=AMBER))
story.append(Spacer(1, 2*mm))
story.append(info_box([
"<b>⚠ CRITICAL RULE:</b> No more than ONE attempt per bone. If needle is misplaced, "
"select a DIFFERENT bone for the next attempt. Complications include compartment "
"syndrome, osteomyelitis, and tibial fracture (rare but serious)."
], bg=RED_LIGHT, border=RED_DARK))
story.append(Spacer(1, 4*mm))
# ══════════════════════════════════════════════════════════════════════════════
# SECTION 7 – COMPLICATIONS & RECOGNITION
# ══════════════════════════════════════════════════════════════════════════════
story.append(KeepTogether([
section_header("7. COMPLICATIONS: RECOGNISE & ACT", color=NAVY),
Spacer(1, 3*mm),
]))
comp_data = [
[Paragraph("Complication", table_hdr), Paragraph("Signs", table_hdr),
Paragraph("Immediate Action", table_hdr)],
[Paragraph("Infiltration / extravasation", table_cell),
Paragraph("Swelling, pallor, pain at site; loss of flashback on flushing", table_cell),
Paragraph("Stop infusion. Remove cannula. Elevate. Treat per extravasation protocol if vesicant.", table_cell)],
[Paragraph("Phlebitis", table_cell),
Paragraph("Red, warm, tender track along vein; may have palpable cord", table_cell),
Paragraph("Remove cannula. Warm compress. Analgesia. Monitor for infection.", table_cell)],
[Paragraph("Infection / sepsis", table_cell),
Paragraph("Erythema, discharge, fever, systemic signs", table_cell),
Paragraph("Remove cannula. Send swab. Blood cultures. IV antibiotics if systemic.", table_cell)],
[Paragraph("Arterial puncture", table_cell),
Paragraph("Pulsatile bright red blood; rapid haematoma; pale/mottled distal limb", table_cell),
Paragraph("Remove immediately. Apply firm pressure ≥5 min. Urgent senior review.", table_cell)],
[Paragraph("Haematoma / bruising", table_cell),
Paragraph("Localised swelling and discolouration", table_cell),
Paragraph("Apply pressure. Cold compress. Document. Allow to resolve naturally.", table_cell)],
[Paragraph("Needlestick injury (staff)", table_cell),
Paragraph("Inadvertent puncture of clinician's skin", table_cell),
Paragraph("Bleed wound, wash thoroughly, report immediately, follow local BBV protocol.", table_cell)],
]
comp_table = Table(comp_data, colWidths=[38*mm, 55*mm, 81*mm], repeatRows=1)
comp_table.setStyle(TableStyle([
("BACKGROUND", (0,0), (-1,0), NAVY),
("ROWBACKGROUNDS",(0,1), (-1,-1), [WHITE, LIGHT_BG]),
("GRID", (0,0), (-1,-1), 0.4, HexColor("#AABBCC")),
("TOPPADDING", (0,0), (-1,-1), 4),
("BOTTOMPADDING", (0,0), (-1,-1), 4),
("LEFTPADDING", (0,0), (-1,-1), 5),
("RIGHTPADDING", (0,0), (-1,-1), 5),
("VALIGN", (0,0), (-1,-1), "TOP"),
]))
story.append(comp_table)
story.append(Spacer(1, 4*mm))
# ══════════════════════════════════════════════════════════════════════════════
# SECTION 8 – SPECIAL POPULATIONS
# ══════════════════════════════════════════════════════════════════════════════
story.append(KeepTogether([
section_header("8. SPECIAL POPULATIONS & SCENARIOS", color=GREEN),
Spacer(1, 3*mm),
]))
sp_data = [
[Paragraph("Population", table_hdr), Paragraph("Key Adaptations", table_hdr)],
[Paragraph("Preterm / extremely low birthweight", table_cell),
Paragraph("Use 26G. Extremely fragile skin – use Povidone-iodine <27 wk (wipe off after). "
"Minimal attempts. Swaddle. Sucrose on pacifier. Escalate to PICC early.", table_cell)],
[Paragraph("Obese / chubby infant", table_cell),
Paragraph("Foot veins preferred. Use transillumination / NIR vein finder. "
"USS guidance. Scalp veins visible regardless of body habitus (<6 months).", table_cell)],
[Paragraph("Dehydrated / shocked child", table_cell),
Paragraph("Veins collapsed – warm compress is critical. Foot often better than hand. "
"Low threshold for IO. Do not delay resuscitation for multiple IV attempts.", table_cell)],
[Paragraph("Child with chronic illness / frequent cannulations", table_cell),
Paragraph("Respect vessel preservation. Use smallest effective gauge. "
"Avoid previously damaged sites. Consider PICC early to protect remaining veins.", table_cell)],
[Paragraph("Sickle cell disease", table_cell),
Paragraph("Avoid tight tourniquets. Keep child warm. Avoid lower limb sites if vaso-occlusive crisis. "
"Avoid prolonged occlusion of any limb.", table_cell)],
[Paragraph("Terrified / combative child", table_cell),
Paragraph("STOP if unsafe. De-escalate. Add hands. Consider intranasal midazolam "
"for procedural anxiolysis (0.2–0.3 mg/kg IN). Never force in unsafe situation.", table_cell)],
]
sp_table = Table(sp_data, colWidths=[46*mm, W - 28*mm - 50*mm], repeatRows=1)
sp_table.setStyle(TableStyle([
("BACKGROUND", (0,0), (-1,0), GREEN),
("ROWBACKGROUNDS",(0,1), (-1,-1), [WHITE, GREEN_LIGHT]),
("GRID", (0,0), (-1,-1), 0.4, HexColor("#AADDBB")),
("TOPPADDING", (0,0), (-1,-1), 4),
("BOTTOMPADDING", (0,0), (-1,-1), 4),
("LEFTPADDING", (0,0), (-1,-1), 5),
("RIGHTPADDING", (0,0), (-1,-1), 5),
("VALIGN", (0,0), (-1,-1), "TOP"),
]))
story.append(sp_table)
story.append(Spacer(1, 4*mm))
# ══════════════════════════════════════════════════════════════════════════════
# SECTION 9 – QUICK REFERENCE SUMMARY
# ══════════════════════════════════════════════════════════════════════════════
story.append(KeepTogether([
section_header("9. AT-A-GLANCE QUICK REFERENCE SUMMARY", color=NAVY),
Spacer(1, 3*mm),
]))
summary_data = [
[Paragraph("Step", table_hdr), Paragraph("Key Action", table_hdr),
Paragraph("Remember", table_hdr)],
[Paragraph("Size", table_cell), Paragraph("24G neonates · 22G infants · 20–22G children", table_cell),
Paragraph("Yellows for babies only", table_cell)],
[Paragraph("Site", table_cell), Paragraph("Hand → foot → scalp (infants) → antecubital", table_cell),
Paragraph("Feet = upside-down hands pre-walking", table_cell)],
[Paragraph("Visualise", table_cell), Paragraph("Warm compress → gravity → transillumination → NIR → USS", table_cell),
Paragraph("USS after 2 fails", table_cell)],
[Paragraph("Angle", table_cell), Paragraph("10–15° neonates · 15–30° older children", table_cell),
Paragraph("Bevel UP always", table_cell)],
[Paragraph("Technique", table_cell), Paragraph("Flashback → advance 1–2 mm → thread cannula", table_cell),
Paragraph("Distal traction to anchor vein", table_cell)],
[Paragraph("Secure", table_cell), Paragraph("Leukostrips + transparent dressing + splint", table_cell),
Paragraph("Splint ALL <10 yr", table_cell)],
[Paragraph("Pain relief", table_cell), Paragraph("EMLA + sucrose + distraction + swaddle", table_cell),
Paragraph("Sucrose 2 min before", table_cell)],
[Paragraph("Escalate", table_cell), Paragraph("2 fails → senior + USS", table_cell),
Paragraph("Critical → IO immediately", table_cell)],
[Paragraph("Document", table_cell), Paragraph("Date, time, gauge, site, attempts, inserter", table_cell),
Paragraph(">5–7 days → PICC", table_cell)],
]
summary_table = Table(summary_data, colWidths=[22*mm, 88*mm, 64*mm], repeatRows=1)
summary_table.setStyle(TableStyle([
("BACKGROUND", (0,0), (-1,0), NAVY),
("ROWBACKGROUNDS",(0,1), (-1,-1), [WHITE, LIGHT_BG]),
("GRID", (0,0), (-1,-1), 0.4, HexColor("#AABBCC")),
("TOPPADDING", (0,0), (-1,-1), 4),
("BOTTOMPADDING", (0,0), (-1,-1), 4),
("LEFTPADDING", (0,0), (-1,-1), 5),
("RIGHTPADDING", (0,0), (-1,-1), 5),
("VALIGN", (0,0), (-1,-1), "MIDDLE"),
("FONTNAME", (0,1), (0,-1), "Helvetica-Bold"),
("TEXTCOLOR", (0,1), (0,-1), TEAL),
]))
story.append(summary_table)
story.append(Spacer(1, 4*mm))
# ══════════════════════════════════════════════════════════════════════════════
# FOOTER BOX
# ══════════════════════════════════════════════════════════════════════════════
story.append(HRFlowable(width="100%", thickness=1, color=TEAL, spaceAfter=3))
story.append(info_box([
"<b>Sources:</b> Don't Forget the Bubbles (DFTB) – 12 Tips for Paediatric PIVC | "
"NYSORA Paediatric IV Access | CAHS Neonatal PIVC Guideline (WA Health) | "
"Miller's Anesthesia 10e | Tintinalli's Emergency Medicine | "
"AVA miniMAGIC Guideline 2024 | Akgül et al., J Pediatr Nursing, 2024"
], bg=LIGHT_BG, border=TEAL))
# ── Build ────────────────────────────────────────────────────────────────────
doc.build(story,
onFirstPage=on_first_page,
onLaterPages=on_later_pages)
print(f"PDF created: {OUTPUT_PATH}")
print(f"File size: {os.path.getsize(OUTPUT_PATH):,} bytes")
cd /tmp/workspace/paed-iv-guide && python generate_pdf.py 2>&1
two_col function has a complex nested syntax. Let me fix it with a cleaner approach:~/paed-iv-guide/generate_pdf.py
Successfully replaced 1 instance(s) of the string in '/tmp/workspace/paed-iv-guide/generate_pdf.py'
cd /tmp/workspace/paed-iv-guide && python generate_pdf.py 2>&1
cd /tmp/workspace/paed-iv-guide && python -c " import pdfplumber with pdfplumber.open('Paediatric_IV_Access_Quick_Reference.pdf') as pdf: print(f'Pages: {len(pdf.pages)}') for i, page in enumerate(pdf.pages, 1): text = page.extract_text() or '' print(f' Page {i}: {len(text)} chars | preview: {text[:80].strip()!r}') "
Paediatric IV Access Quick Reference
PDF Document · PDF
What's inside (4 pages, A4, print-ready):
| Section | Content |
|---|---|
| 1. Cannula Size & Site Selection | Age-by-age gauge table (26G–18G) with 1st choice and fallback sites |
| 2. Step-by-Step Insertion Technique | 10 numbered steps from preparation to documentation |
| 3. Vein Visualisation Techniques | Warm compress → gravity → transillumination → NIR → USS → scalp veins |
| 4. Troubleshooting Common Problems | 7 red-flagged problem/solution pairs (no flashback, rolling veins, infiltration, combative child, etc.) |
| 5. Escalation Pathway | Colour-coded flowchart: Attempt 1 → Attempt 2 → Senior/USS → IO → PICC |
| 6. Intraosseous (IO) Access | Indications, sites, EZ-IO technique, pain management |
| 7. Complications: Recognise & Act | Infiltration, phlebitis, infection, arterial puncture, needlestick |
| 8. Special Populations | Preterm, obese infant, shocked child, sickle cell, combative child |
| 9. At-a-Glance Summary Table | One-line reminders for every key step |