Suturing basic techniques and types what all I need to tell in a teaching course
Reading File
Finding Sources
Finding Sources
Reading File
Reading File
Reading File
Reading File
Reading File
Loading Image
I now have comprehensive content from three major textbooks. Let me compile the full teaching course outline.
Suturing: Basic Techniques & Types — Teaching Course Guide
This covers everything you need to teach in a structured suturing course, organized from foundations to hands-on technique.
1. WOUND ASSESSMENT & PRE-SUTURING PREPARATION
Before picking up a needle, trainees must understand wound readiness:
Wound Evaluation
- Mechanism: Sharp lacerations have discrete edges; blunt injuries cause tissue edema, devitalization, and slower healing
- Time since injury: Primary closure generally safe up to 24 hours for facial wounds; contaminated wounds may need delayed primary closure
- Foreign body exclusion: Palpate and explore — soil, glass, wood fragments increase infection risk
- Deep structure involvement: Nerves, tendons, vessels, facial muscles
Wound Preparation Steps
- Cleanse surrounding skin with chlorhexidine or povidone-iodine — avoid introducing antiseptic into the wound (toxic to tissue)
- Anesthetize prior to exploration and irrigation
- Explore to exclude foreign bodies, deep injuries
- Irrigate copiously using a large syringe with splash guard — retract wound edges to reach deep recesses
- Debride grossly contaminated or devitalized tissue (minimize debridement on the face — excellent blood supply enables recovery)
- Sterile drape, assemble instruments, ensure adequate lighting
— Roberts and Hedges' Clinical Procedures in Emergency Medicine
2. SUTURE MATERIALS
Absorbable vs. Non-Absorbable
| Property | Absorbable | Non-Absorbable |
|---|---|---|
| Definition | Loses >50% tensile strength within 2 months | Retains tensile strength |
| Use | Deep dermal, subcutaneous layers | Epidermal/skin surface closure |
| Removal needed | No | Yes (7–14 days) |
| Rationale | Wound has only 5–10% original skin strength at 2 weeks; suture supports until scar matures | Provides external approximation only |
Monofilament vs. Multifilament
| Property | Monofilament | Multifilament (Braided/Twisted) |
|---|---|---|
| Friction | Low — pulls through tissue easily | Higher |
| Memory | High — tendency to revert to original shape | Low |
| Knot security | Lower — needs more throws | Higher — fewer throws needed |
| Infection risk | Low capillarity, low tissue reactivity | Higher capillarity — traps fluid/bacteria |
| Examples | Nylon, polypropylene, PDS | Vicryl, polyester |
Suture Size (USP Scale)
- Dermatologic/surgical range: 3-0 to 6-0
- Diameter is inversely related to the first digit — 3-0 is thicker/stronger than 6-0
- Tensile strength is directly proportional to diameter
- Number of knot throws generally corresponds to suture size (4-0 → 4 throws, 5-0 → 5 throws)
— Fitzpatrick's Dermatology, Vol. 1 & 2
3. INSTRUMENTS
Teach proper use of:
- Needle driver — for suture placement and tying
- Tissue forceps with teeth / skin hook — to elevate wound edge without crushing tissue
- Iris scissors — for suture cutting
- Adson forceps — fine tissue handling
Needle types to cover:
- Cutting needle — triangular cross-section, for skin (tough tissue)
- Reverse cutting — cutting edge on outer convex side, less tissue tear
- Tapered needle — for delicate tissue (bowel, vessels)
4. INSTRUMENT TIE — THE SQUARE KNOT
This is the foundation before teaching any stitch type:
Steps (Instrument Tie):
- Place needle driver parallel to the wound; wrap the long suture end twice over the driver → this is the surgeon's knot (double first throw prevents loosening)
- Grasp the short suture end on the opposite side of the laceration; pull to tighten — approximate edges only, do not overtighten (causes tissue strangulation)
- Rotate driver 90°; place long suture over driver once (single wrap for throws 2–4)
- Continue for a total of 4 throws (for 4-0 suture)
- Move the knot to one side of the wound — never resting directly over the edges
- Leave 1–2 cm tails — too short risks unraveling; too long is a nuisance at removal
— Roberts and Hedges' Clinical Procedures in Emergency Medicine
5. SUTURE TECHNIQUES — TYPES
5A. Simple Interrupted Suture
The most basic and widely used technique.
Technique:
- Enter skin at 90° to the wound surface
- Needle enters and exits equidistant from wound edges
- Take a larger bite at depth than superficially to achieve wound edge eversion
- First suture placed at midpoint of wound → bisect each segment until complete closure
Advantages: Excellent approximation for irregular/complex lacerations; failure of one suture does not compromise entire closure
Disadvantages: Time-consuming; risk of tissue strangulation if over-tightened
Uses: Low-tension wounds; complex/irregular lacerations
5B. Continuous (Running) Percutaneous Suture
Best for long linear lacerations — fastest technique.
Technique:
- Begin with a simple interrupted suture anchored at one end
- Continue placing sutures in a running fashion without cutting between bites
- Lock with a final knot at the opposite end
Advantages: Rapid; accommodates post-closure edema
Disadvantages: Less meticulous than interrupted; wound may dehisce entirely if a single knot unravels (especially without deep sutures)
Uses: Long linear wounds; percutaneous closure in conjunction with deep sutures
5C. Deep Dermal (Buried) Suture
Critical for high-tension wounds — reduces surface tension.
Technique:
- Needle enters the deep dermis and exits at a superficial level
- Knot is buried within the wound (inverted knot)
- Provides structural support, allows early removal of percutaneous sutures → reduces hatch-mark scarring
Advantages: Reduces tension on skin surface; enables early percutaneous suture removal; may reduce scar width
Disadvantages: May increase infection risk in contaminated wounds
Uses: High-tension wounds; closure of dead space
5D. Continuous Subcuticular (Intradermal) Suture
Best cosmetic result — no percutaneous punctures on the skin surface.
Technique:
- Anchor suture at one end; run the suture horizontally within the dermis parallel to the skin surface
- Alternating bites on each side advance along the wound
- Tie off or use a bead/bolster at the exit point
Advantages: Rapid; reduces/eliminates need for percutaneous sutures; minimal scarring; cosmetically excellent
Disadvantages: Technically difficult; less accurate approximation; entire wound may dehisce if knot fails
Uses: Cosmetically visible areas (face, neck, décolleté)
5E. Vertical Mattress Suture
Best for wound edge eversion — especially in areas prone to inversion.
Technique:
- Far-far entry and exit (wide, deep bite)
- Re-enter close to wound edge on the same side (near-near bite), closer to the surface
Advantages: Excellent wound edge eversion; eliminates dead space; good for areas with thick skin or tendency to invert (e.g., back, neck)
Disadvantages: Time-consuming; more tissue trauma; higher risk of hatch-marking (remove early)
Uses: High-tension wounds; back, posterior neck
5F. Horizontal Mattress Suture
Excellent for wounds with poor circulation.
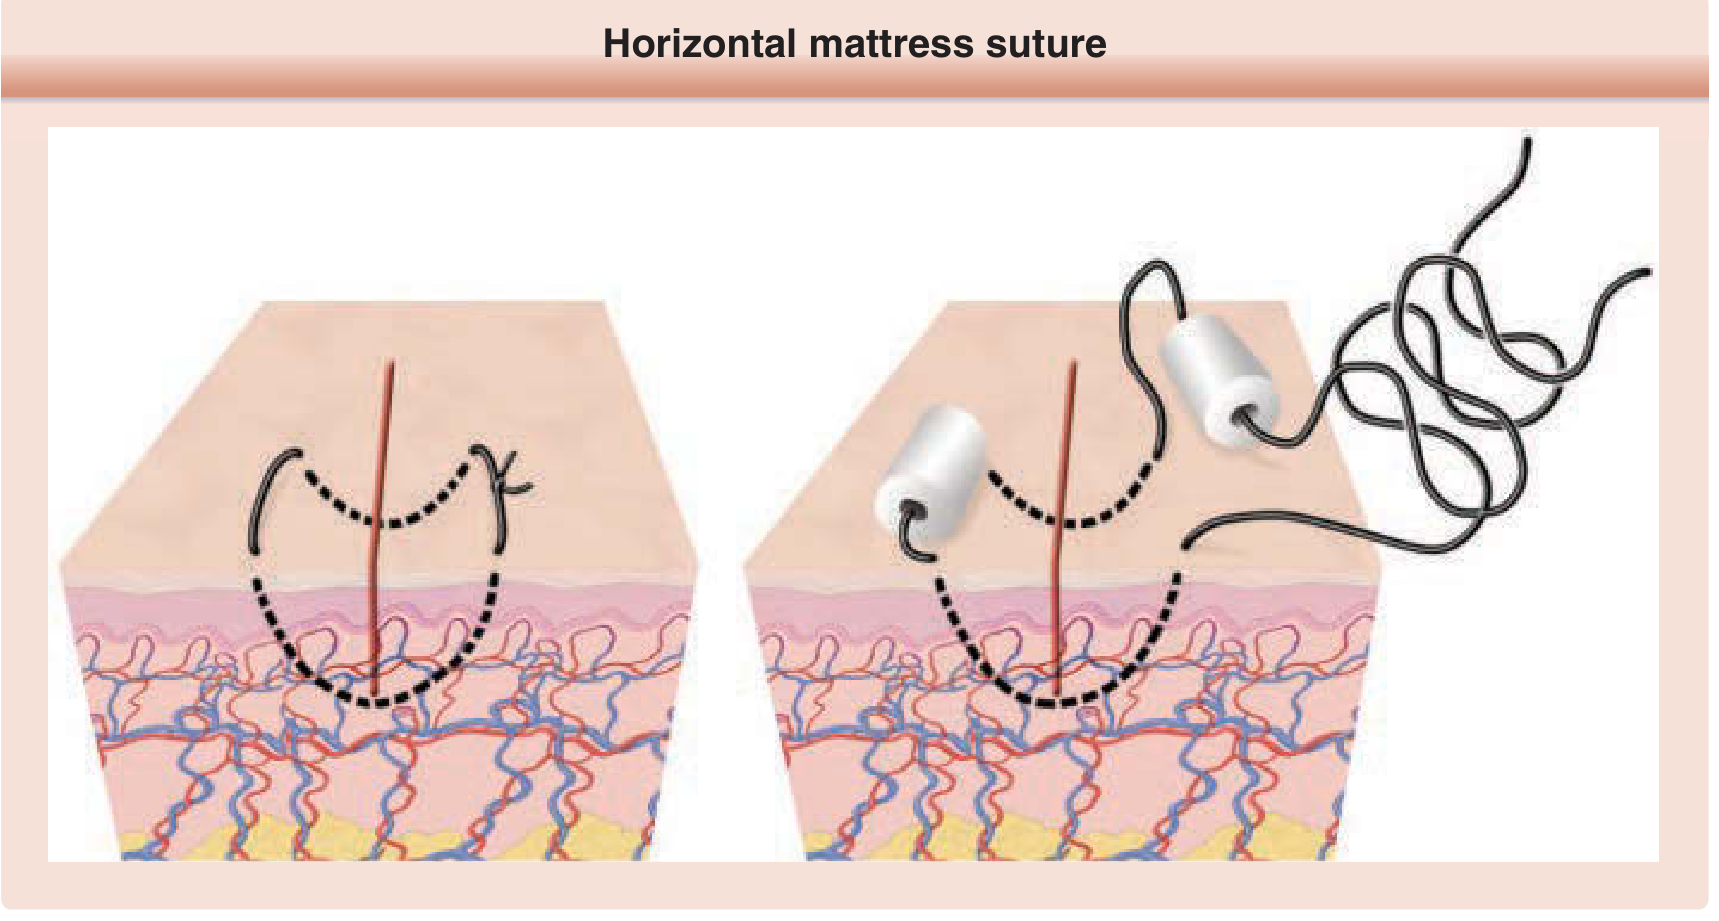
Technique:
- Two parallel bites placed horizontally across the wound
- Forms a rectangular suture pattern — knot tied on one side
Advantages: No percutaneous punctures at wound edges (preserves circulation); good for wounds under tension; rapid placement
Disadvantages: Can strangulate tissue if over-tightened
Uses: Wounds with compromised edge vascularity; fascial closure; high-tension wounds; fragile tissue
— Tintinalli's Emergency Medicine; Fitzpatrick's Dermatology
6. QUICK REFERENCE — SUTURE TECHNIQUE SELECTION TABLE
| Suture Type | Advantages | Disadvantages | Best Use |
|---|---|---|---|
| Simple interrupted | Excellent for irregular wounds | Time-consuming | Low-tension, complex lacerations |
| Continuous percutaneous | Rapid; accommodates edema | Dehiscence risk if knot fails | Long linear lacerations |
| Deep dermal (buried) | Reduces surface tension | Infection risk in contaminated wounds | High-tension wounds |
| Continuous subcuticular | Best cosmesis; no surface marks | Technically difficult | Cosmetically sensitive areas |
| Vertical mattress | Excellent eversion | Hatch-marking; time-consuming | Thick skin, inversion-prone sites |
| Horizontal mattress | Preserves edge perfusion | Strangulation risk | Poor-circulation wounds; fascia |
7. WOUND EDGE EVERSION — KEY CONCEPT
Emphasize this heavily in teaching:
- Ideal closure = meticulous wound edge approximation + eversion
- As wound contracts during healing, an initially flat closure will invert → leading to a depressed, visible scar
- Eversion ensures the final healed scar is flat or slightly raised → contracts to level surface
- Achieved by: correct needle angle (90°), adequate depth of bite, vertical mattress technique when needed
— Fitzpatrick's Dermatology
8. REGIONAL CONSIDERATIONS
Face
- Use non-absorbable monofilament (e.g., 5-0 or 6-0 nylon)
- Place sutures 1–2 mm from edges, 2 mm apart
- Consider tissue adhesive for minimal-tension facial wounds (no mucosa, no hair)
- Tissue adhesive indications: minimal tension, epidermal only, no hair-bearing area
- Remove early (5–7 days) to minimize hatch marks
Scalp
- Thick skin with rich blood supply — significant hemorrhage risk from arterial lacerations
- May use staples for rapid closure
- 3-0 or 4-0 non-absorbable
Mucosa
- Use absorbable suture (Vicryl)
- Place 2–3 mm from edges, 2–3 mm apart
- Superficial bites — do not incorporate underlying muscle/fascia
High-tension areas (back, joints)
- Always use deep dermal sutures first
- Vertical or horizontal mattress for surface
- Consider delayed suture removal
9. SUTURE REMOVAL TIMING
| Location | Removal Timing |
|---|---|
| Face | 5–7 days |
| Scalp | 7–10 days |
| Trunk | 7–10 days |
| Extremities | 10–14 days |
| Over joints | 14 days |
| Hands/feet | 10–14 days |
Removal technique: Pull toward the wound line (not away from it) to avoid tearing apart a healing wound.
10. COMPLICATIONS TO TEACH
| Complication | Cause | Prevention |
|---|---|---|
| Wound dehiscence | Knot failure, excess tension, early removal | Proper knot technique; deep sutures for tension; correct timing |
| Hatch-mark scarring | Sutures left too long; over-tightening | Early removal on face; vertical mattress on back |
| Infection | Inadequate irrigation; braided suture in contaminated wounds | Thorough irrigation; monofilament in contaminated sites |
| Tissue strangulation | Sutures tied too tightly | Approximate, don't strangulate |
| Dead space | Incomplete closure of layers | Use buried/deep dermal sutures |
| Wound inversion | Inadequate eversion technique | Correct needle angle; vertical mattress as needed |
11. SUGGESTED COURSE STRUCTURE
| Session | Content |
|---|---|
| Session 1 | Wound healing phases; anatomy of skin layers; suture materials |
| Session 2 | Instruments; needle types; knot tying (square knot, surgeon's knot) |
| Session 3 | Simple interrupted + continuous running — wet lab on tissue pads |
| Session 4 | Deep dermal + subcuticular — wet lab |
| Session 5 | Mattress sutures (vertical + horizontal) — wet lab |
| Session 6 | Regional considerations (face, scalp, joints); wound complications |
| Assessment | OSCE on fresh tissue/simulation model |
Sources:
- Fitzpatrick's Dermatology, 9th Ed., Vol. 1 & 2 — Suture Materials & Techniques (Ch. 202)
- Tintinalli's Emergency Medicine — Wound Closure, Ch. 41–42
- Roberts and Hedges' Clinical Procedures in Emergency Medicine — General Suturing Technique, Ch. 35
Suturing basic techniques and types what all I need to tell in a teaching course
Reading File
Finding Sources
Finding Sources
Reading File
Reading File
Reading File
Reading File
Reading File
Reading File
Reading File
Reading File
Loading Image
Loading Image
Excellent — I now have comprehensive textbook content and high-quality diagrams from Fitzpatrick's Dermatology and Roberts & Hedges. Here is the complete teaching course guide:
Suturing: Basic Techniques & Types — Complete Teaching Course
Based on: Fitzpatrick's Dermatology (9e), Roberts and Hedges' Clinical Procedures in Emergency Medicine, Tintinalli's Emergency Medicine
MODULE 1 — GOALS OF WOUND CLOSURE
Start by anchoring the "why" before the "how":
"Repair of a surgical defect should maximize cosmetic and functional outcomes. An ideal wound closure consists of meticulous wound edge approximation and eversion." — Fitzpatrick's Dermatology
Key goals to state upfront:
- Approximate wound edges precisely in all three dimensions
- Evert wound edges slightly (prevents depressed scars after wound contraction)
- Minimize tension and eliminate dead space
- Minimize suture track marks (especially in cosmetically sensitive areas)
- Restore anatomic contours
MODULE 2 — WOUND PREPARATION (Before Any Suture Is Placed)
Teach this as a non-negotiable sequence:
| Step | Action | Key Point |
|---|---|---|
| 1 | Cleanse surrounding skin | Chlorhexidine or povidone-iodine — do not introduce antiseptic into the wound (toxic to tissue) |
| 2 | Anesthetize | Before exploration or irrigation |
| 3 | Explore | Exclude foreign bodies, deep structure injuries (tendons, nerves, vessels) |
| 4 | Irrigate copiously | Large syringe + splash guard; retract wound edges to reach deep recesses |
| 5 | Debride | Remove grossly contaminated or devitalized tissue |
| 6 | Setup | Sterile drape, instruments laid out, adequate lighting |
MODULE 3 — INSTRUMENTS
Teach correct handling of each before placing any suture:
- Needle driver — used for suture placement and knot tying; held like a pencil, not in a fist
- Tissue forceps with teeth / skin hook — elevate wound edges without crushing; use the tip of one tine of the forceps to minimize damage
- Iris scissors — for cutting suture tails
- Adson forceps — fine tissue handling
Needle Types
| Type | Cross-section | Use |
|---|---|---|
| Conventional cutting | Triangular, cutting edge on inner curve | Skin |
| Reverse cutting | Triangular, cutting edge on outer curve | Skin, fascia — less tissue tear, preferred |
| Tapered/round-bodied | Round | Delicate tissue — bowel, vessels, subcutaneous |
Teaching point: The motion of the needle holder must mimic the curve of the needle — pronate the wrist so the needle enters the skin perpendicularly; this helps evert the wound edge.
MODULE 4 — SUTURE MATERIALS
4A. Absorbable vs. Non-Absorbable
| Property | Absorbable | Non-Absorbable |
|---|---|---|
| Definition | Loses >50% tensile strength within 2 months | Retains tensile strength indefinitely |
| Primary use | Deep layers: dermis, subcutaneous | Skin surface (epidermal) closure |
| Removal | Not required | Required at 5–14 days |
| Rationale | At 2 weeks, scar has only 5–10% of original skin strength — suture supports until scar matures | Provides surface approximation, not structural support |
4B. Monofilament vs. Multifilament
| Property | Monofilament | Multifilament (Braided) |
|---|---|---|
| Friction | Low — passes easily through tissue | Higher friction |
| Memory | High — tendency to revert to original shape | Low memory |
| Knot security | Lower — needs more throws to prevent unraveling | Higher — fewer throws needed |
| Infection risk | Low capillarity → low tissue reactivity, low infection risk | Porous structure traps fluid and bacteria → higher infection risk |
| Examples | Nylon, polypropylene, PDS, Monocryl | Vicryl, Dexon, silk |
4C. Suture Size (USP Scale)
- Diameter is inversely proportional to the first digit: 3-0 is thicker/stronger than 6-0
- Tensile strength is directly proportional to diameter
- For skin: typically 3-0 to 6-0
- Number of knot throws = suture size number (4-0 → 4 throws, 5-0 → 5 throws)
4D. Commonly Used Sutures (Quick Reference)
| Suture | Type | Absorbable | Common Use |
|---|---|---|---|
| Plain gut | Monofilament | Yes | Mucosa |
| Chromic gut | Monofilament | Yes | Mucosa, oral cavity |
| Vicryl (polyglactin) | Braided | Yes | Deep dermal, subcutaneous |
| PDS (polydioxanone) | Monofilament | Yes | Deep layers needing prolonged support |
| Monocryl (poliglecaprone) | Monofilament | Yes | Subcuticular |
| Nylon (Ethilon, Dermalon) | Monofilament | No | Skin surface |
| Prolene (polypropylene) | Monofilament | No | Skin, subcuticular |
| Silk | Braided | No | Oral mucosa (tied loosely) |
MODULE 5 — KNOT TYING (Foundation Before Any Stitch)
Teach the instrument tie first — this is the square knot.
Instrument Tie — Step by Step:
- Place the needle driver parallel to the wound; wrap the long suture end twice around the driver → this is the surgeon's knot (double first throw prevents loosening while you grab the other end)
- Grasp the short end on the opposite side of the laceration; pull ends toward opposite sides to approximate — not strangulate — edges
- Rotate driver 90°; wrap long end once over driver (single wrap for all subsequent throws)
- Repeat for total of 4 throws (for 4-0 suture)
- Move the completed knot to one side of the wound — never resting directly over the wound edge
- Cut tails to 1–2 cm — too short risks unraveling; too long is a nuisance at removal
Teaching point: Sutures tied too tightly compromise blood supply to wound edges → increased infection risk and suture marks can form within 24 hours.
MODULE 6 — SUTURE TECHNIQUE TYPES
6A. Simple Interrupted Suture
The most basic and most commonly used technique — teach this first.
Technique:
- Enter needle at 90° to skin surface on one side
- The bite should be wider at depth than at surface (bottle-shaped / flask-shaped path) — this is what achieves eversion
- Enter and exit at equal distances from wound edge on both sides
- Tie with a square knot; move knot to one side
Bisecting rule for wound closure: Place first suture at the midpoint of the wound → bisect each segment sequentially until complete — prevents uneven approximation
Advantages: Best for irregular/complex lacerations; if one suture fails, others hold; allows staged removal
Disadvantages: Time-consuming; risk of strangulation if over-tightened
Best for: Low-tension wounds, complex lacerations, areas of concern for impaired healing
6B. Deep Dermal / Buried Interrupted Suture ("Heart-Shaped" Buried Suture)
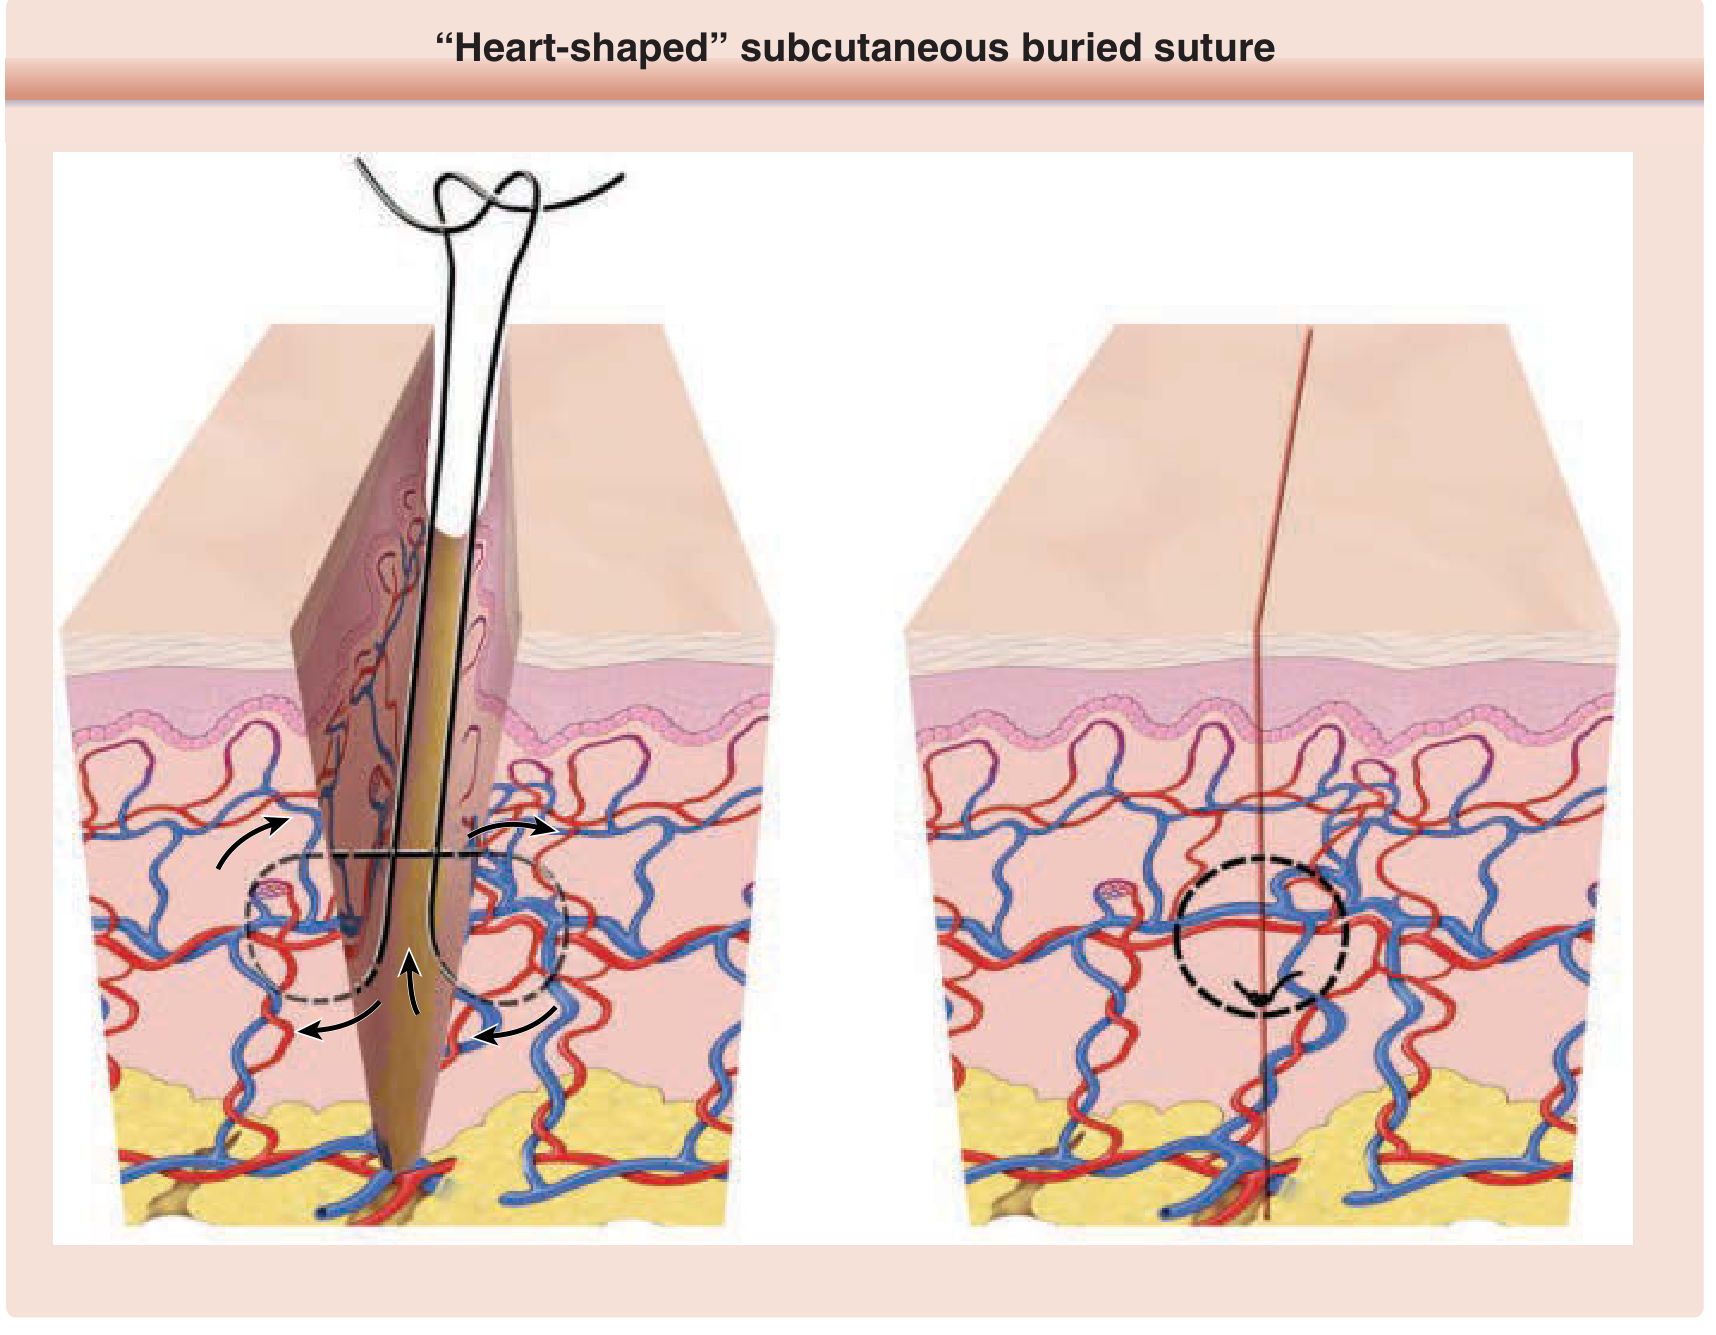
Figure 202-1: "Heart-shaped" subcutaneous buried suture — Fitzpatrick's Dermatology
Technique:
- Needle enters deep in subcutis on one side, sweeps upward to exit in superficial dermis
- Re-enters superficial dermis on the opposite side, sweeps down
- Knot is buried (tied at depth, faces downward) — cannot be felt on surface
Why it works: The heart-shaped path means the deepest point of the bite is at the bottom → as suture tightens, wound edges are drawn together AND everted
Advantages: Reduces tension at the skin surface; supports wound during critical early healing; allows early epidermal suture removal; reduces scar width; eliminates dead space
Disadvantages: May increase infection risk in contaminated wounds
Best for: High-tension wounds; layered closure; cosmetically sensitive areas
6C. Continuous (Running) Percutaneous Suture
Fastest technique — best for long linear lacerations.
Technique:
- Anchor with an initial interrupted suture at one end (not cut)
- Continue placing sutures in a running fashion without cutting between bites
- Lock with a final knot at the other end
Advantages: Rapid closure; accommodates postoperative edema (tension distributed along entire length)
Disadvantages: Less precise than interrupted; entire wound may dehisce if the single end-knot unravels — especially if no buried sutures were placed
Best for: Long linear lacerations; combined with deep sutures
6D. Running Locking Suture
- Variant of the running suture — needle passes through the previous loop before placing the next
- Stronger than simple running; useful for hemostasis in well-vascularized wounds (e.g., scalp)
- Risk: wound-edge necrosis if placed too tightly or if significant postoperative swelling occurs
- Avoid at sites with tendency for inversion
6E. Horizontal Mattress Suture
Figure 202-2: Horizontal mattress suture — Fitzpatrick's Dermatology
Technique:
- Place a bite across the wound (far side to near side)
- Advance parallel to the wound; place a second bite back across
- Tie — forms a rectangular suture pattern
Advantages: Excellent for wounds with poor edge vascularity (no percutaneous punctures at wound edge); provides hemostasis; good wound-edge eversion; useful as a temporary bridging suture to reduce tension while placing deep sutures
Disadvantages: Can strangulate tissue if over-tightened; risk of wound-edge necrosis → use bolsters to protect tissue
Best for: Wounds with compromised perfusion; fascial closure; high-tension closures; bridging sutures
6F. Vertical Mattress Suture
Best technique for wound-edge eversion.
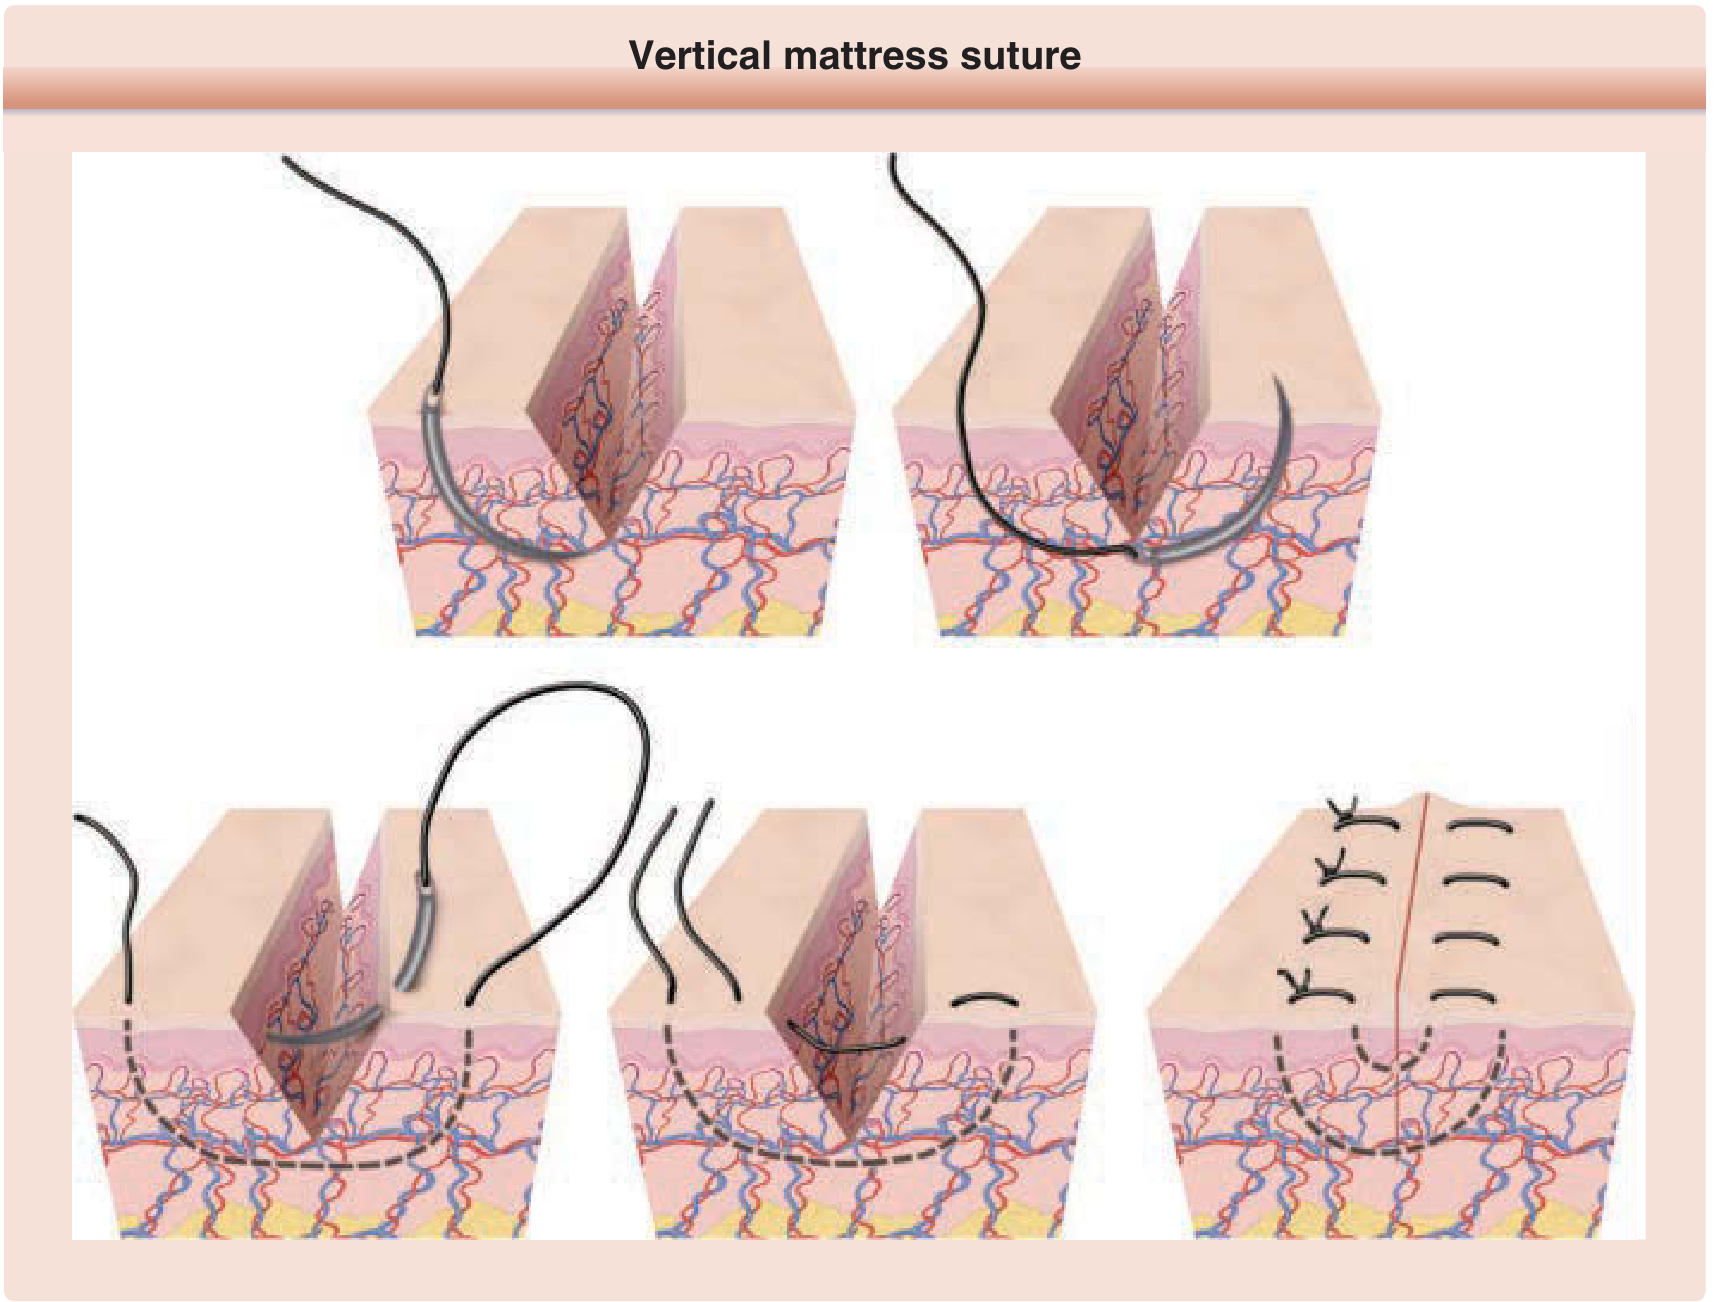
Figure 202-3: Vertical mattress suture — Fitzpatrick's Dermatology
Technique (mnemonic: "Far-Far, Near-Near"):
- Far-Far: Enter far from wound edge on one side → cross wound deep → exit far from wound edge on other side
- Near-Near: Re-enter near the wound edge on that same side → cross superficially → exit near the wound edge back on original side
- Tie
Why it works: Acts as both a buried suture and an epidermal suture combined — minimizes dead space and produces powerful eversion
Advantages: Excellent eversion; eliminates dead space; reduces tension; particularly useful on thick skin or inversion-prone areas
Disadvantages: Time-consuming; paired suture track scars if left too long → remove early; risk of necrosis under excessive tension
Best for: Back, posterior neck, extensor surfaces; thick skin; wounds prone to inversion
6G. Running Subcuticular (Intradermal) Suture
Best cosmesis — no percutaneous marks.
Technique:
- Anchor at one end; run the suture horizontally within the superficial dermis, alternating sides
- The needle never breaks the skin surface
- Exit and secure with a knot or subcutaneous bead/bolster at the other end
Materials: Absorbable monofilament (Monocryl, PDS) — can be left to absorb. Non-absorbable polypropylene — clear suture if leaving long-term; requires eventual removal.
Advantages: No surface suture tracks → no hatch-mark scars; ideal when sutures need to stay longer than 7 days
Disadvantages: Technically difficult; less accurate if wound edges are uneven; entire wound dehisces if knot fails
Best for: Cosmetically visible areas; wounds that are already well-approximated by buried sutures; pediatric patients
MODULE 7 — WOUND EDGE EVERSION: THE MASTER CONCEPT
Emphasize this as the single most important skill concept:
"As wound contraction normally occurs during healing, wound edge eversion at the time of closure promotes the development of a flat, smooth scar. If the wound edge is not sufficiently everted, wound contraction may increase the risk of a depressed or spread scar." — Fitzpatrick's Dermatology
How to teach eversion:
- Correct needle angle — perpendicular entry, bottle-shaped path (wider at depth)
- Lift and turn wound edge outward with skin hook or toothed forceps before inserting needle
- Alternatively, press closed forceps adjacent to wound edge to push it upward
- Slightly everted edges will flatten during healing → flat, level scar
- Inverted edges → catches light as a shadow → visible, depressed scar
MODULE 8 — SUTURE TECHNIQUE SELECTION TABLE
| Technique | Advantages | Disadvantages | Best Use |
|---|---|---|---|
| Simple interrupted | Precise; individual suture failure safe | Slow | Low-tension, complex, irregular wounds |
| Deep dermal (buried) | Reduces tension; allows early surface removal | Infection risk in contaminated wounds | High-tension; layered closure |
| Continuous running | Fast; distributes tension | Dehiscence if knot fails | Long linear wounds with buried sutures |
| Running locking | Strong; hemostatic | Necrosis risk if tight | Scalp; vascular wounds |
| Horizontal mattress | Preserves edge vascularity; hemostasis | Strangulation risk | Poor perfusion; fascia; bridging |
| Vertical mattress | Best eversion; closes dead space | Slow; hatch marks | Thick skin; inversion-prone sites |
| Running subcuticular | No track marks; best cosmesis | Technically hard; all-or-nothing failure | Cosmetically sensitive; long-stay sutures |
MODULE 9 — REGIONAL TIPS
| Site | Suture Choice | Size | Technique Notes |
|---|---|---|---|
| Face | Non-absorbable monofilament (nylon) | 5-0 or 6-0 | 1–2 mm from edge, 2 mm apart; consider tissue adhesive for minimal-tension, non-hairy wounds |
| Scalp | Non-absorbable or staples | 3-0 or 4-0 | Rich blood supply; running locking helps hemostasis |
| Oral mucosa | Absorbable (chromic gut, Vicryl) | 3-0 or 4-0 | 2–3 mm from edge; superficial — mucosa only, not underlying muscle |
| Trunk/back | Deep + surface | 3-0 deep, 4-0 surface | Always use buried sutures first; vertical mattress for surface |
| Over joints | Strong, deep support | 3-0 or 4-0 | High tension — buried sutures essential; delayed removal |
MODULE 10 — SUTURE REMOVAL TIMING
"Crosshatch marks can be minimized by removing sutures within a week of placement, before the formation of epithelial suture tracks." — Fitzpatrick's Dermatology
| Location | Removal Timing |
|---|---|
| Face and ears | 5–7 days |
| Neck | 7 days |
| Scalp | 7–10 days |
| Trunk and extremities | 10–14 days |
| Over joints / high tension | 14 days (or 3–4 extra days if dehiscence risk) |
Removal technique: Always pull toward the wound line — never away from it (pulling away tears the healing wound apart).
If wound well-approximated at 7–10 days with good buried sutures: epidermal sutures may be removed early and steri-strips applied for continued support.
MODULE 11 — COMPLICATIONS TO TEACH
| Complication | Cause | Prevention |
|---|---|---|
| Wound dehiscence | Knot failure; excess tension; premature removal | Proper knot technique; buried sutures for tension |
| Hatch-mark (crosshatch) scarring | Sutures left too long; over-tightened | Remove on time; don't strangulate; use subcuticular for long-stay |
| Tissue strangulation/necrosis | Sutures tied too tight | Approximate, do not strangulate; use bolsters on mattress sutures |
| Wound infection | Inadequate irrigation; braided suture in contaminated wounds | Copious irrigation; monofilament in contaminated wounds |
| Dead space → seroma/hematoma | Failure to close deep layers | Layered closure with buried sutures |
| Wound inversion → depressed scar | Flat or inverted closure technique | Correct needle angle; eversion techniques |
MODULE 12 — SUGGESTED COURSE STRUCTURE
| Session | Content | Format |
|---|---|---|
| 1 | Wound healing phases; skin layer anatomy; goals of closure | Lecture + diagrams |
| 2 | Suture materials (absorbable/non-absorbable, mono/multifilament, sizes) | Lecture + material handling lab |
| 3 | Instruments; needle types; instrument tie / square knot | Hands-on — foam pads |
| 4 | Simple interrupted + deep buried suture | Wet lab — pig trotters/chicken thigh |
| 5 | Continuous running + running subcuticular | Wet lab |
| 6 | Vertical and horizontal mattress sutures | Wet lab |
| 7 | Regional considerations; eversion principles; complications | Case-based discussion |
| 8 | OSCE assessment | Fresh tissue / simulation model |
Sources:
- Fitzpatrick's Dermatology, 9th Edition — Suture Materials (Ch. 202), Suturing Technique (Ch. 202), Suture Removal (Ch. 203)
- Roberts and Hedges' Clinical Procedures in Emergency Medicine — Suture Material (Ch. 35), General Suturing Technique, Instrument Tie, Eversion Techniques
- Tintinalli's Emergency Medicine: A Comprehensive Study Guide — Suture Techniques (Ch. 41)
This is a shared conversation. Sign in to Orris to start your own chat.