
TRU CUT BIOPSY
Reading File
A Tru-Cut biopsy is a core needle biopsy technique using a specially designed needle to obtain a cylindrical tissue core for histological examination. It is widely used for diagnosing masses in breast, liver, kidney, soft tissue, and other organs.
Searching sources...
Finding Sources
Searching the Web
Tru-Cut biopsy technique indications procedure complications
Reading File
Reading File
Finding Sources
Reading File
Reading File
Reading File
Reading File
Reading File
Reading File
Here is a comprehensive overview of the Tru-Cut Biopsy, synthesized from multiple authoritative surgical and radiology textbooks:
Tru-Cut Biopsy (Core Needle Biopsy)
What Is It?
The Tru-Cut biopsy is a form of core needle biopsy (CNB) using a specifically designed needle (originally by Cardinal Health, Dublin, Ohio) that removes a hemicylinder of tissue from the target organ. Unlike fine needle aspiration cytology (FNAC), which yields individual cells, the Tru-Cut needle retrieves an intact cylindrical tissue core that preserves cellular architecture - allowing full histological diagnosis rather than just cytology.
Needle Design
- The needle consists of two components:
- Inner obturator (stylet) - has a specimen notch (trough/groove) near its tip
- Outer cutting cannula - slides rapidly over the stylet to shear off the tissue in the notch
- Gauge: Typically 14-18G (14G most common for breast; 16G for liver; 18G for prostate and kidney)
- Sample notch: 15-30 mm long, yielding a core 15-20 mg or more in weight
- Available as manual (original) or spring-loaded/automated (biopsy gun - e.g., Bard Magnum®)
Mechanism of Action (Two-Step / Throw Technique)
- Insert: The assembled needle is advanced to the edge of the lesion
- Advance obturator: The inner stylet is quickly thrust forward - the specimen notch now lies within the target tissue, which prolapses into the notch
- Fire cannula: The outer cutting cannula is rapidly advanced over the stylet, shearing off the tissue core trapped in the notch
- Withdraw: The needle is removed with the tissue core inside the notch
- The core is extracted and placed in formalin for histopathology
In automated/spring-loaded devices, steps 2 and 3 happen simultaneously with a single trigger action ("fire").
Indications
| Organ/Site | Notes |
|---|---|
| Breast mass | 14G CNB under US guidance; standard of care for triple assessment |
| Liver | 16G Tru-Cut for liver disease classification; percutaneous or EUS-guided |
| Kidney | 14-16G (Franklin-Silverman or Tru-Cut) at lower pole |
| Soft tissue tumors | Preferred over FNAC for sarcoma (requires architecture) |
| Lymph nodes | When FNAC is non-diagnostic or lymphoma suspected |
| Salivary glands | Supplement to FNAC for high-grade/lymphomatous lesions |
| Synovium | Blind Tru-Cut biopsy for rheumatologic diagnosis |
| Prostate | 18G Tru-Cut; transrectal US-guided, 10-12 systematic cores |
| Pancreas | EUS-guided Tru-Cut (though not recommended for chronic pancreatitis per Sabiston) |
| Muscle | Core needle biopsy as alternative to open muscle biopsy |
| Pelvic tumors | US-guided approach for gynecological masses |
Advantages Over FNAC
| Feature | FNAC | Tru-Cut CNB |
|---|---|---|
| Tissue yield | Cells only (cytology) | Intact core (histology) |
| Architecture preserved | No | Yes |
| Immunohistochemistry | Limited | Full panel possible |
| Flow cytometry (lymphoma) | Difficult | Feasible |
| Operator dependence | High | Lower |
| Invasiveness | Minimal | Slightly more |
| Diagnostic accuracy for malignancy | Lower sensitivity | Higher sensitivity & specificity |
As noted in Bailey and Love's Surgery: "Core needle biopsy has greater diagnostic accuracy than FNAC. It provides more tissue for diagnosis and preserves the cellular architecture for further classification of malignancies."
Guidance Methods
- Ultrasound (US) guidance: Method of choice - real-time visualization, most accessible, 80-90% of breast lesions visible
- CT guidance: For deep lesions (retroperitoneal, pulmonary, hepatic); may use coaxial technique
- Stereotactic/DBT x-ray: For impalpable breast microcalcifications
- MRI guidance: For lesions visible only on MRI
- Blind (freehand): For palpable masses, synovial biopsy, or bedside procedures; higher sampling error
Coaxial technique: A hollow introducer needle is placed first under imaging guidance; multiple Tru-Cut passes are then taken through it without re-puncturing - minimizes trauma and allows repeat sampling from same entry point.
Pre-Procedure Preparation
- Informed consent (risks, benefits, alternatives)
- No fasting required for most superficial biopsies
- Loose-fitting clothing for access to biopsy site
- Check coagulation status (especially for liver/kidney)
- Sterile drape, povidone-iodine skin prep
- Local anesthesia infiltrated into skin and subcutaneous tissue (avoid infiltrating the target lesion itself)
- Patient positioned lying down (prevent vasovagal episodes)
Technique (Step-by-Step)
- Position and prep the patient; apply local anesthetic
- Make a small nick with a No. 11 blade scalpel (for easier needle passage)
- Introduce the biopsy needle to the edge of the lesion under imaging guidance
- Fire the needle (manual or automated)
- Withdraw and retrieve the core into formalin
- Take multiple passes (usually 3 cores) from different areas of the lesion
- Apply pressure for 2-3 minutes post-procedure
- Apply Band-Aid / sterile dressing
Needle Comparison Table (Liver Biopsy)
| Needle | Gauge | Advantages | Disadvantages |
|---|---|---|---|
| Tru-Cut | 16G | Rare fragmentation, large core | Max 17-20 mm per pass, less total tissue |
| Jamshidi | 17G | Long cores, minimal insertion | Fragmented tissue with fibrosis |
| INRAD / BioPince | 16 or 18G | Large core, adjustable throw up to 34 mm | Long throw, more procedural pain |
(Yamada's Textbook of Gastroenterology)
Complications
- Bleeding / hematoma at biopsy site - most common; apply pressure
- Bruising and soreness - usually resolves within a few days
- Infection / wound dehiscence - especially in immunosuppressed or steroid-using patients
- Non-diagnostic specimen - requires repeat biopsy
- Nerve injury - prolonged paresthesia if sensory nerve is nicked
- Muscle fibrosis/contracture - rare, after muscle biopsy
- Organ-specific complications:
- Kidney: hematuria, perirenal hematoma, arteriovenous fistula, graft obstruction by blood clot
- Liver: hemorrhage, bile leak, pneumothorax (subcostal approach)
- Prostate: rectal bleeding, sepsis
Handling the Specimen
- Place cores immediately into 10% buffered formalin (do not allow to dry)
- For muscle biopsies: never place in fixative - process within 30 minutes (cryostat freezing required)
- Label clearly with site sampled
- Provide clinical summary, relevant investigations (EMG, lab values) to the pathologist
Special Variants
- Vacuum-Assisted Biopsy (VAB): Uses 7-11G needles with suction, yielding up to 300 mg per core - preferred for breast microcalcifications and B3 lesions; reduces sampling error
- EUS-guided Tru-Cut: For deep lesions (pancreas, mediastinum)
- Postmortem CT-guided biopsy: Used in forensic radiology for minimally invasive autopsy
Sources:
- Bailey and Love's Short Practice of Surgery, 28th Edition
- Grainger & Allison's Diagnostic Radiology
- Yamada's Textbook of Gastroenterology, 7th Edition
- Pfenninger and Fowler's Procedures for Primary Care, 3rd Edition
- Smith and Tanagho's General Urology, 19th Edition
- Brogdon's Forensic Radiology
- Rheumatology, 2-Volume Set (Elsevier 2022)
- Sabiston Textbook of Surgery
OSTEOTOME
An osteotome is a surgical chisel-like instrument used to cut or shape bone. It differs from a regular chisel in that it is beveled on both sides, making it suitable for bone work without splitting. It is driven by a mallet and used in orthopedic, maxillofacial, and spinal surgery.
Searching sources...
Finding Sources
Finding Sources
Searching the Web
osteotome surgical instrument types uses orthopedic surgery
Finding Sources
Reading Web Page
https://pmc.ncbi.nlm.nih.gov/articles/PMC12109620
Reading File
Finding Sources
Searching the Web
osteotome types straight curved monobevel bibevel surgical uses maxillofacial orthopedic spinal
Reading File
Finding Sources
Loading Image
Finding Sources
Finding Sources
Reading File
Finding Sources
Loading Image
Here is a comprehensive overview of the osteotome, drawing from Campbell's Operative Orthopaedics, Cummings Otolaryngology, and other authoritative surgical textbooks:
Osteotome
Definition
An osteotome is a specialized surgical instrument used to cut, divide, shape, or prepare bone. It resembles a chisel but is distinguished by having a beveled edge on both sides (bibevel), which allows it to split through bone without being deflected to one side - unlike a carpenter's chisel which is beveled on one side only. It is driven by a mallet.
Structure and Design
| Component | Description |
|---|---|
| Blade/working end | Flat steel blade with a sharp cutting edge |
| Bevel | Double bevel (both sides angled) - distinguishes it from a chisel |
| Width | Ranges from 3 mm (narrow/fine) to 25 mm (broad) |
| Shank | Connects blade to handle; may be straight or angled |
| Handle | Octagonal or round metal/plastic handle that accepts mallet blows |
| Material | High-grade stainless steel or chrome-vanadium steel |
The double-bevel design directs the instrument straight into bone rather than deflecting. A regular (single-bevel) chisel is used when a more angled, one-directional cut is needed.
Osteotome vs. Chisel
| Feature | Osteotome | Chisel |
|---|---|---|
| Bevel | Both sides (bibevel) | One side only (monobevel) |
| Direction of cut | Straight, predictable | Deflects toward unbeveled side |
| Primary use | Bone splitting/shaping | Removing/planing bone surface |
| Cross-section of tip | Symmetric (lenticular) | Asymmetric (wedge) |
Types of Osteotomes
1. By Shape
| Type | Features | Uses |
|---|---|---|
| Straight | Most common; flat, straight blade | General bone cutting, cortical grafts, laminectomy |
| Curved | Blade curves at tip | Acetabular, pelvic, and spinal osteotomies; areas of limited access |
| Angled/Offset | Handle offset from blade | Better visibility; spinal, vertebral body work |
| Guarded | Has a protective guard | Prevents over-penetration; rhinoplasty, nasal osteotomies |
2. By Size
| Type | Width | Use |
|---|---|---|
| Fine/Mini | 3-5 mm | Corticotomy (Paley technique), fine bone work |
| Medium | 6-15 mm | General orthopedic, nasal, maxillofacial |
| Broad | 18-25 mm | Graft harvesting from iliac crest, cortical peeling |
3. Named/Specialized Osteotomes
| Name | Description |
|---|---|
| Lambotte osteotome | Classic orthopedic design; straight or curved; fine blade |
| Smith-Petersen osteotome | Used in spinal and hip surgery |
| Stille osteotome | Heavier instrument for major bone division |
| Cottle osteotome | Used in rhinoplasty and nasal septum work |
| Rubin osteotome | Specialized for hump reduction in rhinoplasty |
| Heine chain osteotome | Historical instrument (1830); first device called an osteotome; operated like a chain saw |
How It Works
The osteotome is held in the non-dominant hand and positioned on the bone at the desired line of cut. The dominant hand uses a mallet to strike controlled blows on the handle. The cutting edge propagates through cortical or cancellous bone along the intended plane.
Key technique points:
- The blade can be twisted 90 degrees after partial penetration to crack (greenstick) the remaining cortex without displacing periosteum (used in Paley corticotomy)
- A broad osteotome is used with prying motions to peel cortical grafts from the iliac crest
- In rhinoplasty, the osteotome is inserted subperiosteally to preserve the periosteal sleeve and minimize swelling/bruising
Surgical Uses by Specialty
Orthopedic Surgery
- Osteotomy procedures (opening wedge, closing wedge, dome) - correcting bone deformities, realigning joints
- Corticotomy (Paley technique) for limb lengthening - a 5-mm osteotome cuts medial and lateral cortices; twisted 90° to crack posterior cortex while preserving endosteal/periosteal blood supply
- Bone graft harvesting from iliac crest - outline with osteotome or power saw, then peel with broad osteotome
- Pelvic osteotomies - triple innominate, Pemberton, Dega (curved osteotome used)
- Arthroplasty - preparing acetabulum, removing cement
ENT / Maxillofacial Surgery (Rhinoplasty)
- Medial osteotomies of nasal bones to fracture the nasal pyramid
- Lateral osteotomies along the nasofacial groove (using guarded osteotome)
- The osteotome is placed vertically in the plane of the nasal septum and carried to slightly above the dorsal hump, then angled at a beveled angle to undercut the nasal bones - this prevents the "rocker" phenomenon causing postoperative nasal widening
- Subperiosteal approach preferred to avoid periosteal laceration
Spinal Surgery
- Laminectomy - removing laminar bone, accessing the canal
- Vertebral body resection - in combination with Cobb elevator and rongeurs
Dental / Oral Surgery
- Sinus floor elevation (osteotome technique) - sequential expansion of alveolar bone; condensing bone for implant site preparation
- Alveolar ridge expansion for dental implants
- Tooth extraction - sectioning multi-rooted teeth
Corticotomy Technique (Paley) - Illustrated
(Campbell's Operative Orthopaedics, 15th Edition)
The image below from Campbell's shows the step-by-step corticotomy using an osteotome for limb lengthening:
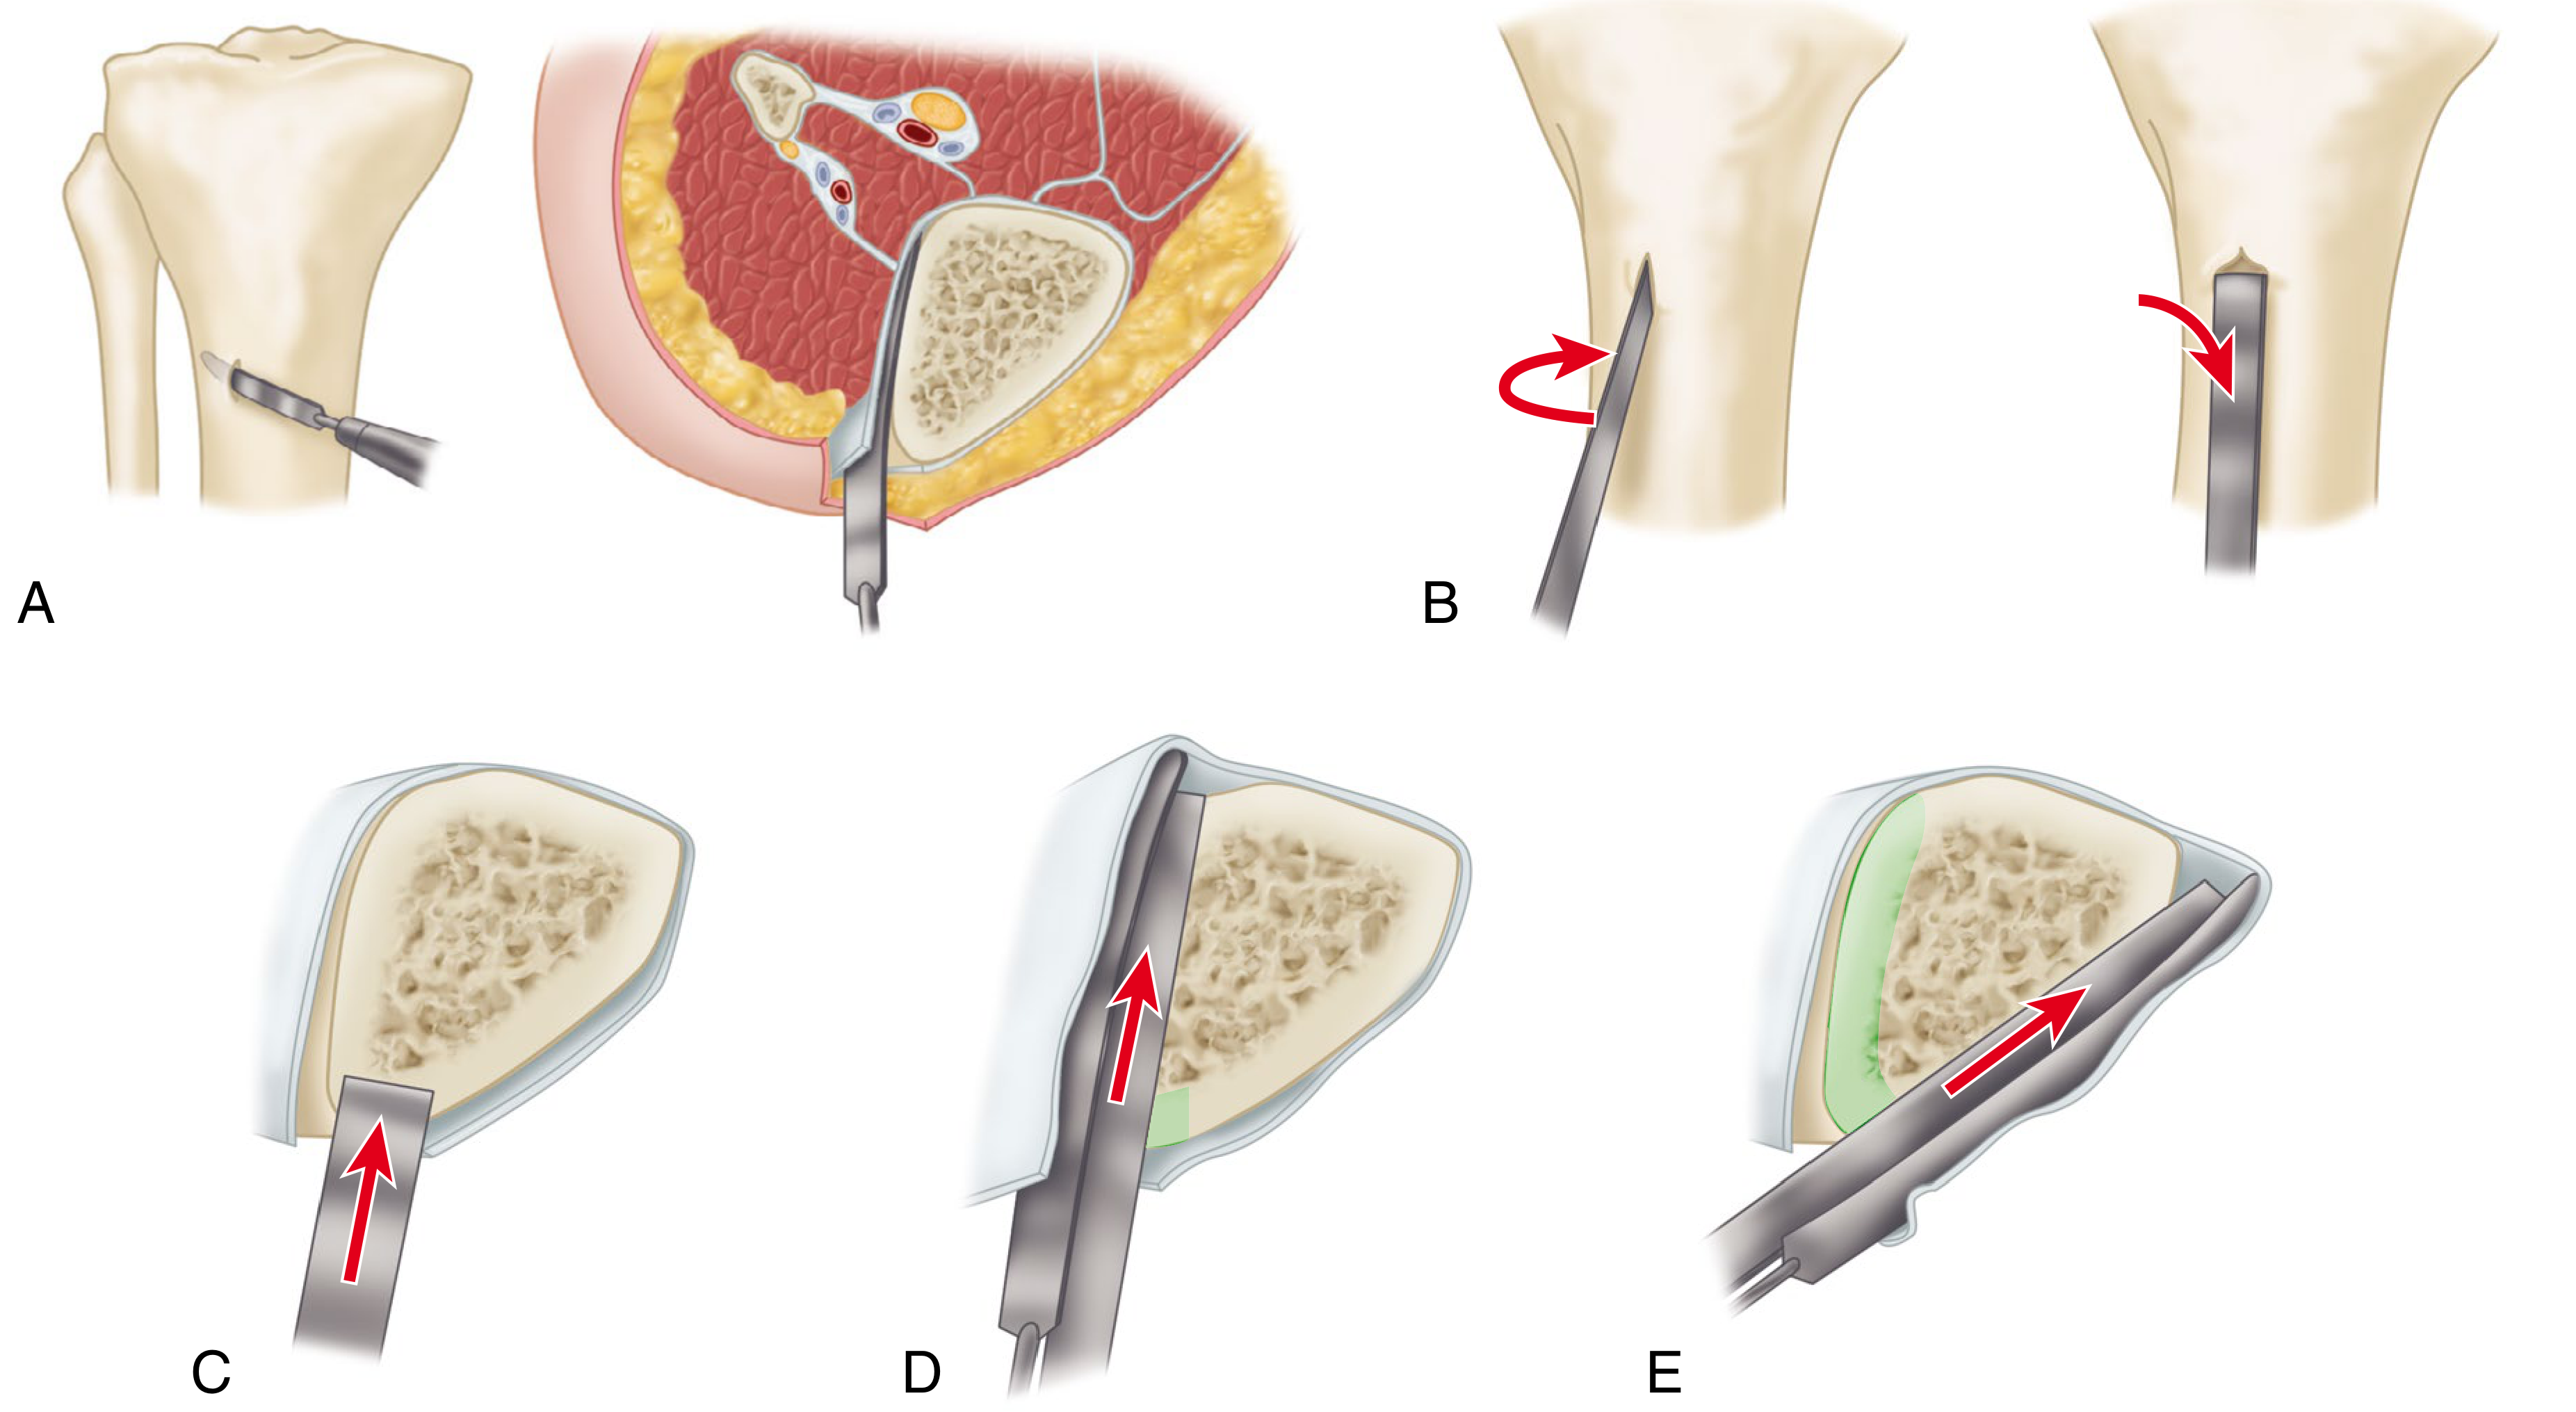
Steps (A-G):
- A: 1.5 cm skin incision with periosteal elevation
- B: Osteotome twisted transversely to cut groove in anterior cortex only
- C: Anterior groove cut to (but not through) medullary cavity
- D: Periosteum elevated laterally; lateral cortex cut with 5-mm osteotome
- E: Anteromedial periosteum elevated; medial cortex cut
- F: Osteotome twisted 90° in posteromedial cortex to crack it; repeated at posterolateral cortex
- G: Osteoclasis completed by gentle external rotation of fixator rings
Nasal Osteotomy - Illustrated
(Cummings Otolaryngology, Head & Neck Surgery)
The diagram below shows the beveled edge principle of the osteotome as applied in rhinoplasty medial osteotomies:
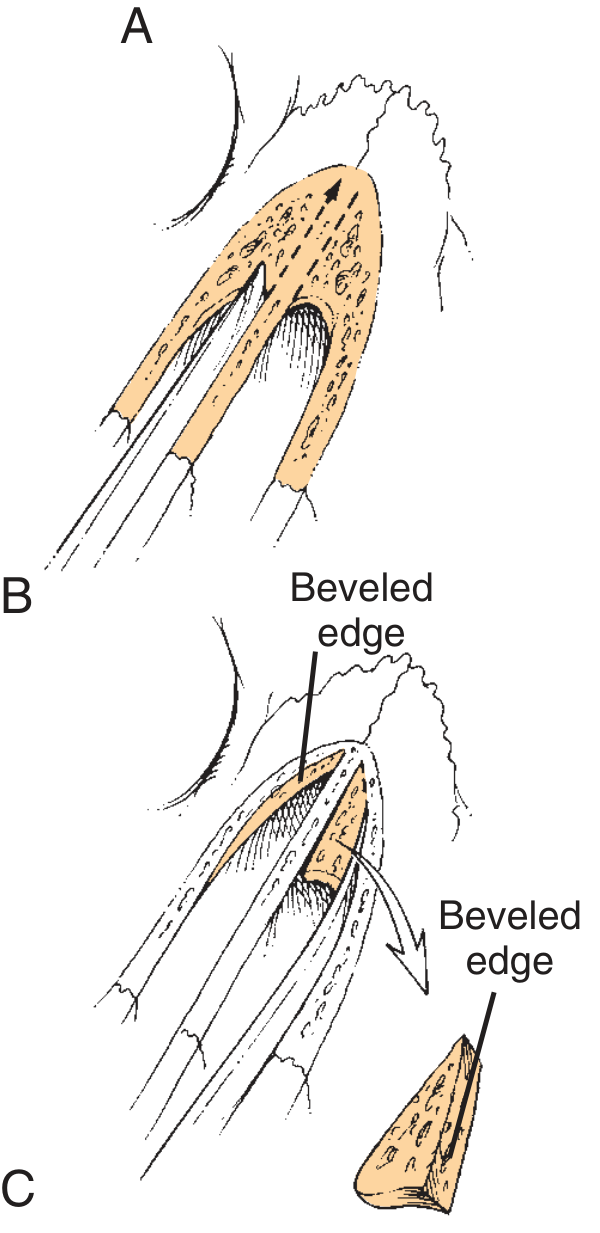
- (A) Osteotome placed in plane of nasal septum for medial osteotomy
- (B) Beveled cut at an angle to undercut nasal bones - opens the nasal root to a higher level
- (C) Resulting bone wedge showing the double beveled edge geometry
Comparison with Similar Instruments
| Instrument | Similarities | Key Difference |
|---|---|---|
| Chisel | Similar shape, mallet-driven | Monobevel; deflects to one side |
| Gouge | Mallet-driven bone instrument | Has a U-shaped/concave cutting edge; scoops out bone |
| Curette | Removes cancellous bone | Spoon-shaped; used by scraping, not mallet-driven |
| Rongeur | Removes bone | Scissor/forceps mechanism; bites off small pieces |
| Bone saw (oscillating) | Cuts bone | Power-driven; less periosteal preservation |
| Periosteal elevator (Cobb) | Used alongside osteotome | Lifts periosteum; does not cut bone |
Precautions and Complications
- Over-penetration - especially near neurovascular structures; use guarded osteotomes when needed
- Fracture propagation in unintended direction - improper alignment or angle
- Excessive heat - more relevant with power instruments; irrigate with saline
- Periosteal stripping - broad or excessive use can devascularize bone
- Instrument breakage - using a bent or fatigued osteotome under heavy mallet blows
Historical Note
The original device called an "osteotome" was the chain osteotome invented by German physician Bernhard Heine in 1830 - it operated on a chain-saw principle. The modern flat-blade, mallet-driven osteotome evolved later and became the standard instrument.
Sources:
- Campbell's Operative Orthopaedics, 15th Edition, 2026
- Cummings Otolaryngology Head and Neck Surgery
- Rockwood and Green's Fractures in Adults, 10th Edition, 2025
- PMC review on osteotomies: techniques and hardware (Azhideh et al., 2025)
Jaboulays procedure
Jaboulay's procedure is a surgical operation for chronic hydrocele of the testis. It involves everting the tunica vaginalis sac and suturing it behind the epididymis, eliminating the potential space for fluid re-accumulation. It is the most commonly performed operation for hydrocele.
Searching sources...
Finding Sources
Finding Sources
Searching the Web
Jaboulay's procedure hydrocele surgical technique steps
Finding Sources
Reading Web Page
https://www.urology-textbook.com/hydrocelectomy.html
Finding Sources
Searching the Web
Jaboulay procedure hydrocele eversion tunica vaginalis steps anatomy complications comparison Lord procedure
Finding Sources
Reading Web Page
https://www.ijsurgery.com/index.php/isj/article/view/11751
Finding Sources
Searching the Web
"Jaboulay" hydrocele "tunica vaginalis" eversion anatomy incision drain postoperative site Bailey Love
Reading File
Reading File
Reading File
Loading Image
Loading Image
Loading Image
Here is a comprehensive overview of Jaboulay's procedure, based on Bailey and Love's Surgery and supplemented by current evidence:
Jaboulay's Procedure
Historical Note
Jaboulay's procedure was described by French surgeon Mathieu Jaboulay in 1895 (La cure radicale de l'hydrocèle vaginale par l'éversion du sac, Revue de Chirurgie). It remains one of the two gold-standard operations for primary vaginal hydrocele in adults.
What Is a Hydrocele?
A hydrocele is an abnormal collection of serous fluid in the tunica vaginalis around the testis. The non-communicating (vaginal) primary hydrocele is the most common type in adults, caused by excessive fluid production or defective lymphatic absorption by the tunica vaginalis.
Clinical photograph and ultrasound of a right-sided hydrocele:
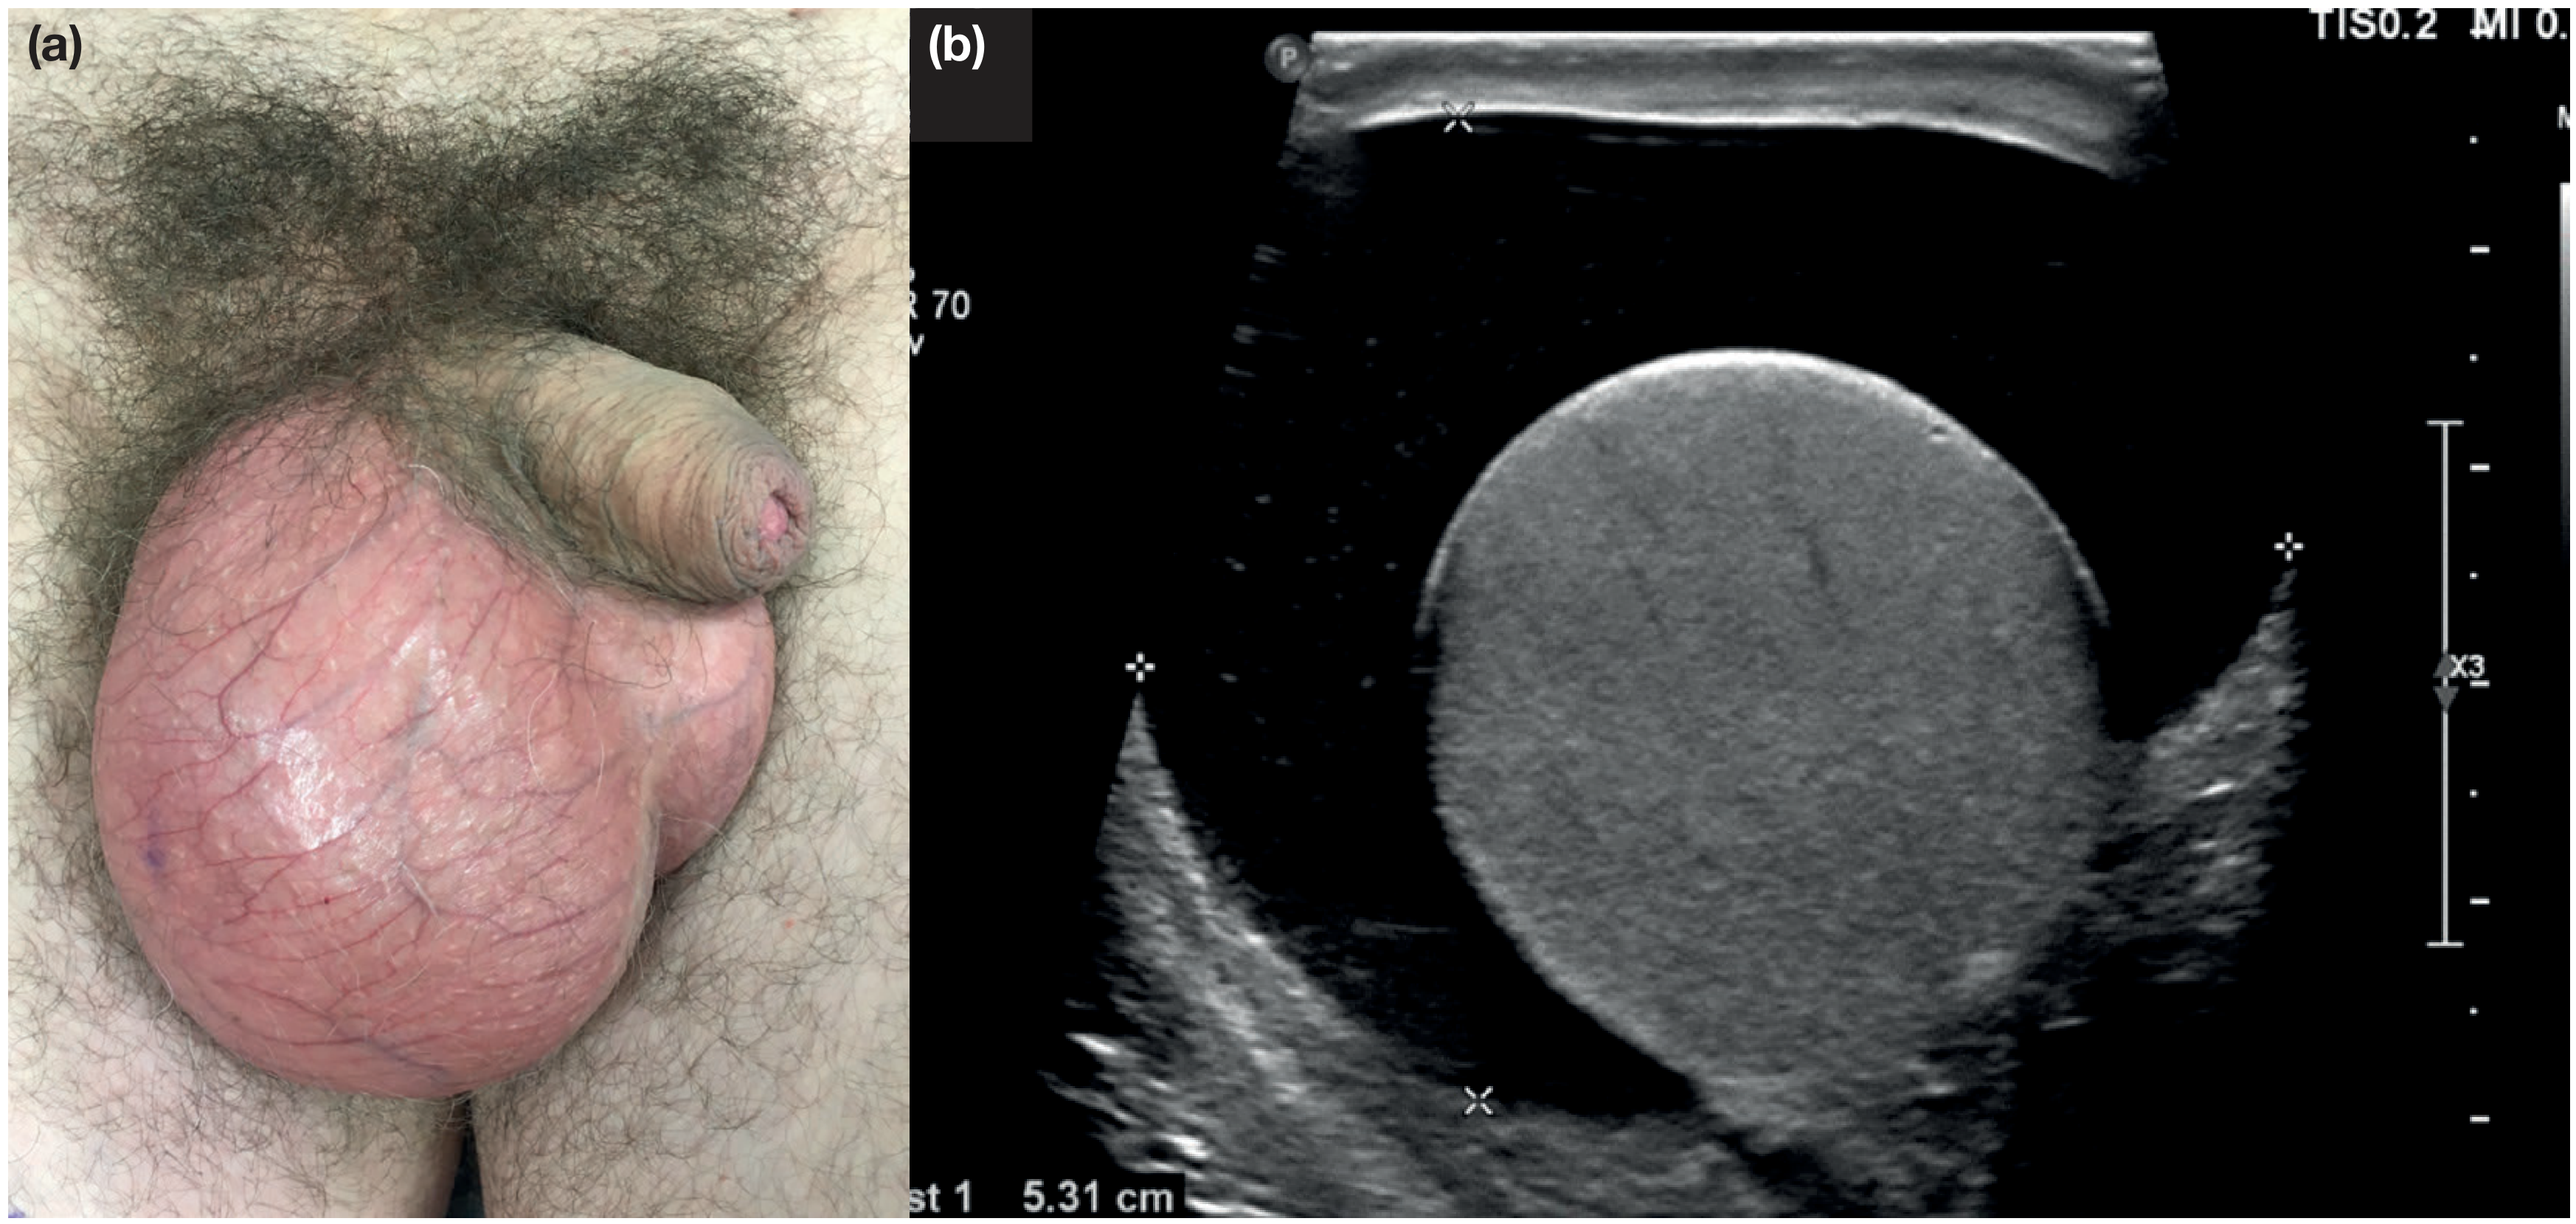
(Bailey and Love's Surgery, 28th Edition)
Indications for Surgery
- Large or symptomatic hydrocele causing discomfort, dragging sensation, or cosmetic concern
- Thick-walled hydroceles (where Lord's plication is not feasible)
- Large hydroceles (Jaboulay's is specifically preferred over Lord's for large or thick-walled sacs)
- Failed aspiration or sclerotherapy
- Secondary hydrocele (once underlying cause is ruled out/treated)
Contraindications to surgery: coagulation disorders, local skin infection, significant surgical comorbidity, hydrocele secondary to hepatic/cardiac failure (not treated surgically).
Anatomy Relevant to the Procedure
The tunica vaginalis has two layers:
- Parietal layer - outer, forms the hydrocele sac wall
- Visceral layer - inner, tightly adherent to the testis and epididymis
The potential space between them normally contains only a few mL of fluid; in hydrocele it accumulates 100-500+ mL. The procedure works by eliminating this potential space.
Surgical Technique - Step by Step
Position and Anesthesia
- Patient supine, legs slightly apart
- General, spinal, or local anesthesia (LA is feasible for non-obese patients)
- Scrotum prepped and draped
Step 1 - Incision
- A transverse or longitudinal scrotal incision (3-5 cm) is made over the most prominent part of the hydrocele
- Incision deepened through skin → dartos muscle → external spermatic fascia → cremasteric layer → internal spermatic fascia to expose the hydrocele sac (parietal tunica vaginalis)
Step 2 - Delivery of the Hydrocele
- The hydrocele is delivered through the wound by blunt and sharp dissection of surrounding fascial layers
- Care taken to avoid the vas deferens, testicular vessels, and epididymis
Step 3 - Aspiration / Opening the Sac
- The hydrocele fluid is aspirated with a needle and syringe (to decompress the sac and improve handling)
- The parietal tunica vaginalis is then opened widely with scissors
- The interior of the sac is inspected (look for secondary causes - tumour, infection, trauma)
- If a tumour is suspected, do not aspirate (risk of malignant seeding)
Step 4 - Partial Excision of the Sac
- The excess parietal tunica vaginalis is excised, leaving a 1-2 cm margin around the testis and epididymis
- Do NOT injure the epididymis, vas deferens, or testicular vessels
- Bleeding from the cut edge is controlled with overrunning (continuous) absorbable sutures or diathermy
Step 5 - Eversion (the Key Step)
- The remaining cut edges of the tunica vaginalis are everted (turned inside-out) around behind the testis and epididymis
- The everted edges are sutured together behind the spermatic cord with absorbable interrupted or continuous sutures
- This places the raw/secreting surface of the tunica facing outward into the retroperitoneal fatty tissue, where it cannot accumulate fluid
- The testis now sits in a newly created pouch in the scrotal fascial planes, outside the tunica
Step 6 - Haemostasis and Closure
- Meticulous haemostasis (critical - the most important step to avoid haematoma)
- A corrugated or closed suction drain may be placed in the scrotum, especially after extensive dissection
- The testis is replaced into the scrotum
- Wound closed in layers: dartos with absorbable sutures, skin with interrupted/subcuticular sutures
- Pressure dressing (scrotal support/jockstrap) applied
Illustration of the Procedure
Lord's plication (top) and Jaboulay's eversion (bottom) - from Bailey and Love's Surgery:
Lord's procedure - plication sutures bunching the tunica:
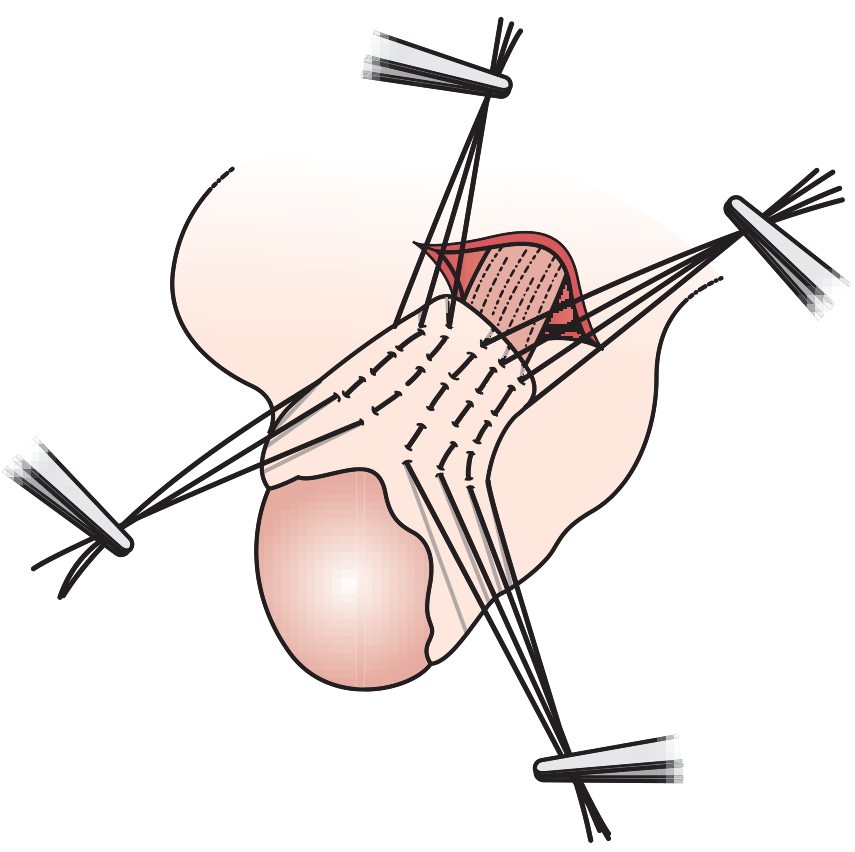
Jaboulay's procedure - everted sac anchored behind the testis:
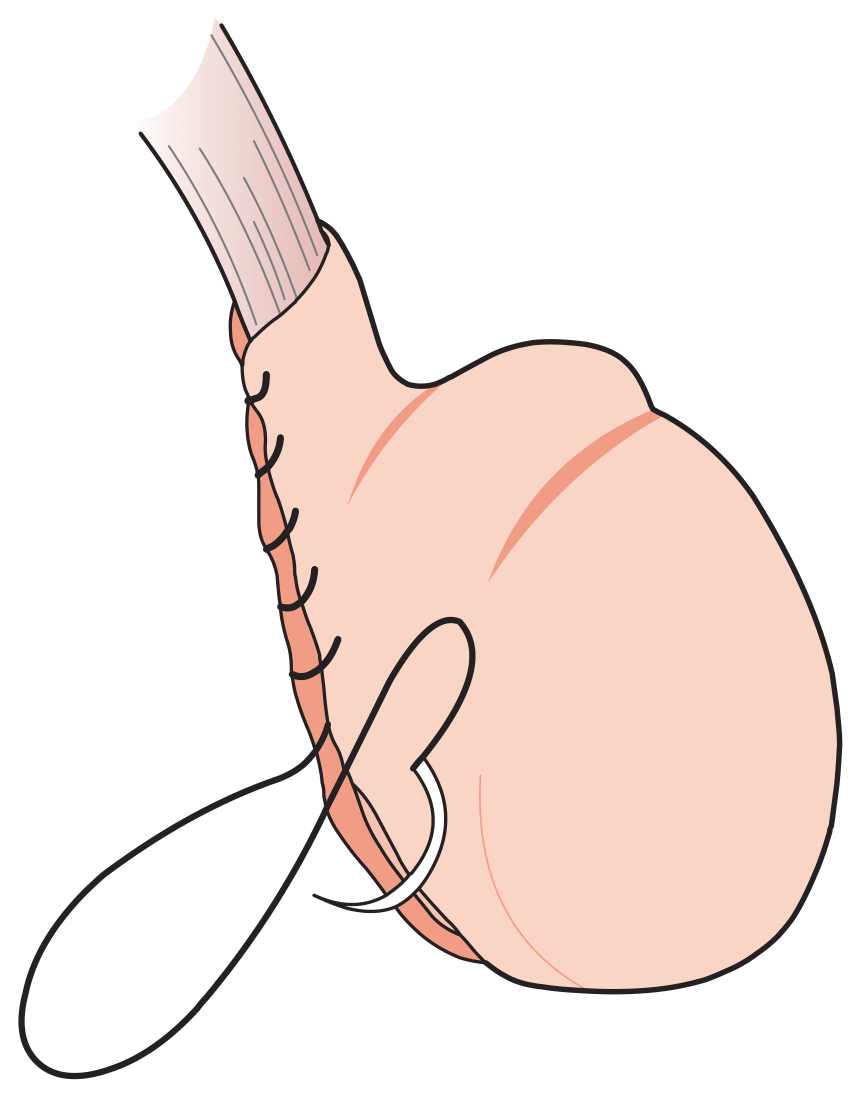
(Bailey and Love's Short Practice of Surgery, 28th Edition, Fig. 86.10)
The diagram clearly shows the everted sac edges sutured behind the spermatic cord and testis, with the testis visible in its new scrotal pouch.
Mechanism of Cure
The eversion eliminates the potential space between parietal and visceral layers. By turning the secreting surface outward, any fluid produced is absorbed by the surrounding retroperitoneal tissue rather than accumulating in the cavity. The testis now sits freely in the scrotal pouch, supported by the surrounding dartos.
Comparison: Jaboulay vs Other Procedures
| Feature | Jaboulay's (Eversion) | Lord's (Plication) | Von Bergmann (Excision) |
|---|---|---|---|
| Principle | Eversion + suture behind testis | Plication sutures fold sac on itself | Complete/subtotal sac excision + oversewing |
| Sac handling | Partial excision + eversion | No excision; folded with sutures | Excision, raw edges oversewn |
| Best for | Large, thick-walled hydroceles | Small-medium, thin-walled | Very large, multilocular, recurrent |
| Dissection | Moderate | Minimal | Extensive |
| Haematoma risk | Moderate (cut edge bleeding) | Low | High |
| Recurrence | Low (~6%) | Low (~6%) | Low |
| Hospital stay | 7.08 ± 1.6 days | 8.0 ± 1.75 days | Variable |
| Complications | 17% (recent study) | 72% (recent study) | Higher |
A 2026 prospective comparative study of 100 patients found Jaboulay's eversion had significantly fewer complications (17% vs 72%, p=0.002), shorter hospital stay, and earlier suture removal compared to Lord's plication, with no recurrence in either group at 6 months. The authors recommend Jaboulay's for large or thick-walled hydroceles.
Postoperative Care
- Scrotal support (jockstrap) for 4-6 weeks - reduces swelling and supports wound healing
- Avoid strenuous activity and heavy lifting for 2-4 weeks
- Pain medication (NSAIDs) for 3-5 days
- Drain removed at 24-48 hours
- Sutures removed at 5-7 days (if non-absorbable)
- Regular wound inspection for haematoma/infection
Complications
| Complication | Notes |
|---|---|
| Scrotal haematoma | Most feared; results from inadequate haemostasis at cut edge; requires evacuation if large |
| Wound infection | Uncommon; treat with antibiotics ± wound opening |
| Scrotal oedema | Common; resolves with scrotal support |
| Recurrence | ~6% overall; occurs if the everted edges are not properly sutured or if a communicating processus vaginalis is missed |
| Damage to vas deferens | Rare; risks infertility if bilateral |
| Testicular atrophy | Very rare; from inadvertent testicular vessel injury |
| Chronic scrotal pain | Unusual |
Bailey and Love note: "Unless great care is taken to stop bleeding after excision of the wall, haemorrhage from the cut edge is liable to cause a large scrotal haematoma. Overrunning stitches at the cut edge can be used to reduce this risk."
Approach Selection
| Situation | Preferred Approach |
|---|---|
| Open processus vaginalis / communicating hydrocele | Inguinal approach (ligation of processus) |
| Suspected testicular tumour | Inguinal approach (never aspirate or scrotal approach) |
| Primary vaginal hydrocele (thin-walled, small) | Scrotal + Lord's plication |
| Primary vaginal hydrocele (thick-walled, large) | Scrotal + Jaboulay's eversion |
| Very large or multilocular hydrocele | Scrotal + von Bergmann excision |
Sources:
- Bailey and Love's Short Practice of Surgery, 28th Edition (primary textbook source)
- Fischer's Mastery of Surgery, 8th Edition
- Comparative analysis of Lord's plication and Jaboulay's eversion - Int Surgery Journal, 2026 (100 patients, prospective)
- Urology Textbook - Hydrocelectomy - Dirk Manski MD
This is a shared conversation. Sign in to Orris to start your own chat.