
How to fill the partograph
I'll look up the medical library skill first, then research how to fill a partograph.
Reading File
Now let me search the medical library and web simultaneously for partograph content.
Finding Sources
Searching the Web
how to fill partograph labor monitoring WHO
Finding Sources
Reading Web Page
https://medicalguidelines.msf.org/en/viewport/ONC/english/5-…
Loading Image
Finding Sources
I now have excellent material to give a thorough, well-structured answer. Here is the complete guide:
How to Fill the Partograph
The partograph is a graphical record of observations made during labour. It monitors both fetal and maternal wellbeing during the active phase of labour and serves as an early warning tool and decision-making aid.
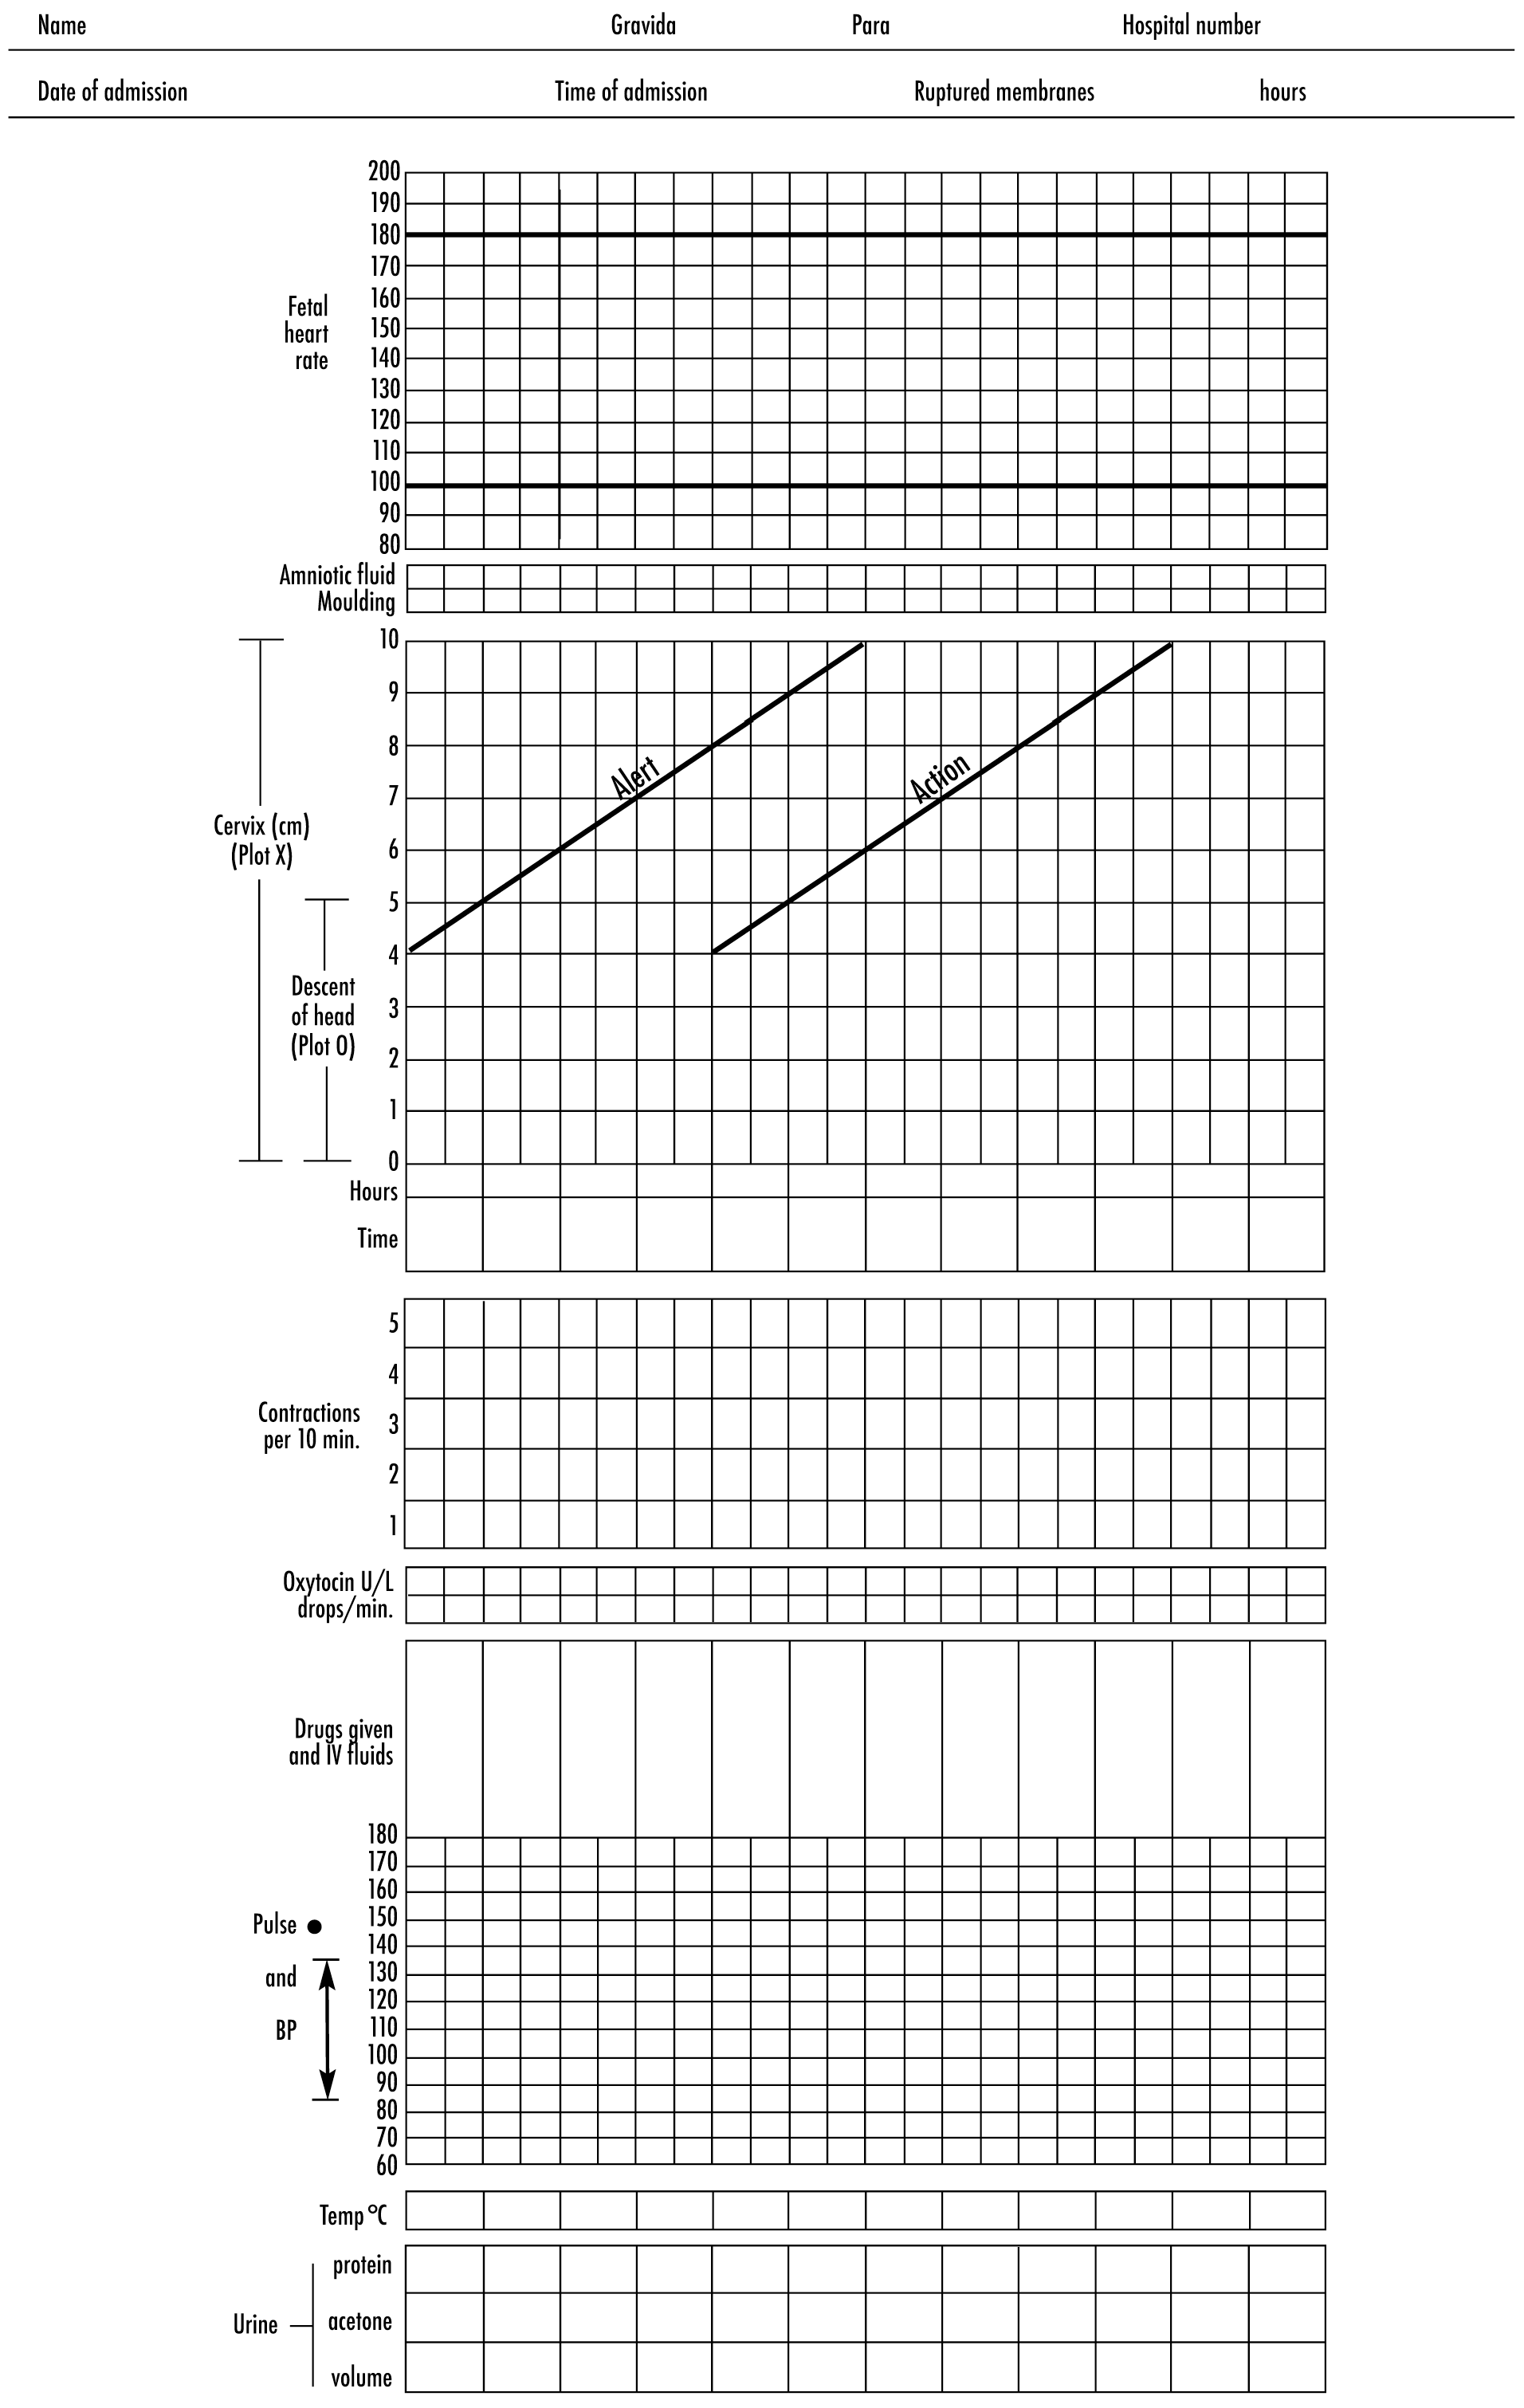
Step 0 - Before You Start
- Only begin a partograph when the woman is confirmed to be in labour (contracting sufficiently).
- Check there are no existing complications requiring immediate action.
- The partograph covers the active phase; it is not started during the latent phase.
- According to the WHO/MSF protocol, start the graph at 5 cm dilation (or 4 cm if labour is induced), with at least 3 contractions every 10 minutes.
SECTION 1 - Patient Identification (Top of the Form)
Fill in at admission:
| Field | What to Record |
|---|---|
| Name | Full name of the woman |
| Gravida | Number of pregnancies (including current) |
| Para | Number of previous deliveries |
| Hospital number | Registration/admission number |
| Date of admission | Calendar date |
| Time of admission | Actual clock time labour began/admission time |
| Ruptured membranes | Number of hours since membranes ruptured |
SECTION 2 - Fetal Condition (Upper Graph)
Fetal Heart Rate (FHR)
- Record every 30 minutes during active labour (every 15 min in second stage).
- Normal range: 110-160 bpm.
- The graph has bold lines at 100 and 180 bpm - values outside these lines indicate fetal distress.
- Plot each reading as a dot and connect with a line.
Amniotic Fluid
- Assessed at each vaginal examination and recorded in the row below FHR.
- Use standard codes:
- I = Intact membranes
- C = Clear fluid
- M = Meconium-stained
- B = Blood-stained
- A = Absent (dry)
Moulding (Caput / Skull Overlap)
- Assessed by vaginal examination.
- Record using codes:
- 0 = No moulding
- + = Bones just touching
- ++ = Bones overlapping but reducible
- +++ = Bones severely overlapping, not reducible (dangerous - suggests cephalopelvic disproportion)
SECTION 3 - Labour Progress (Central Graph - The Most Important Section)
This is the core of the partograph.
Cervical Dilation (Plot with X)
- Assessed by vaginal examination every 4 hours (or more frequently if clinically indicated).
- Plot on the y-axis (0-10 cm) against time on the x-axis.
- Mark each finding with an "X".
- The first plot in the active phase goes directly onto the Alert Line, regardless of actual hours elapsed.
Descent of Fetal Head (Plot with O)
- Assessed by abdominal examination (rule of fifths above the pelvic brim) - always done immediately BEFORE the vaginal examination.
- Scale: 5/5 = head fully above pelvic brim; 0/5 = head fully engaged.
- Plot with an "O" at the same time as cervical dilation.
The Alert Line and Action Line
| Line | What It Represents | Action Required |
|---|---|---|
| Alert Line | Expected dilation of 1 cm/hour (drawn from 4-5 cm to 10 cm) | If cervical dilation plot crosses to the right, labour may be prolonged; consider transfer to CEmONC facility |
| Action Line | Drawn 4 hours to the right of the alert line, parallel to it | If plot reaches or crosses this line, active management is mandatory (augmentation, ARM, caesarean section) |
Normal labour: the cervical dilation plot stays on or to the left of the Alert Line.
SECTION 4 - Contractions (Below the Cervicograph)
- Record every 30 minutes.
- Count number of contractions in a 10-minute window (y-axis: 1-5 contractions).
- Each box represents one contraction; shade the box to indicate duration:
- Dotted/outline only = < 20 seconds (mild)
- Hatched/diagonal lines = 20-40 seconds (moderate)
- Solid/fully filled = > 40 seconds (strong)
SECTION 5 - Medications and Oxytocin
- Oxytocin (U/L and drops/min): Record dose and rate of infusion.
- Drugs given and IV fluids: Write the drug name, dose, route, and time administered in the free-text boxes.
SECTION 6 - Maternal Condition (Lower Section)
Pulse and Blood Pressure
- Pulse (marked with a dot •): Record every 30 minutes.
- Blood pressure (marked as a vertical line with arrows ↑↓): Record every 4 hours (or every 30 min if hypertensive).
- Both are plotted on the same graph (range 60-180).
Temperature
- Record every 4 hours (or 2-hourly if elevated).
- Normal: 36.5-37.5°C.
Urine
- Record each time the woman passes urine:
- Protein: None, trace, +, ++, +++
- Acetone: None, trace, +, ++
- Volume: Amount in mL
Summary: Recording Frequency
| Parameter | Frequency |
|---|---|
| Fetal heart rate | Every 30 min (15 min in 2nd stage) |
| Cervical dilation & fetal descent | Every 4 hours (vaginally) |
| Contractions | Every 30 min |
| Pulse | Every 30 min |
| Blood pressure | Every 4 hours (more if hypertensive) |
| Temperature | Every 4 hours |
| Amniotic fluid & moulding | Each vaginal examination |
Key Interpretation Rules
- Latent phase (0-3 cm): Should last no more than 8 hours; the partograph has a heavy line at 8 hours of the latent phase as a warning.
- Active phase (4-10 cm): Normal rate is at least 1 cm/hour.
- Plot crossing the Alert Line = monitor closely, consider transfer.
- Plot crossing the Action Line = intervene immediately (augment, ARM, or caesarean section).
- Moulding +++ even with adequate contractions strongly suggests cephalopelvic disproportion.
Note: The WHO has more recently introduced the Labor Care Guide (LCG) as an evolution of the partograph, integrating respectful maternity care and shared decision-making principles. However, the traditional partograph remains widely used and taught. - MSF Obstetric Guidelines, Chapter 5.2

17839638842256978810910899714439.jpg
Can you give for this partograph and please ignore the markings on it
analyse_media
Here is a complete, step-by-step guide on how to fill this specific WHO Simplified Partograph form, based on its exact layout:
How to Fill This WHO Simplified Partograph
SECTION 1 - Header (Patient Details)
Fill these fields at the time of admission:
| Field | What to Write |
|---|---|
| Name | Patient's full name |
| Gravida | Total number of pregnancies (including this one) |
| Para | Number of previous deliveries |
| Hospital No. | Hospital registration/medical record number |
| Date of admission | Date the patient was admitted in labour |
| Time of admission | Clock time she was admitted |
| Ruptured membranes | Actual clock time when membranes ruptured |
| Hours | How many hours ago the membranes ruptured |
SECTION 2 - Fetal Condition (Upper Panel)
Fetal Heart Rate
- Y-axis: 100 to 180 bpm, in increments of 10.
- Record every 30 minutes (every 15 minutes in the second stage).
- Plot each reading as a dot, then connect dots with a line.
- Normal range: 110-160 bpm.
- The form has bold/thick lines at 100 and 180 - values outside these are danger signs.
Liquor (Amniotic Fluid)
- Record in the Liquor row at every vaginal examination.
- Use standard codes:
- I = Intact membranes (not yet ruptured)
- C = Clear fluid
- M = Meconium-stained (green/brown)
- B = Blood-stained
- A = Absent / dry
Moulding
- Record in the Moulding row at every vaginal examination.
- Codes:
- 0 = No moulding
- + = Bones just touching
- ++ = Bones overlapping but reducible
- +++ = Severe overlap, not reducible (serious - suggests cephalopelvic disproportion)
SECTION 3 - Progress of Labour (Central Graph - Most Important)
This form has a Latent Phase zone on the left (Hours 0-8 at 3 cm) and an Active Phase zone on the right with two diagonal pre-printed lines.
Understanding the Pre-printed Lines on This Form
- Alert Line: Diagonal line from 4 cm at Hour 8 to 10 cm at Hour 14 - represents 1 cm/hour dilation.
- Action Line: Diagonal line from 4 cm at Hour 12 to 10 cm at Hour 18 - drawn 4 hours to the right of the alert line.
How to Plot Cervical Dilation (use X)
- During the latent phase (0-3 cm), plot dilatation in the latent phase area against actual hours elapsed.
- When the woman enters the active phase (4 cm+), plot the first active-phase reading directly on the Alert Line at 4 cm - do NOT plot it at the actual hour spent so far.
- All subsequent readings are plotted every 4 hours (or as needed) moving to the right.
- Mark each reading with an "X".
How to Plot Descent of Fetal Head (use O)
- Assessed by abdominal examination (fifths of head palpable above pelvic brim) - done just BEFORE each vaginal exam.
- Scale: 5/5 = head fully above brim; 0/5 = fully engaged/delivered.
- Mark with an "O" at the same time column as the cervical dilation reading.
Time Row
- In the Hours row: write 1, 2, 3... sequentially from left.
- In the Time row: write the actual clock time (e.g., 08:00, 08:30, 09:00...) under each column.
Interpreting the Graph
| Plot position | Meaning | Action |
|---|---|---|
| On or to the LEFT of Alert Line | Normal progress | Continue monitoring |
| Crosses to the RIGHT of Alert Line | Labour slowing (<1 cm/hr) | Increase monitoring; consider transfer to higher facility |
| Reaches or crosses the Action Line | Abnormal labour | Intervene immediately - augmentation, ARM, or caesarean section |
SECTION 4 - Contractions (Below the Main Graph)
- Y-axis: 1 to 5 contractions per 10 minutes.
- Record every 30 minutes.
- Count the number of contractions felt in a 10-minute window and shade that many boxes in the column.
- Shade the box differently to indicate strength/duration:
- Outline only (dotted) = < 20 seconds (mild)
- Hatched = 20-40 seconds (moderate)
- Solid/fully shaded = > 40 seconds (strong)
SECTION 5 - Oxytocin & Medications
Oxytocin U/L / drops per min
- Two rows: write the concentration (U/L) in the top row and the infusion rate (drops/min) in the bottom row.
- Update whenever the rate changes.
Drugs given and IV fluids
- In the open section below oxytocin, write:
- Drug name, dose, route, and time given
- Type and volume of IV fluids running
SECTION 6 - Maternal Condition (Lower Panel)
Pulse and Blood Pressure
- Y-axis: 60 to 180 (same scale for both).
- Pulse (dot •): Record every 30 minutes.
- Blood Pressure (vertical arrow ↑↓ with top = systolic, bottom = diastolic): Record every 4 hours (or every 30 min if hypertensive - as noted "4 hourly" on this form).
- Plot both on the same grid and connect pulse dots with a line.
Temperature (Temp °C)
- Record in the Temp °C row every 4 hours (or 2-hourly if raised).
- Write the numeric value in the box (e.g., 37.2).
Urine
Record each time the woman passes urine in the three rows:
- Protein: Nil / Trace / + / ++ / +++
- Acetone: Nil / Trace / + / ++
- Volume: Amount in mL (e.g., 200)
Quick Reference Summary
| Parameter | Plotted With | Frequency |
|---|---|---|
| Fetal heart rate | Dot + line | Every 30 min |
| Liquor/Moulding | Letter code | Every vaginal exam |
| Cervical dilation | X | Every 4 hours |
| Fetal descent | O | Every 4 hours (abdominal exam) |
| Contractions | Shaded boxes | Every 30 min |
| Pulse | Dot • | Every 30 min |
| Blood pressure | Arrow ↑↓ | Every 4 hours |
| Temperature | Number in box | Every 4 hours |
| Urine | Codes/volume | Each void |
Key rule for this form: The Active Phase plotting always starts at the Alert Line (4 cm). If the woman is admitted already at 6 cm, that 6 cm reading goes on the Alert Line at the 6 cm mark - not at whatever hour she spent in labour before admission. All subsequent plots move rightward in real time from that starting point.
This is a shared conversation. Sign in to Orris to start your own chat.