Age of patina is 60 and is dignosed with rigt hemiplegia and is known case of pacemaker, the mmt fir shoulder flexor is 1 and extensor 1 abudctors is 2- and adductor is 1+ . Wrist flexor is 2+ and extensor is 2+ and finger is 1 for hip flexor is 2- and extensor is 1 and abuctor 2- and adductor 2- . Knee flexor is 2- extenor 2 plantar flexor 2- and dorsiflexor 2- .The lower limb is externor rotation . Adductor tightness. Piriformis tightness. Patinet is able to stand with support but for walking he drags right leg in external rotation. He is able to peliv braiding 10s and sit to stand with support frame a physiotherapy mangement to make functional able . And what are the symton of thais mmt and tight ness also frame an detail physiotherapy plan .
Physiotherapy Management — Right Hemiplegia Post-Stroke (60-Year-Old, Pacemaker)
1. UNDERSTANDING THE MMT GRADES & CLINICAL PICTURE
MMT Grade Interpretation (MRC Scale)
| Grade | Meaning | Clinical Sign |
|---|---|---|
| 0 | No contraction | Complete paralysis |
| 1 | Flicker / trace contraction | Visible/palpable twitch, no movement |
| 1+ | Slight movement | Minimal ROM against gravity eliminated |
| 2− | Gravity eliminated, partial ROM | <50% range in horizontal plane |
| 2 | Gravity eliminated, full ROM | Full range horizontally, no resistance |
| 2+ | Some gravity, partial ROM | Movement against gravity <50% |
| 3 | Against gravity, no resistance | Full ROM against gravity only |
Patient's MMT Summary (Right Side)
| Muscle Group | Grade | Clinical Meaning |
|---|---|---|
| Shoulder Flexors | 1 | Trace contraction only, no functional movement |
| Shoulder Extensors | 1 | Trace only |
| Shoulder Abductors | 2− | Partial horizontal movement, <50% ROM |
| Shoulder Adductors | 1+ | Slight movement, non-functional |
| Wrist Flexors | 2+ | Movement against gravity partial — best UL function |
| Wrist Extensors | 2+ | Movement against gravity partial |
| Finger Flexors | 1 | Trace only — very poor hand function |
| Muscle Group | Grade | Clinical Meaning |
|---|---|---|
| Hip Flexors | 2− | Partial horizontal range — cannot lift leg against gravity fully |
| Hip Extensors | 1 | Trace only — very poor push-off |
| Hip Abductors | 2− | Partial — contributes to Trendelenburg |
| Hip Adductors | 2− | Partial |
| Knee Flexors | 2− | Partial horizontal |
| Knee Extensors | 2 | Full horizontal — strongest LL muscle |
| Plantar Flexors | 2− | Weak push-off |
| Dorsiflexors | 2− | Weak — foot-drop tendency |
Symptoms Explained by MMT & Tightness
- Leg dragging in external rotation: Weak hip flexors (2−) cannot lift the leg, so patient circumducts; hip external rotation deformity from piriformis tightness + external rotator dominance
- External rotation deformity: Piriformis tightness rotates femur externally; weak hip abductors/internal rotators cannot counteract
- Adductor tightness: Common post-stroke due to spastic tone in adductors, leads to scissor gait tendency; here combined with external rotation creates characteristic hemiplegic drag
- Trendelenburg gait tendency: Weak hip abductors (2−) → pelvis drops on swing phase
- Poor push-off: Hip extensor grade 1 + plantar flexor 2− → no propulsion
- Foot drop risk: Dorsiflexors 2− → foot may catch ground
- Poor upper limb function: Shoulder muscles grade 1 prevents overhead function; wrist 2+ is the strongest segment — focus for early UL rehab
- Inability to walk independently: Hip flexors insufficient to clear limb; no hip extension for propulsion; piriformis tightness locks ER position
2. PACEMAKER PRECAUTIONS
- Avoid strong electromagnetic fields — no TENS, IFT, ultrasound, diathermy, or electrical stimulation near the chest/pacemaker site
- Heart rate monitoring — note the pacemaker-set rate (typically 60–70 bpm lower limit); use Rate of Perceived Exertion (RPE) scale (Borg 6–20), target RPE 11–13 (light to somewhat hard)
- No upper limb exercises with shoulder abduction > 90° in early weeks (pacemaker lead stability — confirm with cardiologist)
- Avoid Valsalva maneuver during exercises
- Electrotherapy allowed only distal to pacemaker (e.g., hand/wrist) with bipolar electrode placement
- Coordinate with cardiologist for exercise intensity clearance
3. GOAL SETTING
Short-Term Goals (0–4 Weeks)
- Prevent secondary complications (contractures, pressure sores, DVT)
- Improve passive and active range of motion
- Stretch tight structures (piriformis, adductors)
- Progress MMT grades by 0.5–1 grade in key muscles
- Improve standing balance and weight-bearing tolerance
- Safe sit-to-stand with reduced support
Long-Term Goals (4–12+ Weeks)
- Independent ambulation with walking aid (at minimum)
- Eliminate external rotation drag pattern
- Functional upper limb use (at least gross grasp)
- Community-level mobility
- Improved pelvic control and core stability
4. DETAILED PHYSIOTHERAPY MANAGEMENT PLAN
A. POSITIONING & SPASTICITY MANAGEMENT
- Right upper limb: shoulder protracted (slight forward), elbow extended, wrist neutral, fingers extended with thumb abducted (anti-spastic position)
- Right lower limb: hip in neutral rotation (pillow between knees to prevent ER), knee slight flexion, ankle in neutral with foot splint/AFO
- Weight-bearing equally through both buttocks
- Right foot flat on floor
- Trunk upright, no lateral lean
B. RANGE OF MOTION (ROM) EXERCISES
Passive ROM (All joints, 2× daily, 10 repetitions each)
- All shoulder motions (within pacemaker precaution limits)
- Elbow, wrist, finger — full ROM, focus on finger extension
- Hip: flexion, extension, internal rotation (counteracts piriformis/ER tightness)
- Knee flexion/extension
- Ankle dorsiflexion (sustained stretch)
Active Assisted ROM
- Wrist flexion/extension (grade 2+ — patient can assist)
- Knee extension (grade 2 — gravity eliminated position, horizontal)
- Hip flexion (gravity eliminated, side-lying — grade 2−)
C. STRETCHING (Priority: Piriformis + Adductors)
Piriformis Stretch
- Right hip flexed 60°, right ankle resting on left knee
- Gentle pressure on right knee downward (figure-4 stretch)
- Hold 30–60 seconds × 3 repetitions, 2× daily
- Goal: Reduce external rotation deformity, normalize gait pattern
Adductor Stretch
- Both hips flexed, feet flat — allow right knee to fall outward (butterfly position)
- OR: Side-lying with right hip abducted gently with support
- Hold 30–60 seconds × 3 reps, 2× daily
Plantarflexor/Calf Stretch
- Sustained dorsiflexion stretch with towel or standing stretch at wall
- 30–60 seconds × 3 reps (prevents equinus)
Wrist/Finger Extensors
- Sustained gentle extension of fingers and wrist to counteract flexor tone
D. STRENGTHENING PROGRAM
Lower Limb (Gravity Eliminated Positions First — Grades 2)
| Exercise | Target Muscle | Position | Progression |
|---|---|---|---|
| Hip flexion — heel sliding | Hip flexors (2−) | Supine, slide heel up | Add small weight when 2 achieved |
| Bridging — bilateral then assisted right | Hip extensors (1→2) | Supine, knees bent | Unilateral bridge when possible |
| Hip abduction — gravity eliminated | Abductors (2−) | Side-lying on left | Theraband when 3 achieved |
| Knee extension — gravity eliminated | Quads (2) | Side-lying or seated short arc | Add gravity (seated) when 2+ |
| Dorsiflexion — gravity eliminated | Dorsiflexors (2−) | Sitting, foot off floor, slide on smooth surface | Against gravity when 2+ |
| Calf raises (assisted) | Plantar flexors (2−) | Seated, bilateral | Standing bilateral, then unilateral |
Upper Limb
| Exercise | Target | Position | Note |
|---|---|---|---|
| Wrist curls/extensions | Wrist flexors/extensors (2+) | Seated, forearm supported | Can start against gravity |
| Shoulder pendulum (Codman's) | Shoulder (grade 1) | Leaning forward, arm hanging | Gravity-assisted ROM + muscle activation |
| Scapular protraction/retraction | Scapula stabilizers | Sitting | Facilitates shoulder muscle activation |
| Finger tendon gliding | Finger flexors (1) | Seated | Passive to active assist |
Core & Pelvic Stability
- Pelvic tilting (anterior/posterior) — supine
- Pelvic bridging (patient can do 10s) → progress to marching in bridge
- Trunk side-bending in seated — right lateral flexion activation
- Dead bug exercise (supine, legs and arms moving alternately) — when tolerated
E. NEURODEVELOPMENTAL TECHNIQUE (NDT/BOBATH)
- Weight-bearing through affected limb — facilitates tone normalization
- Key point of control (KPC):
- Proximal KPC: shoulder girdle, pelvic girdle
- Distal KPC: wrist, hand
- Inhibition of spastic patterns:
- Trunk rotation in sitting (inhibits limb spasticity)
- Weight shifting in standing
- Facilitation of normal movement:
- Reaching tasks (UL), stepping tasks (LL)
- Rhythmic initiation for hip flexion during gait
F. TRANSFER & FUNCTIONAL MOBILITY TRAINING
Sit-to-Stand (Patient Currently Able With Frame)
- Ensure equal weight through both feet before rising
- Lean trunk forward ("nose over toes") before extending hips
- Cue right hip extension during rise
- Progress: from higher surface → standard height → lower surface
- Work toward frame → quad cane → standard cane
Standing Program
- Standing with frame: weight shift side-to-side (5 min → 15 min)
- Weight transfer onto right leg: controlled unilateral standing 5–10 seconds
- Mini-squats in standing (with frame): activates quads and hip extensors
- Toe tapping and heel raises in standing
G. GAIT RETRAINING (Most Critical Goal)
- Insufficient hip flexion to clear limb
- Piriformis/ER tightness blocking neutral rotation
- No propulsion from hip extensors
- Risk of foot catch/fall
Gait Re-Education Sequence:
- Pelvic bracing and pelvic rocking (patient has 10s pelvic bracing — good foundation)
- Standing hip flexion practice (lift right knee while holding frame — gravity eliminated → against gravity progression)
- Weight shifting forward/backward/lateral in standing
- Marching in place (with frame)
- Therapist facilitates hip internal rotation manually during swing phase
- Cue patient: "Turn your right foot inward / forward"
- Step practice with frame: right leg — emphasize heel strike (not toe drag)
- Parallel bars if available — stepping practice
- Instruct patient to actively internally rotate hip during swing (counteract piriformis)
- Use floor markers (tape lines) to guide step placement
- Rhythmic auditory cueing (metronome) — improves stride regularity
- Mirror feedback — patient observes gait pattern
- Walking frame (current) → wheeled walker → quad cane → single-point cane
- Outdoor walking when indoor is safe
Ankle Foot Orthosis (AFO) Consideration
- Dorsiflexors 2− → foot drop risk during swing phase
- A rigid or hinged AFO prevents foot-drop, improves heel-strike, and improves safety
- Refer to orthotist for assessment
H. BALANCE TRAINING
| Exercise | Level | Frequency |
|---|---|---|
| Sitting balance — unsupported with perturbation | Current level | Daily |
| Standing balance with frame — eyes open | Current level | 2× daily, 5–10 min |
| Standing — weight shift onto right | Progressing | Daily |
| Standing — reduce frame support (1 hand → fingers only) | Progression | Weekly step-down |
| Tandem stance (feet in line) — with support | Intermediate | When stable |
| Single-leg stance on left (right swing) | Advanced | When gait improves |
I. ELECTRICAL STIMULATION (Pacemaker-Safe)
- Neuromuscular Electrical Stimulation (NMES) to right dorsiflexors and wrist extensors (distal electrodes only, bipolar, not near chest)
- NMES for dorsiflexors during gait = Functional Electrical Stimulation (FES) — improves foot clearance
- Confirm with pacemaker manufacturer/cardiologist re: safe parameters (typically 1–5 mA, short pulse, well away from chest)
J. ACTIVITIES OF DAILY LIVING (ADL) & OCCUPATIONAL THERAPY LIAISON
- Right arm used as assist limb for bilateral tasks (wrist 2+ is functional)
- Wrist extension splint to facilitate hand function
- Practice: reaching, object transfer hand-to-hand, weight-bearing on right palm
- Home modification: grab bars, raised toilet seat, non-slip mats
K. HOME EXERCISE PROGRAM
- Piriformis stretch × 3 daily
- Adductor stretch × 3 daily
- Ankle pump/dorsiflexion × 20 reps hourly (DVT prevention + muscle activation)
- Pelvic bridging × 10 reps (patient already achieving 10s hold — maintain and progress)
- Seated wrist curls and extensions × 15 reps
- Standing at kitchen counter for 5–10 minutes (weight bearing)
5. OUTCOME MEASURES TO TRACK PROGRESS
| Measure | What It Assesses |
|---|---|
| MMT (re-assess weekly) | Muscle strength progress |
| Barthel Index | ADL independence |
| Berg Balance Scale | Balance |
| Timed Up and Go (TUG) | Functional mobility |
| Functional Ambulation Category (FAC) | Walking ability level |
| Modified Ashworth Scale | Spasticity grade |
| 10-Meter Walk Test | Gait speed |
6. SUMMARY OF CLINICAL PRIORITIES
| Priority | Rationale |
|---|---|
| 1. Piriformis + adductor stretching | Directly resolves ER drag pattern — gating factor for gait |
| 2. Hip flexor & extensor strengthening | Required for swing phase clearance and propulsion |
| 3. Pelvic stability progression | Patient has 10s pelvic brace — strong foundation; progress to dynamic control |
| 4. Gait retraining with rotation correction | Primary functional goal |
| 5. AFO prescription | Prevents foot drop, improves heel-strike safety |
| 6. Wrist/hand activation | Best UL motor function available — capitalize on it |
| 7. Pacemaker precautions throughout | Patient safety, non-negotiable |
Age of patina is 60 and is dignosed with rigt hemiplegia and is known case of pacemaker, the mmt fir shoulder flexor is 1 and extensor 1 abudctors is 2- and adductor is 1+ . Wrist flexor is 2+ and extensor is 2+ and finger is 1 for hip flexor is 2- and extensor is 1 and abuctor 2- and adductor 2- . Knee flexor is 2- extenor 2 plantar flexor 2- and dorsiflexor 2- .The lower limb is externor rotation . Adductor tightness. Piriformis tightness. Patinet is able to stand with support but for walking he drags right leg in external rotation. He is able to peliv braiding 10s and sit to stand with support frame a physiotherapy mangement to make functional able . And what are the symton of thais mmt and tight ness also frame an detail physiotherapy plan .
Complete Physiotherapy Assessment & Management
60-Year-Old | Right Hemiplegia | Pacemaker
PART 1 — MMT GRADE INTERPRETATION & SYMPTOMS
Understanding the MRC Manual Muscle Test Scale
| Grade | Meaning |
|---|---|
| 0 | No contraction whatsoever |
| 1 | Visible or palpable flicker/twitch — no joint movement |
| 1+ | Slight movement in gravity-eliminated position |
| 2− | Partial range of motion in gravity-eliminated position (<50% ROM) |
| 2 | Full range of motion in gravity-eliminated position (no resistance) |
| 2+ | Moves against gravity through partial range (<50%) |
| 3 | Moves against gravity through full range, no added resistance |
Patient's Complete MMT Profile & Symptoms
UPPER LIMB (Right)
| Muscle Group | Grade | Functional Meaning & Symptoms |
|---|---|---|
| Shoulder Flexors | 1 | Only a flicker of deltoid anterior fibers — cannot raise arm forward at all. Patient cannot reach, push, or initiate shoulder movement functionally. |
| Shoulder Extensors | 1 | Trace posterior deltoid/latissimus — no functional backward push. Cannot stabilize shoulder during weight-bearing on arm. |
| Shoulder Abductors | 2− | Partial horizontal abduction only. Cannot raise arm to side against gravity. Cannot reach sideways. Shoulder remains adducted and internally rotated (hemiplegic posture). |
| Shoulder Adductors | 1+ | Slight adductor contraction. No functional pull-down or overhead support. |
| Wrist Flexors | 2+ | Best upper limb strength. Can flex wrist against gravity partially — some volitional control. Can attempt gross wrist-based tasks (pushing a light object). |
| Wrist Extensors | 2+ | Partial wrist extension against gravity. Important for functional grasp facilitation. |
| Finger Flexors | 1 | Trace twitch only. No grip, pinch, or grasp. Hand is functionally non-functional for manipulation. |
- The arm hangs limp at rest in the classic hemiplegic posture: shoulder adducted and internally rotated, elbow slightly flexed, wrist and fingers flexed (flexor synergy pattern)
- Risk of shoulder subluxation — the rotator cuff and deltoid (grade 1) cannot maintain the humeral head in the glenoid against gravity
- No functional hand use — cannot hold objects, write, or perform fine motor tasks
- Wrist at 2+ is the brightest spot — early functional training target
LOWER LIMB (Right)
| Muscle Group | Grade | Functional Meaning & Symptoms |
|---|---|---|
| Hip Flexors | 2− | Cannot lift leg against gravity; partial horizontal sliding only. During walking, the leg cannot clear the floor — patient compensates by dragging or circumducting. |
| Hip Extensors | 1 | Trace glute/hamstring. No push-off power. The body cannot propel forward from the right leg. Step length is shortened and laboured. |
| Hip Abductors | 2− | Partial horizontal abduction. Cannot stabilize pelvis during single-leg stance. Causes Trendelenburg sign — pelvis drops on left side during right swing. |
| Hip Adductors | 2− | Partial — combined with piriformis tightness and adductor soft-tissue contracture, restricts neutral hip positioning. |
| Knee Flexors | 2− | Partial hamstring contraction. Cannot flex knee during swing phase — knee stays extended, adding to foot drag. |
| Knee Extensors | 2 | Best lower limb muscle — full gravity-eliminated range. Can achieve limited weight-bearing if posture corrected. |
| Plantar Flexors | 2− | Weak gastrocnemius/soleus. No push-off during gait. Cannot perform heel raise. |
| Dorsiflexors | 2− | Weak tibialis anterior. Foot hangs in plantarflexion → risk of toe-catch and tripping during swing phase. |
- Cannot lift leg freely — leads to the circumduction gait (swinging leg out in a wide arc to clear the floor)
- No propulsion from hip extensors or plantar flexors → slow, effortful gait
- Weak knee flexors prevent normal swing — knee stays stiff during walking
- Dorsiflexor weakness → foot drop tendency (toe drags ground during swing)
- Abductor weakness → Trendelenburg lurch (trunk sways right during left stance)
- Patient needs to drag right leg because hip flexors cannot clear it
Symptoms from Soft Tissue Tightness
Piriformis Tightness
- The piriformis muscle externally rotates and abducts the hip
- When tight: hip is locked in external rotation and slight abduction
- Walking symptom: the right foot points outward (toe-out posture) and the leg swings in an externally rotated arc — exactly what this patient shows
- On clinical examination: positive piriformis test, pain/restriction with passive internal rotation of hip, possible sciatic nerve irritation (piriformis syndrome)
- During gait: the right foot contacts ground with lateral border → risk of ankle inversion sprain
- Combined with weak hip internal rotators (grade 1 gluteus medius) — no muscle to counteract the ER deformity
Adductor Tightness
- The adductors (gracilis, adductor longus/brevis/magnus) shorten post-stroke due to spastic tone and disuse positioning
- Symptoms: thighs tend to cross toward each other (scissor posture in severe cases)
- Restricts hip abduction — cannot separate legs for stable base of support
- During standing: narrow base of support → poor balance
- During gait: limits step width, creates mediolateral instability
- On clinical examination: restricted passive hip abduction (<20°), palpable tightness in medial thigh, positive Ober's variant for adductors
Combined Effect (ER + Adductor Tightness + Weak Muscles):
The right leg is pulled into external rotation by tight piriformis, held medially by adductor tightness, with weak muscles unable to counteract either force. Result: the patient drags the right leg in a fixed externally rotated position — the most energy-inefficient, unsafe gait pattern possible.
PART 2 — PACEMAKER PRECAUTIONS (Non-Negotiable)
| Precaution | Reason |
|---|---|
| No TENS, IFT, shortwave diathermy, or ultrasound near chest/device | Electromagnetic interference with pacemaker sensing |
| Electrotherapy (NMES/FES) only distal to elbows/knees, bipolar electrodes | Safe distance from pacemaker generator and leads |
| No shoulder abduction >90° in first 4–6 weeks | Risk of dislodging pacemaker leads (confirm with cardiologist) |
| Use RPE scale (Borg 6–20), target RPE 11–13 | Heart rate may be pacemaker-fixed; cannot rely on HR for exercise intensity |
| Avoid Valsalva maneuver during exercises | Increases intrathoracic pressure, can affect pacing |
| Confirm exercise clearance with cardiologist | Establish safe intensity thresholds |
| Monitor for dizziness, chest pain, palpitations during sessions | Pacemaker malfunction signs |
PART 3 — PHYSIOTHERAPY GOALS
Short-Term Goals (Weeks 1–4)
- Prevent contractures, pressure injury, and shoulder subluxation
- Achieve Grade 2 in hip flexors and hip extensors (minimum for assisted gait)
- Fully stretch piriformis and adductor tightness — restore neutral hip rotation
- Progress from frame-assisted standing to frame-assisted stepping
- Improve pelvic bracing from 10 seconds to 30 seconds
- Improve wrist/hand volitional control for functional grasp
Long-Term Goals (Weeks 4–12+)
- Independent ambulation with walking aid (minimum: frame → quad cane)
- Eliminate external rotation drag — achieve heel-toe gait pattern
- Functional upper limb use (gross grasp at minimum)
- Safe community mobility (step over obstacles, manage uneven terrain)
- Independent sit-to-stand without support frame
PART 4 — DETAILED PHYSIOTHERAPY PLAN
A. POSITIONING & ANTI-SPASTICITY POSTURES
- Right shoulder: slight protraction, arm supported on pillow in slight abduction and external rotation (anti-spastic for flexor synergy)
- Right elbow: extended, wrist neutral, fingers extended over a rolled towel, thumb abducted
- Right lower limb: hip in neutral rotation (pillow placed under right buttock and lateral thigh — prevents external rotation), knee in slight flexion (5–10°)
- Ankle: maintained at 90° with foot splint/AFO to prevent equinus
- Right shoulder forward with arm extended
- Right hip slightly flexed, knee flexed
- Avoid prolonged side-lying on right — pressure injury risk over greater trochanter
- Both buttocks equally weight-bearing
- Right foot flat on floor (not externally rotated)
- Hips and knees at 90°
- Trunk upright — no lateral lean toward right
B. RANGE OF MOTION (ROM) PROGRAM
Passive ROM
- Shoulder: flexion (0–90° within pacemaker precautions), abduction (0–90°), internal/external rotation, horizontal adduction
- Elbow: flexion/extension
- Forearm: pronation/supination
- Wrist: flexion/extension, radial/ulnar deviation
- Fingers: MCP, PIP, DIP — flexion/extension; thumb opposition
- Hip: flexion/extension, abduction/adduction, internal rotation (critical — counteracts piriformis tightness), circumduction
- Knee: flexion/extension
- Ankle: dorsiflexion/plantarflexion, inversion/eversion
- Toes: extension (prevents flexion contracture)
Active Assisted ROM
- Wrist flexion/extension (grade 2+ — can do actively)
- Knee extension in gravity-eliminated position
- Hip flexion in side-lying (gravity eliminated)
- Hip abduction in side-lying
C. STRETCHING PROGRAM (Priority: Piriformis + Adductors)
1. Piriformis Stretch — PRIORITY #1
- Patient supine; right hip flexed to 60°, right ankle rested on left knee
- Therapist (or patient with hands) gently presses right knee down toward the bed
- Simultaneously, slight overpressure on right ankle (pushing it toward chest)
- Hold: 30–60 seconds | Sets: 3 | Frequency: 3× daily
- Patient seated; right ankle placed on left knee
- Lean trunk forward — feel stretch in right buttock
- Hold 30–60 seconds
2. Adductor Stretch — PRIORITY #2
- Both hips flexed, soles of feet together
- Allow right knee to fall outward gently (gravity-assisted)
- Overpressure: gentle downward press on right medial knee
- Hold: 30–60 seconds | Sets: 3 | Frequency: 3× daily
- Patient left side-lying; therapist slowly abducts right hip to end range
- Sustained stretch at barrier
- Hold 30 seconds × 3
- When able to sit on floor: spread legs apart as far as possible
- Lean forward gently to increase stretch
- Hold 60 seconds
3. Calf / Plantarflexor Stretch
- Towel stretch: loop towel around right foot, pull toes toward shin (supine)
- Standing wall stretch: right foot back, heel flat on floor, lean into wall
- Hold 30–60 seconds × 3 × daily
- Goal: Prevent equinus contracture; improve heel-strike in gait
4. Hamstring Stretch
- Supine straight leg raise (passive) to point of hamstring resistance
- Hold 30 seconds × 3
- Improves knee flexion during gait
5. Wrist/Finger Extensor Sustained Stretch
- Right hand palm-down on flat surface, gently press down to extend wrist and fingers
- Hold 20–30 seconds × 5 (inhibits flexor spasticity)
D. STRENGTHENING PROGRAM
LOWER LIMB STRENGTHENING
| Exercise | Target Muscle | Starting Position | Technique | Sets/Reps | Progression |
|---|---|---|---|---|---|
| Heel slides | Hip flexors (2−) | Supine | Slide right heel toward buttock along bed | 3×10 | Add small ankle cuff weight |
| Bridging | Hip extensors (1→2) | Supine, knees bent | Bilateral bridge; therapist facilitates right side | 3×10, hold 5s | Single-leg bridge right; add hold duration |
| Hip abduction | Abductors (2−) | Left side-lying | Slide right leg up bed (gravity eliminated) | 3×10 | Lift off bed against gravity; add weight |
| Hip internal rotation | Gluteus medius, TFL | Sitting/supine | Rotate right knee/foot inward against resistance | 3×10 | Theraband around knees |
| Knee extension (short arc) | Quadriceps (2) | Sitting, roll under knee | Straighten knee from 30° flexion | 3×15 | Full extension; add cuff weight |
| Dorsiflexion | Tibialis anterior (2−) | Sitting, foot on smooth surface | Slide foot back (dorsiflex); then lift toes | 3×10 | Theraband around foot; against gravity |
| Calf raises | Plantar flexors (2−) | Seated bilateral | Rise up on toes bilaterally | 3×15 | Standing bilateral; then unilateral |
| Straight leg raise | Hip flexors + quads | Supine | Lift right leg 30–45° (when hip flexor reaches 2) | 3×10 | Cuff weight; standing hip flexion |
PELVIC/CORE STRENGTHENING
| Exercise | Technique | Target |
|---|---|---|
| Pelvic tilting | Supine; flatten low back into bed (posterior tilt), then arch (anterior tilt) | Transversus abdominis, multifidus |
| Pelvic bracing progression | Patient already holds 10 seconds → progress to 20s, 30s, add arm movement while braced | Core stability |
| Dead bug | Supine, both knees/hips 90°; alternate extending one leg while maintaining brace | Anti-rotation core stability |
| Seated trunk rotation | Sit without back support; rotate trunk right and left | Inhibits spasticity, activates trunk rotators |
| Marching in sitting | Sitting, alternately lift knees | Hip flexor activation, pelvic dissociation |
UPPER LIMB STRENGTHENING
| Exercise | Target | Position | Technique |
|---|---|---|---|
| Wrist curls | Wrist flexors (2+) | Seated, forearm rested on thigh | Curl wrist up with light dumbbell (250g–500g) |
| Wrist extensions | Wrist extensors (2+) | Seated, forearm rested, palm down | Extend wrist upward |
| Codman's pendulum | Shoulder (grade 1) | Stand/lean, arm hanging free | Gentle circular pendulum motion — gravity-assisted ROM + muscle activation |
| Scapular protraction/retraction | Serratus anterior, rhomboids | Sitting | Push arm forward (protraction), then pull back — therapist guides |
| Forearm pronation/supination | Forearm rotators | Seated, elbow at 90° | Rotate forearm with light dumbbell or hammer grip |
| Tendon gliding | Finger flexors (1) | Seated | Passively flex each finger; then attempt active hook, fist, straight fist sequencing |
| Weight-bearing on right palm | Shoulder, wrist stabilizers | Sitting, hand placed on firm surface beside hip | Patient leans weight through extended right arm |
E. NEUROLOGICAL FACILITATION TECHNIQUES
Bobath / Neurodevelopmental Technique (NDT)
- Normalize tone before movement — do not work against strong spasticity
- Use key points of control (KPC) to influence tone throughout the limb:
- Proximal KPC: shoulder girdle, pelvic girdle
- Distal KPC: wrist, thumb web-space (UL); heel, foot (LL)
- Weight-bearing through the affected limb facilitates tone normalization
- Trunk rotation inhibits limb spasticity
- Pelvic mobilization in sitting — hands on pelvis, rotate and tilt pelvis rhythmically → inhibits LL spasticity, prepares for gait
- Seated trunk rotation with arm swing — arms clasped together, rotate right and left → inhibits whole-body spasticity, activates trunk rotators
- Right heel weight-bearing — standing, ensure right heel is fully on floor; therapist facilitates right knee extension → normalizes extensor tone in LL
- Shoulder protraction in sitting — therapist moves right shoulder forward and slightly down → inhibits shoulder retraction pattern
- Hip internal rotation facilitation — therapist cups right knee and internally rotates during walking → teaches brain correct hip position during swing
Proprioceptive Neuromuscular Facilitation (PNF)
- D1 Flexion pattern: Hip flexion + adduction + external rotation (already dominant — modify)
- D2 Flexion pattern: Hip flexion + abduction + internal rotation → this is the therapeutic pattern to train (counteracts ER deformity)
- Patient in supine; therapist resists/guides right limb in D2 flexion diagonal
- Use rhythmic initiation: passive → active-assisted → active → resisted
- D2 Extension: Shoulder extension + abduction + internal rotation → facilitates shoulder control
- Rhythmic initiation for wrist/forearm: Passive pronation/supination → active with facilitation
Electrical Facilitation (Pacemaker-Safe)
- NMES to right dorsiflexors (electrodes on tibialis anterior, below knee — safe distance from pacemaker)
- Bipolar electrode placement, short pulse width
- Combine with attempted voluntary dorsiflexion — biofeedback + electrical facilitation
- 20 minutes/session, 5× week
- NMES to wrist extensors — electrodes on forearm (extensor compartment)
- Stimulate during attempted wrist extension → strengthens, inhibits flexor dominance
- Confirm safe parameters with pacemaker cardiologist
F. TRANSFER & FUNCTIONAL TRAINING
Sit-to-Stand (Patient Currently Able With Frame)
- Move buttocks to edge of chair
- Right foot slightly behind left (active hip flexion practice)
- Lean trunk forward ("nose over toes") — weight shifts over feet
- Push up through frame; therapist cues right hip extension
- Achieve upright standing: hips fully extended, right foot pointing forward (not externally rotated — therapist corrects foot placement manually)
- From higher surface (raised toilet seat height) → standard chair → lower surface
- Reduce frame to one hand → then fingertip touch → unsupported sit-to-stand
Bed Mobility
- Rolling to right: patient clasps hands, swings arms right with momentum
- Rolling to left: therapist facilitates via pelvic rotation
- Sitting up from lying: via side-lying, push up with left arm
G. STANDING BALANCE TRAINING
| Exercise | Level | Duration/Reps | Focus |
|---|---|---|---|
| Standing with frame — bilateral weight-bearing | Current | 10–15 min | Equalize weight through both feet |
| Weight shift side-to-side with frame | Current | 3×10 | Right limb loading |
| Weight shift forward/backward with frame | Current | 3×10 | Anticipatory postural control |
| Single-leg right stance (hold frame) | Progressing | 5–10 seconds × 5 | Hip abductor activation, Trendelenburg correction |
| Forward reach with left arm (frame in right) | Progressing | 3×10 | Reactive balance, right LL loading |
| Tandem stance — left foot in front | Intermediate | 10 seconds × 3 | Anteroposterior stability |
| Reduce frame support — one hand → fingertip → no frame | Advanced | As tolerated | Toward independent standing |
H. GAIT RETRAINING — MOST CRITICAL SECTION
Analysis of Current Gait Fault:
- Right leg drag in external rotation = combination of:
- Piriformis tightness (ER deformity)
- Hip flexor grade 2− (insufficient limb clearance)
- Knee flexor grade 2− (stiff knee during swing)
- Dorsiflexor grade 2− (foot drop tendency)
- No propulsion from hip extensor/plantar flexors
- No hip ER correction from weak internal rotators
Phase 1 — Pre-Gait Foundation (Weeks 1–2)
- Pelvic dissociation in standing: Hold frame; shift weight right → left repeatedly; right pelvis forward and back (simulates gait pelvic rotation)
- Standing hip flexion (marching): Right knee lift with frame — even if only partial, repeat 3×10 — trains hip flexors in functional position
- Hip internal rotation drill standing: Therapist manually rotates right foot to neutral while standing — patient holds position 5s × 10
- Weight acceptance practice: Step sideways — left foot leads, right foot follows — right leg accepts weight for 3 seconds
Phase 2 — Assisted Stepping (Weeks 2–4)
- Therapist-facilitated stepping: Therapist stands right side, right hand guides right pelvis forward, left hand guides right knee into flexion + internal rotation during swing phase
- Floor targets: Place tape marks on floor; patient aims right foot to step on tape (trains step length and direction)
- Forward step practice with frame: Right leg steps forward first — ensure heel-strike, not toe-drag — therapist corrects foot position
- Stairs/step-ups: Step up and down a single step with frame (excellent hip flexor, quadriceps, and hip extensor strengthening in functional context)
Phase 3 — Gait Pattern Correction (Weeks 4–8)
- Verbal cueing: "Turn your right foot straight ahead" before each step
- Mirror biofeedback: Large mirror in front — patient watches foot position during gait and corrects in real time
- Rhythmic auditory stimulation (RAS): Metronome at patient's natural cadence + 5% — improves stride regularity and reduces compensatory patterns
- Treadmill walking (slow speed, hand rails): Forces reciprocal stepping pattern; reduces opportunity for external rotation drag
- Hip internal rotation taping: Kinesio tape in IR facilitation pattern on right hip — proprioceptive cue for IR during swing
- PNF gait facilitation: As described above — D2 flexion diagonal during swing phase
Phase 4 — Walking Aid Progression
- Independent stepping without dragging at previous aid level
- Single-limb stance right ≥5 seconds
- Consistent heel-strike pattern
I. ANKLE FOOT ORTHOSIS (AFO) PRESCRIPTION
- Prevents toe-drag during swing phase
- Improves heel-strike pattern
- Reduces energy expenditure during gait
- Improves safety and walking speed
J. SHOULDER SUBLUXATION PREVENTION
- Arm sling during ambulation and standing — prevents downward subluxation and protects shoulder joint
- Broad arm support in seated position — do not allow arm to hang free
- NEVER lift patient by right arm — subluxation and brachial plexus injury risk
- Glenohumeral strapping: Theraband or kinesio tape supports humeral head in glenoid
- Regular passive shoulder ROM maintains capsule flexibility despite muscle weakness
K. ADJUNCT MODALITIES (Pacemaker-Safe Only)
| Modality | Target | Precaution |
|---|---|---|
| Hot pack (moist heat) | Piriformis, adductors before stretching | Not over implant site |
| NMES | Dorsiflexors, wrist extensors | Distal only, bipolar, away from chest |
| Mirror therapy | Right arm — visual feedback for motor imagery | No equipment risk |
| Mental practice/motor imagery | All limbs — neuroplasticity enhancement | No equipment |
| Hydrotherapy/pool therapy | Gait training, ROM, strengthening | ECG monitor nearby; no underwater electrical stimulation |
L. PATIENT AND CAREGIVER EDUCATION
- Correct handling: Never drag by right arm; support under armpit and forearm
- Positioning at home: Anti-spastic postures in bed, sitting, and standing
- Fall prevention: Clear home pathways, non-slip mats, grab bars in bathroom
- Stretching routine: Piriformis and adductor stretch 3× daily
- Recognition of shoulder subluxation: Visible gap above humeral head — report immediately
- Pacemaker awareness: Avoid magnets, airport security wands — carry pacemaker ID card
- Exercise compliance: Daily home exercises as prescribed below
M. HOME EXERCISE PROGRAM
| Exercise | Sets/Reps/Duration | Frequency |
|---|---|---|
| Piriformis stretch (figure-4) | 3 × 60 seconds each side | 3× daily |
| Adductor stretch (butterfly) | 3 × 60 seconds | 3× daily |
| Ankle pump / dorsiflexion | 20 reps per hour | Hourly while awake |
| Pelvic bridging | 3 × 10 reps, hold 10s | 2× daily |
| Heel slides (hip flexion in supine) | 3 × 15 reps | 2× daily |
| Seated wrist curls and extensions | 3 × 15 reps (light weight) | 2× daily |
| Standing at kitchen counter (weight-bearing) | 10–15 minutes | 2× daily |
| Tendon gliding exercises (fingers) | 5 repetitions each position | 3× daily |
PART 5 — OUTCOME MEASURES (Baseline + Weekly Monitoring)
| Measure | What It Tracks |
|---|---|
| MRC MMT (all muscles) | Strength progress |
| Modified Ashworth Scale | Spasticity grade (shoulder, wrist, hip adductors) |
| Goniometry | Hip internal rotation ROM (piriformis), hip abduction (adductors) |
| Barthel Index | ADL independence score |
| Berg Balance Scale (BBS) | Standing balance (max 56 — target >45 for community ambulation) |
| Timed Up and Go (TUG) | Functional mobility; target <12 seconds for community safety |
| Functional Ambulation Category (FAC) | Walking ability level (0–5 scale) |
| 10-Metre Walk Test | Gait speed and distance |
| Fugl-Meyer Assessment | Motor recovery score in stroke |
PART 6 — TREATMENT SCHEDULE SUMMARY
| Phase | Duration | Frequency | Primary Focus |
|---|---|---|---|
| Acute/Early Subacute | Weeks 1–2 | 5×/week, 45 min | Positioning, ROM, stretching, pelvic bracing, standing tolerance |
| Mid Subacute | Weeks 3–6 | 5×/week, 60 min | Strengthening (priority: hip flexors/extensors), pre-gait training, piriformis correction |
| Late Subacute | Weeks 7–12 | 3–5×/week, 60 min | Gait retraining, walking aid progression, UL functional training |
| Maintenance | Beyond 12 weeks | 3×/week + home program | Community ambulation, ADL independence, fall prevention |
PART 7 — PROGNOSIS & CLINICAL HIGHLIGHTS
- Pelvic bracing 10 seconds → good core activation; strong foundation for gait
- Sit-to-stand with frame → adequate quadriceps and core for weight-bearing
- Wrist flexors/extensors at grade 2+ → best UL function to capitalize on
- Knee extensor grade 2 → sufficient for weight-bearing with facilitation
- Piriformis and adductor tightness — the single biggest mechanical barrier to correct gait; resolve this first and gait will improve rapidly
- Hip flexors must reach grade 2 (full gravity-eliminated) minimum before independent stepping is possible
- Hip extensors need to reach grade 2+ for any propulsion — bridging and step-training are essential
- AFO fitting should happen early — foot drop is a major fall risk during all gait training
Realistic functional targets at 12 weeks: Make protocol for same
12-WEEK FUNCTIONAL REHABILITATION PROTOCOL
Right Hemiplegia | 60-Year-Old | Pacemaker
Target: Assisted Community Ambulation + Functional Upper Limb + Independent ADLs
PROTOCOL OVERVIEW
| Parameter | Detail |
|---|---|
| Total Duration | 12 weeks (84 days) |
| Sessions/Week | Weeks 1–6: 5×/week |
| Session Duration | 60 minutes (excluding rest breaks) |
| Intensity | Borg RPE 11–13 (pacemaker — no HR target) |
| Structure | 4 phases, each with specific milestones before progression |
| Re-assessment | Every 2 weeks (MMT, goniometry, functional scales) |
PACEMAKER SAFETY RULES (ALL PHASES)
These apply throughout all 12 weeks without exception.
- No TENS, IFT, shortwave diathermy, or ultrasound near chest or device
- NMES/FES electrodes: below elbow (UL) or below knee (LL) only, bipolar
- No shoulder abduction > 90° until week 6 (cardiologist clearance)
- Exercise intensity by Borg RPE only — target 11–13 ("light to somewhat hard")
- Stop session immediately if: chest pain, dizziness, palpitations, syncope
- Carry pacemaker ID card; emergency defibrillation protocols noted for gym staff
PHASE 1 — FOUNDATION PHASE
Weeks 1–2 | 5 sessions/week | 60 min/session
SESSION STRUCTURE — PHASE 1 (60 minutes)
| Block | Time | Content |
|---|---|---|
| Warm-Up | 0–10 min | Positioning correction, passive ROM all joints |
| Stretching | 10–25 min | Piriformis + adductors + plantarflexors (priority) |
| Strengthening | 25–45 min | Gravity-eliminated strengthening, pelvic work |
| Functional Activity | 45–55 min | Sit-to-stand practice, standing tolerance |
| Cool Down / HEP | 55–60 min | Home exercise programme review |
WEEK 1 — DAILY PROTOCOL
Day 1, 3, 5 (Monday/Wednesday/Friday Pattern)
- Full passive ROM: shoulder (0–90°), elbow, wrist, fingers — 10 reps each
- Full passive ROM: hip (all planes), knee, ankle — 10 reps each
- Emphasis: Hip internal rotation — 10 slow reps, end-range hold 3 seconds
- Set anti-spastic positioning for rest of session
| Stretch | Technique | Hold | Sets |
|---|---|---|---|
| Piriformis (figure-4) | Supine, right ankle on left knee, gentle overpressure on right knee | 60 sec | 3 |
| Adductor (butterfly) | Supine, soles together, right knee gently pressed down | 60 sec | 3 |
| Plantarflexors | Towel around right foot, pull toes toward shin | 45 sec | 3 |
| Wrist/finger extension | Right palm pressed flat on surface | 30 sec | 3 |
| Exercise | Position | Sets × Reps | Cue |
|---|---|---|---|
| Hip flexion (heel slide) | Supine | 3×10 | Slide heel toward buttock, feel hip flexor work |
| Hip internal rotation (gravity elim) | Supine, hip/knee 90° | 3×10 | Rotate knee inward — therapist guides |
| Bilateral bridging | Supine, knees bent | 3×10 hold 5s | Tighten core first, then lift buttocks |
| Knee extension short arc | Sitting, roll under knee | 3×15 | Straighten fully, hold 2 seconds |
| Wrist curls (250g) | Seated, forearm rested | 3×15 | Controlled curl and return |
| Wrist extensions (250g) | Seated, palm down | 3×15 | Extend, hold top 2 seconds |
- Standing with frame: 2 × 5 minutes bilateral weight-bearing
- Weight shift side-to-side: 2 × 10 reps (therapist ensures right heel contact)
- Sit-to-stand × 5 (frame): therapist corrects right foot position (neutral rotation)
Day 2, 4 (Tuesday/Thursday Pattern)
- Same structure but replace hip IR strengthening with hip abduction (side-lying)
- Add pelvic bracing in standing: 3 × 10 seconds (progress from current 10s)
- Add Codman's shoulder pendulum: 2 minutes (activate shoulder muscles)
- Add tendon gliding fingers: hook fist → full fist → straight fist — 3×5 each
WEEK 2 — PROGRESSION
| New Addition | Why |
|---|---|
| Increase piriformis stretch hold to 90 seconds | Deeper tissue creep, greater IR gain |
| Hip abduction side-lying: add 3 more reps → 3×13 | Progressive overload |
| Introduce unilateral bridge right (assisted by therapist) | Begins hip extensor isolation |
| Standing: introduce right knee lift with frame (marching) × 10 | First hip flexor in functional position |
| Pelvic bracing progression: 3 × 15 seconds | Core endurance |
| Standing time: increase to 3 × 5 minutes | Weight-bearing tolerance |
- Hip internal rotation passive ROM improved ≥ 10° from baseline
- Hip flexor MMT progressed to grade 2 (full gravity-eliminated range)
- Pelvic bracing 3 × 15 seconds in standing
- Standing tolerance 15 minutes continuous with frame
- Right knee lift (hip flexion in standing) — partial range × 10 reps
PHASE 2 — ACTIVATION & PRE-GAIT PHASE
Weeks 3–4 | 5 sessions/week | 60 min/session
SESSION STRUCTURE — PHASE 2 (60 minutes)
| Block | Time | Content |
|---|---|---|
| Warm-Up | 0–8 min | Stretching (piriformis + adductors — now routine) |
| Strengthening | 8–28 min | Gravity + anti-gravity strengthening focus |
| Neurofacilitation | 28–38 min | NDT/PNF facilitation, tone management |
| Pre-Gait Training | 38–55 min | Standing stepping, weight transfer, partial gait |
| Cool Down | 55–60 min | HEP review, ice if needed |
WEEK 3 — DAILY PROTOCOL
- Piriformis × 2 × 90 sec (therapist maintained stretch)
- Adductor × 2 × 60 sec
- Calf × 2 × 45 sec
- Total: maintain gains from Phase 1 — done quickly, not dwelt upon
| Exercise | Sets × Reps | Progression from Phase 1 |
|---|---|---|
| Hip flexion — standing (frame) | 3 × 12 | Was supine — now upright, functional |
| Unilateral bridge right | 3 × 10, hold 5s | New: isolates right gluteals |
| Hip abduction — against gravity (small range) | 3 × 10 | Was gravity-eliminated → now slight against gravity |
| Knee extension (seated, no support roll) | 3 × 15 | Full arc from 90° → progress toward 0° |
| Step-up right leg (4-inch step, frame) | 3 × 8 | New — functional hip flexor + quad + glute |
| Wrist curl/extension (500g) | 3 × 15 | Weight increased from 250g |
| Forearm pronation/supination (hammer grip) | 3 × 15 | New — forearm rotators |
- NDT trunk rotation in sitting: Clasped hands, rotate right and left × 20 — inhibits limb spasticity
- PNF D2 flexion diagonal (LL): Therapist guides right limb — hip flexion + abduction + internal rotation → trains correct swing phase movement
- Hip IR facilitation: Therapist internally rotates hip during active hip flexion — 10 reps, bimanual guidance
- Weight-bearing right arm (palm on plinth beside hip): 2 × 30 seconds lean through right arm — activates shoulder
| Activity | Duration | Key Cue |
|---|---|---|
| Standing weight shift — exaggerated | 3 min | Right foot flat, not externally rotated |
| Right knee lift marching (frame) | 3 × 15 reps | "Bring your right knee up and forward" |
| Backward stepping right leg | 3 × 10 reps | Activates hip extensors in functional position |
| Lateral stepping: right leg leads | 3 × 10 reps | Hip abductor activation |
| First forward steps (therapist guides right limb) | 5 min | Therapist: right hand on pelvis, left hand on right knee — IR correction, 5 minutes walking |
- Therapist places right foot in neutral (0° rotation) before each step
- Patient instructed: "Point your right toes straight"
- Aim for heel-strike — not toe-drag
- 5 steps → rest → 5 steps: quality over distance
WEEK 4 — PROGRESSION
| Progression | Detail |
|---|---|
| Step-up height increase to 6 inches | Greater hip flexor and extensor demand |
| Backward walking × 10 meters (frame) | Activates hip extensors and glutes functionally |
| Gait training distance: 10 meters × 3 sets | Increase from 5-step attempts |
| Introduce floor markers (tape) | Patient aims right foot to hit tape marks — corrects step placement |
| Mirror biofeedback during gait | Patient watches feet — self-corrects ER in real time |
| Wrist: attempt light object transfer | Pick up 100g cup, place 30cm away — functional wrist/hand |
| Introduce NMES dorsiflexors (below knee, bipolar) | 20 min during rest after gait block |
- Hip flexor MMT: grade 2+ (moves against gravity, partial range)
- Hip extensor MMT: grade 2 (full gravity-eliminated range)
- Walks 10 meters × 3 sets with frame and therapist guidance
- Right foot placed in <15° external rotation (down from presenting ER)
- Heel-strike achieved on ≥5/10 steps
- Pelvic bracing 3 × 30 seconds
- AFO fitted and tolerated (minimum 2 hours wear)
PHASE 3 — GAIT RETRAINING & STRENGTHENING PHASE
Weeks 5–8 | 4–5 sessions/week | 60 min/session
SESSION STRUCTURE — PHASE 3 (60 minutes)
| Block | Time | Content |
|---|---|---|
| Warm-Up / Stretching | 0–8 min | Routine maintenance stretches |
| Strengthening | 8–25 min | Progressive resistance, task-specific |
| Gait Training | 25–50 min | Walking corridor, stairs, obstacles |
| Upper Limb Function | 50–58 min | Task-specific hand activities |
| Cool Down | 58–60 min | HEP, feedback, next session preview |
WEEKS 5–6 PROTOCOL
| Exercise | Sets × Reps | Target |
|---|---|---|
| Standing hip flexion (frame, right knee lift) | 3 × 15 — add ankle cuff 0.5kg | Hip flexors |
| Single-leg stance right (hold frame) | 3 × 10 seconds | Hip abductors, balance |
| Step-up right (8-inch step) | 3 × 10 | Quads, hip extensors, hip flexors |
| Lateral band walk (theraband at ankles) | 3 × 10 steps each direction | Hip abductors |
| Sit-to-stand: from standard chair (no raised seat) | 3 × 10 | Functional quad/hip power |
| Bicep curl right (500g → 750g) | 3 × 12 | Elbow flexors for ADL |
| Wrist exercises (750g) | 3 × 15 each direction | Maintain/progress |
| Grip strengthening: putty/soft ball | 3 × 15 squeezes | Finger flexors — from grade 1 |
| Activity | Duration | Goal |
|---|---|---|
| Warm-up walk — frame, therapist standby | 5 min | Establish baseline for session |
| Gait correction drills: exaggerated hip flexion steps | 5 min | "High knee march" — trains hip flexor clearance |
| Internal rotation cuing: tape on floor, kinesio tape on hip | 5 min | Correct ER during swing |
| RAS (Rhythmic Auditory Stimulation): metronome | 5 min | Regular cadence, reduces compensatory patterns |
| Distance walk with frame | 5 min | Target: 15 meters × 3 sets minimum |
External Rotation Elimination Protocol:
- Manual correction: Therapist positions right foot at 0° before each step until patient does it independently
- Floor tape lines: Two parallel tape strips 10cm apart — patient must keep right foot within the lines
- Kinesio taping (hip IR facilitation): Applied from greater trochanter inferiorly in spiral toward medial knee — proprioceptive IR cue
- Verbal + visual feedback loop: "Knee forward, toes straight" + mirror
- Success criterion: Right foot ≤5° ER independently, 8/10 steps
| Task | Skill Targeted |
|---|---|
| Reach and touch targets at different heights (right arm, supported) | Shoulder motor control activation |
| Object transfer: slide cup from right to left hand | Bilateral coordination, wrist control |
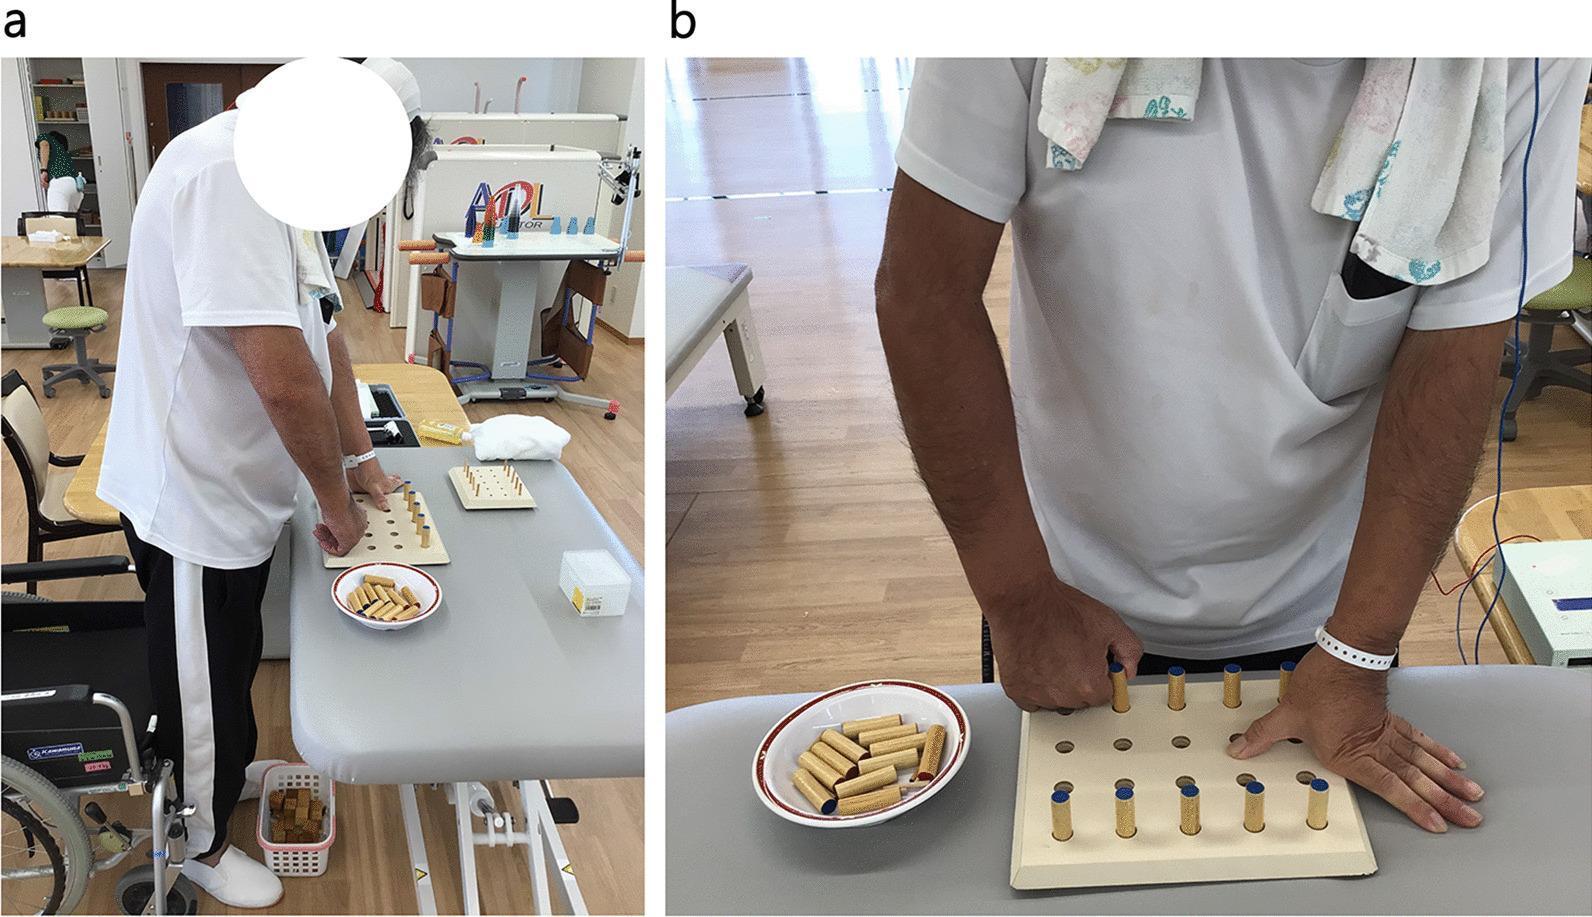
| Peg board (large pegs) | Gross grasp + release |
| Wipe table with right hand (bilateral weight shift) | Wrist extension + weight-bearing on arm |
| Press button / turn door handle (assisted) | Finger flexor + wrist coordination |
WEEKS 7–8 — PROGRESSION
| Addition | Rationale |
|---|---|
| Treadmill walking (0.5–1.0 km/h, handrails) | Forces reciprocal stepping, reduces ER compensation, task repetition |
| Obstacle course: step over foam rolls (5cm, 10cm, 15cm) | Trains hip flexion clearance, prepares for real-world gait |
| Stairs: step up and down 3–5 steps (rail + frame) | Critical ADL skill; hip extensor + quad + hip flexor |
| Dual-task walking: walk + carry light object in left hand | Cognitive-motor integration, real-world preparation |
| Walking aid trial: wheeled walker (rollator) | If 20m achieved with frame — progress to rollator |
| NMES during treadmill gait (dorsiflexors, below knee) | FES-assisted dorsiflexion during swing = foot-drop prevention + neuroplasticity |
- Walks 20 meters with frame or rollator — no therapist hand guidance
- Right foot ER ≤ 10° for majority of steps
- No toe-drag (AFO or active dorsiflexion maintaining foot clearance)
- Single-leg stance right: 10 seconds with frame
- Hip flexor MMT: grade 3 (against gravity full range) — OR grade 2+ minimum
- Sit-to-stand from standard chair × 5 repetitions independently
- Gross grasp: can pick up 200g object with right hand
- Stairs: 5 steps up and down with railing
PHASE 4 — FUNCTIONAL INDEPENDENCE PHASE
Weeks 9–12 | 3–4 sessions/week | 60 min/session
SESSION STRUCTURE — PHASE 4 (60 minutes)
| Block | Time | Content |
|---|---|---|
| Warm-Up | 0–5 min | Brief stretch routine (patient now independent) |
| Advanced Strengthening | 5–20 min | Functional, task-specific, higher resistance |
| Advanced Gait & Community Skills | 20–48 min | Distance, terrain, obstacles, dual-task |
| Upper Limb ADL Training | 48–56 min | Bilateral ADL practice, fine motor |
| HEP + Discharge Planning | 56–60 min | Compliance, education, goal review |
WEEKS 9–10 PROTOCOL
| Exercise | Sets × Reps | Load |
|---|---|---|
| Standing hip flexion with cuff weight | 3 × 15 | 1–1.5kg cuff |
| Single-leg stance right — reduced frame support (fingertip) | 3 × 15 seconds | Bodyweight |
| Step-up right (10-inch step) | 3 × 12 | Bodyweight + controlled descent |
| Terminal knee extension (theraband) | 3 × 15 | Light-medium theraband |
| Hip abduction standing (theraband) | 3 × 15 | Light theraband |
| Wrist exercises (1kg) | 3 × 15 | Increased load |
| Grip strengthening (spring grip 1kg) | 3 × 15 | Spring or putty — medium resistance |
| Finger opposition (thumb to each finger) | 3 × 10 each | Fine motor — coordination |
| Activity | Duration | Target |
|---|---|---|
| Walk 30–40 meters (rollator or quad cane trial) | 10 min | Distance and endurance |
| Quad cane introduction: 5–10 meter trials | 5 min | Less support → more independence |
| Outdoor/uneven surface walking (gravel path or ramp) | 5 min | Real-world adaptability |
| Walking speed drills: "walk as fast as safely possible" | 5 min | Target: TUG < 20 seconds by week 10 |
| Stair training: full flight (10 steps) with railing | 3 min | Community access |
| Task | Bilateral Role |
|---|---|
| Pouring water from jug to cup (right hand) | Wrist control, grasp |
| Washing face — bilateral (right assists) | Bilateral coordination |
| Buttoning shirt (adaptive approach) | Finger flexor + coordination |
| Picking up coins from table | Fine grip — progression from gross grasp |
| Opening jar lid (right hand stabilises) | Forearm rotation + grip |
WEEKS 11–12 — CONSOLIDATION & DISCHARGE PREPARATION
| Activity | Details | Outcome Measure |
|---|---|---|
| Community walk simulation | Walk 50+ metres, turn, return; negotiate doorways and narrow passages | 10MWT target: >0.4 m/s (household ambulation speed) |
| Ramp and incline | 5–10° slope, both up and down | Real-world confidence |
| Curb step-up (15cm kerb height) | With quad cane | Community independence |
| Timed Up and Go (assessed formally) | Sit → stand → walk 3m → return → sit | Target < 20 seconds |
| Dual-task (walk + carry bag in left hand) | Simulates real life | No increase in ER, no gait breakdown |
| Walking with quad cane only (no therapist hand guidance) | Final 5 min each session | Independence |
| Measure | Baseline | Week 4 | Week 8 | Week 12 Target |
|---|---|---|---|---|
| Fugl-Meyer LL | Low | +5 points | +10 points | ≥+15 points |
| Fugl-Meyer UL | Low | +3 points | +7 points | ≥+10 points |
| Berg Balance Scale | <30 | >35 | >40 | >45 (community ambulation threshold) |
| Timed Up and Go | >30 sec | <25 sec | <22 sec | <20 sec |
| Functional Ambulation Category (FAC) | 1 (max guard) | 2 (min guard) | 3 (supervision) | 4 (cane only) |
| 10-Metre Walk Test | Not applicable | <0.2 m/s | 0.3 m/s | >0.4 m/s |
| Barthel Index | <40/100 | 50 | 65 | >75/100 |
| Hip flexor MMT | 2− | 2 | 2+ | 3 |
| Hip extensor MMT | 1 | 2− | 2 | 2+ |
| Dorsiflexor MMT | 2− | 2− | 2 | 2+ |
| Hip ER deformity | Fixed ER | <20° ER | <10° ER | ≤5° ER |
| Wrist flexor/extensor MMT | 2+ | 2+ | 3 | 3 |
| Gross grasp | Absent | Trace | 200g object | 500g object |
HOME EXERCISE PROGRAMME — ALL 12 WEEKS
Morning Routine (20 minutes)
| Exercise | Sets/Reps/Hold | Purpose |
|---|---|---|
| Piriformis stretch (figure-4) | 3 × 60 seconds | Maintain IR gains overnight |
| Adductor butterfly stretch | 3 × 60 seconds | Prevent adductor re-tightening |
| Ankle pumps (dorsiflexion/plantarflexion) | 20 reps each foot | DVT prevention + dorsiflexor activation |
| Pelvic bridging | 3 × 10, hold 10 seconds | Core and hip extensor |
Afternoon Routine (15 minutes)
| Exercise | Sets/Reps | Purpose |
|---|---|---|
| Heel slides (hip flexion) | 3 × 15 | Hip flexor strengthening |
| Wrist curls and extensions | 3 × 15 | UL maintenance |
| Tendon gliding (fingers) | 3 × 10 each position | Prevent contracture, activate fingers |
| Standing at kitchen counter | 10–15 minutes | Weight-bearing, balance, fatigue tolerance |
Evening Routine (10 minutes)
| Exercise | Sets/Reps | Purpose |
|---|---|---|
| Calf stretch (towel or standing) | 3 × 45 seconds | Prevent equinus |
| Shoulder pendulum (Codman's) | 2 minutes | Shoulder subluxation prevention |
| Seated reach practice (right arm) | 3 × 10 reaches | Motor relearning |
INTERDISCIPLINARY COORDINATION
| Team Member | Role | Timeline |
|---|---|---|
| Cardiologist | Clear exercise intensity, confirm NMES safety, shoulder ROM limits | Week 1 (before initiating) |
| Orthotist | AFO fitting (hinged preferred) | Week 3–4 |
| Occupational Therapist | Hand function, ADL retraining, home modification assessment | Week 4 onwards |
| Speech & Language Therapist | If dysarthria/dysphagia present (common post-stroke) | Week 1 screen |
| Psychologist / Counsellor | Post-stroke depression (affects 30–40% of patients) — impacts rehab compliance | Week 2 screen |
| Dietitian | Nutritional support for muscle recovery | Week 1–2 |
| Social Worker | Discharge planning, home support, carer training | Week 8 onwards |
DISCHARGE CRITERIA (END OF WEEK 12)
- Walks 50 meters with quad cane — no drag, no ER deformity beyond 5°
- TUG < 20 seconds
- Berg Balance Scale > 45/56
- Independent sit-to-stand from standard chair
- Manages 5+ steps with railing (stair access)
- Can perform basic ADLs with affected arm as assist limb
- HEP understood and demonstrated independently
- Caregiver trained in handling, positioning, and HEP supervision
- Community follow-up physiotherapy arranged (1–2×/week maintenance)
- Pacemaker monitoring schedule confirmed with cardiologist
PROTOCOL DECISION TREE
START PHASE 1
     ↓
Week 2 Milestones Met?
     YES → Move to Phase 2
     NO  → Extend Phase 1 by 1 week, reassess

Phase 2 → Week 4 Milestones Met?
     YES → Move to Phase 3
     NO  → Repeat Week 3–4 protocol, identify bottleneck

Phase 3 → Week 8 Milestones Met?
     YES → Move to Phase 4
     NO  → Extend Phase 3, address specific deficit

Phase 4 → Week 12 Discharge Criteria Met?
     YES → Community discharge + outpatient maintenance
     NO  → Extend to Week 14–16, reassess goals
KEY CLINICAL PRINCIPLE UNDERLYING THIS PROTOCOL
Neuroplasticity drives recovery. The brain rewires fastest when:
- Movements are repetitive (high volume — aim 50–100 repetitions of key movements per session)
- Movements are task-specific (functional, not just isolated muscle work)
- Movements are performed at the edge of capability (challenging but achievable)
- Feedback is immediate and accurate (mirror, therapist cues, RAS)
- Practice happens outside of clinic (HEP compliance = neuroplasticity every day)
Suggest a vegetarian diet and noveg
Diet Plan for Stroke Rehabilitation Patient
60-Year-Old | Right Hemiplegia | Pacemaker | 12-Week Recovery Protocol
NUTRITIONAL GOALS FOR THIS PATIENT
| Goal | Rationale |
|---|---|
| High protein | Muscle recovery, prevent sarcopenia (age-related muscle loss), support MMT grade progression |
| Anti-inflammatory | Reduce post-stroke neuroinflammation, support neuroplasticity |
| Heart-healthy | Pacemaker + stroke = cardiovascular disease — low saturated fat, low sodium |
| Bone health | Calcium + Vitamin D — hemiplegia causes disuse osteoporosis risk |
| Constipation prevention | Reduced mobility → high fibre diet essential |
| Hydration | Prevents DVT, urinary tract infections, and fatigue during rehab |
| Antioxidants | Neuroprotection, reduce oxidative stress post-stroke |
DAILY NUTRITIONAL TARGETS
| Nutrient | Target | Reason |
|---|---|---|
| Calories | 1800–2000 kcal/day | Active rehabilitation — higher than sedentary elderly |
| Protein | 1.2–1.5 g/kg body weight/day (~85–105g/day for 70kg) | Muscle repair and neurological recovery |
| Carbohydrates | 50–55% of calories (complex only) | Sustained energy for rehab sessions |
| Fats | 25–30% (unsaturated priority) | Brain and cardiovascular health |
| Fibre | 25–30g/day | Constipation prevention |
| Sodium | < 2000 mg/day | Blood pressure control (stroke prevention) |
| Fluid | 2–2.5 litres/day | Hydration, DVT prevention |
| Calcium | 1000–1200 mg/day | Bone health (disuse osteoporosis risk) |
| Vitamin D | 800–1000 IU/day | Calcium absorption, muscle function |
| Omega-3 | 1–2g/day | Anti-inflammatory, neuroprotection |
VEGETARIAN DIET PLAN
EARLY MORNING (6:30–7:00 AM)
| Item | Quantity | Benefit |
|---|---|---|
| Warm water with lemon | 1 glass (250 ml) | Digestion, hydration on waking |
| Soaked almonds | 6–8 nuts | Vitamin E, healthy fats, brain health |
| Walnuts | 2–3 halves | Omega-3 (ALA), neuroprotective |
BREAKFAST (8:00–8:30 AM)
| Item | Quantity | Benefit |
|---|---|---|
| Vegetable oats upma / oatmeal porridge | 1 bowl (150g oats) | Complex carbs, beta-glucan, fibre |
| Boiled egg whites (if ovo-vegetarian) | 3 whites | High biological value protein |
| OR Paneer bhurji (low oil) | 100g paneer | Protein 18g, calcium |
| Glass of warm low-fat milk | 200 ml | Calcium, protein |
| Seasonal fruit (banana / papaya) | 1 medium | Potassium, digestive enzymes |
| Item | Quantity | Benefit |
|---|---|---|
| Moong dal chilla (2 pieces) | 2 pieces | Protein 12g, easy to digest |
| Green chutney (mint + coriander) | 2 tbsp | Antioxidants |
| Curd / yoghurt (low fat) | 1 small bowl (100g) | Probiotics, calcium, protein |
| Mixed fruit bowl | 1 cup | Vitamin C, antioxidants |
MID-MORNING SNACK (10:30–11:00 AM)
| Item | Quantity | Benefit |
|---|---|---|
| Buttermilk (chaas) with roasted cumin | 1 glass (200 ml) | Hydration, probiotics, electrolytes |
| Handful of roasted chana (chickpeas) | 30g | Plant protein, iron, fibre |
| OR fruit (orange / guava) | 1 medium | Vitamin C (enhances iron absorption) |
LUNCH (1:00–1:30 PM)
| Item | Quantity | Benefit |
|---|---|---|
| Brown rice / multigrain roti (2–3) | 1 katori (75g) rice or 2 rotis | Complex carbs, B vitamins |
| Mixed dal (moong + masoor) | 1 large bowl (150g cooked) | Protein 12–15g, iron, folate |
| Sabzi: palak + paneer OR mixed vegetables | 1 bowl | Iron, protein, vitamins A, C, K |
| Salad: cucumber + tomato + carrot + onion | 1 large plate | Fibre, antioxidants, raw vitamins |
| Curd / raita (low fat) | 1 small bowl | Probiotics, calcium |
| Ghee (on roti — small amount) | ½ tsp | Fat-soluble vitamin absorption |
AFTERNOON SNACK (4:00–4:30 PM)
| Item | Quantity | Benefit |
|---|---|---|
| Green tea (no sugar) | 1 cup | Antioxidants (EGCG), anti-inflammatory |
| Sprouts salad (moong / mixed) | 1 small bowl (50g dry weight) | Plant protein 8g, vitamin C |
| OR mixed seeds (pumpkin + sunflower + flax) | 2 tbsp | Zinc, magnesium, omega-3 |
| OR roasted makhana (fox nuts) | 1 small handful (20g) | Calcium, low calorie snack |
DINNER (7:00–7:30 PM)
| Item | Quantity | Benefit |
|---|---|---|
| Multigrain roti (2) | 2 medium | Light on digestion, B vitamins |
| Rajma / chole / black chana curry (alternate days) | 1 bowl | Protein 15g, iron, fibre |
| OR tofu stir-fry with vegetables | 150g tofu | Complete protein, isoflavones |
| Vegetable soup (tomato / spinach / mixed) | 1 bowl | Micronutrients, hydration |
| Steamed or sautéed vegetables | 1 bowl | Fibre, low calorie, vitamins |
BEDTIME (9:00–9:30 PM)
| Item | Quantity | Benefit |
|---|---|---|
| Warm turmeric milk (haldi doodh) | 1 glass (200 ml low-fat milk) | Curcumin = anti-inflammatory, neuroprotective; calcium; promotes sleep |
VEGETARIAN WEEKLY PROTEIN ROTATION
| Day | Primary Protein Source | Approximate Protein |
|---|---|---|
| Monday | Paneer + Moong dal | 35–40g |
| Tuesday | Tofu + Rajma | 35–40g |
| Wednesday | Egg white (ovo-veg) + Masoor dal | 38–42g |
| Thursday | Chickpea + Curd | 30–35g |
| Friday | Soya chunks + Moong sprouts | 40–45g |
| Saturday | Paneer + Mixed dal | 35–40g |
| Sunday | Egg white (ovo-veg) + Black chana | 38–42g |
NON-VEGETARIAN DIET PLAN
EARLY MORNING (6:30–7:00 AM)
| Item | Quantity | Benefit |
|---|---|---|
| Warm water with lemon | 1 glass | Hydration, digestion |
| Soaked almonds | 6–8 | Brain health, healthy fats |
| Walnuts | 2–3 halves | Omega-3 |
BREAKFAST (8:00–8:30 AM)
| Item | Quantity | Benefit |
|---|---|---|
| Boiled eggs (2 whole + 2 whites) | 4 eggs | High quality protein 22g, choline (brain health) |
| Whole wheat toast (2 slices) | 2 slices | Complex carbs |
| Sautéed vegetables (spinach, tomato, onion) | 1 bowl | Iron (enhances egg iron absorption), antioxidants |
| Low-fat milk / tea (no sugar) | 200 ml | Calcium |
| Item | Quantity | Benefit |
|---|---|---|
| Egg omelette (2 eggs, low oil) with vegetables | 2 eggs | Protein, lutein (brain health) |
| Oatmeal / upma | 1 bowl | Fibre, complex carbs |
| Fruit (banana / papaya) | 1 medium | Potassium, digestive enzymes |
MID-MORNING SNACK (10:30–11:00 AM)
| Item | Quantity | Benefit |
|---|---|---|
| Chicken broth / bone broth | 1 cup | Collagen, glycine, joint support |
| OR boiled egg (1) | 1 egg | Quick protein hit |
| Fruit | 1 medium | Vitamin C, antioxidants |
LUNCH (1:00–1:30 PM)
| Item | Quantity | Benefit |
|---|---|---|
| Grilled / boiled chicken breast | 120–150g | Lean protein 35–40g, zero saturated fat |
| Brown rice / 2 multigrain rotis | 1 katori / 2 rotis | Complex carbs |
| Dal (any) | 1 bowl | Additional protein, fibre |
| Large salad (cucumber + tomato + greens + lemon) | 1 plate | Fibre, vitamin C |
| Curd | 1 bowl | Probiotics, calcium |
| Item | Quantity | Benefit |
|---|---|---|
| Baked / steamed fish (rohu / salmon / mackerel / surmai) | 150g | Omega-3 (EPA/DHA) 1.5–2g — neuroprotective, anti-inflammatory; protein 30g |
| Brown rice | 1 katori | Complex carbs |
| Mixed vegetable curry | 1 bowl | Micronutrients |
| Salad | 1 plate | Fibre |
Omega-3 fish priority: Mackerel (bangda) > Salmon > Surmai (kingfish) > Rohu — aim for fatty fish 3–4×/week for maximum anti-inflammatory benefit post-stroke
AFTERNOON SNACK (4:00–4:30 PM)
| Item | Quantity | Benefit |
|---|---|---|
| Green tea (no sugar) | 1 cup | EGCG antioxidants |
| Boiled egg white (2) | 2 whites | Quick protein, low calorie |
| OR handful of mixed nuts (almonds + walnuts) | 20–25g | Healthy fats, omega-3 |
DINNER (7:00–7:30 PM)
| Item | Quantity | Benefit |
|---|---|---|
| Chicken soup with vegetables | 1 large bowl | Light protein, collagen, glycine |
| Multigrain roti (2) | 2 | Complex carbs, light on digestion |
| Steamed / sautéed vegetables | 1 bowl | Fibre, micronutrients |
| Item | Quantity | Benefit |
|---|---|---|
| Scrambled eggs (2) with spinach | 2 eggs | Protein, iron, folate |
| Multigrain roti (2) or brown rice | 2 rotis | Complex carbs |
| Dal + sabzi | 1 bowl each | Protein, fibre |
| Item | Quantity | Benefit |
|---|---|---|
| Grilled fish | 120g | Lean protein, omega-3 |
| Brown rice / roti | 1 katori / 2 rotis | Carbs |
| Vegetable curry | 1 bowl | Fibre, vitamins |
BEDTIME (9:00–9:30 PM)
| Item | Quantity | Benefit |
|---|---|---|
| Warm turmeric milk (low fat) | 200 ml | Anti-inflammatory, calcium, sleep |
| OR bone broth | 1 cup | Collagen, joint support, light on stomach |
NON-VEG WEEKLY MEAL ROTATION
| Day | Lunch Protein | Dinner Protein |
|---|---|---|
| Monday | Grilled chicken breast | Egg bhurji / omelette |
| Tuesday | Baked mackerel / salmon | Chicken soup |
| Wednesday | Eggs (boiled + dal) | Fish curry (light) |
| Thursday | Chicken stir-fry | Egg whites + dal |
| Friday | Grilled surmai / rohu | Chicken tikka (grilled, no cream) |
| Saturday | Fish + brown rice | Egg + vegetable |
| Sunday | Chicken + dal (Sunday special) | Light egg meal |
FOODS TO STRICTLY AVOID (BOTH PLANS)
| Food | Reason |
|---|---|
| Table salt / high-sodium foods (pickles, papad, processed foods) | Hypertension → stroke recurrence risk |
| Deep fried foods | Saturated fat → cardiovascular risk |
| Red meat (beef, mutton, pork) — non-veg plan | High saturated fat, raises LDL cholesterol |
| Full-fat dairy (cream, butter in excess, full-fat paneer) | Saturated fat |
| Refined carbs (white rice in excess, maida, white bread) | Spikes blood sugar, low nutrient density |
| Sugar, sweets, mithai | Inflammatory, cardiovascular risk |
| Alcohol | Stroke recurrence risk, interacts with pacemaker medications |
| Caffeinated beverages in excess (>2 cups tea/coffee) | Diuretic, affects pacemaker threshold at high doses |
| Vitamin K rich foods in excess (if on warfarin) | Interferes with anticoagulation — ask cardiologist |
| Carbonated soft drinks | Sugar, empty calories, acidic |
SPECIAL NUTRITIONAL CONSIDERATIONS FOR THIS PATIENT
1. Dysphagia Precaution
- Modify food texture: soft, moist foods (no dry bread, no chunky pieces)
- Thicken liquids if needed (consult speech therapist)
- Avoid nuts whole — crush or give as nut butter
- Small frequent meals over large meals
2. Anti-Stroke / Cardioprotective Focus
- Omega-3 daily: walnuts + flaxseeds (veg) or fatty fish 3–4×/week (non-veg)
- Turmeric: curcumin is neuroprotective — daily in milk or cooking
- Garlic: anti-platelet, anti-hypertensive — 1–2 raw cloves or cooked daily
- Amla (Indian gooseberry): highest natural Vitamin C — 1 daily or as juice
- Beetroot: improves cerebral blood flow — 3×/week in salad or juice
3. Bone Health (Disuse Osteoporosis Risk)
- Calcium 1000–1200 mg/day (2 servings dairy/fortified plant milk + green leafy vegetables)
- Vitamin D supplement: 800–1000 IU/day (sunlight exposure 15–20 min/day also recommended)
- Avoid excess caffeine and sodium (both leach calcium)
4. Constipation Prevention (Reduced Mobility)
- Minimum 25–30g fibre daily (dal, vegetables, fruits, whole grains)
- 2–2.5 litres water daily
- Prunes (2–3) or isabgol (psyllium husk) 1 tsp in water at bedtime if needed
5. Muscle Recovery (Supporting MMT Progression)
- Protein within 30–45 minutes after each physiotherapy session
- Post-session snack: glass of milk + banana (veg) or 2 boiled egg whites + banana (non-veg)
- Magnesium-rich foods (nuts, seeds, dark leafy greens) — essential for muscle contraction
SAMPLE ONE-DAY COMPARISON
| Meal | Vegetarian | Non-Vegetarian |
|---|---|---|
| Early morning | Lemon water + almonds + walnuts | Lemon water + almonds + walnuts |
| Breakfast | Moong dal chilla + curd + fruit | 2 boiled eggs + oats + milk |
| Mid-morning | Buttermilk + roasted chana | Bone broth / boiled egg + fruit |
| Lunch | Brown rice + dal + palak paneer + salad + curd | Brown rice + grilled fish + dal + salad |
| Snack | Green tea + sprouts | Green tea + egg whites / nuts |
| Dinner | Roti + rajma + sabzi + soup | Roti + chicken soup + sabzi |
| Bedtime | Turmeric milk | Turmeric milk |
| Approx. Protein | 75–90g | 95–115g |
| Approx. Calories | 1750–1900 kcal | 1850–2000 kcal |
POST-PHYSIOTHERAPY RECOVERY SNACK (Both Plans)
| Plan | Snack | Protein |
|---|---|---|
| Vegetarian | 1 glass low-fat milk + 1 banana + 2 tbsp roasted peanuts | ~18g |
| Vegetarian (enhanced) | Greek yoghurt (100g) + fruit + walnuts | ~15g |
| Non-Vegetarian | 2 boiled egg whites + 1 banana + 1 glass milk | ~22g |
| Non-Vegetarian (enhanced) | Chicken sandwich (grilled, multigrain bread, no mayo) | ~25g |
How can i improve upper limb movement of sholder and also grasping . Tell exercise step by step
shoulder exercises hemiplegia stroke rehabilitation upper limb
hand grasp finger exercises stroke rehabilitation
Upper Limb Exercise Programme
Right Hemiplegia | Shoulder + Grasp Recovery
Step-by-Step Guide
IMPORTANT RULES BEFORE STARTING
- Pacemaker: No shoulder abduction beyond 90° until cleared by cardiologist (first 4–6 weeks)
- No pain: All exercises should be pain-free — stop if sharp pain occurs
- Quality over speed: 3 slow controlled reps = better than 10 fast reps
- Think about the movement while doing it — mental focus drives neuroplasticity
- Rest 60 seconds between each set
PART 1 — SHOULDER EXERCISES
LEVEL 1: AWAKENING THE MUSCLE (Grade 1 — Trace Contraction)
Goal: Get the brain to send signals to the shoulder muscles again
EXERCISE 1 — MENTAL IMAGERY + MUSCLE ACTIVATION
EXERCISE 2 — CODMAN'S PENDULUM EXERCISE
EXERCISE 3 — PASSIVE SHOULDER FLEXION (Therapist/Caregiver Assisted)
EXERCISE 4 — PASSIVE SHOULDER ABDUCTION (Gravity Eliminated, Side-Lying)
LEVEL 2: ACTIVATING THE MUSCLE (Grade 2 — Gravity Eliminated)
Goal: Patient moves the arm independently in a horizontal plane
EXERCISE 5 — ACTIVE SHOULDER FLEXION (GRAVITY ELIMINATED — TABLE SLIDING)
EXERCISE 6 — ACTIVE SHOULDER ABDUCTION (GRAVITY ELIMINATED — TABLE SLIDING)
EXERCISE 7 — BILATERAL CLASP AND LIFT (Self-Assisted Shoulder Flexion)
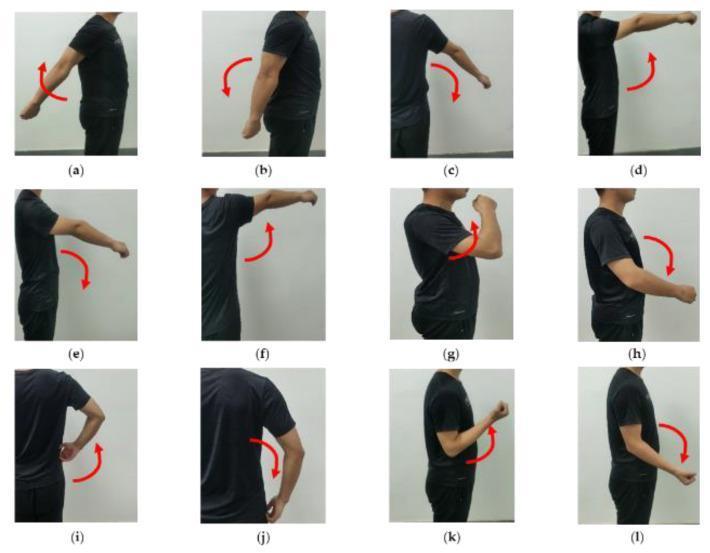
EXERCISE 8 — SHOULDER SCAPULAR PROTRACTION AND RETRACTION
LEVEL 3: AGAINST GRAVITY (Grade 2+ → Grade 3)
Goal: Lift the arm against gravity, control movement, build endurance
EXERCISE 9 — ACTIVE SHOULDER FLEXION AGAINST GRAVITY
EXERCISE 10 — SHOULDER EXTERNAL AND INTERNAL ROTATION (Side-Lying)
EXERCISE 11 — WALL SLIDE (Assisted Shoulder Flexion + Protraction)
EXERCISE 12 — PNF FACILITATION — D2 FLEXION DIAGONAL
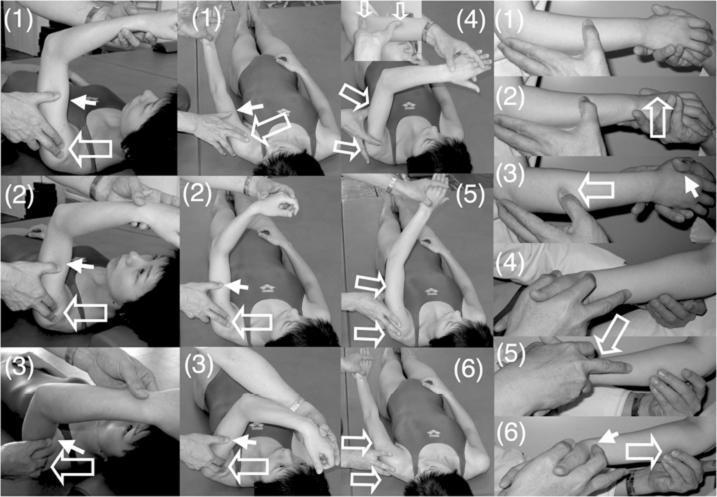
PART 2 — HAND AND GRASP EXERCISES
LEVEL 1: FINGER AWAKENING (Grade 1 — Trace)
Goal: Establish any voluntary finger movement; prevent contracture
EXERCISE 13 — PASSIVE FINGER EXTENSION STRETCH
EXERCISE 14 — TENDON GLIDING SEQUENCE
| Position | How to do it | What it trains |
|---|---|---|
| Position 1: Straight hand | All fingers fully straight, thumb out | Full finger extension |
| Position 2: Hook fist | Bend only the middle and tip finger joints — keep knuckles straight (like claws) | Flexor digitorum superficialis + profundus |
| Position 3: Full fist | Curl all fingers into a full fist, thumb across fingers | Power grasp muscles |
| Position 4: Tabletop | Bend knuckles to 90° but keep finger tips straight (like a table) | Intrinsic hand muscles |
| Position 5: Straight fist | Fingers straight and together, bend knuckles downward | MCP flexion isolation |
- Step 1: Use the left hand to passively move the right hand through each position one at a time.
- Step 2: After passive movement, try to hold the position using right hand muscles for 3 seconds.
- Step 3: Then actively try to move to the next position (caregiver assists if needed).
- Step 4: Go through all 5 positions as a sequence — this is one repetition.
EXERCISE 15 — WRIST FLEXION AND EXTENSION (Active — Grade 2+)
EXERCISE 16 — FOREARM PRONATION AND SUPINATION
LEVEL 2: BUILDING GRASP (Grade 1+ → Grade 2)
Goal: Achieve functional grip and release
EXERCISE 17 — GROSS GRASP WITH LARGE OBJECTS
- Soft foam ball → Tennis ball → Soft rubber ball → Putty → Hard rubber ball → Rigid cylinder
EXERCISE 18 — PUTTY EXERCISES (Progressive Resistance)
EXERCISE 19 — PEG BOARD EXERCISE
- Pegs at 15 cm → 25 cm → 35 cm → different heights → at shoulder height
EXERCISE 20 — OBJECT TRANSFER (Functional Grasp Practice)
LEVEL 3: FUNCTIONAL HAND USE (Grade 2 → Grade 3)
Goal: Use hand for real daily tasks
EXERCISE 21 — PINCH STRENGTHENING
EXERCISE 22 — WRIST STABILISATION WITH FUNCTIONAL TASKS
EXERCISE 23 — MIRROR THERAPY
FULL DAILY EXERCISE SCHEDULE
| Time | Exercises | Duration |
|---|---|---|
| Morning (after waking) | Passive ROM all joints (Exercise 3 + 4) + Finger stretch (Ex 13) + Tendon gliding (Ex 14) | 20 min |
| Therapy session (morning) | Pendulum (Ex 2) + Table sliding (Ex 5+6) + Bilateral clasp lift (Ex 7) + PNF D2 (Ex 12) + Wrist exercises (Ex 15+16) | 40 min |
| Midday | Putty exercises (Ex 18) + Object transfer (Ex 20) + Tendon gliding (Ex 14) | 15 min |
| Afternoon therapy | PEG board (Ex 19) + Grasp objects (Ex 17) + Wall slide (Ex 11) + Mirror therapy (Ex 23) | 40 min |
| Evening | Wrist curls (Ex 15) + Pinch exercises (Ex 21) + Cup holding (Ex 22) + Mental imagery (Ex 1) | 20 min |
PROGRESSION MILESTONES
| Milestone | What It Means | When Expected |
|---|---|---|
| Shoulder flicker becomes 5° of lift | Grade 1 → 1+ | Week 1–2 |
| Table sliding full range (shoulder) | Grade 2− achieved | Week 2–3 |
| Arm lifts 30° against gravity | Grade 2+ achieved | Week 4–5 |
| Arm lifts 90° against gravity | Grade 3 achieved | Week 7–10 |
| Finger closes around tennis ball | Grade 1 finger flexors → 1+ | Week 2–3 |
| Can squeeze soft putty independently | Grade 1+ → 2− | Week 4–6 |
| Can pick up large cup | Gross grasp functional | Week 6–8 |
| Can pick up small objects (coins) | Fine pinch developing | Week 10–12 |
But he is in flexion sengery pattern and abduction is about 60 degreee and elbow is continuous flex and does not in flexion