
lab report on blood pressure using a spignomanometer
What is this lab report for? · What sections do you need in the report?
sphygmomanometer blood pressure measurement technique
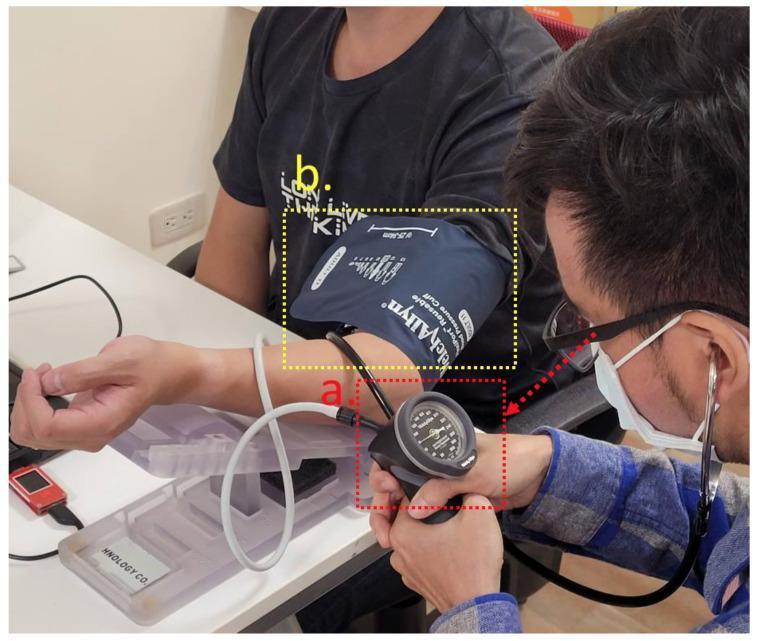
Clinical photograph demonstrating the auscultatory method of blood pressure measurement in a research or clinical setting. The image is divided into two highlighted sections: (a) shows a Welch Allyn DS66 aneroid sphygmomanometer, featuring a circular gauge with a black face and white numerical scale, connected to a black rubber inflation bulb held by a researcher. (b) displays a dark blue reusable adult blood pressure cuff (Welch Allyn) secured around the subject's left upper arm. A stethoscope chest piece is placed over the brachial artery beneath the distal edge of the cuff to detect Korotkoff sounds. The researcher is shown wearing the stethoscope and manually inflating the cuff. This visual illustrates the gold standard for non-invasive blood pressure monitoring used to validate novel pulse wave sensors and algorithms. Key educational concepts include proper cuff placement, manual sphygmomanometry technique, and clinical cardiovascular assessment.
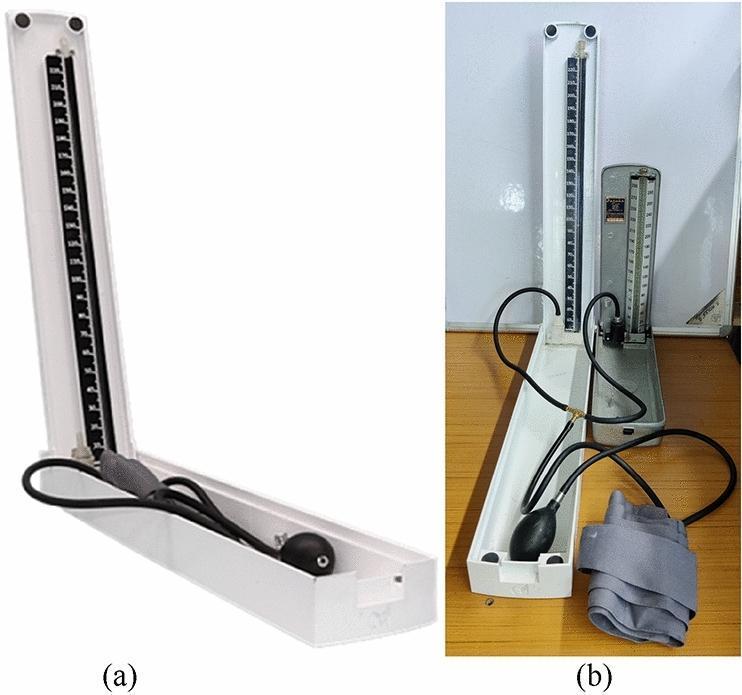
This clinical photograph displays a comparative analysis of sphygmomanometer devices used for blood pressure measurement. Panel (a) shows the 'Merkfree' alpha-prototype, a mercury-free sphygmomanometer featuring a white 3D-printed thermoplastic (PLA) enclosure. The design includes a horizontal base compartment containing a black rubber inflation bulb and tubing, and a vertical measuring scale with high-contrast markings calibrated for mmHg. The device utilizes Galinstan, a non-toxic liquid metal alloy, as the measuring fluid within a glass tube, maintaining the traditional vertical column interface. Panel (b) provides a technical comparison between the Merkfree prototype and a standard Mercurial Sphygmomanometer (MS). Both devices are connected via a T-connector joint to a single inflation bulb and blood pressure cuff (visible in the foreground) to ensure simultaneous pressure application during validation trials. The comparison highlights differences in enclosure materials—white polymer for the prototype versus metallic for the conventional unit—while demonstrating the similar structural logic intended to maintain clinician familiarity and reduce rounding-off errors through improved scale calibration.
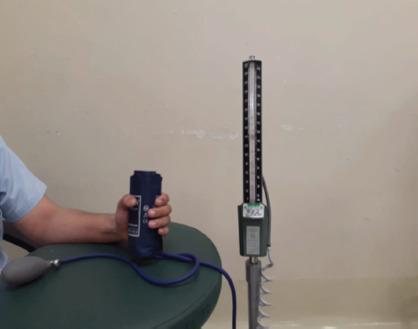
Clinical photograph of a patient's hand being used to assess hand grip strength using a modified mercury sphygmomanometer. The setup includes a dark blue blood pressure cuff that has been rolled into a cylindrical shape to fit the patient's palm, connected via blue flexible tubing to a hand-held inflation bulb and a vertical mercury-filled column scale. The scale is mounted on a metallic base and shows numerical gradations for pressure measurement in mmHg. This clinical assessment technique is often utilized in postoperative hand rehabilitation, such as after ulnar claw hand deformity correction, to provide a reproducible and reliable measurement of functional grip strength. The photograph captures the educational application of standard diagnostic equipment for monitoring recovery in orthopedic and plastic surgery contexts.
Lab Report: Measurement of Blood Pressure Using a Sphygmomanometer
1. Aim
2. Learning Objectives
- Understand the physiological basis of blood pressure measurement
- Correctly identify the five phases of Korotkoff sounds
- Accurately record systolic and diastolic blood pressure values
- Classify blood pressure readings using the ACC/AHA classification system
3. Background / Theory
- Systolic Blood Pressure (SBP): the peak pressure during ventricular contraction
- Diastolic Blood Pressure (DBP): the minimum pressure during ventricular relaxation
The Sphygmomanometer
- An inflatable cuff with an inner pneumatic bladder
- A rubber inflation bulb with a valve
- A manometer (mercury column or calibrated aneroid gauge) to read pressure in mmHg
- A release valve for controlled deflation
The Auscultatory Method and Korotkoff Sounds
| Phase | Sound Character | Clinical Significance |
|---|---|---|
| Phase I | Sharp tapping / thumping | First sound heard = Systolic BP |
| Phase II | Blowing or swishing murmur | Turbulent flow as cuff partially occludes artery |
| Phase III | Louder, rhythmical thumping | Flow increasing through wider opening |
| Phase IV | Muffled, softer sounds | Cuff pressure approaching diastolic level |
| Phase V | Complete silence (disappearance) | Diastolic BP (clinically used in most cases) |
4. Apparatus / Materials
| Equipment | Specification |
|---|---|
| Sphygmomanometer | Mercury or aneroid type, calibrated |
| Stethoscope | Standard binaural, with diaphragm and bell |
| Blood pressure cuff | Standard adult (bladder width ~12-13 cm); or appropriate size |
| Subject | Adult, rested for at least 5 minutes |
| Recording chart | To document readings |
| Pen/pencil | For documentation |
5. Procedure
Pre-measurement preparation
- Ask the subject to rest quietly for at least 5 minutes before measurement. Avoid exercise, caffeine, smoking, or talking during this period.
- The subject should be seated comfortably with the arm supported at heart level (mid-sternal level), feet flat on the floor, and back supported.
- Remove any tight clothing from the upper arm.
- Select the appropriate cuff size.
Palpatory method (to estimate systolic pressure first)
- Locate the radial pulse at the wrist. Wrap the cuff snugly around the upper arm, 2-3 cm above the antecubital fossa, with the bladder centred over the brachial artery.
- Inflate the cuff while palpating the radial pulse. Note the pressure at which the radial pulse disappears.
- Inflate a further 20-30 mmHg above this level.
- Slowly deflate (2-3 mmHg/second). Note the pressure at which the radial pulse returns - this estimates the systolic pressure and prevents missing an auscultatory gap.
Auscultatory method (main measurement)
- Place the stethoscope diaphragm (or bell) gently but firmly over the brachial artery at the antecubital fossa (do not tuck it under the cuff).
- Inflate the cuff to 20-30 mmHg above the estimated systolic pressure from the palpatory step.
- Slowly release the valve at approximately 2-3 mmHg per second or per heartbeat.
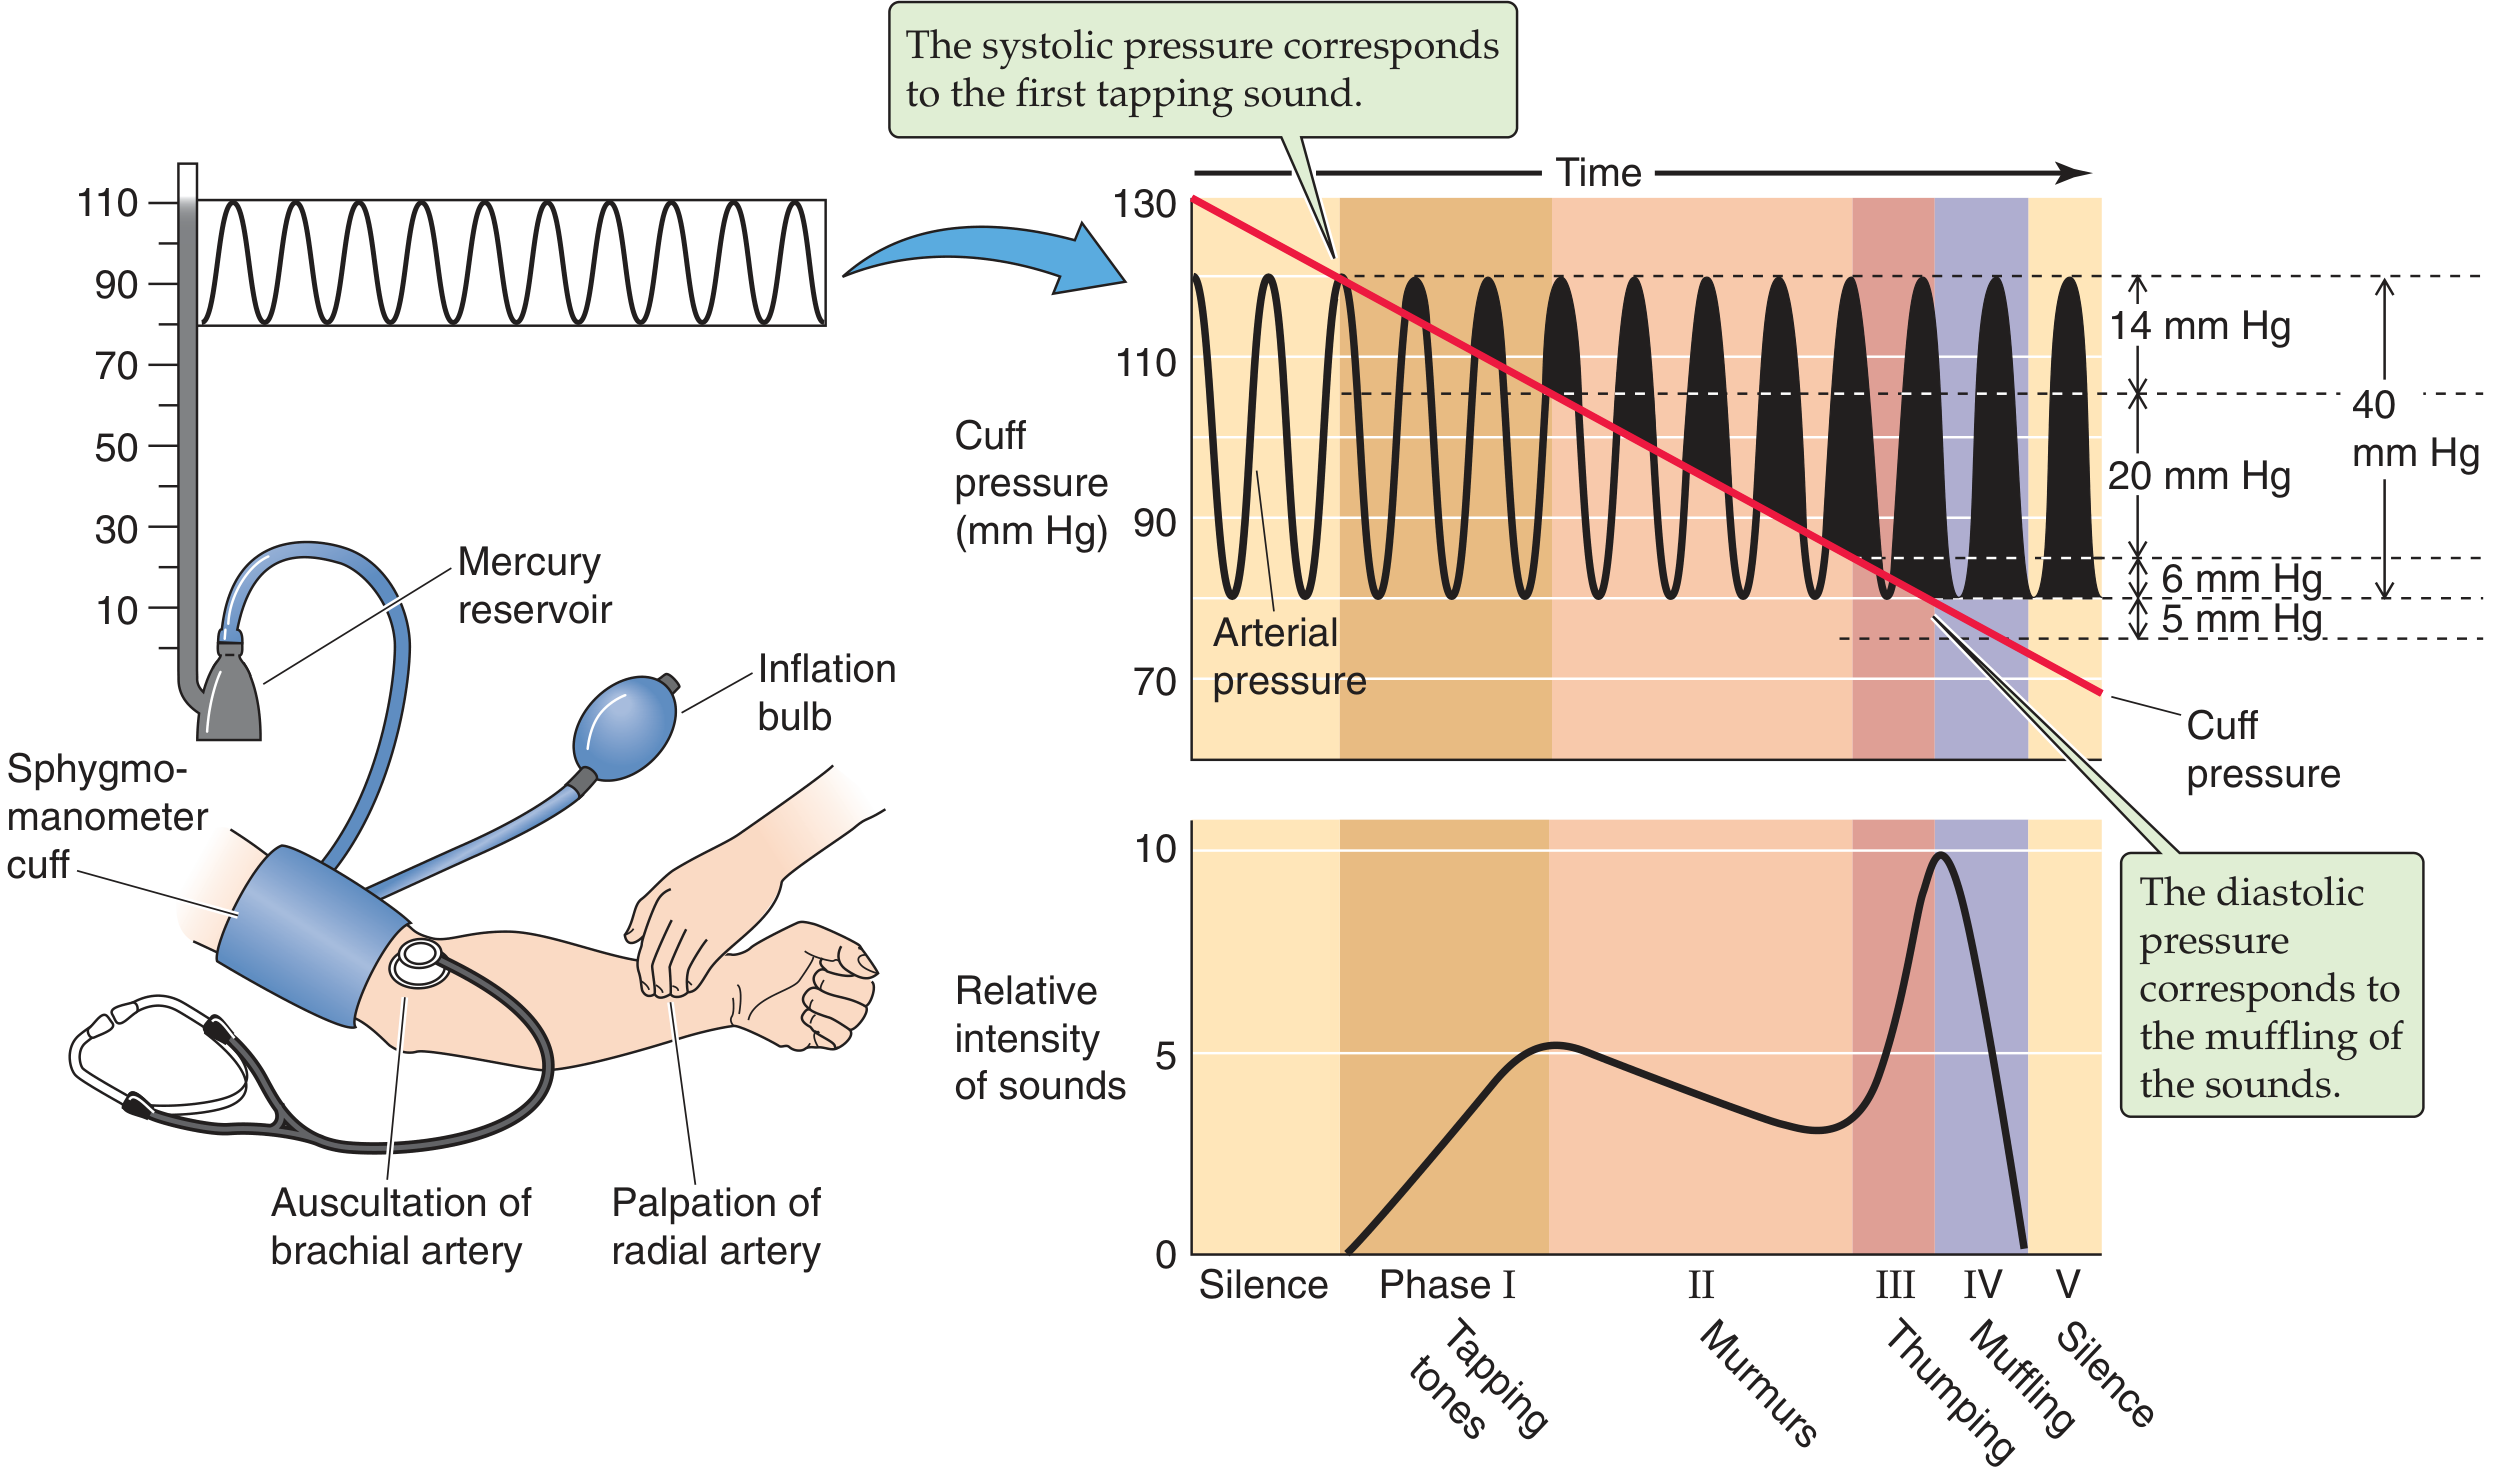
- Systolic BP: Note the pressure reading on the manometer when the first tapping sound (Phase I Korotkoff) is heard.
- Continue deflating. Listen through phases II and III.
- Diastolic BP: Note the pressure reading when the sounds become muffled (Phase IV) or completely disappear (Phase V) - record both if there is a discrepancy.
- Deflate the cuff completely. Wait at least 1-2 minutes before repeating.
- Take two readings and record the average. If values differ by >5 mmHg, take a third measurement.
- Repeat on the other arm at the first visit and record both.
Documentation
- Record as: SBP / DBP mmHg (e.g., 118/76 mmHg), noting which arm was used, subject's position, time, and any relevant conditions.
6. Observations / Results Table
| Parameter | Reading 1 | Reading 2 | Reading 3 (if needed) | Average |
|---|---|---|---|---|
| Systolic BP (mmHg) - Right arm | ||||
| Diastolic BP (mmHg) - Right arm | ||||
| Systolic BP (mmHg) - Left arm | ||||
| Diastolic BP (mmHg) - Left arm | ||||
| Heart rate (beats/min) | ||||
| Subject position | Sitting / Supine | |||
| Time of measurement | ||||
| Phase IV diastolic (if applicable) | ||||
| Phase V diastolic (if applicable) |
- Right arm: 118/76 mmHg (average of two readings)
- Left arm: 116/74 mmHg
- Heart rate: 72 bpm
- Both readings within 10 mmHg of each other (acceptable)
7. BP Classification
| Category | Systolic BP (mmHg) | Diastolic BP (mmHg) | |
|---|---|---|---|
| Normal | < 120 | and | < 80 |
| Elevated | 120-129 | and | < 80 |
| Stage 1 Hypertension | 130-139 | or | 80-89 |
| Stage 2 Hypertension | ≥ 140 | or | ≥ 90 |
8. Discussion
Physiological significance of the readings
Sources of error in sphygmomanometry
| Source of Error | Effect on Reading | How to Avoid |
|---|---|---|
| Cuff too small | Overestimates BP | Use correct cuff size |
| Cuff too loose | Overestimates BP | Apply snugly |
| Arm above heart level | Underestimates BP | Support at heart level |
| Arm below heart level | Overestimates BP | Elevate appropriately |
| Deflating too fast (>2-3 mmHg/sec) | Underestimates systolic, overestimates diastolic | Slow, steady deflation |
| Auscultatory gap not detected | Underestimates systolic | Use palpatory method first |
| Observer bias (digit preference) | Rounds to nearest 0 or 5 | Use automated device or blind recording |
| "White coat hypertension" | Overestimates true resting BP | Automated or home measurement |
| Recent exercise, caffeine, or stress | Overestimates resting BP | Ensure 5-minute rest |
The auscultatory gap
Clinical relevance
9. Precautions
- Ensure the manometer is at eye level and calibrated to zero before use.
- Never inflate the cuff beyond 200-220 mmHg unnecessarily; prolonged occlusion causes discomfort and petechiae.
- Allow a minimum 1-2 minute rest between repeated measurements on the same arm.
- Do not measure on an arm with an arteriovenous fistula, lymphedema, axillary node dissection, or IV line.
- Ensure the stethoscope is not pressed under the cuff (produces artefact sounds).
- Mercury sphygmomanometers must be stored upright and handled carefully to prevent mercury spillage (environmental hazard).
- Inform the patient about the procedure before starting.
10. Conclusion
11. References
- Guyton AC, Hall JE. Guyton and Hall Textbook of Medical Physiology. Elsevier; 2021. Chapter 15: Clinical Methods for Measuring Systolic and Diastolic Pressures.
- Boron WF, Boulpaep EL. Medical Physiology. Elsevier; 2017. Chapter 17: Blood Pressure Measurement by Sphygmomanometry.
- Barrett KE, Barman SM, Brooks HL, Yuan JX. Ganong's Review of Medical Physiology, 26th ed. McGraw-Hill; 2019. Chapter 31: Auscultatory Method.
- Loscalzo J et al. Harrison's Principles of Internal Medicine, 22nd ed. McGraw-Hill; 2025. Chapter 288: Blood Pressure Measurement.
- Tintinalli JE et al. Tintinalli's Emergency Medicine: A Comprehensive Study Guide. McGraw-Hill. Sphygmomanometry.
- Cheung AK et al. International consensus on standardized clinic blood pressure measurement: A call to action. Am J Med. 2023;136:438.
Note on the diagram above: The figure from Medical Physiology (Boron & Boulpaep) illustrates the complete sphygmomanometry process - the left side shows cuff placement and stethoscope position over the brachial artery, while the right graphs show the five phases of Korotkoff sounds plotted against cuff pressure (red line) declining from above systolic to below diastolic. Phase I (tapping) corresponds to systolic; Phase IV (muffling) corresponds to diastolic.