ndt techniques of 24 which i said before using those principles neck control trunk for balance sit to stand and everthing related to ndt in deatil
Reading File
Finding Sources
Finding Sources
Finding Sources
Finding Sources
The library does not contain a dedicated NDT/neurodevelopmental treatment rehabilitation textbook. I'll answer comprehensively from established clinical knowledge on NDT principles as they apply to the 24 key techniques you mentioned — neck control, trunk for balance, sit-to-stand, and all related concepts.
NDT (Neurodevelopmental Treatment) — 24 Principles Applied in Detail
What is NDT?
NDT (Bobath Concept / Neurodevelopmental Treatment) is a problem-solving approach used by physiotherapists, occupational therapists, and speech therapists primarily with patients who have central nervous system dysfunction (stroke, cerebral palsy, TBI, etc.).
Core philosophy: Normal movement cannot happen without normal postural tone, normal sensory processing, and proper proximal stability before distal mobility.
The 24 NDT Principles / Key Points of Control
GROUP 1 — POSTURAL TONE & INHIBITION
1. Normalization of Tone
- Hypertonia (spasticity) is inhibited; hypotonia is facilitated
- Before any functional movement, tone must be normalized
- Technique: slow rhythmic rotation, weight-bearing through affected limb, prolonged stretch
2. Reflex Inhibiting Patterns (RIPs) / Reflex Inhibiting Postures
- Positions and movements that break up abnormal synergy patterns
- Upper limb flexor synergy → inhibited by shoulder depression + external rotation + elbow extension + wrist dorsiflexion + finger extension
- Lower limb extensor synergy → inhibited by hip flexion + abduction + knee flexion + ankle dorsiflexion
3. Inhibition of Abnormal Postural Reactions
- Associated reactions (involuntary movement in affected limb during effort) are inhibited by reducing effort elsewhere
- Tone-inhibiting positioning is maintained throughout activity
GROUP 2 — KEY POINTS OF CONTROL (KPCs)
NDT uses proximal and distal key points to influence tone throughout the body.
4. Proximal Key Points of Control
- Head & neck — controls tone in the entire body (tonic neck reflexes)
- Shoulder girdle — influences upper limb tone and trunk
- Pelvic girdle — influences lower limb tone and trunk
5. Distal Key Points of Control
- Hand / thumb — web space of thumb → reduces UL flexor tone
- Foot — dorsiflexion of foot → reduces LL extensor tone
- Fingers and toes
GROUP 3 — NECK CONTROL
6. Head & Neck Control — Foundation of All Movement
- The head leads the body — all postural reactions begin with head righting
- Without neck control, trunk and limb control cannot be established
- Tonic neck reflexes (ATNR, STNR) must be integrated before voluntary control develops
7. Facilitation of Neck Righting
- Patient in supine → therapist rotates head → body follows segmentally
- Develops neck righting → body-on-body righting → full rolling
8. Neck Control in Sitting
- Patient sits with therapist behind
- KPC: therapist's hands on shoulders (proximal KPC)
- Facilitate head righting in all planes: anterior, posterior, lateral
- In lateral tilt → head rights vertically (labyrinthine righting response)
- In forward lean → head extends to right (optical righting)
9. Neck Control for Balance Reactions
- Tilting reactions: when body tilts, head rights, trunk curves, limb abducts on raised side
- Protective extension (parachute): head raises, arms extend forward/laterally/backward
- These are facilitated through controlled tilting on a tilt board or therapy ball
GROUP 4 — TRUNK CONTROL FOR BALANCE
10. Trunk as the Central Controller
- All balance reactions originate from the trunk
- Lateral trunk flexors, extensors, and rotators must be active for balance
- Core stability (deep stabilizers: transversus abdominis, multifidus, pelvic floor, diaphragm) is prerequisite for dynamic balance
11. Trunk Elongation and Shortening
- During weight shift to one side → ipsilateral trunk shortens, contralateral elongates
- NDT facilitates this through lateral weight shifts in sitting
- KPCs: shoulder girdle bilaterally or pelvis bilaterally
12. Trunk Rotation
- Dissociation of shoulder girdle and pelvic girdle is critical
- Facilitating trunk rotation: patient in sitting, therapist rotates shoulders against stable pelvis (or vice versa)
- Trunk rotation is prerequisite for reciprocal gait and functional reaching
13. Sitting Balance — Three Phases
- Static sitting: no external perturbation, patient holds position
- Dynamic sitting: therapist introduces controlled perturbations (anterior, posterior, lateral)
- Reactive sitting: unexpected perturbations elicit automatic postural reactions
14. Balance Reactions in Sitting
- Righting reactions: keep head/trunk upright against gravity
- Equilibrium (tilting) reactions: shift weight and adjust trunk curve and limb abduction
- Protective reactions: extend limb to prevent fall
15. Facilitation of Sitting Balance
- Patient on therapy plinth, feet flat (or on stool)
- Therapist sits behind or to the side
- KPC: bilateral pelvis → facilitate anterior pelvic tilt (lumbar extension) and posterior pelvic tilt
- Lateral weight shifts over each ischial tuberosity
- Forward weight shift: facilitates thoracic extension, posterior hip loading
GROUP 5 — SIT TO STAND (STS)
16. Biomechanical Prerequisites for Sit-to-Stand
- Forward trunk flexion (lean forward from hip, not lumbar spine)
- Anterior pelvic tilt
- Weight shift forward over feet
- Ankle dorsiflexion (tibia over foot)
- Symmetrical foot placement (hip width apart, feet slightly behind knees)
- Eccentric quadriceps control on descent, concentric on ascent
17. NDT Approach to Sit-to-Stand
- Prepare tone: normalize extensor tone in LL, inhibit extensor spasticity before STS
- Position patient at edge of plinth, hips slightly higher than knees (raises seat → easier STS)
- Feet flat, hip-width apart, slightly behind vertical of knee
18. Phases of Sit-to-Stand in NDT
- Phase 1 — Flexion-momentum: trunk forward lean over hip, pelvis tilts anteriorly, CoM shifts forward
- KPC: therapist's hands on pelvic crest bilaterally → guide anterior tilt + weight shift forward
- Phase 2 — Momentum transfer: CoM passes forward over BOS, hip/knee extension begins
- Therapist: hands remain on pelvis, guides vertical rise
- Phase 3 — Extension: full hip and knee extension, upright standing achieved
- Ensure symmetrical weight bearing through both LL
19. Common Problems in STS and NDT Correction
- Extensor thrust: patient pushes back into extension → inhibit by slowing movement, maintaining forward trunk lean, reduce seat height gradually
- Asymmetrical weight bearing: affected LL unloaded → use mirror feedback + facilitation through affected side pelvis/knee
- Posterior trunk lean: due to hip flexor tightness or poor anterior pelvic tilt → facilitate trunk lean with hand on sternum guiding forward
- Circumduction at hip: due to extensor synergy → inhibit before STS using RIPs
- Knee collapse (valgus): weak hip abductors → KPC at knee or use hand to guide knee alignment over 2nd toe
20. Stand-to-Sit (Eccentric Control)
- Reverse of STS: controlled lowering requires eccentric quadriceps
- Patient prone to drop rapidly → therapist uses pelvic KPC to slow descent
- Facilitate anterior trunk lean during lowering (same as STS Phase 1 in reverse)
GROUP 6 — FACILITATION TECHNIQUES
21. Handling Techniques
- Tapping: quick light tap on muscle belly → increases tone, facilitates muscle activation
- Pressure: sustained pressure on tendon/bone → decreases tone
- Compression: axial loading through joint → stimulates co-contraction and joint stability (e.g., through shoulder or knee during weight bearing)
- Placing: therapist moves limb into position, then removes support gradually → patient learns to hold (co-contraction)
- Holding: patient holds a position against gravity; therapist gives minimal assistance
22. Weight Bearing and Proprioceptive Stimulation
- Affected UL weight bearing (e.g., hand flat on plinth beside patient) → reduces spasticity, improves proprioception, stimulates extensor tone in hypotonic limb
- Affected LL weight bearing in standing → stimulates extensor tone, activates postural muscles
- Vibration over tendon → facilitates muscle (Tonic Vibration Reflex)
23. Developmental Sequence in NDT
NDT follows the cephalocaudal and proximal-to-distal principle:
| Level | Position | Key Activity |
|---|---|---|
| 1 | Supine | Head control, rolling, ATNR inhibition |
| 2 | Prone on elbows | Head/neck extension, shoulder girdle stability |
| 3 | Four-point kneeling | Trunk co-contraction, weight shifting |
| 4 | Kneeling | Hip extension, trunk balance |
| 5 | Half-kneeling | Hip/trunk dissociation |
| 6 | Sitting | Trunk balance, equilibrium reactions |
| 7 | Sit to stand | Full LL loading |
| 8 | Standing / Gait | Dynamic balance, reciprocal movement |
GROUP 7 — SPECIFIC NDT TECHNIQUES (Points 24)
24. Specific NDT Activities Summary
| Technique | Purpose | Key Points |
|---|---|---|
| Bridging | Pelvic control, LL loading, trunk stabilization | Supine, feet flat, lift pelvis; use tapping on glutes |
| Rolling | Trunk rotation, ATNR inhibition, bed mobility | Facilitate with shoulder or pelvis KPC |
| Prone on elbows | Neck/shoulder stability, antigravity head control | Weight bearing through UL, cervical extension facilitated |
| Quadruped rocking | Trunk co-contraction, proprioception | Rock forward/back; lateral weight shifts |
| Kneeling balance | Hip extension, trunk stability | Tilt board or manual perturbation |
| Half-kneeling → stand | Transitional movement, LL dissociation | Affected foot forward (more challenging) |
| Step-up / step-down | Eccentric/concentric LL, dynamic balance | Controlled speed, therapist at pelvis |
| Weight shifting in standing | Dynamic balance, gait preparation | Lateral, anterior-posterior shifts |
| Trunk rotation in standing | Gait dissociation, reaching | Shoulder-over-pelvis rotation facilitation |
| Gait facilitation | Reciprocal gait pattern | Pelvic facilitation: forward, rotation with each step |
Summary of Core NDT Sequence for a Typical Patient
1. Assess tone → normalize (inhibition or facilitation)
2. Supine: inhibit ATNR, facilitate head control
3. Rolling: trunk rotation, transitional movement
4. Sitting: establish balance reactions (righting → tilting → protective)
5. Neck control in sitting: all planes
6. Trunk control: lateral shifts, rotation, elongation/shortening
7. STS: prepare pelvis, guide through 3 phases
8. Standing balance: static → dynamic → reactive
9. Gait preparation: weight shifting, step practice
10. Functional activities: incorporate all above into daily tasks
Key NDT Principles to Remember
| Principle | Meaning |
|---|---|
| Proximal before distal | Stabilize trunk before training hands/feet |
| Normal movement quality | Avoid compensatory patterns |
| Sensory feedback is motor input | Tactile/proprioceptive handling drives learning |
| Task-specific practice | Functional goals embedded in every activity |
| Handling fades over time | Move from full facilitation → guidance → independence |
| 24-hour postural management | NDT principles apply to positioning, transfers, all activities — not just therapy sessions |
This covers all 24 NDT techniques/principles centered on neck control, trunk for balance, sit-to-stand, and related neurodevelopmental concepts in clinical practice. If you want deeper detail on any specific technique, facilitation level, or application to a specific diagnosis (e.g., stroke, CP, TBI), ask and I'll expand on it.
using ndt explain 1sr for neck control how to do demonstaree
Finding Sources
Finding Sources
Searching Images
NDT neck control facilitation physiotherapy demonstration
Loading Image
Loading Image
Loading Image
Here is a full step-by-step NDT demonstration for Neck Control — the very first and foundational skill in the NDT developmental sequence.
NDT — Neck Control: Step-by-Step Demonstration
Why neck control comes first: In NDT, the head is the key proximal control point for the entire body. Tonic neck reflexes (ATNR, STNR) dominate if neck control is absent, making all other voluntary movement impossible. You must establish head/neck control before trunk, sitting, or standing work.
STAGE 1 — SUPINE: Establishing Basic Head Control
Setup
- Patient lies supine on a firm therapy mat/plinth
- Therapist kneels or sits at the head end
Step-by-Step
Step 1 — Assess tone first
- Passively move the head side to side, flex and extend
- Feel for: rigidity (hypertonia), floppiness (hypotonia), or ATNR dominance (head turning causes arm extension on face side)
Step 2 — Inhibit ATNR (if present)
- Keep head in midline — this is mandatory before any movement
- KPC: Place both hands gently on the patient's head/temporal regions
- Hold head centered for 10–15 seconds until tone normalizes
Step 3 — Facilitate head righting in supine
- Slowly rotate the head to one side
- Observe: does the body follow segmentally (neck righting response)?
- If absent → gently rotate head → wait → assist shoulder to follow → then pelvis (teaching segmental rolling)
STAGE 2 — PRONE ON ELBOWS: Antigravity Neck Extension
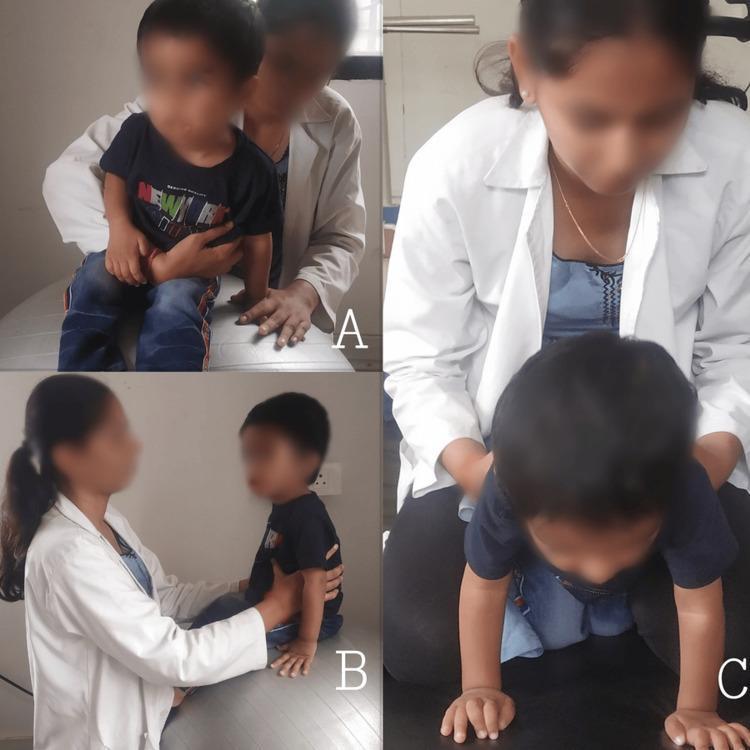
This is shown in the clinical images below — the foundational position for neck extensor strengthening.
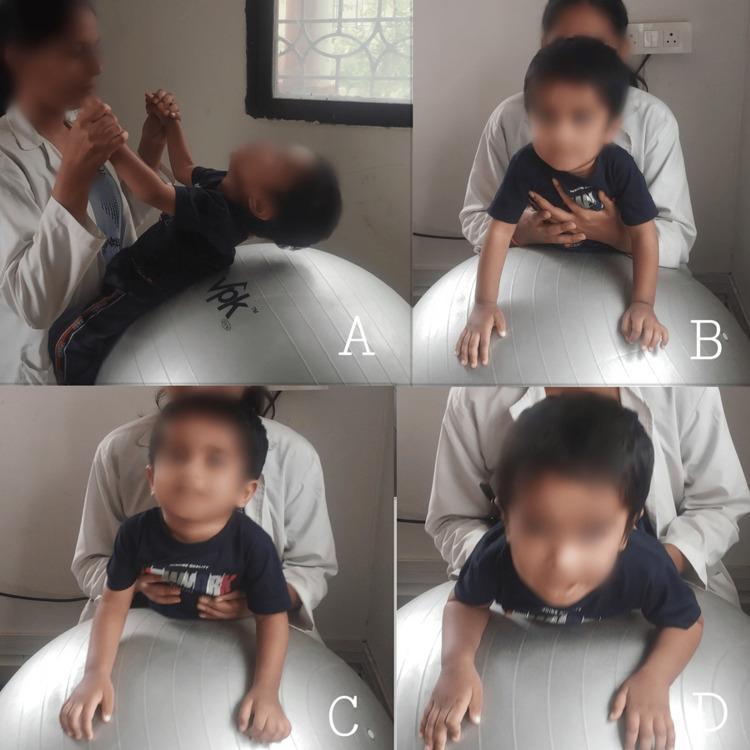
Panel A — Supine on ball: therapist holds hands, child lifts head (neck flexors working against gravity)
Panel B — Prone on elbows on ball: therapist supports chest, head extends (neck extensors activated)
Panel C — Prone on hands: increased challenge, more neck extension required
Panel D — Full neck extension with scapular retraction: highest antigravity challenge
Step-by-Step — Prone on Elbows
Step 1 — Position
- Patient prone, elbows directly under shoulders, forearms flat
- Therapist in front of patient, face-to-face
Step 2 — KPC: Shoulder girdle
- Place hands on bilateral shoulder girdle (posterior surface)
- Apply gentle downward compression → stimulates co-contraction → stabilizes the base so the head can move freely
Step 3 — Facilitate head lift
- Use a visual target (bright toy, mirror) held at eye level
- Patient attempts to lift and hold head against gravity
- If unable → therapist places one hand under chin, gives minimal assistance, then removes gradually
Step 4 — Grading the assistance
| Level | Therapist Action |
|---|---|
| Full assist | Therapist supports full head weight |
| Partial | Therapist gives light upward pressure under occiput |
| Minimal | Therapist only provides tactile cue on occiput |
| Independent | Patient holds head 3–5 seconds without support |
STAGE 3 — ON PHYSIOBALL: Dynamic Neck Control
This is the most powerful tool in NDT for neck control.
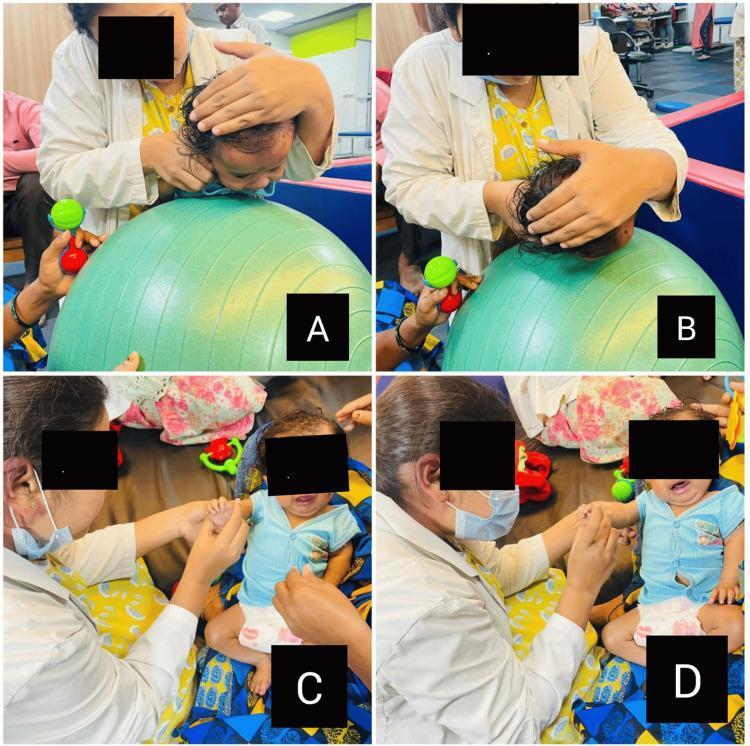
Panel A & B — Therapist manually supports and guides the head over the ball to facilitate cervical strengthening in flexion/extension
Step-by-Step — Ball Work
Step 1 — Position on ball (prone)
- Drape patient prone over the physioball
- Hips and chest supported by ball, arms hanging or on floor
- Therapist stands behind or to the side
Step 2 — KPC: Therapist's hands on occiput/parietal region
- Hands cup the head gently — do NOT grip tightly
- Feel the tone in the neck muscles through your hands
Step 3 — Slow forward tilt of ball
- Tilt ball gently forward → head drops into flexion (gravity-assisted)
- Then bring ball back → patient must extend head to keep it level
- This is eccentric–concentric neck extensor training
Step 4 — Lateral tilts on ball
- Tilt ball to the right → head should right itself to vertical (labyrinthine righting)
- If head falls with the body → patient has absent righting reaction → provide gentle facilitation to bring head to upright
Step 5 — Rolling off ball (advanced)
- Ball tilted further → elicits protective extension of head and arms
STAGE 4 — SUPPORTED SITTING: Neck Control for Balance
Panels C & D — Neck control: flexion (head tucked) vs. extension on the ball
Panel E — Progression to quadruped on ball for trunk + neck combined stability
Step-by-Step — Neck Control in Sitting
Step 1 — Position
- Patient sits on plinth or therapist's lap (for child)
- Feet flat on floor or footstool
- Therapist sits behind the patient
Step 2 — KPC: Bilateral shoulder girdle
- Therapist places both hands on the patient's shoulders
- Provides gentle postural support — enough to free the head to move
Step 3 — Lateral neck righting
- Therapist gently tilts patient's trunk to the right (by depressing right shoulder)
- Head should right itself to vertical → labyrinthine righting response
- If absent → therapist uses one hand to gently guide head to vertical while other hand tilts trunk
Step 4 — Anterior neck control
- Therapist gently tilts trunk forward
- Patient must extend neck to keep head upright (optical righting, labyrinthine)
- Use a mirror in front so patient gets visual feedback
Step 5 — Posterior neck control
- Therapist slightly tilts trunk backward
- Patient must flex neck to bring head forward
- Watch for: head falling straight back (poor flexor control) vs. chin tucking first (normal)
Step 6 — Head rotation (dissociation)
- Head rotates independently of trunk
- KPC: hold trunk stable at shoulders → ask patient to look left, then right
- This is critical for visual tracking and eventually for gait
Summary — NDT Neck Control Progression
LEVEL 1 → Supine: midline head hold, ATNR inhibition
     ↓
LEVEL 2 → Prone on elbows: antigravity neck extension
     ↓
LEVEL 3 → Physioball prone: dynamic flexion/extension, righting reactions
     ↓
LEVEL 4 → Supported sitting: lateral righting, anterior/posterior control
     ↓
LEVEL 5 → Unsupported sitting: head control with trunk perturbations
     ↓
LEVEL 6 → Standing: head control integrated into gait and functional movement
Key NDT Handling Rules for Neck Control
| Rule | Why |
|---|---|
| Always start with midline head position | Inhibits ATNR domination |
| Normalize tone BEFORE movement | Abnormal tone prevents normal movement patterns |
| Use slow rhythmic movements | Slow = inhibitory; fast = facilitatory |
| Give minimal assistance | Over-assistance prevents active muscle recruitment |
| Use visual and auditory targets | Drives voluntary head movement (optical righting) |
| Always work proximal first (shoulder KPC) | Stable base allows free head movement |
| 24-hour management | Positioning in pram, car seat, sleep must maintain head midline |
If you want, I can now move to Stage 2 — Trunk Control for Balance in the same step-by-step demonstration format, or go deeper into any specific level of neck control above.
2nd for trunk control
Searching Images
NDT trunk control facilitation sitting balance physiotherapy
Loading Image
Loading Image
Loading Image
NDT — 2nd: Trunk Control for Balance — Step-by-Step Demonstration
Why trunk control is second: After neck control is established, the trunk becomes the next foundation. All limb movements, balance reactions, and functional activities (including sit-to-stand) require a stable, mobile trunk. In NDT, trunk control = the ability to stabilize AND move the trunk selectively — not just hold stiffly.
CORE NDT CONCEPT: What "Trunk Control" Actually Means
| Component | What it means |
|---|---|
| Trunk elongation | The side you weight-bear on lengthens (lateral flexors eccentrically control) |
| Trunk shortening | The side you unload shortens (lateral flexors concentrically activate) |
| Trunk rotation | Shoulder girdle and pelvic girdle move independently (dissociation) |
| Co-contraction | Flexors + extensors work together for stability |
| Selective activation | Patient can activate one part without the whole body stiffening |
STAGE 1 — SUPINE / BRIDGING: Trunk & Pelvic Foundation
Before sitting work, pelvic control is built in supine.
Bridging
Step 1 — Position
- Patient supine, knees bent, feet flat hip-width apart
- Therapist kneels beside at pelvis level
Step 2 — KPC: Bilateral iliac crests
- Therapist places both hands on the pelvic crests
- Feels the asymmetry: does one side lift more? Does pelvis rotate?
Step 3 — Facilitate pelvic lift
- Cue: "Press your feet into the floor and lift your bottom"
- Therapist guides: equal upward lift through both hands on iliac crests
- If one side lags (common on affected side in hemiplegia) → apply upward pressure on that side
Step 4 — Hold and grade
| Grade | Task |
|---|---|
| 1 | Lift pelvis with both therapist hands guiding |
| 2 | Lift with one hand on affected side only |
| 3 | Hold bridged position independently for 5–10 sec |
| 4 | Hold bridge + therapist introduces perturbation (gentle push) |
| 5 | Single-leg bridge (affected leg alone) |
NDT principle: Bridging activates hip extensors (glutes), hamstrings, and lumbar extensors — the posterior chain needed for upright sitting and standing.
STAGE 2 — SUPPORTED SITTING: Building Trunk Stability
Setup
- Patient sits on firm plinth, edge of bed, or therapy mat
- Feet flat on floor (use a footstool if needed — feet must be grounded)
- Hips and knees at 90°
- Therapist sits behind or to the side of the patient
STEP 1 — Establish Neutral Pelvis (Anterior Pelvic Tilt)
This is the single most important step before any trunk activity.
How to do it:
- KPC: Therapist places both hands on bilateral iliac crests (pelvic KPC)
- Guide pelvis into anterior tilt — lumbar spine comes into mild lordosis, trunk lifts tall
- Cue: "Sit tall, let your back arch slightly, chest forward"
- Common error in hemi patients: posterior pelvic tilt, trunk collapses into flexion — always correct this FIRST
NDT rule: You cannot build trunk control on a posteriorly tilted pelvis. The pelvis is the foundation of the trunk.
STEP 2 — Lateral Weight Shifting (Most Important Trunk Control Exercise)
This is shown in the NDT-TCE clinical image below:
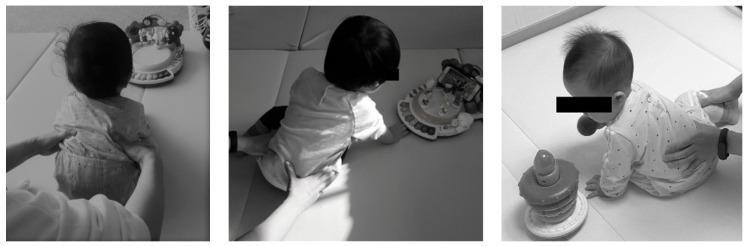
Stage 1 (Left photo): Therapist supports bilaterally at mid-trunk → patient sits upright with toy at midline → building static sitting balance
Stage 2 (Middle photo): Therapist supports at lower trunk → patient reaches sideways → lateral weight shift with trunk elongation on the weight-bearing side
Stage 3 (Right photo): Patient reaches diagonally → trunk rotation — the most advanced stage
Step-by-Step — Lateral Weight Shift:
Step 1
- Therapist's hands: one on each iliac crest (bilateral pelvic KPC)
- Gently shift patient's weight onto the RIGHT ischial tuberosity
- Patient should feel RIGHT buttock loading into the plinth
Step 2 — Observe trunk response
- Normal response: RIGHT trunk elongates (lengthens), LEFT trunk shortens
- Abnormal: whole trunk tips like a rigid block with no lateral curve → needs facilitation
Step 3 — Facilitate elongation (if absent)
- Therapist's right hand: on right iliac crest pushing DOWN (loading)
- Therapist's left hand: on left ribcage, gently LIFTING upward to encourage left shortening
- This creates the lateral curve artificially until the patient's muscles learn it
Step 4 — Grade the activity
- Add a reach: place a toy/object to the RIGHT → patient reaches right → weight naturally shifts right
- Then place object to LEFT → patient reaches left → weight shifts left
- Reaching is the most natural way to drive trunk weight shifting
STEP 3 — Anterior Weight Shift (Forward Lean)
Step 1 — Position
- Patient sitting, therapist behind with hands on iliac crests or bilateral shoulders
Step 2 — Guide forward
- Guide trunk forward from hip joint (NOT lumbar spine)
- Anterior pelvic tilt must be maintained throughout — watch for lumbar rounding
- Cue: "Lean forward from your hips, not your back"
Step 3 — Hold and return
- Patient holds forward lean 3–5 seconds
- Returns to upright under control (eccentric trunk extensors)
- This directly prepares for sit-to-stand Phase 1 (momentum phase)
This is shown in the clinical image below — trunk forward lean with bilateral arm reach:
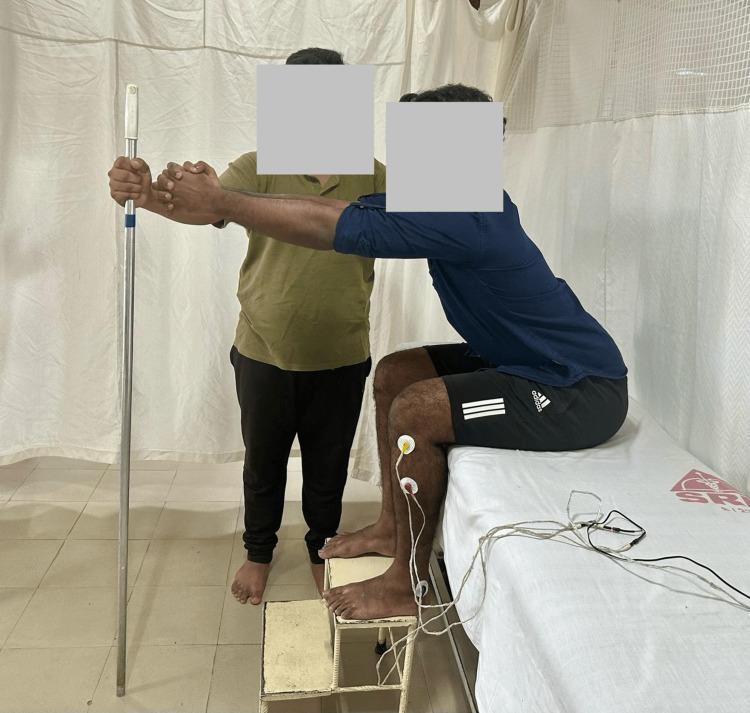
Patient seated at edge of bed, feet flat, reaching forward with both arms toward a target — this is anterior trunk control combined with upper limb extension.
STEP 4 — Trunk Rotation (Dissociation)
This is the highest-level trunk control skill in sitting.
Step 1 — Stabilize pelvis
- Therapist sits in front of patient (or to side)
- KPC: hands on bilateral iliac crests — hold pelvis STILL
Step 2 — Facilitate shoulder girdle rotation
- Ask patient to turn shoulders to the right while pelvis stays forward
- Therapist's hands on iliac crests RESIST any pelvic rotation
- Observe: can the patient rotate shoulders independently of pelvis?
Step 3 — Reverse: stabilize shoulders, rotate pelvis
- Therapist now holds bilateral shoulder girdle stable
- Ask patient to rotate pelvis/hips to the right
- This dissociation = prerequisite for reciprocal gait
STAGE 3 — DYNAMIC SITTING ON PHYSIOBALL: Reactive Trunk Control
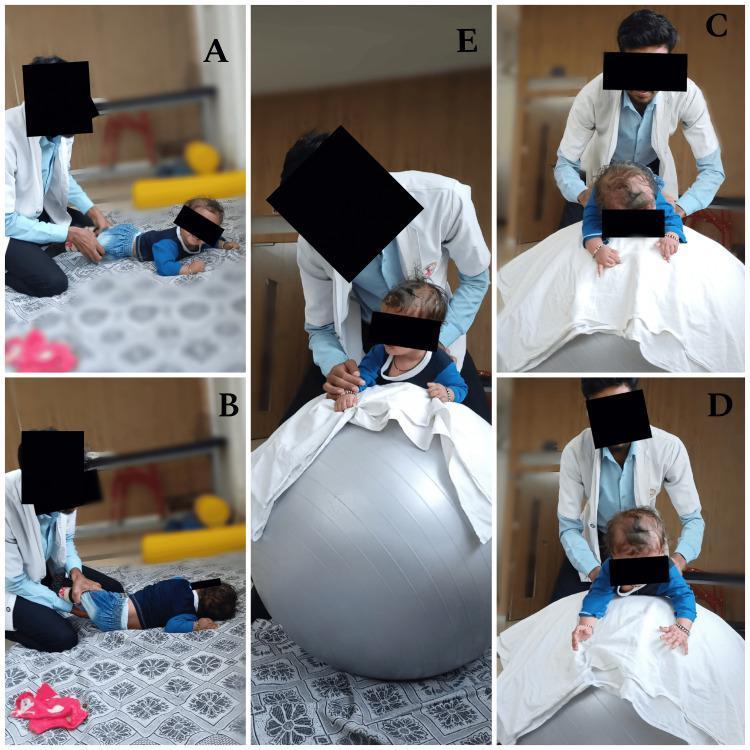
Panel A — Therapist behind patient on plinth: hands at pelvis/lower trunk → facilitating unilateral weight shifts (lateral trunk control)
Panel B — Patient sitting on physioball: dynamic surface challenges equilibrium reactions automatically; therapist provides lateral support
Panel C — Quadruped on mat: advanced trunk co-contraction with upper limb weight bearing
Step-by-Step — Physioball Sitting
Step 1 — Position
- Patient sits on ball, feet flat, hip-width apart
- Ball size: hips = 90°, knees = 90°
- Therapist stands to the side or behind
Step 2 — Controlled ball movements
- Gently roll ball forward → patient's trunk must extend to maintain upright
- Roll ball backward → patient's trunk must flex to maintain balance
- Roll ball left/right → trunk lateral righting reactions triggered automatically
Step 3 — Therapist facilitation
- KPC: hands on bilateral iliac crests OR bilateral shoulder girdle
- Use slow rhythmic perturbations — ball is already doing the work
- Grade: begin with small controlled movements → progress to unexpected perturbations
NDT principle: The unstable surface of the ball continuously stimulates postural reactions without the therapist having to manually perturb — the ball IS the facilitation tool.
STAGE 4 — BALANCE REACTIONS IN SITTING (3 Types)
| Reaction | Stimulus | Normal Response | NDT Facilitation |
|---|---|---|---|
| Righting | Trunk tilted | Head rights to vertical | Tilt trunk via shoulder KPC; guide head if needed |
| Equilibrium (Tilting) | Weight shifted | Trunk curves, arm abducts on raised side | Controlled lateral tilt; feel for arm abduction |
| Protective (Saving) | Fast unexpected tilt | Arm extends to floor to prevent fall | Fast lateral push; therapist stands ready to catch |
Sequence to use in treatment:
- Start with righting reactions (slowest, most controlled)
- Progress to tilting/equilibrium reactions (medium speed)
- Finally introduce protective reactions (fast, functional)
Full Trunk Control Progression in NDT
LEVEL 1 → Bridging (supine): pelvic control, posterior chain
     ↓
LEVEL 2 → Supported sitting: neutral pelvis, static hold
     ↓
LEVEL 3 → Lateral weight shifts: elongation + shortening
     ↓
LEVEL 4 → Anterior weight shift: forward lean from hip
     ↓
LEVEL 5 → Trunk rotation: dissociation of shoulder/pelvic girdle
     ↓
LEVEL 6 → Perturbations: righting → tilting → protective reactions
     ↓
LEVEL 7 → Physioball: dynamic reactive trunk control
     ↓
LEVEL 8 → Sitting + reaching: functional integration
     ↓
LEVEL 9 → Transition to SIT-TO-STAND
Key NDT Handling Rules for Trunk Control
| Rule | Why |
|---|---|
| Fix pelvis in neutral FIRST | Posterior pelvic tilt collapses the trunk — nothing works on this base |
| Use pelvic KPC for trunk work | Pelvis drives everything above it |
| Elongation is as important as shortening | Both sides of the trunk must work — not just the weak side |
| Never allow compensatory trunk lean | Patient must move from the trunk, not substitute with head or arms |
| Slow = inhibitory, Fast = facilitatory | Match speed to the tone problem |
| Functional tasks drive trunk control | Reaching, playing, dressing — embed in every activity |
Ready for 3rd — Sit to Stand (STS) with the same step-by-step NDT demonstration? That directly builds on this trunk control work.
This is a shared conversation. Sign in to Orris to start your own chat.