
hi
emergency medical services
What would you like to know about Emergency Medical Services?
Which area of EMS protocols or procedures are you interested in?
EMS prehospital airway management protocols 2024 2025
EMS Airway Management
1. When to Intervene - The Decision to Intubate
- Failure to maintain or protect the airway - inability to keep a patent airway, pooling secretions, absent swallowing, or easy tolerance of an oral airway
- Failure of ventilation or oxygenation - hypoxia or hypercarbia not correctable by other means
- Anticipated clinical deterioration - conditions expected to worsen (e.g., rising GCS, progressive edema, cervical spine injury above C3)
Note: The gag reflex is NOT a reliable indicator of airway protection - it is absent in 12-25% of normal adults. The patient's ability to handle secretions and level of consciousness are more reliable guides.
2. The Main Airway Decision Algorithm
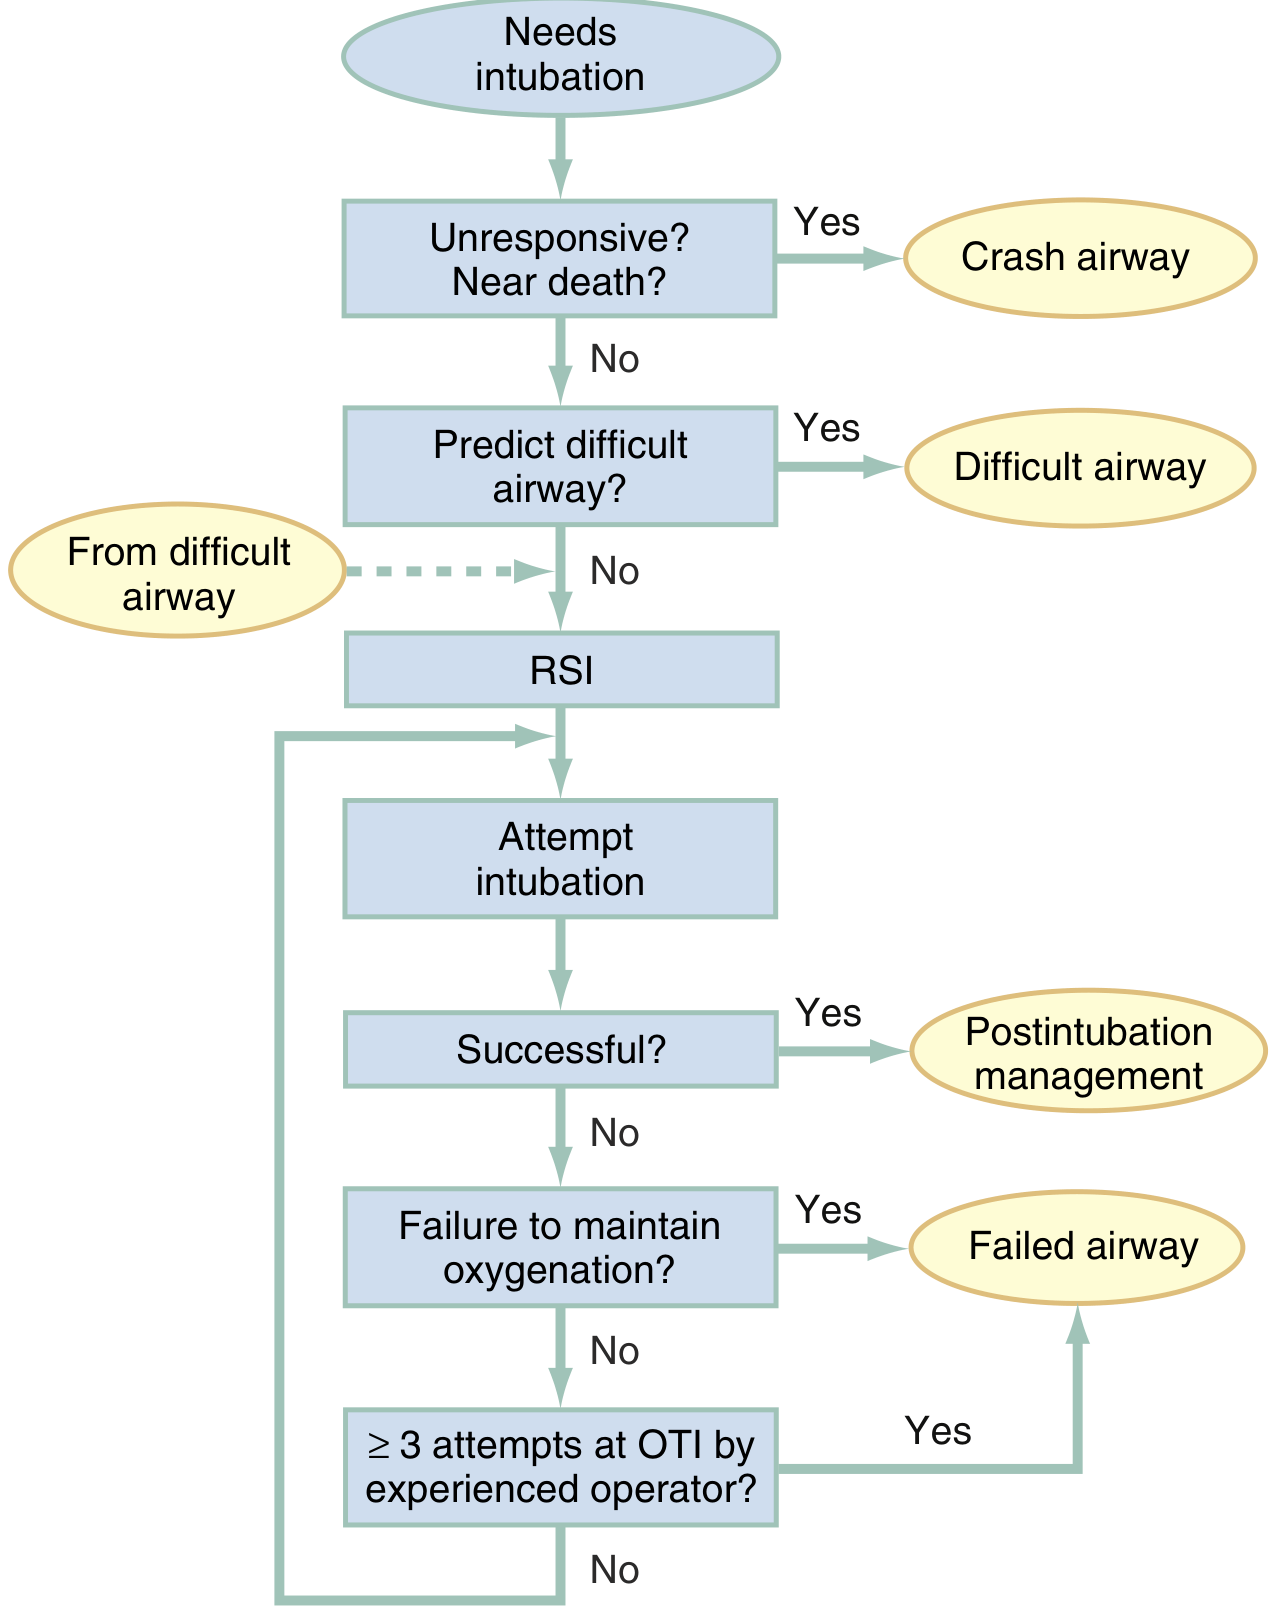
| Scenario | Approach |
|---|---|
| Agonal/unresponsive/near-death | Crash Airway - immediate laryngoscopy, no drugs initially |
| Predicted difficult airway | Difficult Airway Algorithm - awake techniques, video laryngoscopy |
| Neither of above | RSI - drug-assisted intubation |
3. Crash Airway
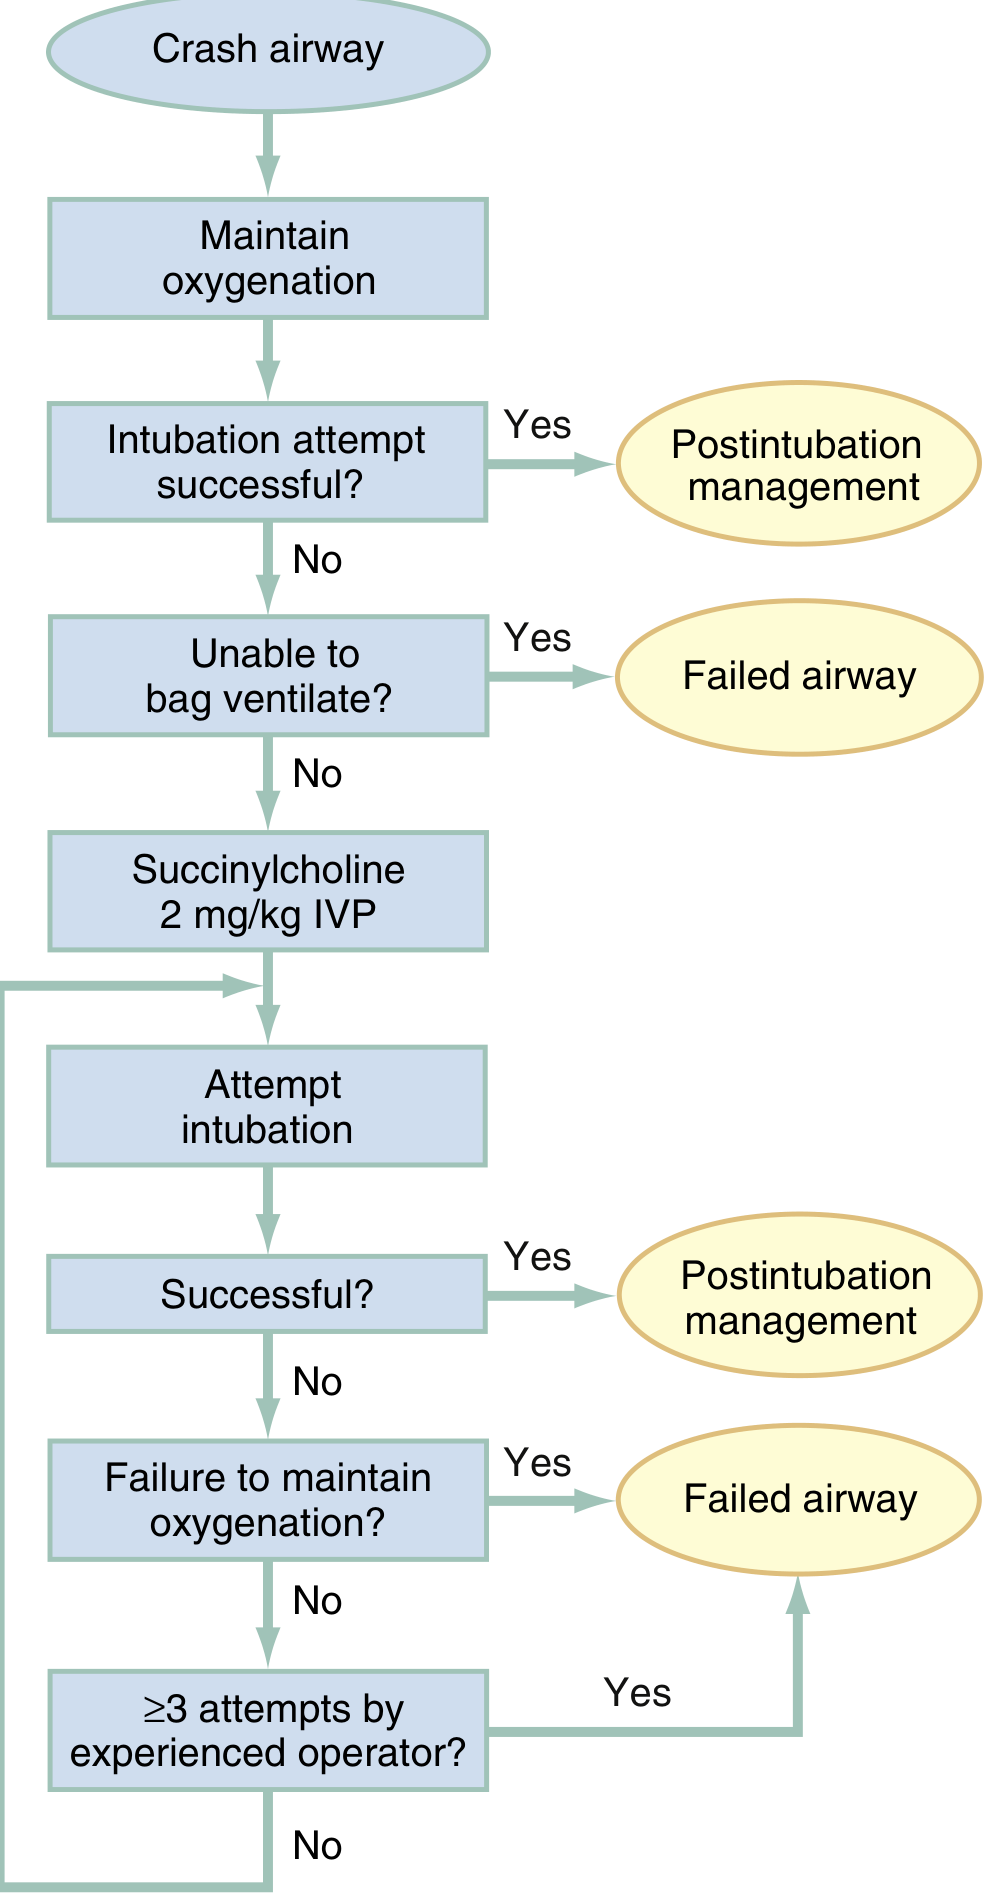
- Attempt immediate laryngoscopy without drugs
- If first attempt fails and patient is not relaxed enough: succinylcholine 2 mg/kg IV push (higher dose to compensate for impaired circulation in arrest)
- If unable to bag-mask ventilate after failed intubation → Failed Airway protocol (cricothyrotomy)
4. Rapid Sequence Intubation (RSI) - The Gold Standard
| Step | Action |
|---|---|
| 1. Preparation | IV access, monitoring (cardiac, SpO2, ETCO2), assemble equipment and backup devices |
| 2. Preoxygenation | 100% O2 for 3 min (or 4 maximal vital capacity breaths) - creates 6-8 min apneic reserve in healthy patients; apply nasal cannula at 15 L/min for apneic oxygenation (NO DESAT technique) |
| 3. Pretreatment | Lidocaine, fentanyl, or atropine 2-3 min before induction (based on clinical scenario - e.g., fentanyl for head injury to blunt ICP rise) |
| 4. Paralysis + Induction | Sedative agent first (induction), then immediately followed by neuromuscular blocking agent |
| 5. Placement | Orotracheal intubation under video laryngoscopy (preferred) or direct laryngoscopy |
| 6. Postintubation Mgmt | Confirm position with ETCO2 + auscultation + CXR; initiate sedation/analgesia |
RSI Drug Selection
| Drug Class | Agent | Notes |
|---|---|---|
| Induction (sedative) | Etomidate | Used in >90% of RSIs; hemodynamically stable |
| Ketamine | Preferred in hypotension or bronchospasm | |
| Propofol | Used where hypotension risk is lower | |
| Paralytic (NMBA) | Succinylcholine | Fast onset/offset; contraindicated in hyperkalemia, burns >48h, crush injuries >5 days |
| Rocuronium | Fewer adverse effects, longer duration; can be reversed with sugammadex |
5. Video Laryngoscopy (VL)
6. Tube Placement Confirmation
- End-tidal capnography (waveform preferred over colorimetric)
- Bilateral auscultation
- Chest X-ray for tube depth
7. The Failed Airway
- CI:CO (can't intubate, can't oxygenate) - SpO2 falling despite optimal BMV
- Three best attempts by an experienced operator have failed
8. Special EMS Considerations
- Injuries above C3 can cause rapid respiratory paralysis; lower injuries can ascend
- Associated airway obstruction from retropharyngeal hemorrhage, edema, or maxillofacial trauma is common
- Use manual in-line stabilization (MILS) during laryngoscopy
- Choose induction agents that minimize hypotension (avoid propofol in hypotensive trauma - prefer ketamine)
- (Rosen's EM, p. 445)
- Success rates reach 92-98% with a full drug complement
- EGDs (supraglottic airways) are widely used in prehospital systems for rescue oxygenation
- ETCO2 monitoring during transport is standard of care
9. Difficult Airway Prediction Tools
- LEMON (Look externally, Evaluate 3-3-2 rule, Mallampati, Obstruction, Neck mobility) - predicts difficult laryngoscopy
- ROMAN - predicts difficult BVM ventilation
- RODS - predicts difficult extraglottic device use
- SMART - predicts difficult surgical airway
Search for recent EMS protocol updates on RSI complications
rapid sequence intubation prehospital complications
prehospital RSI adverse events EMS outcomes
EMS RSI protocol updates 2024 2025 complications guidelines
ento trachial tube 1.definition 2.medical name Others name alls 3.pathophysiology 1line 4.indications 5.contraindications 6.complications 7.types and parts with picture 8.parts of use and parts anatomy place ment 9.size and colour 10.measurement adult Pediatric Infant 11.sterilization method 1 line 12.procedure 10steps 13.after further management
endotracheal tube types parts sizes adult pediatric infant procedure
endotracheal tube parts anatomy diagram sterilization method complications indications
https://derangedphysiology.com/main/required-reading/intensi…
A detailed medical diagram of an endotracheal tube (ETT) showing all labeled parts: 15mm connector (adapter) at the proximal end, tube body (transparent PVC), centimeter markings along the tube, Murphy's eye (side hole near tip), beveled distal tip, high-volume low-pressure cuff, cuff inflation line, pilot balloon, one-way valve, and radio-opaque line. Clean white background, professional medical illustration style with clear text labels and arrows pointing to each part.
Medical diagram showing correct anatomical placement of an endotracheal tube in the human airway. Cross-section view showing: oral cavity, tongue, epiglottis, vocal cords (glottis), trachea, carina, right and left main bronchi, and the ETT tube passing through the mouth, past the vocal cords, with the cuff inflated just below the vocal cords, tube tip 2-3 cm above the carina. Labels pointing to each structure. Professional medical illustration on white background.
ENDOTRACHEAL TUBE (ETT) - Complete Reference Guide
1. DEFINITION
2. MEDICAL NAME & OTHER NAMES
| Term | Details |
|---|---|
| Medical / Official Name | Endotracheal Tube (ETT) |
| Also Called | Tracheal tube, ET tube, breathing tube |
| Orotracheal tube | Inserted via mouth |
| Nasotracheal tube | Inserted via nose |
| Cuffed ETT | Has inflatable cuff to seal trachea |
| Uncuffed ETT | No cuff (used in small children/neonates) |
| Armoured / Reinforced tube | Spiral metal wire embedded to prevent kinking |
| Double-lumen tube (DLT) | Two lumens for independent lung ventilation |
| RAE tube | Pre-formed oral/nasal tube (Ring-Adair-Elwyn) |
| Microlaryngeal tube (MLT) | Long thin tube for laryngeal surgery |
| Laser-safe tube | Metal-wrapped, resistant to laser ignition |
3. PATHOPHYSIOLOGY (1 Line)
4. INDICATIONS
- GCS ≤ 8 (unable to protect airway)
- Loss of consciousness / coma
- Absent gag reflex with pooling secretions
- Angioedema, epiglottitis, facial/neck trauma
- Respiratory failure (hypoxia not correctable by mask O2)
- Hypercarbia / respiratory acidosis
- Apnea or agonal breathing
- General anesthesia requiring airway control
- Cardiac arrest (CPR)
- Status epilepticus with respiratory compromise
- Severe asthma / ARDS requiring mechanical ventilation
- Anticipated deterioration (e.g., inhalation injury, progressive airway edema)
5. CONTRAINDICATIONS
| Type | Examples |
|---|---|
| Absolute | Complete laryngeal/tracheal transection; radical laryngectomy (no larynx present) |
| Relative | Suspected fractured larynx (may worsen injury - consider surgical airway instead); severe coagulopathy with nasotracheal route; complete upper airway obstruction (tumour, foreign body - may need rigid bronchoscopy or surgical airway) |
Note: There are very few hard contraindications. A "difficult airway" is not a contraindication - it is an indication to modify technique (awake intubation, video laryngoscopy, fiberoptic).
6. COMPLICATIONS
During Intubation:
- Esophageal intubation (unrecognized = fatal)
- Right mainstem bronchus intubation (endobronchial)
- Dental trauma / lip laceration
- Oropharyngeal laceration
- Laryngospasm
- Aspiration of gastric contents
- Hypoxemia from prolonged attempts
- Bradycardia / hypotension (vagal response)
- Elevated intracranial pressure (stimulation)
After Intubation:
- Tube displacement / accidental extubation
- Tube obstruction (mucus, kinking, biting)
- Cuff rupture / pressure loss
- Mucosal necrosis from cuff over-inflation (target cuff pressure: 20-30 cmH2O)
- Tracheal stenosis (long-term)
- Ventilator-associated pneumonia (VAP)
- Tracheal rupture (rare - from overinflated cuff or stylet trauma)
- Subglottic edema / post-extubation stridor
7. TYPES AND PARTS
Types of ETT:
| Type | Feature | Use |
|---|---|---|
| Standard cuffed | High-volume, low-pressure cuff | Adults, children >8 yrs |
| Uncuffed | No cuff | Neonates, infants, small children |
| Murphy tube | Has Murphy's eye (side hole) | Most common standard type |
| Magill tube | No Murphy's eye | Less common |
| Armoured / Reinforced | Wire spiral in wall | Prone/flexion cases, head/neck surgery |
| RAE tube | Pre-formed curve | Oral/nasal surgery (keeps tube away from field) |
| Double-lumen tube | Two separate lumens | Thoracic surgery, single-lung ventilation |
| Laser-safe tube | Metal-wrapped PVC or silicone | Airway laser surgery |
| Microlaryngeal (MLT) | Long, small diameter with large cuff | Laryngeal/vocal cord procedures |
| Nasotracheal tube | Softer, more flexible | Nasal insertion |
Parts of the ETT (Diagram):
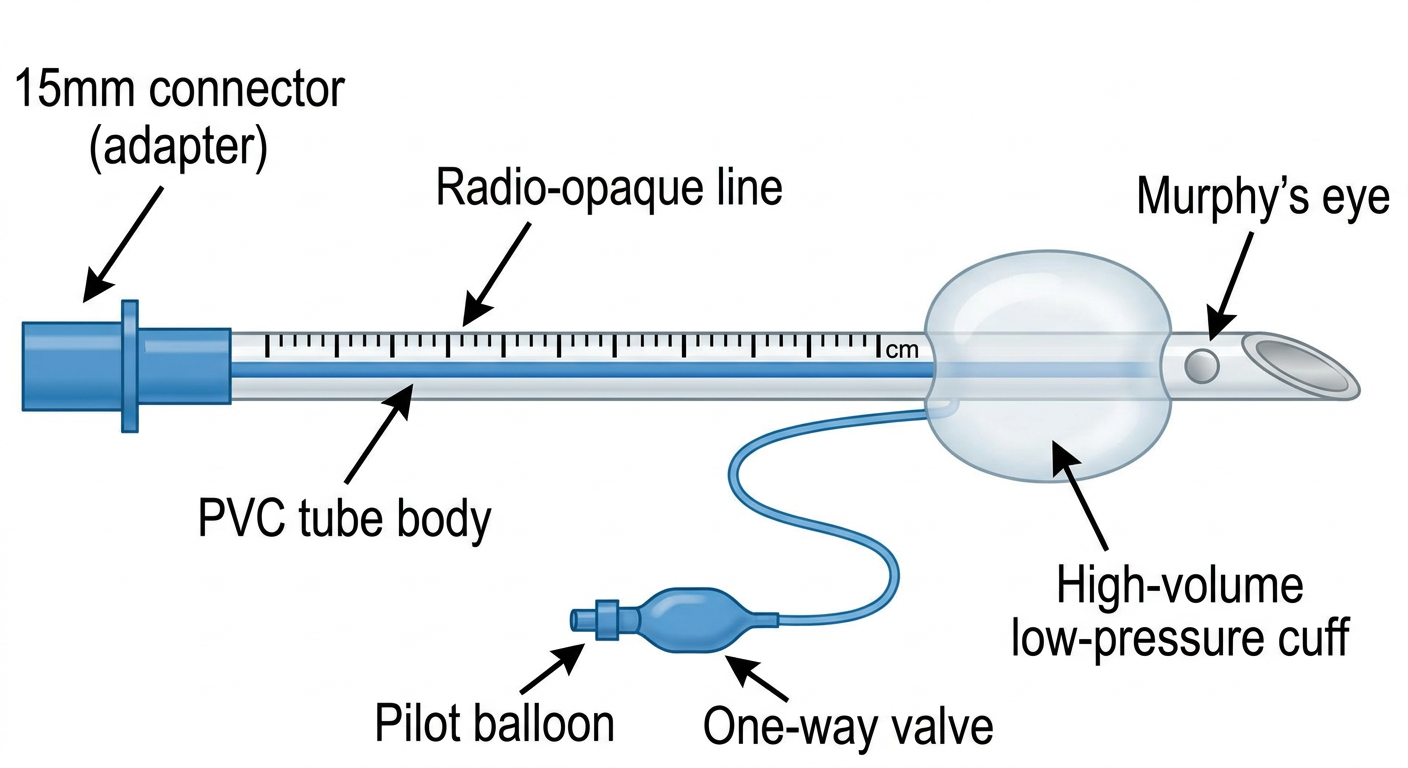
| Part | Function |
|---|---|
| 15 mm Universal Connector | Connects to BVM, ventilator circuit, ETCO2 monitor |
| Tube Body (PVC, ~33 cm long) | Main hollow shaft; transparent to detect secretions/blood |
| Centimeter Markings | Depth guide; adult insertion ~21-23 cm at teeth |
| Radio-opaque Line | Visible on chest X-ray to confirm tube position |
| Black Vocal Cord Guide Line | Single black line marking - should sit at vocal cord level |
| High-Volume Low-Pressure Cuff | Inflated in trachea to create seal; prevents aspiration |
| Cuff Inflation Line | Connects cuff to pilot balloon |
| Pilot Balloon | Indicates cuff is inflated; used to gauge cuff pressure |
| One-Way Valve | On pilot balloon; allows syringe to inflate/deflate cuff |
| Murphy's Eye | Oval side hole near tip; prevents full occlusion if tip is blocked |
| Bevelled Distal Tip | Angled end to ease passage through cords |
8. ANATOMICAL PLACEMENT
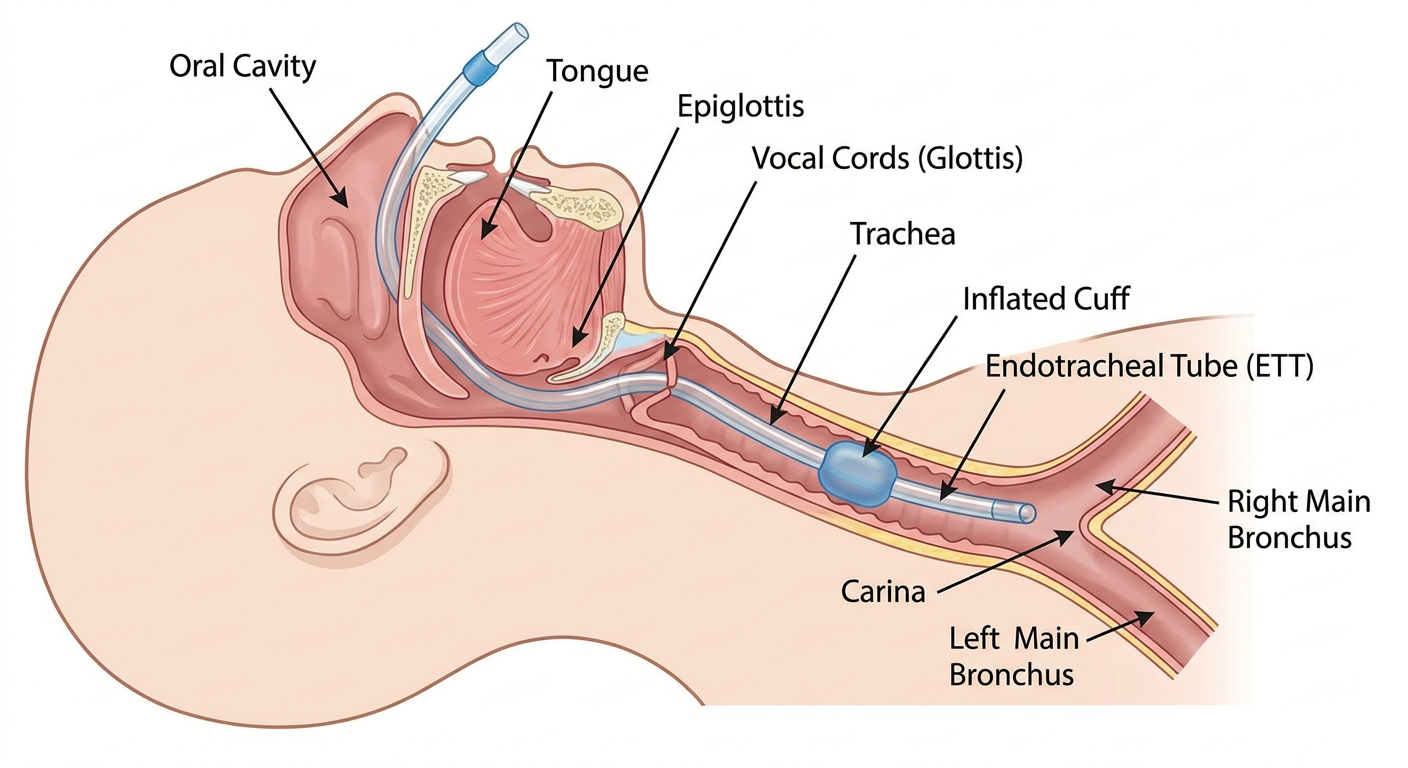
| Structure | Detail |
|---|---|
| Oral cavity / Nares | Entry point |
| Oropharynx | Posterior to tongue |
| Epiglottis | Lifted by laryngoscope blade |
| Glottis / Vocal cords | Tube passes through here |
| Subglottis | Cuff positioned just below vocal cords |
| Trachea | Tube tip should sit here |
| Correct final position | Tube tip 3-5 cm above carina (midtrachea) |
9. SIZE AND COLOUR
| Size (ID mm) | Colour Code |
|---|---|
| 2.0 | Grey |
| 2.5 | Grey |
| 3.0 | Red |
| 3.5 | Red |
| 4.0 | Green |
| 4.5 | Green |
| 5.0 | Orange |
| 5.5 | Orange |
| 6.0 | Blue |
| 6.5 | Blue |
| 7.0 | Black |
| 7.5 | Black |
| 8.0 | White |
| 8.5 | White |
| 9.0 | Purple/Violet |
| 9.5 | Purple/Violet |
10. MEASUREMENTS
Adult:
| Patient | ETT Size (ID) | Insertion Depth (at teeth) |
|---|---|---|
| Adult Female | 7.0 - 7.5 mm | 20 - 21 cm |
| Adult Male | 7.5 - 8.5 mm | 21 - 23 cm |
Pediatric (Age > 1 year):
| Formula | Type |
|---|---|
| (Age ÷ 4) + 4 | Uncuffed tube size (mm ID) |
| (Age ÷ 4) + 3.5 | Cuffed tube size (mm ID) |
| Insertion depth = ETT size × 3 cm (approximate) | |
| Or: (Age ÷ 2) + 12 cm | Depth at lips |
| Age | Tube Size (mm ID) |
|---|---|
| 1 year | 4.0 - 4.5 |
| 2 years | 4.5 |
| 4 years | 5.0 |
| 6 years | 5.5 |
| 8 years | 6.0 |
| 10 years | 6.5 |
| 12 years | 7.0 |
Infant / Neonate:
| Age / Weight | Tube Size (mm ID) | Depth (tip to lip) |
|---|---|---|
| Premature < 28 weeks / < 1 kg | 2.5 mm | 7 cm |
| 28-34 weeks / 1-2 kg | 3.0 mm | 8 cm |
| 34-38 weeks / 2-3 kg | 3.5 mm | 9 cm |
| Term neonate > 38 weeks / > 3 kg | 3.5 - 4.0 mm | 10 cm |
| Infant 1-6 months | 3.5 - 4.0 mm | 10 cm |
| Infant 6-12 months | 4.0 - 4.5 mm | 11 cm |
Tip: Newborn depth formula = 6 + weight in kg (cm at lip)
11. STERILIZATION METHOD (1 Line)
12. PROCEDURE - 10 STEPS (Orotracheal Intubation)
| Step | Action |
|---|---|
| Step 1 - Prepare | Assemble equipment: correct-size ETT, laryngoscope (check light), 10 ml syringe, stylet, tape/tube holder, suction, BVM with O2, ETCO2 monitor. Test cuff integrity. |
| Step 2 - Position | Place patient supine. Elevate head ~10 cm ("sniffing position") to align oral-pharyngeal-laryngeal axes. For trauma: manual in-line stabilization. |
| Step 3 - Preoxygenate | Apply 100% O2 via non-rebreather mask for 3 minutes (or 4 maximal breaths). Apply nasal cannula at 15 L/min for apneic oxygenation throughout procedure. |
| Step 4 - Medications (RSI) | Administer induction agent (e.g., ketamine 1-2 mg/kg IV or etomidate 0.3 mg/kg IV), then paralytic (succinylcholine 1.5 mg/kg IV or rocuronium 1.2 mg/kg IV). |
| Step 5 - Laryngoscopy | Hold laryngoscope in LEFT hand. Insert blade into right side of mouth, sweep tongue left. Advance to vallecula (curved/Macintosh blade) or below epiglottis (straight/Miller blade). Lift up-and-forward (NOT lever back). |
| Step 6 - Visualize Cords | Identify vocal cords (white V-shaped structure). Apply BURP maneuver if needed (Backward, Upward, Rightward Pressure on larynx). |
| Step 7 - Insert Tube | Pass ETT through vocal cords with RIGHT hand. Advance until cuff just disappears below cords. Black vocal cord guide line at cord level. |
| Step 8 - Inflate Cuff | Remove stylet. Inflate cuff with 5-10 ml air using syringe. Target cuff pressure 20-30 cmH2O (use manometer if available). |
| Step 9 - Confirm Position | Attach ETCO2 detector - waveform capnography is gold standard. Auscultate bilateral lung fields and epigastrium. Observe bilateral chest rise. Obtain chest X-ray. |
| Step 10 - Secure Tube | Secure with tape or commercial tube holder. Note cm marking at teeth/lips. Document tube size, depth, and confirmation method. |
13. AFTER (POST-INTUBATION) MANAGEMENT
| Priority | Action |
|---|---|
| Sedation & Analgesia | Start sedation (propofol, midazolam, or dexmedetomidine) + analgesia (fentanyl, morphine) to prevent tube intolerance and pain |
| Ventilator Settings | Set mode (typically Assist-Control or SIMV). Tidal volume 6-8 ml/kg ideal body weight. Rate 12-14/min. PEEP 5 cmH2O starting point. FiO2 to maintain SpO2 ≥ 94% |
| Continuous Monitoring | SpO2, waveform ETCO2 (normal 35-45 mmHg), continuous ECG, blood pressure, RR |
| ABG / CXR | Arterial blood gas within 30 min to verify ventilation. CXR to confirm tube tip position (2-3 cm above carina) |
| Cuff Pressure Check | Maintain 20-30 cmH2O (check every 8 hours) - prevents aspiration and tracheal necrosis |
| Oral Care / Suction | Regular oral suctioning; subglottic suctioning if available (reduces VAP risk) |
| Head of Bed Elevation | 30-45 degrees to reduce aspiration and VAP risk |
| Tube Security | Reassess tube position and security at each nursing assessment; note and document cm marking at teeth |
| Daily Sedation Vacation | Daily interruption of sedation (SAT) to assess readiness for extubation |
| Extubation Planning | Assess daily: can patient follow commands? Adequate oxygenation on minimal FiO2? Secretion management? Passed spontaneous breathing trial (SBT)? Cuff leak test before extubation in prolonged cases |
opa same style
oropharyngeal airway OPA Guedel airway definition types parts sizes indications contraindications complications procedure
https://www.ncbi.nlm.nih.gov/books/NBK470198
A detailed medical diagram of an Oropharyngeal Airway (OPA / Guedel airway) showing all labeled parts: flange (lip guard) at the proximal end, bite block (reinforced section), curved body, air channel (hollow lumen), and rounded distal tip. Show both front view and side profile. Also show a size scale from 000 (infant) to 5 (large adult) with color coding. Clean white background, professional medical illustration style with clear text labels and arrows pointing to each part.
Medical diagram cross-section of the human head and neck showing correct anatomical placement of an oropharyngeal airway (OPA / Guedel airway). Labels pointing to: mouth/oral cavity, tongue (displaced forward and down by the OPA), OPA curved body lying over the tongue, OPA tip sitting in the oropharynx above the epiglottis, epiglottis, pharynx, trachea, and the flange resting at the lips. Arrow showing the open airway channel allowing air to flow past the tongue to the pharynx. Professional medical illustration, clean white background, clear labels and arrows.
OROPHARYNGEAL AIRWAY (OPA) - Complete Reference Guide
1. DEFINITION
2. MEDICAL NAME & OTHER NAMES
| Term | Details |
|---|---|
| Medical / Official Name | Oropharyngeal Airway (OPA) |
| Common Eponym | Guedel Airway (named after Arthur Guedel, 1933) |
| Also Called | Oral airway, oral pharyngeal airway, mouth airway |
| Abbreviations | OPA, OA |
| Berman Airway | A type of OPA with open lateral channels |
| Bite block | Alternate functional name (prevents biting of ETT) |
| Oral airway adjunct | Formal clinical term |
3. PATHOPHYSIOLOGY (1 Line)
4. INDICATIONS
- Unconscious / deeply obtunded patient with tongue-based airway obstruction
- GCS drop with loss of airway muscle tone (stroke, overdose, head injury, hypoglycaemia, seizure post-ictal)
- Cardiac arrest - to facilitate bag-valve-mask (BVM) ventilation
- Anesthesia induction - once patient loses consciousness and gag reflex
- Pre-intubation airway maintenance while preparing for RSI
- Bite block to prevent patient from biting an endotracheal tube post-intubation
- Aid oropharyngeal suctioning (guides suction catheter to posterior pharynx)
- Improve mask seal during BVM ventilation by supporting soft tissue contours
- Short surgical/procedural sedation when airway tone is lost
5. CONTRAINDICATIONS
| Type | Details |
|---|---|
| Absolute | Conscious or semi-conscious patient with intact gag reflex - will trigger vomiting and laryngospasm |
| Absolute | Foreign body airway obstruction - may push obstruction deeper |
| Relative | Oral/facial trauma, fractures, or active oral bleeding - risk of worsening injury |
| Relative | Trismus (clenched jaw / jaw spasm) - insertion may be impossible |
| Relative | Loose, broken, or recently avulsed teeth - risk of aspiration |
| Relative | Active seizure - risk of oral injury from biting |
| Relative | Major facial trauma where oral route is unstable - consider NPA or advanced airway instead |
Key rule: If the patient can cough, gag, or swallow - do NOT insert an OPA.
6. COMPLICATIONS
During Insertion:
- Triggering vomiting and aspiration (most feared - if gag reflex present)
- Laryngospasm (from stimulation of hypopharynx)
- Worsening airway obstruction if too small (pushes tongue back further)
- Laryngospasm/airway trauma if too large (tip presses on epiglottis)
- Dental damage or tooth avulsion
- Lip and soft tissue laceration
- Pushing a foreign body deeper into the airway
After Insertion:
- Pressure necrosis of lips and tongue (prolonged use without repositioning)
- Mucosal ulceration at contact points
- Aspiration if patient regains consciousness and vomits with OPA in place
- Tube displacement/rotation causing renewed obstruction
- Failure to adequately relieve obstruction (may still need jaw thrust + BVM)
7. TYPES AND PARTS
Types of OPA:
| Type | Material | Key Feature | Best Use |
|---|---|---|---|
| Guedel Airway | Rigid plastic, colour-coded | Closed tubular design; reinforced bite block; most common | Routine resuscitation, ED, EMS, anesthesia |
| Berman Airway | Rigid plastic | Open lateral channels (I-shaped cross-section) allow suctioning alongside tube | Patients with excess secretions; trauma cases needing frequent suction |
| Williams Airway Intubator | Rigid plastic | Proximal half is open (facilitates blind nasal intubation); distal half is tubular | Aids fiberoptic or blind intubation |
| Ovassapian Airway | Rigid plastic | Wide open design to guide fiberoptic scope | Awake fiberoptic intubation |
Parts of the OPA (Diagram):
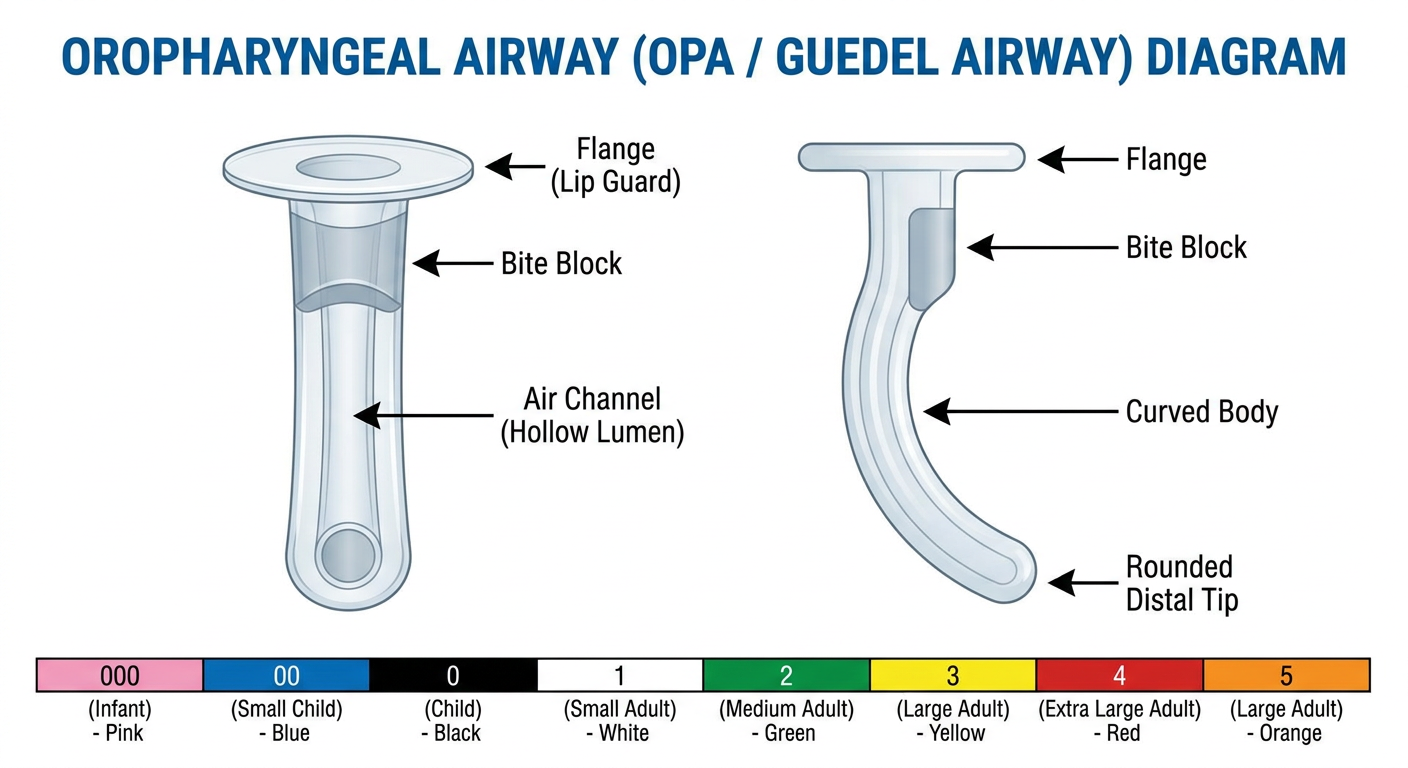
| Part | Function |
|---|---|
| Flange (Lip Guard) | Flat projection at the proximal end; rests against the teeth/lips; prevents over-insertion; allows suction catheter access |
| Bite Block (Reinforced Section) | Hard reinforced portion between teeth; prevents patient biting and collapsing the airway; protects ETT if used as bite block |
| Curved Body | J-shaped curve that follows the natural contour of the palate and tongue; displaces tongue anteriorly |
| Air Channel (Hollow Lumen) | Central hollow passage for air flow, suction catheter passage, and oxygen delivery |
| Distal Tip | Rounded end that rests in the oropharynx above the epiglottis; lifts tongue base off pharyngeal wall |
8. ANATOMICAL PLACEMENT
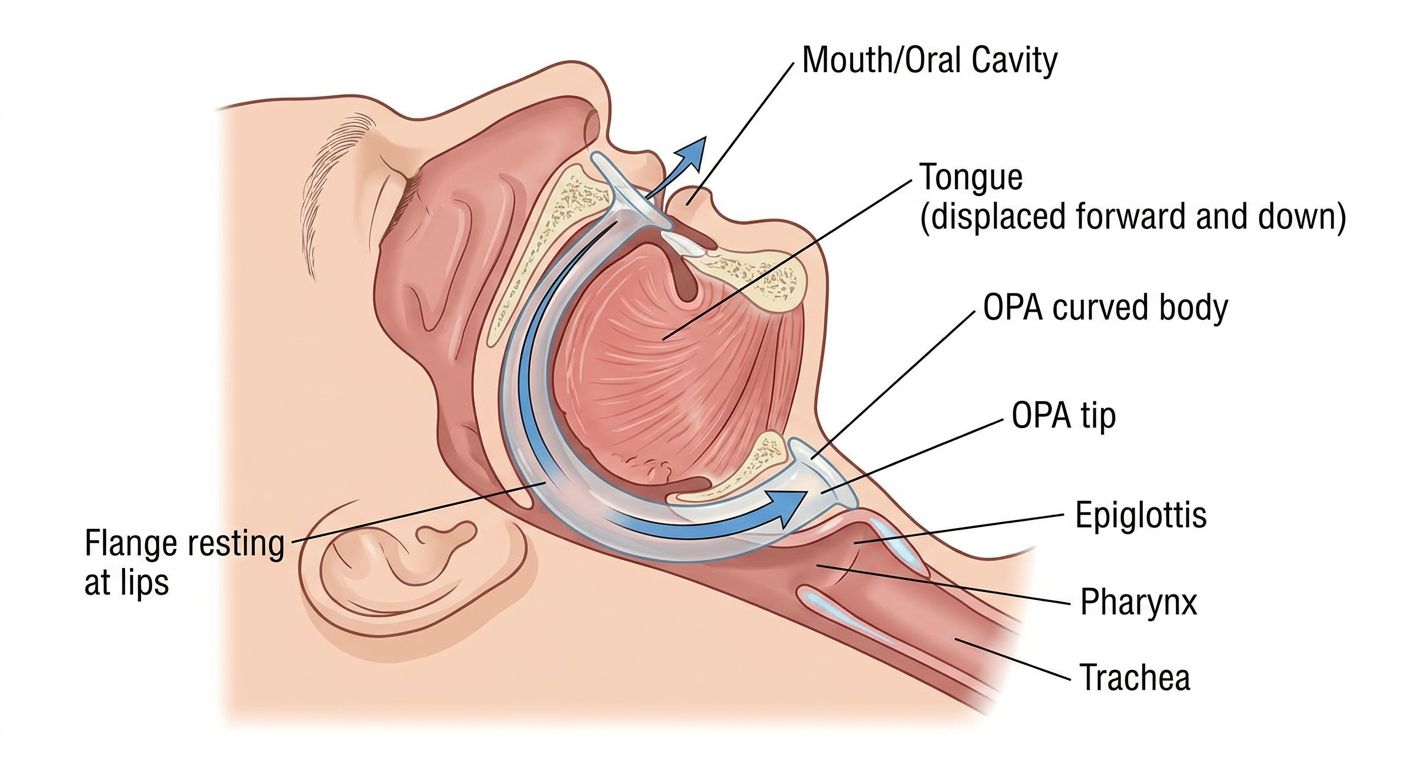
| Structure | Detail |
|---|---|
| Lips / Oral cavity | Flange rests at lips; bite block between upper and lower teeth |
| Tongue | Curved body lies on top of tongue, displacing it anteriorly and downward |
| Hard palate | Body curves along the palate |
| Soft palate / Oropharynx | Tip enters the oropharynx |
| Correct final position | Tip rests in the oropharynx, just above and anterior to the epiglottis - airway channel runs from mouth to oropharynx |
9. SIZE AND COLOUR
| Guedel Size | Length (mm) | Colour | Patient Group |
|---|---|---|---|
| 000 | 40 mm | Transparent / Pink | Premature neonate |
| 00 | 50 mm | Pink | Neonate / small infant |
| 0 | 60 mm | Blue | Infant |
| 1 | 70 mm | Black | Small child |
| 2 | 80 mm | White | Child |
| 3 | 90 mm | Green | Small adult |
| 4 | 100 mm | Yellow | Medium adult (most common) |
| 5 | 110 mm | Red | Large adult |
10. MEASUREMENT
How to Size the OPA:
Size Quick Reference:
| Patient | Guedel Size | Length |
|---|---|---|
| Large adult (male) | 4 - 5 | 100-110 mm |
| Medium adult (female) | 3 - 4 | 90-100 mm |
| Small adult | 3 | 90 mm |
| Child (8-12 yr) | 2 | 80 mm |
| Child (4-8 yr) | 1 - 2 | 70-80 mm |
| Toddler (1-4 yr) | 1 | 70 mm |
| Infant (6-12 months) | 0 - 1 | 60-70 mm |
| Infant (< 6 months) | 00 | 50 mm |
| Premature neonate | 000 | 40 mm |
Too small = pushes tongue back (worsens obstruction). Too large = tip presses on epiglottis (causes laryngospasm). Correct sizing is critical.
11. STERILIZATION METHOD (1 Line)
12. PROCEDURE - 10 STEPS
| Step | Action |
|---|---|
| Step 1 - Assess | Confirm patient is unconscious with no gag reflex. Do NOT insert in a conscious or semi-conscious patient. Check for foreign body, oral trauma, or loose teeth. |
| Step 2 - Select Size | Measure OPA from corner of mouth to angle of mandible. Select correct size - confirm tip reaches angle of jaw when flange is at lips. |
| Step 3 - Prepare | Don gloves and PPE. Have suction ready. Inspect OPA for defects. If needed, lubricate tip with water-soluble lubricant or water. |
| Step 4 - Position Patient | Lay patient supine. Apply head-tilt-chin-lift (if no C-spine concern) or jaw-thrust (if C-spine suspected) to open airway first. |
| Step 5 - Open Mouth | Use cross-finger or tongue-jaw-lift technique to open the mouth. Suction any secretions, vomit, or blood before inserting. |
| Step 6a - Adult Insertion Technique | Insert OPA upside down (tip pointing toward palate / ceiling) and advance it into the mouth. As it passes the hard palate, rotate 180° so tip now points toward the pharynx. Advance until flange rests at the lips. |
| Step 6b - Pediatric/Infant Technique | In children, insert the OPA right-side up (tip pointing toward the floor of mouth) using a tongue depressor to hold tongue down. Rotate technique NOT recommended in children (risk of palate injury). |
| Step 7 - Confirm Position | Flange should rest against the lips/teeth. Check no lip or tongue is trapped. Verify airway is patent - listen for air movement, watch for chest rise. |
| Step 8 - Reassess Airway | Apply jaw thrust / chin lift alongside OPA if needed. Apply BVM with 100% O2. Observe bilateral chest rise and listen for breath sounds. |
| Step 9 - Monitor Gag Reflex | Continuously observe patient. If patient begins to gag, cough, or regain consciousness - remove OPA immediately to prevent vomiting and aspiration. |
| Step 10 - Secure and Document | Note size used and time of insertion. Reposition every 2-4 hours (in prolonged use) to prevent pressure injury to lips and tongue. Prepare for definitive airway if condition deteriorates. |
13. AFTER (POST-INSERTION) MANAGEMENT
| Priority | Action |
|---|---|
| Oxygenation | Apply supplemental O2 via non-rebreather mask (15 L/min) or BVM with reservoir. Monitor SpO2 continuously - target ≥ 94% |
| Continuous Monitoring | SpO2, respiratory rate, level of consciousness, GCS. Continuously reassess gag reflex - remove if patient wakes up |
| Positioning | Recovery position (lateral decubitus) if patient is breathing spontaneously and not at risk of C-spine injury - reduces aspiration risk |
| Suction | Keep suction ready at bedside; suction through or alongside OPA if secretions accumulate |
| Pressure Care | Reposition OPA every 2-4 hours in prolonged use; inspect lips and tongue for ulceration or blanching |
| Reassess Airway | If SpO2 falls or ventilation remains inadequate despite OPA + BVM, upgrade to nasopharyngeal airway (NPA), supraglottic airway (LMA/i-gel), or endotracheal intubation |
| Escalation Decision | OPA is a temporary, non-definitive airway. Plan for ETT intubation if: prolonged unconsciousness expected, patient deteriorating, airway protection needed, or BVM ventilation still difficult |
| Remove When | Patient regains consciousness / gag reflex returns / definitive airway established / patient no longer needs airway support |
| Documentation | Record: OPA size, insertion time, SpO2 before and after, airway assessment findings, any complications |