Per op note for vaginal hysterectomy
Reading File
Finding Sources
Reading File
Reading File
Reading File
Reading File
Reading File
Reading File
I now have comprehensive operative details. Let me compile the full per-op note.
Operative Note: Vaginal Hysterectomy
PREOPERATIVE DETAILS
Procedure: Vaginal Hysterectomy ± Bilateral Salpingo-Oophorectomy (BSO)
Indications: [e.g., uterine prolapse, symptomatic fibroids, abnormal uterine bleeding, cervical/uterine pathology]
Surgeon: ________________________________
Assistant(s): ________________________________
Anesthesia: General / Regional (specify)
Date/Time: ________________________________
EBL: ________ mL | Urine Output: ________ mL
Specimens: Uterus ± cervix ± bilateral tubes and ovaries
PATIENT PREPARATION
The patient was brought to the operating room, placed in the dorsal high lithotomy position with the buttocks positioned just over the table edge. Padded stirrups were applied; hip flexion was maintained >60° and knee flexion 90–120° to avoid nerve and vascular injury. A Trendelenburg tilt of 10–15° was used to aid intravaginal visualization.
Examination under anesthesia was performed, confirming uterine mobility, uterine descent, and size. Pubic hair was clipped from the labia majora. The vagina, vulva, mons, inner thighs, perineum, and anal area were prepped with dilute 4% chlorhexidine-alcohol. The patient was draped in standard sterile fashion. A Foley catheter was inserted to drain the bladder.
PROCEDURE
1. Setup and Cervical Grasping
A short weighted speculum was placed in the vagina. Sidewall retractors were positioned lateral to the cervix. The anterior and posterior lips of the cervix were grasped with a single/double-toothed tenaculum. Downward traction was applied. The vaginal epithelium at the planned incision site was injected with dilute lidocaine with epinephrine (1:200,000) for hemostasis and hydrodissection.
2. Circumferential Incision
A circumferential incision was made in the vaginal epithelium at the cervicovaginal junction, at least 1 cm distal to the bladder, with the aim of preserving vaginal length. The incision was angled posteriorly to facilitate cul-de-sac entry. Using curved Mayo scissors, the vaginal epithelium was dissected circumferentially from the underlying cervical stroma.
3. Posterior Cul-de-Sac Entry
The posterior vaginal epithelium was placed on traction. The posterior peritoneum (cul-de-sac of Douglas) was identified, elevated with forceps, and entered sharply with scissors. Entry was confirmed by digital examination. The posterior peritoneum was secured to the posterior vaginal epithelium with a figure-of-eight delayed absorbable suture for hemostasis and orientation. The posterior pelvic cavity was inspected. A long-weighted (Auvard) speculum was placed into the peritoneal cavity.
4. Uterosacral Ligament Ligation
With lateral retraction and counter-traction on the cervix, the uterosacral ligaments were clamped bilaterally with a curved Heaney clamp, tips incorporating the lower portion of the cardinal ligaments. The clamp was placed perpendicular to the uterine axis, tips touching the cervix. The pedicle was transected and suture-ligated with 0-gauge delayed absorbable suture (transfixion stitch). Suture ends were tagged with hemostats for the most inferior pedicle.
5. Anterior Dissection / Vesicouterine Space Entry
Downward traction was placed on the cervix. Using Mayo scissors directed toward the uterus, the vesicouterine space was developed, separating the bladder from the anterior lower uterine segment. A Heaney retractor was placed in the midline to protect the bladder. The vesicouterine peritoneal fold was identified, elevated with forceps, and entered sharply. Digital confirmation of peritoneal entry was made. The retractor was repositioned into the anterior cul-de-sac to maintain bladder elevation throughout the remainder of the procedure.
6. Cardinal Ligament Ligation
The cardinal ligaments were clamped bilaterally (sequentially or in combination with uterosacral ligaments depending on size) using curved Heaney clamps, transected, and suture-ligated with 0-gauge delayed absorbable suture. This was repeated in sequential bites as needed until the uterine vessels were reached. Suture ends were tagged with hemostats.
7. Uterine Artery Ligation
The cervix was placed on outward and lateral traction. The uterine artery was identified on each side, clamped with a curved Heaney clamp, transected, and doubly ligated with 0-gauge delayed absorbable suture (suture-tie followed by a medial transfixion ligature). The contralateral uterine artery was secured in the same manner.
8. Uterine Fundus Delivery and Upper Pedicles
The uterine fundus was grasped and delivered posteriorly (posterior morcellation technique as needed). Traction was placed inferiorly. The surgeon's finger was placed behind the utero-ovarian ligament complex to guide clamp placement. The utero-ovarian ligaments and round ligament complexes were clamped bilaterally with Heaney clamps, transected, and double-ligated (suture tie + medial transfixion ligature with 0-gauge delayed absorbable suture). Hemostats were placed on the upper pedicle sutures for identification.
9. Specimen Removal
The uterus was removed and sent to pathology. (If enlarged: morcellation was performed after securing uterine artery pedicles.)
9a. Bilateral Salpingo-Oophorectomy (if performed)
The round ligaments were separated from the adnexal pedicles. The ovary was drawn medially with a Babcock clamp. A Heaney clamp was placed across the infundibulopelvic ligament (ovarian vessels). The tube and ovary were excised. A transfixion tie and suture ligature were placed. Bilateral adnexal specimens were sent to pathology.
9b. Opportunistic Salpingectomy (if performed)
The round ligament was isolated. The ovary was retracted medially and the fimbria identified. With the entire fallopian tube in view, a clamp was placed across the mesosalpinx lateral to the fallopian tube, excluding the infundibulopelvic ligament. This pedicle was cut and suture-ligated bilaterally.
10. Hemostasis Inspection
All pedicles were inspected: the most inferior pedicle (uterosacral) through to the most superior pedicle (utero-ovarian ligament). Hemostasis was confirmed at each pedicle. Any bleeding points were addressed with suture ligation.
11. Vault Closure and Cuff Repair
The vaginal cuff was closed with interrupted or running delayed absorbable suture. The uterosacral ligaments were incorporated into the lateral angles of the vault for apical support (McCall culdoplasty performed if indicated — see addendum).
The peritoneum was reapproximated, or left open per surgeon preference. Final inspection of the cuff and pedicles confirmed hemostasis.
12. Foley Catheter
The Foley catheter was confirmed in place and draining clear urine. (Note any cystotomy and repair if occurred.)
CLOSURE
The vaginal cuff was closed without complication. Instruments, sponge, and needle counts were correct × [number]. The patient tolerated the procedure well and was transferred to the PACU in stable condition.
OPERATIVE FINDINGS
- Uterine size: _______ weeks / _______ grams
- Adnexa: Normal / Abnormal (specify) / Removed bilaterally
- Cul-de-sac: Clear / Adhesions noted (specify)
- Estimated blood loss: _______ mL
- Complications: None / (specify)
SPECIMENS SENT TO PATHOLOGY
- Uterus with cervix
- Right tube and ovary
- Left tube and ovary
- Right fallopian tube (salpingectomy)
- Left fallopian tube (salpingectomy)
Source: Berek & Novak's Gynecology, Chapter 27; Campbell-Walsh-Wein Urology, Chapter 68
Search for clinical images of vaginal hysterectomy surgical anatomy
Searching Images
vaginal hysterectomy surgical anatomy
Searching Images
vaginal hysterectomy operative steps cervix uterosacral ligament
Loading Image
Loading Image
Loading Image
Loading Image
Loading Image
Loading Image
Searching Images
vaginal hysterectomy colpotomy incision bladder dissection anterior cul de sac
Loading Image
Loading Image
Loading Image
Here is a curated gallery of clinical intraoperative images covering the key anatomical steps of vaginal hysterectomy:
Vaginal Hysterectomy — Surgical Anatomy in Clinical Images
1. Initial Exposure: Cervix Visualisation & Anterior Colpotomy
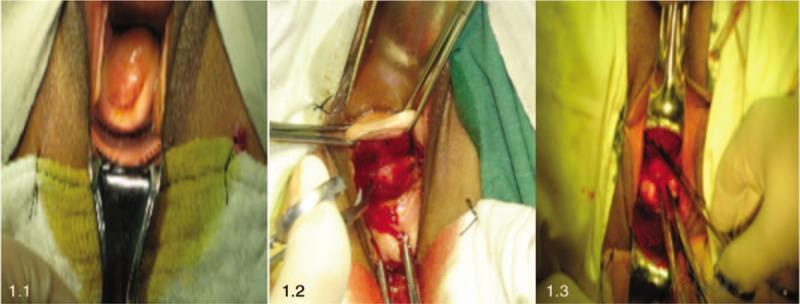
Panel 1.1 — Cervix exposed with weighted speculum; the cervical os and portio vaginalis are visible.
Panel 1.2 — Semi-annular anterior vaginal fornix incision below the bladder sulcus, with forceps and active minor bleeding at the colpotomy site.
Panel 1.3 — Deep dissection exposing the uterovesical peritoneal reflection, separating the vesicocervical space.
2. Vesicouterine Space Dissection (Bladder Mobilisation)
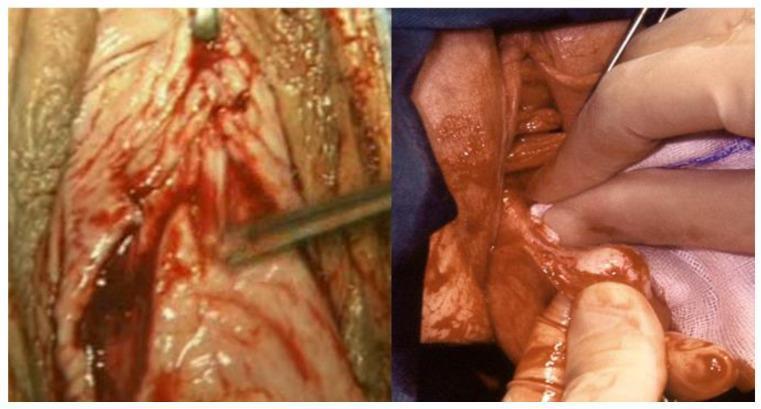
Left — Sharp dissection defining the avascular cleavage plane between bladder and cervix.
Right — Blunt dissection with surgical gauze separating the bladder base from the uterine cervix, revealing the vesicouterine space before anterior peritoneal entry.
3. Posterior Cul-de-Sac Entry & Uterosacral Ligament Exposure
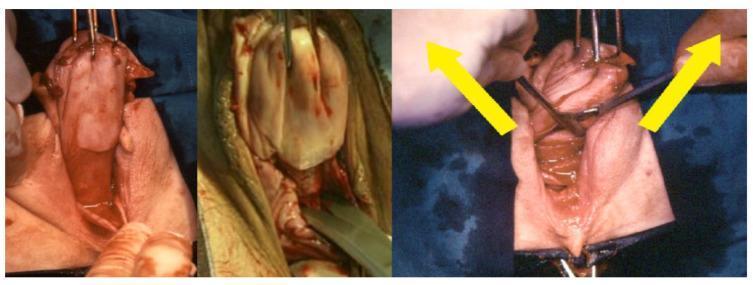
Left — Exposure of the pouch of Douglas (rectouterine pouch) peritoneum; vaginal wall retracted with probes.
Center — Sharp transverse incision through the posterior peritoneum with scissors.
Right — Scissors spread (yellow arrows) to bluntly expand the opening, exposing the uterosacral ligaments and paracervical tissues laterally.
4. Uterosacral Ligament Clamping & Uterine Rotation
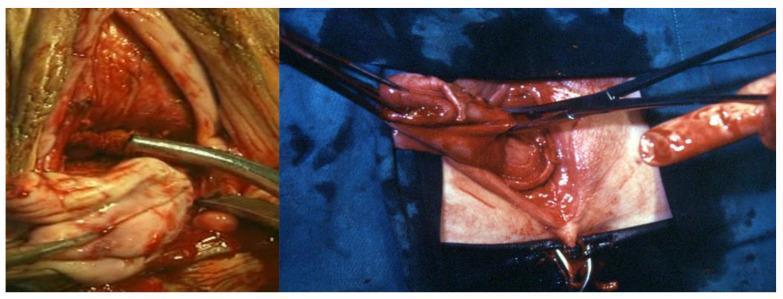
Left — Heaney clamp positioned with the lower blade beneath the sacrouterine ligament for ligation; paracervical structures visible.
Right — Clockwise uterine rotation providing access to the contralateral uterosacral-paracervical complex; clamps bundle the ligaments in preparation for sequential transection.
5. Upper Pedicles — Round Ligament, Utero-ovarian Ligament & Fallopian Tube
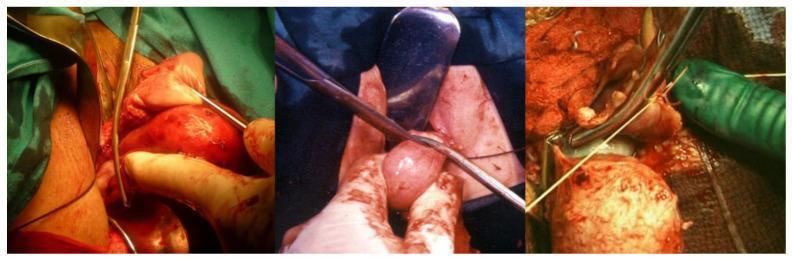
Left — Heaney clamp grasping and elevating the round ligament, utero-ovarian ligament, and fallopian tube complex.
Center — Division of the clamped adnexal structures, separating them from the uterine body.
Right — Suture ligation of the divided upper pedicles to secure hemostasis.
6. Colpotomy Line & Sacrouterine / Cardinal Ligament Anatomy
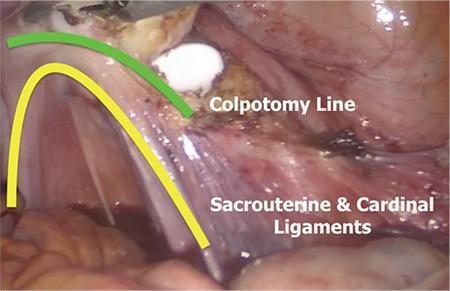
Endoscopic view labeling the anatomical relationship between the colpotomy line (green arc) and the sacrouterine and cardinal ligaments (yellow arc). These fibrous striated structures fan upward toward the colpotomy, providing the structural support that is systematically divided during hysterectomy. Preservation of their stumps enables vault suspension.
7. Deep Pelvic Vascular & Nerve Anatomy (Parametrial Dissection)
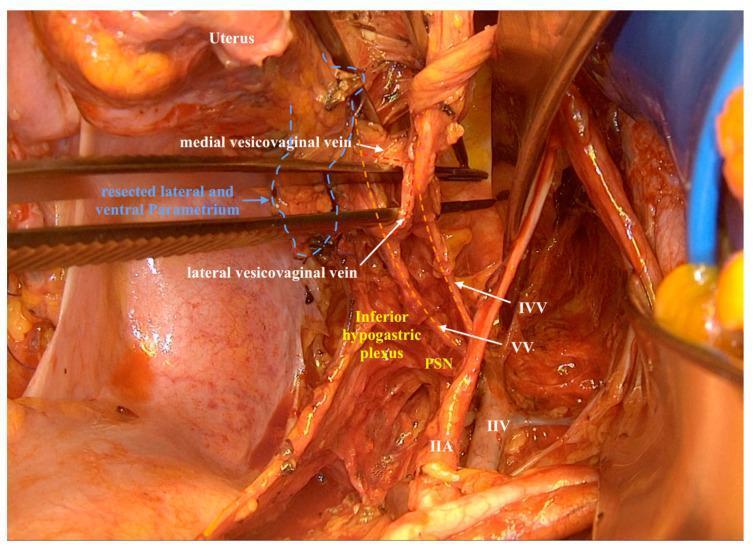
Detailed intraoperative anatomy following parametrial resection, showing:
- VV = Vaginal vein
- IVV = Inferior vesical vein
- Medial and lateral vesicovaginal veins
- IIA/IIV = Internal iliac artery and vein (pelvic sidewall)
- PSN = Pelvic splanchnic nerves
- Inferior hypogastric plexus — critical to identify and preserve for bladder/sexual function
8. vNOTES-Assisted Hysterectomy with Uterosacral Suspension
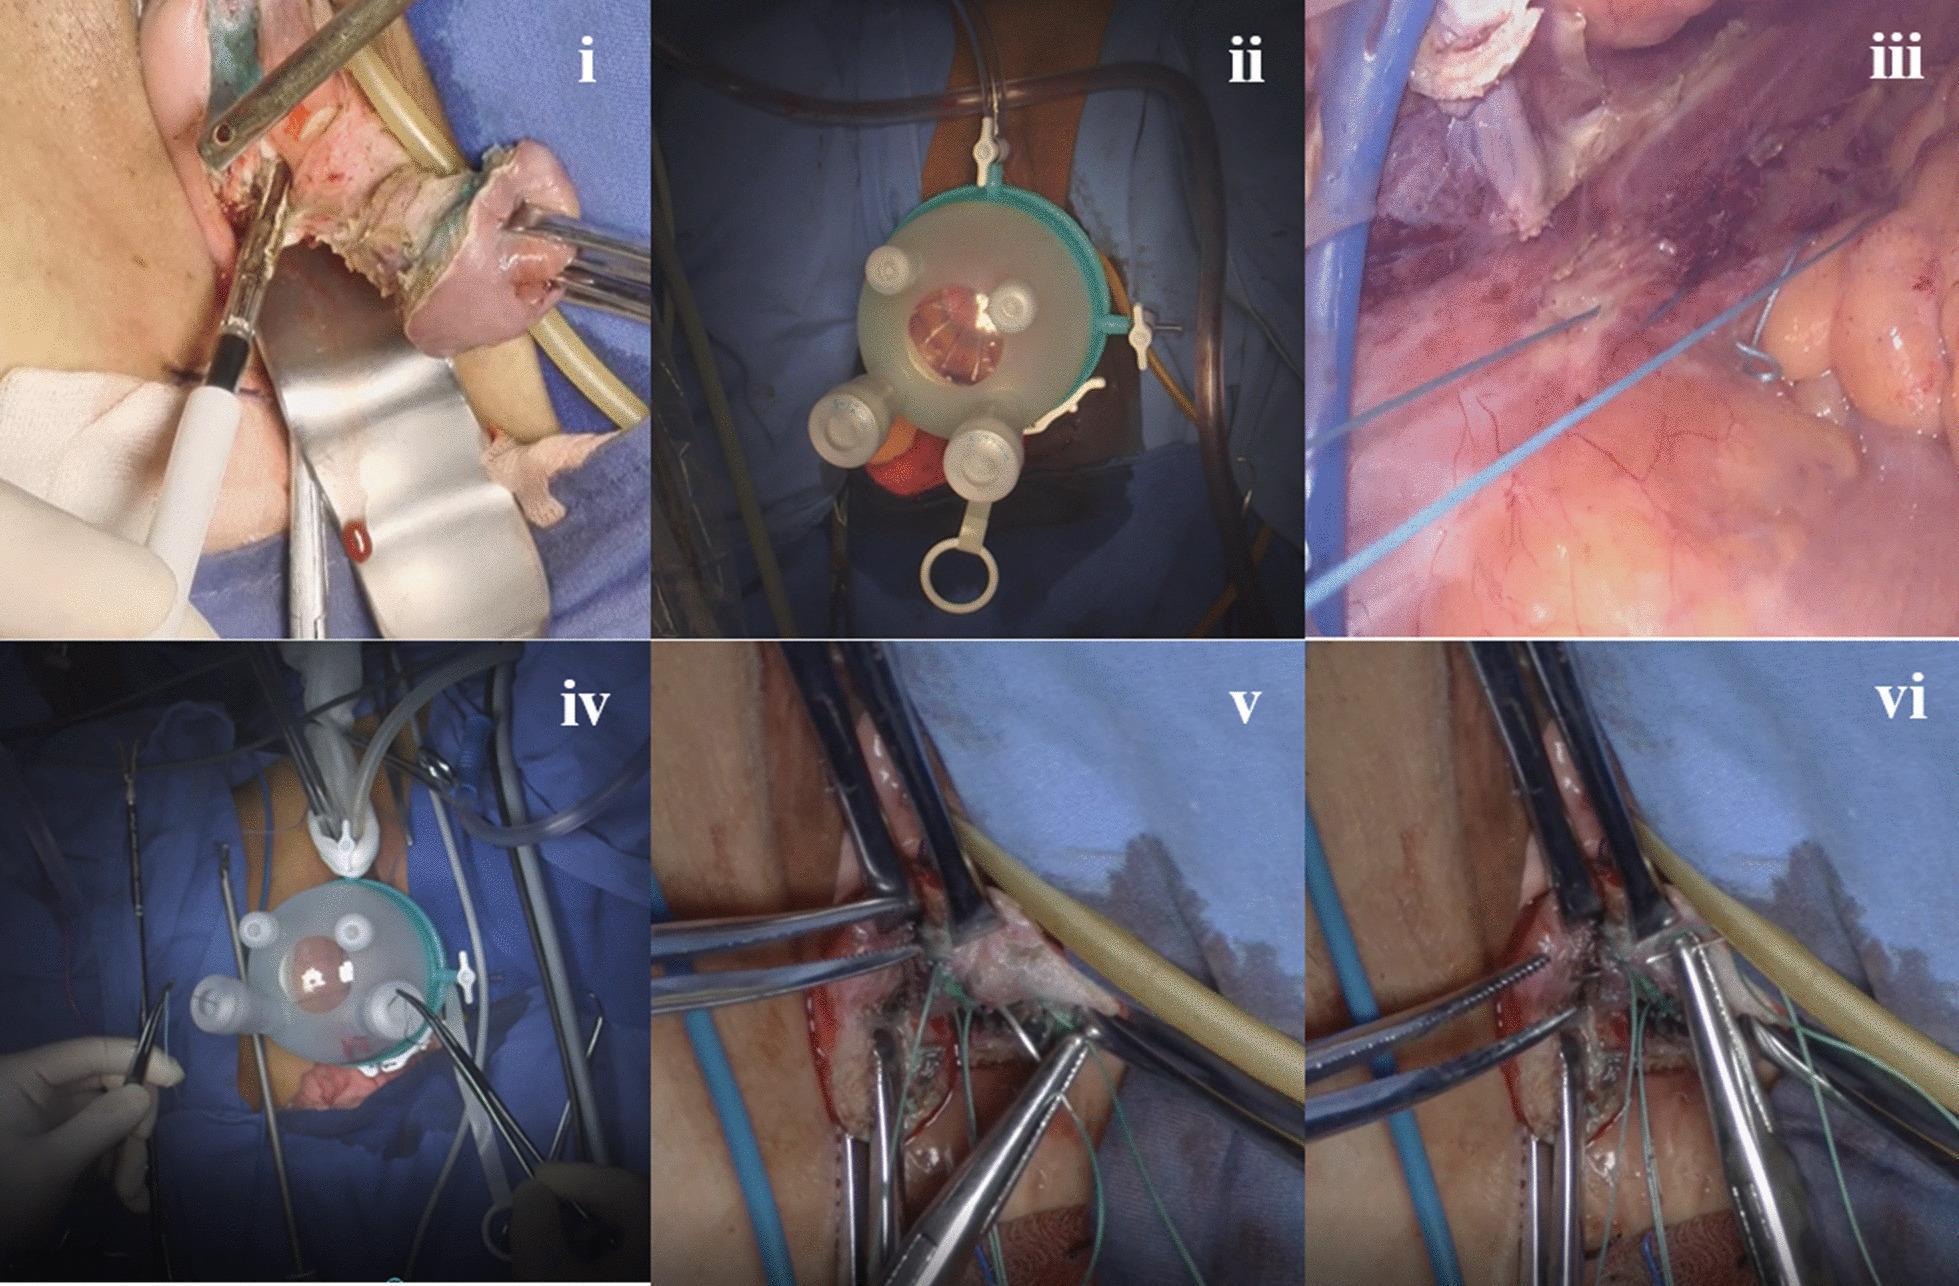
Six-panel series combining transvaginal hysterectomy with endoscopic uterosacral ligament suspension (vNOTES):
- (i) Transvaginal phase with retractors
- (ii) Single-port laparoscopic platform at vaginal introitus
- (iii) Endoscopic view — blue non-absorbable sutures placed around the uterosacral ligament near the ischial spine
- (iv) External instrumentation confirming suture tension
- (v–vi) Apical suspension anchored to cardinal ligament stump and pubocervical fascia
Images sourced from peer-reviewed PMC clinical literature. All depict intraoperative anatomy for surgical education.
Create a PDF quick-reference guide on vaginal hysterectomy surgical planes and landmarks
Reading File
Running Command
Writing File
Your credits are exhausted. Your daily credits reset tomorrow, or you can purchase a top-up for more.
This is a shared conversation. Sign in to Orris to start your own chat.