
Vaginal hysterectomy details
Reading File
Now let me search the medical library for vaginal hysterectomy content.
Finding Sources
Searching the Web
vaginal hysterectomy indications steps complications surgical technique
Good - I have strong textbook sources. Let me read the most detailed sections in parallel.
Reading File
Reading File
Reading File
Excellent - rich content from multiple textbooks. Let me now read more of the Berek & Novak section (which appears most comprehensive) and also the surgical choice section.
Reading File
Reading File
Let me read more of the Berek & Novak surgical technique section and also look for complications data.
Reading File
Finding Sources
Let me now read the complications section and the cuff closure/culdoplasty sections.
Reading File
Reading File
I now have comprehensive content from multiple authoritative textbooks. Let me also fetch a couple of the surgical illustrations to enhance the answer.
Reading File
I have very comprehensive content now. Let me compile the full detailed answer.
Vaginal Hysterectomy - Complete Overview
Definition
Vaginal hysterectomy is one of the earliest reported gynecologic surgeries - removal of the uterus (and optionally the adnexa) entirely through the vaginal route, without any abdominal incision. The procedural steps are essentially unchanged since its introduction, and the order of dissection is the reverse of abdominal hysterectomy: colpotomy first, cornual pedicles last.
- Berek & Novak's Gynecology, p. 1430
- Sabiston Textbook of Surgery, p. 2801
Indications
Vaginal hysterectomy is the preferred route for most benign indications when feasible:
- Uterine leiomyomata (fibroids)
- Dysfunctional/abnormal uterine bleeding
- Uterovaginal prolapse (primary indication where it has clear advantage)
- Endometriosis (uncomplicated)
- Adenomyosis
- Cervical dysplasia (CIN)
- Chronic pelvic pain
Advantages Over Other Routes
| Comparison | Outcome |
|---|---|
| Vaginal vs. Abdominal | Return to normal activities ~9.5 days shorter (95% CI -12.6 to -6.4) |
| Vaginal vs. Laparoscopic | No significant outcome difference; vaginal is cheaper with shorter OR time |
| Laparoscopic vs. Abdominal | More urinary tract injuries (OR 2.4, 95% CI 1.2-4.8) with laparoscopic |
Vaginal hysterectomy has fewer perioperative complications than laparoscopic or robotic approaches, while laparotomy carries the highest complication rate. It is also less expensive than laparoscopic approaches.
- Berek & Novak's Gynecology, p. 1417-1418 (Cochrane data, Aarts et al. 2015)
Preoperative Evaluation
Key Determinants of Feasibility
- Uterine mobility - the single most important factor. Apply gentle traction under anesthesia to confirm descent.
- Uterine size - width of the lower uterine segment is critical. If width >9-10 cm, uterine artery clamping may not be safe. Most surgeons avoid the vaginal route if size is >16-18 weeks.
- Pelvic architecture - pubic arch angle should be ≥90 degrees; bituberous diameter should exceed 10 cm. A narrow pubic arch (<90°) is the only factor shown to significantly increase risk of failed vaginal hysterectomy.
- Vaginal accessibility - narrow vagina (less than two fingerbreadths at apex) is a relative barrier.
Not Contraindications
- Prior cesarean section
- Nulliparity
- Obesity alone
Contraindications (Relative/Absolute)
-
Suspected adnexal malignancy
-
Significant cul-de-sac disease or adhesions
-
Need for visual peritoneal assessment
-
Uterine malignancy requiring lymphadenectomy
-
Berek & Novak's Gynecology, p. 1430-1431, 1417
Patient Positioning and Preparation
- High lithotomy position with buttocks slightly beyond the table edge
- Hip flexion >60°; knee flexion 90-120°; padded stirrups to prevent nerve injury
- Trendelenburg (10-15°) improves intravaginal visualization
- Examination under anesthesia (EUA) performed first
- Prep: dilute 4% chlorhexidine-alcohol to vagina, vulva, inner thigh, perianal area
- Foley catheter inserted (some surgeons delay until after anterior colpotomy to detect accidental cystotomy)
- Perineal pubic hair clipped to prevent field contamination
Instruments
- Weighted speculum (Auvard or Steiner-Auvard)
- Single- or double-toothed tenaculum / Lahey-thyroid clamp for cervix
- Heaney or Heaney-Ballantine curved hysterectomy clamps
- Zeppelin clamps (alternative)
- Right-angle retractors / Breisky-Navratil retractors
- Heaney needle holders
- Curved Mayo scissors and Metzenbaum scissors
- Lone Star self-retaining ring retractor for introital exposure
- Vessel-sealing devices: useful for large uteri, reduce operative time but increase cost
Step-by-Step Surgical Technique
Step 1 - Cervical Traction and Circumferential Incision
A tenaculum or Lahey clamp is applied to the anterior and posterior lips of the cervix. The cervix is placed on traction. A circumferential incision is made at the junction of the vaginal epithelium and cervix (where vaginal rugae meet smooth cervical epithelium) - from 10 to 2 o'clock anteriorly and 8 to 4 o'clock posteriorly - through full-thickness vaginal epithelium. Sharp dissection or electrocautery is used. Some surgeons inject dilute 1:200,000 epinephrine or lidocaine-epinephrine into the vaginal wall for hemostasis and hydrodissection.
Step 2 - Posterior Colpotomy (Enter Posterior Cul-de-sac First)
The posterior vaginal wall is elevated with Allis clamps or tissue forceps and pulled downward. The posterior peritoneum is identified, grasped, and sharply incised with curved Mayo scissors - the posterior cul-de-sac (pouch of Douglas) is entered first. The posterior peritoneum is secured to the posterior vaginal wall with a stay suture. A long-bladed weighted Auvard speculum is inserted through the vagina into the posterior peritoneal cavity.
Step 3 - Uterosacral Ligament Division
With the cervix on upward traction, the uterosacral ligaments are identified by palpation. Each is clamped with a curved Heaney clamp, transected, and suture ligated with 0-gauge delayed absorbable suture (transfixion stitch). The suture ends are tagged with hemostats and NOT cut - they are kept for identification and later use in McCall culdoplasty.
Step 4 - Anterior Colpotomy (Bladder Dissection)
Attention turns anteriorly. The anterior vaginal wall is elevated. The vesicouterine (vesicocervical) space is developed by sharp dissection, pushing the bladder off the cervix up to the level of the anterior peritoneal fold. The anterior peritoneum is grasped and sharply opened (never blindly - risk of bladder injury). A right-angle retractor is passed through this incision to retract the bladder anteriorly and protect it for the rest of the procedure.
The anterior peritoneal cavity should not be opened blindly because of increased risk of bladder injury. If the peritoneum cannot be identified, the bladder must be further advanced before each additional pedicle.
Step 5 - Cardinal Ligament Ligation
With continued downward traction on the cervix, the cardinal ligaments are clamped medial to the previous pedicle, divided, and suture ligated bilaterally in serial steps. Incorporating the anterior and posterior peritoneum into the clamp helps anatomic definition and hemostasis. Each successive pedicle further delivers the uterus into the vaginal canal.
Step 6 - Uterine Artery Ligation
Contralateral and downward traction are maintained. The uterine vessels are identified, clamped (incorporating anterior and posterior peritoneal leaves), cut, and doubly suture ligated. A single suture and single-clamp technique is preferred to decrease risk of ureteral injury. If the uterus is large or distorted by fibroids, a second suture may ligate remaining branches.
Step 7 - Cornual Pedicle (Round Ligament, Tube, Utero-ovarian Ligament)
A tenaculum is placed on the uterine fundus to deliver it posteriorly. The surgeon's index finger identifies the utero-ovarian ligament and guides clamp placement. A curved clamp is placed under direct visualization across the cornual structures (round ligament + fallopian tube + utero-ovarian ligament), ensuring bowel is not entrapped. The pedicle is cut inferiorly, freeing the uterus completely. This is doubly ligated and closely inspected for hemostasis before being allowed to retract superiorly out of view.
- If oophorectomy is planned: the clamp is placed across the ovarian vessels (infundibulopelvic ligament) instead of the utero-ovarian ligament.
Step 8 - Hemostasis Check
A retractor or tagged moist sponge is placed into the peritoneal cavity. All pedicles (tagged at start and end) are systematically inspected. Additional sutures or clamps are placed on any bleeding points. Peritoneum does NOT need to be reapproximated (it reforms within 24 hours).
Step 9 - McCall Culdoplasty (Vault Suspension)
Should be performed routinely to prevent and treat vaginal apex prolapse. An absorbable suture is passed through:
- Full-thickness posterior vaginal wall at the vault apex
- Lateral-to-medial through the left uterosacral ligament (to avoid ureter)
- Across the posterior peritoneum between uterosacral ligaments (incorporating rectosigmoid serosa)
- Lateral-to-medial through the right uterosacral ligament
- Back through the full-thickness posterior vaginal wall
Multiple rows may be placed. Sutures are tied after cuff closure, beginning most proximal row first progressing caudally. Cystoscopy is performed to confirm ureteral patency given proximity of placement.
Step 10 - Vaginal Cuff Closure
The edges of the vaginal epithelium (colpotomy) are grasped with Allis clamps, incorporating the peritoneal layer. Angle stitches are placed first, incorporating the previously tagged uterosacral ligaments. The remainder is closed horizontally (or vertically) with delayed absorbable suture in running, figure-of-eight, or interrupted fashion - through the entire vaginal wall thickness to obliterate dead space and minimize granulation tissue. The McCall culdoplasty suture is then tied.
Step 11 - Postoperative
-
Foley catheter may be discontinued within 24 hours if no complications
-
Routine vaginal packing is NOT recommended
-
Cystoscopy should be performed to confirm ureteral patency if McCall culdoplasty was done
-
Berek & Novak's Gynecology, p. 1432-1450
-
Campbell-Walsh-Wein Urology, p. 3710-3714
-
Sabiston Textbook of Surgery, p. 2801
Surgical Illustrations
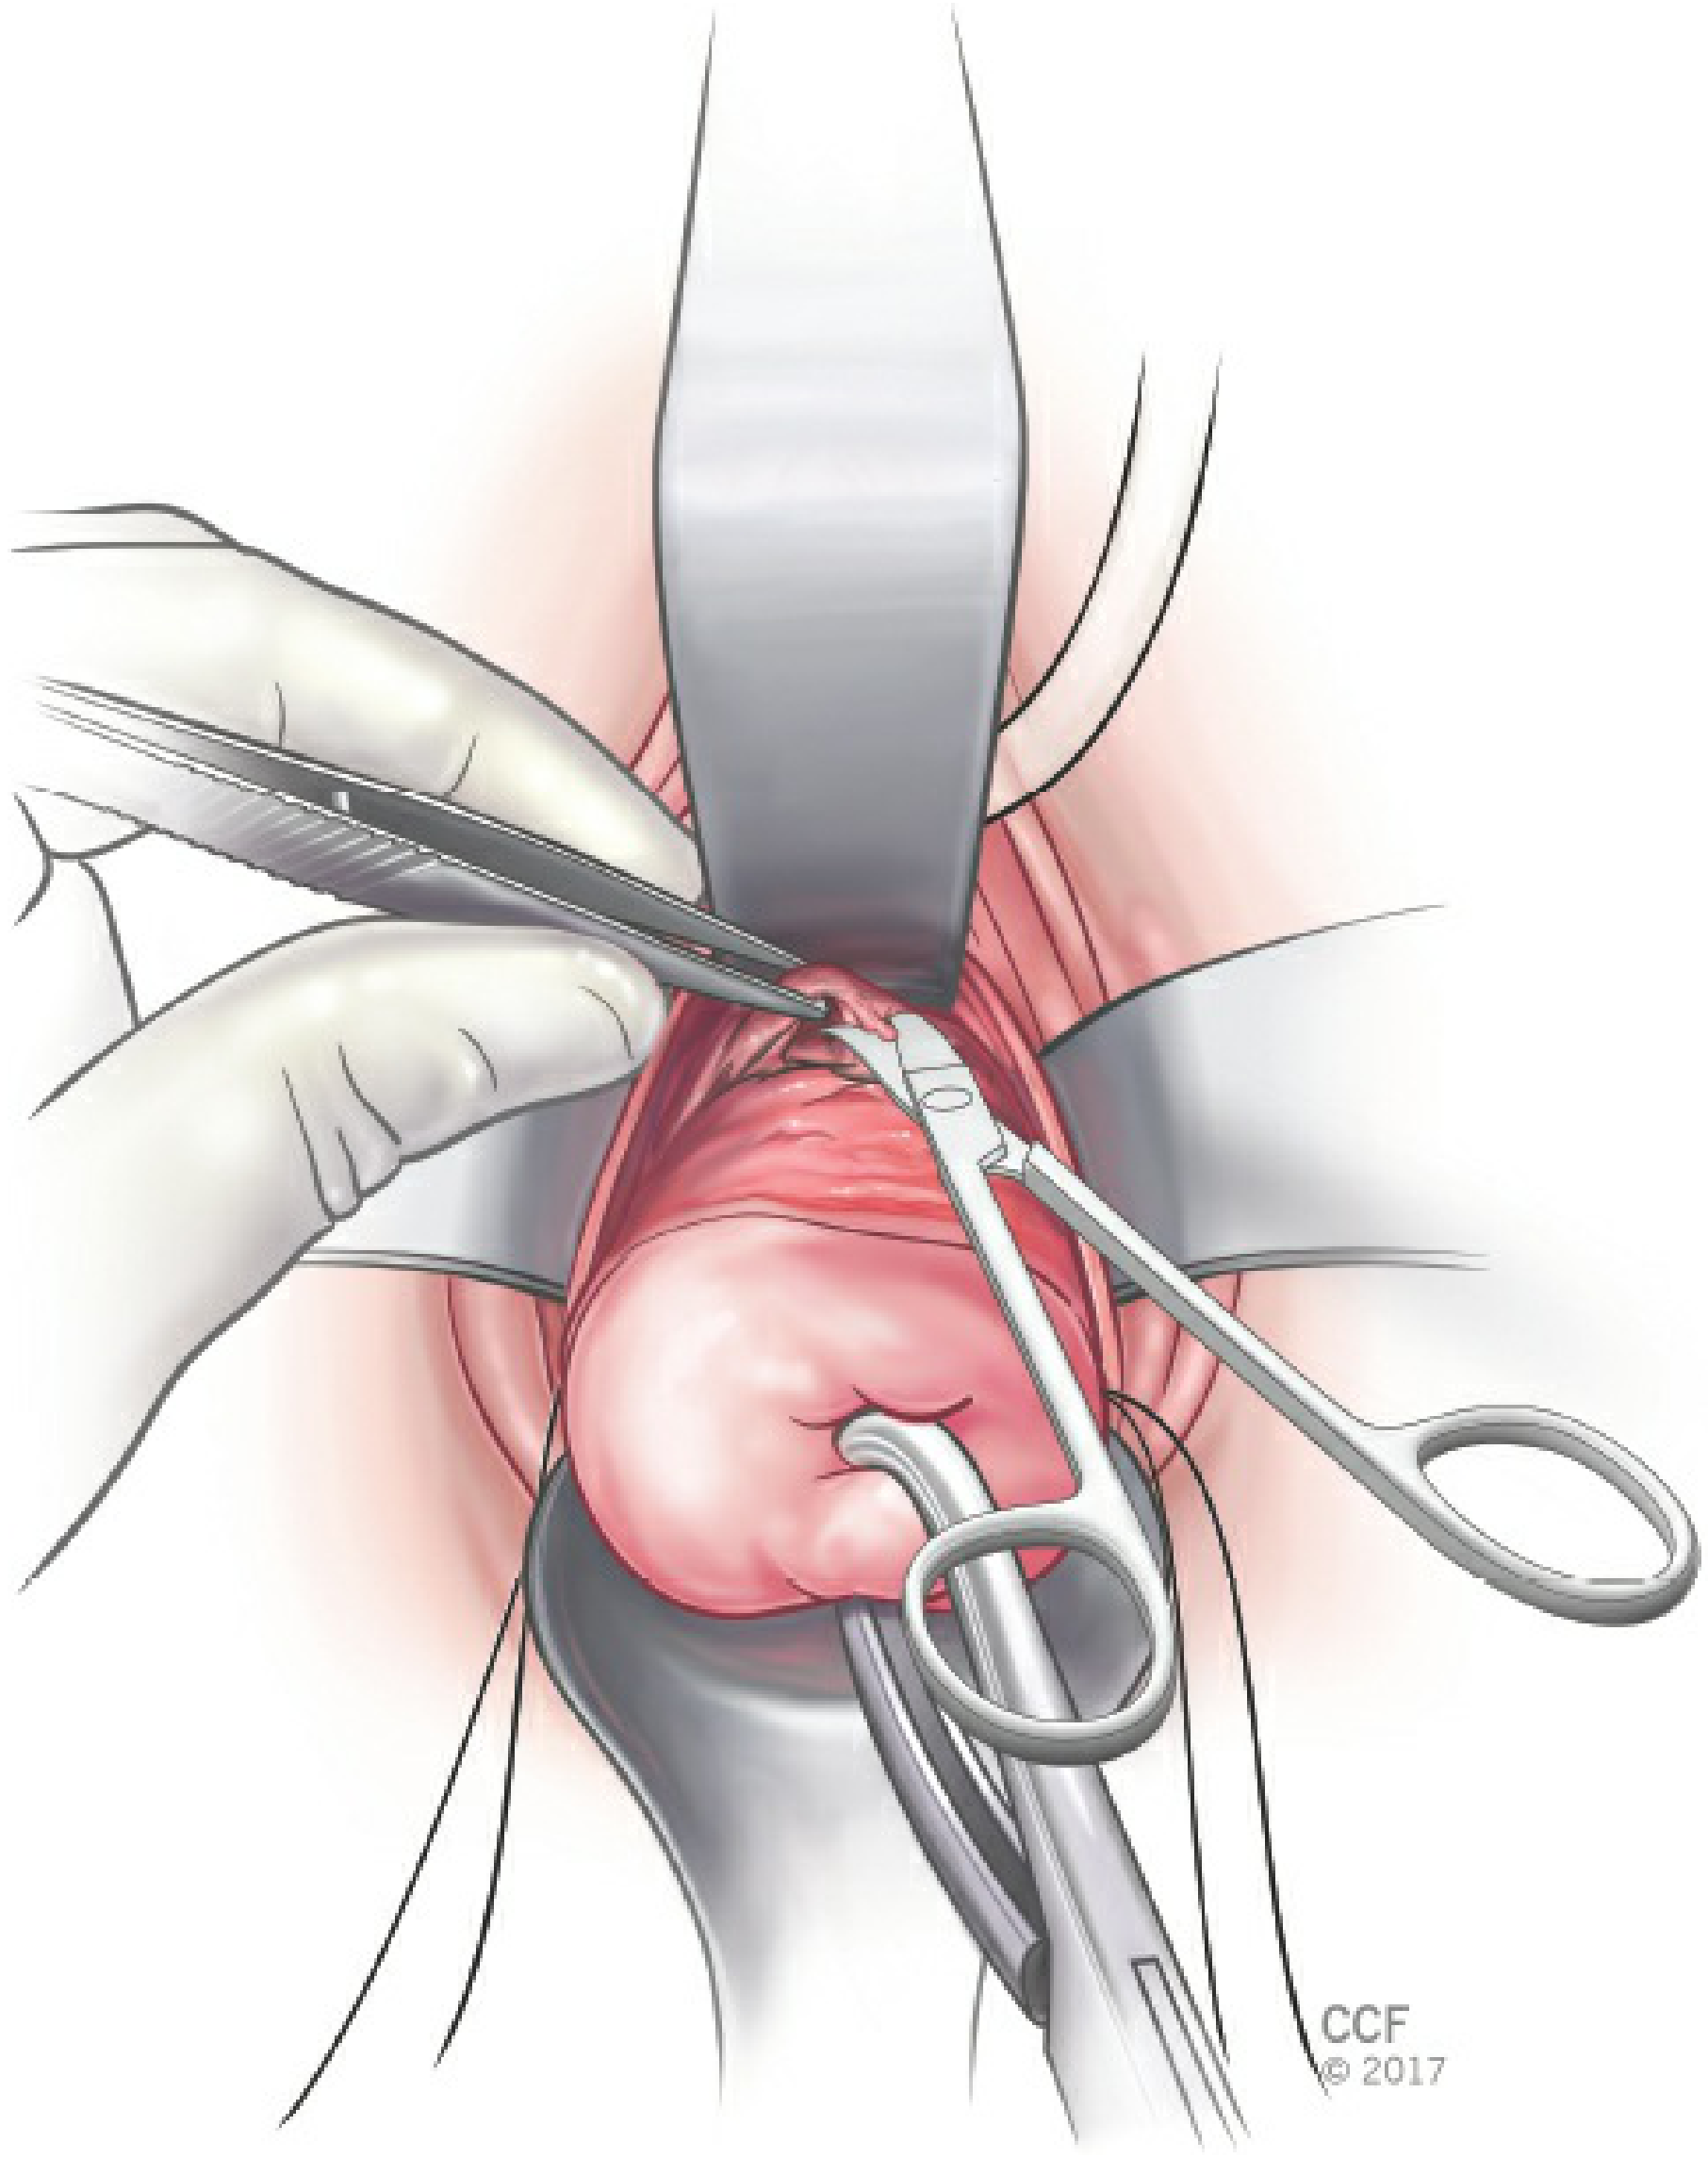
Figure: Anterior peritoneum entered sharply - Berek & Novak's Gynecology
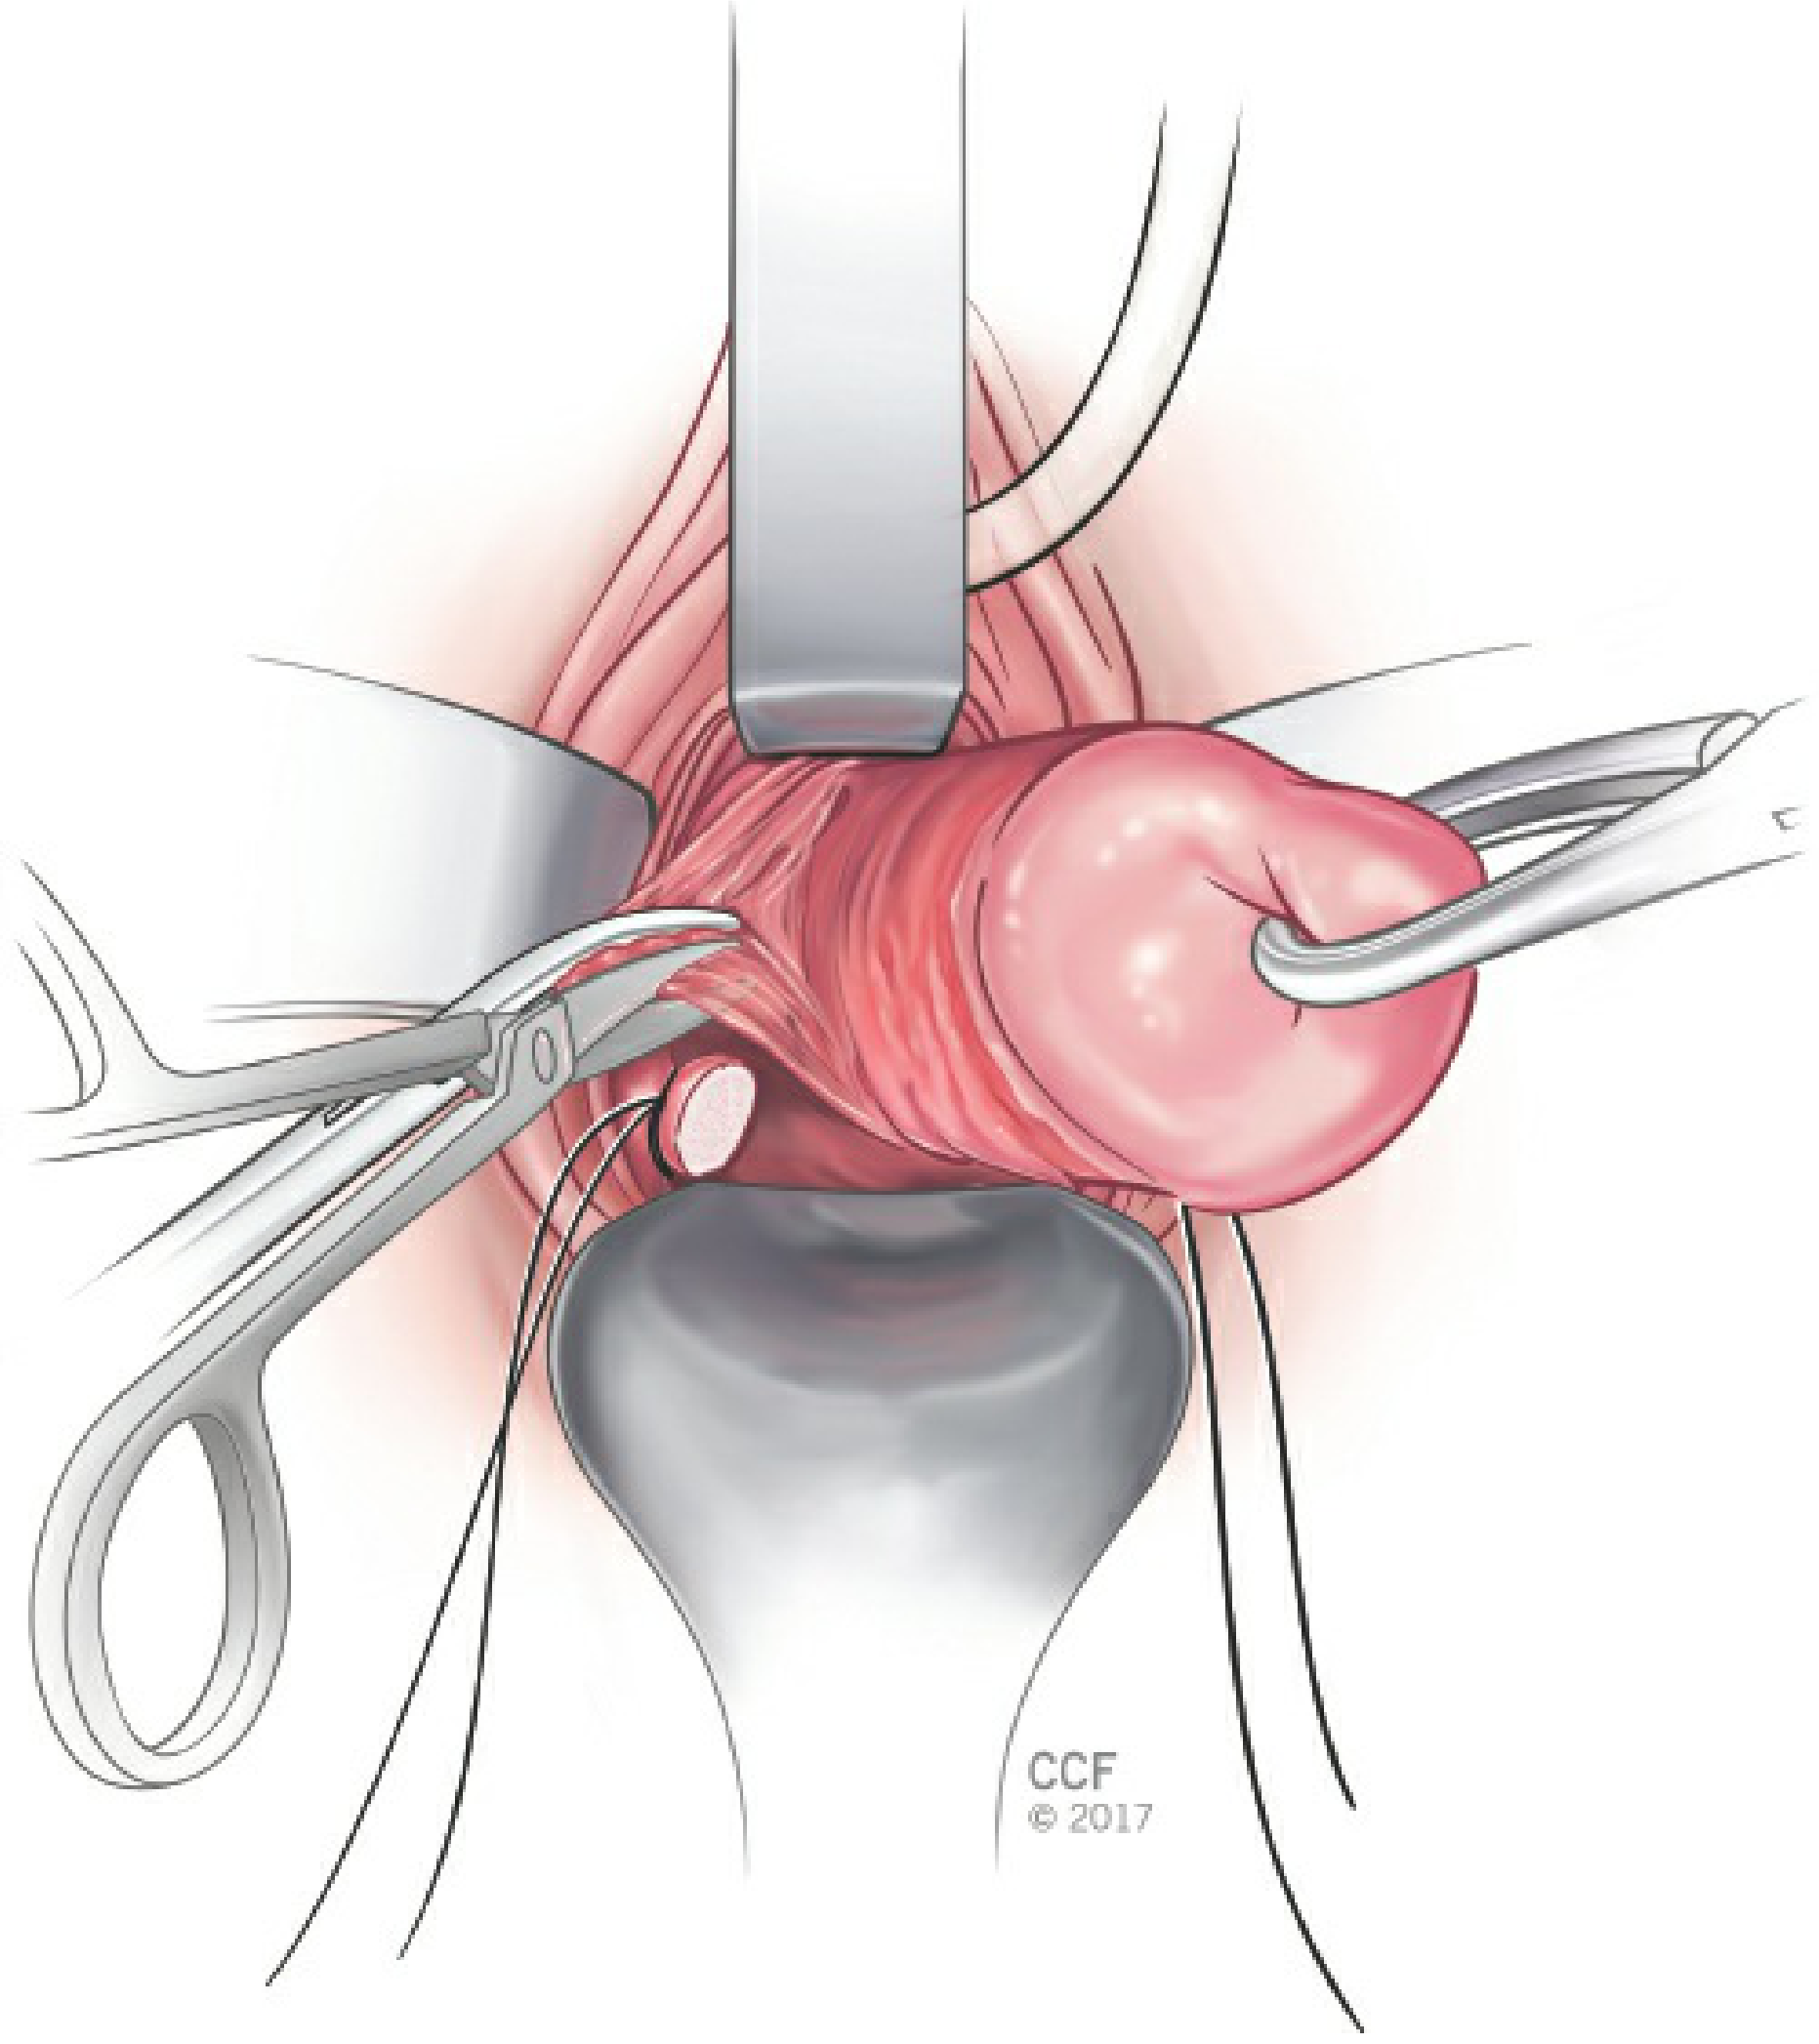
Figure: Clamps advanced medial to previous pedicle for cardinal ligament and uterine vessel ligation
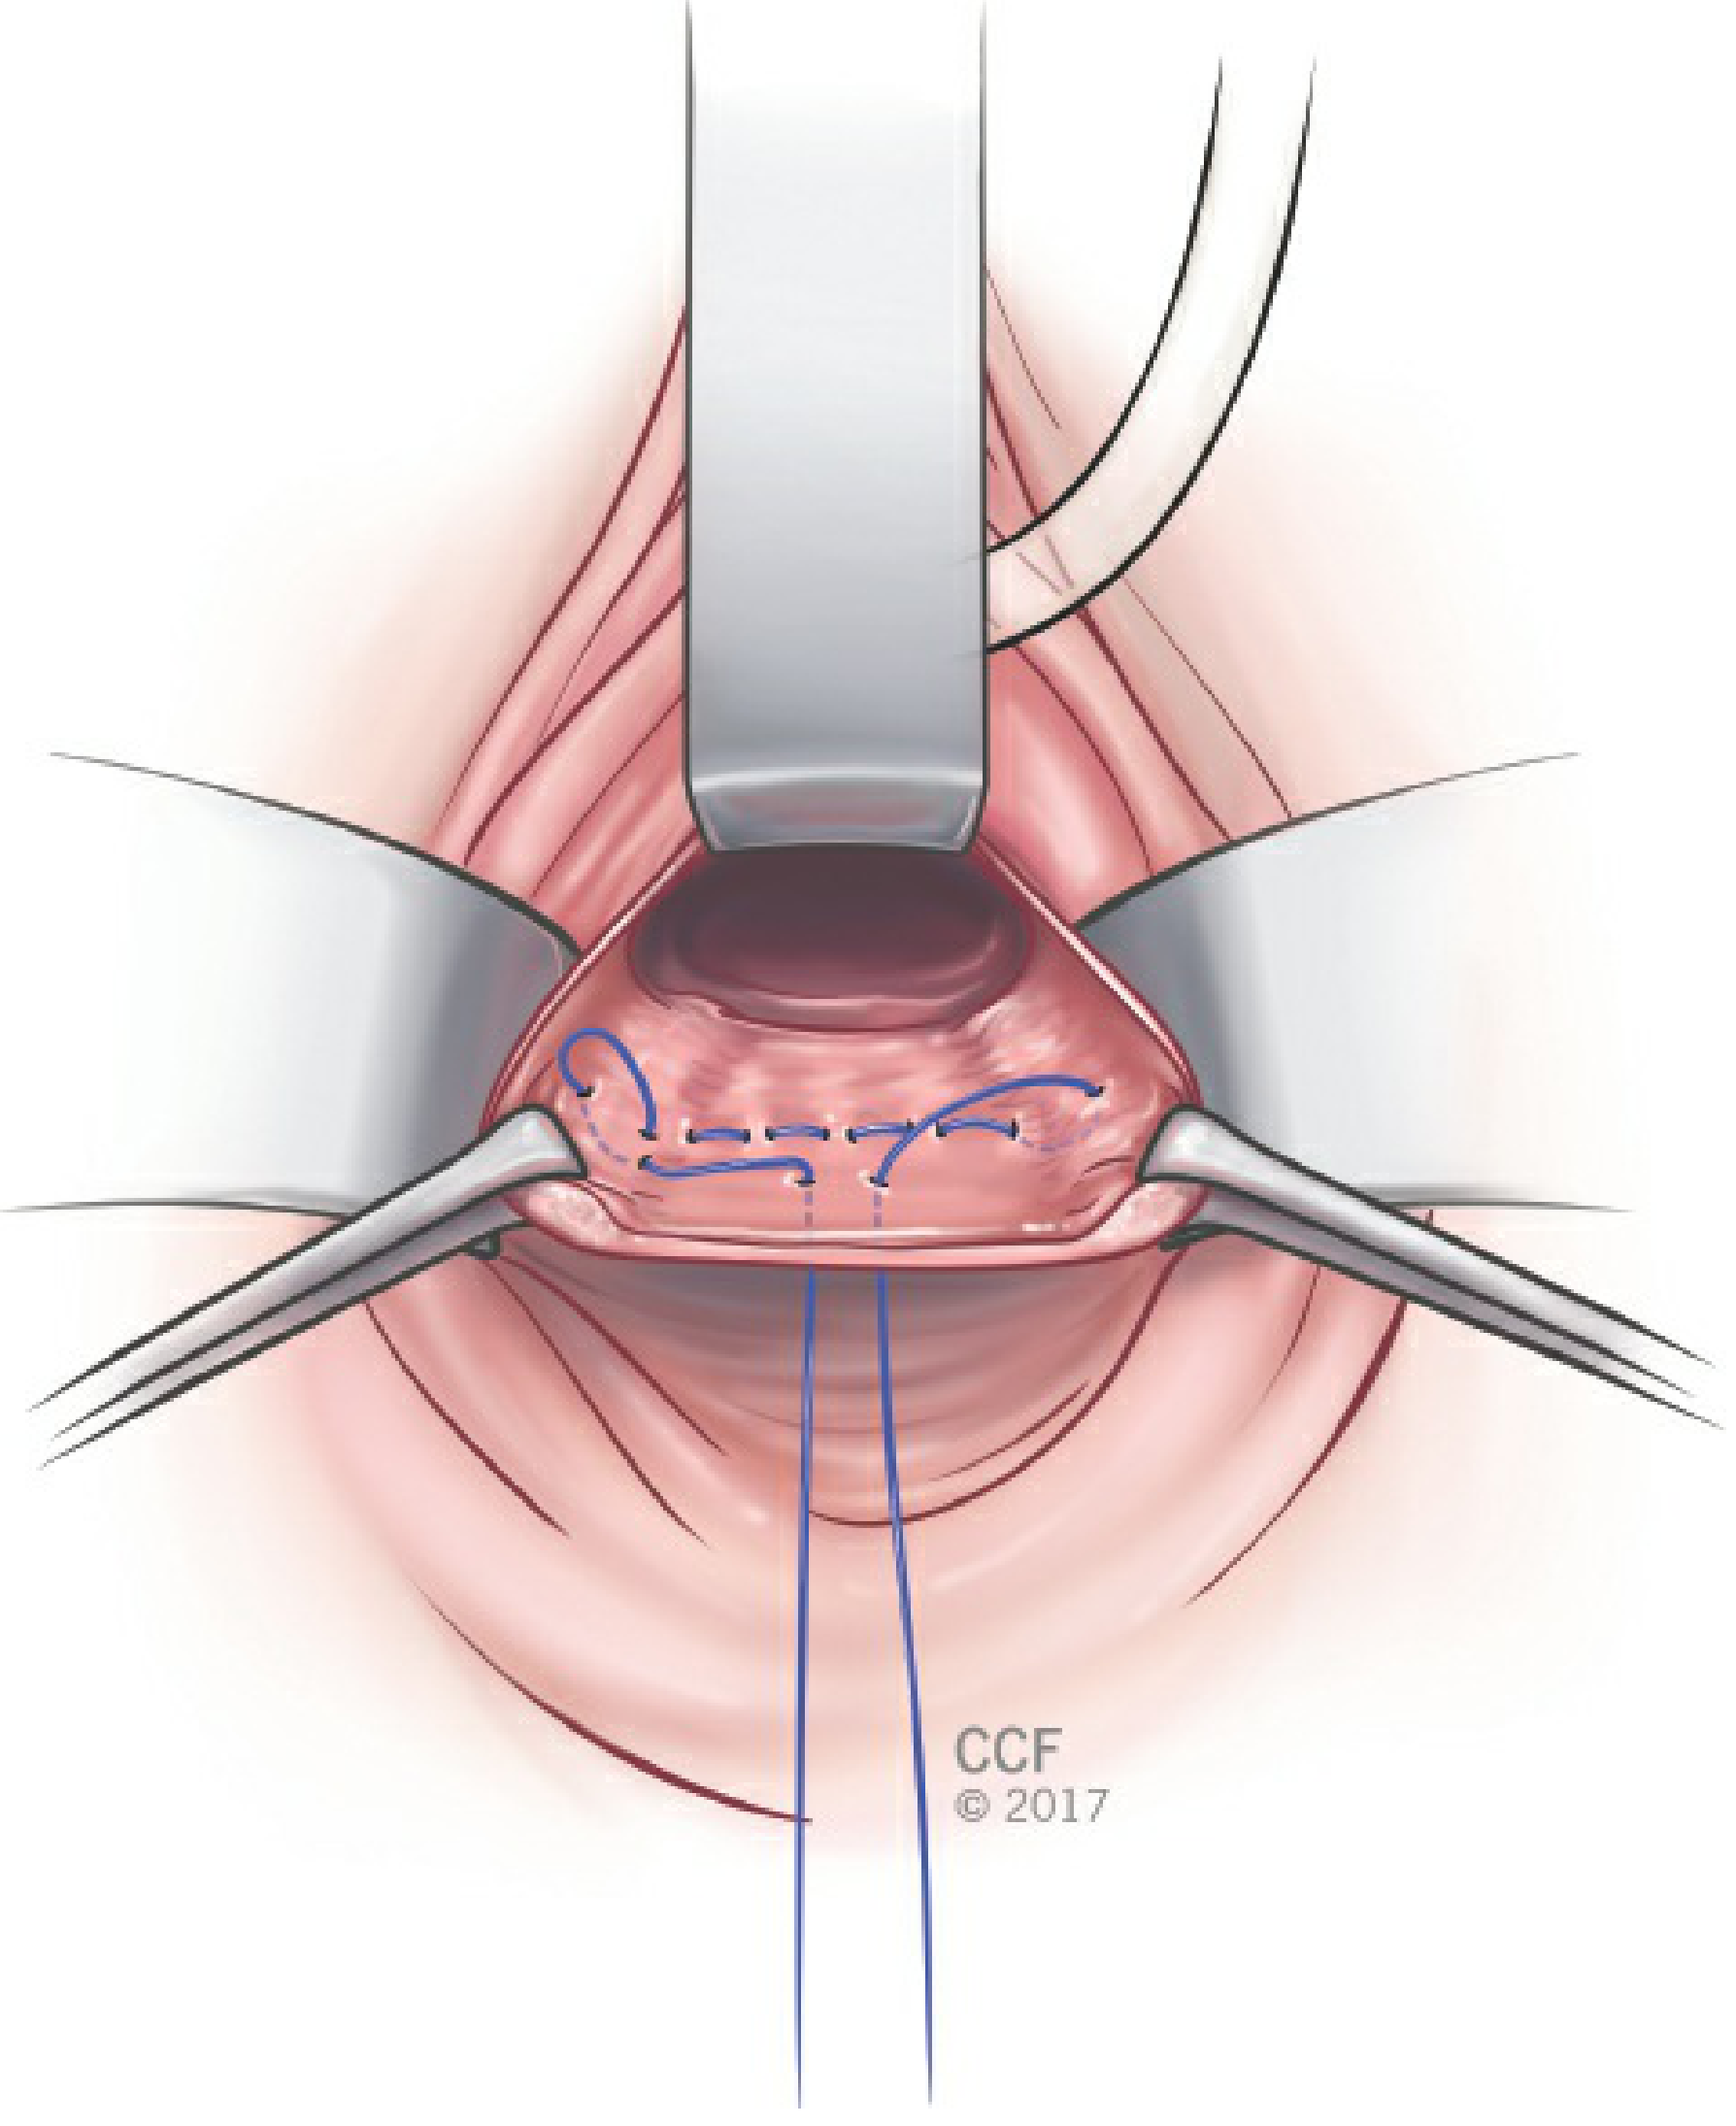
Figure: McCall culdoplasty suture placement for vault suspension
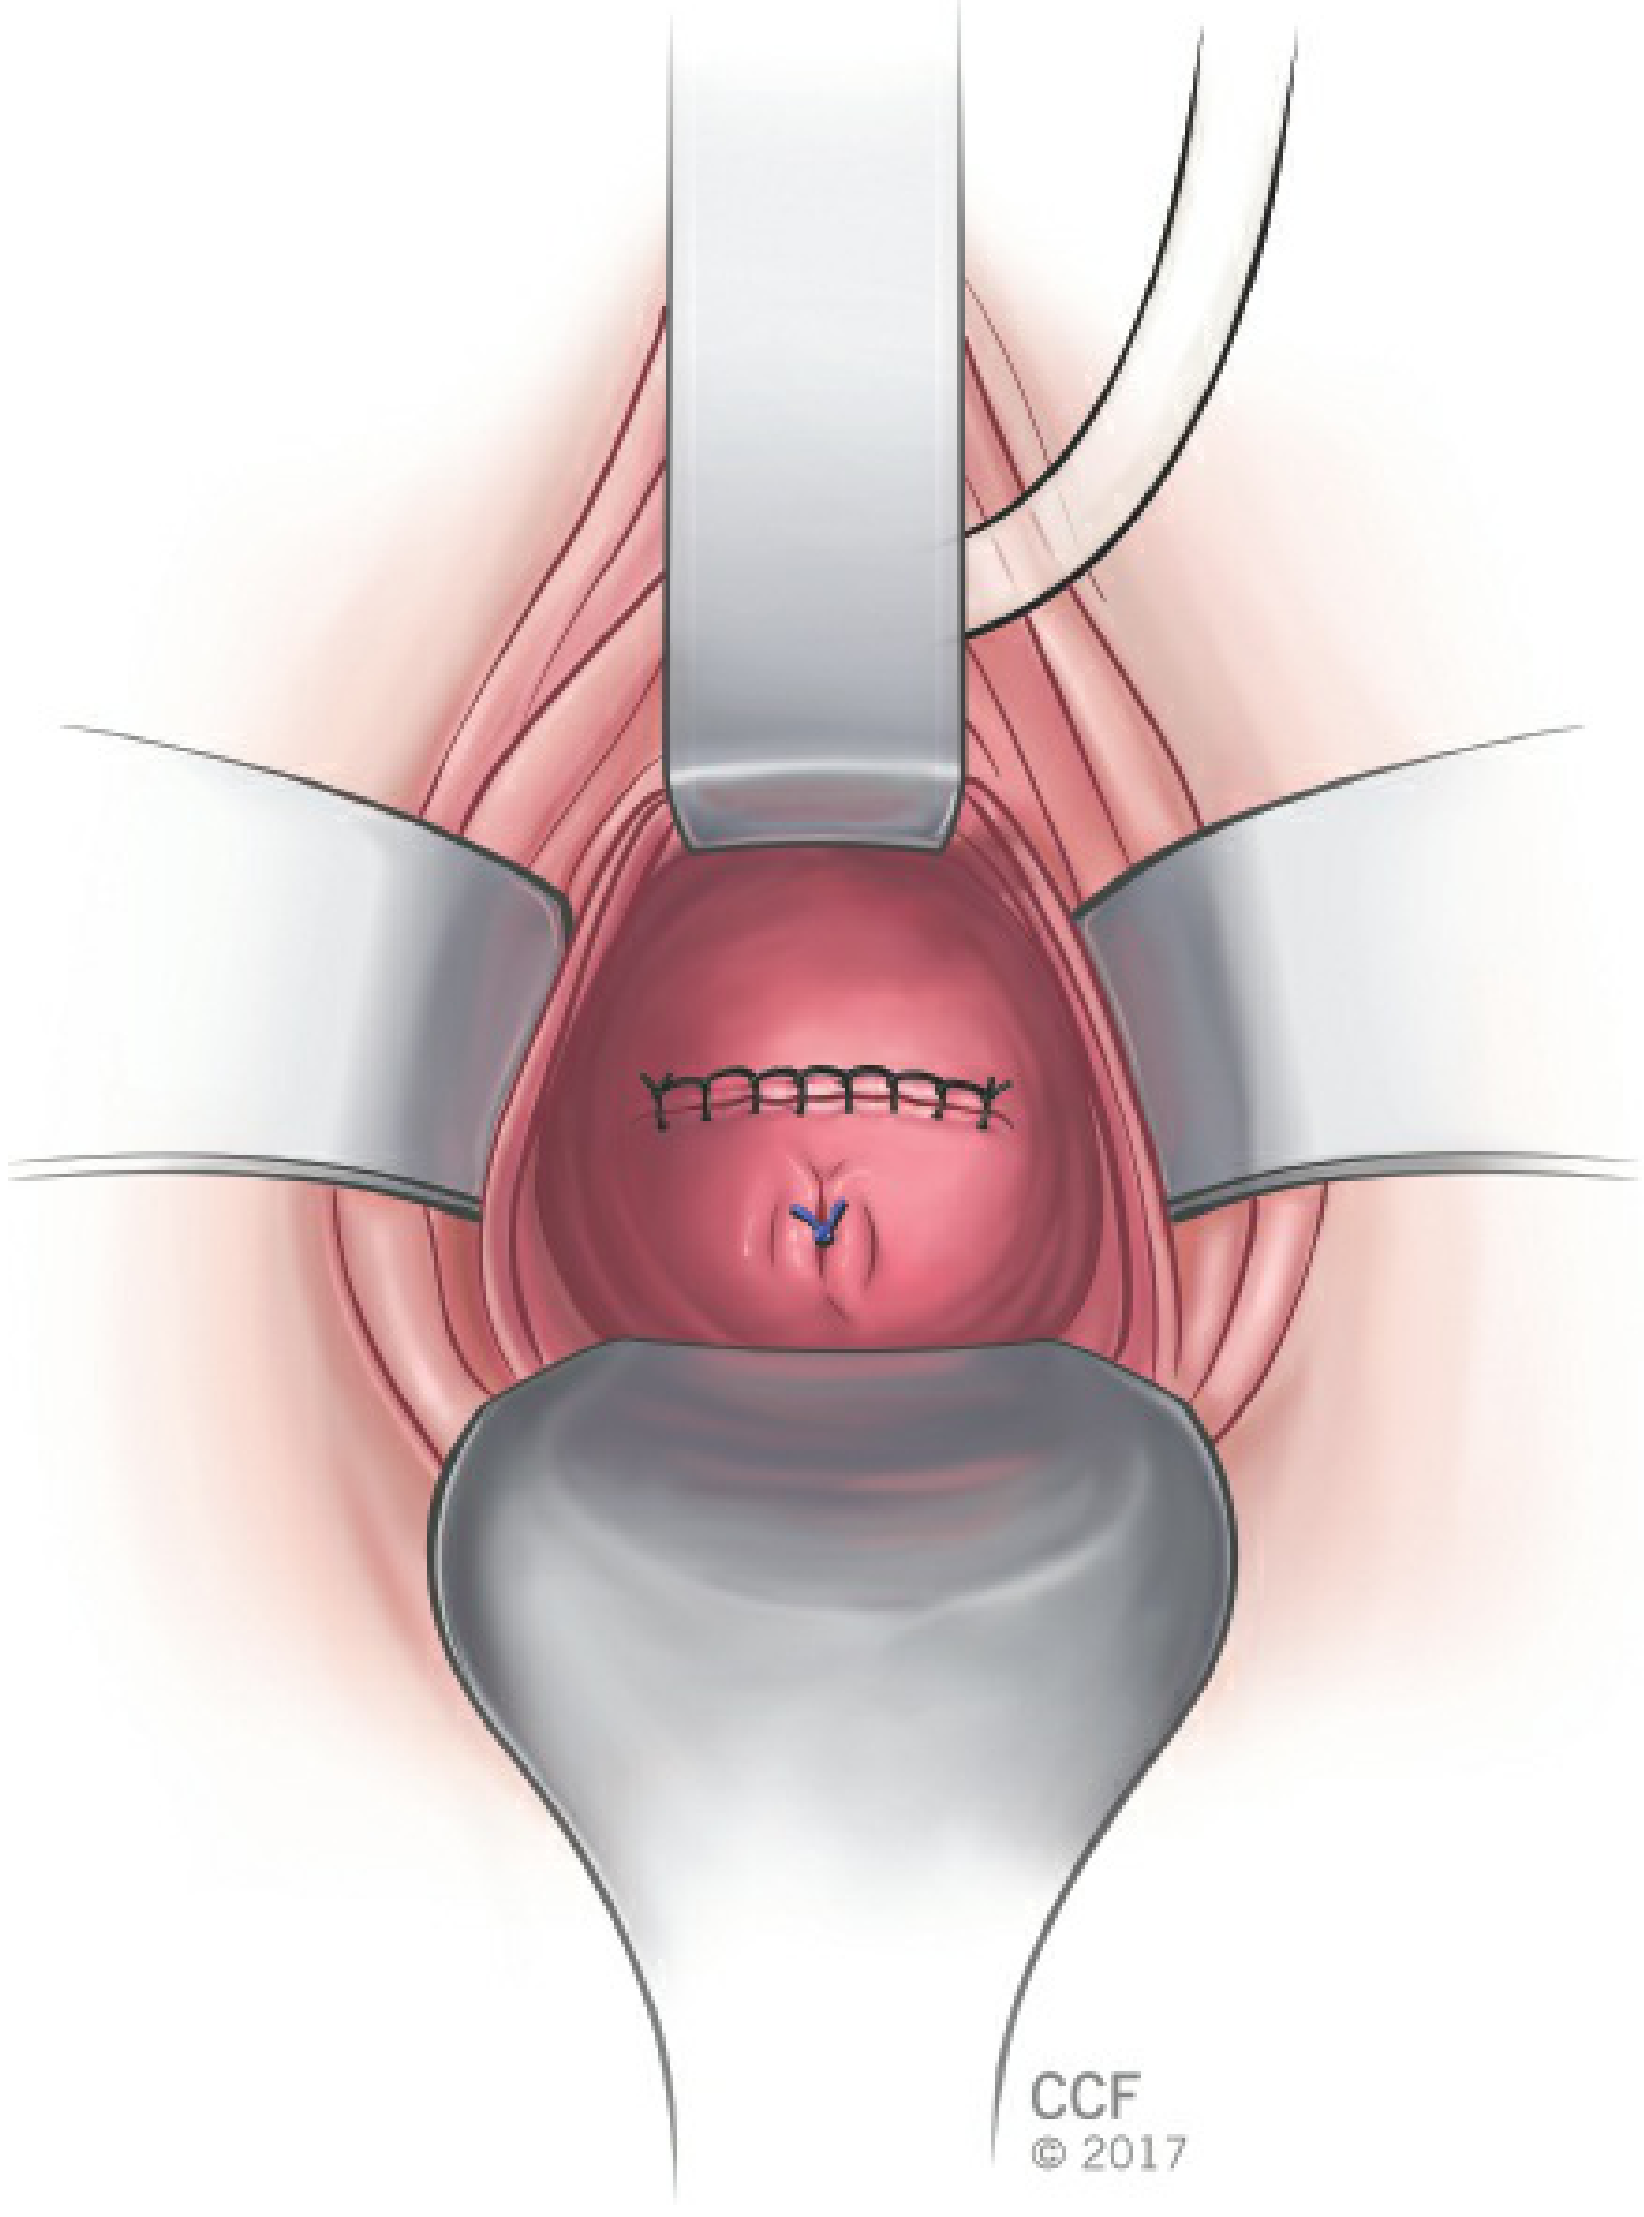
Figure: Closure of the vaginal cuff
Techniques for Special Cases
Enlarged Uterus - Morcellation
Uterine vessels must be ligated first before any morcellation. Three techniques:
- Hemisection/Bivalving - cervix split at midline, uterus cut into two halves; best for fundal midline fibroids
- Wedge ("V") Morcellation - wedge cuts reduce midline bulk, allowing progressive descent; best for anterior/posterior fibroids
- Intramyometrial Coring - myometrium is incised circumferentially parallel to the uterine axis, creating an elongated mass that can be delivered; converts a globular into a narrow structure
Difficult Vaginal Exposure - Schuchardt Incision
A paramedian relaxing incision from the 4-o'clock position at the hymenal margin to halfway between the anus and ischial tuberosity. Infiltrate area with lidocaine-epinephrine first. Used when the vaginal introitus is narrow. Must be repaired at the end of the case.
- Berek & Novak's Gynecology, p. 1450-1452
Complications
Intraoperative
| Complication | Rate |
|---|---|
| Hemorrhage | 1.4-2.6% |
| Bladder injury | 2.9% |
| Ureteral injury | 1.8% |
| Total urinary tract injury | 4.3% |
| Bowel injury | 0.4% |
| Conversion to abdominal approach | ~0.4% |
Postoperative
| Complication | Rate |
|---|---|
| Unexplained fever (vaginal) | 7.2% (vs. 16.8% for abdominal) |
| Urinary tract infection | 3.4% |
| Vesicovaginal fistula | <1% |
| Ileus | <1% |
| Fallopian tube prolapse | <1% |
| Vaginal vault prolapse | 0.2-43% (case-control: ~0.5%) |
Quality of life data show significant improvement in mood (depression, anxiety, irritability) and symptom burden following hysterectomy. Local nerve disruption and anatomic changes are responsible for the minority of patients who experience new pelvic floor dysfunction.
- Campbell-Walsh-Wein Urology, p. 3714
- Berek & Novak's Gynecology, p. 1418
Key Anatomical Points to Remember
- Ureter is at greatest risk during uterosacral and uterine vessel ligation - always clamp lateral-to-medial, stay close to the cervix/uterus
- Bladder is at risk during anterior colpotomy - never open blindly; advance bladder before each pedicle
- Rectum is at risk during posterior colpotomy - always confirm entry under direct vision
- Ovarian vessels must be separately ligated if oophorectomy is planned
Summary of Ligament Division Order (Vaginal Route)
- Posterior colpotomy (cul-de-sac)
- Uterosacral ligaments (tagged)
- Anterior colpotomy (bladder dissected off)
- Cardinal ligaments (serial bilateral steps)
- Uterine vessels
- Broad ligament / utero-ovarian ligaments
- Cornual pedicles (round ligament + tube + utero-ovarian) → uterus delivered
This is reverse order compared to abdominal/laparoscopic hysterectomy, which starts with the cornual structures.
This is a shared conversation. Sign in to Orris to start your own chat.