
TBW patella ms ortho 20 marks answer
I'll read the medical library skill first, then research TBW (Tension Band Wiring) of the patella comprehensively.
Reading File
Now let me search the medical library for TBW patella content in parallel:
Finding Sources
Finding Sources
Excellent results. Now let me read the most comprehensive sections in parallel:
Reading File
Reading File
Reading File
Let me get the detailed Rockwood & Green section on surgical technique and Campbell's section:
Reading File
Reading File
Let me get the surgical technique details from Rockwood & Green:
Reading File
Reading File
Reading File
Now let me read the surgical technique steps section:
Reading File
Now let me get the surgical technique steps for TBW:
Reading File
Let me also get the earlier part of the surgical technique (exposure and reduction steps):
Reading File
I now have comprehensive material. Let me fetch the key X-ray image showing TBW technique:
Loading Image
I now have all the information needed for a comprehensive 20-mark answer. Let me compose the full structured answer.
Tension Band Wiring (TBW) of the Patella
Sources: Rockwood & Green's Fractures in Adults 10th ed 2025; Miller's Review of Orthopaedics 9th ed; Campbell's Operative Orthopaedics 15th ed 2026
1. Introduction and Anatomy
The patella is the largest sesamoid bone in the body. It lies within the quadriceps tendon and improves the mechanical advantage of the extensor mechanism by increasing the lever arm, boosting knee extension force by up to 50% depending on knee angle. Patellar fractures account for approximately 1% of all skeletal fractures.
The extensor mechanism comprises: quadriceps muscle, quadriceps tendon, patella, patellar tendon, and medial/lateral retinacula.
2. Mechanism of Injury
Direct: Fall onto the knee or dashboard impact (motor vehicle accident). Produces comminuted patterns; retinacular disruption is less common.
Indirect: Violent quadriceps contraction with the knee in flexion (e.g., stumbling, sudden deceleration). Produces transverse fractures; retinacular tears are more extensive and active knee extension is usually lost.
Combined: Most clinically encountered fractures involve both mechanisms.
3. Classification (Descriptive)
| Pattern | Features |
|---|---|
| Transverse | Most common; results from indirect force; usually through mid-body |
| Comminuted/Stellate | High-energy direct blow; multiple fragments |
| Vertical/Longitudinal | Rare; usually nondisplaced; rarely needs surgery |
| Proximal/Distal Pole | Avulsion-type; distal pole (sleeve) common in children |
| Osteochondral | Associated with patellar dislocation |
Displaced fracture = fragment separation >3 mm OR articular step-off >2 mm.
OTA Classification: based on articular involvement and fragment count; used mainly for research standardization.
4. Clinical Features
- Pain, swelling, bruising over the anterior knee
- Palpable gap over the patella
- Inability to perform straight-leg raise or active knee extension = incompetent extensor mechanism (key sign)
- Haemarthrosis
5. Investigations
- X-ray: AP and lateral views of the knee. Lateral view best shows displacement and articular step-off. Bipartite patella (superolateral location, smooth cortical margins) must be distinguished from fracture.
- CT scan: For comminuted patterns to plan ORIF; better defines articular displacement.
- MRI: Evaluates associated extensor mechanism injuries; usually unnecessary for straightforward fractures.
6. Indications for Surgery
Operative indications:
- Displacement >3 mm between fragments
- Articular incongruity >2 mm
- Loss of active knee extension (disrupted extensor mechanism)
- Open fractures
Non-operative treatment:
- Nondisplaced fractures with intact extensor mechanism
- Hinged knee brace in extension; progressive flexion after 2-3 weeks
7. Goals of Surgical Treatment
- Restoration of functional integrity and strength of the extensor mechanism
- Maximizing articular congruity
- Preservation of patellar bone stock
- Stable fixation allowing early ROM and rehabilitation
8. Principle of Tension Band Wiring
This is the key concept for the exam.
The AO/ASIF principle: when a wire or figure-of-eight construct is placed on the anterior (tension) surface of the patella, the compressive force of the quadriceps during knee flexion is converted into interfragmentary compression at the fracture site (posterior/articular surface). This dynamic compression promotes fracture healing and allows early mobilization.
- Works best for simple transverse or short oblique fractures
- The anterior surface is the tension side; the posterior (articular) surface is the compression side
- During knee flexion, the wire tightens and compresses the fracture gap
9. Operative Technique: Modified Anterior Tension Band Wiring (AO Technique)
Preoperative Planning
- Radiolucent table; supine position; small bump under the ipsilateral hip
- Tourniquet may be applied but inflated only if needed
- Image intensifier (C-arm) available
Step 1 - Incision and Exposure
- Midline longitudinal incision centered over the patella
- Most versatile; can be extended proximally and distally
- After incising skin and subcutaneous tissue, the articular surface is exposed through the fracture site or through retinacular rents
- Medial and lateral retinacular tears are extended if needed for finger palpation of the articular surface
Step 2 - Joint Irrigation
- Haemarthrosis is evacuated; joint is irrigated
- Fracture surfaces are cleaned of interposed soft tissue and hematoma
Step 3 - Reduction
- Fracture is reduced under direct vision
- Articular congruity is confirmed by finger palpation through the retinacular rent (or by lateral arthrotomy and patellar eversion in comminuted cases)
- Reduction held with a pointed reduction clamp/towel clip
Step 4 - K-Wire Placement
- Two parallel 1.6-mm K-wires are placed perpendicular to the fracture line
- Placed 5 mm below the anterior cortical surface (to allow the tension band to sit flush against bone)
- Wires spaced to divide the patella longitudinally into thirds
- Antegrade technique: wires passed from proximal to distal across the fracture
- Retrograde technique: proximal fragment is flexed 90°, wires started at fracture surface and advanced proximally then distally across the fracture
Step 5 - Tension Band Wire Placement (Figure-of-Eight)
- An 18-gauge stainless steel wire (or braided non-absorbable suture as an alternative) is used
- One end passed posterior to the proximal K-wires from medial to lateral (using a large-bore needle/angiocatheter as a conduit to protect the quadriceps tendon)
- A figure-of-eight configuration is created:
- The wire is brought diagonally over the anterior patella to the contralateral distal pole
- Passed posterior to the distal K-wire ends
- Brought back over the anterior surface to the original superior corner
- Wire is tightened simultaneously from two points using a pliers or needle driver to ensure symmetric, equal tension on both sides
- Wire twisted a minimum of three turns but not over-tightened (risk of articular gapping or wire breakage)
- Wire twist sites ideally placed superiorly where more soft tissue coverage exists
Step 6 - K-Wire Bending and Impaction
- K-wires are cut at both ends and bent acutely 180° posteriorly over the tension band wire
- Ends are gently impacted into the patella using a bone tamp to prevent migration
- Distally, K-wires are bent posteriorly away from skin
Step 7 - Retinacular Repair
- Retinacular tears are repaired with interrupted or figure-of-eight non-absorbable sutures
- Arthrotomy closed in a watertight fashion
- Wound closed in layers
Step 8 - Postoperative Care
- Hinged knee brace; immediate weight-bearing as tolerated
- Early ROM encouraged - this is the main advantage of TBW
- Progressive flexion; quadriceps strengthening
10. Cannulated Screw Tension Band (Modified Technique)
- Same exposure and reduction as above
- Two 4.0-mm cannulated screws are placed perpendicularly across the fracture (guidewires positioned 5 mm below anterior cortex)
- Tension band wire (or braided suture) passed through the cannulated screws in a figure-of-eight configuration
- Biomechanically superior to K-wire technique
- Associated with 50% lower rate of symptomatic hardware requiring reoperation vs K-wires
- The wire should be tensioned over the edge of the patella, not the screw tips (to prevent wire breakage)
11. X-ray showing cannulated screw + tension band technique:
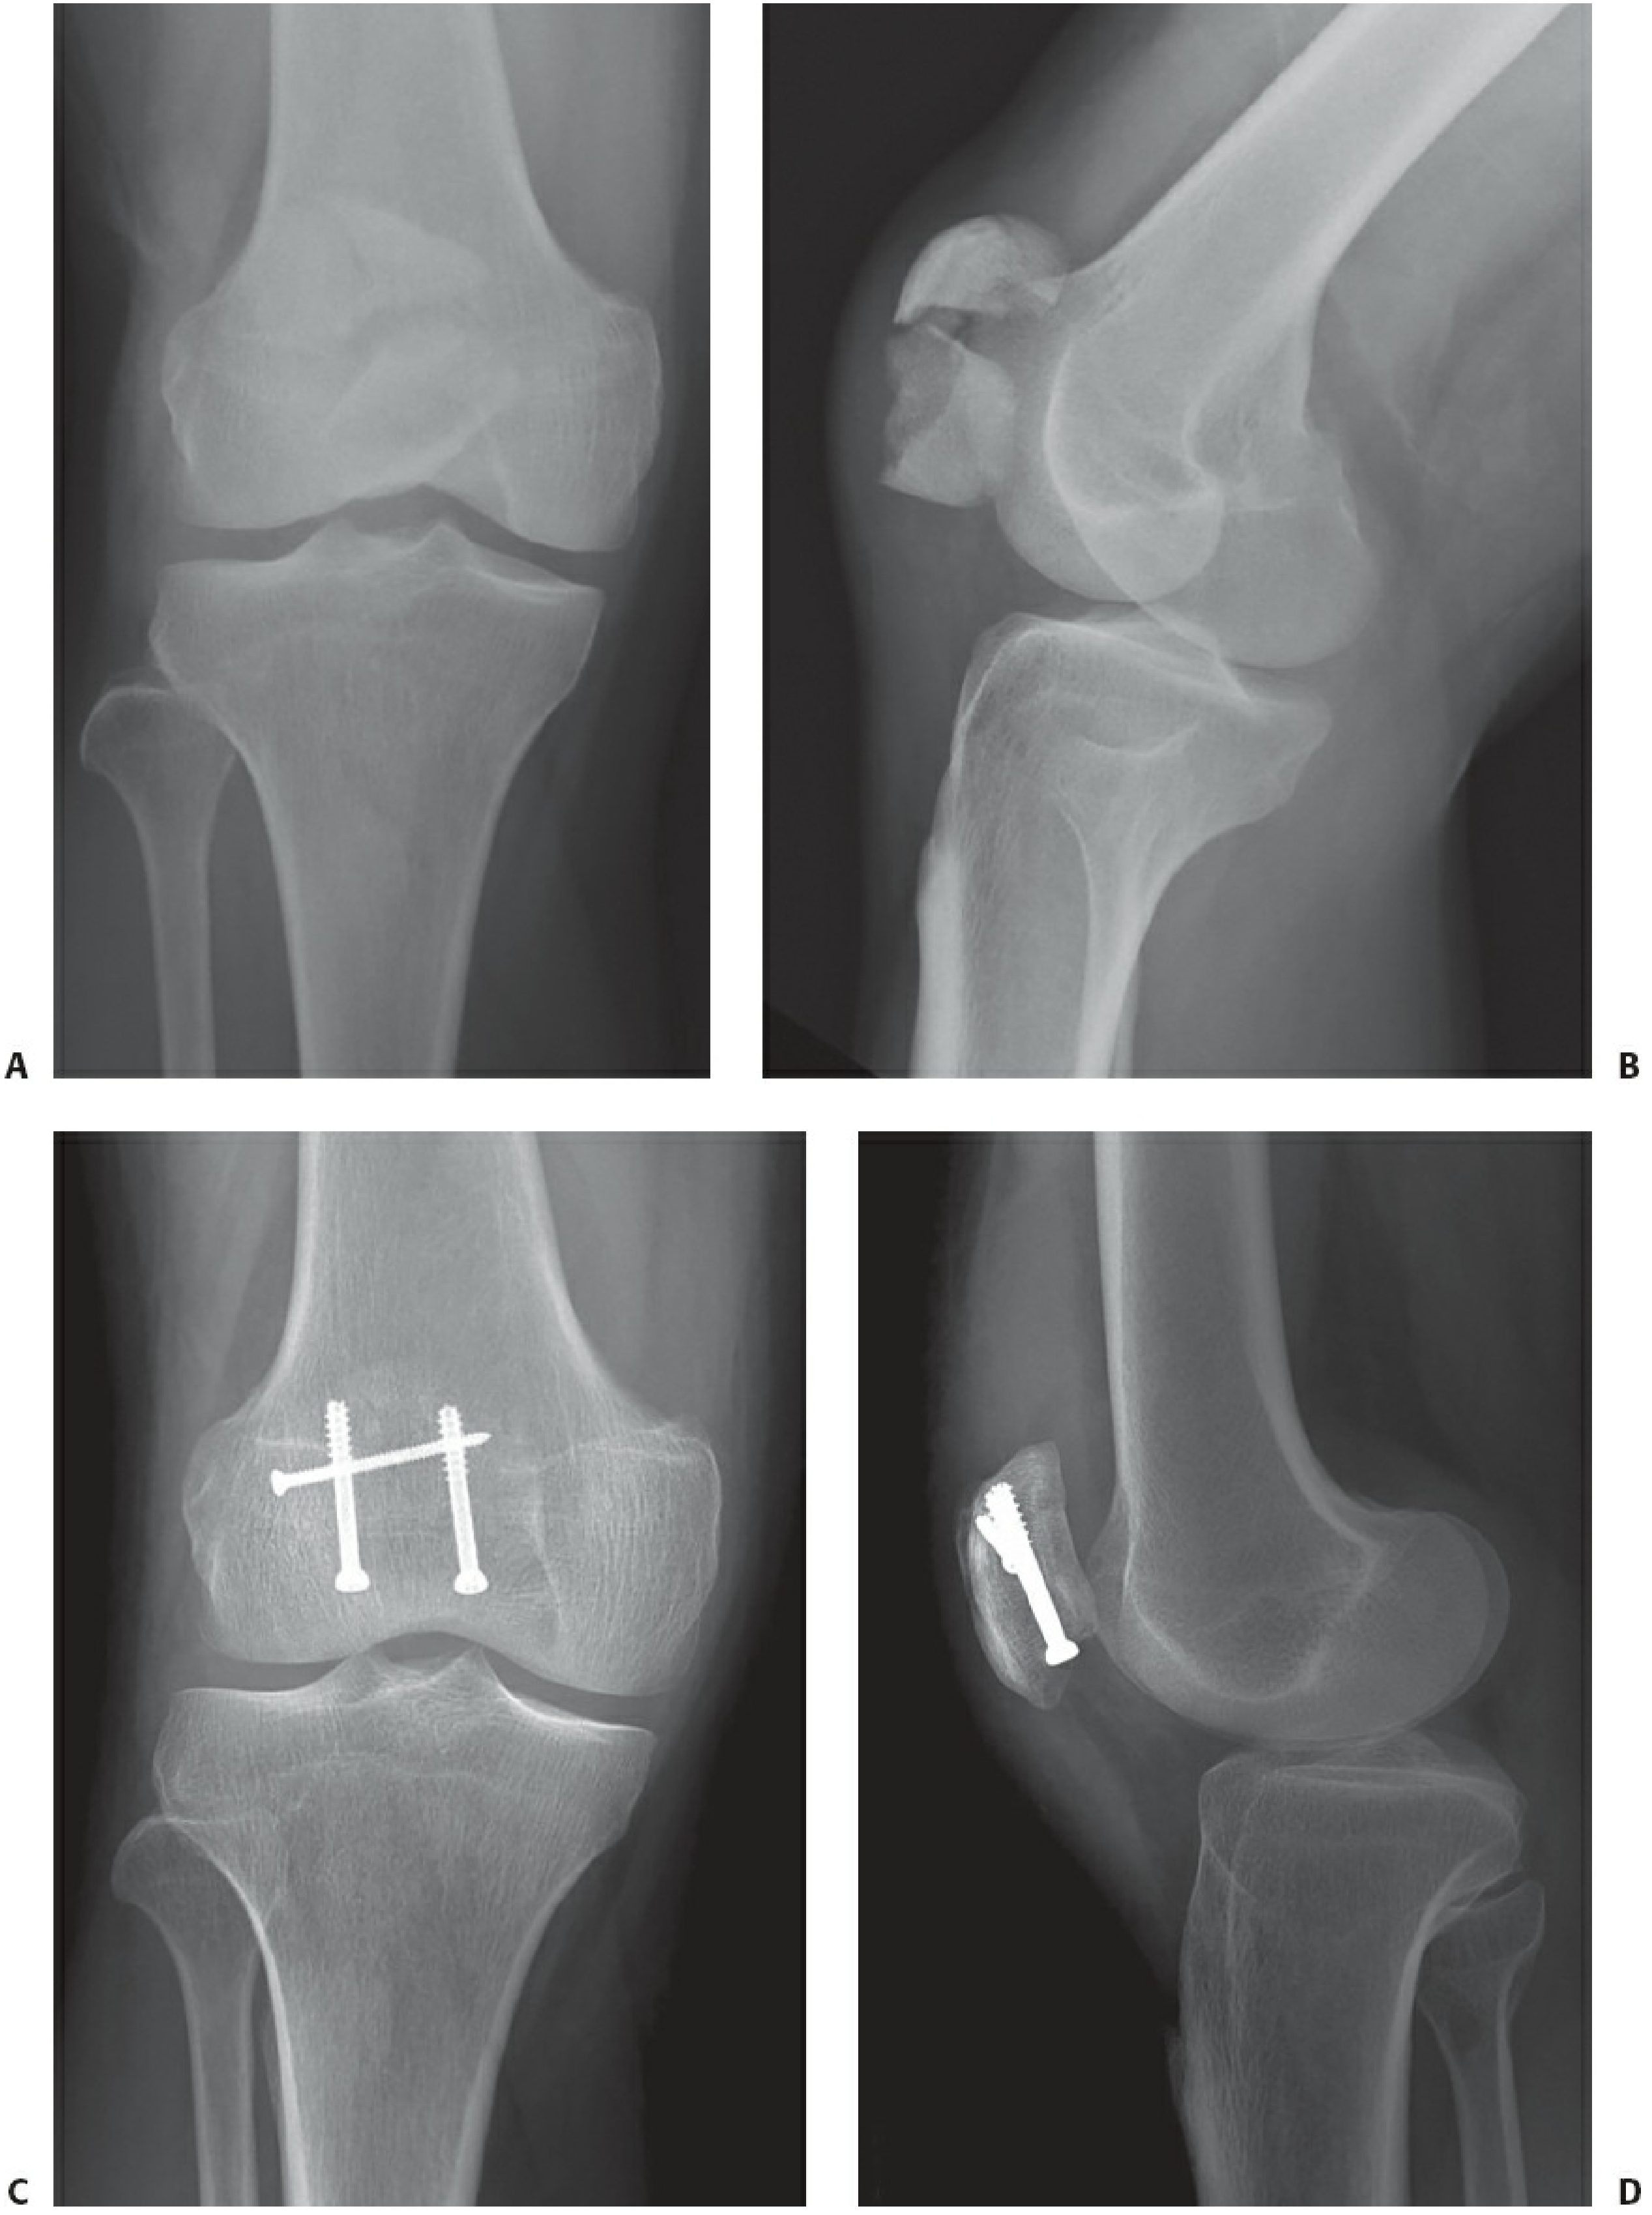
AP (C) and lateral (D) post-op views showing interfragmentary screw in the proximal fragment with cannulated screw plus tension band fixation - Rockwood & Green's Fractures in Adults 10th ed
12. Special Situations
| Fracture Type | Preferred Treatment |
|---|---|
| Transverse, simple | TBW with K-wires or cannulated screws |
| Stellate/comminuted, minimally displaced | Cerclage + tension band wiring |
| Severely comminuted | Plate fixation (emerging technique) or partial patellectomy |
| Distal pole (extraarticular) | Partial patellectomy with patellar tendon reattachment |
| Nondisplaced, intact extensor | Non-operative |
Plate fixation is emerging for comminuted patterns - biomechanically equivalent or superior to TBW with lower fracture gapping during cyclical loading.
13. Complications
| Complication | Notes |
|---|---|
| Symptomatic hardware | Most common complication; occurs in >33% - reoperation rate 33.6% (Dy et al. meta-analysis) |
| Loss of reduction | 22% |
| K-wire migration | Prevented by bending ends 180° and impacting into bone |
| Nonunion | ≤5%; risk increases significantly with age |
| Infection | Uncommon |
| Arthrofibrosis/stiffness | Especially with delayed mobilization |
| Patellofemoral arthritis | Articular cartilage irregularities in 73% at arthroscopy despite "good" Lysholm scores |
| Wound breakdown | Avoid creating subcutaneous flaps |
14. Outcomes
- Modified anterior tension band wiring: 86% good-to-excellent outcomes reported in historical series
- Cannulated screw tension band: lower reoperation rate for hardware than K-wires alone
- Braided suture alternatives (FiberWire, Ethibond #5): comparable biomechanical strength, lower reoperation rate for hardware removal
- Total patellectomy (reserved for irreparable comminution): 49% reduction in extensor strength; inferior outcomes - avoid wherever possible
15. Key Points for Exam
- AO principle: anterior surface = tension side; wire converts tensile to compressive forces during knee flexion
- Displacement criteria: >3 mm separation OR >2 mm articular step-off = operative
- K-wires placed 5 mm below anterior cortex, dividing patella into thirds
- Figure-of-eight wire placed posterior to K-wires at both poles
- Cannulated screw TBW is biomechanically superior with less hardware irritation
- Most common complication = symptomatic hardware (very high rate; counsel patients)
- Preserve patella always - even one fragment improves extensor mechanism leverage
- K-wire migration prevented by bending ends posteriorly into bone
- Early ROM is the main advantage of TBW over cast immobilization
- Retinacular repair is mandatory after fixation
Rockwood and Green's Fractures in Adults 10th ed 2025, pp. 3001-3017 | Miller's Review of Orthopaedics 9th ed, p. 924 | Campbell's Operative Orthopaedics 15th ed 2026
Posterior approach to hip ms ortho 20 marks answer
Finding Sources
Finding Sources
Reading File
Reading File
Reading File
Reading File
Reading File
Finding Sources
Reading File
Finding Sources
Loading Image
Finding Sources
Finding Sources
Reading File
I now have all the key information needed. Let me fetch the anatomical diagram from Campbell's for the Moore approach:
Loading Image
I have comprehensive material from Campbell's, Miller's, and Rockwood & Green. Here is the complete 20-mark answer:
Posterior Approach to the Hip (Moore / Southern Approach)
Sources: Campbell's Operative Orthopaedics 15th Ed 2026 | Miller's Review of Orthopaedics 9th Ed | Rockwood & Green's Fractures in Adults 10th Ed 2025
1. Introduction
The posterior approach to the hip (also called the Moore approach or "Southern exposure") is the most widely used approach to the hip joint in orthopaedic surgery. It provides excellent access to the femoral head, neck, acetabulum, and posterior wall. The approach exploits the interval posterior to the hip capsule, splitting the gluteus maximus and reflecting the short external rotators.
It was popularized by Moore (1957) and is sometimes also referred to as the Kocher-Langenbeck approach when used for acetabular fractures.
2. Indications
| Indication | Notes |
|---|---|
| Total hip arthroplasty (THA) | Most common use worldwide |
| Hemiarthroplasty (femoral neck fractures) | Austin Moore prosthesis, bipolar |
| Revision hip arthroplasty | Excellent extensile exposure |
| Posterior hip dislocation (open reduction) | Irreducible or nonconcentric reduction |
| Posterior wall acetabular fractures | Kocher-Langenbeck variant |
| Posterior column fractures | With trochanteric osteotomy if needed |
| Transverse + T-type acetabular fractures | With posterior displacement |
| Septic arthritis of hip (drainage) | Access to posterior capsule |
| Excision arthroplasty (Girdlestone) |
Key concept from Campbell's: Posterior approaches are ideally suited for procedures in which femoral head viability is not required (e.g., resection arthroplasty, proximal femoral prosthesis insertion). If femoral head viability is necessary (e.g., hip resurfacing, fracture fixation), anterior approaches are often better suited.
3. Relevant Surgical Anatomy
Superficial Layer
- Gluteus maximus: The principal landmark. Supplied by the inferior gluteal nerve and artery (enter the muscle from the deep surface, approximately 5 cm from the greater trochanter). The muscle must not be split more than 7 cm from the tip of the trochanter to avoid denervation of its anterosuperior portion.
- Fascia lata / iliotibial band: Incised in line with the skin incision distally.
Deep Layer - Short External Rotators (from superior to inferior)
These are the key structures divided in this approach:
- Piriformis - inserts on the tip/superior facet of the greater trochanter
- Obturator internus (with gemellus superior above and gemellus inferior below)
- Gemellus superior
- Gemellus inferior
- Quadratus femoris - NOT divided; left intact to protect the ascending branch of the medial femoral circumflex artery (MFCA)
- Obturator externus - NOT divided; lies deep and also protects MFCA
Critical Neurovascular Structures
- Sciatic nerve: Runs posterior to the short external rotators, overlying the quadratus femoris. It is the most important structure at risk. Typically (84%) passes deep/inferior to the piriformis muscle. Must be identified and protected.
- Anatomic variations of sciatic nerve relative to piriformis:
- Peroneal division through the piriformis, tibial division below (12%)
- Entire nerve through the muscle (1%)
- Peroneal above, tibial below (3%)
- Anatomic variations of sciatic nerve relative to piriformis:
- Medial femoral circumflex artery (MFCA): Its ascending branch runs deep to the quadratus femoris and obturator externus. Preserving these two muscles protects the blood supply to the femoral head.
- Superior gluteal nerve and vessels: Exit the greater sciatic notch; at risk if abductors are excessively retracted superiorly.
- Inferior gluteal nerve and artery: Supply gluteus maximus from the deep surface.
4. Surgical Technique (Moore's Approach - Step by Step)
Patient Positioning
- Lateral decubitus (patient on the unaffected side) - standard
- The affected limb is draped free for manipulation
- A small bump under the hip helps control external rotation
- Radiolucent table; C-arm available if needed
Step 1 - Skin Incision
- Begin approximately 10 cm distal to the posterior superior iliac spine (PSIS)
- Extend the incision distally and laterally, parallel to the fibers of the gluteus maximus, toward the posterosuperior angle of the greater trochanter
- Then direct the incision distally 10-13 cm, parallel to the femoral shaft (creating a curved/hockey-stick incision)
- Total length approximately 15-20 cm
Step 2 - Fascial Incision
- Expose and divide the deep fascia (fascia lata) in line with the skin incision
Step 3 - Split Gluteus Maximus
- By blunt dissection, split the fibers of the gluteus maximus in line with its fibers - no more than 7 cm from the tip of the greater trochanter
- This protects branches of the inferior gluteal nerve and artery
- Retract the proximal fibers proximally and the distal fibers distally
- Partially divide the distal insertion of gluteus maximus into the linea aspera to increase exposure
Step 4 - Identify and Protect the Sciatic Nerve
- The sciatic nerve is now visible, overlying the posterior surface of the quadratus femoris
- Identify and protect it throughout the procedure
- Once the surgeon is experienced with this approach, the nerve does not always need to be formally exposed, but during acetabular surgery it must be directly visualised
Step 5 - Internally Rotate the Femur
- The femur is internally rotated - this stretches the short external rotators taut, making them easier to identify and divide
- Internally rotating the thigh also lifts the muscles away from the sciatic nerve
Step 6 - Divide the Short External Rotators
- Identify piriformis, gemellus superior, obturator internus, gemellus inferior
- Tag and divide these tendons 1.5 cm from their insertion into the greater trochanter (to preserve a cuff for later reattachment and to protect the ascending branch of the MFCA)
- Reflect the muscles medially - the reflected muscles act as a natural shield over the sciatic nerve
- Critical: Leave the quadratus femoris and obturator externus intact to protect the ascending branch of the medial circumflex femoral artery (blood supply to the femoral head)
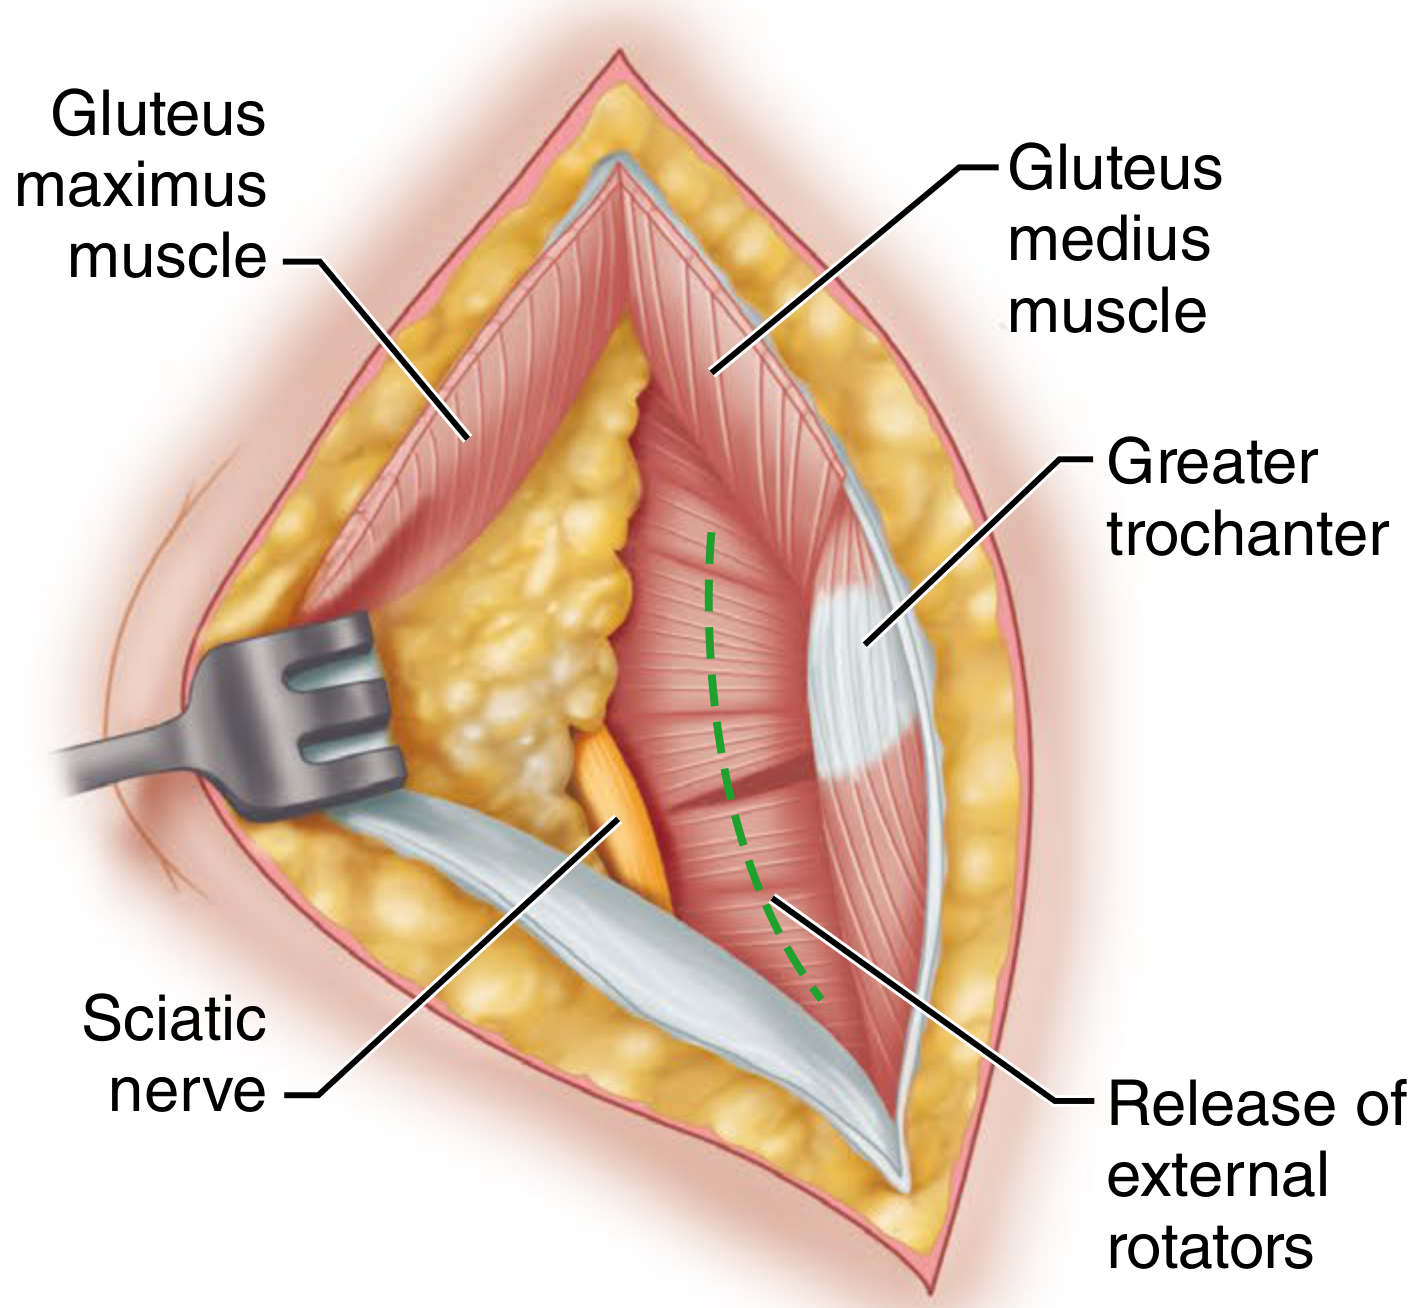
Deep exposure of the posterior approach - sciatic nerve visible, short external rotators being released at the greater trochanter. (Campbell's Operative Orthopaedics 15th ed)
Step 7 - Expose the Joint Capsule
- The posterior hip joint capsule is now fully in view
- Incise the capsule longitudinally from distal to proximal, along the line of the femoral neck, to the rim of the acetabulum
- Detach the distal part of the capsule from the femur
- Further retract the gluteus medius proximally and the quadratus femoris distally for additional exposure
Step 8 - Dislocation of the Hip
- Flex the thigh and knee to 90 degrees
- Internally rotate the thigh
- Adduct the limb
- The hip dislocates posteriorly
- The femoral head and acetabulum are now fully accessible
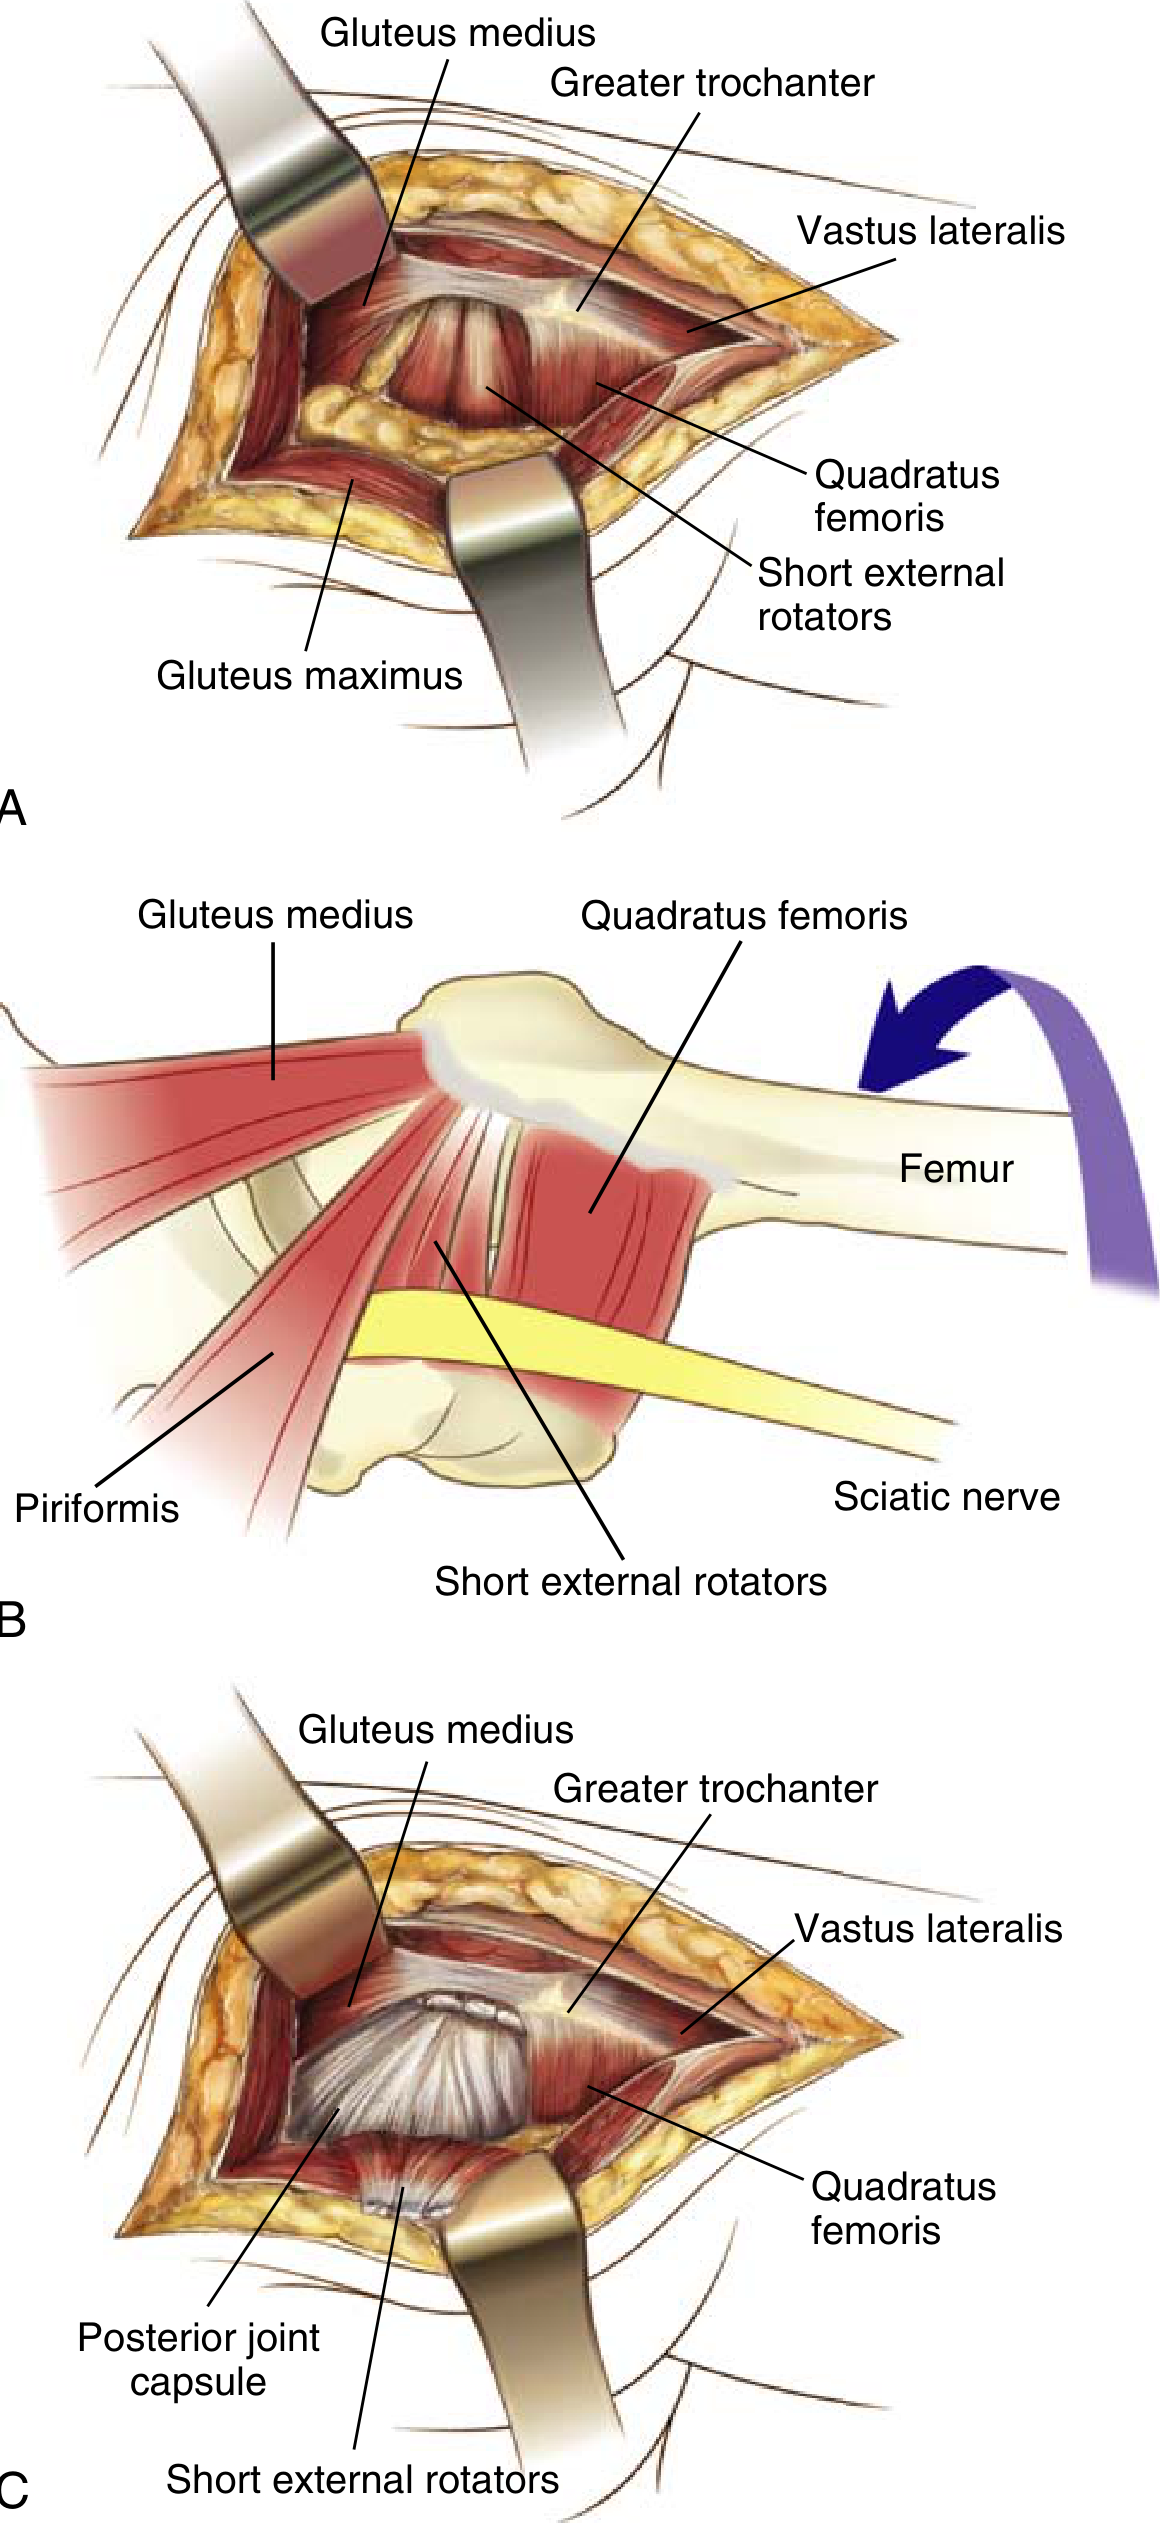
Posterior (Moore/Southern) approach to the hip: (A) Superficial exposure showing gluteus maximus split. (B) Short external rotators and sciatic nerve with femur in internal rotation. (C) Deep exposure showing posterior joint capsule. (Miller's Review of Orthopaedics 9th ed, Fig. 2.92)
5. Wound Closure
- Reduce the hip (or insert prosthesis) and check stability
- Repair the posterior capsule - with interrupted non-absorbable sutures; watertight repair
- Reattach the short external rotators (piriformis, obturator internus, gemelli) back to the greater trochanter using drill holes or suture anchors through a non-absorbable suture
- This posterior soft tissue repair (capsule + external rotators) is mandatory to reduce dislocation risk after posterior approach THA
- Allow the gluteus maximus to fall back into position (no formal repair needed)
- Close fascia lata, subcutaneous tissue, and skin in layers
6. Extensions of the Approach (Kocher-Langenbeck for Acetabulum)
For acetabular fractures, the Gibson/Kocher-Langenbeck modification adds:
- Elevation of gluteus medius and minimus subperiosteally from the posterior and lateral ilium
- Steinmann pins inserted into the ilium above the greater sciatic notch to support retractors
- Trochanteric osteotomy if additional anterior exposure needed - reattached with two 6.5-mm lag screws at closure
- Origin of hamstrings may be reflected from the ischial tuberosity for further exposure
Key precaution for acetabular surgery: Piriformis and obturator internus tendons must be cut at least 1.5 cm from the greater trochanter to avoid injury to the ascending branch of the MFCA.
7. Advantages
| Advantage |
|---|
| Familiar anatomy; most widely taught and practiced |
| Excellent direct access to femoral canal and acetabulum |
| No risk to abductor mechanism (gluteus medius/minimus preserved) |
| Extensile - can be extended for complex revision or acetabular work |
| Easier femoral canal preparation (straight access) |
| No osteotomy needed for routine THA |
| Less blood loss than anterolateral approaches in some studies |
8. Disadvantages
| Disadvantage |
|---|
| Highest dislocation rate of all hip approaches (if soft tissue repair is not performed) - posterior capsule and external rotators must be repaired |
| Sciatic nerve at risk throughout the procedure |
| Medial femoral circumflex artery at risk if quadratus femoris is disrupted |
| Patient requires lateral positioning (positioning complications) |
| Infection risk slightly higher (gluteal cleft contamination) |
With posterior soft tissue repair (capsule + external rotators): dislocation rate is equivalent to anterior/anterolateral approaches, and no increased rate of dislocation is seen in modern series (Schwartz's Principles of Surgery).
9. Complications
| Complication | Prevention |
|---|---|
| Sciatic nerve injury (most serious) | Identify early; protect throughout; avoid excessive internal rotation |
| Posterior hip dislocation (post-THA) | Repair capsule + external rotators; hip precautions initially |
| Avascular necrosis (femoral head) | Preserve quadratus femoris and obturator externus |
| Gluteus maximus denervation (partial) | Split ≤7 cm from trochanter tip; protect inferior gluteal nerve |
| Superior gluteal nerve injury | Avoid excessive superior retraction of abductors |
| MFCA injury | Do not detach quadratus femoris from femoral side |
| Wound infection | Careful soft tissue handling |
| Heterotopic ossification | NSAID prophylaxis or low-dose radiotherapy |
10. Key Exam Points
- Eponyms: Moore (Southern exposure) = posterior approach; Kocher-Langenbeck = posterior approach for acetabular fractures
- Position: Lateral decubitus, affected side up
- Incision: Curved, from PSIS distally/laterally to posterior trochanter, then distally along femoral shaft
- Gluteus maximus split must not exceed 7 cm from trochanter tip - protects inferior gluteal nerve
- Internal rotation of femur stretches short external rotators for easier identification
- Short external rotators divided 1.5 cm from insertion - tagged for reattachment
- Quadratus femoris and obturator externus are NOT divided - protect MFCA/femoral head vascularity
- Sciatic nerve lies on quadratus femoris - must be identified and protected
- Reflected external rotators shield the sciatic nerve medially
- Hip dislocation manoeuvre: flex 90°, internally rotate, adduct = posterior dislocation
- Posterior capsule + short external rotator repair at closure = critical to prevent post-op dislocation
- Most common complication = posterior dislocation (without soft tissue repair)
- Sciatic nerve anatomy around piriformis has 4 known variations; the "normal" pattern (nerve runs below piriformis) is present in ~84%
Campbell's Operative Orthopaedics 15th Ed 2026, Techniques 1.72-1.73, pp. 87-88 | Miller's Review of Orthopaedics 9th Ed, Fig. 2.92, p. 224 | Rockwood & Green's Fractures in Adults 10th Ed 2025, pp. 2498-2499
Smith peterson approach ms ortho 20 marks answer
Finding Sources
Finding Sources
Reading File
Reading File
Reading File
Finding Sources
Reading File
Finding Sources
Reading File
Reading File
Reading File
Loading Image
I have comprehensive material. Let me now compose the full 20-mark answer.
Smith-Petersen Approach (Anterior Iliofemoral Approach) to the Hip
Sources: Campbell's Operative Orthopaedics 15th Ed 2026 | Rockwood & Green's Fractures in Adults 10th Ed 2025 | Miller's Review of Orthopaedics 9th Ed
1. Introduction and History
The Smith-Petersen approach, also called the anterior iliofemoral approach or Direct Anterior Approach (DAA), is a classic surgical approach to the hip joint from the front. It was first described by Hueter in 1887 and later modified and popularized in North America by Smith-Petersen in the 1920s. He further improved it by reflecting the iliacus muscle from the medial surface of the anterior ilium and detaching the rectus femoris from its origin, allowing extensive exposure of the hip and acetabulum.
It is one of the only truly internervous approaches to the hip, making it safer and less damaging to muscle than the lateral or posterior approaches.
2. Internervous Plane
This is the most important concept for the exam.
The Smith-Petersen approach exploits two internervous planes:
| Layer | Medial structure (nerve) | Lateral structure (nerve) |
|---|---|---|
| Superficial | Sartorius (femoral nerve) | Tensor fasciae latae / TFL (superior gluteal nerve) |
| Deep | Rectus femoris (femoral nerve) | Gluteus medius/minimus (superior gluteal nerve) |
Because both sides of each interval are supplied by different nerves, neither muscle is denervated when the interval is developed. This is a true internervous plane between:
- The femoral nerve territory (sartorius, rectus femoris) medially
- The superior gluteal nerve territory (TFL, gluteus medius) laterally
3. Indications
| Indication |
|---|
| Total hip arthroplasty (THA) - increasingly popular as minimally invasive DAA |
| Hemiarthroplasty for femoral neck fractures |
| Open reduction of anterior hip dislocation |
| Femoral head fractures (Pipkin types I and II without posterior wall fracture) |
| Periacetabular osteotomy (Bernese PAO) |
| Open reduction of congenital dislocation of the hip (CDH) |
| Labral repair and femoral osteochondroplasty (hip impingement surgery) |
| Exploration of the hip joint capsule and acetabulum |
| Synovial biopsy |
| Septic arthritis drainage (anterior approach) |
4. Relevant Surgical Anatomy
Superficial layer
- Tensor fasciae latae (TFL): Arises from outer lip of iliac crest and ASIS; innervated by the superior gluteal nerve. Lies lateral in the interval.
- Sartorius: Arises from the ASIS; innervated by the femoral nerve. Lies medial in the interval.
- Lateral femoral cutaneous nerve (LFCN): Purely sensory nerve; passes over the sartorius approximately 2.5 cm distal to the ASIS. The key nerve at risk - injury causes meralgia paraesthetica (numbness/dysaesthesia over lateral thigh).
Deep layer
- Rectus femoris: Two heads:
- Direct head - from the anterior inferior iliac spine (AIIS)
- Reflected head - from above the acetabular rim
- Innervated by the femoral nerve; lies medially
- Gluteus medius and minimus: Innervated by the superior gluteal nerve; lie laterally
Vascular
- Ascending branch of the lateral femoral circumflex artery (LFCA): Runs transversely across the deep part of the wound approximately 5 cm distal to the hip joint. Must be identified, clamped, and ligated to avoid significant haemorrhage.
Joint
- Hip joint capsule and iliofemoral ligament (Y-ligament of Bigelow): exposed anteriorly
- Ligamentum teres: may be divided to allow dislocation of the femoral head
5. Patient Positioning
- Supine on a radiolucent operating table
- A small bump may be placed under the ipsilateral hip
- For THA/DAA: often a traction/fracture table is used to facilitate femoral preparation and intraoperative fluoroscopy
- Alternatively, a standard radiolucent table with an adequate assistant to manipulate the limb
- C-arm (image intensifier) is available
6. Surgical Technique (Step by Step)
Step 1 - Skin Incision
- Begin at the middle of the iliac crest (or as far posteriorly as required for more extensive exposure)
- Carry the incision anteriorly to the ASIS
- Then turn the incision distally and slightly laterally for another 10-12 cm, directed toward the fibular head
- For limited DAA (THA/arthroplasty): start 2-3 cm lateral and 2-3 cm distal to the ASIS, incision 10-15 cm long directed toward the fibular head
- A cosmetic "bikini" incision along the inguinal crease can be used in thin female patients
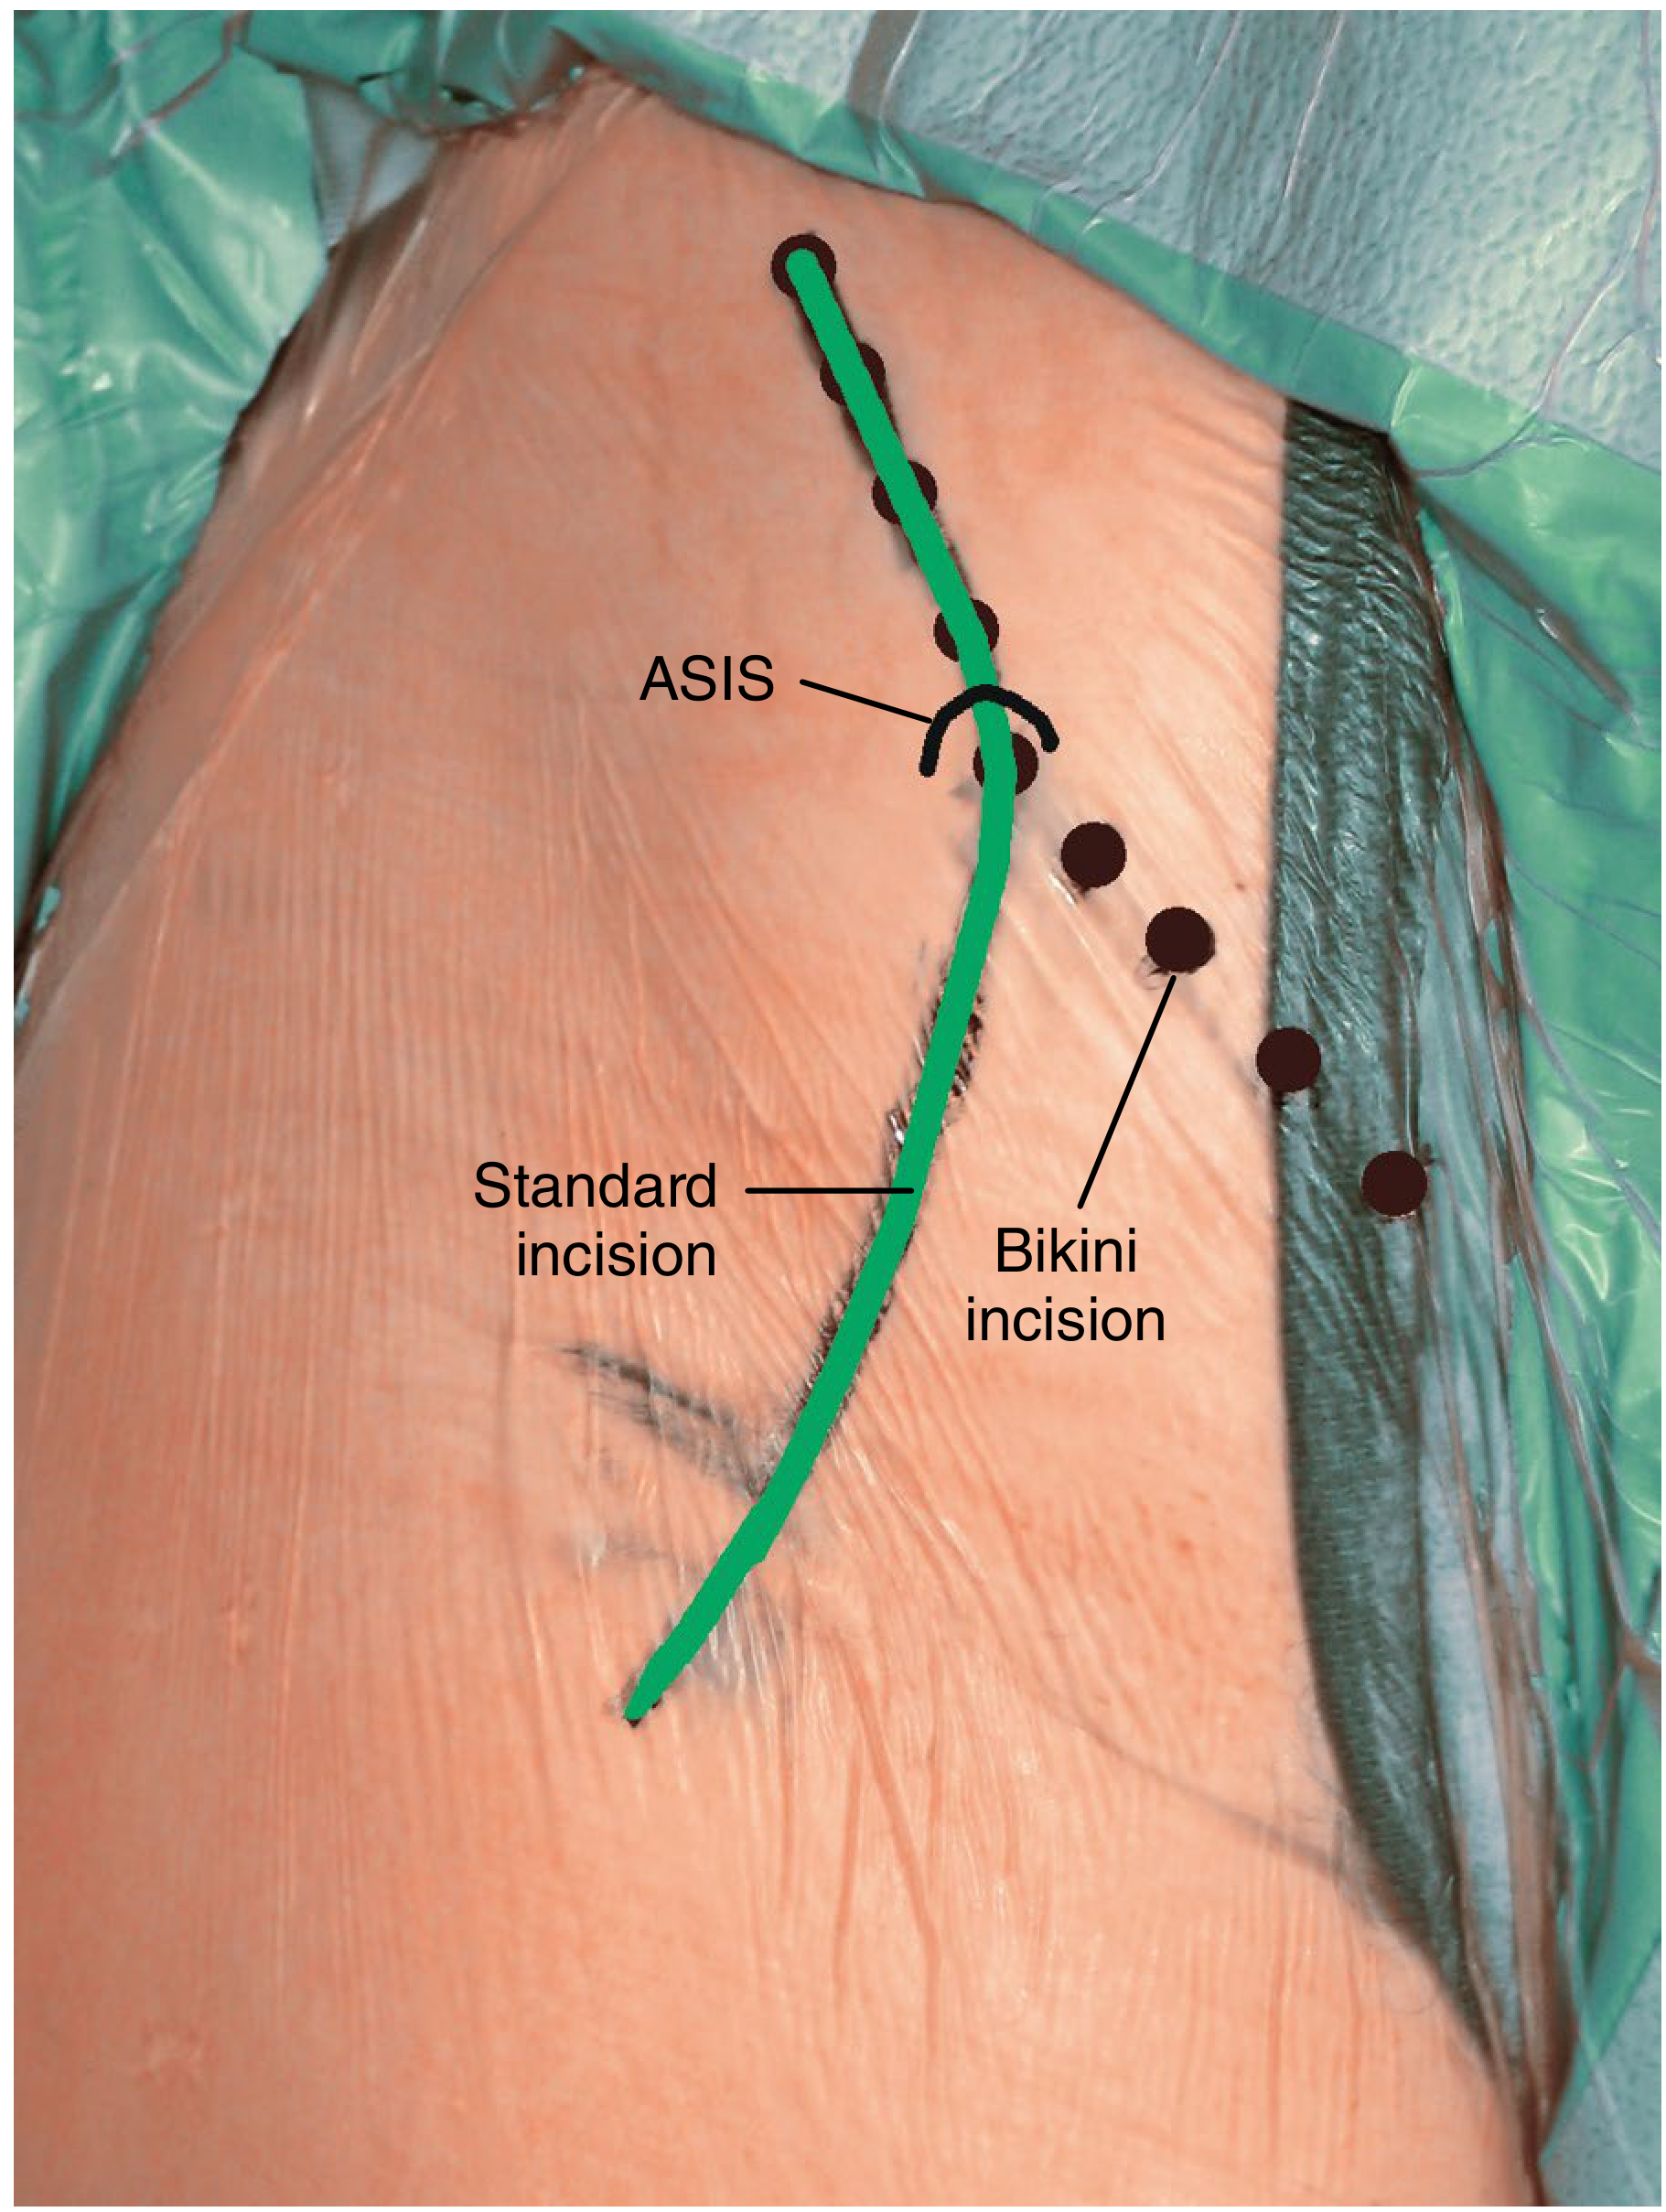
Smith-Petersen standard incision (green line) from iliac crest to ASIS then distally, with bikini incision variant shown. ASIS = anterior superior iliac spine. (Campbell's Operative Orthopaedics 15th ed, Fig. 7.42)
Step 2 - Fascial Incision
- Divide the superficial fascia in line with the skin incision
- Free the attachments of the gluteus medius and tensor fasciae latae from the iliac crest
- With a periosteal elevator, strip the periosteum (along with gluteus medius and minimus attachments) from the lateral surface of the ilium; pack the interval to control bleeding from nutrient vessels
Step 3 - Develop the Superficial Internervous Interval
- Carry dissection through the deep fascia of the thigh
- Develop the interval between:
- TFL (laterally)
- Sartorius medially (with the intramuscular septum retracted medially to protect the LFCN)
- The fascia of the TFL is incised just anterior to the perforating vessels (which mark the junction of the TFL and gluteus maximus fascia); this keeps the septum intact and protects the LFCN
- Identify and protect the lateral femoral cutaneous nerve - it crosses over the sartorius 2.5 cm distal to the ASIS; retract it to the medial side
Step 4 - Ligate the Lateral Femoral Circumflex Vessels
- Identify the ascending branch of the lateral femoral circumflex artery running across the deep part of the wound approximately 5 cm distal to the joint
- Clamp, ligate, and divide - failure to do this results in significant haemorrhage
Step 5 - Develop the Deep Internervous Interval
- TFL is retracted laterally; sartorius retracted medially
- Expose the rectus femoris - identify both its direct (from AIIS) and reflected (from above acetabulum) heads
- Separate the reflected head from the acetabulum and capsule, leaving the direct head attached (or detach it if more exposure needed, tagging with suture for reattachment)
- Develop the plane between the rectus femoris (medially) and the anterior hip capsule (posterolaterally)
- A cobra retractor is placed to fully expose the anterior hip capsule
Step 6 - Capsulotomy
- Incise the hip joint capsule:
- T-shaped capsulotomy - longitudinal limb along the femoral neck, horizontal limb at the level of the acetabular labrum
- The vertical cut is made parallel to the femoral neck; the horizontal cut opens the joint fully
- A No. 12 blade (curved) is useful to protect the labrum during capsulotomy
- The posterior capsule is not violated - important for stability
Step 7 - Expose the Hip Joint
- The femoral head and proximal margin of the acetabulum are now visible
- For complete exposure:
- The ligamentum teres may be divided with a curved knife or scissors
- The hip is then dislocated - for anterior dislocation, the limb is placed in extension and external rotation
- All parts of the joint are accessible
Step 8 - Extension of the Approach (Full Iliofemoral)
If greater exposure is needed (acetabular fractures, PAO):
- The skin incision is extended proximally along the iliac crest
- External oblique attachments are sharply elevated off the iliac crest
- Iliacus is elevated off the inner table of the ilium subperiosteally
- Sartorius can be tagged and released from the ASIS or an ASIS osteotomy performed
- Hip flexion allows the psoas to be retracted medially to expose the anterior acetabular wall
- TFL origin can be peeled back to expose the anterolateral acetabulum
Step 9 - Wound Closure
- Reduce the hip (or insert prosthesis)
- Repair the anterior capsule - with interrupted non-absorbable sutures
- Reattach rectus femoris (both heads) through drill holes in the AIIS or with suture anchors
- Allow the TFL and gluteus medius to fall back into place; no formal repair needed
- Repair the fascia lata/fascial layer
- Close subcutaneous tissue and skin in layers
7. Comparison with Other Hip Approaches (Miller's Review Table)
| Approach | Superficial interval | Deep interval | Nerve at risk | Pros | Cons |
|---|---|---|---|---|---|
| Anterior (Smith-Petersen) | Sartorius / TFL | Rectus / Gluteus medius | LFCN, LFCA | True internervous; stability; rapid recovery | Difficult femoral exposure; limits posterior acetabulum access; may need special table |
| Anterolateral (Watson-Jones) | TFL / Gluteus medius | None | Superior gluteal nerve | Stability | Abductor damage risk |
| Lateral (Hardinge) | Split gluteus medius | None | Superior gluteal nerve | Better femoral access | Abductor weakness (limp), heterotopic ossification |
| Posterior (Moore) | Split gluteus maximus | External rotator tenotomies | Sciatic nerve | Extensile; quick; low complications | Dislocation risk if capsule/rotators not repaired |
8. Advantages
- Truly internervous - the only commonly used approach to the hip that is completely internervous; no muscle is denervated
- No abductor damage - gluteus medius and minimus are not cut
- Lowest dislocation rate after THA - anterior structures (capsule/iliofemoral ligament) are repaired; posterior capsule is preserved
- Rapid functional recovery - no muscle repair needed
- Excellent access to the anterior acetabulum and femoral head
- Supine positioning allows easy intraoperative assessment of leg length and limb alignment
- Fluoroscopy is simple in supine position
- Extensile - can be extended to a full iliofemoral approach for acetabular/pelvic surgery
9. Disadvantages
- Difficult femoral canal preparation - requires specialized retractors; the femur is not as easily delivered into the wound as with posterior/lateral approaches
- Limited posterior acetabular access - cannot visualize the posterior wall through this approach alone
- May require a specialized orthopaedic (traction) table
- LFCN at risk - meralgia paraesthetica is the most common complication (numbness over lateral thigh); reportedly occurs in up to 20-40% of DAA THA cases, though often transient
- Learning curve is steeper than lateral/posterior approaches
- Restricted access in obese patients
- Higher risk of proximal femoral fracture during femoral preparation in THA (if femur inadequately elevated)
10. Structures at Risk
| Structure | Risk | Prevention |
|---|---|---|
| Lateral femoral cutaneous nerve (LFCN) | Most common; meralgia paraesthetica | Identify and retract medially; incise fascia anterior to perforating vessels |
| Ascending branch of LFCA | Haemorrhage | Ligate before proceeding; do not miss |
| Femoral nerve | Excessive medial retraction | Avoid over-retraction of sartorius medially |
| Femoral artery and vein | Rare; excessive medial dissection | Stay lateral to iliopsoas |
| Superior gluteal nerve | Excessive proximal dissection | Avoid splitting TFL more than 5 cm proximal to greater trochanter |
| Iliopsoas | Damage to muscle/tendon | Identify and retract medially for acetabular access |
11. Modifications
- Direct Anterior Approach (DAA/Hueter interval): Limited version for THA; starts 2-3 cm distal and lateral to ASIS; no iliac crest dissection; uses traction table
- Bikini/inguinal crease incision: Cosmetic variant for thin women; same interval but incision along skin crease; slightly limited exposure
- Somerville approach: For open reduction of CDH in children; ASIS osteotomy with sartorius and rectus release; radial capsulotomy
- Full Anterior Iliofemoral (Smith-Petersen extended): Includes iliac crest dissection, iliacus elevation, and sometimes sartorius/ASIS osteotomy for acetabular surgery and PAO
12. Key Exam Points
- Eponym: Smith-Petersen = anterior approach; also called DAA; Hueter first described the interval
- Internervous plane (must know):
- Superficial: sartorius (femoral n.) / TFL (superior gluteal n.)
- Deep: rectus femoris (femoral n.) / gluteus medius (superior gluteal n.)
- Position: Supine (key differentiator from posterior approach)
- Incision: From mid-iliac crest → ASIS → distal 10-12 cm along anterolateral thigh
- LFCN is the most important nerve at risk; passes over sartorius 2.5 cm below ASIS
- Ascending branch of LFCA must be ligated ~5 cm below joint
- Capsulotomy: T-shaped or H-shaped; vertical limb along femoral neck
- Dislocation: Extension + external rotation (vs. flexion + internal rotation for posterior approach)
- Rectus femoris is tagged and repaired to AIIS at closure
- Posterior capsule is preserved = lowest dislocation rate of all hip approaches
- Femoral canal access is the main limitation (specialized retractors needed)
- LFCN injury (meralgia paraesthetica) is the most common complication
Campbell's Operative Orthopaedics 15th Ed 2026, Technique 1.63, pp. 75-77 | Rockwood & Green's Fractures in Adults 10th Ed 2025, p. 2609 | Miller's Review of Orthopaedics 9th Ed, Fig. 2.92 comparison table, p. 225
This is a shared conversation. Sign in to Orris to start your own chat.