
knee examination from standard ortho books
Lachman test knee examination anterior cruciate ligament
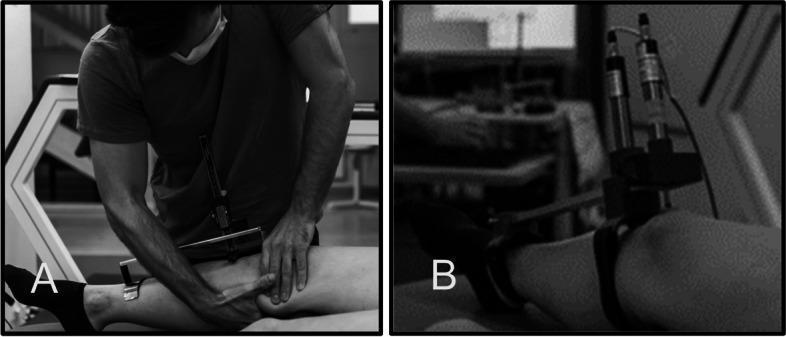
Two grayscale clinical photographs demonstrating instruments used for measuring anterior tibial translation (ATT) during the Lachman test, an orthopedic physical examination for anterior cruciate ligament (ACL) integrity.
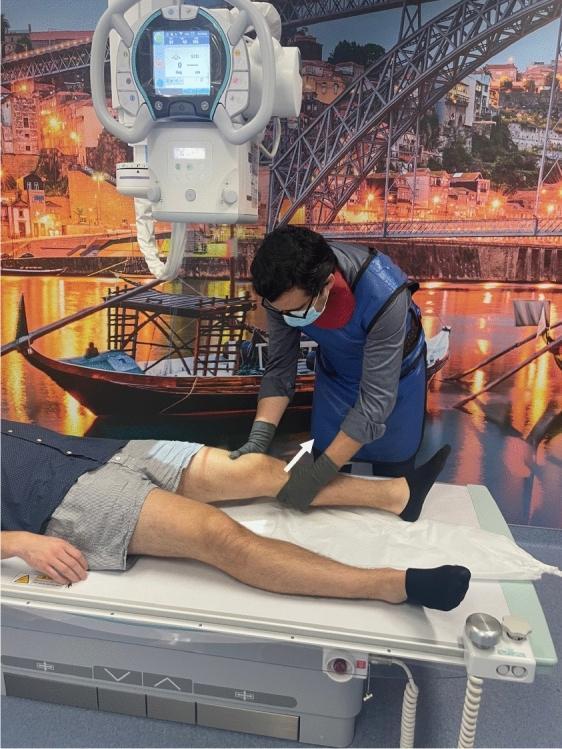
A clinical photograph and diagnostic setup showing a physician performing the Lachman test manually for stress radiography. The patient is in a supine position on a radiolucent examination table. The physician, wearing a lead apron, protective gloves, and a mask, is positioned beside the patient's right knee. One hand is placed on the distal femur to stabilize the leg, while the other hand is positioned on the proximal tibia. A white arrow indicates the anterior translatory force applied to the tibia relative to the femur, a maneuver used to assess the integrity of the Anterior Cruciate Ligament (ACL). Above the patient's knee, a digital X-ray tube head with a control display is positioned to capture the joint laxity under stress. This clinical scenario demonstrates the integration of physical examination maneuvers with medical imaging to objectively quantify knee instability and ligamentous laxity.
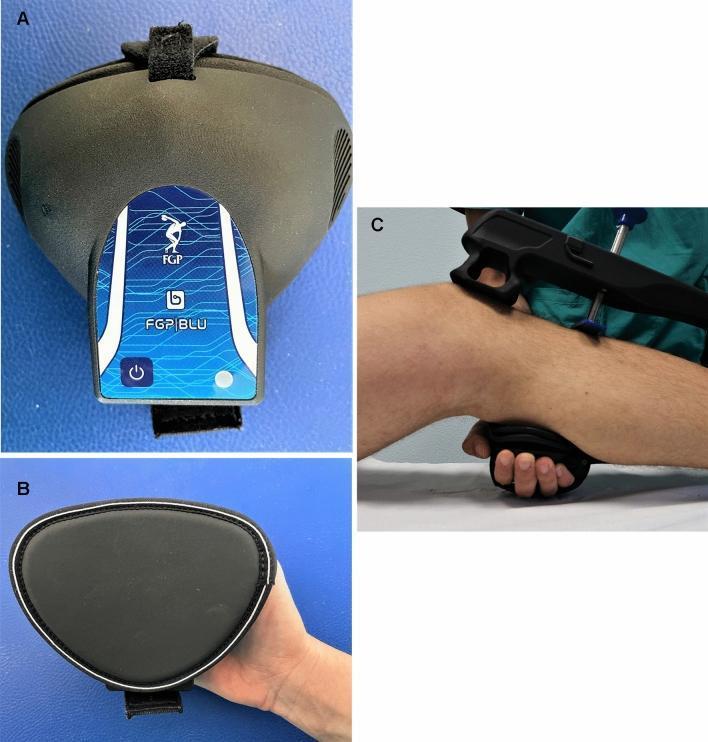
Educational panel illustrating the components and clinical application of an arthrometry system for assessing knee ligament laxity. Images A and B show the accessory Bluetooth-connected dynamometer, which features a teardrop-shaped ergonomic housing with a blue control panel (labeled FGP BLU), a power icon, an LED indicator, and integrated Velcro straps for secure attachment. The reverse side (B) displays a padded, hand-contoured interface with a white-bordered perimeter. Image C demonstrates the clinical use of the system during a physical examination (such as a Lachman test). The arthrometer is positioned atop the patient's flexed knee with supports on the patella and distal tibia, while the examiner applies anterior traction to the proximal tibia. The examiner holds the accessory dynamometer against the posterior aspect of the patient's leg, allowing the system to concurrently quantify applied force and anterior tibial translation in millimeters. This setup is designed to provide objective data for diagnosing anterior cruciate ligament (ACL) injuries and monitoring knee joint stability.
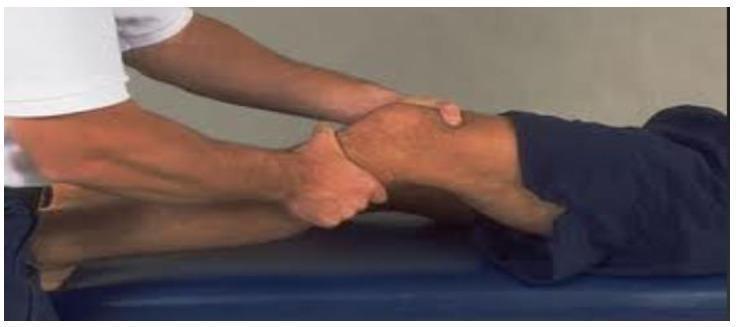
This clinical photograph demonstrates the performance of the Lachman test, a primary physical examination maneuver used to assess the integrity of the anterior cruciate ligament (ACL). The image shows a patient in the supine position with the knee joint passively flexed to approximately 20-30 degrees. The examiner’s hands are strategically positioned for orthopedic assessment: one hand stabilizes the distal femur just superior to the patella, while the other hand grasps the proximal tibia at the level of the tibial tuberosity. The procedure involves applying a brisk anterior force to the tibia relative to the femur to evaluate for anterior translation and the quality of the 'end-point' resistance. Increased laxity or a soft end-point indicates a potential ACL tear. This visual is representative of clinical orthopedic and sports medicine evaluations, serving as a pedagogical tool for teaching physical diagnosis of knee instability.
McMurray test meniscus examination knee
Knee Examination (Look, Feel, Move, Special Tests)
Relevant Anatomy
1. History
2. Inspection ("Look")
- Both knees exposed, compared side to side, viewed from front, sides, back, and including the popliteal fossa
- Attitude: fixed flexion, abduction/adduction, hyperextension
- Skin: scars, sinuses
- Soft tissue: quadriceps wasting, swelling in front of or behind the knee
- Bone: overall varus/valgus alignment (measure intermalleolar or intercondylar distance), recurvatum
- Gait: antalgic gait (osteoarthritis), varus thrust
3. Palpation ("Feel")
- Palpate quadriceps and patellar tendons for defects (rupture)
- Fluid displacement/stroke test and patellar tap test - assess for effusion
- Palpate tibial tuberosity, patellar facets, ligament origins/insertions, and joint lines (medial and lateral)
- Palpate popliteal fossa for swelling (Baker's cyst, aneurysm)
- Check distal neurovascular status (dorsalis pedis, posterior tibial pulses) - especially important after trauma or suspected dislocation (Rosen's, Box 48.1)
- A specific point midway between the patellar ligament and the tibial collateral ligament, tender on flexion, suggests a torn anterior horn of the medial meniscus (S Das, p. 208)
4. Movement ("Move")
- Normal range: flexion 0-135°, extension 0 to -10°
- Extensor lag test: patient lifts the straight leg, then bends and re-extends the knee in the air - inability to fully re-straighten indicates quadriceps weakness
- Differentiate a fixed flexion deformity of the knee from one arising at the hip by sitting the patient with knees over the edge of the couch and attempting passive extension
5. Special (Ligament/Meniscal) Tests
| Test | Technique | Assesses |
|---|---|---|
| Lachman test | Knee flexed 15-30°, femur stabilized, tibia pulled anteriorly; soft/absent end-point = positive | ACL (most sensitive test) |
| Anterior drawer test | Knee flexed 90°, hip 45°, tibia pulled forward; graded 1+ (0-5mm), 2+ (5-10mm), 3+ (>10mm) | ACL (less sensitive, more specific than Lachman) |
| Posterior drawer test | Knee flexed 90°, posterior force on proximal tibia; >5mm displacement or soft end-point positive | PCL (most reliable clinical test for PCL) |
| Posterior sag sign | Knees flexed 45-90°, look for tibia sagging backward | PCL |
| Collateral ligament stress test (valgus/varus) | Knee flexed ~30°, apply valgus (MCL) or varus (LCL) stress, palpate joint line opening; laxity in full extension implies combined cruciate/capsular injury | MCL / LCL |
| McMurray's test | Supine, hip and knee flexed 45°, valgus stress + external rotation while extending knee (for medial meniscus); a palpable click/pain is positive | Meniscal tear |
| Patellar apprehension (Fairbank's) test | Knee flexed ~30°, push patella laterally; patient apprehension or quadriceps contraction is positive | Patellar instability |
| Patellar tracking ('J' sign) | Extend knee slowly from 90° flexion, watch for lateral subluxation near full extension | Patellofemoral maltracking |
6. Clinical Decision Rules (Emergency Setting)
| Ottawa Knee Rules | Pittsburgh Knee Rules |
|---|---|
| Age >55 | Age <12 or >50 |
| Isolated patellar tenderness | Inability to walk 4 steps (in ED or immediately after injury) |
| Isolated fibular head tenderness | |
| Flexion <90° | |
| Inability to weight-bear 4 steps | |
| Sensitivity 98.5%, specificity 49% | Sensitivity 100%, specificity 79% |
Summary Box (Bailey & Love style)
- Look: skin, soft tissue, alignment, gait
- Feel: effusion tests, bony/soft tissue landmarks, joint line
- Move: flexion/extension, extensor lag
- Special tests: Lachman, drawer tests, collateral stress tests, McMurray's, patellar apprehension