
a 10 years old child reports with a history of trauma to upper front tooth following a fall from bicycle 3 months ago. on examination, the maxillary right central incisor is discoloured, non responsive to vitality tests and tenderness on percussion. radiograph reveals a mature root with periapical radiolucency. discuss the diagnosis, investigations, treatment plan and follow up for patient.
periapical radiolucency non-vital tooth radiograph
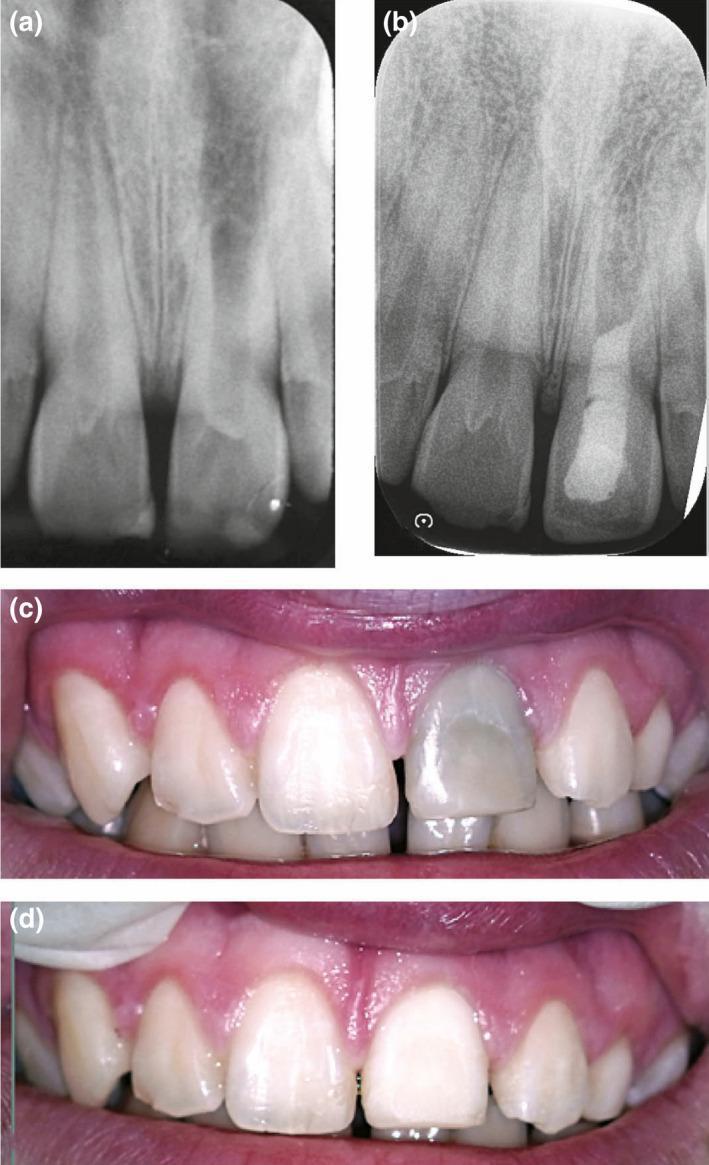
This composite educational resource consists of diagnostic periapical radiographs and clinical photographs demonstrating the management of a non-vital, discolored left maxillary central incisor. Panel (a) shows a preoperative periapical radiograph of the left maxillary central incisor exhibiting interrupted root development, a wide pulp canal, and periapical radiolucency, indicative of pulp necrosis in an immature tooth. Panel (b) illustrates the post-treatment radiograph after regenerative endodontic procedures, showing a radiopaque intracanal filling material and improved root morphology. Panel (c) is a clinical photograph showing severe greyish-black extrinsic/intrinsic discoloration of the same incisor compared to adjacent teeth. Panel (d) shows the clinical result following three internal/external bleaching appointments, demonstrating a significant aesthetic improvement with the tooth shade now harmonizing with the surrounding dentition. This case serves as a clinical example of regenerative endodontic protocols and non-invasive aesthetic management of tooth discoloration resulting from trauma or necrosis.
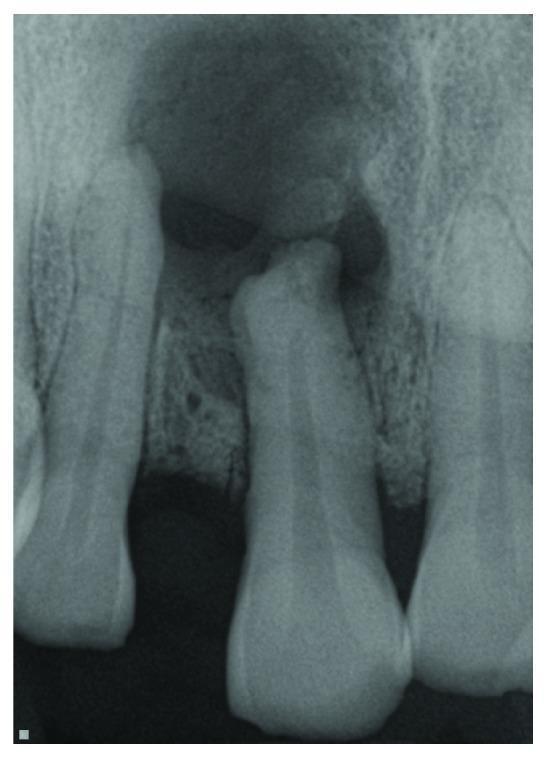
This diagnostic periapical radiograph focuses on the anterior maxilla, specifically depicting the permanent maxillary right central incisor (tooth #8). The most prominent feature is a large, well-defined, unilocular radiolucency originating at the apex of tooth #8 and extending superiorly and laterally. This radiolucent area signifies significant alveolar bone resorption or a cystic/granulomatous lesion, likely resulting from chronic pulpal necrosis. The borders of the lesion appear relatively smooth, displacing the normal trabecular bone pattern. Tooth #8 shows an intact crown but exhibits pathological changes in the root apex which is submerged within the radiolucency. The adjacent teeth (upper left central and upper right lateral incisors) are visible at the periphery, showing the extent of the lesion's involvement in the interdental bone spaces. This image is a classic representation of periapical pathology, such as a radicular cyst or periapical granuloma, secondary to a non-vital tooth.
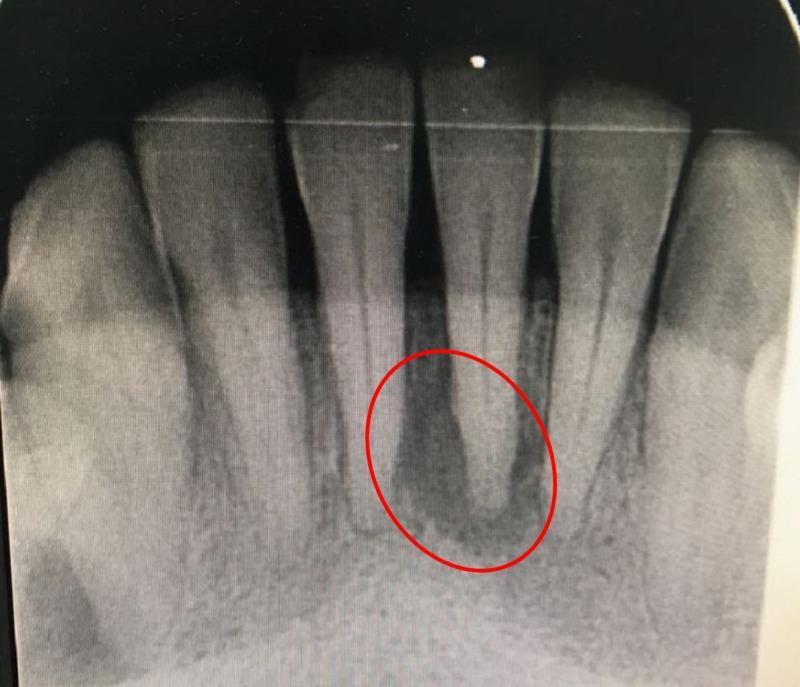
This diagnostic image is a periapical radiograph of the mandibular anterior segment, focusing on the central and lateral incisors. The radiograph demonstrates the dental crowns, roots, and supporting alveolar bone. A significant finding is a well-defined periapical radiolucency (highlighted by a red circle) associated with the apex of the mandibular left central incisor. This area of decreased radiopacity suggests periapical pathology, such as a periapical cyst, granuloma, or abscess. The neighboring teeth show varied morphology, including one tooth with a shorter, wider appearance. The periodontal ligament spaces are visible as thin radiolucent lines surrounding the radiopaque roots. Notable non-carious tooth surface loss is visible on the incisal edges of the crowns. The image serves as a clinical example of endodontic-periodontal assessment, illustrating the radiographic appearance of apical bone resorption in a vital or non-vital tooth scenario within the field of dentistry.
pulp necrosis periapical periodontitis root canal treatment child
non-vital discoloured incisor tooth trauma child
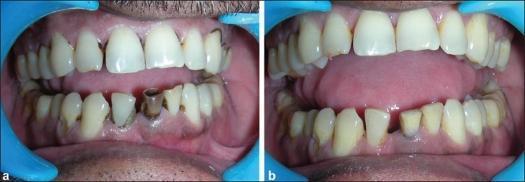
This comparative intraoral clinical photograph illustrates a pre-operative and post-operative case of a non-vital discolored mandibular left central incisor. Image (a) depicts the pre-operative state, showing severe intrinsic brownish-black discoloration and visible structural damage to the mandibular left central incisor, contrasting sharply with the adjacent natural dentition. This type of localized discoloration is characteristic of pulp necrosis or previous trauma. Image (b) shows the clinical result after three sessions of non-vital bleaching (walking bleach technique) using 35% hydrogen peroxide followed by composite resin restoration. The post-operative view demonstrates a significant metamorphosis, where the previously discolored tooth now exhibits a shade and translucency that harmoniously matches the surrounding mandibular teeth. The primary educational concept illustrated is the effectiveness of internal bleaching for restoring aesthetics in traumatized, non-vital anterior teeth.
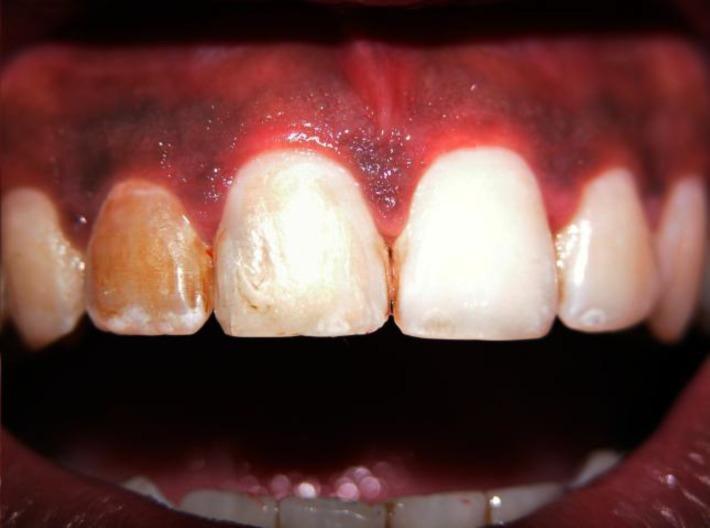
This intraoral clinical photograph displays the maxillary anterior teeth with a primary focus on the upper right central (tooth #11) and lateral (tooth #12) incisors. The image illustrates significant intrinsic dental discoloration, often associated with pulpal necrosis and chronic periapical periodontitis following trauma. The lateral incisor shows a prominent brownish-yellow hue across its labial surface, particularly concentrated near the gingival margin. The central incisor exhibits more diffuse, mottled discoloration with lighter shades towards the incisal edge. The surrounding gingiva appears erythematous, glossy, and slightly edematous around the cervical margins of the affected teeth, indicating localized inflammation. This visual serves as an educational example of the long-term aesthetic sequelae of non-vital teeth and the clinical presentation of post-endodontic cases where internal staining persists. The photograph is intended for dental students and endodontic practitioners to recognize visual indicators of tooth non-vitality and associated soft tissue changes.
Clinical Case: Non-Vital Maxillary Right Central Incisor with Periapical Pathology in a 10-Year-Old
1. DIAGNOSIS
Primary Diagnosis
Basis for Diagnosis
| Finding | Clinical Significance |
|---|---|
| History of trauma (3 months ago) | Trauma disrupts blood supply -> pulp necrosis |
| Discolouration of crown | Breakdown products of haemoglobin from pulp haemorrhage cause intrinsic grey/brown staining |
| Non-responsive to vitality testing | Confirms pulp is necrotic (no sensory nerve function) |
| Tenderness on percussion | Periapical inflammation - involvement of periodontal ligament at the apex |
| Periapical radiolucency | Bone resorption from chronic inflammatory lesion at the apex (granuloma or cyst) |
| Mature root (closed apex) | Root development complete - rules out an immature (open apex) scenario |
Pathological Sequence
2. INVESTIGATIONS
Clinical Tests
| Test | Expected Finding | Purpose |
|---|---|---|
| Electric Pulp Test (EPT) | No response | Confirms pulp non-vitality |
| Cold test (ethyl chloride/Endo Ice) | No response | Confirms non-vitality |
| Heat test | No response | Confirms non-vitality |
| Percussion test | Tender (already noted) | Confirms periapical inflammation |
| Palpation | May be tender over labial plate | Detects buccal cortical expansion |
| Periodontal probing | Normal probing depths (endo lesion, not perio) | Rules out endo-perio lesion |
| Tooth mobility | Mild or none | Assess degree of bone loss |
| Transillumination | Reduced/absent light transmission | Shows internal staining, structural changes |
Radiographic Investigations
- Periapical radiograph (paralleling technique) - PRIMARY investigation
- Assess size of periapical lesion
- Evaluate root length, curvature, root canal morphology
- Assess root development (confirmed mature in this case)
- Look for root fracture, external root resorption, internal resorption
-
Bitewing radiograph - Assess alveolar bone levels
-
CBCT (Cone Beam CT) - Indicated if:
- Lesion is large or atypical
- Suspected root fracture on plain film
- Suspected vertical root fracture
- Treatment planning for surgical intervention
Laboratory / Additional Tests (if needed)
- Biopsy of periapical lesion during apical surgery - histopathology to confirm granuloma vs. cyst (cannot be reliably differentiated on radiograph alone - size >10 mm favours cyst, but this is not definitive)
3. TREATMENT PLAN
Step-by-Step Treatment Protocol
Phase 1: Emergency/Symptomatic Relief
- If acute exacerbation present: drainage through access cavity
- Prescribe analgesics (ibuprofen) if required
- No antibiotics unless systemic signs (lymphadenopathy, fever, facial swelling)
Phase 2: Root Canal Treatment
- Local anaesthesia (topical + infiltration - 2% lidocaine with 1:80,000 epinephrine)
- Rubber dam isolation
- Access cavity preparation through the palatal surface of the crown
- Working length determination - electronic apex locator + periapical radiograph
- Biomechanical preparation (BMP):
- Manual files (stainless steel) or NiTi rotary system
- Copious irrigation with sodium hypochlorite (NaOCl) 1-3% - primary antibacterial irrigant
- Final rinse with EDTA (17%) to remove smear layer
- Final rinse with NaOCl
- For necrotic tooth with periapical lesion - intracanal medicament placed between visits:
- Calcium hydroxide (Ca(OH)₂) paste is the gold standard dressing
- Placed for 1-4 weeks (some protocols 3 months for large lesions)
- Mechanism: high pH (~12.5) destroys bacteria, promotes periapical healing, dissolves necrotic tissue
- Remove calcium hydroxide with irrigation
- Final irrigation protocol: NaOCl -> EDTA -> NaOCl -> CHX (optional)
- Canal drying with paper points
- Obturation with gutta-percha and zinc oxide eugenol-based sealer (e.g., AH Plus)
- Lateral condensation or warm vertical compaction
- Coronal seal with glass ionomer cement base
- Definitive restoration: composite resin restoration (aesthetic, tooth-coloured)
- If significant tooth structure loss: consider full coverage crown (unlikely at age 10 - defer until growth complete)
- Discuss internal bleaching (walking bleach technique) for the discolouration AFTER successful RCT if aesthetics remain a concern:
- Sodium perborate + water (safer than H₂O₂ in cervical area)
- Placed in pulp chamber for 1 week intervals (2-3 visits)
Periapical Lesion Management
- Majority of periapical granulomas/small cysts resolve after successful RCT alone (conservative approach)
- Surgical (periapical surgery / apicoectomy) is reserved for:
- Failure of orthograde RCT (lesion persists at 12-month review)
- Retreatment not possible (post, extensive restoration)
- Large periapical cyst unlikely to resolve with RCT alone
- Suspicion of vertical root fracture
- Biopsy required for diagnosis
- Surgical procedure: root end resection (apicoectomy) + root end filling (MTA or Biodentine)
4. FOLLOW-UP PROTOCOL
Clinical and Radiographic Reviews
| Time Point | Assessment |
|---|---|
| Immediately post-obturation | Baseline periapical radiograph |
| 3 months | Clinical review - symptoms, percussion, palpation; periapical X-ray |
| 6 months | Clinical + radiographic review; assess reduction in lesion size |
| 12 months | Full clinical + radiographic review; decision point for success vs. failure |
| Annual reviews (up to 4 years) | Large lesions may take up to 4 years to fully resolve |
Criteria for Successful Treatment
- Patient is asymptomatic (no pain, no swelling, no sinus tract)
- Tooth is functional (normal occlusal function, no mobility)
- Periapical lesion is reducing in size or fully resolved on serial radiographs
- Intact periodontal ligament space radiographically
- No pathological root resorption
Signs of Failure (Prompt Retreatment or Surgery)
- Persistent or enlarging periapical lesion at 12 months
- Development of new sinus tract (gum boil / parulis)
- Increasing tooth mobility
- Pain on biting
- Radiographic evidence of external root resorption progressing
Additional Considerations for a 10-Year-Old Patient
- Parental consent and patient cooperation are essential - consider behaviour management (tell-show-do, positive reinforcement)
- Shorter appointments with adequate breaks for a paediatric patient
- Growth consideration: avoid placing permanent crown until jaw growth is complete (typically ~18 years); composite build-up is preferable in the interim
- Psychological impact: address aesthetic concerns sensitively - a discoloured front tooth can significantly affect a child's self-esteem and social interactions
- Monitor adjacent teeth: traumatic force may have affected adjacent teeth (UR2) - examine and test these too
- Sports mouthguard: advise a custom-made mouthguard for future sports/cycling to prevent reinjury
- Diet and oral hygiene instruction: reinforce brushing, fluoride toothpaste, reduced sugar intake
5. DIFFERENTIAL DIAGNOSIS
| Condition | How to Distinguish |
|---|---|
| Periapical granuloma | Most common; non-vital tooth; well-defined radiolucency; resolves with RCT |
| Radicular (periapical) cyst | Non-vital tooth; larger lesion (often >1 cm); may not resolve with RCT alone; needs biopsy for definitive diagnosis |
| Periapical abscess (chronic) | Sinus tract / parulis may be present; smaller acute component may cause swelling |
| Condensing osteitis | Increased radiopacity rather than radiolucency; rare in anterior teeth |
| Nasopalatine duct cyst | Vital teeth; heart-shaped radiolucency at midline between upper centrals |
| Trauma-related root fracture | Step on root visible radiographically; abnormal mobility pattern |
Summary
- Harrison's Principles of Internal Medicine, 22nd Ed.: Pulpal infection, periapical abscess, granuloma, and cyst formation with root apex radiolucency
- Scott-Brown's Otorhinolaryngology: Radicular cyst arising from non-vital tooth requiring root canal treatment or extraction with surgical enucleation for larger lesions
7 year old child undergoes premature loss of mandibular 2nd primary molar tell the management with apprpriate space maintainer
band and loop space maintainer mandibular primary molar
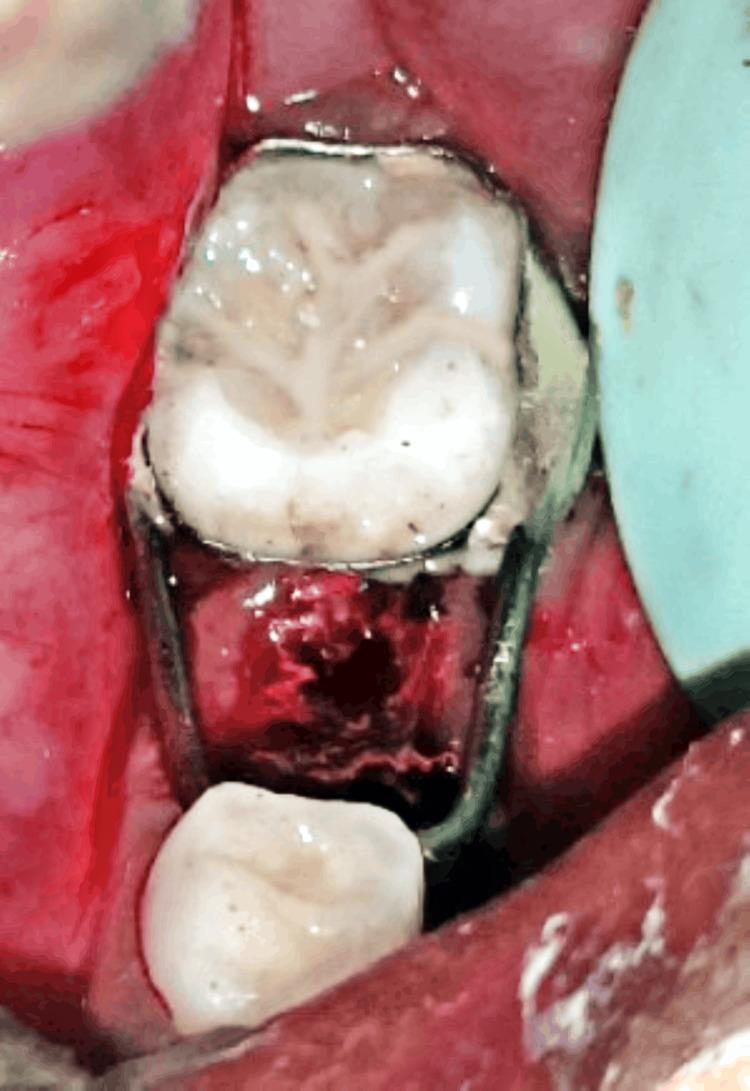
This intraoral clinical photograph demonstrates the immediate post-operative placement of a fixed band and loop space maintainer in a pediatric patient. The appliance is anchored on a primary molar, likely the mandibular second deciduous molar, which shows significant occlusal wear and staining. A stainless steel band is closely adapted around the tooth's circumference, secured with visible luting glass ionomer cement at the margins. Soldered to the band is a passive metal wire loop that extends anteriorly across an edentulous space created by a recent extraction. The loop is contoured to contact the distal surface of the adjacent tooth, preventing the mesial drifting of the posterior molar and preserving arch length for permanent tooth eruption. The extraction site shows a fresh blood clot within the socket. The surrounding gingival tissues exhibit moderate postoperative erythema and inflammation. This image illustrates a standard preventive orthodontic intervention in pediatric dentistry to manage premature loss of primary teeth.
This diagnostic image is a periapical radiograph of the mandibular posterior region in a pediatric patient. It demonstrates a prefabricated band and loop space maintainer in situ. A highly radiopaque metallic band is seen closely adapted and cemented around the crown of the permanent mandibular first molar. Extending mesially from this band is a radiopaque wire loop that spans the edentulous space created by the extraction of a submerged primary second molar. The loop's distal end is soldered to the band, while its mesial aspect rests against the distal surface of the adjacent primary first molar to prevent mesial drift and maintain the mesiodistal arch dimension. The underlying alveolar bone in the extraction site shows normal trabecular healing. The image illustrates a common interceptive orthodontic procedure used to manage premature primary tooth loss and ensure adequate space for the eruption of the succedaneous premolar.
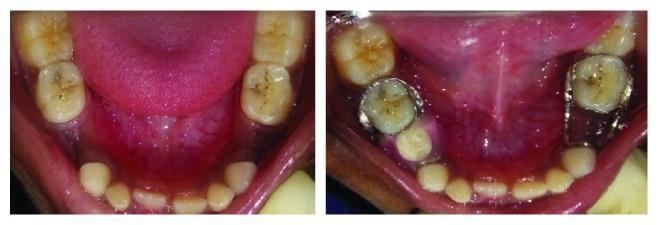
This intraoral clinical photograph provides a comparative view of the mandibular arch in a pediatric patient, showing preoperative (left) and immediate postoperative (right) states. The primary focus is on two different space-maintaining interventions following the premature loss of deciduous molars. In the left mandibular quadrant (tooth 74 region), a conventional fixed band and loop space maintainer is installed, consisting of a stainless steel band around the second deciduous molar and a simple wire loop extending mesially to maintain the mesiodistal dimension. In the right mandibular quadrant (tooth 84 region), a functional band and loop space maintainer is visible. This modified appliance features a stainless steel band and wire loop integrated with an aesthetic acrylic pontic (artificial tooth) designed to restore occlusal function and prevent supra-eruption of opposing teeth while maintaining space. The images illustrate key concepts in pediatric dentistry and interceptive orthodontics, specifically the management of arch length and masticatory function during the transition from primary to permanent dentition.
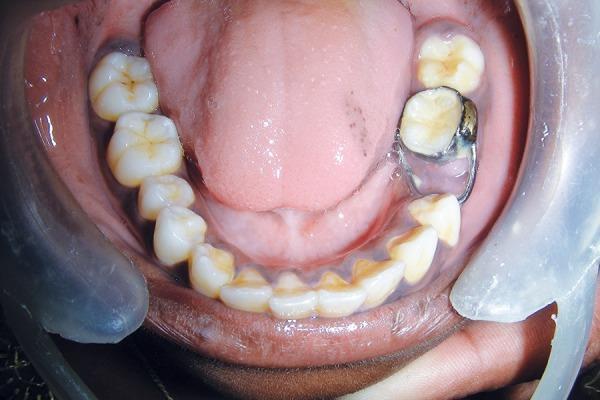
This intraoral clinical photograph provides an occlusal view of the mandibular dental arch in a pediatric patient. The primary focus is a fixed orthodontic appliance—specifically a metallic band and loop space maintainer—situated on the lower left quadrant. The band is cemented to the mandibular first molar, with the wire loop extending mesially to contact the distal surface of the mandibular first premolar, thereby preserving the space left by the premature loss of the second primary molar. The mandibular teeth exhibit mixed dentition with mild extrinsic staining and plaque accumulation along the gingival margins. The tongue is visible in the background, showing normal anatomy with some focal pigmented macules on the dorsal surface. This image serves as a clinical example of space management in pediatric dentistry following the extraction of primary teeth to prevent mesial drifting of permanent molars and subsequent malocclusion.
distal shoe space maintainer erupting permanent molar
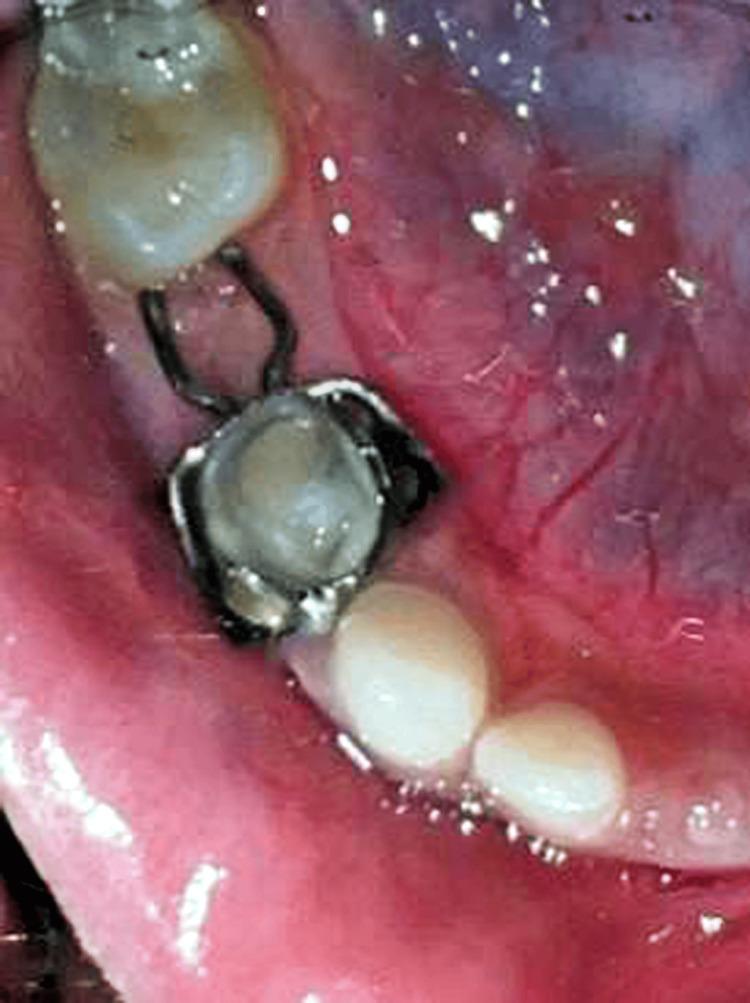
An intraoral clinical photograph showing a distal shoe space maintainer in a pediatric patient. A stainless steel band is securely fitted around the primary first molar. Attached to this band is a wire framework consisting of buccal and lingual arms with horizontal adjustment loops. The wire extends distally across the extraction site of the primary second molar to guide the eruption of the permanent mandibular first molar. The mesial aspect of the partially erupted permanent first molar is visible, making contact with the distal extension of the appliance. The surrounding gingival tissues show mild erythema and inflammation around the band margin and the site of the intra-alveolar projection. This image demonstrates the clinical application of a fixed passive space maintainer used in pediatric dentistry to prevent the mesial tipping of permanent molars following the premature loss of primary second molars.
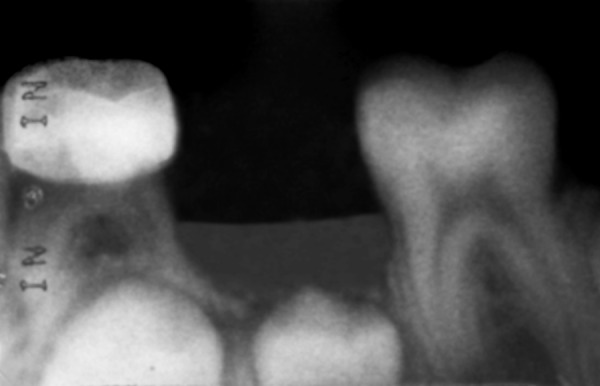
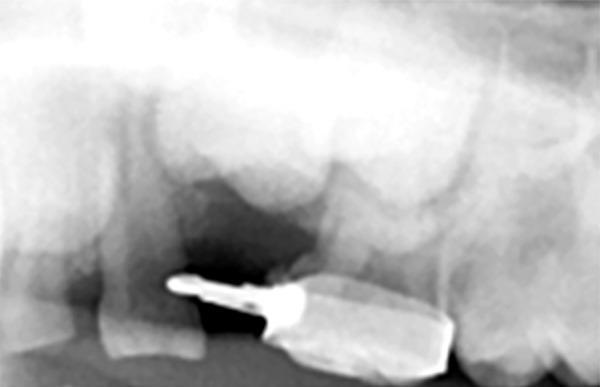
**Imaging Modality:** Intraoral periapical radiograph. **Anatomical Region:** Posterior mandible demonstrating primary and permanent dentition in a pediatric or mixed-dentition patient. **Observed Pathology/Procedures:** The radiograph shows a postoperative site following the extraction of a primary molar (likely the mandibular second primary molar). A radiopaque orthodontic band is visible on the adjacent primary tooth to the left, which is part of a distal shoe space maintainer. The horizontal extension or "blade" of the space maintainer is visible, extending into the soft tissue and alveolar bone of the extraction socket to guide the eruption of the unerupted permanent first molar. **Characteristic Visual Features:** * **Space Maintainer:** A distal shoe appliance with a radiopaque band and a subgingival extension. * **Erupting Permanent Dentition:** The crown of the permanent first molar is visible positioned distally to the extraction site, while the developing permanent premolar buds are visible inferior to the primary tooth roots. * **Bone Healing:** The extraction socket shows early signs of healing with a reduction in radiolucency and initial bone remodeling. **Diagnostic Features:** Proper positioning of the distal shoe guide plane relative to the mesial surface of the unerupted permanent molar crown.
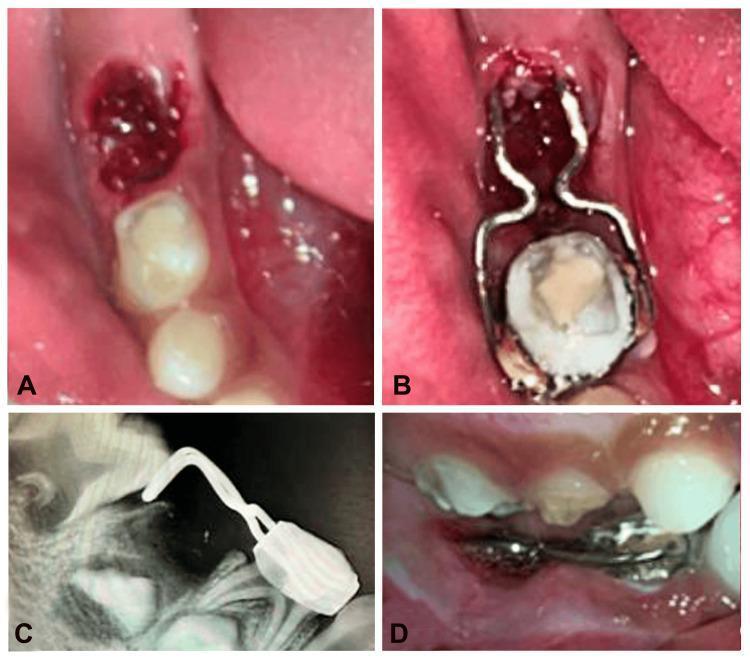
This composite figure illustrates the clinical and radiographic sequence for the placement of a distal shoe space maintainer in a pediatric patient. Panel A shows an intraoral occlusal view of a fresh mandibular extraction socket (tooth 85) containing a blood clot. Panel B displays the distal shoe appliance in situ post-cementation; it consists of a stainless steel band adapted to the primary first molar (tooth 84) with distal wire extensions featuring horizontal adjustment loops. Panel C is a periapical radiograph confirming the correct placement of the appliance's intra-alveolar vertical projection, which serves to guide the eruption of the unerupted permanent first molar (tooth 46) and prevent mesial drifting. Panel D shows a lateral intraoral view of the appliance in occlusion. This sequence demonstrates pediatric interceptive orthodontics and space management after the premature loss of a primary second molar.
lingual arch space maintainer bilateral primary molar loss mandible
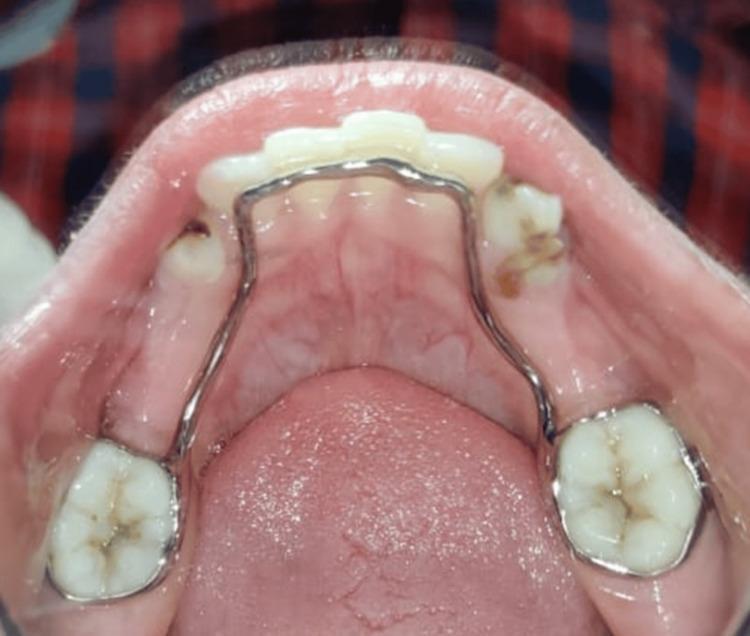
This clinical photograph shows a post-operative intraoral occlusal view of the mandible in a pediatric patient. The primary feature is a 3D-printed lingual arch space maintainer fabricated from a titanium-based powdered metal. The appliance is a monolithic, one-piece design consisting of bilateral molar bands cemented onto the permanent first molars, connected by a rigid metal arch wire that follows the lingual contour of the mandibular dentition. The arch wire is positioned to maintain the mesiodistal dimensions of the arch following the extraction of primary molars (indicated by edentulous spaces in the premolar regions). Adjacent teeth, specifically the canines and primary molars, exhibit visible dental pathology, including brown carious lesions and structural loss on the facial and occlusal surfaces. The image demonstrates the application of additive manufacturing (micro laser sintering) in pediatric dentistry to provide a customized, well-adapted orthodontic appliance that minimizes occlusal interference and potential breakage points common in traditional soldered appliances.
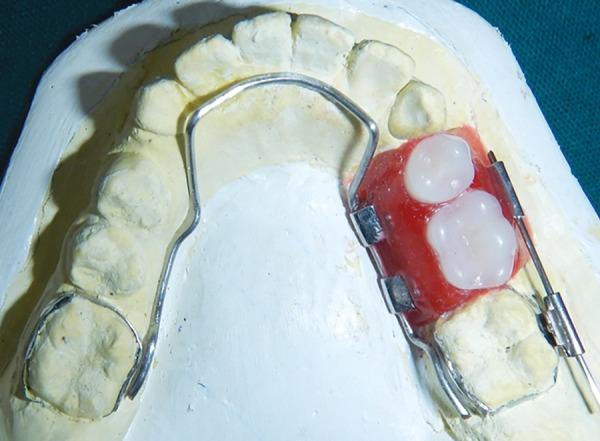
A clinical photograph of a specialized pediatric space maintainer, known as a functional lingual arch with hinge-type lockable dentulous component (LHLD), fabricated on a dental cast of the mandibular arch. The appliance features a 0.9 mm stainless steel lingual arch wire adapted to the lingual surfaces and soldered to molar bands on the first permanent molars. On the right side of the arch, an edentulous span is managed by a red wax-up (representing the future acrylic component) containing two white artificial molar teeth. This dentulous section is integrated with the lingual arch via a hinge mechanism consisting of metal molar tubes. On the buccal aspect, a locking mechanism is visible, comprising a metal wire passing through a tube on the dentulous component and a corresponding buccal tube on the molar band. This appliance is designed to maintain space and restore chewing function in a mixed dentition patient following the premature loss of primary molars while allowing for the eventual eruption of succedaneous premolars.
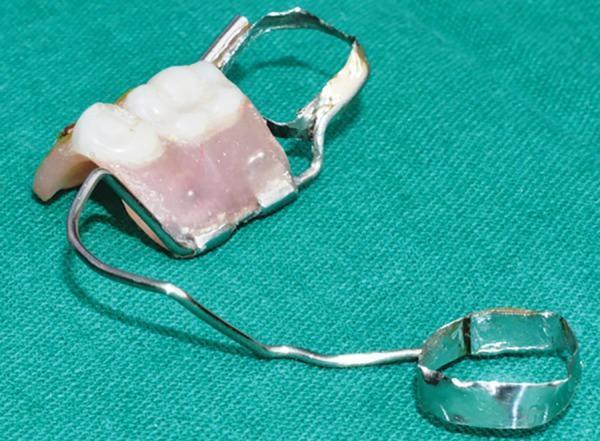
This clinical photograph displays a functional lingual arch space maintainer, specifically a Lockable Hinge-type Lingual Dentulous (LHLD) appliance, used in pediatric dentistry. The device consists of two stainless steel molar bands designed for cementation onto the mandibular first molars. A 0.9 mm stainless steel lingual arch wire connects the bands, contoured to follow the lingual anatomy of the dental arch. Integrated into the edentulous span is a dentulous component featuring two artificial white acrylic molar teeth set within a pink heat-cure or self-cure acrylic resin base, simulating natural gingival tissue. The acrylic section is attached to the lingual arch via a hinge mechanism consisting of metal molar tubes, allowing for functional movement. This appliance is indicated for pediatric patients with premature loss of primary molars to prevent space loss, maintain mesiodistal dimensions for succedaneous teeth, and restore masticatory function.
Management of Premature Loss of Mandibular Second Primary Molar in a 7-Year-Old
Clinical Significance
| Consequence | Mechanism |
|---|---|
| Mesial drift of permanent first molar | No distal stop - permanent first molar tips/drifts mesially |
| Space loss for 2nd premolar | The succedaneous second premolar erupts at ~11-12 years; insufficient space causes impaction or ectopic eruption |
| Arch length discrepancy | Loss of leeway space (which is normally used for natural arch adjustment) |
| Midline shift | If unilateral loss, the dental midline can shift |
| Over-eruption of opposing upper tooth | Supra-eruption of the maxillary second primary molar into the space |
| Altered chewing pattern | Avoidance of the extraction side; potential skeletal asymmetry |
Step 1: Clinical Assessment Before Space Maintainer Placement
- Radiographic assessment (periapical + panoramic OPG)
- Location and developmental stage of the unerupted 2nd premolar
- Is the permanent first molar fully erupted? (affects abutment choice)
- Bone level over the premolar crown
- Root resorption pattern of remaining primary teeth
-
Amount of space available - measure mesiodistally on study models or CBCT
-
Eruption stage of permanent first molar
- Fully erupted: band and loop is feasible
- Not yet erupted: distal shoe appliance is needed (rare at age 7 - first molar usually erupts at 6)
-
Unilateral vs. bilateral loss - determines type of appliance
-
General dental health and patient cooperation - caries risk, oral hygiene
-
Overjet/overbite and occlusion - will appliance interfere with bite?
Step 2: Choosing the Appropriate Space Maintainer
Classification of Space Maintainers
Space Maintainers
├── Fixed
│   ├── Non-functional (passive)
│   │   ├── Band and Loop ← PRIMARY CHOICE for this case
│   │   ├── Distal Shoe (if 1st molar unerupted)
│   │   ├── Lingual Arch (bilateral loss)
│   │   └── Transpalatal Arch (maxillary bilateral)
│   └── Functional
│       └── Fixed partial denture (pontic type)
└── Removable
    ├── Acrylic partial denture
    └── Hawley appliance with pontic
PRIMARY APPLIANCE: Band and Loop Space Maintainer
Design
- Band: Stainless steel orthodontic band cemented on the permanent mandibular first molar (abutment tooth)
- Loop: 0.9 mm stainless steel round wire soldered to the band, extending mesially to contact the distal surface of the mandibular first primary molar (or the first premolar if it has erupted)
- The loop is passive - it only prevents mesial movement; it does not apply active force
Fabrication Steps
- Impression of the quadrant (or digital scan)
- Band selection and fitting - try in bands on permanent 1st molar; select best fit
- Send to lab with impression and prescription - band soldered with loop
- Cementation at next visit:
- Isolation and drying
- Zinc phosphate cement or glass ionomer luting cement
- Seat band with band seater/pusher
- Remove excess cement
- Verify loop contacts distal surface of adjacent tooth without impinging on gingiva
- Check occlusion - loop should not cause premature contact
Advantages of Band and Loop
- Simple to fabricate and cement
- Does not rely on patient cooperation (fixed)
- Does not interfere with eruption of succedaneous premolar
- Easily replaced or adjusted
- Does not impede jaw growth
Disadvantages
- Does not restore masticatory function (no occlusal contact in the space)
- Does not prevent over-eruption of opposing tooth
- Requires good abutment tooth (permanent first molar must be healthy)
- Band can de-cement if not monitored
ALTERNATIVE APPLIANCE 1: Distal Shoe Space Maintainer
Design
- Band placed on the primary first molar (abutment)
- Wire extends distally with an intragingival/intra-alveolar vertical projection (the "shoe")
- The blade portion slides along the mesial surface of the erupting permanent first molar crown, guiding it into proper position
Key Points
- Most invasive space maintainer - subgingival component requires radiographic monitoring
- Once the permanent first molar erupts sufficiently, convert to a band and loop
- Contraindicated in patients with bleeding disorders or systemic conditions affecting wound healing
ALTERNATIVE APPLIANCE 2: Lower Lingual Holding Arch (LLHA)
Design
- Stainless steel bands on both permanent mandibular first molars
- 0.9 mm stainless steel lingual arch wire spanning the entire arch, resting against the cingula of lower incisors
- Maintains arch length bilaterally and prevents lingual tipping of incisors
ALTERNATIVE APPLIANCE 3: Removable Partial Denture / Acrylic Space Maintainer
- Multiple teeth lost in multiple quadrants
- Fixed abutment not available (abutment tooth carious/extracted)
- Patient/parent refuses fixed appliance
- Bilateral loss in a cooperative child
Design
- Acrylic baseplate
- Adams clasps on permanent first molars and primary canines
- Acrylic pontic(s) in the extraction site(s)
- Can restore aesthetics and function
Disadvantage: Requires patient cooperation - must be worn full time; easily lost or broken.
Decision Tree for This Case
7-year-old, mandibular 2nd primary molar lost
                    │
         ┌──────────┴──────────┐
   Permanent 1st           Permanent 1st
   molar ERUPTED            molar NOT erupted
         │                        │
   Band and Loop             Distal Shoe
         │                   (convert to B&L
   ┌─────┴─────┐              once erupted)
Unilateral   Bilateral
    │             │
Band & Loop   Lower Lingual
              Holding Arch
Step 3: Timing of Appliance Placement
- Place the space maintainer as soon as possible after extraction (ideally same appointment or within 1-2 weeks)
- Space loss can begin within weeks of extraction - the longer the delay, the more space is lost
- If some space loss has already occurred before placement: attempt space regaining with an active appliance before placing a passive maintainer
Step 4: Instructions and Follow-Up
Patient/Parent Instructions
- Avoid sticky, hard foods (toffee, chewing gum) that may dislodge the band
- Maintain good oral hygiene - brushing around the band carefully with a fluoride toothpaste
- Report immediately if the appliance feels loose, is swallowing, or causes pain
- The appliance is not removable - do not attempt to remove it
Follow-Up Schedule
| Interval | Assessment |
|---|---|
| 1 week | Check band adaptation, cement seal, soft tissue |
| 3 months | Periapical radiograph; check for recurrent caries under band; verify space maintained |
| 6 months | Clinical + radiographic review; check eruption of 2nd premolar |
| Every 6 months | Until eruption of the 2nd premolar |
When to Remove the Space Maintainer
- The permanent second premolar is about to erupt (radiographically confirmed root formation, bone covering reduced to <1-2 mm)
- The permanent 2nd premolar is erupting and there is sufficient space
- Do NOT remove prematurely - leave until eruption is imminent
Step 5: Consequences if Space Maintainer is NOT Placed
| Time After Extraction | Space Loss |
|---|---|
| 1-3 months | 0.5-1 mm mesial drift begins |
| 6 months | Significant tipping of 1st molar |
| 1-2 years | 2-4 mm space loss possible |
| At age 11-12 | Second premolar impacted, ectopically erupting or requiring orthodontic treatment |
Summary Table
| Parameter | Details |
|---|---|
| Tooth lost | Mandibular 2nd primary molar (75/85) |
| Patient age | 7 years |
| Successor tooth | Permanent 2nd premolar (erupts ~11-12 yrs) |
| Appliance of choice | Fixed Band and Loop space maintainer |
| Abutment | Permanent mandibular 1st molar |
| Loop contact | Distal surface of 1st primary molar (or 1st premolar) |
| Alternative (bilateral) | Lower Lingual Holding Arch |
| Alternative (1st molar unerupted) | Distal Shoe |
| Alternative (no fixed abutment) | Removable acrylic partial denture |
| Follow-up | Every 6 months until 2nd premolar eruption |
| Removal | When 2nd premolar is about to erupt |
Carroll and Jones18 reported regarding a pressure-type appliance suc cessfully used to guide the permanent molar as it erupted.
Carroll and Jones pressure type appliance guide permanent molar eruption space maintainer pediatric dentistry
Carroll Jones pressure appliance permanent molar eruption guidance
https://pmc.ncbi.nlm.nih.gov/articles/PMC11320792
Carroll Jones acrylic pressure ridge extraalveolar appliance permanent molar eruption guidance
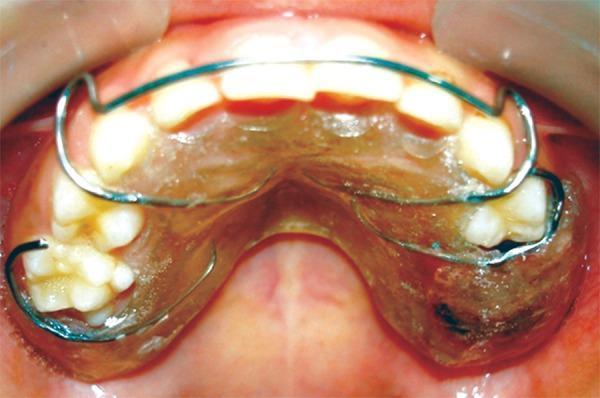
This intraoral clinical photograph displays a maxillary removable acrylic splint appliance positioned in the mouth of a pediatric patient. The appliance features a translucent acrylic base closely adapted to the hard palate and alveolar ridge. A stainless steel wire framework is embedded in the acrylic, consisting of a labial bow that spans the anterior incisors and various retentive components, such as C-clasps or Adams-like clasps, engaging the buccal surfaces of the posterior primary molars and premolars. On the patient's left side (image right), the acrylic base covers an extraction site corresponding to the primary second molar, serving as both a space maintainer and a protective surgical splint for hemostasis. The appliance is designed to provide mechanical stability and protection of the socket in a patient with a bleeding disorder, such as Glanzmann’s thrombasthenia, while awaiting secondary wound healing and permanent tooth eruption.
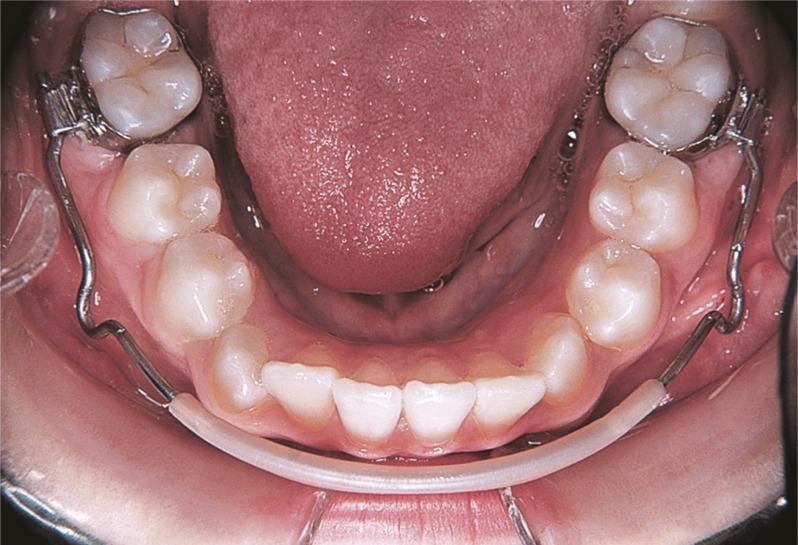
This clinical photograph provides an intraoral occlusal view of a mandibular arch featuring a pre-fabricated lip bumper appliance. The appliance consists of a stainless steel wire framework anchored posteriorly to orthodontic bands on the permanent first molars via specialized molar tubes. Anteriorly, a translucent acrylic shield is integrated into the wire, extending labially from canine to canine. The appliance is positioned to maintain a clear gap (approximately 2–3 mm) between the acrylic shield and the labial surfaces of the lower incisors, as well as a wider clearance (4–5 mm) from the buccal segments. Clinically, this orthodontic appliance is used to harness lip pressure to achieve spontaneous mandibular expansion, distalize or stabilize molars, and gain arch length by preventing the perioral musculature from exerting pressure on the mandibular dentition. The image demonstrates the specific spatial relationship required for the appliance to be active and functional within a pediatric or adolescent orthodontic treatment plan.
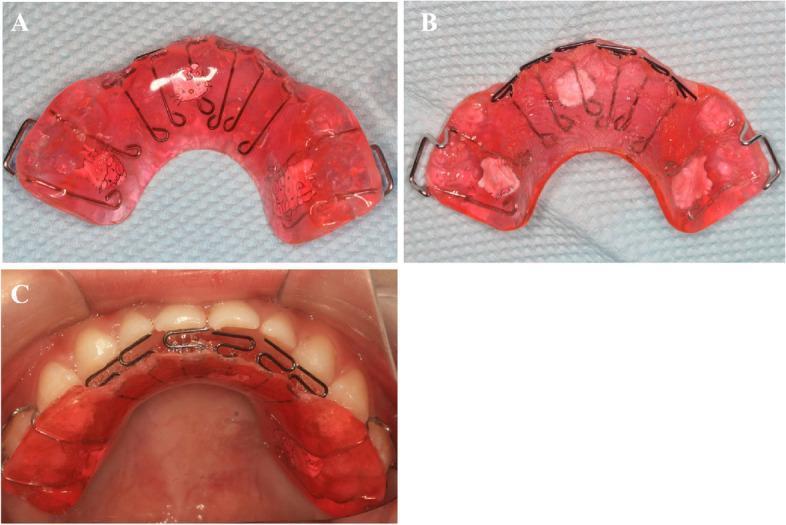
This composite clinical and intraoral image illustrates a maxillary pad movable appliance used in pediatric orthodontics for treating skeletal Class III malocclusion in the deciduous dentition. Panels (A) and (B) show the front and back views of the appliance, respectively. It features a horseshoe-shaped, reddish-pink acrylic base with integrated stainless steel wire components, including Adam’s clasps for molar retention and multiple hyperbolic tongue springs designed to apply labial pressure to the anterior teeth. Panel (B) reveals opaque white occlusal pads embedded in the acrylic, which function to relieve the crossbite and guide mandibular repositioning. Panel (C) is an intraoral photograph showing the appliance in situ. The acrylic base conforms to the palatal vault, while the wire springs are positioned against the lingual surfaces of the maxillary incisors. The appliance serves as a functional tool to correct dental retroversion and facilitate mandibular retreat, reconstructing a normal occlusal relationship prior to the eruption of permanent dentition.
Carroll and Jones (1982) - The Acrylic Pressure Ridge Appliance
Background and Context
| Year | Author(s) | Contribution |
|---|---|---|
| ~1960s | Willett | Original distal shoe (intra-alveolar wire extension) - the classic design |
| 1980 | Croll | Crown with a half-loop buccally - for partially erupted permanent first molars |
| 1982 | Carroll and Jones | Acrylic pressure ridge / extraalveolar acrylic pressure appliance |
| 1983 | Garcia-Godoy | Modified distal shoe with U-loops on buccal and lingual arms - semi-adjustable |
| 2002 | Brill | Chairside-fabricated, adjustable distal shoe |
What Is the Carroll and Jones Pressure-Type Appliance?
Concept and Rationale
Design Features
- Acrylic ridge/pressure pad: A strategically shaped acrylic component placed at the extraction site of the primary second molar that contacts and exerts gentle mesio-occlusal pressure on the mesial surface of the erupting permanent first molar crown
- Extraalveolar: The appliance component sits above the gingival tissue, not penetrating into the socket - making it less invasive than Willett's design
- Abutment: Anchored (typically via band or crown) to the primary first molar on the mesial side
- The appliance acts as both a space maintainer and a molar eruption guide
How It Works (Mechanism)
Extraction site of
2nd primary molar
        ↓
[Primary 1st Molar] ←——[Acrylic Ridge]——→ [Erupting Permanent 1st Molar]
    (abutment)          (pressure pad)         (being guided)
                                                       ↑
                         Pressure keeps the molar erupting vertically
                         rather than tipping mesially into the space
Clinical Significance and Comparison
Advantage over Willett's Distal Shoe
- Less invasive: No subgingival metal projection means less trauma, no risk of damaging the permanent premolar follicle, and no infection risk from the intra-alveolar component
- Simpler fabrication: The acrylic component can be constructed without the technically demanding intra-alveolar extension
- Better patient comfort: No penetration into healing socket tissue
Limitation
- Works best when the permanent first molar crown is already close to or at the gingival margin - the extraalveolar pressure can only guide what is near the surface
- For deeply unerupted permanent molars, the intra-alveolar Willett's design (or modified versions with U-loops by Garcia-Godoy) may be more effective
Where This Fits in Modern Practice
Summary
What is harrison principal that you told in first answer
The Harrison's Principle I Cited
Harrison's Principles of Internal Medicine, 22nd Edition (2025, McGraw Hill Medical) Chapter: Diseases of the Teeth and Periodontal Structures
"Pulpal infection leads to periapical abscess formation, which can produce pain on chewing. If the infection is mild and chronic, a periapical granuloma or eventually a periapical cyst forms, either of which produces radiolucency at the root apex."
What This Means Clinically
| Stage | What Happens | Finding in Your Case |
|---|---|---|
| Pulpal infection | Bacteria colonise the necrotic pulp (after trauma cut off blood supply) | Tooth non-responsive to vitality tests |
| Periapical abscess | Acute infection spreads through the apical foramen | Tenderness on percussion |
| Periapical granuloma | Chronic low-grade infection; body walls off the infection with granulation tissue | Periapical radiolucency on X-ray |
| Periapical cyst | Long-standing granuloma undergoes cystic transformation (radicular cyst) | Larger radiolucency if cyst has formed |
"Once irreversible pulpitis occurs, root canal therapy becomes necessary; removal of the contents of the pulp chamber and root canal is followed by thorough cleaning and filling with an inert material."