
shoulder joint injection a-z
Create a quick reference guide for shoulder injection procedure
yes
shoulder joint injection approach anatomy diagram
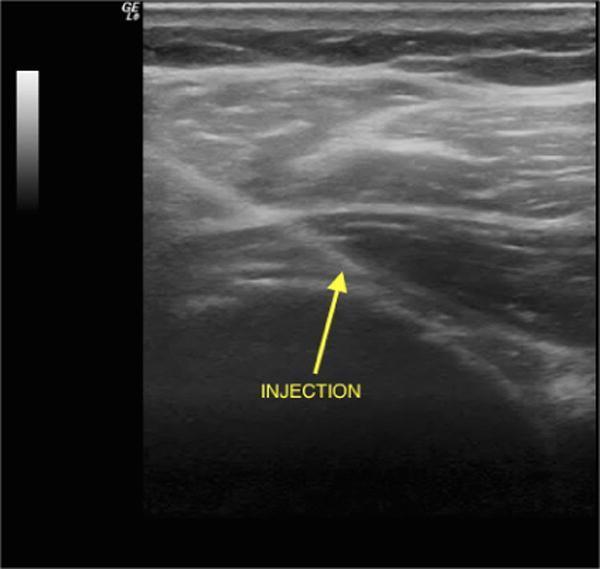
This diagnostic ultrasound image demonstrates an ultrasound-guided intra-articular injection of the glenohumeral joint using a posterior, lateral-to-medial approach. The grayscale B-mode image shows the musculoskeletal anatomy of the shoulder, including the superficial soft tissue and underlying musculature with characteristic striated, heterogenous echogenicity. A hyperechoic, linear needle trajectory is visible, oriented at an oblique angle as it penetrates the deep fascia and approaches the hypoechoic joint space. An annotation arrow labeled 'INJECTION' points to the needle tip positioned at the target site between the humeral head and the glenoid rim. The image illustrates a common orthopedic procedural technique for managing adhesive capsulitis or osteoarthritis, emphasizing the use of real-time imaging to ensure accurate needle placement and optimal delivery of therapeutic agents such as corticosteroids or hyaluronic acid into the joint capsule.
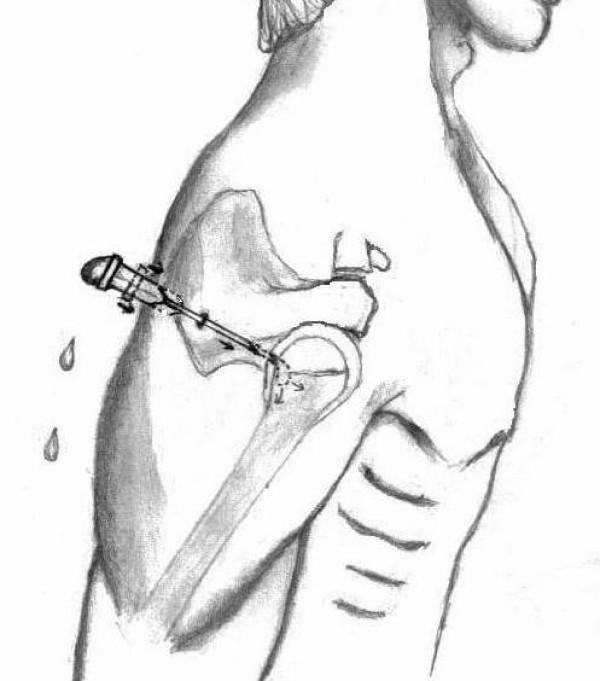
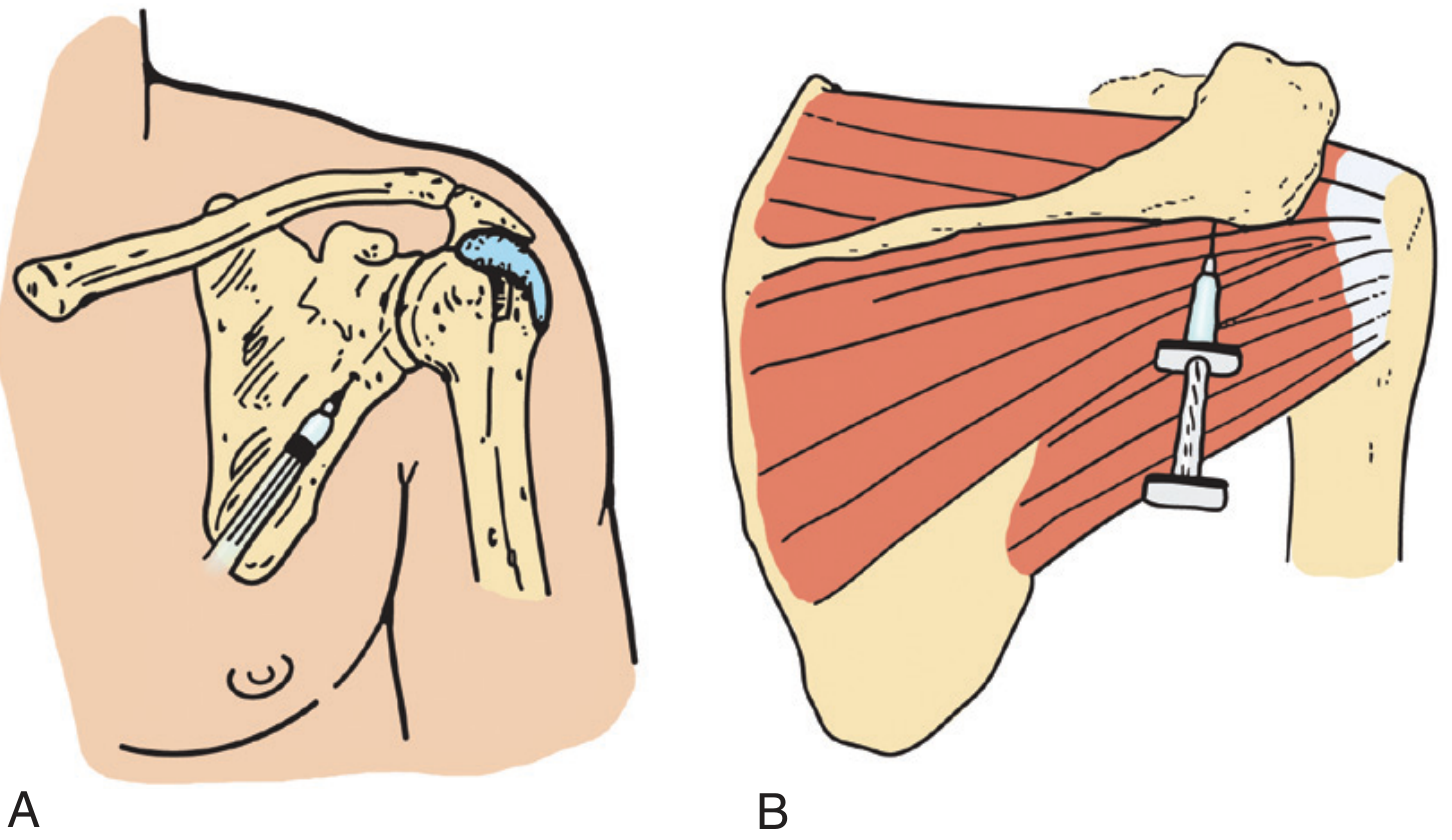
This medical illustration depicts a posterior approach for shoulder joint aspiration or injection, frequently utilized in orthopedic procedures like arthroscopy. The diagram shows a 21-gauge hypodermic needle inserted through the 'soft spot' of the posterior shoulder, located between the infraspinatus and teres minor muscles. Anatomical landmarks include the scapula with its glenoid fossa and the humeral head, forming the glenohumeral joint. A key educational feature shown is the 'hush' or 'vacuum' sign used to confirm intra-articular needle placement. The needle hub (butt) is filled with fluid, forming a convex meniscus; as the needle tip penetrates the negative-pressure environment of the glenohumeral joint, the fluid film is visualized being sucked inward, and the convexity is lost. This visual cue serves as a clinical indicator of successful entry into the joint space prior to saline distension or medication delivery.
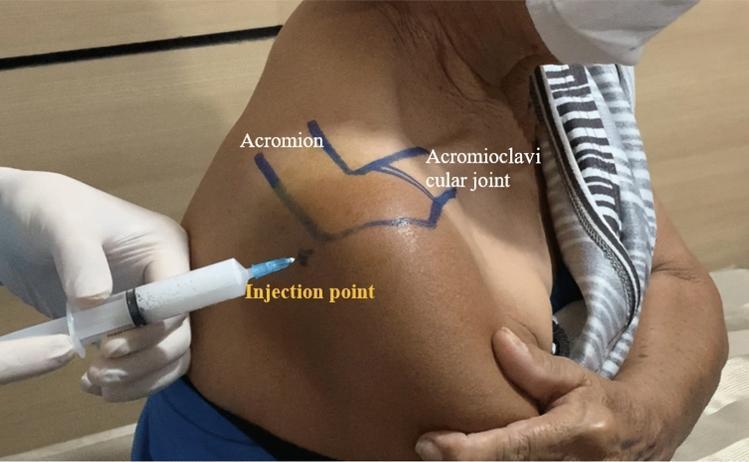
This clinical photograph demonstrates the procedural landmarks for a posterior approach subacromial corticosteroid injection in a human shoulder. The image displays the posterior and lateral aspect of a patient's shoulder with surface anatomy clearly delineated in blue ink. Key anatomical landmarks are labeled, including the 'Acromion' (specifically the posterolateral corner) and the 'Acromioclavicular joint' located superiorly. A specific 'Injection point' is marked with a small cross, situated approximately 2 cm inferior and 2 cm medial to the posterolateral acromial corner. A clinician's gloved hand is shown holding a syringe filled with a white, opaque suspension (consistent with a corticosteroid like triamcinolone acetonide). The needle tip is positioned precisely at the designated injection point, oriented at approximately a 45-degree angle to access the subacromial space. This visual serves as an educational guide for orthopedic or rheumatologic procedures, emphasizing aseptic technique and landmark-guided needle placement for treating subacromial impingement syndrome.
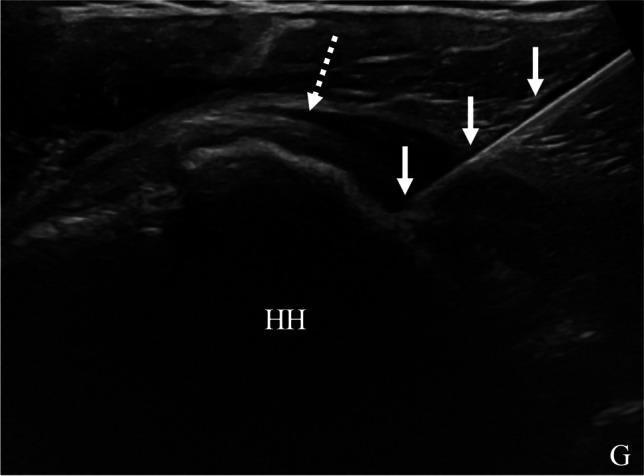
Diagnostic Image: Ultrasound (US) showing a glenohumeral joint corticosteroid injection via a posterior approach in a 46-year-old patient. The ultrasound frame displays a longitudinal view of the posterior shoulder anatomy including the humeral head (HH) and the glenoid (G). The bony surfaces appear as hypoechoic lines with deep acoustic shadowing. A more hyperechoic, fibrillar structure representing the infraspinatus tendon is indicated by a dashed arrow. An echogenic needle (solid arrows) is visualized in-plane using a medial-to-lateral trajectory. The needle tip is correctly positioned deep to the infraspinatus tendon, resting on the articular surface of the humeral head within the joint space. This clinical photograph demonstrates the real-time visualization required for accurate intra-articular needle placement to treat chronic shoulder pain or rotator cuff pathology while avoiding extra-articular injection.
Shoulder Injection - Quick Reference Guide
Injection Sites at the Shoulder
| Target | Primary Use |
|---|---|
| Glenohumeral (GH) joint | OA, RA, frozen shoulder (adhesive capsulitis) |
| Subacromial bursa | Rotator cuff syndrome, subacromial impingement |
| Acromioclavicular (AC) joint | AC joint OA, post-traumatic arthritis |
| Bicipital tendon sheath | Bicipital tendinitis |
| Coracoid process | Coracobrachialis/short head biceps enthesopathy |
1. Glenohumeral (GH) Joint Injection
Indications
- Shoulder OA, rheumatoid / inflammatory arthritis, frozen shoulder
Equipment
- Needle: 21-23 gauge, 1.5-inch
- Syringe: 5 mL
- Agent: Triamcinolone acetonide / hexacetonide or methylprednisolone 20-40 mg ± 1 mL 1% lidocaine
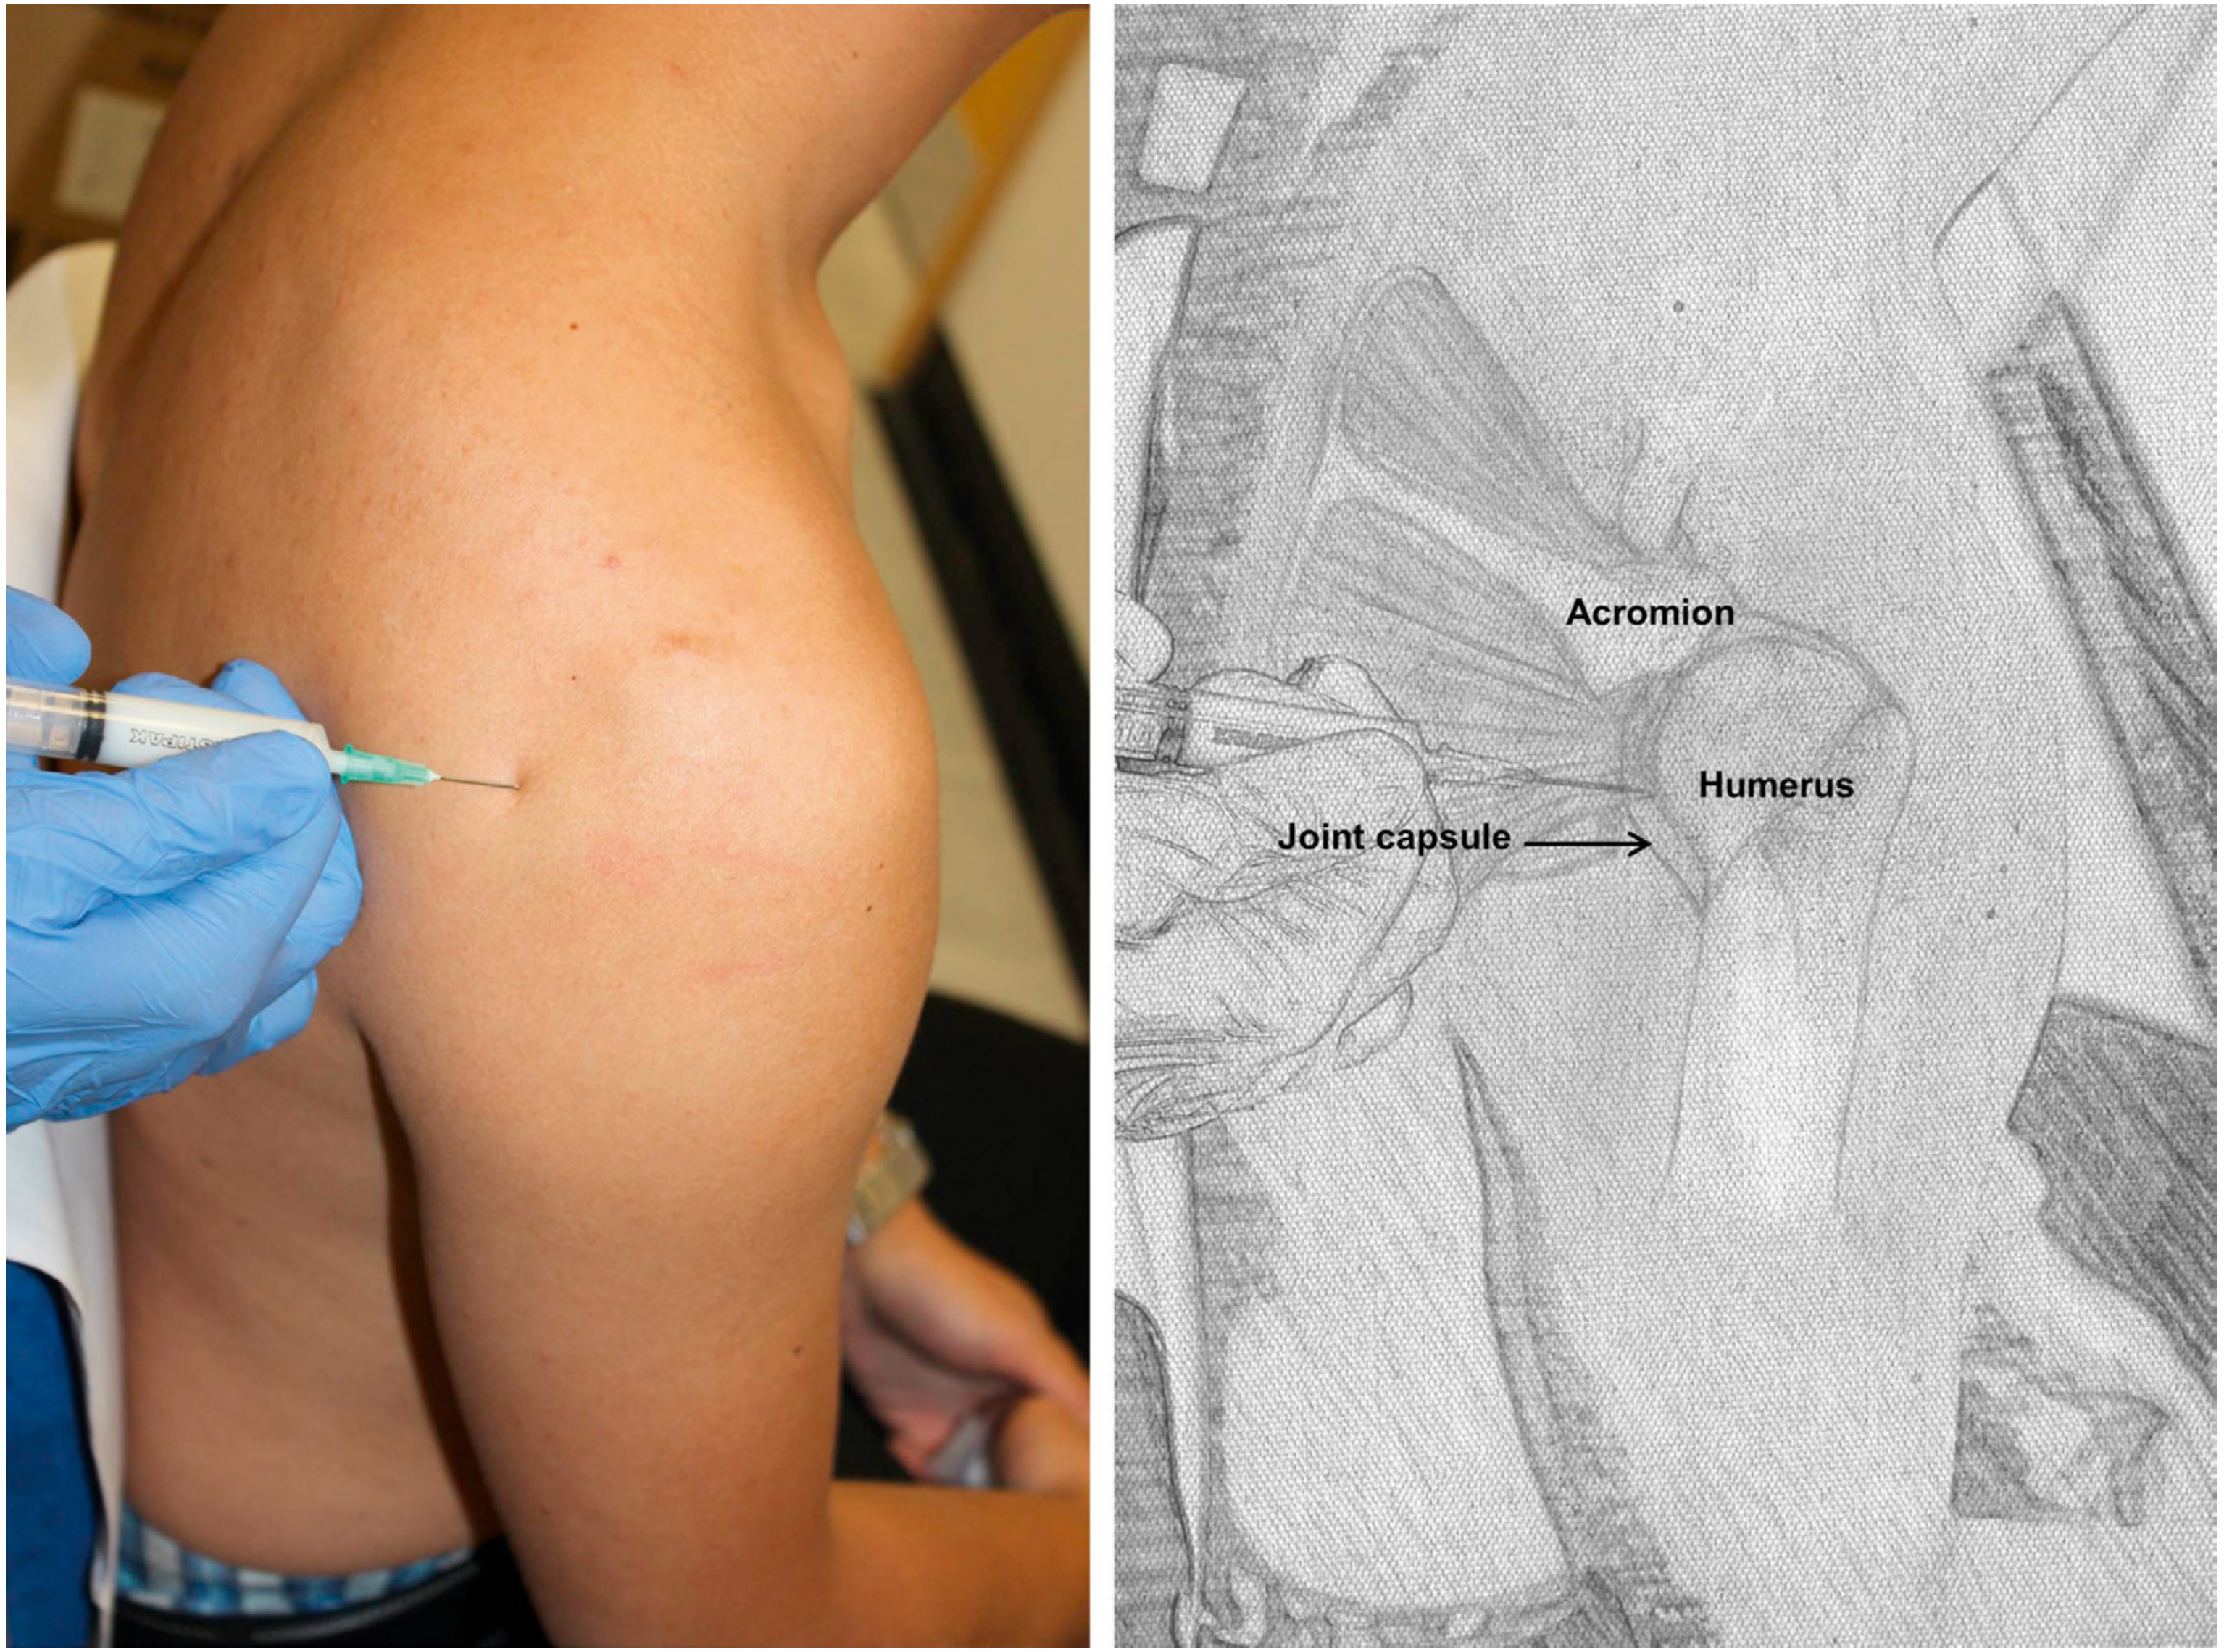
Posterior Approach (preferred - less neurovascular risk)
- Patient sits with back to you, arm internally rotated across the waist
- Palpate the inferoposterior acromial angle
- Insert needle 2-3 cm inferior and medial to the acromial angle
- Aim the needle anteriorly toward the coracoid process, advance 2-3 cm
- Confirm: plunger should meet little or no resistance on injection
- Aspirate before injecting; watch for fluid return
Anterior Approach (alternative)
- Patient seated, shoulder externally rotated (opens joint space)
- Identify the coracoid process (palpable below clavicle, medial to humeral head)
- Insert needle 1 cm inferior and 1 cm lateral to the coracoid
- Direct the needle perpendicularly or slightly laterally into the GH joint
- Correctly placed needle should not contact bone
2. Subacromial Bursa Injection
Indications
- Subacromial impingement syndrome, rotator cuff tendinopathy, subacromial bursitis
Equipment
- Needle: 22 gauge, 1-1.5 inch
- Agent: Methylprednisolone acetate 30-40 mg + 5-7 mL 1% lidocaine
Lateral Approach (most common)
- Palpate the superior shoulder surface, moving laterally to the acromion edge
- Locate the soft spot above the humeral head just lateral to the acromial edge
- Insert needle perpendicular to skin surface through the deltoid into the bursa
- Needle should be free-floating (in a space, not in muscle/tendon)
- The supraspinatus tendon lies directly medial - avoid injecting into the tendon
- If calcified tendon is entered, a gritty sensation is felt
3. Acromioclavicular (AC) Joint Injection
Equipment
- Needle: 25 gauge, small syringe (or insulin syringe)
- Agent: Triamcinolone 10-20 mg + 0.5-1 mL lidocaine
Technique
- Locate the AC joint line by palpation (small, narrow joint space)
- Consider US guidance if osteophytosis, narrow joint space, or difficult habitus
- Insert directly into the AC joint space from above, perpendicular
4. Bicipital Tendon Injection
Indications
- Bicipital tendinitis (long head of biceps in bicipital groove)
Equipment
- Needle: 22 gauge, 1.5-inch
- Agent: Methylprednisolone 10-20 mg + 5-10 mL 1% lidocaine
Technique
- Seat patient, arm flexed 90 degrees
- Place thumb over proximal humerus anteriorly; internally/externally rotate arm
- Palpate the bicipital groove - the tendon "snap" is felt under the thumb
- Target the most tender area in the groove
- Aim for peritendinous injection - NOT intra-tendinous
- Fanlike pattern injection may be needed if pain persists after initial injection
Position Summary Table
| Target | Patient Position | Landmark | Needle Entry Point | Direction |
|---|---|---|---|---|
| GH joint (posterior) | Seated, back to clinician | Inferoposterior acromial angle | 2-3 cm inferior and medial to acromion | Anterior toward coracoid |
| GH joint (anterior) | Seated, arm externally rotated | Coracoid process | 1 cm inferior + 1 cm lateral to coracoid | Perpendicular or slightly lateral |
| Subacromial bursa | Seated or standing | Lateral acromial edge soft spot | Below lateral acromion | Perpendicular to skin |
| AC joint | Seated | AC joint line | Directly into joint space from above | Perpendicular |
| Bicipital groove | Seated, arm flexed 90° | Bicipital groove palpated anteriorly | Into groove at max tenderness | Peritendinous |
Ultrasound Guidance
- AC joint injection (small joint, frequent osteophytes)
- Glenohumeral injection in difficult anatomy or obese patients
- Confirming intra-articular placement vs. extra-articular
Medications - Standard Doses
| Drug | Dose (shoulder) | Notes |
|---|---|---|
| Triamcinolone acetonide | 20-40 mg | GH joint; preferred for longer action |
| Triamcinolone hexacetonide | 20-40 mg | GH joint; longest-acting |
| Methylprednisolone acetate | 20-40 mg (GH/bursa); 10-20 mg (biceps/AC) | Widely available |
| 1% Lidocaine | 1-7 mL depending on target | Mixed with steroid for immediate relief |
Contraindications
| Absolute | Relative |
|---|---|
| Active local or systemic infection / septic arthritis | Coagulopathy (INR therapeutic - proceed cautiously, <0.5% complication rate) |
| Overlying skin infection at injection site | Diabetes mellitus (transient glucose elevation) |
| Known allergy to injectate | Recent injection at same site (<4-6 weeks) |
| Prosthetic joint (specialist referral needed) | Immunosuppression |
| Poorly controlled hypertension |
Complications
- Infection / septic arthritis - most serious; sterile technique is non-negotiable
- Injection into vessel - rarely causes systemic harm (steroids/lidocaine given IV for other indications)
- Tendon rupture - avoid direct intra-tendinous injection, especially supraspinatus
- Post-injection flare - transient increased pain 12-24 h after injection; seen in ~2-5%
- Skin atrophy / depigmentation - superficial or subcutaneous steroid deposition
- Facial flushing - transient, self-limited
- Glucose elevation in diabetics - monitor for 24-48 h
Post-Injection Care
- Apply pressure over the puncture site; adhesive bandage
- Advise relative rest for 24-48 hours
- Warn about post-injection flare (pain worsens before it improves)
- Expected onset of effect: 2-7 days (steroid); lidocaine works immediately
- Repeat injection: generally not sooner than 4-6 weeks; limit to 3-4 injections per year per joint
- Review if no improvement at 4 weeks - reconsider diagnosis or consider US-guided injection
Key Pearls
- Posterior approach is preferred for GH joint - lower risk of anterior neurovascular injury
- Free-floating needle = correct bursal placement - resistance suggests tendon or soft tissue
- Externally rotating the shoulder for the anterior GH approach opens the joint space
- Internally/externally rotating the arm during landmark palpation confirms the GH joint line
- Aspirate before injecting - blood return = vascular; stop and reposition
- Resistance on injection = needle not in joint/bursa; reposition before injecting full dose
- Peritendinous (NOT intratendinous) injection is mandatory for biceps tendon