Teach me tge topic of stop the bleeding skills teach me every aspect of this topic or toac station i have to prepare it for an exam so teach me every key point in easy understandable and memorizable way
stop the bleeding hemorrhage control techniques tourniquet wound packing
direct pressure hemostatic dressings pressure bandage bleeding control first aid
tourniquet application hemorrhage control wound packing
🩸 STOP THE BLEEDING — Complete Exam Guide
🔑 THE BIG PICTURE — Why It Matters
Uncontrolled hemorrhage is the #1 preventable cause of death from trauma. The core rule: Control bleeding BEFORE airway if there is exsanguinating (massive) external hemorrhage. (Bailey & Love's Surgery, 28th Ed., p. 376)
🧠 MEMORIZE THIS FRAMEWORK — "3-P Rule"
| Step | Action | Mnemonic |
|---|---|---|
| 1️⃣ | Press – Direct Pressure | Push hard |
| 2️⃣ | Pack – Wound Packing | Plug the hole |
| 3️⃣ | Pinch – Tourniquet | Pinch off flow |
📌 THE 3 MAIN TECHNIQUES (Core of Every Exam)
1️⃣ DIRECT PRESSURE
- Use a clean cloth, gauze, or dressing
- Place directly over the wound
- Press HARD and CONTINUOUSLY — do not lift to check
- Hold for at least 10 minutes (arterial bleeds can take longer)
- If soaked through → add more gauze on top, do NOT remove the first layer
⚠️ Key exam point: Removing the dressing disturbs the clot. Always add on top!
2️⃣ WOUND PACKING
- Pack gauze INTO the wound cavity — use finger-over-finger technique
- Fill the entire cavity tightly
- Apply firm direct pressure on top of the packed gauze
- Hold for 3–5 minutes minimum
- Contains agents that augment local coagulation (speed up clotting)
- Used in military and civilian trauma
- Preferred over plain gauze for deep wounds
⚠️ Key exam point: Wound packing + hemostatic gauze is THE method for junctional wounds where tourniquets cannot be applied.
3️⃣ TOURNIQUET
- Apply 2–3 inches (5–7 cm) ABOVE the wound (proximal to injury, not on a joint)
- Tighten until bleeding STOPS (not just slows)
- Note the TIME of application — write it on the patient's skin or tourniquet
- Do NOT remove in the field
- Get the patient to surgical care URGENTLY
⚠️ Critical exam points:
- Once applied → limb becomes ischemic — time is tissue!
- Maximum recommended time before tissue damage: ~2 hours
- Always record application time
- Never apply over a joint
- Improvised tourniquets (belt, cloth) can be used if no commercial TQ available
📦 TYPES OF DRESSINGS — Know These
| Type | Use |
|---|---|
| Plain gauze | Basic direct pressure |
| Hemostatic gauze (QuikClot, Combat Gauze) | Deep wounds, wound packing — contains kaolin or zeolite to boost clotting |
| Pressure bandage / Israeli bandage | Maintains constant pressure on wound hands-free |
| Improvised dressings | Clean cloth, T-shirt in absence of equipment |
🗺️ WOUND LOCATION → CHOOSE YOUR TECHNIQUE
| Location | Best Technique |
|---|---|
| Limb (arm/leg) | Tourniquet ± packing |
| Junctional (groin, armpit, neck) | Wound packing with hemostatic gauze |
| Scalp / face | Direct pressure |
| Trunk / chest / abdomen | Direct pressure + packing — no tourniquet possible |
🔢 STEP-BY-STEP OSCE/TOAC APPROACH
1. ENSURE SCENE SAFETY — protect yourself (gloves if available)
2. CALL FOR HELP — activate EMS / shout for assistance
3. IDENTIFY the source of bleeding
4. CHOOSE your technique:
     → Surface wound? → DIRECT PRESSURE
     → Deep/junctional? → WOUND PACKING
     → Limb spurting/uncontrolled? → TOURNIQUET
5. APPLY and HOLD firmly
6. RECORD time (for tourniquet)
7. MONITOR — watch for continued bleeding
8. DO NOT REMOVE dressings — add on top if soaked
9. REASSURE the patient
10. TRANSPORT urgently to surgical care
⚡ RECOGNITION — Types of Bleeding (Exam Classic)
| Type | Source | Appearance | Urgency |
|---|---|---|---|
| Arterial | Artery | Bright red, spurting, pulsatile | 🔴 Highest |
| Venous | Vein | Dark red, steady flow | 🟠 High |
| Capillary | Capillaries | Slow ooze | 🟡 Lower |
Trick: "Arteries = bright red + pulse. Veins = dark + drain."
⚠️ KEY RULES TO NEVER FORGET (Exam Red Flags)
| ❌ NEVER | ✅ ALWAYS |
|---|---|
| Remove a soaked dressing | Add more on top |
| Apply tourniquet ON a joint | Apply 2–3 inches ABOVE wound |
| Forget to note tourniquet time | Write time immediately |
| Use tourniquet on trunk/junctional wounds | Use packing instead |
| Delay hemorrhage control for airway in massive bleed | Control bleed FIRST |
🧲 MEMORY ANCHORS — Quick Recall
- "ABC" in trauma = C-ABC → Catastrophic hemorrhage comes before Airway
- "Pack it, press it, don't peel it" → wound packing rule
- "2-3 above, time it, don't remove" → tourniquet rule
- Hemostatic gauze = chemical clotting booster in a bandage
- Junctional wounds = tourniquet can't go there → pack it
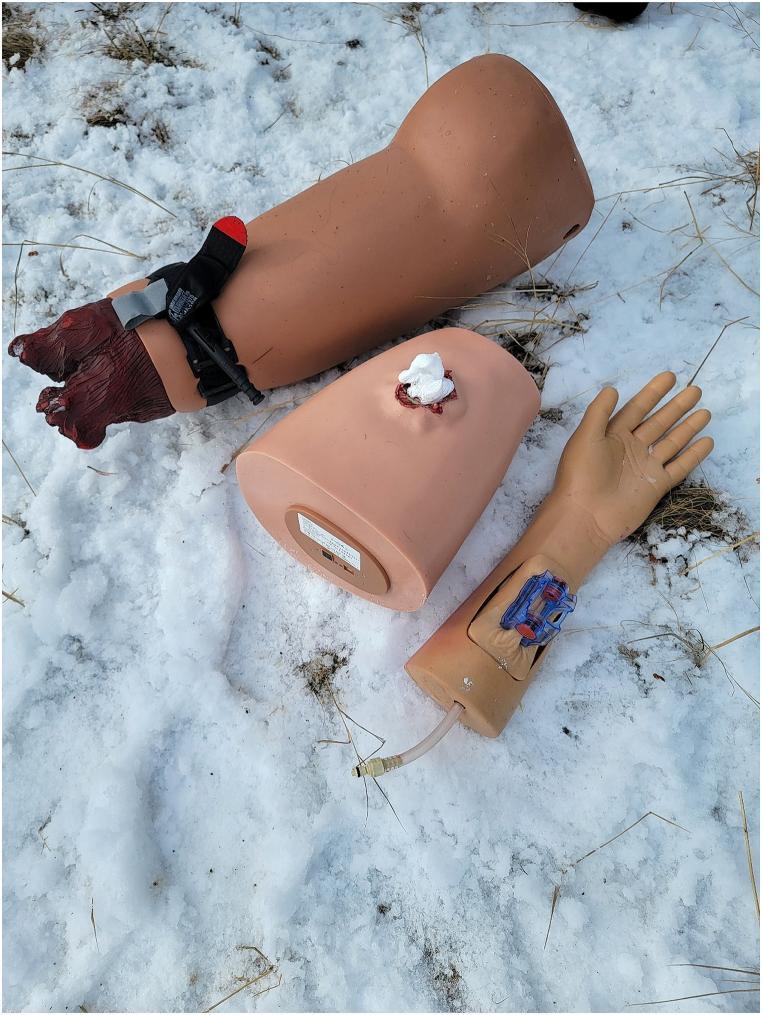
📷 Training Simulators Used in Stop-the-Bleed Stations
📝 QUICK EXAM CHEAT SHEET
BLEEDING TYPES:    Arterial (bright/spurt) | Venous (dark/flow) | Capillary (ooze)
3 TECHNIQUES:      Direct Pressure → Wound Packing → Tourniquet
TOURNIQUET RULES:  2-3in above wound | Tighten till stopped | Write time | Max ~2hrs
WOUND PACKING:     For deep/junctional | Finger-over-finger | Hemostatic gauze preferred
DIRECT PRESSURE:   10+ min | Don't lift | Add on top if soaked
REMEMBER C-ABC:    Catastrophic bleed controlled BEFORE airway
Teach me the topic of Various incision marking skills teach me every aspect of this topic or toac station i have to prepare it for an exam so teach me every key point in easy understandable and memorizable way ... everything should be from authentic sources
surgical incision types abdominal incisions marking anatomy
Langer lines lines of cleavage skin tension incision planning
midline paramedian transverse oblique incision surgical access abdomen
abdominal surgical incisions diagram types marking
abdominal incision midline paramedian Kocher Pfannenstiel Gridiron anatomy layers
principles of surgical incision good access healing cosmesis nerve vessel damage
Langer lines skin tension lines body diagram
Kocher incision thyroidectomy subcostal cholecystectomy surgical landmarks
Pfannenstiel incision McBurney gridiron appendicectomy Lanz incision landmarks
✏️ SURGICAL INCISION MARKINGS — Complete Exam Guide
🔑 WHY INCISION MARKING MATTERS
- ✅ Maximum access to the target organ
- ✅ Minimum damage to nerves, vessels, and muscles
- ✅ Good healing and minimal scarring
- ✅ Best cosmetic outcome
- ✅ Ability to extend the incision if needed
📐 PART 1 — SKIN TENSION LINES (The Foundation of All Incision Marking)
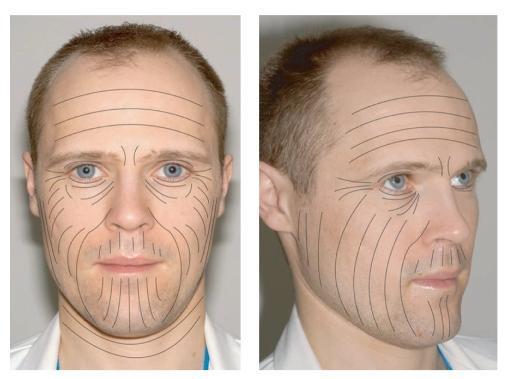
🔴 Langer's Lines
- Represent the orientation of dermal collagen fibres
- Originally mapped on cadavers
- Historically used to guide incision placement
- Clinical relevance has been questioned by modern surgeons
🟢 Relaxed Skin Tension Lines (RSTLs) — The Modern Standard
- Follow the creases formed when skin is pinched and relaxed
- More clinically useful, especially in head and neck surgery
- Incisions placed parallel to RSTLs → less tension on suture line → better healing → less visible scar
- Natural body creases and wrinkles are the best guide
Trick to remember: "Langer = old cadaver lines. RSTLs = live skin creases. USE THE CREASE."
Langer's Lines on the Face:
📏 PART 2 — PRINCIPLES OF A GOOD SURGICAL INCISION
The "ACCESS" Mnemonic:
| Letter | Principle |
|---|---|
| A | Access — must give adequate exposure to the target |
| C | Cosmesis — should follow natural skin lines/creases |
| C | Can extend — should be extendable if more access needed |
| E | Extensile — avoid critical structures (nerves, vessels) |
| S | Scars minimized — parallel to tension lines |
| S | Secure closure — layers must close without tension |
🗺️ PART 3 — CLASSIFICATION OF SURGICAL INCISIONS
By Direction:
| Type | Description |
|---|---|
| Longitudinal | Along the long axis of the body (e.g., midline) |
| Transverse | Across the body (e.g., Pfannenstiel) |
| Oblique | At an angle (e.g., Kocher's, McBurney's) |
By Location:
| Location | Incision Names |
|---|---|
| Abdomen | Midline, Paramedian, Transverse, Kocher's, Pfannenstiel, McBurney's/Lanz |
| Chest | Sternotomy, Clamshell (bilateral thoracotomy), Lateral thoracotomy |
| Neck | Kocher's collar, Longitudinal sternomastoid |
| Breast | Periareolar, Inframammary |
🧠 PART 4 — ALL MAJOR NAMED INCISIONS (The Exam Core)
1️⃣ MIDLINE INCISION (Median Laparotomy)
- Landmark: From xiphisternum → umbilicus → pubic symphysis (or any segment)
- Layers cut: Skin → subcutaneous fat → linea alba → peritoneum
- Key point: Cuts through the avascular linea alba — no muscles or major vessels cut
- Advantages:
- Fastest to open and close
- Best access to the entire abdomen
- Easily extended upward or downward
- Uses: Emergency laparotomy, bowel surgery, aortic surgery, trauma
🏆 Gold standard for emergency abdominal surgery
Trick: "Midline = fastest, most versatile. Goes through linea alba — no bleeding."
2️⃣ PARAMEDIAN INCISION
- Landmark: 2–3 cm lateral to midline, vertical
- Layers cut: Skin → anterior rectus sheath → rectus muscle (retracted laterally, NOT cut) → posterior rectus sheath → peritoneum
- Advantage: Muscle-sparing (retracted, not divided) → stronger closure, less hernia risk
- Disadvantage: Slower than midline; denervation risk if too lateral
- Uses: Elective abdominal surgery (now largely replaced by midline)
Trick: "Para = beside. 2–3 cm beside the midline. Muscle moves aside, not cut."
3️⃣ KOCHER'S SUBCOSTAL INCISION
- Landmark: Parallel to and 2–5 cm below the costal margin (right side = biliary surgery, left side = splenectomy)
- Layers: Skin → external oblique → internal oblique → rectus muscle (cut) → peritoneum
- Right Kocher's: Used for open cholecystectomy, liver surgery
- Left Kocher's: Used for splenectomy
- Bilateral Kocher's (Chevron / Rooftop incision): Used for liver transplantation, total gastrectomy
Trick: "Kocher = under the ribs. Right = liver/gallbladder. Left = spleen. Both = transplant."
4️⃣ KOCHER'S COLLAR INCISION (Neck)
- Landmark: Transverse, 2–3 cm above the suprasternal notch, in a natural skin crease
- Use: Thyroidectomy, parathyroidectomy
- Follows RSTL → excellent cosmesis
Trick: "Collar = necklace shaped. 2 fingers above the notch. For thyroid."
5️⃣ PFANNENSTIEL INCISION
- Landmark: Transverse curved incision just above the pubic symphysis (~3 cm above), within the pubic hairline
- Layers: Skin (curved) → anterior rectus sheath (transverse) → rectus muscles separated in midline → peritoneum (vertical)
- Key point: Skin incision = horizontal/curved, but peritoneum entered vertically
- Uses: Caesarean section, hysterectomy, bladder surgery, pelvic surgery
- Advantage: Excellent cosmesis (scar hidden in hairline)
Trick: "Pfannenstiel = bikini cut. Just above pubis. Scar hidden. For C-section."
6️⃣ McBURNEY'S INCISION (Gridiron Incision)
- Landmark: McBurney's Point = junction of lateral 1/3 and medial 2/3 of the line from ASIS to umbilicus
- The incision is made perpendicular to this line at McBurney's point
- Layers (split, not cut): Skin → external oblique (split in direction of fibres) → internal oblique (split) → transversus abdominis (split) → peritoneum
- Use: Open appendicectomy
- Key point: Muscles are split along their fibre direction (gridiron = grid pattern of muscle splitting)
Trick: "McBurney = 1/3 from ASIS. Gridiron = muscles split like a grid. Appendix only."
7️⃣ LANZ INCISION
- Landmark: Same region as McBurney's but the incision is transverse (horizontal), within skin crease
- Advantage over McBurney's: Better cosmesis
- Uses: Open appendicectomy (preferred cosmetically, especially in women)
Trick: "Lanz = Lanz horizontal = better scar than McBurney's. Same area, just sideways."
8️⃣ STERNOTOMY (Median Sternotomy)
- Landmark: Midline of the sternum, from suprasternal notch to xiphisternum
- Use: Cardiac surgery (CABG, valve surgery), mediastinal surgery
- Key point: Sternum split with an oscillating saw
9️⃣ THORACOTOMY
- Lateral Thoracotomy: Along intercostal space (e.g., 5th or 6th) — for lung, esophagus surgery
- Clamshell (Bilateral Thoracotomy): Transverse across both sides of chest — for bilateral lung transplant, trauma
- Landmarking: Along specific rib space counted from top
🔟 PERIAREOLAR INCISION
- Landmark: Along the edge of the areola
- Use: Breast lumpectomy, breast augmentation, gynaecomastia
- Advantage: Scar hidden at pigmented border
1️⃣1️⃣ INFRAMAMMARY INCISION
- Landmark: In the fold below the breast
- Use: Breast augmentation, breast reconstruction
- Advantage: Scar hidden in natural fold
1️⃣2️⃣ INGUINAL INCISION
- Landmark: Parallel to the inguinal ligament, from ASIS toward pubic tubercle
- Use: Inguinal hernia repair, femoral artery access, orchidopexy
1️⃣3️⃣ PERIUMBILICAL / TRANSVERSE INCISION
- Used for access to suprarenal aorta or umbilical hernia
- Just above or around the umbilicus
1️⃣4️⃣ THORACOABDOMINAL INCISION
- Combines thoracotomy + laparotomy → used for oesophagectomy, proximal gastric surgery, thoracoabdominal aorta
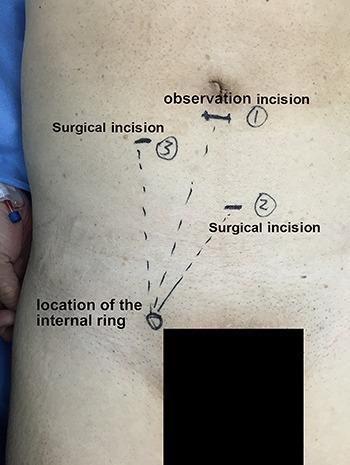
🖼️ Laparoscopic Incision Marking (Port Placement)
🧩 PART 5 — HOW TO MARK AN INCISION (TOAC Station Steps)
STEP 1 — IDENTIFY the target organ and what access you need
STEP 2 — IDENTIFY key bony/surface landmarks (ASIS, umbilicus, costal margin, pubic symphysis)
STEP 3 — CHECK skin tension lines / natural creases in the region
STEP 4 — MARK the incision with a skin marker BEFORE draping
STEP 5 — CONFIRM:
          ✔ Adequate access?
          ✔ Avoids major nerves/vessels?
          ✔ Can be extended?
          ✔ Follows skin crease where possible?
STEP 6 — PROCEED with incision along the marking
📊 PART 6 — MASTER COMPARISON TABLE
| Incision | Direction | Location | Operation | Key Feature |
|---|---|---|---|---|
| Midline | Vertical | Xiphoid → pubis | Emergency laparotomy | Through linea alba — avascular |
| Paramedian | Vertical | 2–3 cm lateral to midline | Elective abdominal | Muscle retracted, not cut |
| Kocher's (subcostal) | Oblique | 2–5 cm below costal margin | Cholecystectomy (R), Splenectomy (L) | Cuts rectus muscle |
| Kocher's collar | Transverse | 2–3 cm above sternal notch | Thyroidectomy | Follows skin crease |
| Pfannenstiel | Transverse/curved | 3 cm above pubis | C-section, hysterectomy | Bikini line — best cosmesis |
| McBurney's/Gridiron | Oblique | McBurney's point (1/3 ASIS–umbilicus) | Appendicectomy | Muscles split, not cut |
| Lanz | Transverse | Same as McBurney's | Appendicectomy | Better cosmesis than McBurney's |
| Sternotomy | Vertical | Midline of sternum | Cardiac surgery | Bone cut |
| Periareolar | Curved | Areola border | Breast surgery | Hidden scar |
| Inguinal | Oblique | Parallel to inguinal ligament | Hernia repair | ASIS to pubic tubercle |
| Chevron/Rooftop | Bilateral subcostal | Both sides | Liver transplant, gastrectomy | Two Kochers joined |
| Clamshell | Transverse | Bilateral thoracotomy | Bilateral lung transplant | Biggest thoracic access |
⚡ PART 7 — QUICK ANATOMY FOR MARKING (Know These Landmarks)
| Landmark | Location | Used For |
|---|---|---|
| Xiphisternum | Lower end of sternum | Upper limit of midline incision |
| Umbilicus | Centre of abdomen | Reference for most abdominal incisions |
| ASIS (Anterior Superior Iliac Spine) | Palpable front of pelvis | McBurney's point, inguinal incision |
| Pubic symphysis | Midline of pubis | Lower limit of midline; Pfannenstiel |
| Costal margin | Lower rib edge | Kocher's subcostal |
| Suprasternal notch | Top of sternum | Kocher's collar (thyroid) |
| McBurney's Point | 1/3 from ASIS to umbilicus | Appendix |
| Inguinal ligament | ASIS → pubic tubercle | Inguinal incision |
🧲 PART 8 — MEMORY TRICKS SUMMARY
| Incision | Memory Hook |
|---|---|
| Midline | "The highway — straight down, fastest, no bleeding" |
| Paramedian | "Para = beside. Muscle moves aside like a door" |
| Kocher subcostal | "Under the ribs. R = bile. L = spleen. Both = transplant" |
| Kocher collar | "Necklace for thyroid" |
| Pfannenstiel | "Bikini cut. Scar hidden. For baby" |
| McBurney's | "1/3 from ASIS. Gridiron = muscles split like a grid" |
| Lanz | "Lanz = horizontal McBurney. Prettier scar" |
| Sternotomy | "Crack the sternum for the heart" |
| Periareolar | "Around the nipple border — hidden" |
| Clamshell | "Open like a clamshell — both lungs" |
📝 RAPID-FIRE EXAM CHEAT SHEET
SKIN TENSION LINES:    Langer's (collagen, old) vs RSTLs (live skin creases — USE THESE)
RULE:                  Incisions PARALLEL to tension lines = less scar, better healing

MIDLINE:               Linea alba, avascular, fastest, best access, emergency
PARAMEDIAN:            2-3cm lateral, muscle retracted NOT cut
KOCHER SUBCOSTAL:      R=cholecystectomy, L=splenectomy, both=transplant
KOCHER COLLAR:         Thyroid, 2-3cm above sternal notch, skin crease
PFANNENSTIEL:          Bikini, 3cm above pubis, C-section/hysterectomy
McBURNEY'S:            1/3 ASIS-umbilicus, gridiron split, appendix
LANZ:                  Horizontal McBurney's, same place, better cosmesis
STERNOTOMY:            Midsternal, cardiac surgery
INGUINAL:              Parallel to inguinal ligament, hernia repair

McBURNEY'S POINT:      1/3 from ASIS along line to umbilicus
LINEA ALBA:            Midline, avascular fusion of aponeuroses → midline incision uses this