
Cervical spondylosis
Treatment non operative and operative with images with surgical approaches
Reading File
Now let me search the medical library for cervical spondylosis treatment sections and relevant images in parallel.
Finding Sources
Finding Sources
Searching PubMed
"cervical spondylosis" AND treatment
Good results. Now let me read all the key sections in parallel.
Reading File
Reading File
Reading File
Good. Now let me read the key treatment sections from Miller's Orthopaedics (the most relevant orthopaedic source) and also search for surgical approach images.
Reading File
Finding Sources
Finding Sources
Excellent! Let me now read the treatment sections from Campbell's (the most comprehensive surgical text) and Adams & Victor's, plus search for images.
Reading File
Reading File
Finding Sources
I found a key algorithm image. Let me now read the detailed treatment sections and also fetch all relevant images in parallel.
Reading File
Reading File
Loading Image
Finding Sources
Excellent! I have the surgical approach algorithm image. Now let me read the treatment sections and fetch more images.
Reading File
Reading File
Loading Image
Now let me read the Campbell's nonoperative treatment box detail and look for surgical technique images.
Reading File
Finding Sources
Now let me get the posterior foraminotomy technique image and the ACDF technique details from Campbell's.
Reading File
Finding Sources
I found surgical images. Let me fetch the most useful ones and also get the ACDF anterior technique section from Campbell's.
Loading Image
Loading Image
Reading File
I have rich content from textbooks. Let me now search for the ACDF anterior approach images and the Grainger radiology section on spinal surgery.
Reading File
Finding Sources
Let me fetch the spinal hardware image and also the posterior foraminotomy technique image from Campbell's.
Loading Image
Loading Image
Excellent! I now have comprehensive content and images from multiple authoritative textbooks. Let me compile the full response.
Cervical Spondylosis: Treatment (Non-Operative & Operative) with Surgical Approaches
Overview of Treatment Strategy
Cervical spondylosis produces four distinct clinical entities - discogenic neck pain, radiculopathy, myelopathy, and myeloradiculopathy - each with different treatment thresholds. The approach to treatment is guided by the clinical syndrome, severity, and whether neurological deficits are present or progressive.
Primary indications for operative treatment are:
- Failure of nonoperative pain management
- Increasing or significant neurological deficit
- Cervical myelopathy (which predictably progresses based on natural history studies)
- Campbell's Operative Orthopaedics 15th Ed 2026, p. 2294
Part I: Non-Operative Treatment
Between 70-80% of patients with symptomatic cervical disc herniations, including some with nonprogressive radicular weakness, respond well to nonoperative treatment. Acute disc herniations also decrease in size over time in the cervical region.
1. Rest & Activity Modification
- Short periods of rest, massage, ice, and anti-inflammatory agents (glucocorticoids or NSAIDs)
- Active mobilization as soon as possible
- Comfortable positioning of the neck is essential for pain relief
- Patients with spondylosis (hard disc) are most comfortable with neck in flexion
- Patients with hyperflexion injuries prefer the neck extended with a small roll under the neck
2. Pharmacotherapy
- NSAIDs - first-line for axial neck pain and radiculopathy
- Oral corticosteroids - short course for acute flares with radicular symptoms
- Neuropathic agents - gabapentin, pregabalin for radicular pain
- Miller's Review of Orthopaedics 9th Ed, p. 761: NSAIDs, cervical epidural injections, isometric exercises, traction, and occasionally temporary collar immobilization for cervical myelopathy
3. Cervical Traction
- Helpful in selected patients; traction applied to the head in the position of maximal pain relief
- Caution: Traction should never be continued if it increases pain
- Weights rarely exceed 10 pounds (weight of the head)
- Proper head halter and duration of traction sessions necessary to prevent temporomandibular joint irritation
"Poor man's" traction:
- Uses the weight of the unsupported head (≤10 lbs)
- For extension traction: patient placed supine and head allowed to extend gently off examining table
- For flexion traction: same procedure in prone position
- Exercise in the most comfortable position performed several times daily for 5-10 minutes
4. Cervical Braces / Orthoses
- Limit excessive motion; useful in very active patients
- A soft collar to restrict anteroposterior motions is reasonable and may reduce neck and arm discomfort
- Use of an orthosis should be limited (except in trauma) to prevent muscle atrophy
- Adams and Victor's Principles of Neurology 12th Ed, p. 914: The soft collar has been used as standard conservative management, though many patients are unable to wear it for prolonged periods
5. Posture Correction & Ergonomics
- More frequent changes in position
- Ergonomic changes in the work area to prevent fatigue and encourage good posture
- Techniques to minimize or relieve tension
6. Physical Therapy & Exercises
- Neck and shoulder exercises most beneficial as acute pain subsides
- Isometric exercises are helpful in the acute phase
- If concomitant shoulder problems exist (e.g., adhesive capsulitis), complete immobilization of the painful extremity should be avoided
- Bradley and Daroff's Neurology in Clinical Practice: No significant difference between outcomes of surgical vs. conservative management (physical therapy or hard cervical collar immobilization) for uncomplicated radiculopathy in some studies
7. Cervical Epidural Steroid Injections (CESI)
- Indicated for radiculopathy refractory to medications and PT
- Provides short- to medium-term relief of radicular pain
- Performed under fluoroscopic guidance
- Miller's Review of Orthopaedics 9th Ed: listed among standard non-surgical treatment options
Patient Education
- Emphasizing the self-limiting nature of symptoms is important for axial neck pain
- For discogenic neck pain (axial only, no neurological signs): surgical options are limited and should be avoided
Part II: Operative Treatment
Surgical Indications
| Indication | Notes |
|---|---|
| Failure of nonoperative management | Persistent pain interfering with daily activity |
| Progressive neurological deficit | Increasing weakness, sensory loss |
| Cervical myelopathy | Natural history is typically progressive; surgery frequently indicated |
| Signs of spasticity, sphincter disturbance, or cord signal change on MRI | Should not delay more than a few weeks |
Adams and Victor's 12th Ed, p. 918: Any degree of spasticity, sphincter disturbance, or loss of sensation in the hands will not improve or will usually worsen over months without surgery. Hand weakness and muscular atrophy from radicular compression will improve with decompression.
Surgical Approach Decision Algorithm
The choice between anterior and posterior procedures depends on C2-7 alignment (kyphosis vs. lordotic/neutral) and the number of levels compressed:
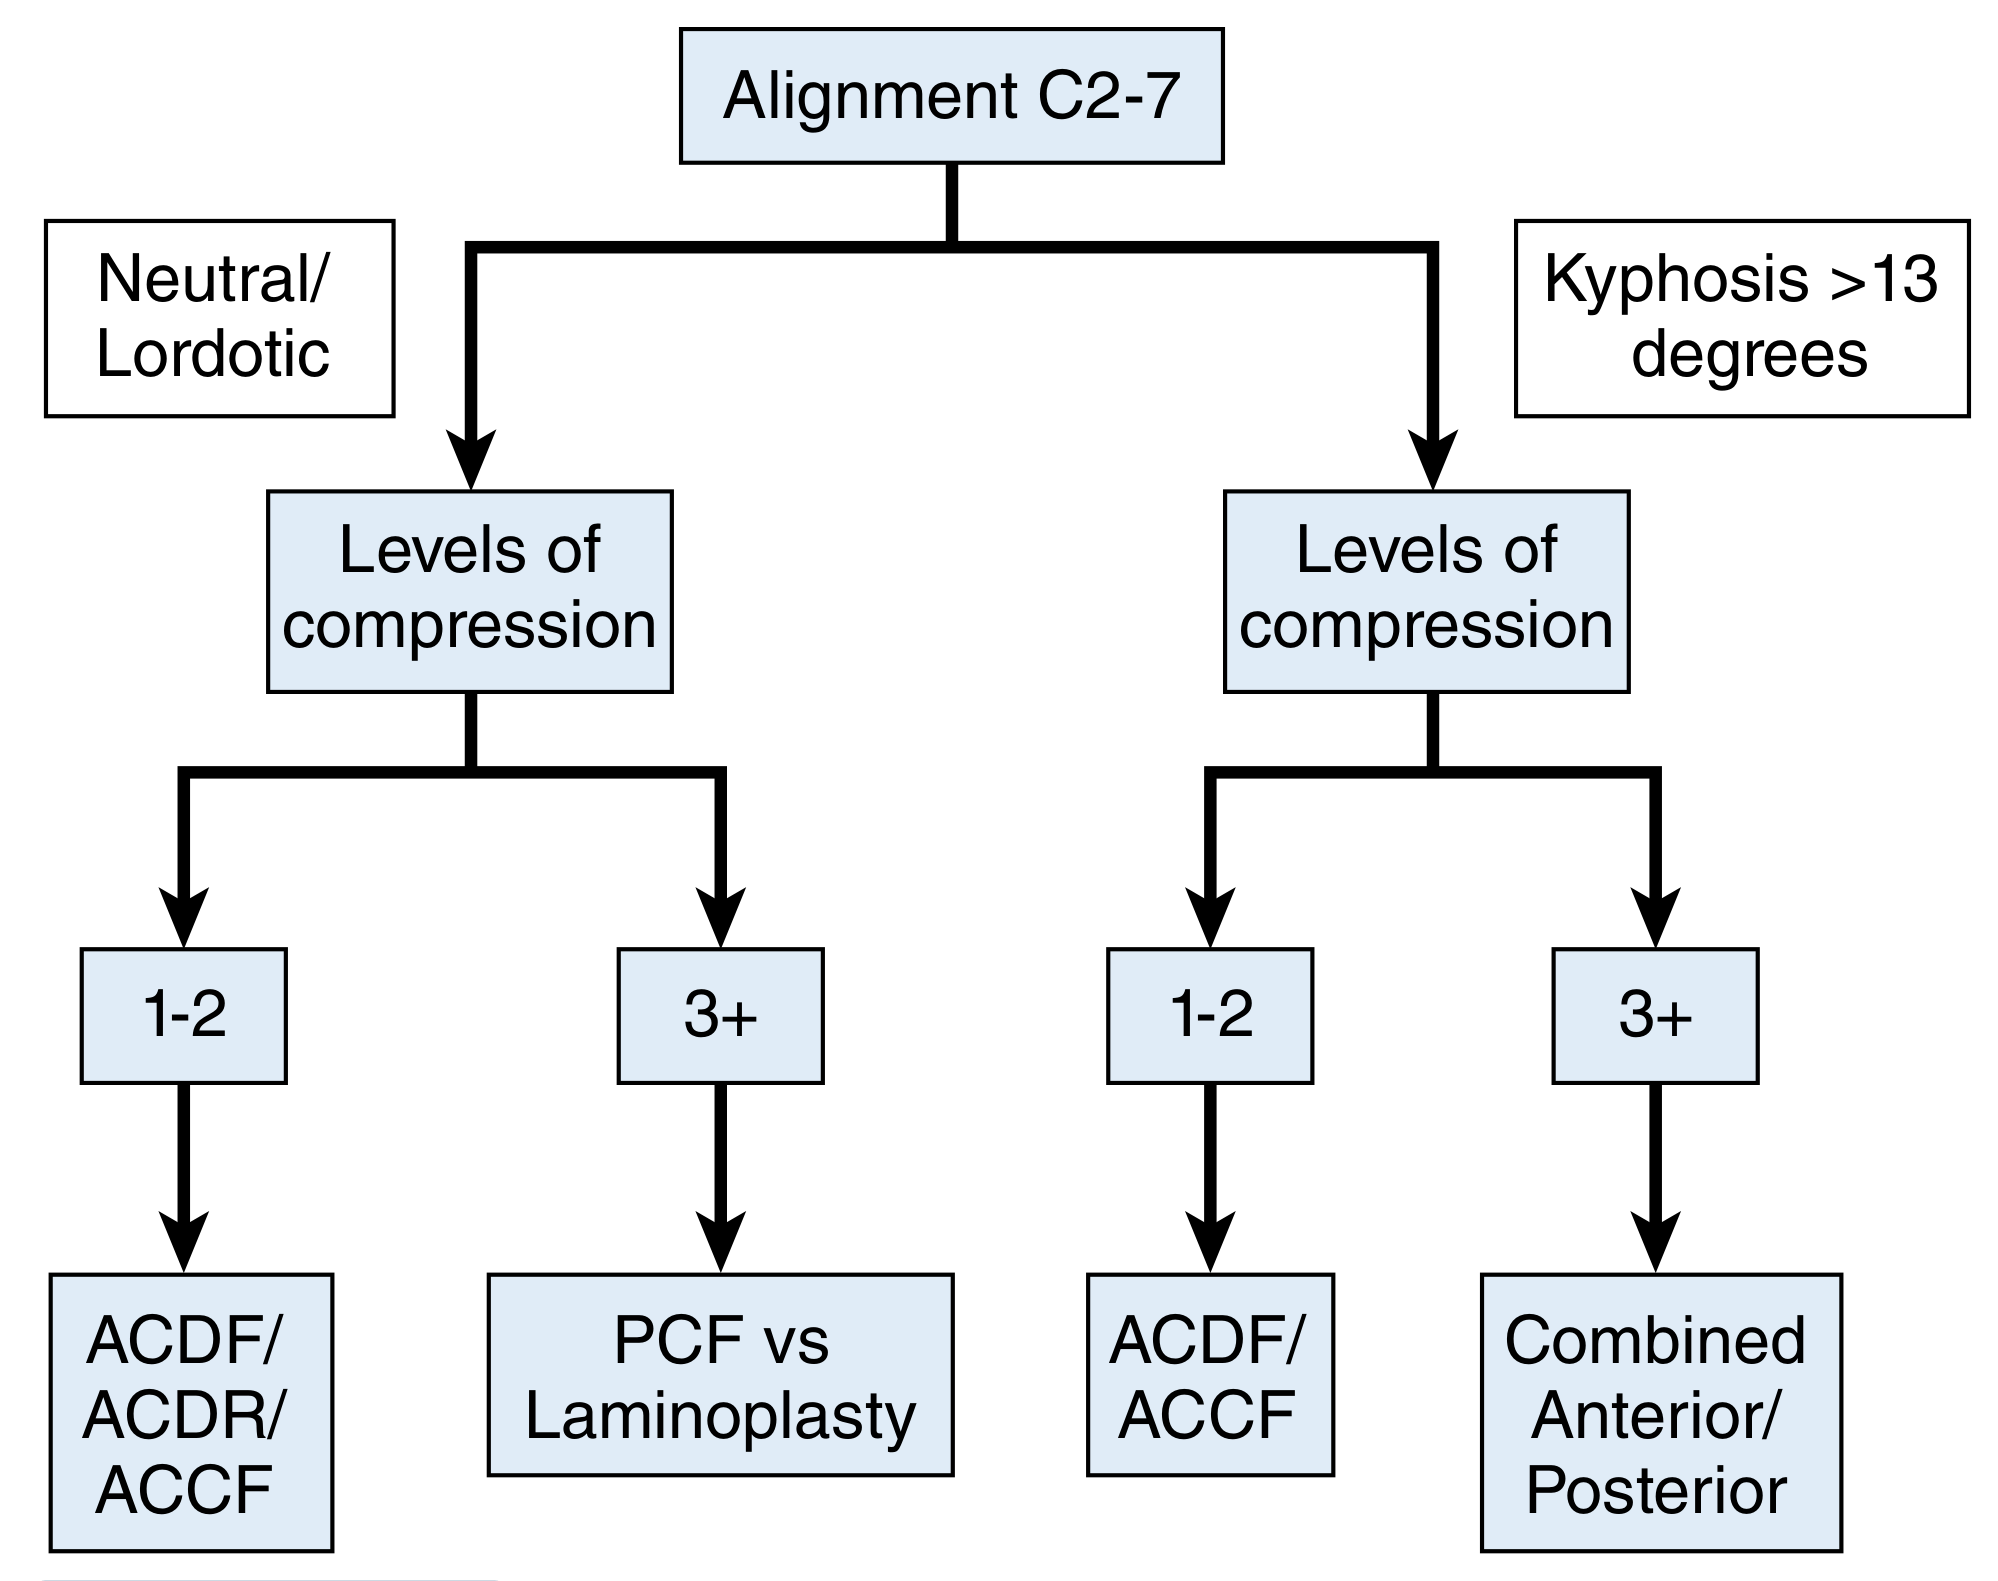
FIGURE 45.8 - Algorithm for choice of approach for surgical treatment of cervical myelopathy. ACCF = anterior cervical corpectomy and fusion; ACDF = anterior cervical discectomy and fusion; ACDR = anterior cervical disc replacement; PCF = posterior cervical fusion. (Campbell's Operative Orthopaedics 15th Ed 2026)
Key rule: Posterior-based options are contraindicated in patients with fixed cervical kyphosis - indirect cord decompression cannot occur if the cord is tethered anteriorly across a kyphotic apex.
Radiological appearance of cord compression requiring surgery
T2-weighted sagittal MRI showing disc-related myelopathy with cord compression and high T2 signal (myelomalacia / cord ischemia):
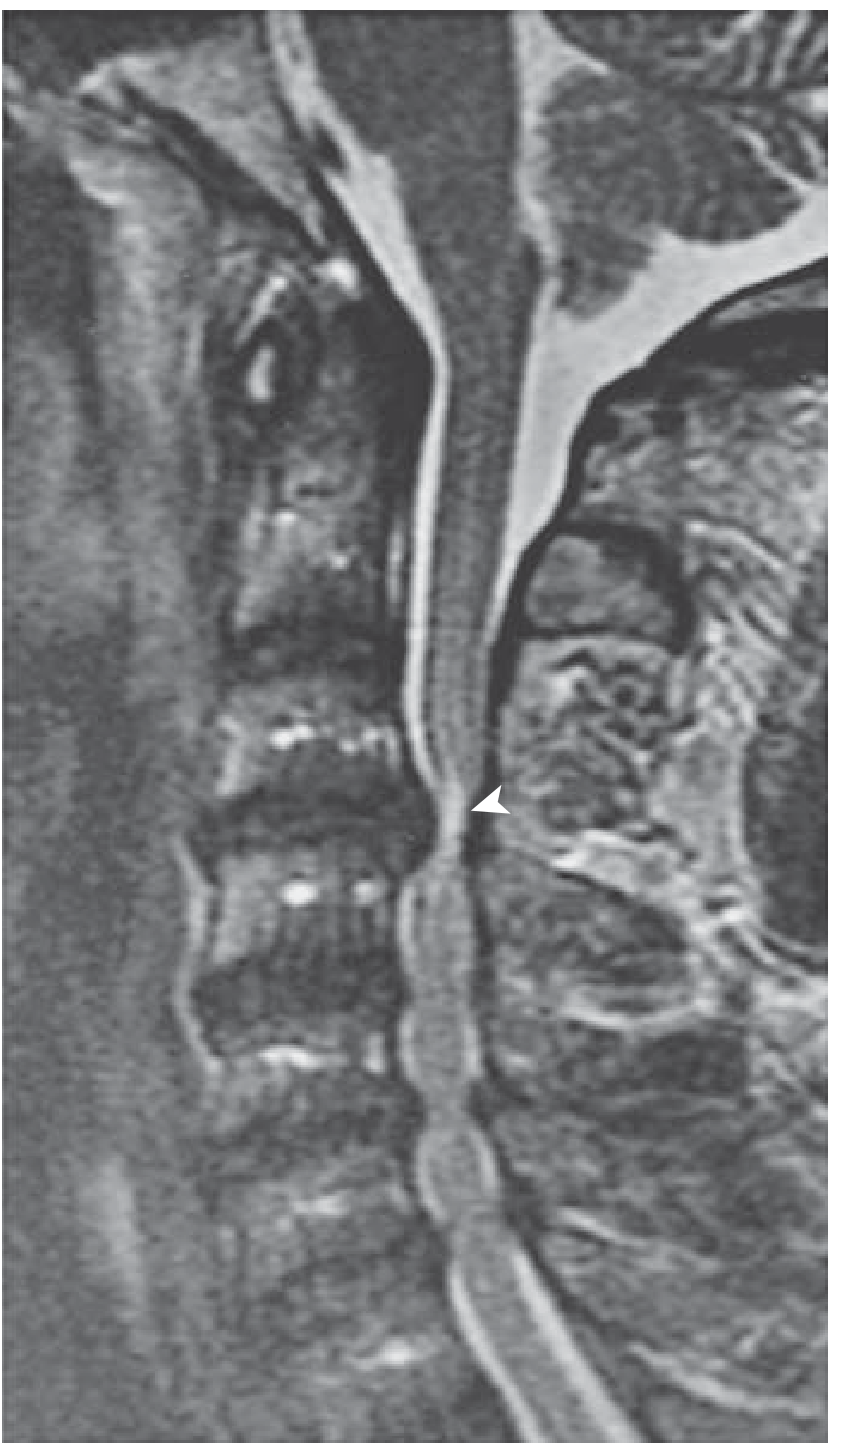
FIG. 8.7 - The C3-C4 disc protrudes into the spinal canal causing cord compression with high signal (arrowhead) representing cord ischemia with myelomalacia. Multilevel canal stenosis also visible at lower levels. (Miller's Review of Orthopaedics 9th Ed)
Operative Approaches
A. ANTERIOR APPROACHES
1. Anterior Cervical Discectomy and Fusion (ACDF) - Smith-Robinson Approach
Indications:
- 1-2 levels of compression (soft central or lateral hard disc)
- Kyphotic or lordotic alignment (versatile)
- Radiculopathy from hard disc / discoosteophytic spur
- Myelopathy from 1-3 levels
Approach:
- Transverse (single level) or oblique skin incision along the anterior border of the SCM
- Medial retraction of the carotid sheath, lateral retraction of the trachea/esophagus
- Smith-Robinson interval used to reach the anterior vertebral bodies and discs
- Fluoroscopic confirmation of level
- Discectomy with or without posterior osteophyte removal
- Interbody fusion with autograft (iliac crest), allograft, or titanium/PEEK cage + anterior plate
Outcomes: When only one or two interspaces are compressed, anterior discectomy and fusion (ACDF) gives better results with less risk than posterior laminectomy. - Adams and Victor's, p. 918
2. Anterior Cervical Corpectomy and Fusion (ACCF)
Indications:
- Multilevel disc disease with retrovertebral spondylotic bars
- OPLL extending behind the vertebral body
- Preferred when osteophytes are predominantly posterior to the vertebral body
Approach:
- Same anterior Smith-Robinson approach
- Corpectomy (removal of vertebral body) performed with Kerrison rongeurs and high-speed drill
- Strut graft (fibular allograft or titanium mesh cage) placed in corpectomy defect
- Anterior plate fixation spanning the construct
Postoperative imaging showing ACDF/ACCF hardware:
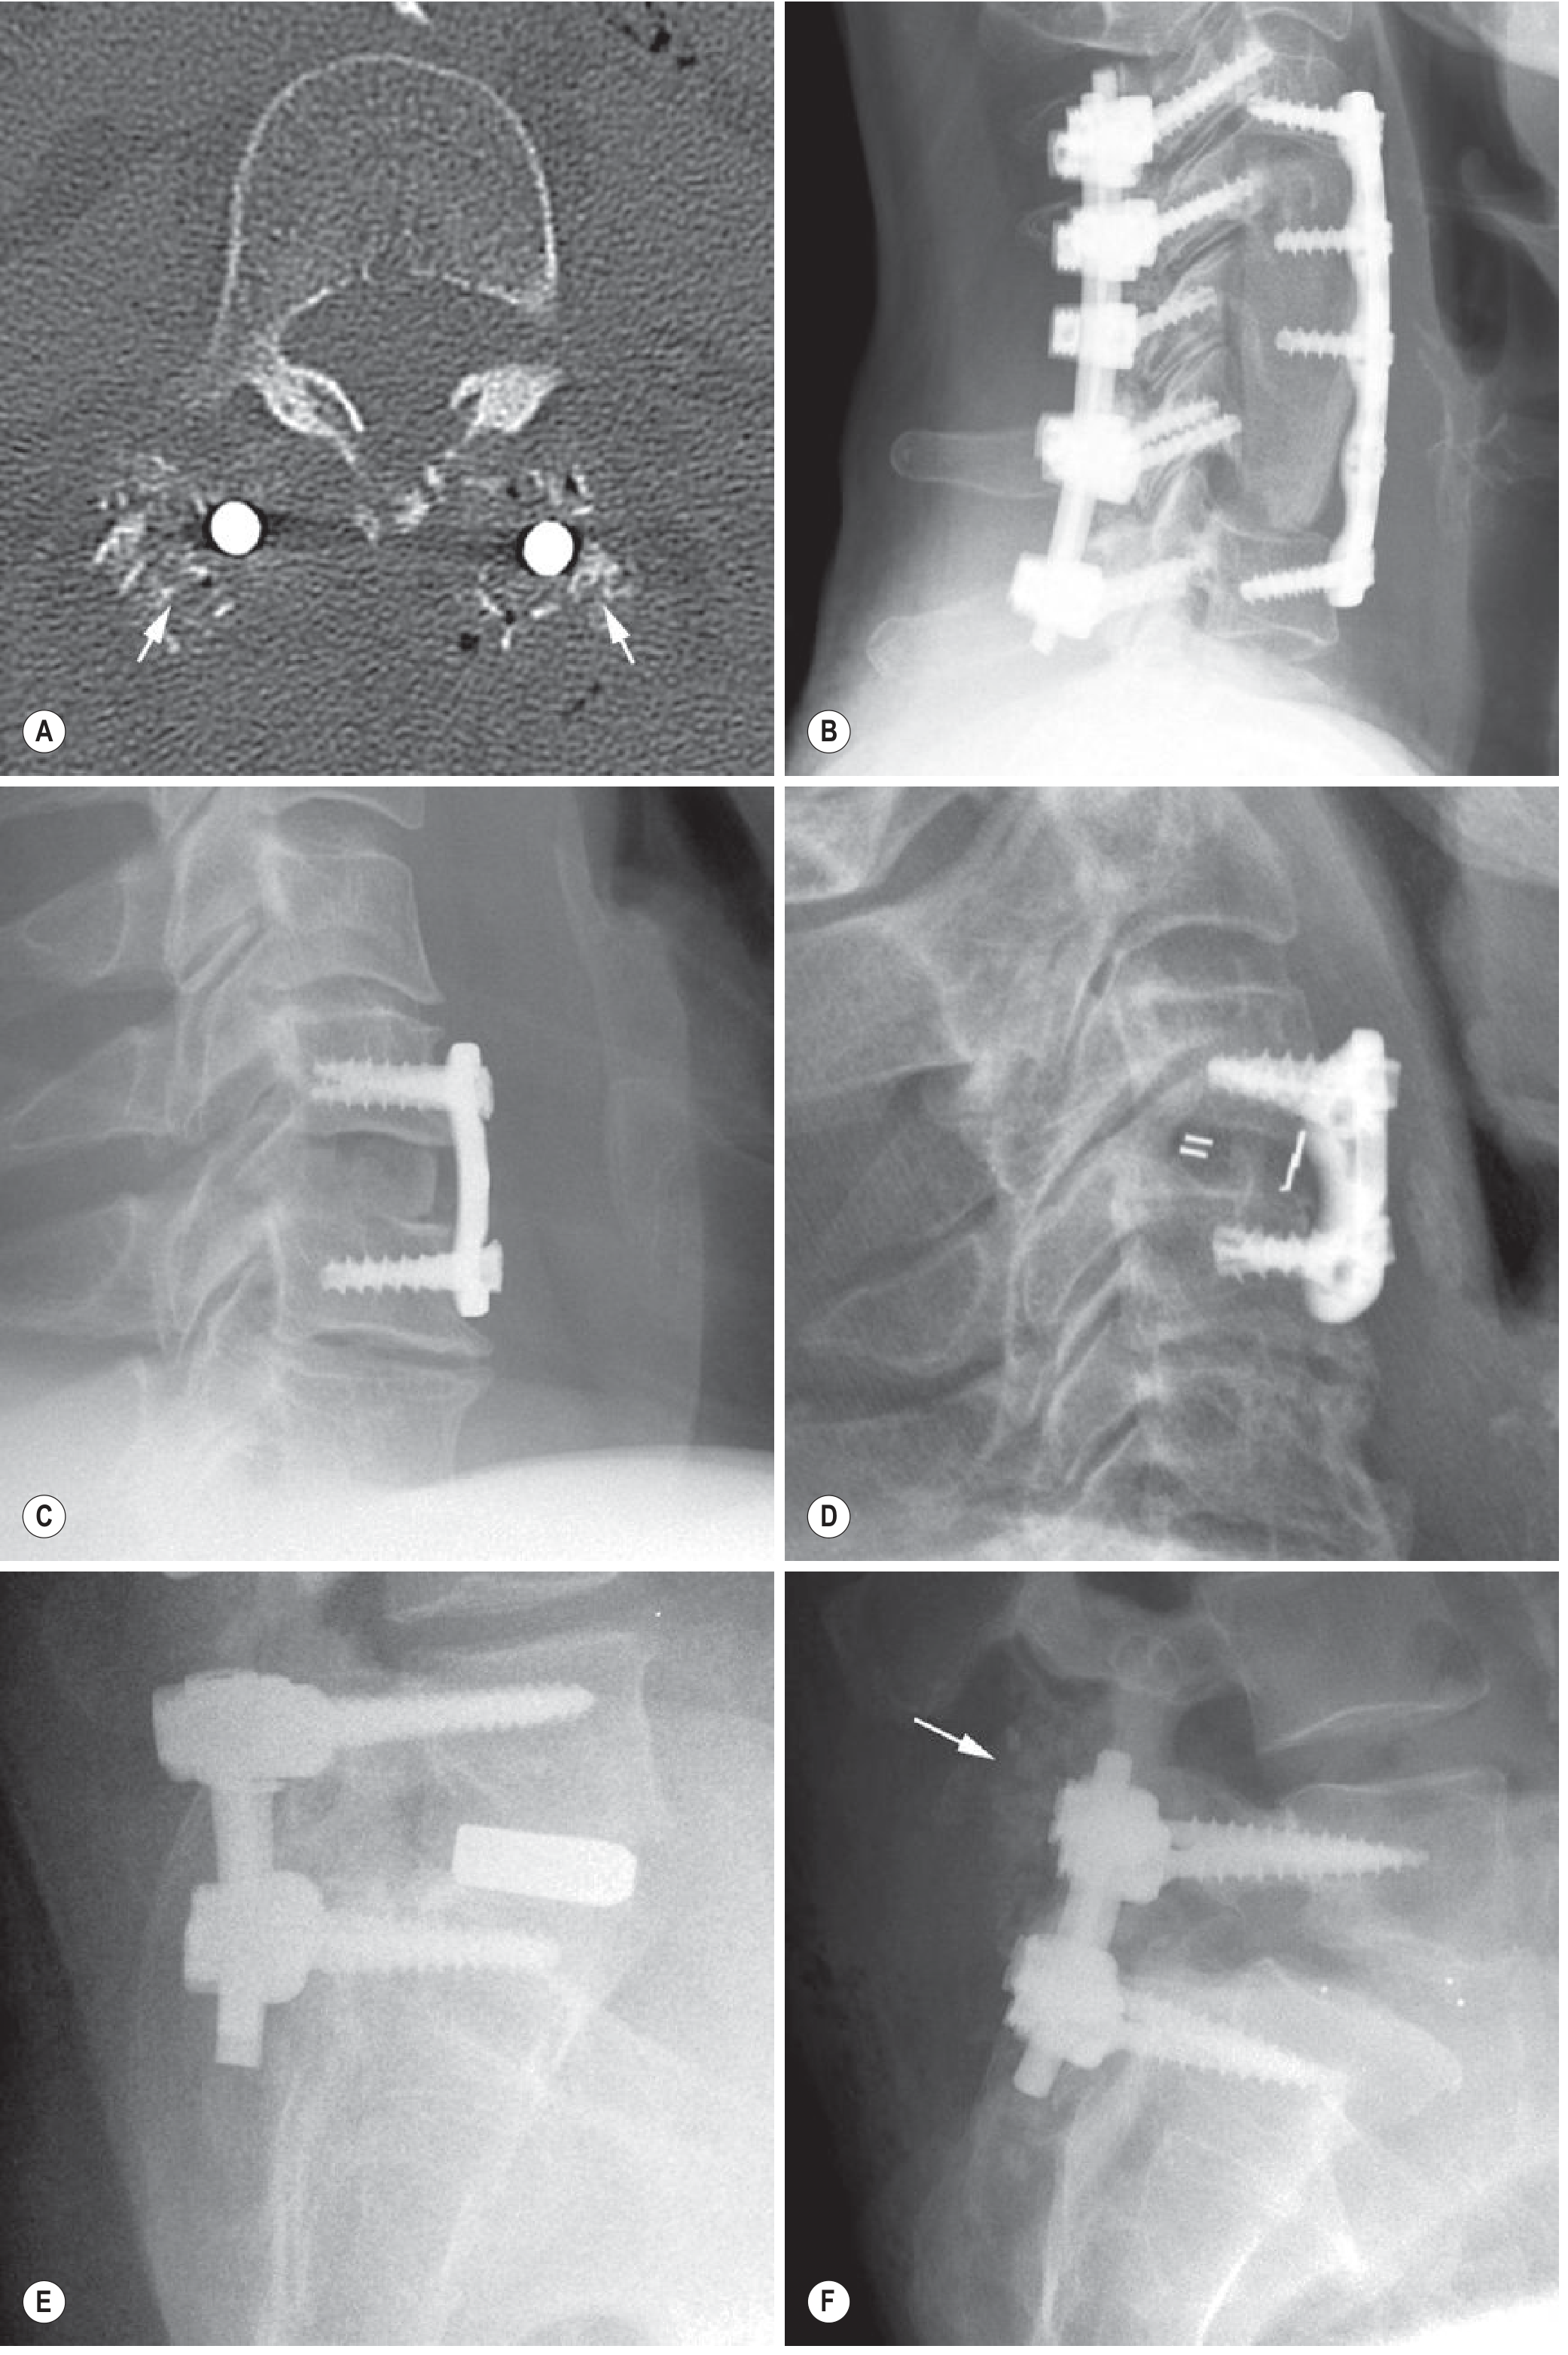
(C) Autologous bone graft ACDF; (D) Synthetic radiolucent interbody cage with radiopaque markers; (B) Multilevel cervical corpectomy with anterior plate and posterior instrumentation C3-C7. (Grainger & Allison's Diagnostic Radiology)
3. Anterior Cervical Disc Replacement (ACDR / Total Disc Replacement)
Indications:
- Single-level radiculopathy in a patient with preserved disc height and lordotic or neutral alignment
- Alternative to ACDF when adjacent segment disease is a concern
Advantages over ACDF:
- Preserves motion at the operated level
- Lower rates of adjacent segment disease
- No need for bone graft or external orthosis
Outcomes: At 7- and 10-year follow-up, cervical disc replacement demonstrated equivalent patient-reported outcomes and lower reoperation rates compared to ACDF. - Miller's Review of Orthopaedics 9th Ed, p. 761
B. POSTERIOR APPROACHES
4. Posterior Cervical Foraminotomy (Keyhole Laminoforaminotomy)
Indications:
- Radiculopathy secondary to posterior compression (facet hypertrophy) or lateral soft disc herniation
- Persistent/recurrent nerve root symptoms after ACDF
- Patients in whom anterior approaches are contraindicated (tracheostomy, prior irradiation, neck infection, previous radical neck surgery)
- Contraindication: Central disc herniation (cannot safely access from posterior), cervical kyphosis, gross instability
Technique (Campbell's Technique 45.4):
(A) Incision and Exposure:
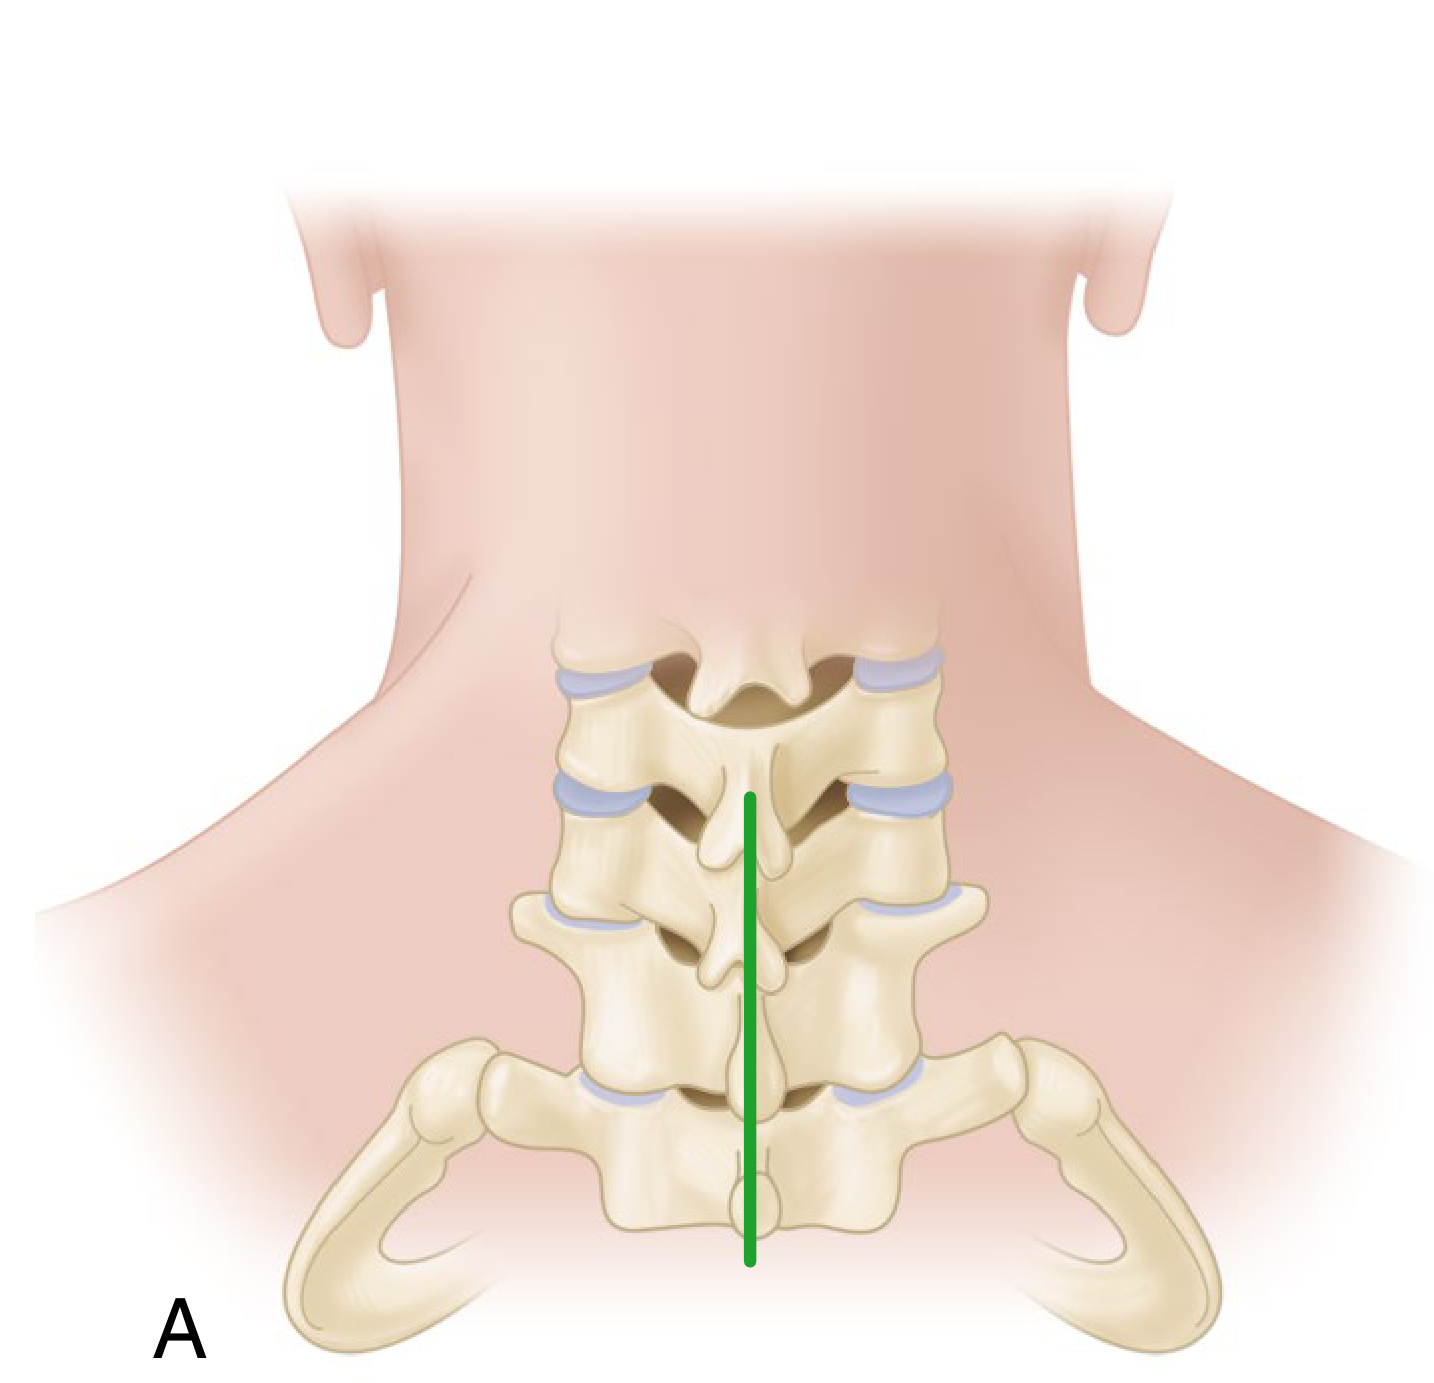
Panel A: Midline incision centered on the spinous process tip of the cephalad level involved.
- Patient prone in Mayfield positioner, neck flexed to decrease cervical lordosis
- Midline incision ~2 cm, centered on spinous process tip of cephalad level
- Divide ligamentum nuchae longitudinally to expose spinous processes above and below
- Subperiosteal dissection of paravertebral muscles on the side of the lesion
(B) Drilling the Keyhole:
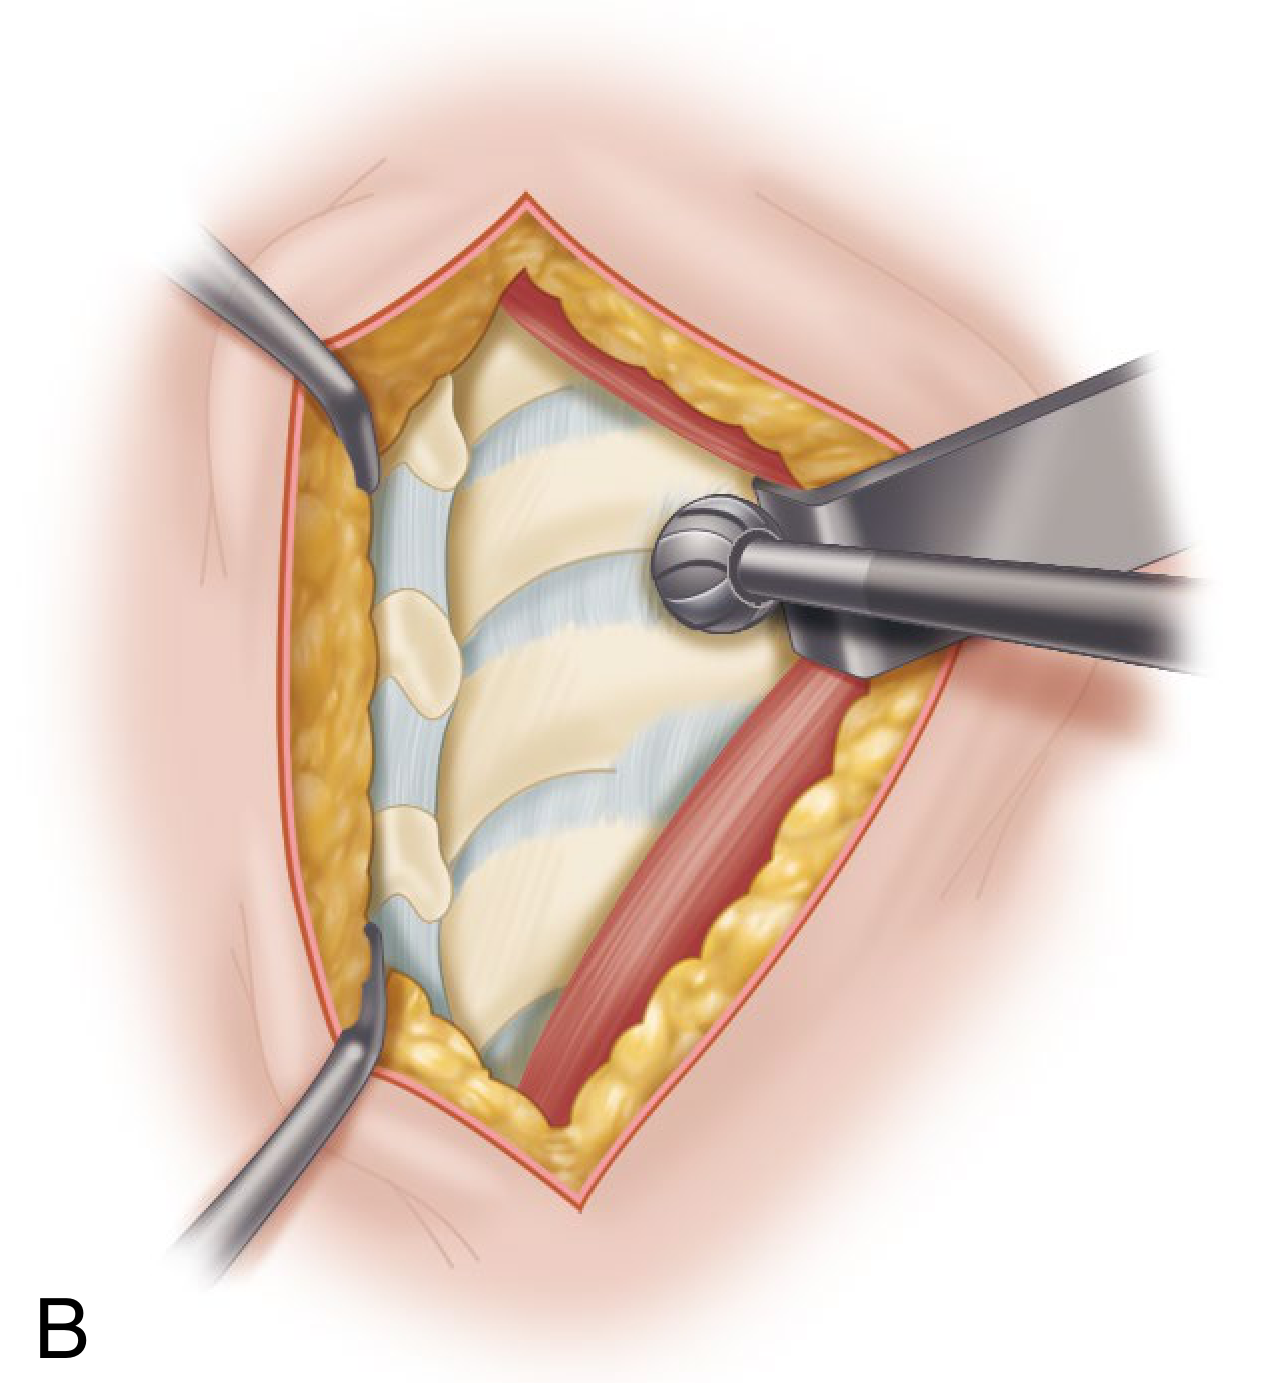
Panel B: High-speed burr drilling away the caudal edge of the lateral portion of the lamina cephalad to the interspace.
- With a small high-speed burr, drill away the caudal edge of the lateral portion of the lamina (the "keyhole"). Only a small amount of the medial facet needs removal.
- Sharply excise the ligamentum flavum with a 1-2 mm Kerrison rongeur
(C) Nerve Root Decompression and Disc Removal:
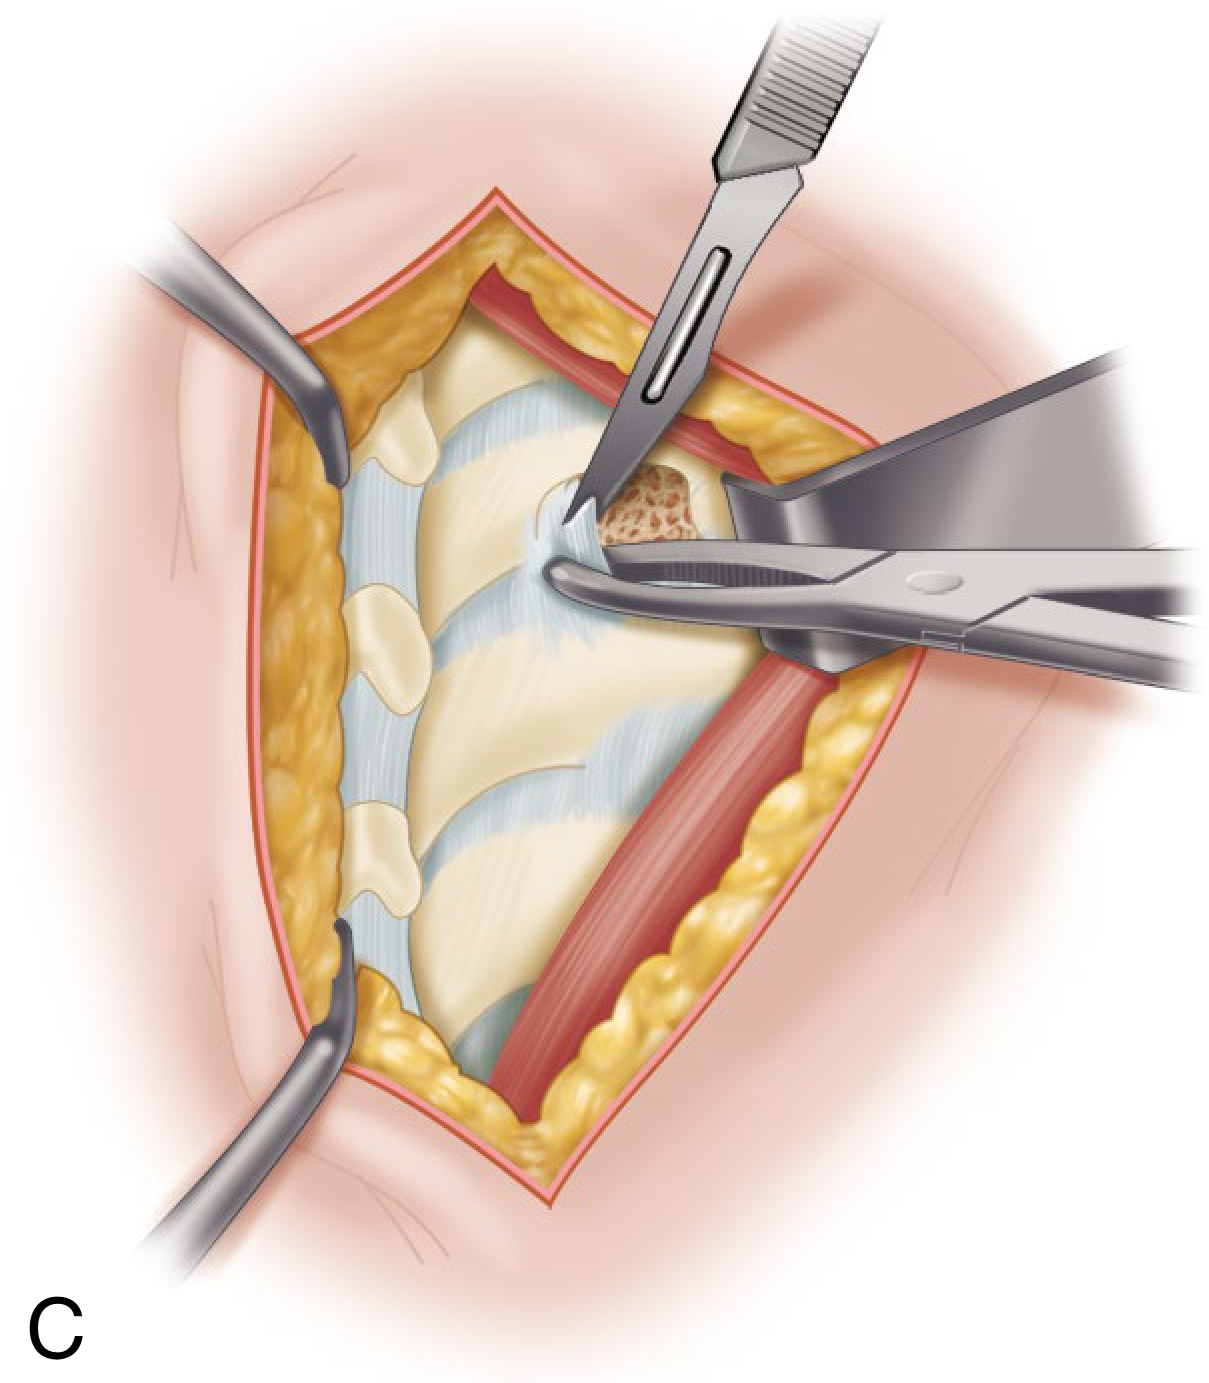
Panel C: Nerve root retracted cephalad; scalpel incising the posterior longitudinal ligament in a cruciate manner over the herniated nucleus pulposus for fragment removal.
- Identify nerve root (commonly displaced posteriorly by disc fragments)
- Use operative microscope for remainder of procedure
- Gently retract nerve root superiorly (never caudally - risk of injury)
- Incise PLL in cruciate manner over herniated nucleus pulposus; remove disc fragments
- Confirm thorough decompression by probing the intervertebral foramen
Outcomes: Approximately 90% of patients achieve good results with open or minimally invasive posterior foraminotomy. - Campbell's Operative Orthopaedics, p. 2947
5. Minimally Invasive Posterior Cervical Foraminotomy (Technique 45.5)
- Patient in semi-sitting position (Mayfield three-point fixation, head flexed perpendicular to floor)
- 18 mm longitudinal incision ~1.5 cm off midline
- Kirschner wire docked at inferomedial edge of the rostral lateral mass under fluoroscopy
- Sequential tubular dilators advanced; 16-mm working channel tubular retractor placed
- Same keyhole bone removal and disc/fragment removal under endoscope
Advantages over open:
- Significantly greater improvement in VAS pain scores
- Improved postoperative cervical lordosis
- Better quality of life
- Similar complication and reoperation rates to ACDF
6. Posterior Laminectomy ± Fusion (PCF)
Indications:
- Multilevel (3+) spondylotic myelopathy with neutral or lordotic alignment
- When posterior decompression across multiple levels is required
Technique:
- Midline posterior incision, subperiosteal dissection bilaterally
- Spinous processes removed with rongeur
- Laminectomy performed with Kerrison rongeur and high-speed drill at each level
- Severance of dentate ligaments helps prevent further cord injury
- Fusion (posterior instrumentation with lateral mass screws and rods) added to prevent postlaminectomy kyphosis
- Adams and Victor's, p. 918: In fully two-thirds of patients, improvement in leg function occurs; in most others, progression of myelopathy is halted. Risk of acute quadriplegia (rare) from cord manipulation.
Important: Pure laminectomy without fusion has been largely supplanted by anterior approaches and laminoplasty due to risk of progressive kyphosis.
7. Laminoplasty (Open-Door or French Door)
Indications:
- Multilevel (3+) cervical spondylotic myelopathy
- Preferred over laminectomy alone when alignment is neutral/lordotic
- Contraindicated in patients with fixed cervical kyphosis
Types:
- Open-door (Hirabayashi): Hinge created on one side, "door" opened on the other, maintained with sutures, bone graft, or plate/spacer
- French-door (Kurokawa): Midline split of spinous processes, bilateral hinges opened symmetrically
Advantages over laminectomy:
- Preserves posterior tension band
- Reduces risk of postlaminectomy kyphosis
- Allows re-operation if needed
8. Combined Anterior + Posterior (Circumferential Surgery)
Indications:
- Multilevel kyphosis (3+ levels) requiring corpectomy with strut reconstruction
- Highly unstable cervical spine requiring 360° fixation
- Patients requiring multilevel corpectomy who need additional posterior stabilization
Postoperative Complications to Know
| Complication | Notes |
|---|---|
| C5 palsy | Most common postoperative nerve root palsy after cervical decompression |
| Adjacent segment disease | More common after ACDF; less with disc replacement |
| Dysphagia | Common after anterior approaches; usually transient |
| Recurrent laryngeal nerve injury | Risk with right-sided anterior approach |
| Pseudoarthrosis | Failure of fusion at operated level |
| Postlaminectomy kyphosis | Risk of laminectomy without fusion |
C5 is the most common postoperative nerve root palsy. - Miller's Review of Orthopaedics 9th Ed, p. 762
Summary Table
| Clinical Scenario | Preferred Approach |
|---|---|
| Discogenic axial neck pain | Conservative only; avoid surgery |
| Single-level radiculopathy (lateral soft disc) | Posterior foraminotomy OR ACDF |
| Single-level radiculopathy (central or hard disc) | ACDF |
| 1-2 level myelopathy, lordotic/neutral | ACDF / ACDR / ACCF |
| 3+ level myelopathy, lordotic/neutral | PCF vs Laminoplasty |
| 1-2 level myelopathy, kyphosis >13° | ACDF / ACCF |
| 3+ level myelopathy, kyphosis >13° | Combined anterior + posterior |
Sources: Campbell's Operative Orthopaedics 15th Ed 2026 | Miller's Review of Orthopaedics 9th Ed | Adams and Victor's Principles of Neurology 12th Ed | Grainger & Allison's Diagnostic Radiology | Bradley and Daroff's Neurology in Clinical Practice
All Spinal approes step by step with images
Finding Sources
Finding Sources
Finding Sources
Finding Sources
Finding Sources
Finding Sources
Finding Sources
Finding Sources
Reading File
Reading File
Reading File
Reading File
Loading Image
Reading File
Loading Image
Loading Image
Reading File
Loading Image
Loading Image
Reading File
Excellent! I have a fantastic cross-sectional anatomy image of the anterior cervical approach. Now let me get the lumbar stenosis algorithm image and the thoracic approach details.
Loading Image
Reading File
All Spinal Surgical Approaches - Step by Step with Images
Anatomical Landmarks for All Spinal Approaches
Before any spinal approach, surface landmarks guide incision planning:
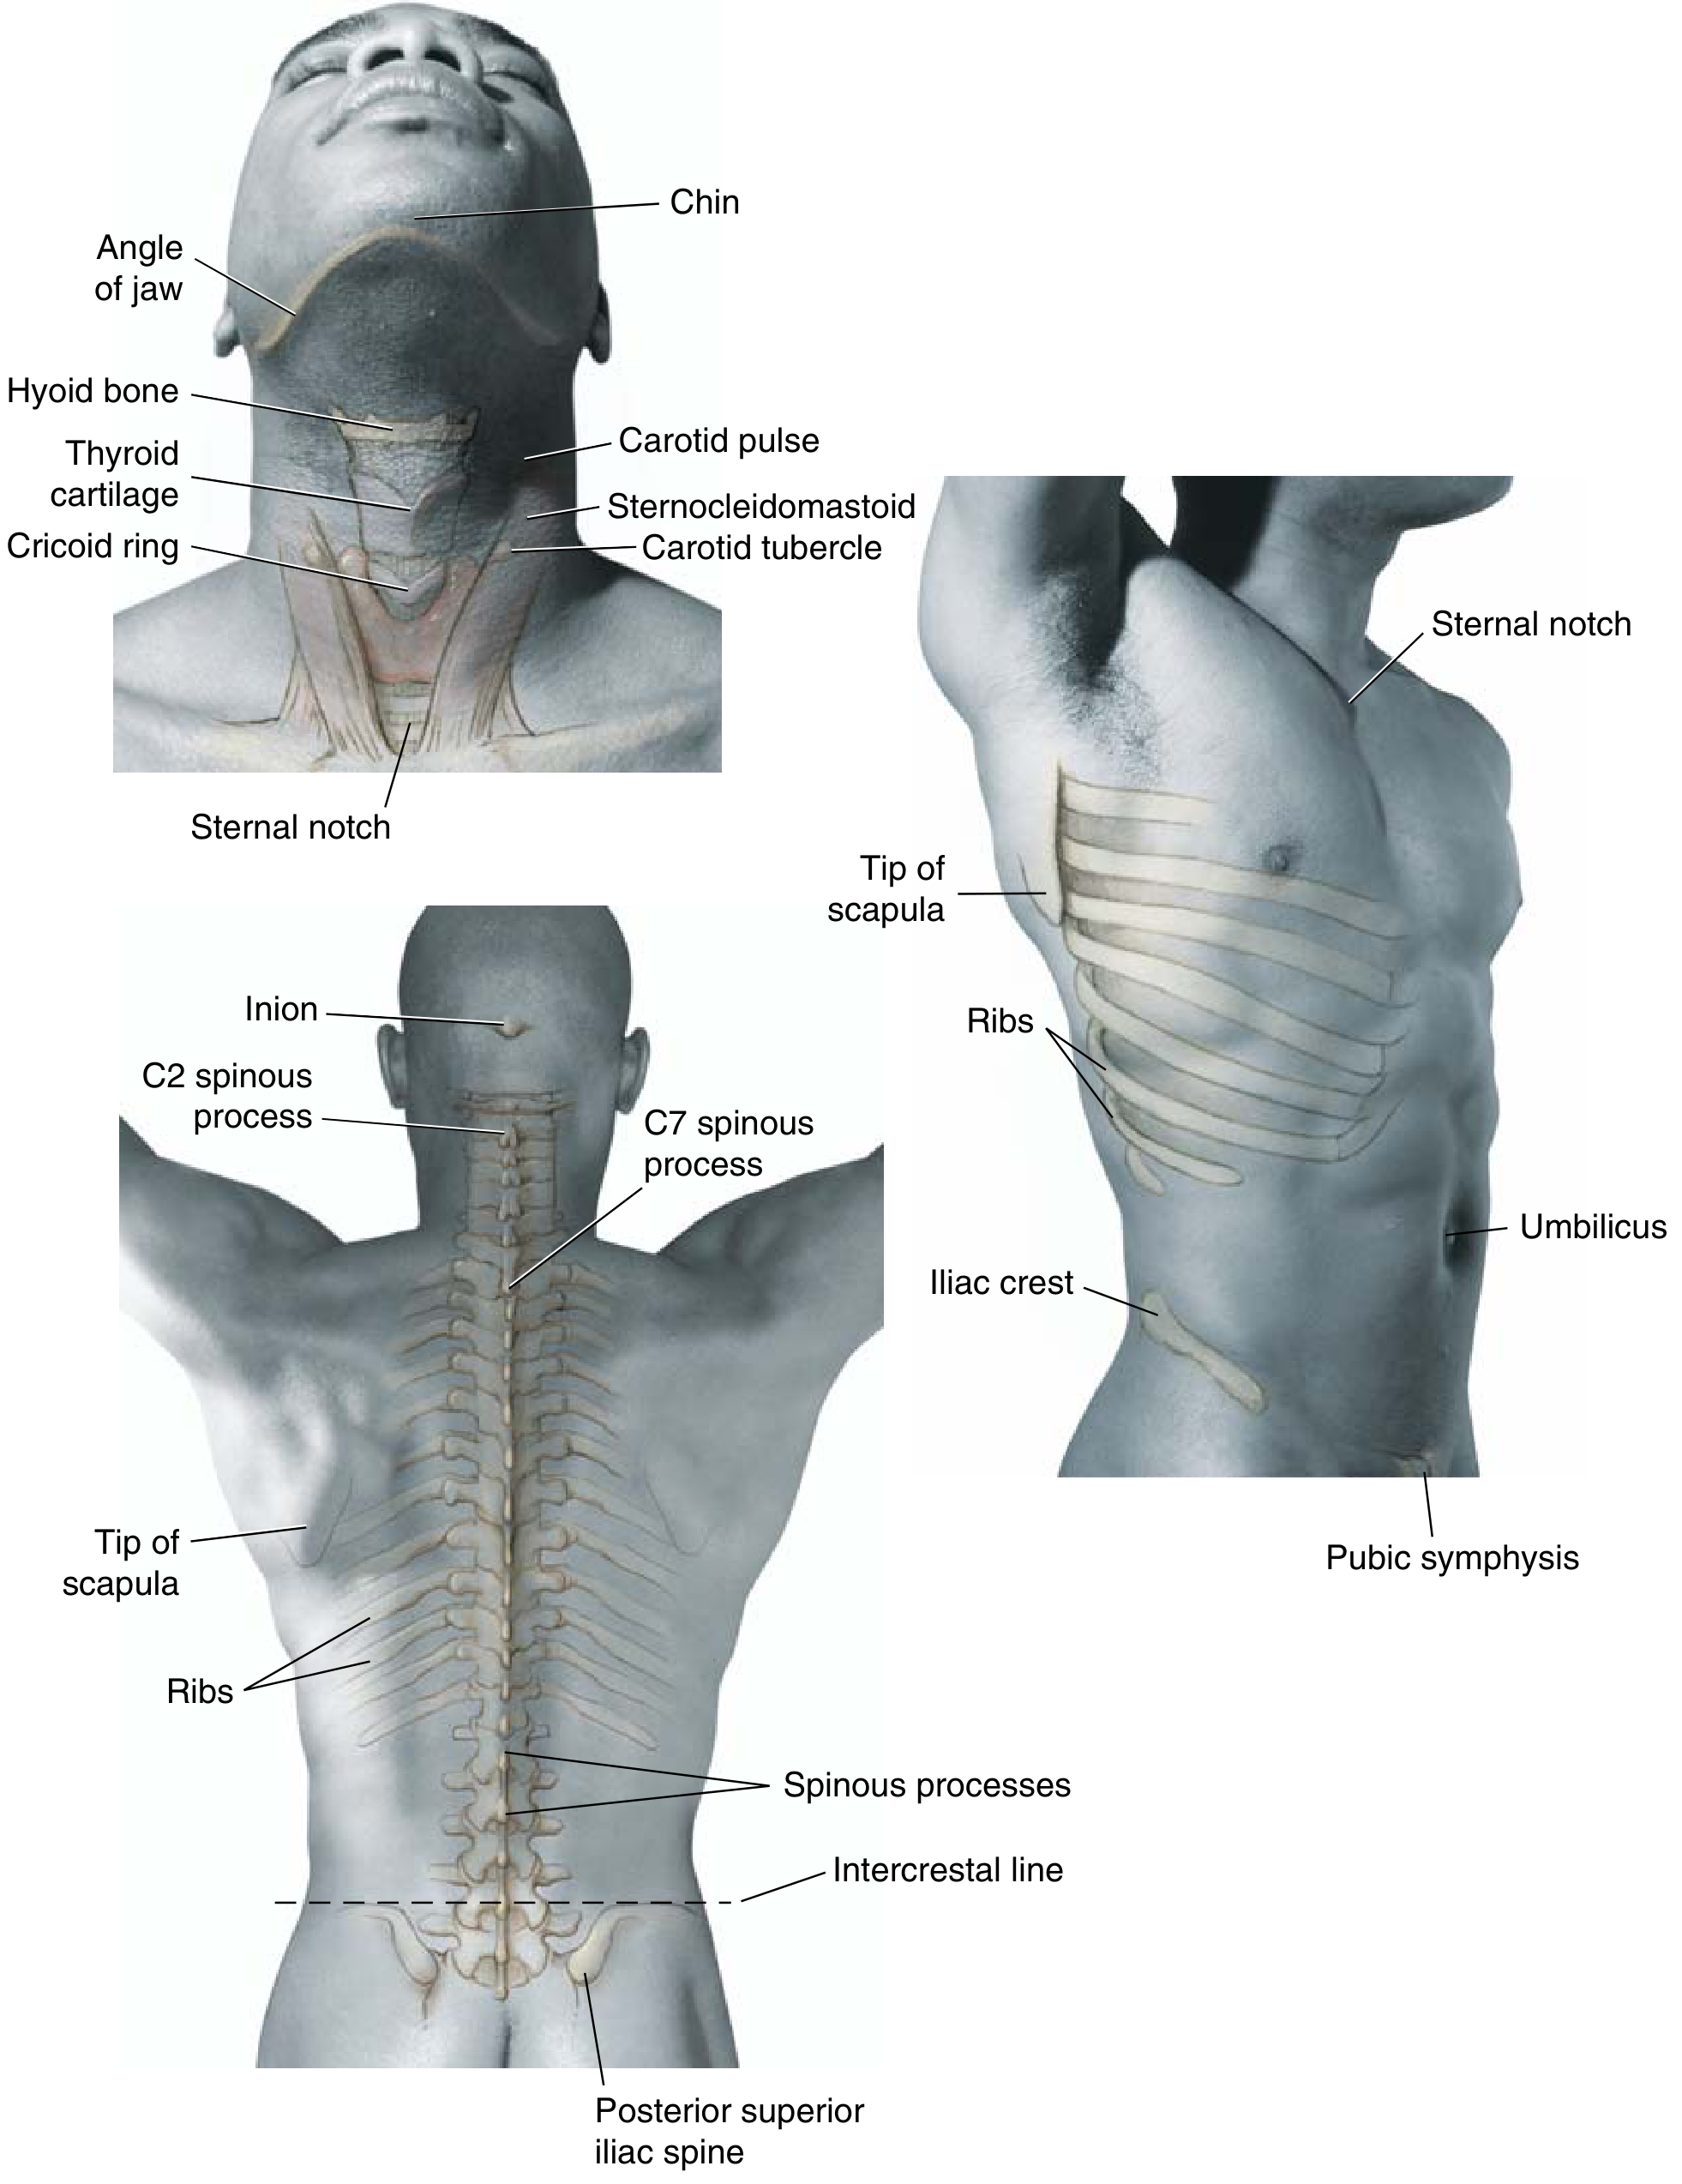
FIG. 2.117 - Surface landmarks of the spine. Key reference points: hyoid bone = C3, thyroid cartilage = C4-5, cricoid ring = C6, sternal notch = T2-3, tip of scapula = T7, intercrestal line = L4, PSIS = S2. (Miller's Review of Orthopaedics 9th Ed)
Relation of Spinal Nerve Roots to Vertebrae
Understanding root-vertebral relationships is essential for surgical level selection:
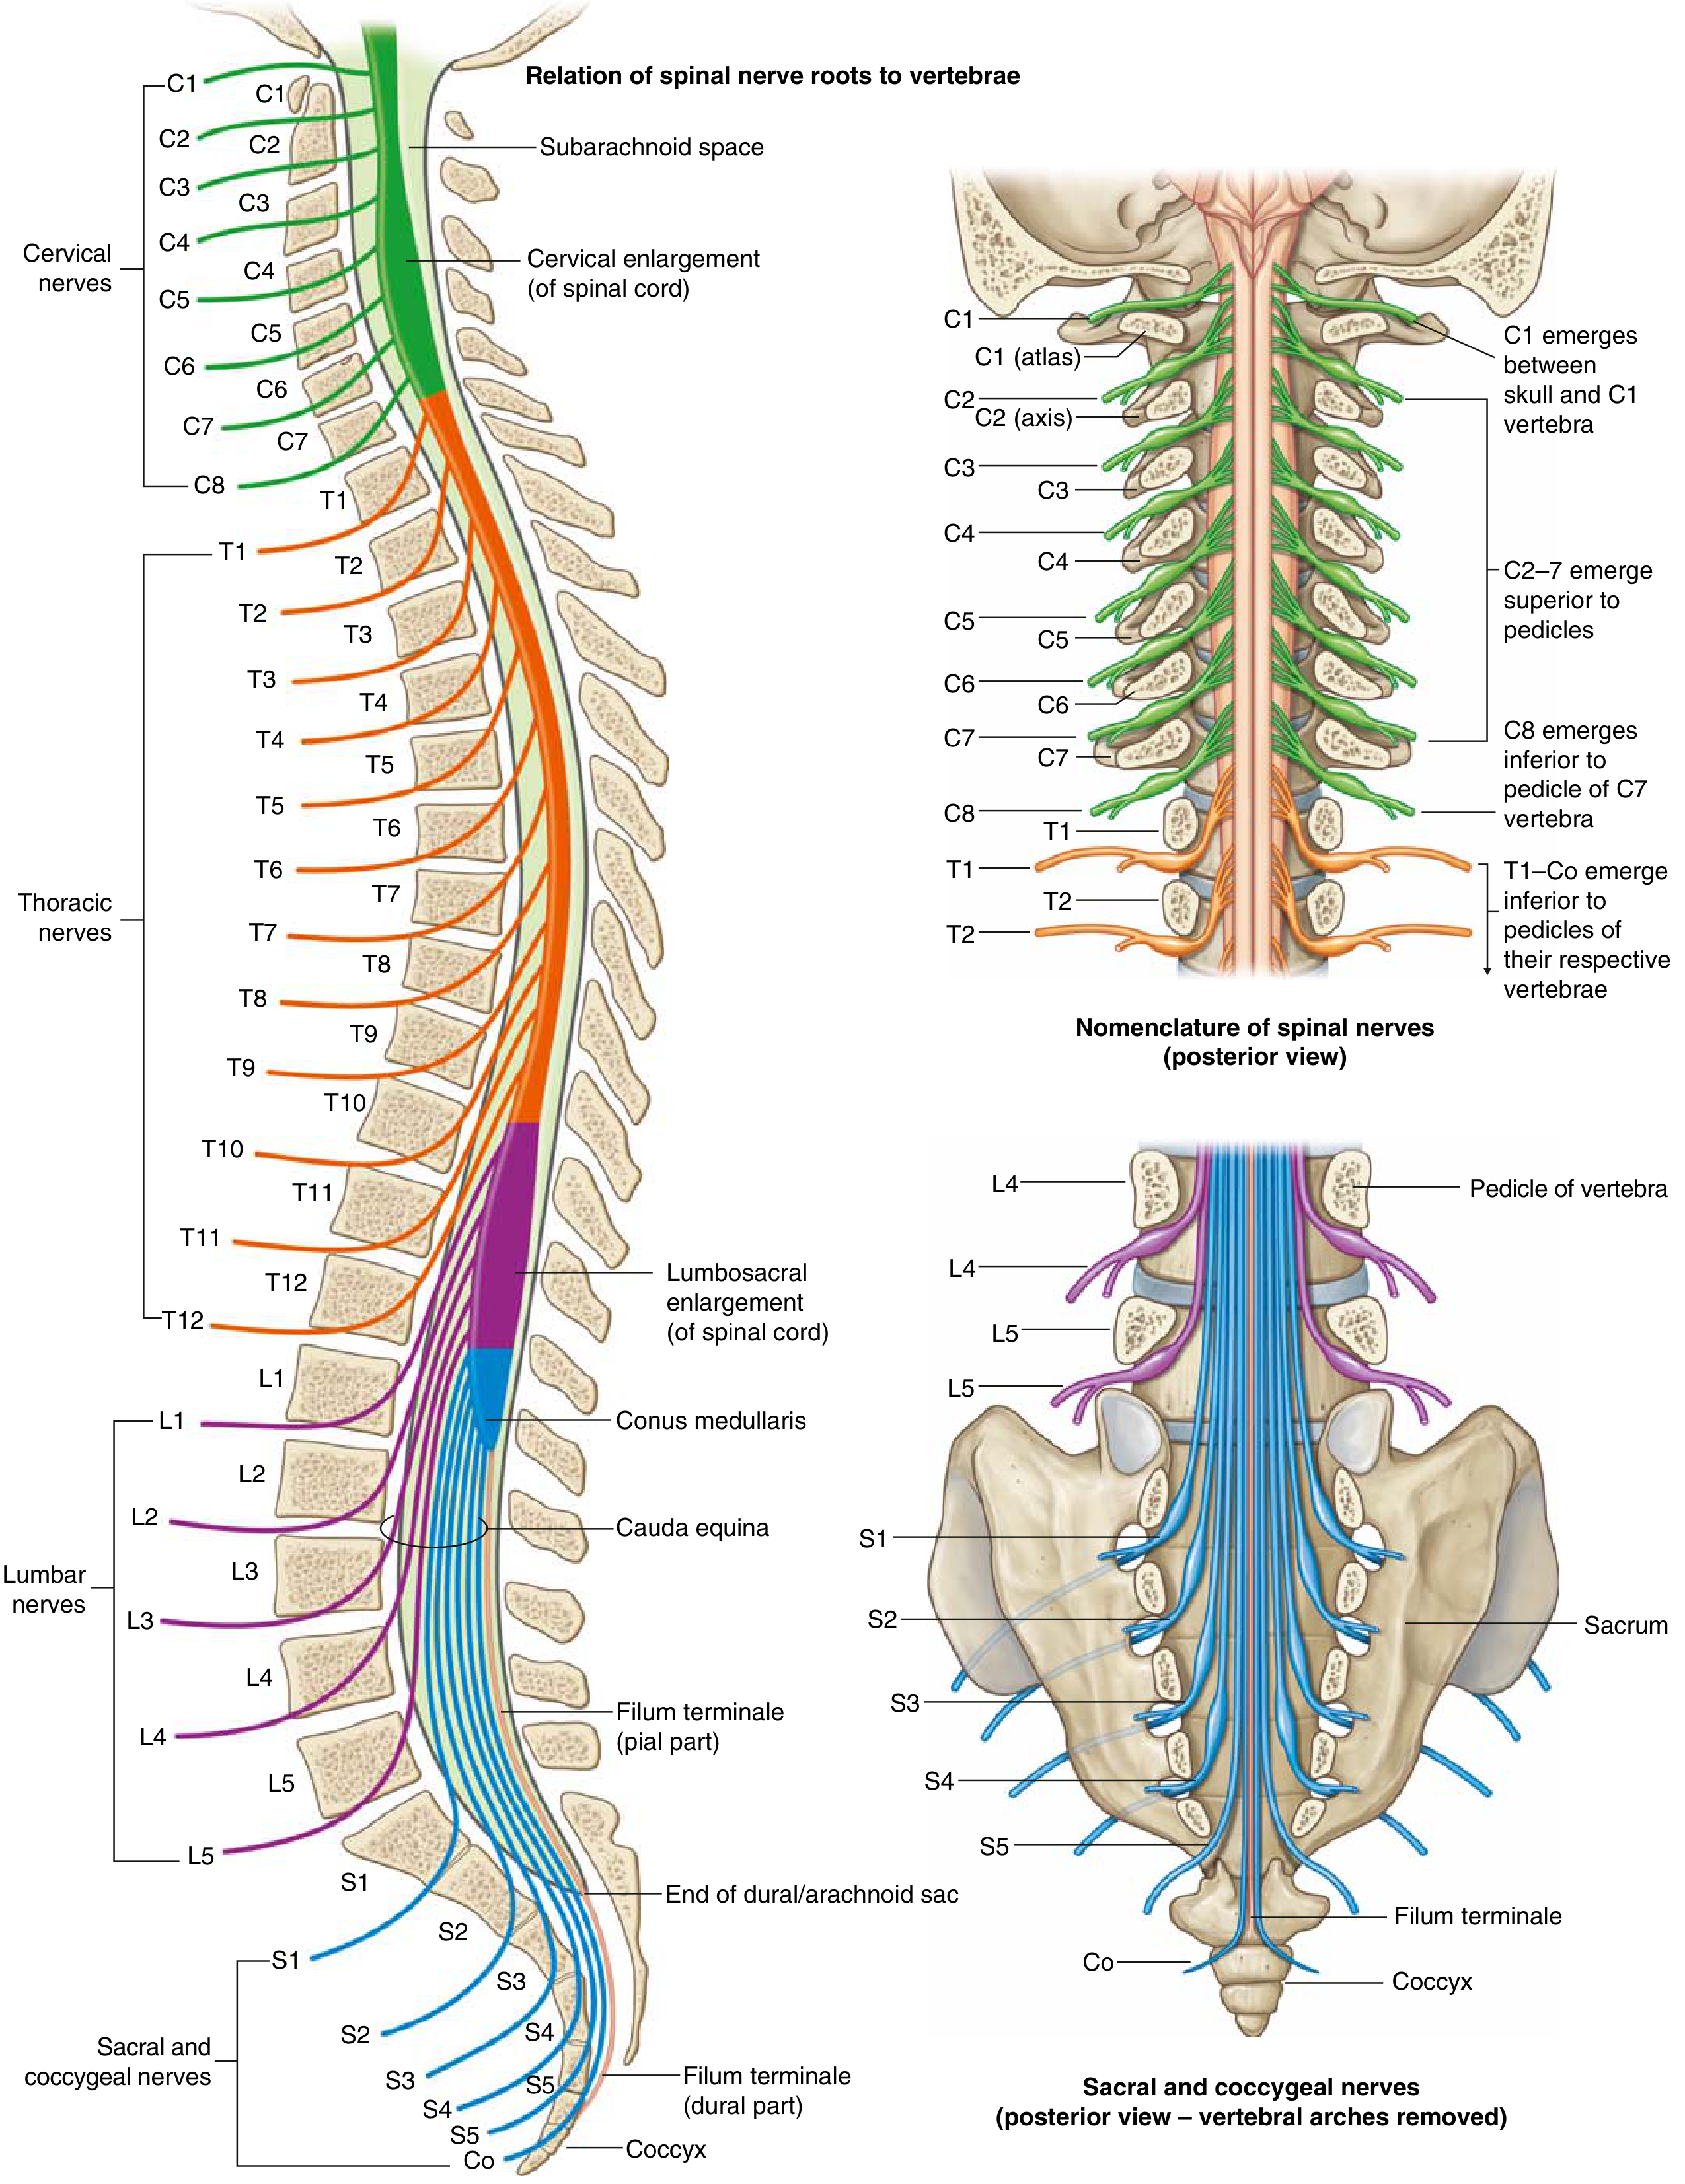
FIG. 2.112 - Relation of spinal nerve roots to vertebrae (Gray's Atlas of Anatomy). Cervical roots C1-C7 exit ABOVE their corresponding vertebra; C8 exits below C7; all thoracic and lumbar roots exit BELOW. (Miller's Review of Orthopaedics 9th Ed)
Master Reference Table: Spinal Approaches
| Approach | Interval | Structures at Risk |
|---|---|---|
| Anterior cervical | Between carotid sheath and trachea/esophagus | Recurrent laryngeal nerve, sympathetic ganglion |
| Posterior cervical | Midline between paracervical muscles | Vertebral artery, C5 nerve root |
| Anterior thoracic | Transverse, two ribs above level of interest | Intercostal neurovascular bundle (dissect over top of rib) |
| Posterior thoracolumbar | Midline over spinous processes | Posterior primary rami, segmental vessels, nerve root |
| Anterior lumbar (transperitoneal) | Between rectus abdominis muscles | Presacral sympathetic plexus (retrograde ejaculation) |
| Anterolateral lumbar (retroperitoneal) | Oblique from 12th rib to lateral rectus border | Sympathetic chain, ureter, segmental lumbar vessels |
Miller's Review of Orthopaedics 9th Ed, Table 2.46 (compiled)
CERVICAL SPINE APPROACHES
APPROACH 1: Anterior Cervical Approach (Smith-Robinson)
Cross-Sectional Anatomy at C4
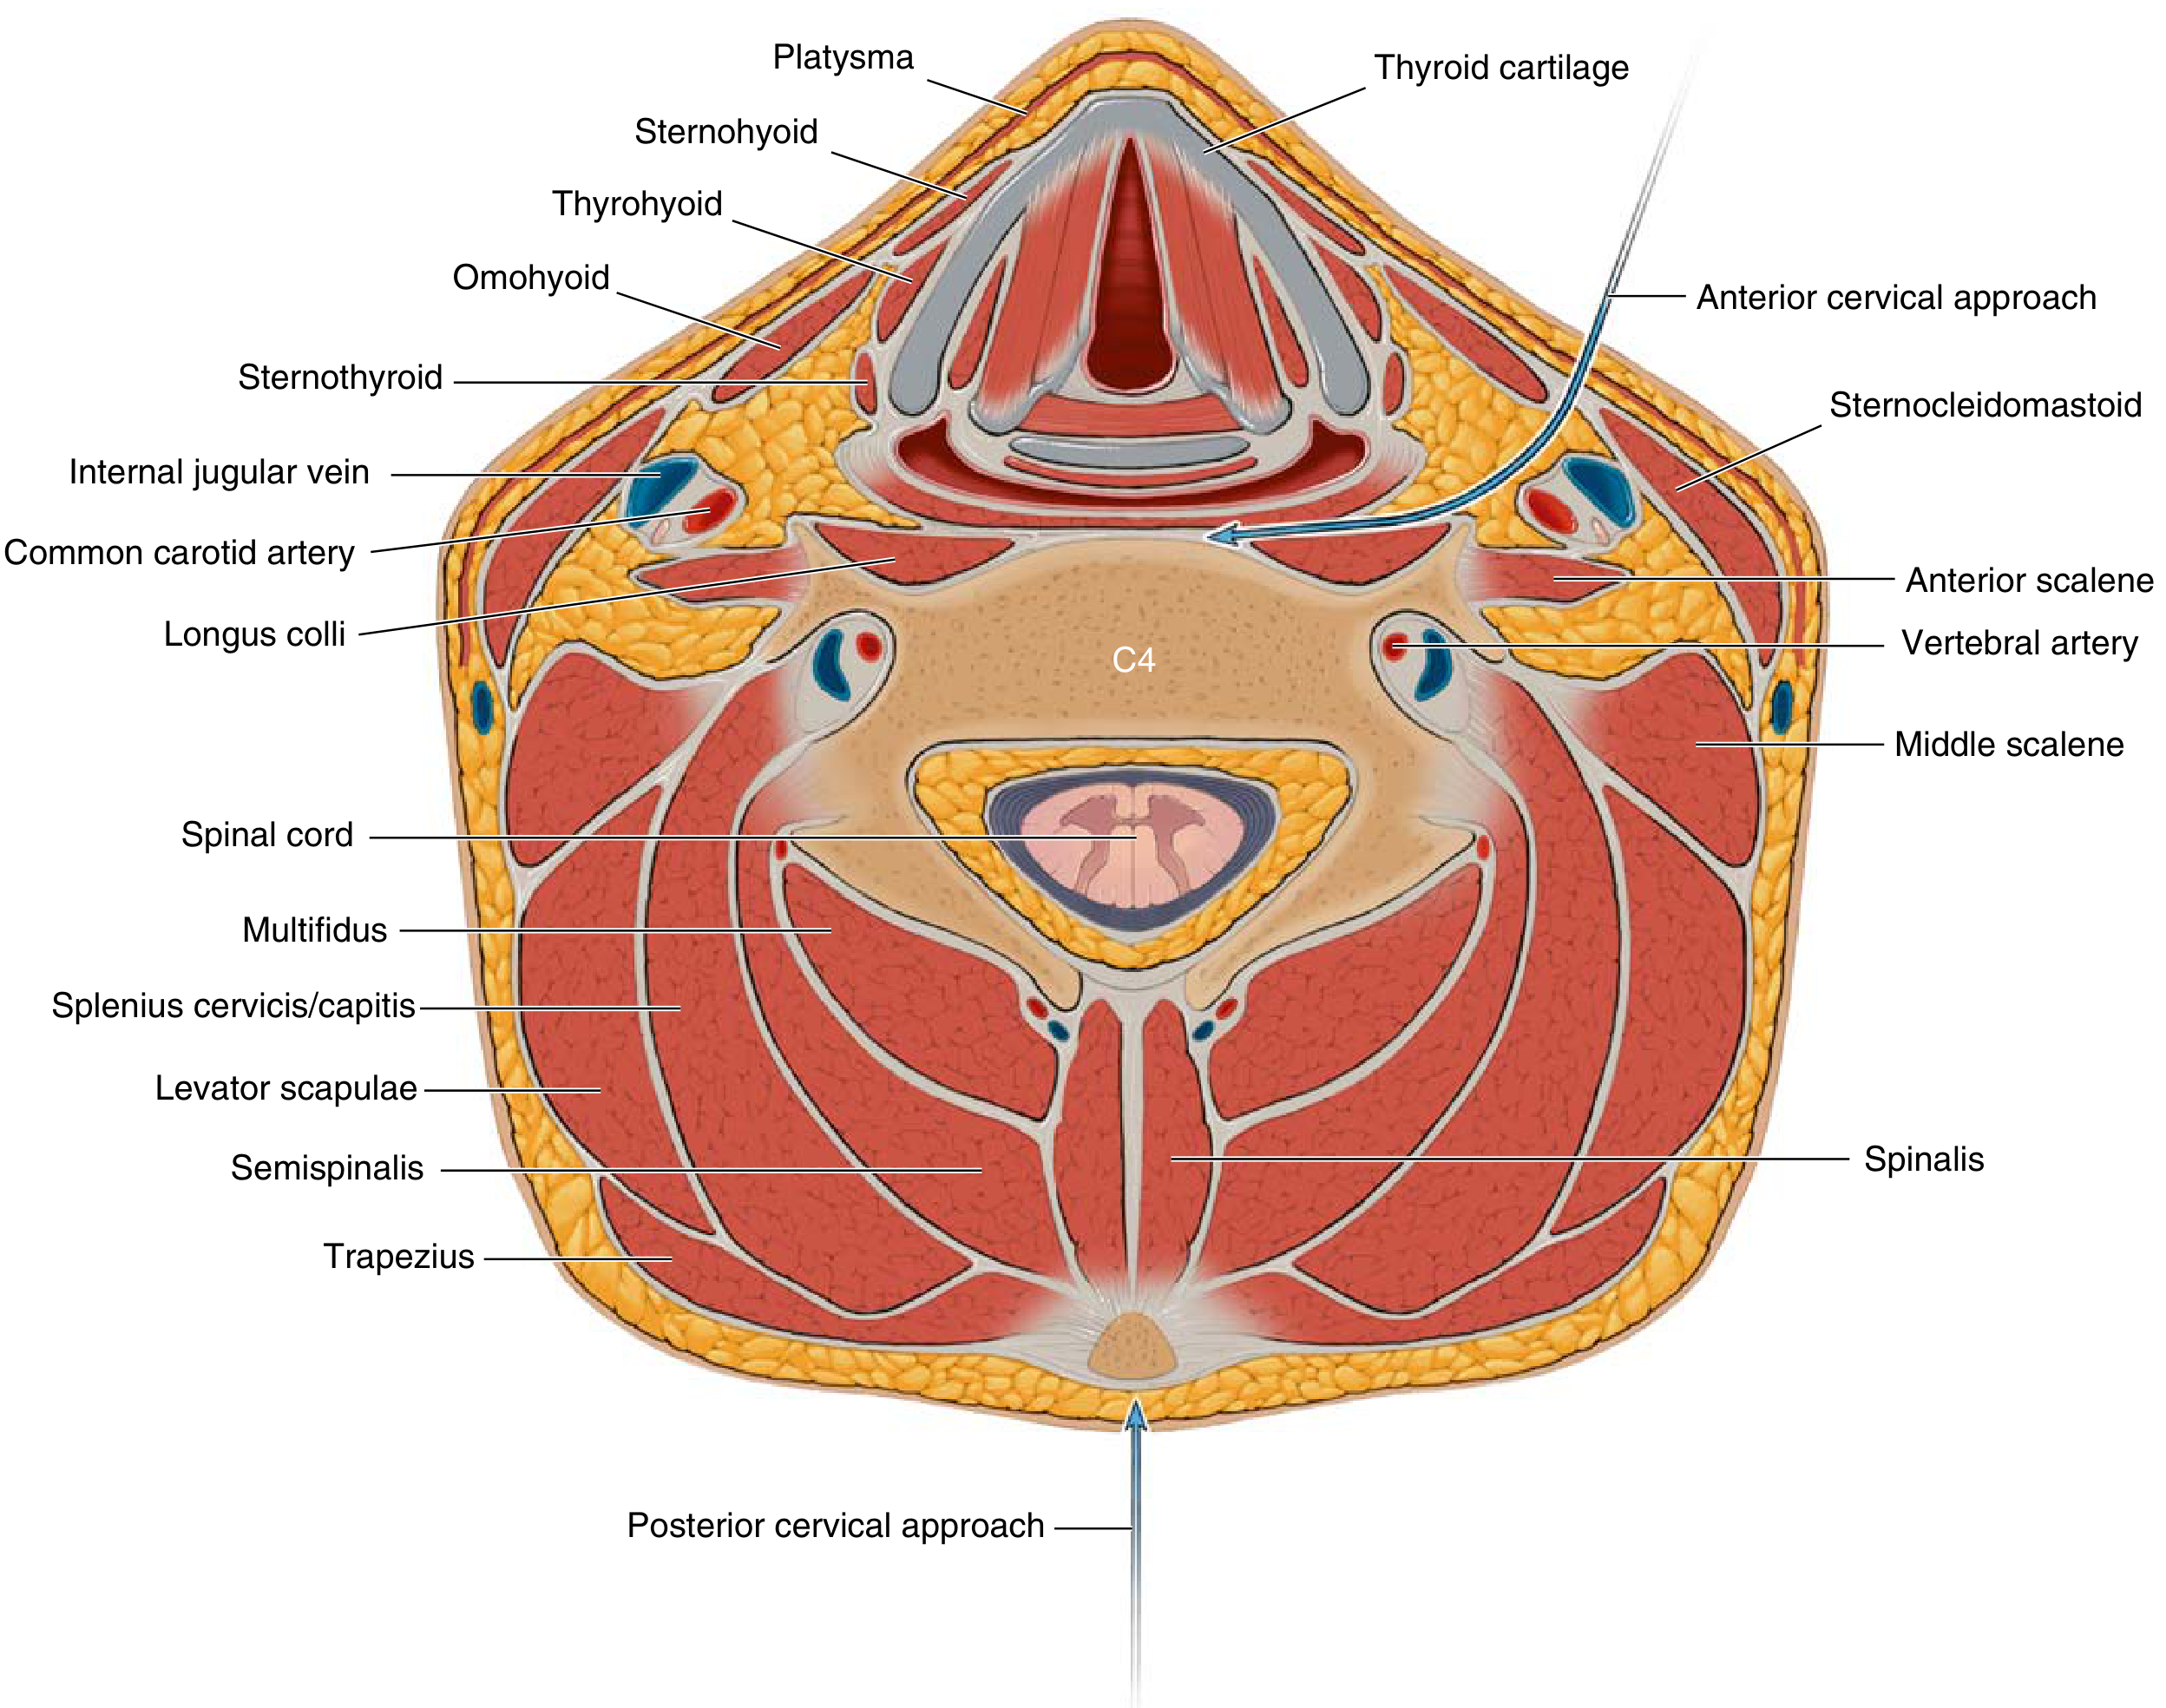
FIG. 2.116 - Surgical intervals of the cervical spine at C4. The anterior approach passes between the carotid sheath (containing common carotid artery, internal jugular vein, vagus nerve) and the trachea. Note: Longus colli muscles flank the midline; the vertebral artery lies within the transverse foramen. (Miller's Review of Orthopaedics 9th Ed)
Step-by-Step Technique
Patient Position:
- Supine with a small roll under the shoulders to extend the neck
- Head slightly turned to the contralateral side (usually right-sided approach to protect the recurrent laryngeal nerve)
Step 1 - Incision:
- Transverse skin incision based on desired level, in a natural skin crease
- Level landmarks: hyoid = C3, thyroid cartilage = C4-5, cricoid ring = C6
- For C5: enter the carotid triangle
Step 2 - Platysma:
- Retract the platysma with the skin (subplatysmal flaps superiorly and inferiorly)
Step 3 - Finding the Interval:
- Expose the pretracheal fascia
- Develop the interval between:
- Laterally: carotid sheath (containing internal/common carotid artery, internal jugular vein, vagus nerve CN X)
- Medially: trachea and esophagus
- Use blunt finger dissection to develop this plane
Step 4 - Prevertebral Fascia:
- Incise the prevertebral fascia sharply
- Retract the longus colli muscle gently laterally (protecting the recurrent laryngeal nerve which lies just outside the sheath)
- Anterior surface of the vertebral body is now exposed
Step 5 - Level Confirmation:
- Fluoroscopic confirmation of correct level with a spinal needle
Step 6 - Discectomy and Decompression:
- Caspar retractor pins placed into adjacent vertebral bodies
- Discectomy with rongeur, curettes, high-speed drill
- Posterior osteophytes removed with angled curettes/Kerrison rongeurs
- Posterior longitudinal ligament removed if indicated
Step 7 - Interbody Reconstruction:
- Autograft (iliac crest), allograft, or PEEK/titanium cage placed
- Anterior cervical plate applied across construct
Key Risks:
- Right-sided approach: Recurrent laryngeal nerve (RLN) injury (hoarse voice, unilateral vocal cord palsy). RLN arises from vagus at subclavian artery level on right (shorter course, more vulnerable)
- Left-sided approach (lower): Thoracic duct injury (posterior to carotid sheath)
- Horner syndrome: stellate ganglion at C7-T1, protected by subperiosteal dissection of longus muscles
- Postoperative: upper airway edema, hematoma, vocal cord paralysis
APPROACH 2: Posterior Cervical Approach
Step-by-Step Technique
Patient Position:
- Prone in Mayfield three-pin head fixation
- Neck flexed to decrease cervical lordosis and open interlaminar spaces
- Reverse Trendelenburg position reduces venous bleeding
- Shoulders retracted inferiorly with tape (for lower cervical levels)
Step 1 - Incision:
- Midline longitudinal incision
- Centered on the spinous process(es) of interest
- For single-level foraminotomy: ~2 cm incision centered on spinous process tip of cephalad level
Step 2 - Ligamentum Nuchae:
- Divide the ligamentum nuchae longitudinally in the midline (avascular midline raphe)
- Expose tips of spinous processes above and below designated area
Step 3 - Subperiosteal Dissection:
- Reflect the superficial layer (trapezius) and intermediate layer (splenius cervicis, semispinalis, longissimus capitis) laterally using subperiosteal dissection
- Use a self-retaining retractor to maintain exposure of the laminae
Step 4 - Level Confirmation:
- Palpate the last bifid spinous process (usually C6)
- Fluoroscopic confirmation with a marker on the spinous process
Step 5 - Decompression:
- Access to the spinal canal through laminectomy or facetectomy
- For foraminotomy: high-speed burr removes caudal edge of lateral lamina ("keyhole")
- Ligamentum flavum excised with small Kerrison rongeur
Step 6 - Neural Decompression:
- Nerve root identified (displaced posteriorly by disc/osteophyte)
- Root retracted superiorly (never caudally)
- Disc fragments/osteophytes removed under microscope
Key Risks:
- Vertebral artery: especially vulnerable where it leaves the foramen transversarium and travels superiorly/medially to pierce the atlantooccipital membrane
- Greater occipital nerve (C2) and third occipital nerve (C3) in the suboccipital region
- C5 palsy: most common postoperative complication, particularly with laminoplasty (due to tethering and "drift" of cord after posterior decompression)
Minimally Invasive Posterior Cervical Foraminotomy (Tubular Retractor System)
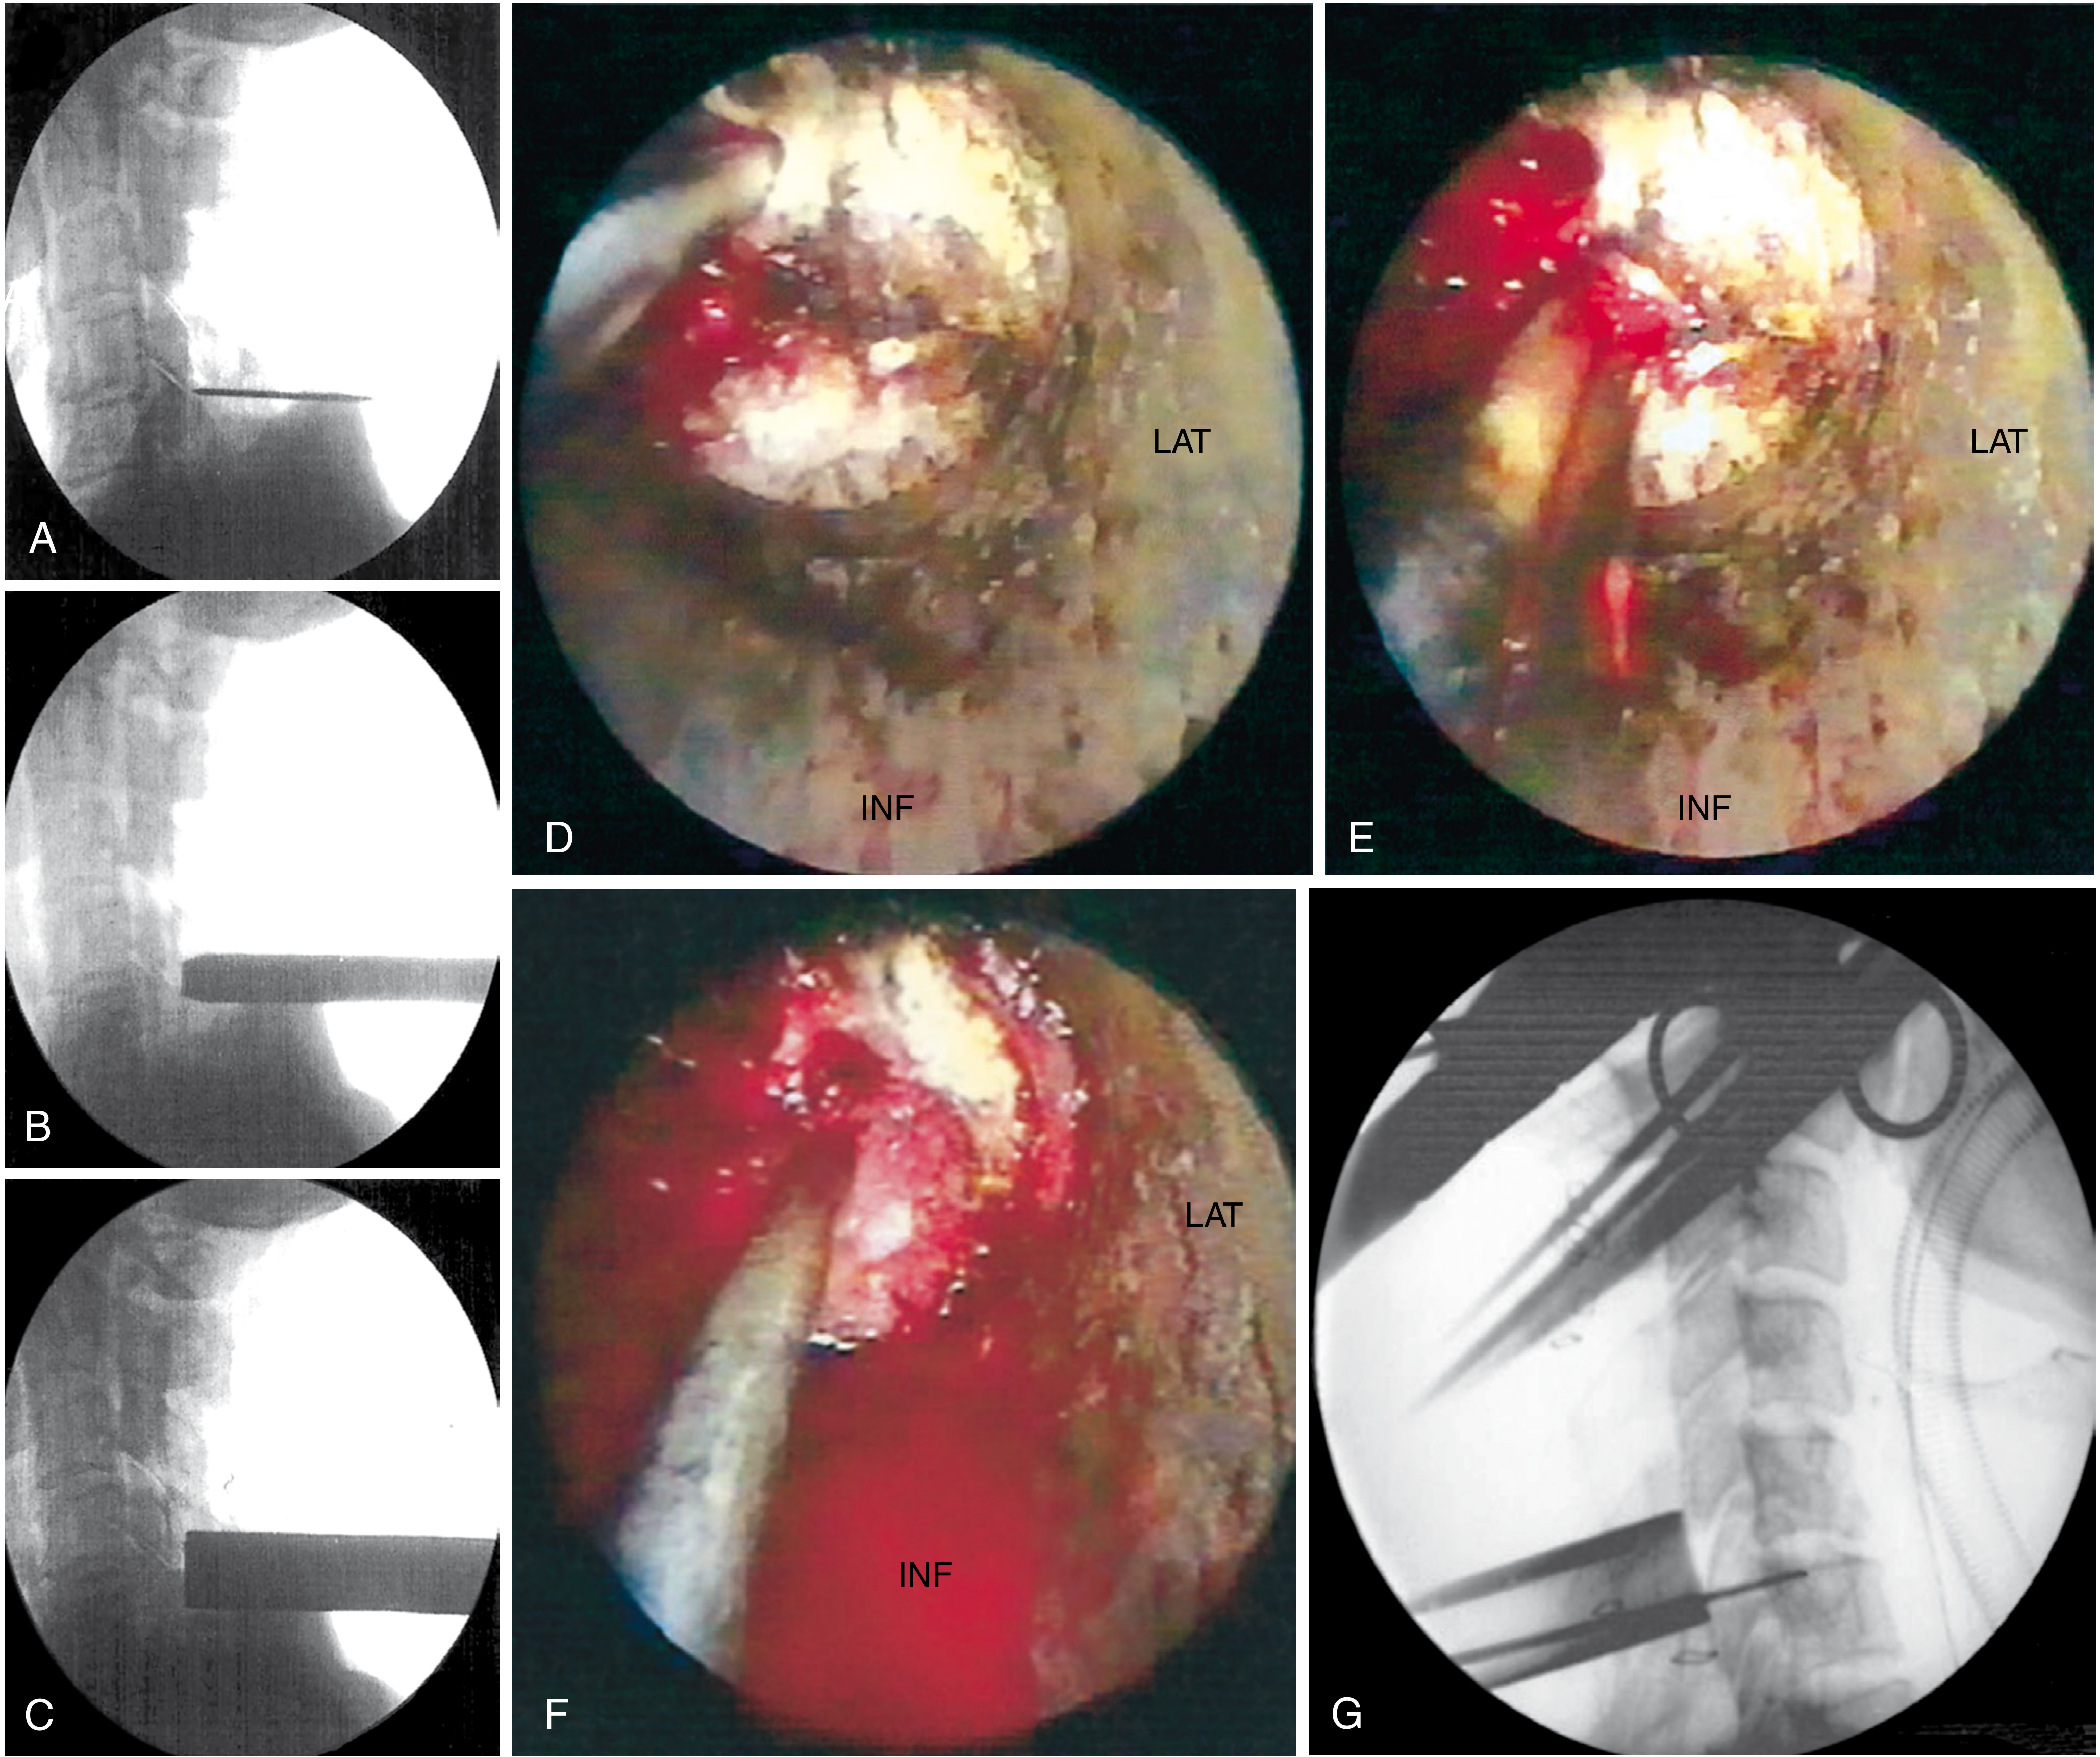
FIGURE 45.10 - Minimally invasive posterior cervical foraminotomy. (A-C) K-wire identification and sequential tubular dilator placement under fluoroscopy. (D-E) Endoscopic laminotomy and foraminotomy. (F) Disc fragment removal. (G) Final position fluoroscopy. (Campbell's Operative Orthopaedics 15th Ed 2026)
Steps (Gala, O'Toole, Voyadzis and Fessler Technique):
- Semi-sitting position: Mayfield three-point fixation; neck flexed, long axis of cervical spine perpendicular to floor
- Fold arms across lap; pad all pressure points
- Confirm operative level on lateral fluoroscopy
- Mark 18 mm longitudinal incision ~1.5 cm off midline on operative side; inject local anesthetic
- Through stab incision, advance K-wire under fluoroscopy; dock at inferomedial edge of rostral lateral mass
- Advance sequential tubular dilators (16 mm working channel)
- Dock tubular retractor; attach to table-mounted arm
- Confirm position with fluoroscopy
- Use angled curette to detach ligamentum flavum from undersurface of inferior laminar edge
- Kerrison punch begins laminotomy; high-speed drill if significant facet hypertrophy
- After laminotomy, remove ligamentum flavum medially to identify lateral dural edge and nerve root
- Bony resection follows the nerve root into the foramen (partial medial facetectomy; preserve ≥50% of facet for stability)
- Coagulate and incise venous plexus overlying nerve root
- Fine angled dissector palpates space ventral to nerve root for osteophytes/fragments
- Osteophyte: down-angled curette tamps material into disc space. Soft disc: nerve hook teases fragment; pituitary rongeur removes it
- Final inspection of foramen; irrigation; hemostasis
- Remove tube; inject local anesthetic into surrounding fascia/muscles
- Close: absorbable fascia stitch, inverted subcutaneous stitches, running subcuticular + skin adhesive
- Postop: Patient mobilized immediately; no collar required; discharge after 2-3 hours
THORACIC SPINE APPROACHES
APPROACH 3: Anterior Transthoracic Approach (Thoracotomy)
Indications: Thoracic disc herniation, vertebral body fractures, tumor, infection requiring anterior column access
Step-by-Step Technique
Patient Position:
- Lateral decubitus (right side preferred to avoid aorta, segmental arteries, artery of Adamkiewicz, and thoracic duct)
- Double-lumen endotracheal tube for single-lung ventilation (deflate ipsilateral lung for exposure)
Step 1 - Incision:
- Transverse incision made approximately two ribs above the level of interest
- Example: T8 disc = incision at T6 rib
Step 2 - Rib Approach:
- Dissect over the top of the selected rib to avoid the intercostal neurovascular bundle (which lies on the inferior internal surface of the rib: vein, artery, nerve from top to bottom)
- Subperiosteal dissection of the rib
Step 3 - Rib Resection:
- Detach rib from costochondral junction anteriorly and at rib head posteriorly
- Remove rib from the surgical field (may serve as bone graft)
Step 4 - Thoracic Cavity:
- Enter the thoracic cavity through the periosteum/pleura
- Deflate the ipsilateral lung
- Place self-retaining rib spreader
Step 5 - Parietal Pleura:
- Incise parietal pleura longitudinally over the target vertebra
- Ligate segmental vessels at the midpoint of the vertebral body (avoid artery of Adamkiewicz, typically T9-L1 on left)
Step 6 - Vertebral Exposure:
- Expose disc/vertebral body anterolaterally
- Perform discectomy, corpectomy, or stabilization as planned
Key Risks:
- Intercostal neuralgia (most common complication)
- Injury to the artery of Adamkiewicz (anterior spinal artery supply, mainly T9-L1 left side) → anterior spinal artery syndrome
- Aortic injury (left-sided approaches)
- Chylothorax from thoracic duct injury
- Pneumothorax requiring chest drain postoperatively
APPROACH 4: Costotransversectomy (Posterolateral Thoracic)
Indications: Thoracic disc, infection, tumor - when patient cannot tolerate thoracotomy; reasonable and safe access to thoracic anterior column
Step-by-Step Technique
Patient Position: Prone
Step 1 - Incision:
- Paramedian or hockey-stick incision ipsilateral to pathology
Step 2 - Posterior Dissection:
- Subperiosteal dissection of paravertebral muscles from spinous processes and laminae
- Expose transverse process and posterior rib head at target level
Step 3 - Rib Resection:
- Resect ~6-8 cm of the posterior rib including the rib head (costotransversectomy)
- Remove the transverse process
Step 4 - Anterior Access:
- Work around the lateral wall of the vertebral body and disc through this posterolateral corridor
- Limited access compared to full thoracotomy but avoids thoracic cavity
Step 5 - Neural Decompression:
- Removal of disc herniation, abscess, or tumor through this channel
- Packing of defect / stabilization as needed
Key Risks:
- Sacrifice of one thoracic nerve root often required for adequate exposure
- Intercostal neuralgia
- Limited anterior visualization compared to thoracotomy
LUMBAR SPINE APPROACHES
APPROACH 5: Posterior Lumbar Approach (Standard Open / Midline)
Lumbar Nerve Root Anatomy
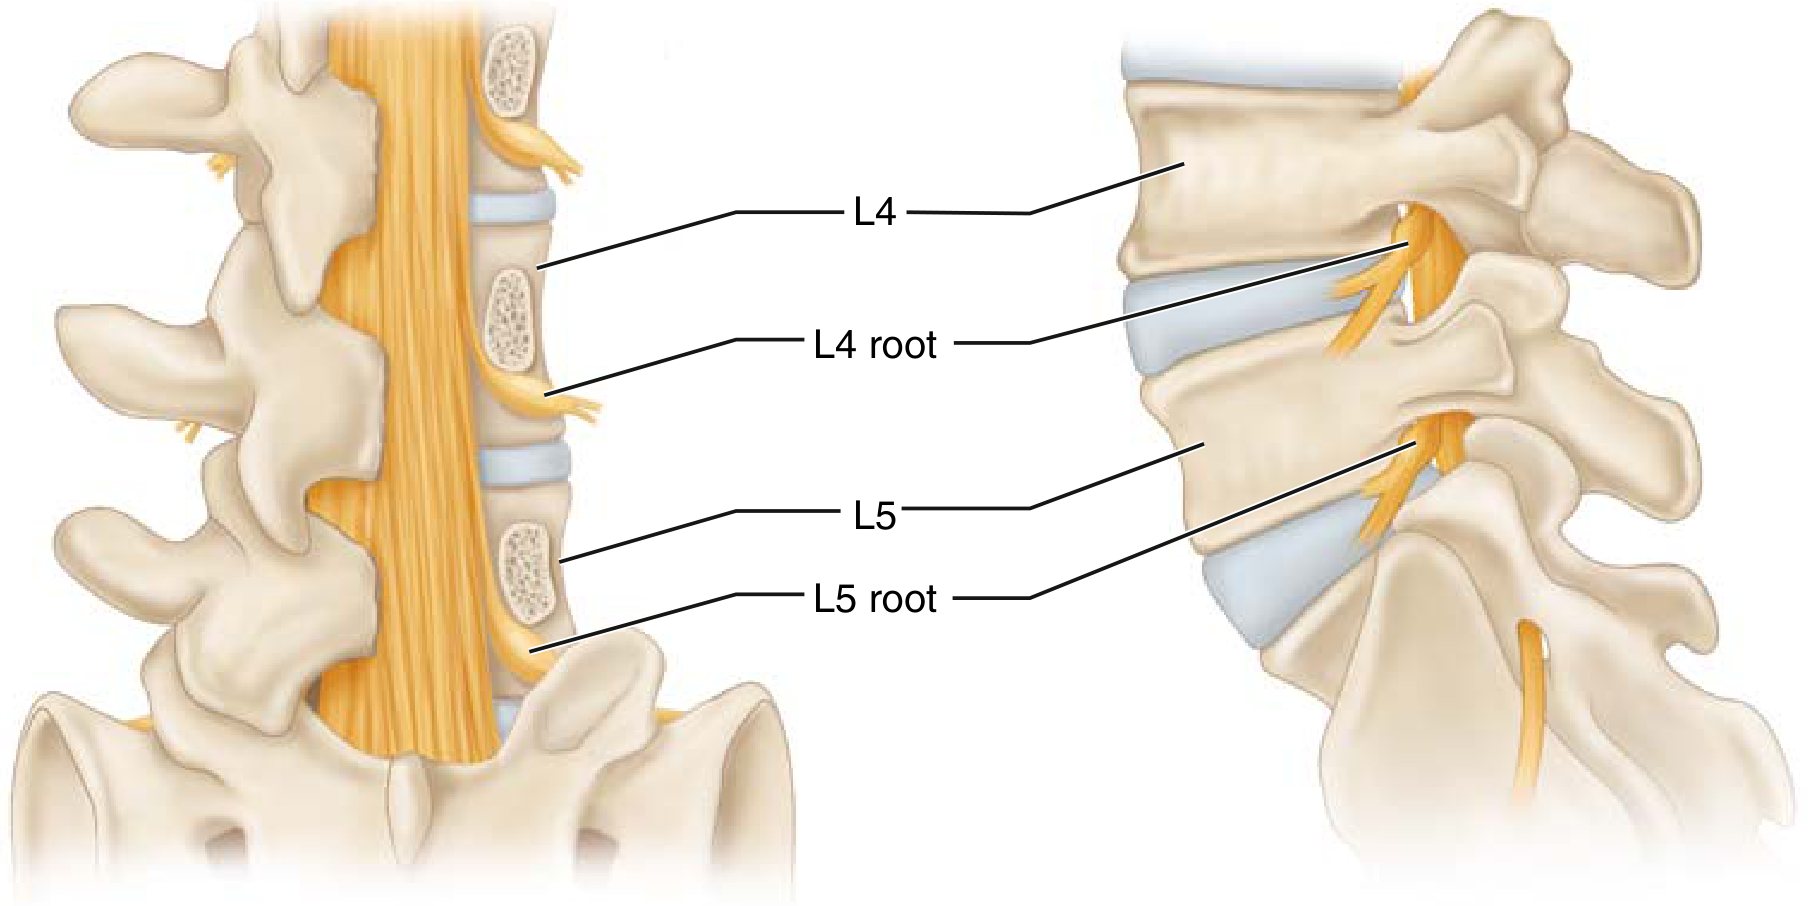
FIG. 2.113 - Lumbar spine nerve roots. L4 root exits at L4-5 foramen; the L5 root traverses the L4-5 disc space before exiting below L5. A posterolateral L4-5 disc herniation typically compresses the traversing L5 root. (Miller's Review of Orthopaedics 9th Ed)
Step-by-Step Technique
Patient Position:
- Prone with abdomen hanging free (reduces epidural venous pressure and bleeding - Andrew's frame, Wilson frame, or Relton-Hall frame)
- Hips extended if fusion is planned (prevents positional kyphosis)
Step 1 - Incision:
- Straight midline incision over the spinous processes
- Length depends on number of levels
- Carried down through thoracolumbar fascia to spinous processes
Step 2 - Level Marking:
- Count from sacrum superiorly (S1 = first non-bifid spinous process)
- Fluoroscopic confirmation with marker at spinous process level
Step 3 - Subperiosteal Muscle Dissection:
- Incise the supraspinous and interspinous ligaments
- Subperiosteal dissection of the paravertebral muscles (erector spinae) off the spinous processes and laminae bilaterally
- Self-retaining retractors placed; expose laminae and facet joints
Step 4 - Laminotomy / Laminectomy:
- Laminotomy (fenestration): Partial removal of one or both laminae using Kerrison rongeurs; preserves midline structures
- Laminectomy: Complete removal of spinous process and bilateral laminae; wide decompression
- Ligamentum flavum excised to enter the epidural space
Step 5 - Nerve Root Identification:
- Identify thecal sac and nerve root at disc level
- Traversing root runs medially (at risk with posterolateral disc herniation)
- Exiting root runs laterally in foramen (at risk with foraminal/extraforaminal herniation)
Step 6 - Disc Fragment Removal:
- Gently retract nerve root medially with a nerve root retractor
- Do not retract caudally
- Incise posterior annulus fibrosus
- Remove disc fragments with pituitary rongeur and curettes
Step 7 - Haemostasis & Closure:
- Thorough irrigation; bipolar haemostasis; Gelfoam/thrombin for epidural veins
- Layered closure: thoracolumbar fascia, subcutaneous tissue, skin
- Drain optional
Spinal Stenosis - Algorithm for Surgical Approach
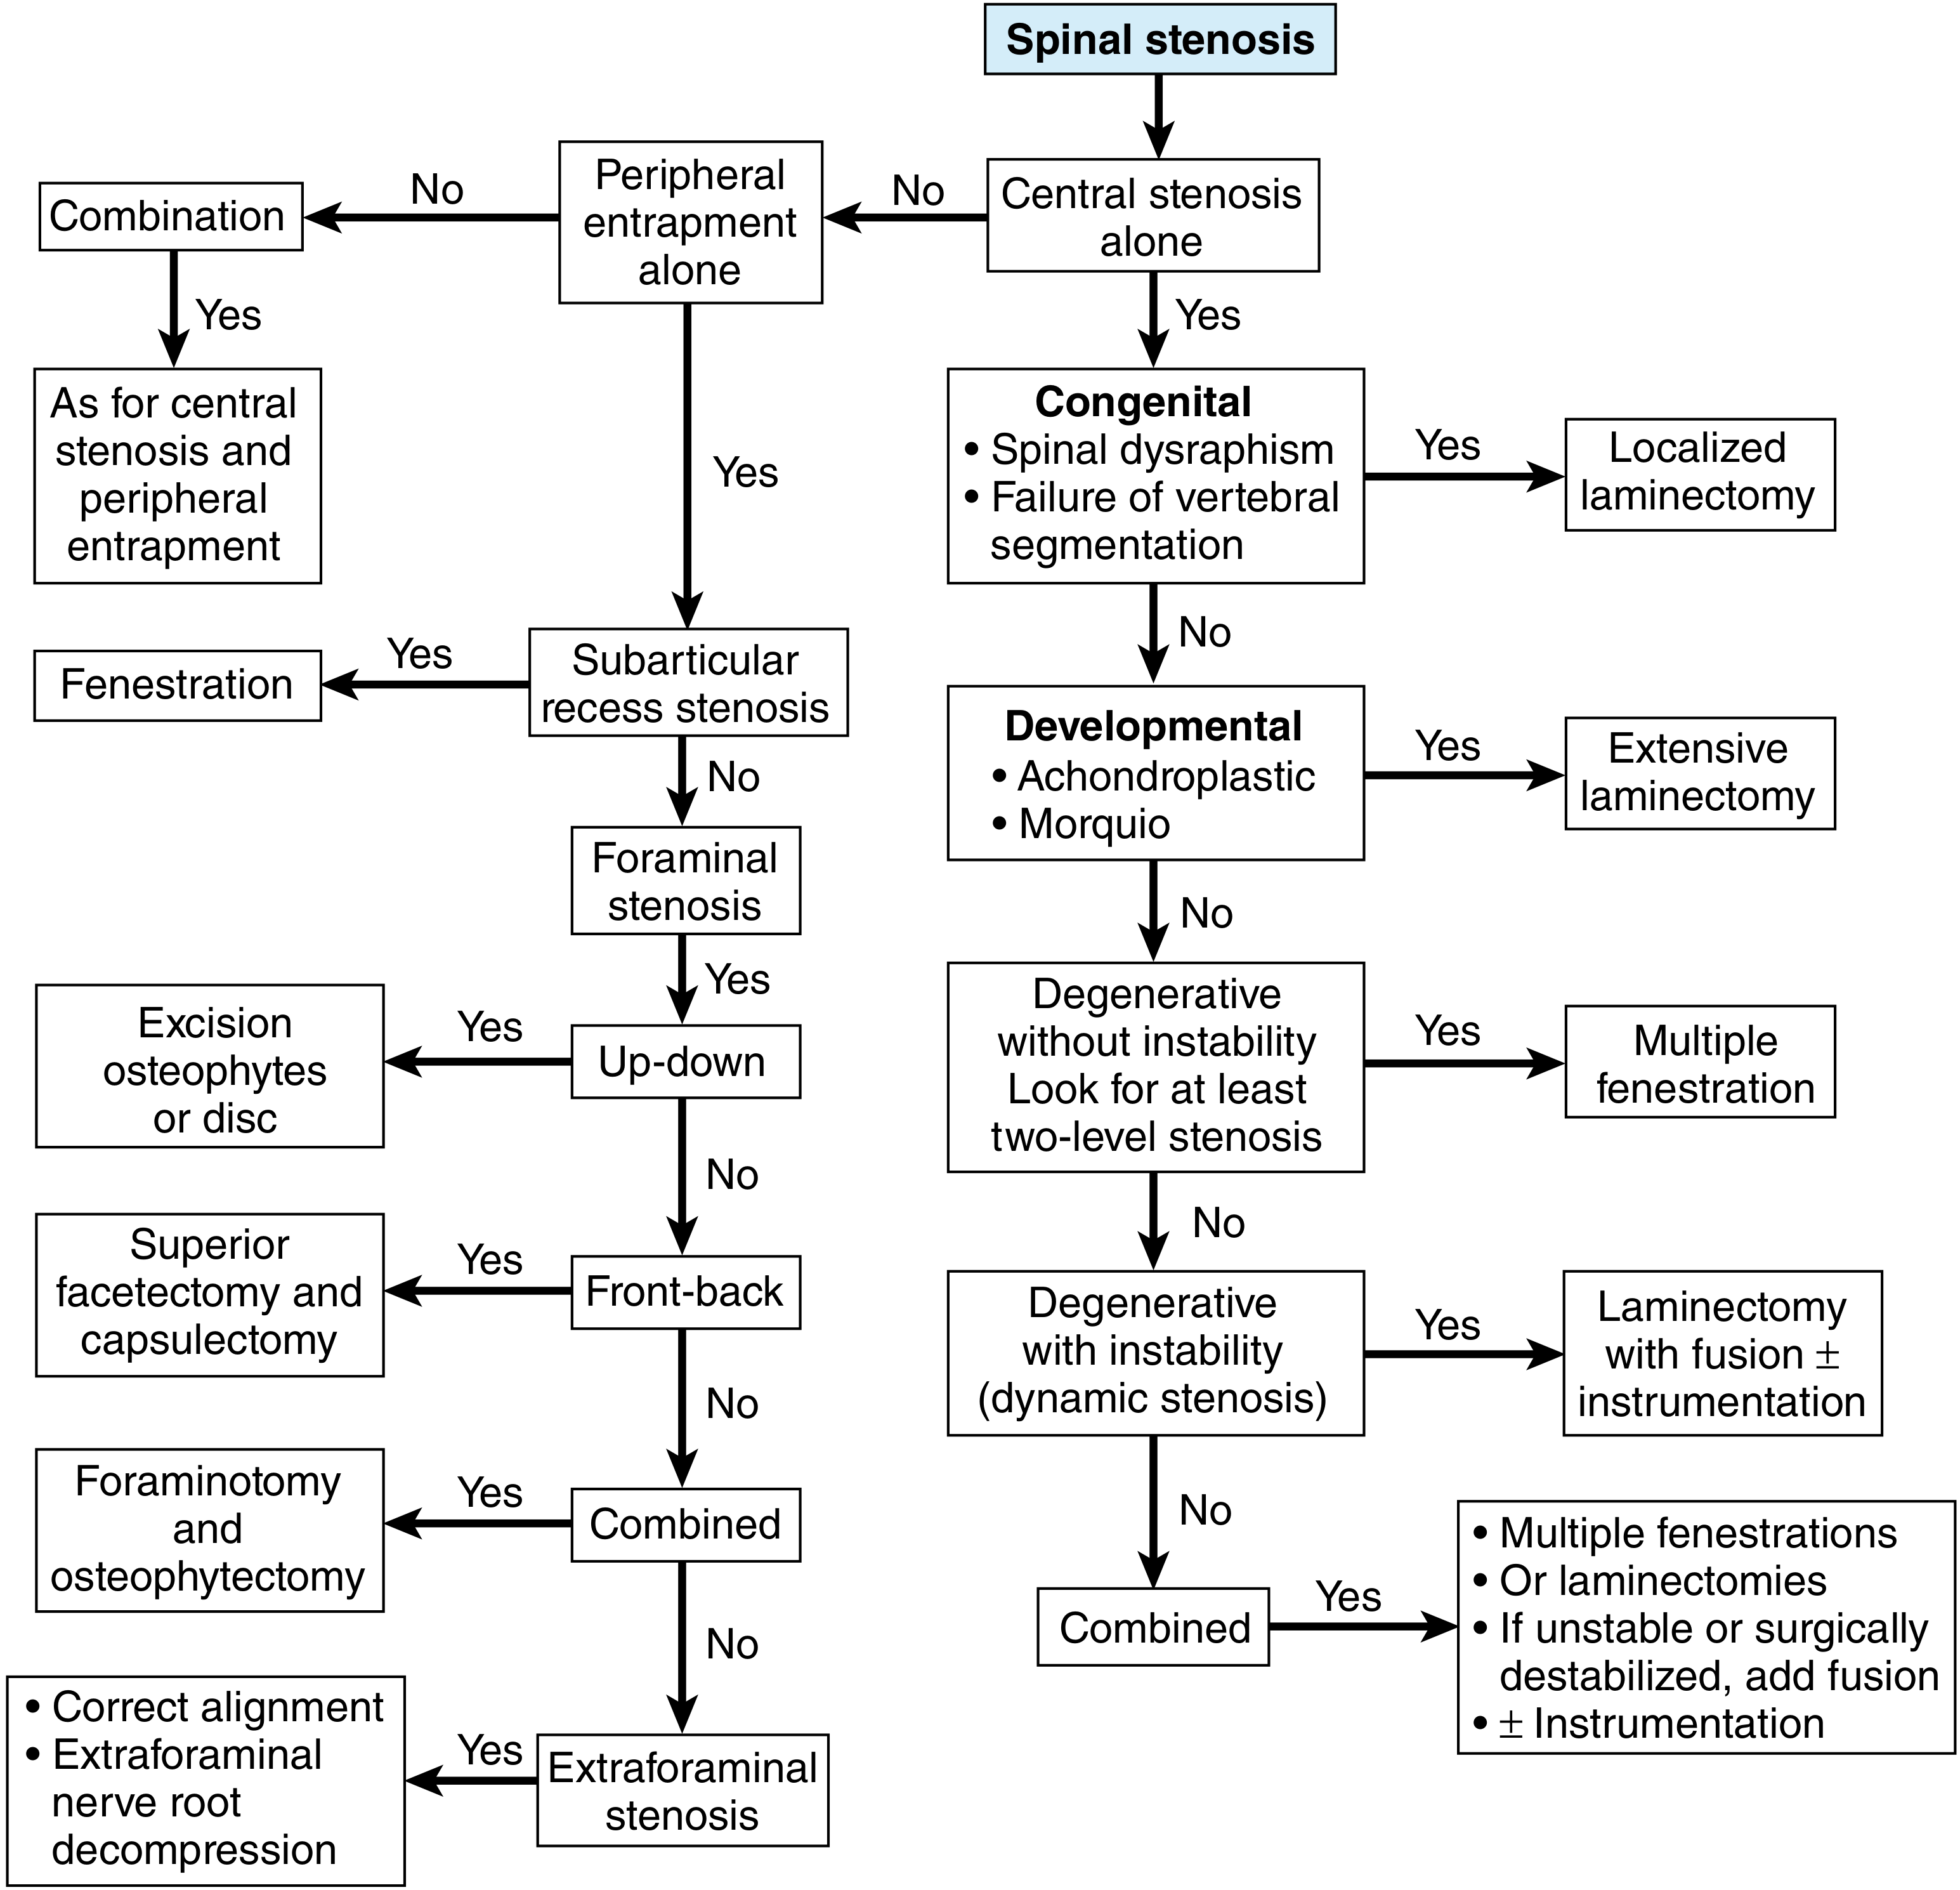
FIGURE 46.36 - Algorithm for treatment of spinal stenosis. Central stenosis with instability = laminectomy + fusion ± instrumentation. Foraminal stenosis = foraminotomy ± facetectomy. (Campbell's Operative Orthopaedics 15th Ed 2026)
Key Risks of Posterior Lumbar:
- Dural tear (CSF leak, pseudomeningocele)
- Nerve root injury / retraction neuropraxia
- Epidural hematoma
- Cauda equina syndrome if bilateral retraction or missed fragment
- Posterior primary rami injury (muscle denervation) → chronic paraspinal atrophy
- Segmental vessel injury
APPROACH 6: Anterior Lumbar Approach (Transperitoneal / ALIF)
Indications: L5-S1 and L4-5 disc disease, ALIF (anterior lumbar interbody fusion), spondylolisthesis, corpectomy
Step-by-Step Technique
Patient Position: Supine with slight Trendelenburg; sandbag under lumbar spine for lordosis
Step 1 - Incision:
- Longitudinal midline incision from just below the umbilicus to just above the pubic symphysis
- Or: transverse Pfannenstiel incision (lower, cosmetically preferred for L5-S1 only)
Step 2 - Rectus Sheath:
- Split the rectus abdominis muscles in the midline (linea alba)
- Incise the posterior rectus sheath / peritoneum
Step 3 - Peritoneal Retraction:
- Protect and retract the bladder distally
- Retract the bowel cephalad with moist laparotomy pads
Step 4 - Posterior Peritoneum:
- Incise the posterior peritoneum longitudinally over the sacral promontory
Step 5 - Vascular Exposure:
- The aortic bifurcation is revealed (typically at L4 vertebral body)
- Ligate the middle sacral artery (runs in the midline over L5-S1)
- The L5-S1 disc space lies below the bifurcation and is directly accessible
- For L4-5: mobilize the aorta and inferior vena cava to the left
Step 6 - Discectomy and Fusion:
- Remove L5-S1 or L4-5 disc
- Place large interbody cage (PEEK or titanium) packed with bone graft
- Supplementary posterior pedicle screw fixation often added
Key Risks:
- Presacral sympathetic plexus (superior hypogastric plexus) lies over the L5 vertebral body: injury causes retrograde ejaculation (sympathetic), NOT erection (parasympathetic)
- Vascular injury to aorta, IVC, iliac vessels
- Ureter injury
- Ileus / bowel obstruction
APPROACH 7: Anterolateral Lumbar Approach (Retroperitoneal / XLIF/LLIF)
Indications: L1-L4 levels, lateral interbody fusion, tumor, infection; avoids great vessels and bowel
Step-by-Step Technique
Patient Position: Lateral decubitus (right side up for left-sided approach)
Step 1 - Incision:
- Oblique incision centered over the 12th rib to the lateral border of the rectus abdominis muscle
Step 2 - Abdominal Wall Muscles:
- Incise in sequence:
- External oblique
- Internal oblique
- Transversus abdominis
- All incised in line with the skin incision
Step 3 - Retroperitoneal Space:
- Develop the retroperitoneal fat plane by blunt dissection
- The retroperitoneal space is entered anterior to the transversus abdominis
- Reveals the psoas major muscle and genitofemoral nerve on its anterior surface
Step 4 - Vascular Mobilization:
- Ligate segmental lumbar vessels (running transversely at the midpoint of each vertebral body)
- Mobilize the aorta (left) and vena cava (right) to expose the desired vertebral level
- Great vessels typically bifurcate at L4-5: requires larger dissection area; L5-S1 lies below bifurcation
Step 5 - Psoas Splitting (XLIF/LLIF variant):
- Split psoas muscle using sequential tubular dilators under neuromonitoring (EMG)
- Tubular retractor docked at lateral disc space
- Discectomy and interbody cage placement through lateral corridor
Key Risks:
- Sympathetic chain (medial to psoas, lateral to vertebral body): injury causes vasodilation, warmth, and dry foot
- Ureters (between peritoneum and psoas fascia): injury causes urinoma
- Genitofemoral nerve (on psoas): injury causes groin/medial thigh numbness and dysesthesia
- Lumbar plexus injury during psoas splitting (particularly L4 root)
Summary: Approach Selection by Region and Pathology
| Region | Pathology | Preferred Approach |
|---|---|---|
| Cervical (1-2 levels) | Disc herniation, radiculopathy (central/hard) | Anterior cervical (ACDF) |
| Cervical (lateral soft disc) | Radiculopathy from posterior compression | Posterior cervical foraminotomy |
| Cervical (multilevel myelopathy, lordotic) | Myelopathy 3+ levels | Laminoplasty or posterior cervical fusion |
| Cervical (kyphosis >13°) | Myelopathy 3+ levels | Combined anterior + posterior |
| Thoracic | Disc herniation, fracture, tumor | Costotransversectomy or thoracotomy |
| Lumbar (disc herniation) | Radiculopathy, sciatica | Posterior (microdiscectomy) |
| Lumbar (stenosis without instability) | Neurogenic claudication | Posterior laminectomy / fenestration |
| Lumbar (stenosis + instability) | Dynamic stenosis, spondylolisthesis | Posterior laminectomy + PLIF/TLIF + fusion |
| L4-5, L5-S1 (large segment) | Spondylolisthesis, interbody fusion needed | ALIF (anterior transperitoneal) |
| L1-L4 | Tumor, infection, lateral interbody fusion | Retroperitoneal / LLIF |
Sources: Miller's Review of Orthopaedics 9th Ed | Campbell's Operative Orthopaedics 15th Ed 2026 | Grainger & Allison's Diagnostic Radiology | Adams and Victor's Principles of Neurology 12th Ed
This is a shared conversation. Sign in to Orris to start your own chat.