
How do you read a xray
A chest X-ray is read systematically to avoid missing findings. The classic approach uses mnemonics like ABCDE or a structured review of all anatomical regions.
Searching sources...
Reading File
Searching the Web
how to read a chest xray systematic approach
Finding Sources
Reading File
Reading File
Reading File
Here is a thorough, structured guide to reading a chest X-ray (CXR), based on Pfenninger and Fowler's Procedures for Primary Care and standard radiology resources.
How to Read a Chest X-Ray
Here is a normal PA chest X-ray with key structures labeled:
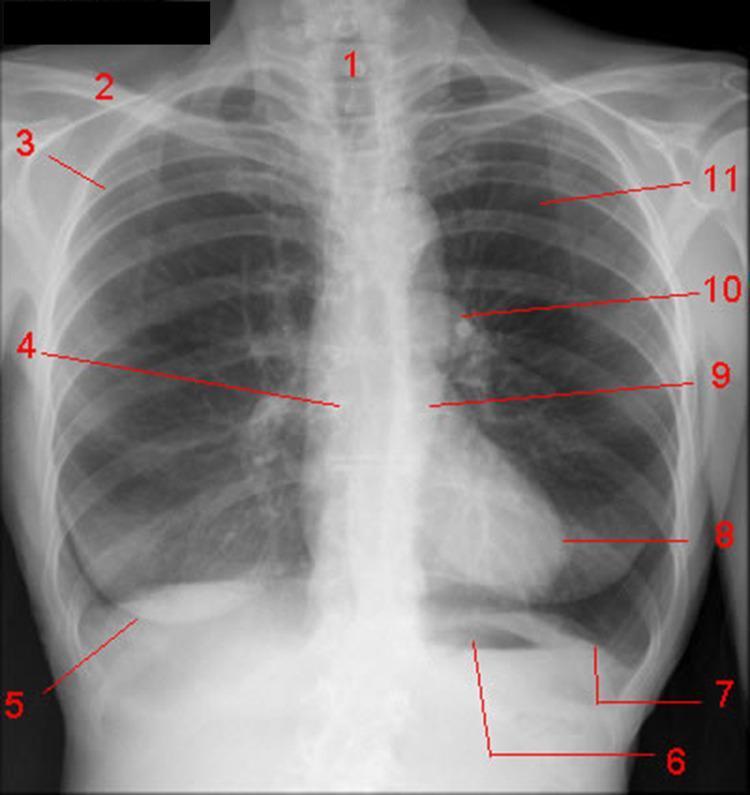
Step 1 - Before You Look at the Film
Always check:
- Patient ID - confirm name, date of birth, and date of the X-ray
- Clinical context - why was the film ordered? (cough, dyspnea, chest pain?)
- Compare with old films if available - this alone can change your interpretation
Step 2 - Assess Image Quality (RIP)
Use the mnemonic RIP before interpreting anything:
| Letter | Meaning | How to check |
|---|---|---|
| R | Rotation | On the PA view, the spinous processes should be equidistant from both clavicle heads. A >2-3 mm difference = rotation. |
| I | Inspiration | Count posterior ribs at the spine. You need at least 9 ribs visible. Fewer = poor inspiration, making the lungs look falsely opaque. |
| P | Penetration | Intervertebral spaces should disappear within the cardiac shadow. Too white = underpenetrated; lung fields turning black = overpenetrated. |
A poor-quality film means your interpretation must carry a disclaimer, and repeat imaging may be needed.
Step 3 - Systematic Anatomical Review (ABCDE)
Work through every region in a fixed order so nothing is missed. The classic framework:
A - Airway
- Is the trachea midline? Deviation suggests a tension pneumothorax (pushed away) or lung collapse/fibrosis (pulled toward).
- Check the carina - it should be a sharp angle (~60-70 degrees). Splaying of the carina suggests left atrial enlargement.
- Follow the main bronchi bilaterally.
B - Breathing (Lungs & Pleura)
- Lung fields: Do a rapid visual "ping-pong" comparison - left vs. right. Look for asymmetry, opacification, or hyperlucency.
- Lung parenchyma patterns to know:
- Consolidation - dense white opacity, often with air bronchograms (pneumonia)
- Interstitial pattern - diffuse fine lines (pulmonary edema, fibrosis)
- Nodules/masses - nodules are 5-30 mm; masses are >30 mm
- Cephalization of flow - enlarged upper lobe vessels = early heart failure
- Vascular markings should stop 3-5 mm from the chest wall
- Pleura: Look for blunting of the costophrenic angles (pleural effusion) or a visible pleural line with absent lung markings (pneumothorax).
- Hilum: Normally the left hilum is higher than the right in ~70% of people. Bilateral hilar enlargement suggests sarcoidosis, lymphoma, or TB.
C - Cardiac/Circulation
- Cardiac size: On a PA view, the heart should be less than 50% of the transthoracic diameter (cardiothoracic ratio). Greater than 50% = cardiomegaly.
- Cardiac borders: Loss of a border = silhouette sign (pathology is in contact with that structure).
- Mediastinum: Width >8 cm at the aortic knob level is considered wide - think aortic dissection, lymphoma, or thymoma. If the mediastinal width exceeds 25% of the thoracic diameter at the carina level, it is abnormal.
D - Diaphragm
- The right hemidiaphragm is normally 2-20 mm higher than the left (stomach gas bubble beneath the left).
- Free air beneath the diaphragm = surgical emergency (bowel perforation) until proven otherwise.
- Blunted costophrenic angles = fluid.
- Elevated diaphragm = atelectasis, phrenic nerve palsy, subphrenic pathology.
E - Everything Else
- Bones: Rib fractures, lytic lesions, vertebral collapse, sclerotic changes (metastases).
- Soft tissues: Subcutaneous emphysema, breast shadows, skin folds.
- Lines and tubes: If present - check ETT position (2-5 cm above carina), central line tip (SVC/RA junction), NG tube (below diaphragm, not bronchus).
Step 4 - Check the Lateral View
Do not ignore it. On the lateral:
- Review the spine - vertebral bodies should get gradually darker (more lucent) from top to bottom. Loss of this gradient = posterior consolidation.
- Anterior clear space (behind the sternum) - opacification suggests anterior mediastinal mass or fluid.
- Retrocardiac space - consolidation or mass here can only be seen on lateral.
- Diaphragms - the left ends at the anterior chest wall, the right passes all the way across.
Step 5 - The Silhouette Sign
A key diagnostic tool: when a lung abnormality touches a normally visible structure, it erases its border.
| Obscured border | Location of pathology |
|---|---|
| Right heart border | Right middle lobe |
| Left heart border | Lingula |
| Right hemidiaphragm | Right lower lobe |
| Left hemidiaphragm | Left lower lobe |
Summary Checklist
- Patient ID and clinical context
- Image quality (RIP - rotation, inspiration, penetration)
- Lateral view (spine, anterior space, retrocardiac space, diaphragms)
- Bones and soft tissues
- Mediastinum (width, trachea)
- Cardiac silhouette (size, borders)
- Diaphragms (level, free air)
- Lungs: hila, parenchyma, pleura
- Pfenninger and Fowler's Procedures for Primary Care, 3rd ed., p. 1613
- Radiopaedia ABCDEF approach and Radiology Masterclass offer good supplementary visual guides.
A great video walkthrough of this technique:
This is a shared conversation. Sign in to Orris to start your own chat.