
Explain popq classification for uv prolapse in detail and how to write it down
Reading File
Now let me search the medical library for POP-Q classification content in parallel:
Finding Sources
Finding Sources
Searching the Web
POP-Q classification uterovaginal prolapse points explained how to write
Now let me read the detailed POP-Q section from Berek & Novak's Gynecology and extract more from the ICS reference:
Reading File
Reading Web Page
https://pmc.ncbi.nlm.nih.gov/articles/PMC3056425
I have excellent content. Let me fetch the textbook image and read the staging criteria section:
Loading Image
Reading File
I now have all the content needed for a thorough answer. Let me compile the complete explanation.
POP-Q Classification for Uterovaginal Prolapse
The Pelvic Organ Prolapse Quantification (POP-Q) system is the internationally standardized method for describing and staging pelvic organ prolapse. It was developed by Bump et al. in 1996 and approved by the International Continence Society (ICS), AUGS, ACOG, and SGS. It replaced older, less reproducible systems (like Baden-Walker) by using objective, centimeter-based measurements relative to a fixed anatomical landmark.
The Core Concept: The Hymen as Reference Zero
The hymen (hymenal ring) is the fixed reference point. Every measurement is made relative to it:
- Above the hymen (normal/reduced) = negative number (e.g., -3 cm)
- At the hymen = 0
- Below the hymen (prolapsing out) = positive number (e.g., +2 cm)
All measurements except total vaginal length (tvl) are taken at maximum Valsalva (straining).
The 9 Measurements
The system records 9 measurements in total: 6 vaginal points + 3 anatomical landmarks.
The Anatomical Diagram
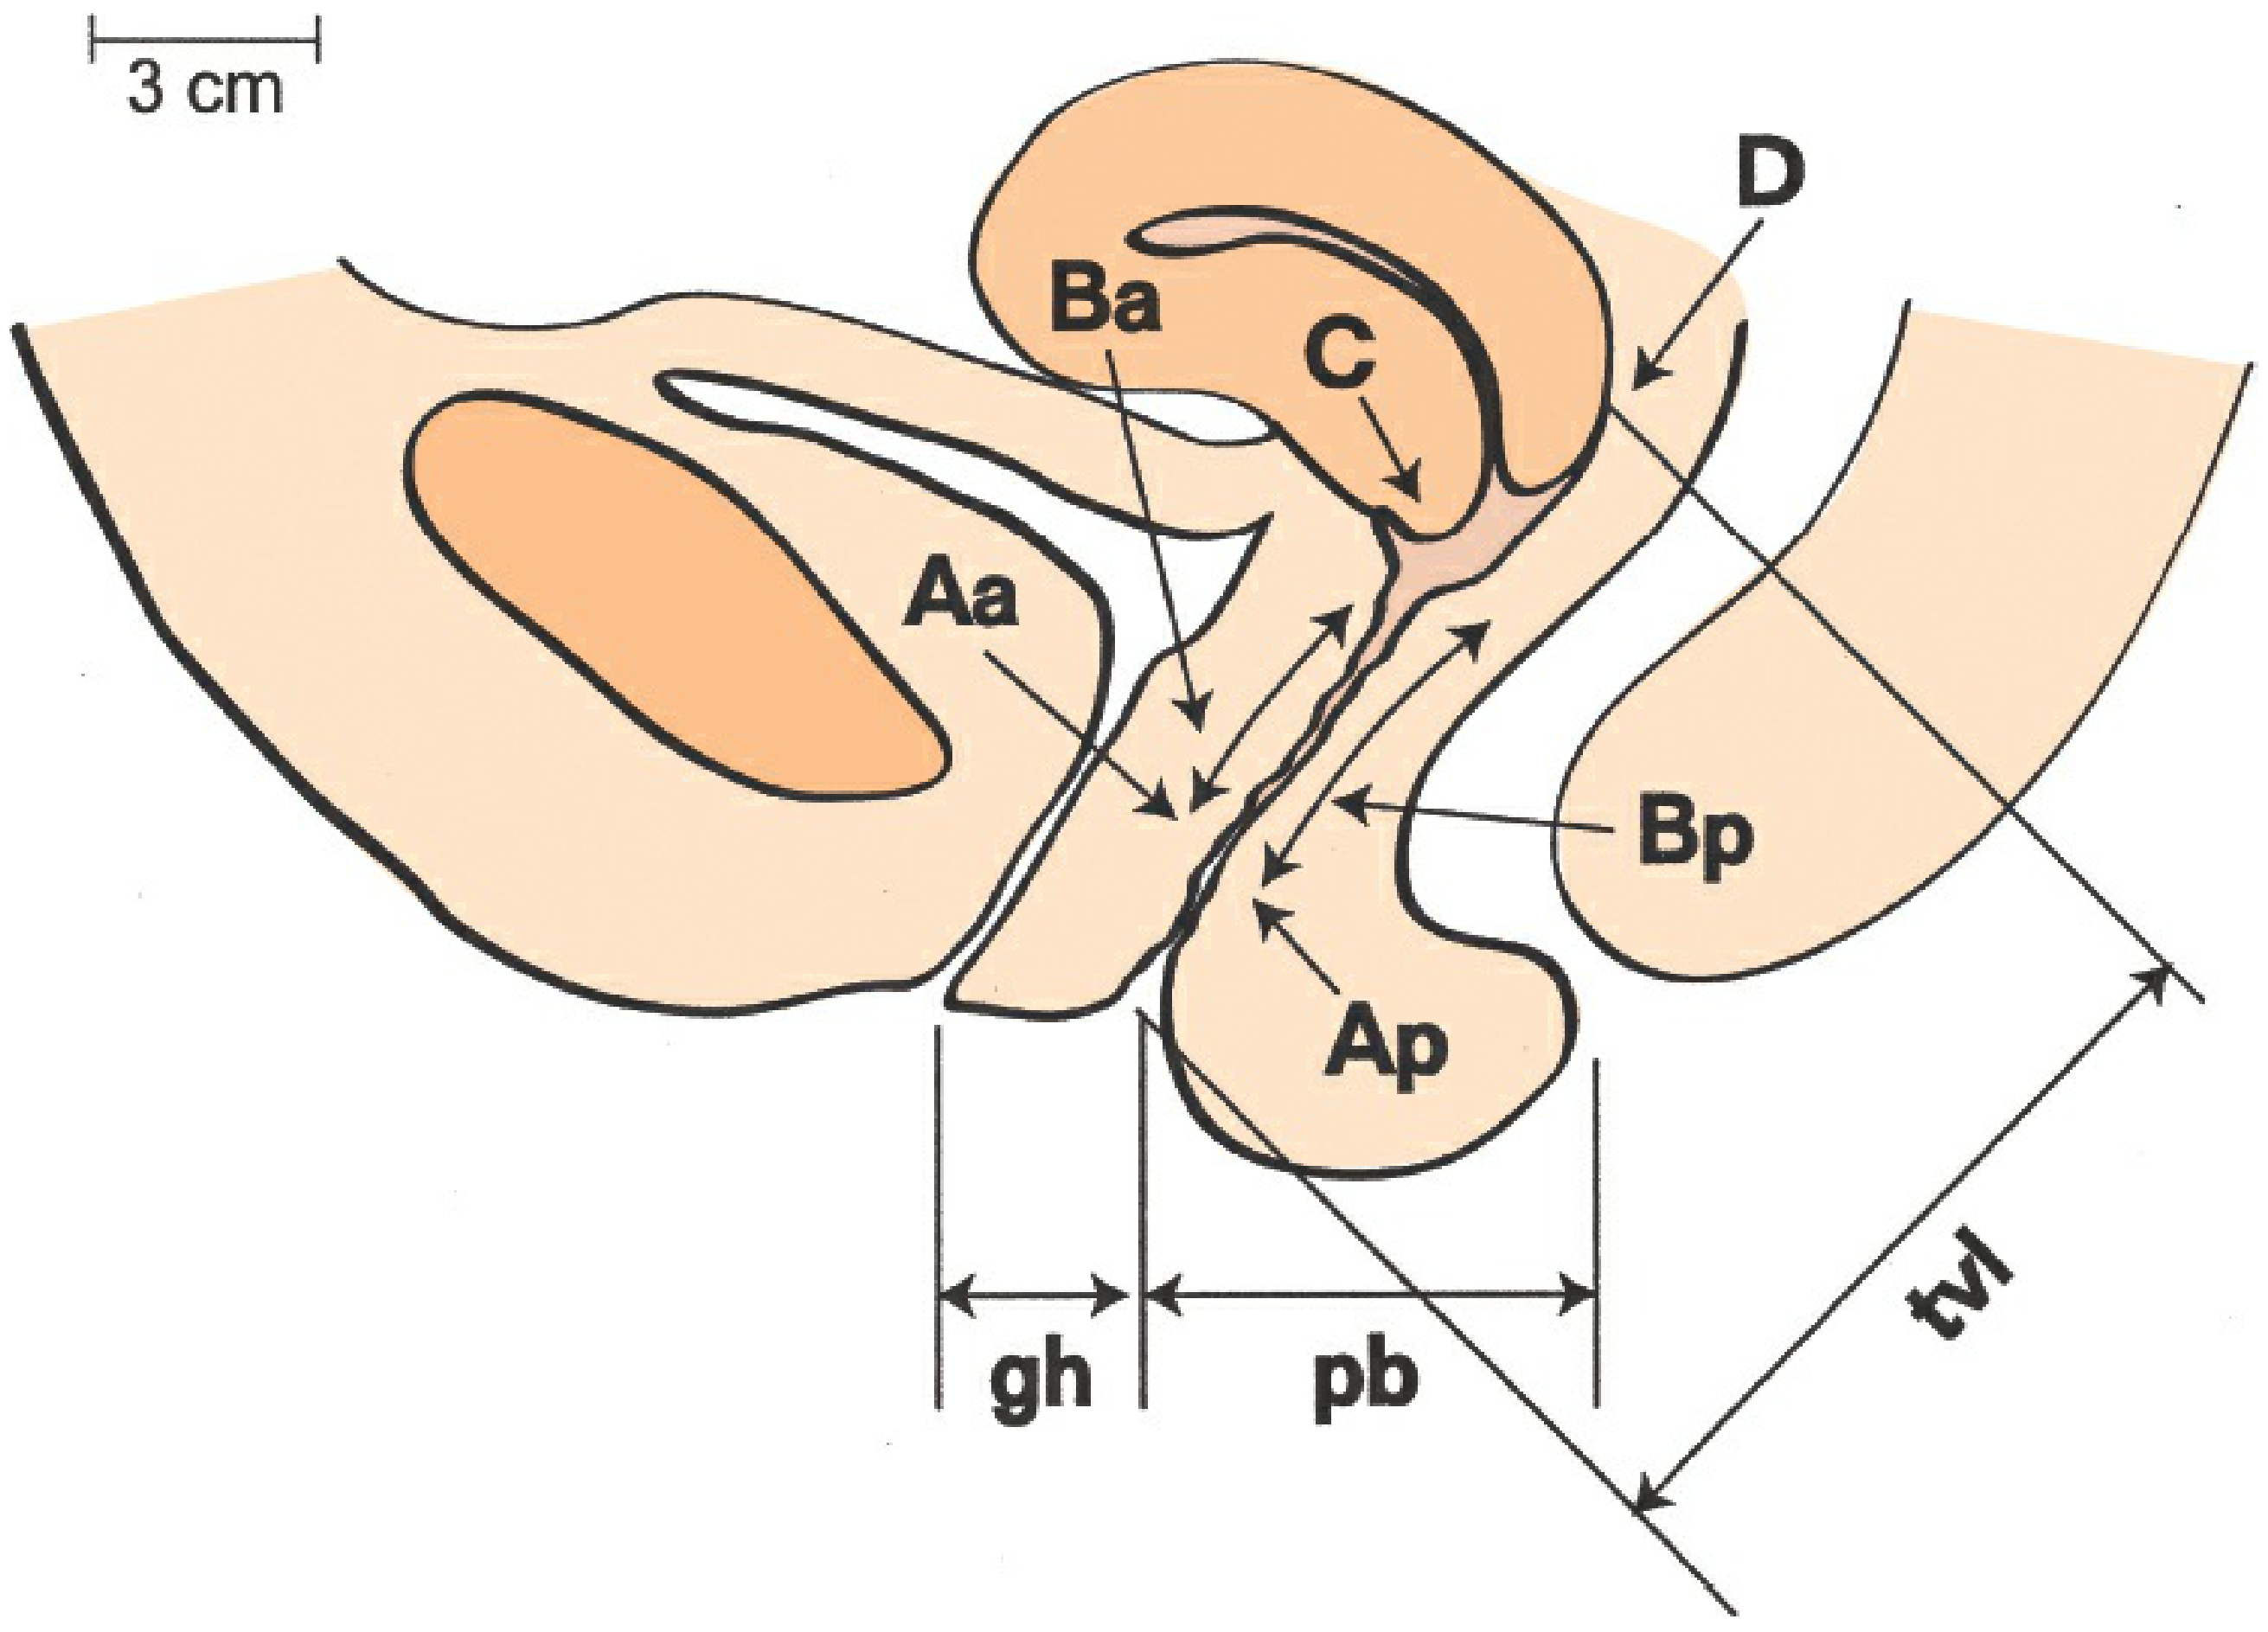
6 Vaginal Points (Measured at Valsalva)
Anterior Compartment
| Point | Definition | Normal Value | Range |
|---|---|---|---|
| Aa | Fixed point on the anterior vaginal wall, 3 cm proximal to the external urethral meatus (approximates urethrovesical junction / bladder neck) | -3 cm | -3 to +3 cm |
| Ba | Most distal (dependent) point of ANY part of the upper anterior vaginal wall, from the anterior cervix/cuff to point Aa. Moves with prolapse. | -3 cm | -3 to +tvl |
- In a normal woman: Ba = Aa = -3 cm
- In full vaginal eversion: Ba = +tvl
Middle / Apical Compartment
| Point | Definition | Normal Value | Range |
|---|---|---|---|
| C | Most distal edge of the cervix (or vaginal cuff scar after hysterectomy) | -(tvl - 2) or less | ± tvl |
| D | Posterior fornix / pouch of Douglas - represents the level of uterosacral ligament attachment to the posterior cervix. Omitted after hysterectomy | Behind C by ~2 cm | ± tvl or omitted |
- The difference between C and D helps differentiate true uterine descent (C and D descend together) from cervical elongation (C descends, D stays high).
Posterior Compartment
| Point | Definition | Normal Value | Range |
|---|---|---|---|
| Ap | Fixed point on the posterior vaginal wall, 3 cm proximal to the hymen (midline) | -3 cm | -3 to +3 cm |
| Bp | Most distal (dependent) point of ANY part of the upper posterior vaginal wall, from the vaginal apex/cuff to point Ap | -3 cm | -3 to +tvl |
3 Anatomical Landmarks (NOT measured at Valsalva)
| Landmark | Abbreviation | How Measured |
|---|---|---|
| Genital Hiatus | gh | Middle of external urethral meatus → posterior midline of hymen |
| Perineal Body | pb | Posterior margin of genital hiatus → mid-anal opening |
| Total Vaginal Length | tvl | Greatest depth of vagina when the apex (C or D) is fully reduced to its normal position. Measured WITHOUT Valsalva. |
Normal values: gh ~3-4 cm, pb ~3-4 cm, tvl ~9-10 cm
How to Record / Write Down the POP-Q
Method 1: The Tic-Tac-Toe Grid (Standard Format)
The measurements are recorded in a 3 x 3 grid, which is the standard way to document POP-Q in notes and publications:
 Aa   |  Ba  |  C
------+------+------
 gh   |  pb  | tvl
------+------+------
 Ap   |  Bp  |  D
Example of a normal examination (tvl = 9 cm):
 -3   |  -3  |  -8
------+------+------
  3   |   3  |   9
------+------+------
 -3   |  -3  |  -9
Example of significant anterior prolapse (cystocele):
 +2   |  +4  |  -5
------+------+------
  4   |   3  |   8
------+------+------
 -3   |  -3  |  -5
Here Ba = +4 means the anterior wall is 4 cm below the hymen (prolapsed), while the posterior wall (Ap = -3, Bp = -3) is normal.
Method 2: Linear Notation
The 9 values can also be written in a line, in the order: Aa, Ba, C, D, Ap, Bp, tvl, gh, pb
Example:
-3, -3, -8, -10, -3, -3, 11, 4, 3(as cited in Berek & Novak's Gynecology, p. 1612)
The 5 Stages of POP-Q (Staging Criteria)
Staging is based on the most dependent (leading) point of prolapse:
| Stage | Criteria | Clinical Meaning |
|---|---|---|
| Stage 0 | Aa, Ap, Ba, Bp = -3 cm AND C or D ≤ -(tvl - 2) cm | No prolapse; all points well supported |
| Stage I | Stage 0 not met; leading edge is < -1 cm (above the hymen) | Prolapse present but not reaching hymen |
| Stage II | Leading edge is ≥ -1 cm but ≤ +1 cm (at or near the hymen) | Leading edge within 1 cm of hymen |
| Stage III | Leading edge is > +1 cm but < +(tvl - 2) cm | Prolapse extends beyond hymen but not complete |
| Stage IV | Leading edge is ≥ +(tvl - 2) cm | Complete or near-complete vaginal eversion |
The leading edge is whichever single point has the most positive (most prolapsed) value. That point alone determines the stage.
Important Points and Clinical Pearls
-
After hysterectomy: Point D is omitted. Point C represents the vaginal cuff, and Ba = Bp = -3 if no prolapse.
-
C vs D differentiation: If C descends significantly but D remains high, this suggests cervical elongation rather than true uterine descent. This is clinically relevant for surgical planning.
-
Aa and Ap are fixed points (always between -3 and +3). Ba and Bp are variable and move with prolapse - they are the "leading edge" markers for each compartment.
-
Naming the prolapse in POP-Q terminology: Rather than saying "cystocele," POP-Q describes which points are abnormal (e.g., "anterior wall prolapse with Ba +4").
-
How to identify which compartment is most affected:
- Anterior prolapse (cystocele): Ba is the most positive point
- Apical prolapse: C or D is most positive
- Posterior prolapse (rectocele): Bp is most positive
-
Worked example - posterior predominant prolapse (from PMC3056425):
- Bp = +5, Ap = +2, vaginal cuff C = -6, tvl = 8
- Leading edge = Bp = +5; since +5 > +1 and < +(8-2) = +6, this is Stage III Bp prolapse
Summary: Quick Reference Card
9 measurements = 6 vaginal points + 3 landmarks

ANTERIOR:  Aa (fixed, -3 to +3) | Ba (variable, leading anterior edge)
APICAL:    C (cervix/cuff)       | D (posterior fornix; omit post-hysterectomy)
POSTERIOR: Ap (fixed, -3 to +3) | Bp (variable, leading posterior edge)
LANDMARKS: gh | pb | tvl (not at Valsalva)

Grid format:
 Aa  | Ba  | C
 gh  | pb  | tvl
 Ap  | Bp  | D

Staging: based on most positive single measurement (leading edge)
 Stage 0: all points normal
 Stage I:  leading edge < -1 cm
 Stage II: leading edge -1 to +1 cm
 Stage III: leading edge > +1 cm but < (tvl-2) cm
 Stage IV: leading edge ≥ (tvl-2) cm
Source: Berek & Novak's Gynecology, pp. 1610-1612; Bump RC et al., Am J Obstet Gynecol 1996;175:10-17 (original ICS standardization paper); Persu et al., PMC3056425
Details of surgery for uv prolapse
Surgery for uterovaginal (UV) prolapse broadly falls into reconstructive procedures (restoring normal anatomy) and obliterative procedures (closing the vaginal canal). The main approaches are vaginal hysterectomy with pelvic floor repair, sacrocolpopexy, sacrospinous fixation, and colpocleisis for elderly patients not sexually active.
Searching sources...
Finding Sources
Finding Sources
Finding Sources
Reading File
Finding Sources
Reading File
Finding Sources
Finding Sources
Reading File
Finding Sources
Finding Sources
Reading File
Finding Sources
Reading File
Loading Image
I now have comprehensive content from multiple textbooks. Let me compile the full detailed answer.
Surgery for Uterovaginal (UV) Prolapse
Surgery is indicated when conservative management (pelvic floor physiotherapy, ring pessary, topical oestrogen) has failed or is not acceptable, when prolapse is symptomatic, or when the patient is fit and wishes definitive treatment. The surgical approach depends on the compartment(s) involved, the degree of prolapse, whether uterine preservation is desired, and the patient's fitness, age, and sexual activity.
Overview: Compartment-Based Approach
UV prolapse is addressed compartment by compartment, and often multiple repairs are done at one sitting:
| Compartment | Defect | Surgery |
|---|---|---|
| Anterior | Cystocele / urethrocele | Anterior colporrhaphy |
| Apical | Uterine descent / vault prolapse | Vaginal hysterectomy ± sacrospinous fixation; Manchester repair; sacrocolpopexy; uterosacral ligament suspension |
| Posterior | Rectocele / enterocele | Posterior colporrhaphy + perineorrhaphy; enterocele repair |
| Complete / elderly | Procidentia | Colpocleisis (Le Fort) |
1. Anterior Compartment - Anterior Colporrhaphy (Anterior Vaginal Wall Repair)
Indication: Cystocele, urethrocele
Principle: Plication of the pubocervical fascia beneath the bladder to reduce the anterior wall bulge.
Steps:
- Patient in lithotomy position; catheterise bladder.
- Inject dilute adrenaline solution under anterior vaginal wall to hydrodissect.
- Vertical midline incision on anterior vaginal wall from just below the urethral meatus to the cervix/vault.
- Dissect the vaginal epithelium laterally off the pubocervical fascia using sharp/blunt dissection.
- Identify the fascial edges and plicate them in the midline using interrupted or continuous absorbable sutures (2-0 Vicryl), reducing the bladder neck and bladder.
- Trim excess vaginal epithelium.
- Close vaginal skin with a continuous absorbable suture.
Complications: Haemorrhage, urinary fistula, voiding dysfunction, de novo stress urinary incontinence (unmasking of occult SUI), dyspareunia, recurrence (~30%).
Note on mesh: Mesh-augmented anterior repair had higher short-term anatomical success but carries significant risks (pain, erosion, dyspareunia) and is restricted in the UK. Current standard is native tissue repair.
2. Apical Compartment Procedures
A. Vaginal Hysterectomy (with Pelvic Floor Repair)
The most common definitive operation for uterine prolapse when fertility is not required.
Pre-operative: Bowel prep, catheter, thromboprophylaxis.
Steps:
- Lithotomy position. Cervix grasped with Vulsellum forceps.
- Circumferential incision around the cervix at the cervicovaginal junction (ring incision).
- Anterior dissection: Bladder pushed upward; anterior peritoneum of the pouch of vesicouterine peritoneum opened.
- Posterior dissection: Posterior vaginal wall opened; pouch of Douglas (posterior peritoneum) entered.
- Clamping of ligaments (in sequence):
- Uterosacral and cardinal ligaments (Mackenrodt ligaments) - clamped, cut, ligated bilaterally. These are the most important supports. The pedicles are later incorporated into the vault repair.
- Broad ligament / uterine vessels - clamped, cut, ligated.
- Cornual pedicles (round ligament, tube and ovarian ligament or infundibulopelvic ligament if oophorectomy required).
- Uterus delivered and removed.
- Vault closure and apical support: The vaginal vault is closed, incorporating the uterosacral-cardinal ligament pedicles into the angles of the vault closure to provide apical support. This is the McCall culdoplasty technique - placing sutures through the uterosacral ligaments and posterior vaginal wall to obliterate the pouch of Douglas and elevate the vault.
- Anterior and/or posterior colporrhaphy + perineorrhaphy performed as needed.
Complications: Haemorrhage (uterine vessels, vaginal plexus), bladder injury (most common, especially anteriorly), ureteric injury, rectal injury, vault haematoma, infection, subsequent vault prolapse.
B. Manchester (Fothergill) Repair - Uterus-Preserving
Indication: Uterine descent/cervical elongation when uterus preservation is desired, and family is complete (relative - fertility may still be possible but complications exist).
Principle: Amputation of the elongated cervix + plication of the cardinal ligaments (transverse cervical/Mackenrodt) in front of the remaining cervix to elevate it + anterior colporrhaphy.
Steps:
- Anterior vaginal wall opened, bladder dissected upward.
- Cardinal (transverse cervical) ligaments identified and divided on each side.
- Cervical amputation at the level of internal os. The Sturmdorf suture is used to re-cover the raw cervical stump with vaginal skin (reduces stenosis).
- The cut ends of the cardinal ligaments are sutured together anteriorly to the residual cervical stump - this is the Fothergill stitch - providing apical elevation.
- Anterior colporrhaphy and posterior repair done as required.
Specific complications: Cervical stenosis, infertility, miscarriage in subsequent pregnancy, dystocia, inability to assess cervix on smear.
C. Sacrospinous Ligament Fixation (SSLF)
Indication: Vaginal vault prolapse (post-hysterectomy) or uterine prolapse when uterus preservation is requested (uterosacral hysteropexy variant). One of the most commonly performed vaginal apical procedures.
Principle: The vaginal vault (or posterior cervix) is attached by non-absorbable sutures to the sacrospinous ligament (usually right-sided), suspending it to this strong fibromuscular structure.
Anatomy of sacrospinous ligament (SSL): Runs from the ischial spine to the lateral sacrum and coccyx. Closely related to the pudendal nerve and vessels (in Alcock's canal just medial), inferior gluteal vessels, sciatic nerve, and hypogastric plexus. Sutures must be placed 1.5-3 cm medial to the ischial spine to avoid these structures.
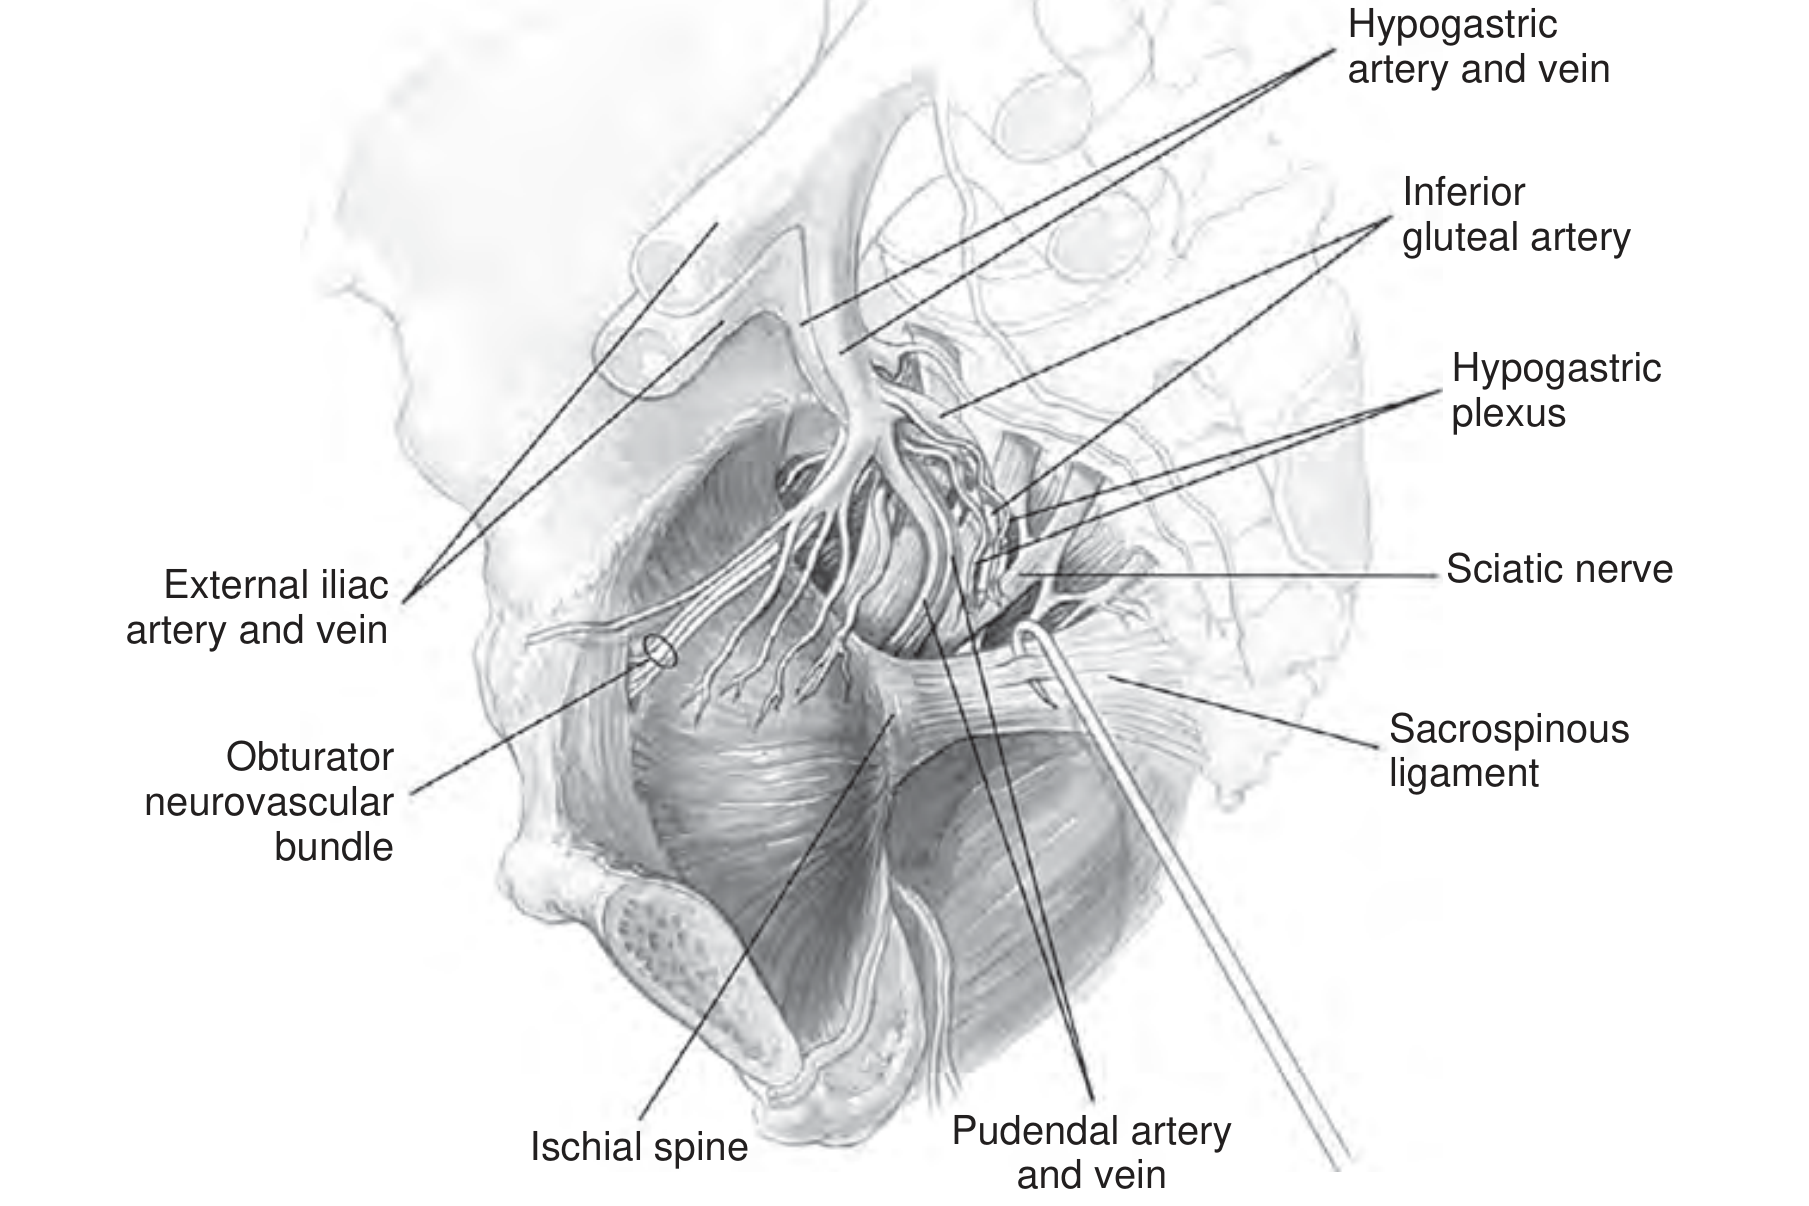
Steps:
- Midline posterior vaginal incision; enter rectovaginal space by blunt dissection, pushing rectum medially.
- Identify ischial spine; blunt dissection exposes the SSL.
- Breisky-Navratil or Heaney retractors used for exposure.
- Two non-absorbable sutures (e.g. PDS or Prolene) placed through the SSL approximately 1.5-2 fingerbreadths medial to the ischial spine - using a Capio suture device, Miyazaki hook, or Deschamps ligature carrier.
- Sutures brought through the vaginal vault and tied, pulling the vault to the ligament ("pulley sutures" - delayed tying until other repairs complete).
- Concomitant anterior and posterior colporrhaphy performed if needed.
Results: Apical success ~90-96%, but anterior wall failure (recurrence of cystocele) is the most common problem (~12-16%) due to the posterior and rightward deflection of the vaginal axis.
Complications: Buttock/perineal pain (most common - usually resolves within 3 months due to gluteal nerve/inferior gluteal vessel proximity), haemorrhage from pudendal vessels, sciatic nerve injury, rectal injury, dyspareunia, vaginal axis deflection posteriorly.
D. Uterosacral Ligament Suspension (High Uterosacral Colpopexy)
Indication: Vaginal vault prolapse or apical prolapse, vaginal or laparoscopic approach.
Principle: Vault sutured to remnants of the uterosacral ligaments bilaterally at the level of the ischial spine, restoring the normal horizontal vaginal axis (unlike SSLF which creates a posterior deflection).
Steps (vaginal approach):
- Vaginal vault opened; peritoneum of pouch of Douglas entered.
- Uterosacral ligaments identified on each side at the level of the ischial spine.
- Permanent or delayed-absorbable sutures (2-3 per side) placed through uterosacral ligaments.
- Sutures attached to the full thickness of the vaginal vault bilaterally.
- Culdoplasty (McCall) performed to close the cul-de-sac.
- Peritoneum closed; vault suspended.
Key risk: Ureteric kinking/injury (up to 11% ureteric obstruction rate); cystoscopy with indigo carmine dye is mandatory at the end of the procedure to confirm ureteric patency.
E. Sacrocolpopexy (Abdominal/Laparoscopic/Robotic)
The gold standard for vault prolapse, with best long-term anatomical results.
Indication: Vaginal vault prolapse (post-hysterectomy), Stage III-IV prolapse, failed prior vaginal repairs, young sexually active patients where durability is important.
Principle: A Y-shaped polypropylene mesh bridges the vaginal vault to the sacral promontory (S1/S2), providing durable apical suspension along the vaginal axis.
Steps (laparoscopic / robotic - same principle as open):
- Patient in Trendelenburg; bowel retracted.
- Retroperitoneal dissection to expose the sacral promontory (S1 level). Identify right ureter, middle sacral artery and vein.
- Dissect vesicovaginal space anteriorly (between bladder and vagina) and rectovaginal space posteriorly.
- Y-mesh: anterior arm sutured to anterior vaginal wall (2-3 cm below vault), posterior arm to posterior vaginal wall, trunk to the sacral promontory with permanent sutures (Prolene) or bone anchors.
- Peritoneum closed over the mesh (retroperitonealise) to prevent bowel adhesions.
- Concomitant Burch colposuspension or mid-urethral sling can be added for stress incontinence.
Results: Anatomical success ~95% at 5 years; superior to SSLF for anterior compartment support (avoids anterior wall recurrence). Long-term durability well documented.
Complications: Mesh erosion into vagina (~3-5%), mesh infection, haemorrhage from middle sacral vessels (life-threatening), L5 osteomyelitis (rare), bowel obstruction, ileus, ureteric injury, de novo SUI after vault elevation.
F. Sacrohysteropexy (Uterus-Preserving Abdominal Approach)
Same as sacrocolpopexy but the uterus is retained. Mesh attached to the posterior cervix and carried up to the sacral promontory. Laparoscopic approach (laparoscopic sacrohysteropexy) is increasingly performed with good results and avoids the complications of hysterectomy.
3. Posterior Compartment - Posterior Colporrhaphy + Perineorrhaphy
Indication: Rectocele, enterocele, deficient perineum.
Steps:
- Allis forceps applied to posterior fourchette; triangular skin incision on perineum.
- Midline vertical incision up the posterior vaginal wall to the vaginal apex.
- Vaginal skin dissected laterally off the rectovaginal fascia.
- Enterocele sac (if present) identified, opened, hernial sac contents reduced, neck ligated with a purse-string suture, sac excised.
- Levator ani muscles approximated in the midline with interrupted absorbable sutures (levatorplasty) - note: over-aggressive levatorplasty causes dyspareunia.
- Pubocervical / rectovaginal fascia plicated in the midline over the rectum.
- Excess vaginal skin trimmed.
- Perineal body reconstructed (perineorrhaphy) using interrupted sutures to rebuild the perineal body.
- Vaginal skin and perineal skin closed.
Complications: Haemorrhage, rectal injury, dyspareunia (most significant long-term complaint, especially if over-zealous levatorplasty), recurrence.
4. Obliterative Procedures - Colpocleisis (Le Fort's Procedure)
Indication: Elderly or medically unfit women with complete prolapse (procidentia) who no longer wish to have sexual intercourse. Offers the highest success rates with the lowest surgical morbidity.
Principle: The anterior and posterior vaginal walls are sutured together, obliterating the vaginal canal. The uterus (if present) remains inside; tunnels are left laterally for uterine drainage.
Steps (Le Fort partial colpocleisis):
- Rectangular strips of vaginal epithelium removed from anterior and posterior vaginal walls.
- Denuded anterior and posterior surfaces approximated with interrupted absorbable sutures, effectively closing off the vaginal canal while leaving lateral drainage channels for any cervical/uterine discharge.
- Perineorrhaphy performed.
Results: Recurrence rate <5%; very high patient satisfaction. Cannot be reversed. Requires exclusion of cervical/endometrial malignancy first.
Contraindication: Any woman who may wish to have penetrative intercourse in the future.
5. Mesh Considerations
Mesh augmentation (transvaginal mesh kits) was widely used in the 2000s but has been restricted in the UK, Australia, and many other countries due to significant adverse events:
- Chronic pelvic/vaginal/buttock pain
- Mesh erosion into vagina or bladder/rectum
- Dyspareunia
- Recurrent UTI and voiding dysfunction
Current guidelines require MDT assessment, detailed counselling, and specialist centre referral before any mesh-based prolapse repair. Sacrocolpopexy (abdominal mesh) remains acceptable under these conditions, while transvaginal mesh kits are largely abandoned.
6. Choice of Procedure - Summary
| Patient Profile | Preferred Operation |
|---|---|
| Uterine prolapse, family complete | Vaginal hysterectomy + McCall culdoplasty + anterior/posterior repair |
| Uterine prolapse, wishes uterus retained | Manchester repair OR laparoscopic sacrohysteropexy |
| Vault prolapse (post-hysterectomy), vaginal approach | SSLF or uterosacral ligament suspension |
| Vault prolapse, young/active patient | Laparoscopic sacrocolpopexy |
| Elderly, medically unfit, procidentia | Colpocleisis (Le Fort) |
| Isolated cystocele | Anterior colporrhaphy |
| Isolated rectocele | Posterior colporrhaphy + perineorrhaphy |
Recurrence rate across all prolapse surgeries is approximately 30% lifetime, increasing with subsequent procedures. - Bailey & Love's Short Practice of Surgery, 28th Ed., p. 1612; Campbell-Walsh-Wein Urology, pp. 3693-3696
Explain in detail Manchester procedure
The Manchester (Fothergill) repair is a uterus-preserving vaginal operation for uterine prolapse, mainly due to cervical elongation, involving cervical amputation and cardinal ligament plication. It is still performed today especially in women who want to retain their uterus.
Searching sources...
Finding Sources
Finding Sources
Searching the Web
Manchester Fothergill procedure uterovaginal prolapse surgical steps technique details
Finding Sources
Finding Sources
Reading Web Page
https://irispublishers.com/aun/fulltext/manchester-repair-as…
Reading Web Page
https://www.slideshare.net/slideshow/manchester-repair/23654…
Finding Sources
Finding Sources
Finding Sources
Finding Sources
Finding Sources
Searching the Web
Manchester repair Sturmdorf suture Fothergill stitch steps prolapse anatomy uterosacral cardinal ligament
Reading Web Page
https://atlasofpelvicsurgery.org/5Uterus/8ManchesterOperatio…
Excellent - I now have thorough detail from multiple authoritative sources. Let me compile the comprehensive answer.
The Manchester (Fothergill) Repair - Detailed Account
History
The operation was originally devised by Dr Archibald Donald of Manchester in 1888 - hence the name "Manchester repair." It was later refined and popularised by Dr William Edebohls Fothergill, who added the critical step of plicating the cardinal (Mackenrodt's) ligaments in front of the cervical stump - the "Fothergill stitch" - giving the operation its dual name: Manchester-Fothergill repair.
What the Operation Does (Principle)
Three anatomical corrections are achieved simultaneously:
- Cervical amputation - removes the elongated descending cervix
- Cardinal ligament plication (Fothergill stitch) - shortens and reattaches the Mackenrodt/cardinal ligaments to the anterior surface of the cervical stump, elevating and retroverting the uterus into the pelvis
- Anterior colporrhaphy + posterior colpoperineorrhaphy - repairs the associated cystocele and rectocele
The physiological result is a change in the axis of the uterus - the cardinal and uterosacral ligaments brought anteriorly displace the lower uterine segment posteriorly, rotating the fundus back into an anteverted position within the pelvis and reducing the prolapse.
Crucially, the peritoneal cavity is NOT entered - this reduces morbidity and operating time compared to vaginal hysterectomy.
Indications
- Uterine prolapse with cervical elongation - the classic and best indication. The cervix is elongated but the uterine body has not descended much. The uterine sound on D&C will show the elongated canal.
- Desire to preserve the uterus - women who want to retain the uterus but whose family is complete (relative - see below)
- Preservation of reproductive function - in carefully selected younger women (though with significant obstetric caveats)
- Elderly or unfit patients - the procedure avoids entering the peritoneal cavity, making it suitable for those not fit for hysterectomy
Contraindications
- Cervical or endometrial pathology (must be excluded preoperatively with colposcopy and endometrial sampling/hysteroscopy)
- Active cervical or pelvic infection
- Uterine body prolapse without cervical elongation (here vaginal hysterectomy is better)
- Undiagnosed uterine bleeding
- Severe cystocele or enterocele that cannot be corrected concomitantly
Pre-operative Assessment
- Full pelvic examination with POP-Q staging
- Cervical smear / colposcopy - mandatory to exclude cervical dysplasia/malignancy
- Endometrial sampling / hysteroscopy - to exclude endometrial pathology
- Uterine sound to measure the degree of cervical elongation
- Urodynamic studies if urinary symptoms coexist
- Thromboprophylaxis planning
- Bowel preparation (optional, centre-dependent)
Composite Steps of the Manchester Repair
The operation has 5 principal steps, performed in the following sequence:
Step 1 - Preliminary Dilatation and Curettage (D&C)
Why it is done:
- The uterine sound gives accurate measurement of the degree of cervical elongation (length of cervical canal vs. total uterine length)
- Dilatation of the cervical canal facilitates passage of sutures through the canal later during the Sturmdorf/Bonney covering step
- Ensures adequate uterine drainage post-operatively and reduces risk of cervical stenosis
- Curettage provides endometrial tissue for histology - excludes malignancy
Technique: Standard dilatation of the external os using Hegar's dilators up to size 8-10, followed by systematic curettage of the uterine cavity.
Step 2 - Amputation of the Cervix
This is the central and most technically demanding step.
Position: Lithotomy. Catheter in situ. Cervix grasped with a Vulsellum (two-toothed) forceps.
Incision and bladder mobilisation:
- Anterior and posterior vaginal incisions are made circumferentially around the cervix at the cervicovaginal junction.
- The bladder is pushed superiorly off the anterior cervix using sharp/blunt dissection (identify the "tent of tissue" anteriorly and incise into the vesicovaginal space). A right-angle Heaney retractor elevates the bladder and ureter out of the field throughout.
- Posteriorly, the posterior cul-de-sac is explored digitally to ensure no bowel has prolapsed into it.
Ligament division:
- The cervix is deviated to one side; the uterosacral and cardinal ligaments are identified laterally on each side.
- Each uterosacral ligament is clamped with a Heaney clamp placed immediately adjacent to the lower uterine segment (the clamp should grasp a small portion of the lower uterine segment), then incised and ligated with No. 1 or 2-0 synthetic absorbable suture (e.g. Vicryl). This is done bilaterally.
- Similarly, a small section of the cardinal ligament on each side is clamped, incised, and tied.
- Any enterocele sac found in the pouch of Douglas is identified, reduced, and repaired with a purse-string suture at this point before proceeding.
Cervical amputation:
- With the bladder elevated anteriorly and rectum depressed posteriorly, the cervix is amputated at the level of the internal os / lower uterine segment using a scalpel.
- The incision is deliberately angulated (wedge-shaped / bevelled) rather than a straight horizontal cut. The anterior cut is made slightly higher than the posterior - this creates a "wedge" shape that makes it easier to cover the raw cervical stump with vaginal mucosa anteriorly.
- The amputated cervix (specimen) is sent for histology.
- The anterior lip of the remaining cervical stump is held with a single-toothed Vulsellum.
Step 3 - Covering the Amputated Cervix
The raw cervical stump must be covered with vaginal epithelium to prevent raw surfaces, haemorrhage, stenosis, and scarring. Two classical methods are used:
Method A - Sturmdorf Suture (most common)
A figure-of-8 or purse-string type suture:
- A suture (chromic catgut or Vicryl) is placed through the anterior vaginal flap near its apex.
- The needle is then passed through the cervical canal from outside inwards, and brought out again laterally.
- When tied, this pulls the vaginal mucosa flap over and into the cervical canal, neatly covering the raw stump.
- The same is done for the posterior vaginal flap.
- The result is that both flaps cover the raw cervical stump on anterior and posterior surfaces, with the canal visible in the middle.
Method B - Bonney's Method
- A catgut stitch is fixed at the apex of the posterior vaginal flap.
- The two ends of the suture are passed through the cervical canal and brought out laterally on either side of the new posterior fornix.
- The ends are tied in the midline, drawing the posterior vaginal flap over the cervical stump.
Step 4 - Plication of Mackenrodt's (Cardinal) Ligaments - The Fothergill Stitch
This is Fothergill's essential contribution and the step that makes this operation effective for apical support.
Anatomy relevant here: The cardinal (Mackenrodt/transverse cervical) ligaments are the primary condensations of parametrial connective tissue running from the cervix and upper vagina laterally to the pelvic sidewall. Together with the uterosacral ligaments, they form the main uterine supports (Level I support of DeLancey).
Technique - Fothergill's Stitch:
The suture passes through the following tissues in sequence:
- Vaginal skin at the lateral "Fothergill point" (lateral margin of anterior vaginal incision)
- Through the Mackenrodt / cardinal ligament on that side
- Through the cervical tissue from outside inwards (from the lateral surface into the cervical canal)
- Through the cervical tissue from inside outwards on the other side
- Through the Mackenrodt / cardinal ligament of the opposite side
- Through the vaginal skin at the Fothergill lateral point of the opposite side
- Tied firmly
Effect: This suture pulls the two cardinal ligaments together across the anterior surface of the cervical stump (and anterior lower uterine segment), shortening them, pushing the lower uterine segment posteriorly, and thereby antevert and elevate the uterus back into the pelvis. This corrects the apical prolapse and restores the uterovaginal axis.
Alternatively (or additionally), the cardinal and uterosacral ligaments can be sutured with interrupted No. 1 absorbable sutures to the anterior surface of the lower uterine segment, overlapping from right and left sides.
The pubocervical fascia is then approximated in the midline as part of the anterior colporrhaphy.
Step 5 - Anterior Colporrhaphy and Posterior Colpoperineorrhaphy
These steps address the associated cystocele and rectocele/deficient perineum (always performed as part of the Manchester repair):
Anterior colporrhaphy:
- The redundant vaginal mucosa on the anterior wall is now trimmed.
- The cut margins of the vagina are approximated with interrupted or continuous absorbable sutures.
- The pubocervical fascia has already been plicated (Step 4), reinforcing the bladder base.
Posterior colpoperineorrhaphy:
- A posterior vaginal incision is made.
- The rectovaginal fascia is plicated.
- Levatorplasty if needed (judicious - over-tightening causes dyspareunia).
- Perineal body reconstructed.
- Vaginal skin and perineum closed.
Completion:
- Vaginal vault inspected for haemostasis.
- Vaginal pack (ribbon gauze soaked in antiseptic) inserted for 24-48 hours.
- Catheter left in for 24-48 hours post-operatively.
Summary of Operative Sequence
1. D&C (uterine sound → cervical dilatation → endometrial curettage)
     ↓
2. Circumferential vaginal incision at cervicovaginal junction
   - Bladder pushed up anteriorly
   - Check for enterocele posteriorly (repair if found)
   - Bilateral uterosacral + cardinal ligament clamping, division, ligation
     ↓
3. Cervical amputation at internal os (bevelled/wedge cut)
   - Specimen to histology
     ↓
4. Cover cervical stump (Sturmdorf suture or Bonney's method)
     ↓
5. Fothergill stitch: bilateral cardinal ligaments plicated
   anteriorly over cervical stump → uterus anteverted + elevated
     ↓
6. Anterior colporrhaphy (pubocervical fascia plication, trim vaginal skin)
     ↓
7. Posterior colpoperineorrhaphy + perineorrhaphy
     ↓
8. Vaginal pack + catheter
Complications
Intraoperative
- Haemorrhage - from the paracervical venous plexus or uterine vessels; vaginal packing usually controls it
- Bladder injury - if the vesicovaginal plane is not carefully developed; risk highest anteriorly when mobilising the bladder off the cervix
- Ureteric injury - if the clamp on the cardinal ligament is placed too high; the ureter lies ~1.5 cm lateral to the cervix and may be caught
- Rectal injury - rare, during posterior dissection
Post-operative (early)
- Haemorrhage / vault haematoma
- Urinary retention (requires catheterisation)
- Urinary tract infection
- Wound infection / dehiscence
- Deep vein thrombosis
Post-operative (late)
- Cervical stenosis (at the external os) - leads to haematometra / pyometra. The preliminary dilatation is done specifically to reduce this risk.
- Dyspareunia - from vaginal narrowing, especially if over-zealous colporrhaphy
- Recurrence of prolapse (~4-7% at apex, which is actually lower than vaginal hysterectomy)
- Residual/de novo stress urinary incontinence - unmasked after anterior repair; Kelly plication can be added at the time of operation if needed
- Failure to conceive / infertility - from cervical stenosis blocking sperm passage
- Miscarriage - cervical incompetence due to shortened cervical length
- Preterm labour / dystocia - from reduced cervical length and rigidity of the scarred cervix
- Difficulty taking smears - from cervical stenosis; these patients require endocervical cytology
Comparison with Vaginal Hysterectomy
| Feature | Manchester Repair | Vaginal Hysterectomy |
|---|---|---|
| Peritoneal entry | No | Yes |
| Operating time | Shorter | Longer |
| Uterus retained | Yes | No |
| Future pregnancy | Possible (with risk) | Not possible |
| Vault prolapse risk | Lower (uterosacral support retained) | Higher (~10-15%) |
| Cervical cancer risk | Remains (needs surveillance) | Eliminated |
| Endometrial cancer risk | Remains | Eliminated |
| Apical recurrence | ~4-7% | ~4-7% |
| Best for | Cervical elongation | True uterine descent |
Studies (Tolstrup et al.) show that anatomical recurrence is comparable between the two procedures, with the Manchester repair having equal or lower recurrence at the apex.
Post-operative Care
- Vaginal pack removed at 24-48 hours
- Catheter removed at 24-48 hours; trial of void
- Mobilise early; VTE prophylaxis (LMWH + TED stockings)
- Topical oestrogen cream post-operatively aids healing (especially peri/post-menopausal women)
- Avoid intercourse for 6-8 weeks
- Avoid heavy lifting for 3 months
- Cervical surveillance (smears) must continue as per national schedule
Sources: Atlas of Pelvic Surgery (atlasofpelvicsurgery.org); Bailey & Love's Short Practice of Surgery, 28th Ed., p. 1612; Iris Publishers - Manchester Repair Review; NFOG Manchester-Fothergill vs. Vaginal Hysterectomy Analysis; BSUG Patient Information Leaflet
This is a shared conversation. Sign in to Orris to start your own chat.