
Give me a very detailed well explained contents for the topic EPITHELIAL TISSUED
Reading File
Now let me search the medical library for comprehensive content on epithelial tissue.
Finding Sources
Finding Sources
Excellent! I found content in both Junqueira's Basic Histology and the Histology Text & Atlas. Let me read both sources in parallel.
Reading File
Reading File
Let me now read the main body of the Junqueira's chapter on epithelial tissue and the classification section from the Histology atlas.
Reading File
Reading File
Excellent content. Let me read more detailed sections on junctions, basement membranes, glands, and apical specializations.
Reading File
Reading File
Now let me read the sections on types of epithelia, glands, transport, and renewal.
Reading File
Reading File
Now let me read the summary/key points and the sections on transport and renewal of epithelial cells.
Reading File
I now have comprehensive content from Junqueira's Basic Histology (17e) to build a detailed, well-organized answer. Let me also fetch a couple of key diagrams to include.
Loading Image
Loading Image
I now have rich content from Junqueira's Basic Histology (17th edition) and the Histology Text & Atlas. Let me compose the full detailed answer.
EPITHELIAL TISSUE - Detailed & Comprehensive Notes
Sources: Junqueira's Basic Histology: Text and Atlas, 17e | Histology: A Text and Atlas with Correlated Cell and Molecular Biology
1. INTRODUCTION & DEFINITION
Epithelial tissues are composed of closely aggregated polyhedral cells that adhere strongly to one another and to a thin layer of extracellular matrix (ECM), forming cellular sheets. The word "epithelia" derives from the Greek epi (upon) + thele (nipple).
These sheets line the cavities of organs, cover the body surface, and form the parenchyma of glands. A defining characteristic is that all substances entering or leaving an organ must cross this tissue.
Epithelial cells are distinguished by:
- Close cell apposition with very little intercellular substance
- Location at a free surface (external or internal)
- Resting on a basal lamina
- Absence of internal blood vessels (avascular) - nutrients diffuse from underlying connective tissue
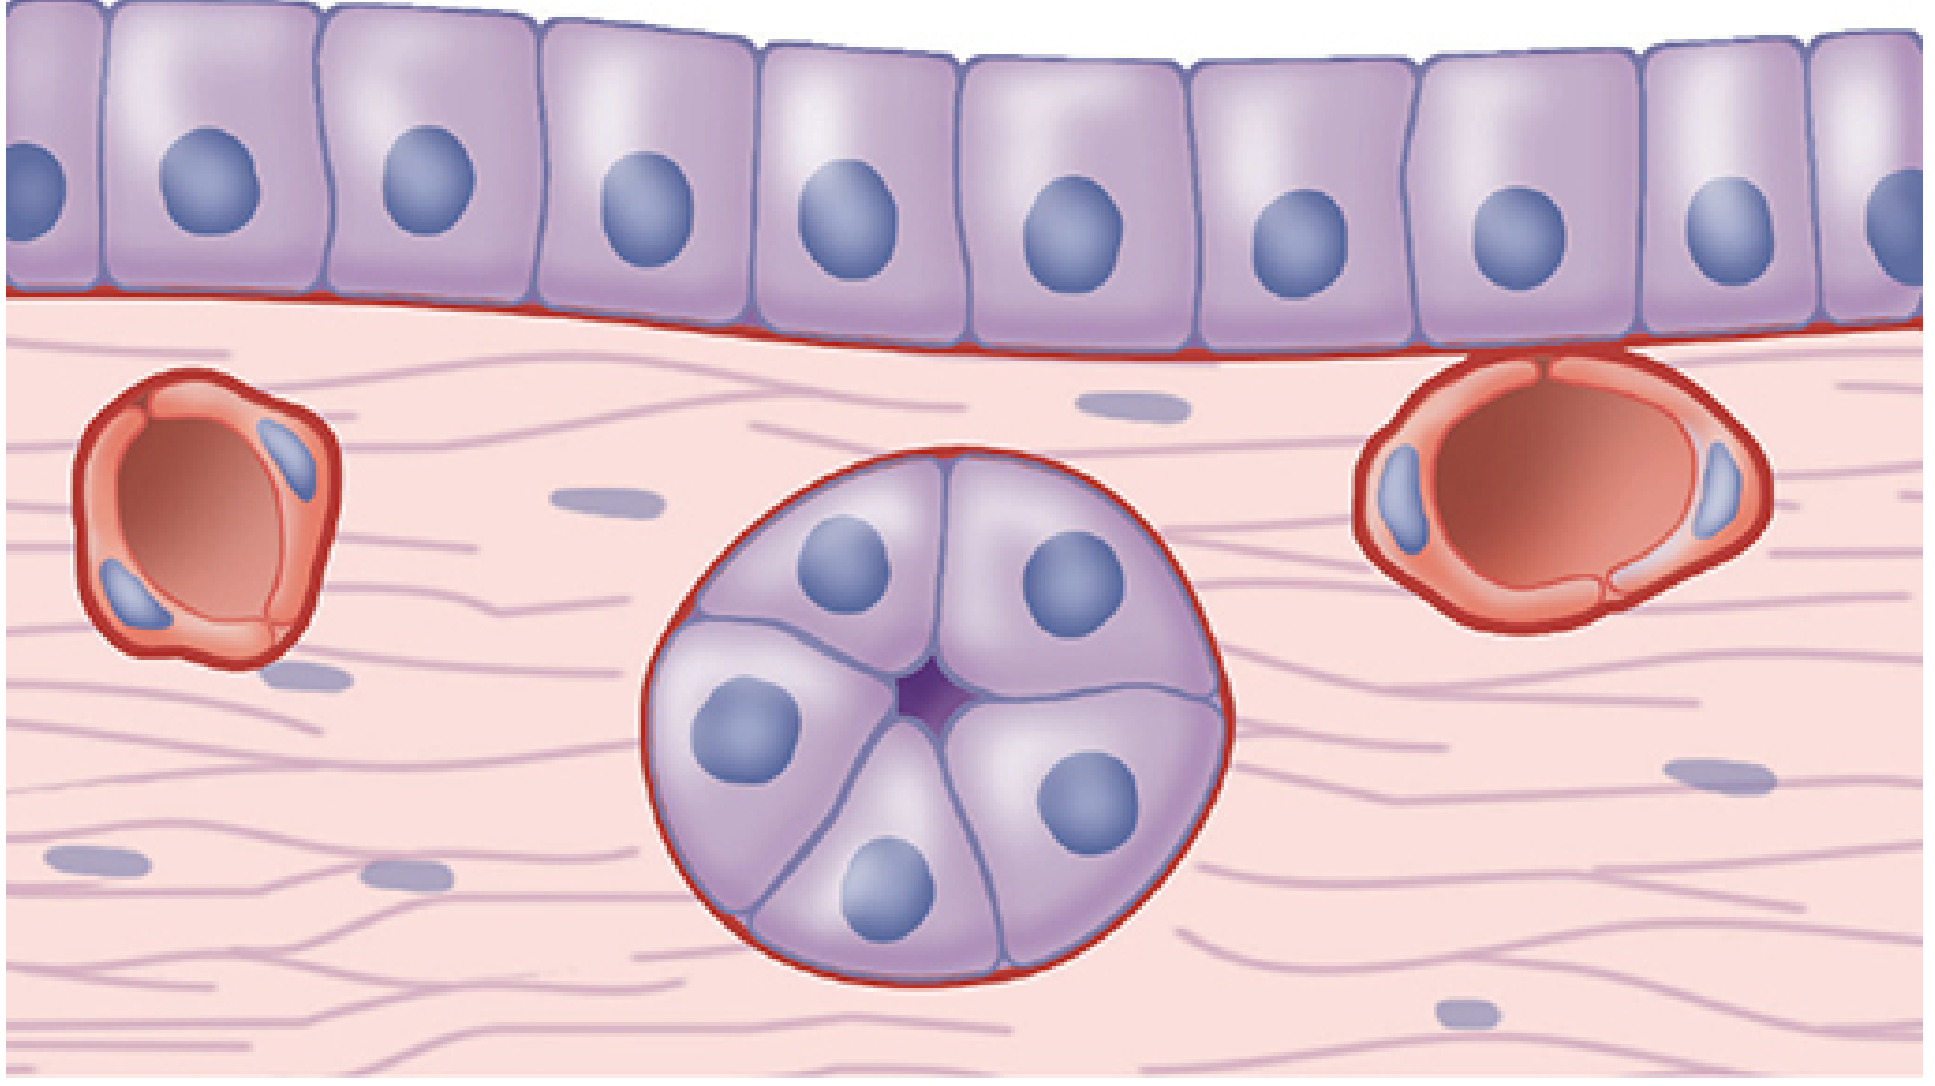
Figure: Cuboidal epithelial cells (above) resting on the basement membrane (red line), separated from the underlying connective tissue containing blood vessels. - Junqueira's Basic Histology, 17e
2. EMBRYONIC ORIGIN
Epithelial tissues arise from all three embryonic germ layers:
| Germ Layer | Epithelial Derivatives |
|---|---|
| Ectoderm (surface) | Epidermis, corneal & lens epithelia, enamel of teeth, oral mucosa, lower anal canal, adenohypophysis, inner ear |
| Neuroectoderm | Neural tube, neural crest derivatives |
| Mesoderm | Mesothelium (lining body cavities), endothelium of blood & lymph vessels, kidneys, gonads, adrenal cortex |
| Endoderm | Alimentary canal epithelium, respiratory tract, most of GI glands, liver, pancreas, urinary bladder |
3. FUNCTIONS OF EPITHELIAL TISSUE
- Covering, lining, and protecting surfaces - e.g., epidermis protects against dehydration and microbial invasion
- Absorption - e.g., intestinal lining absorbs digested nutrients
- Secretion - e.g., parenchymal cells of exocrine and endocrine glands
- Selective permeability/barrier - controls passage of substances between body compartments
- Sensory reception - specialized epithelial cells form taste buds and olfactory epithelium
- Contractile function - myoepithelial cells (found in salivary and mammary glands) can contract to help expel secretions
- Ion and water transport - e.g., renal tubular epithelium regulates salt and water balance
4. CHARACTERISTIC FEATURES OF EPITHELIAL CELLS
4.1 Cell Polarity
Epithelial cells are structurally and functionally polarized, meaning the apical surface (facing the lumen/free surface) differs markedly from the basolateral surface (facing the basement membrane and neighboring cells).
- Apical domain: faces external environment or internal lumen; bears specializations (microvilli, stereocilia, cilia)
- Lateral domain: communicates and adheres to adjacent cells via junctions
- Basal domain: attaches to the basement membrane; involved in anchoring and transport
4.2 Cell Shape and Nuclear Morphology
The shape and density of stained nuclei help indicate cell shape and density in routine light microscopy (lipid-rich cell membranes are often indistinguishable). Nuclear shape correlates with cell shape:
| Cell Shape | Nuclear Shape | Example |
|---|---|---|
| Columnar | Elongated/oval | Intestinal absorptive cells |
| Cuboidal | Spherical | Renal tubular cells |
| Squamous | Flattened | Alveolar type I cells, endothelium |
4.3 Avascularity
Epithelia are avascular - they contain no blood vessels. Nutrients and O₂ must diffuse across the basement membrane from the underlying connective tissue (lamina propria in digestive, respiratory, and urinary organs). However, nerve fibers do penetrate epithelia.
5. BASEMENT MEMBRANE
The basement membrane lies at the interface between the epithelium and the underlying connective tissue and is always present beneath epithelial sheets.
Structure
By electron microscopy, it consists of two layers:
A. Basal Lamina (produced by epithelial cells themselves)
- ~20-100 nm thick
- Contains: Type IV collagen (self-assembles into a two-dimensional mesh network), laminins (large glycoproteins that attach to transmembrane integrins in the basal cell membrane), nidogen (a short rod-like protein) and perlecan (a heparan sulfate proteoglycan) which cross-link laminins to the type IV collagen network
- Hemidesmosomes on the basal cell membrane anchor the epithelium to the basal lamina
B. Reticular Lamina (produced by fibroblasts of connective tissue)
- Contains type III collagen (reticular fibers)
- Anchored to the basal lamina by type VII collagen anchoring fibrils
- More diffuse and thicker than the basal lamina
Functions of the Basement Membrane
- Structural support - mechanically supports epithelial cells
- Attachment - anchors epithelium to connective tissue
- Semipermeable filter - regulates which molecules pass between epithelium and connective tissue (its perlecan component determines pore size/porosity)
- Cell polarity - organizes integrins and other plasma membrane proteins; maintains apical-basal polarity
- Signal transduction scaffold - mediates cell-to-cell interactions and localizes signaling events
- Regeneration scaffold - guides epithelial repair and regeneration after injury
- Migration route - marks paths for cell migration during development and wound healing
Note: Similar "external laminae" with comparable composition surround muscle cells, peripheral nerves, and fat-storing cells - where they act as semipermeable barriers.
6. INTERCELLULAR JUNCTIONS
Epithelial cells adhere strongly to neighboring cells via several types of membrane-associated junctions. These are especially prominent in epithelia subject to friction or mechanical forces.
6.1 Tight Junctions (Zonula Occludens)
- Most apically located junction in the junctional complex
- Form a belt completely encircling each cell
- Created by transmembrane proteins (claudins and occludins) that physically contact and seal off intercellular spaces
- Function: Create a barrier that prevents paracellular diffusion of ions and molecules between the apical and basolateral compartments - essential for maintaining epithelial polarity
- Also serve as a "fence" that restricts lateral diffusion of lipids and proteins between apical and basolateral membrane domains
6.2 Adherens Junctions (Zonula Adherens)
- Located just basal to tight junctions; form a belt around the cell
- Transmembrane proteins (cadherins) link to the actin cytoskeleton inside the cell via catenins
- Function: Strong mechanical adhesion between adjacent cells; also involved in signaling pathways that regulate cell proliferation and differentiation
- In light microscopy, the region of tight + adherens junctions appears as the "terminal bar"
6.3 Desmosomes (Macula Adherens)
- Disc-shaped or spot-like junctions; do not form continuous belts
- Transmembrane proteins (desmogleins, desmocollins - members of the cadherin family) are anchored intracellularly to intermediate filaments (keratin tonofilaments) via desmoplakin and plakophilin
- Function: Resist mechanical stress by distributing tensile forces across the cytoskeleton network; especially abundant in skin, cardiac muscle, and cervix
- Clinical relevance: Autoantibodies against desmogleins cause pemphigus vulgaris, a blistering skin disease
6.4 Gap Junctions (Nexus)
- Formed by transmembrane protein complexes called connexins that form hexameric channels (connexons); connexons from adjacent cells align to form a pore ~1.5 nm in diameter
- Function: Allow direct passage of small molecules and ions (up to ~1 kDa) between adjacent cells - enable electrical and metabolic coupling (important in cardiac epithelium and smooth muscle coordination)
6.5 Hemidesmosomes
- Located on the basal cell membrane
- Structurally similar to half-desmosomes; use integrin proteins (not cadherins) to anchor keratin intermediate filaments to the basal lamina
- Function: Attach the basal cell surface to the basement membrane, resisting delamination
The Junctional Complex
In many simple columnar epithelia (e.g., intestine), the most apical three junctions - tight junction + adherens junction + desmosome - are arranged consecutively and are collectively called the junctional complex (or terminal bar in light microscopy).
7. SPECIALIZATIONS OF THE APICAL CELL SURFACE
7.1 Microvilli
- Short, finger-like cytoplasmic projections, ~1 μm tall and ~0.1 μm wide
- Supported internally by a core of actin microfilaments connected to the membrane by myosin I and ezrin; the actin filaments terminate in a dense horizontal meshwork called the terminal web
- When very densely packed and regular (as in intestinal absorptive cells and renal proximal tubule), they form a brush border or striated border
- Function: Dramatically increase apical surface area for absorption and secretion - a single intestinal cell may have ~3,000 microvilli, increasing surface area ~20-fold
- The glycocalyx coating microvilli contains digestive enzymes (e.g., lactase, sucrase) and other receptors
7.2 Stereocilia
- Long, irregular branching microvilli-like projections (despite their misleading name, they are NOT true cilia - they contain actin, not microtubules)
- Non-motile
- Found in: epididymis (maximize surface area for sperm maturation and fluid reabsorption) and hair cells of the inner ear (mechanosensory transduction)
- Much longer than ordinary microvilli
7.3 Cilia
- Long, highly motile projections, 5-10 μm long and ~0.2 μm wide (much longer and twice as wide as typical microvilli)
- Contain an internal axoneme - a core of microtubules in the classic 9 + 2 arrangement: nine outer peripheral microtubule doublets surrounding a central pair of singlet microtubules
- Each outer doublet has a complete A-tubule and a partial B-tubule
- Ciliary movement is powered by dynein ATPase (attached to the A-tubule of each doublet), which causes doublets to slide, bending the cilium in a coordinated power stroke and recovery stroke
- Kinesin and cytoplasmic dynein motors carry components in and out of cilia (intraflagellar transport, IFT)
- At the base of each cilium is a basal body (centriole-derived) anchoring the axoneme to the apical cytoplasm
- Found in: respiratory tract epithelium, oviduct, ependyma lining brain ventricles, some renal tubules
- Function: Move fluid and particles along epithelial surfaces (mucociliary clearance in the respiratory tract; propulsion of ovum in the oviduct)
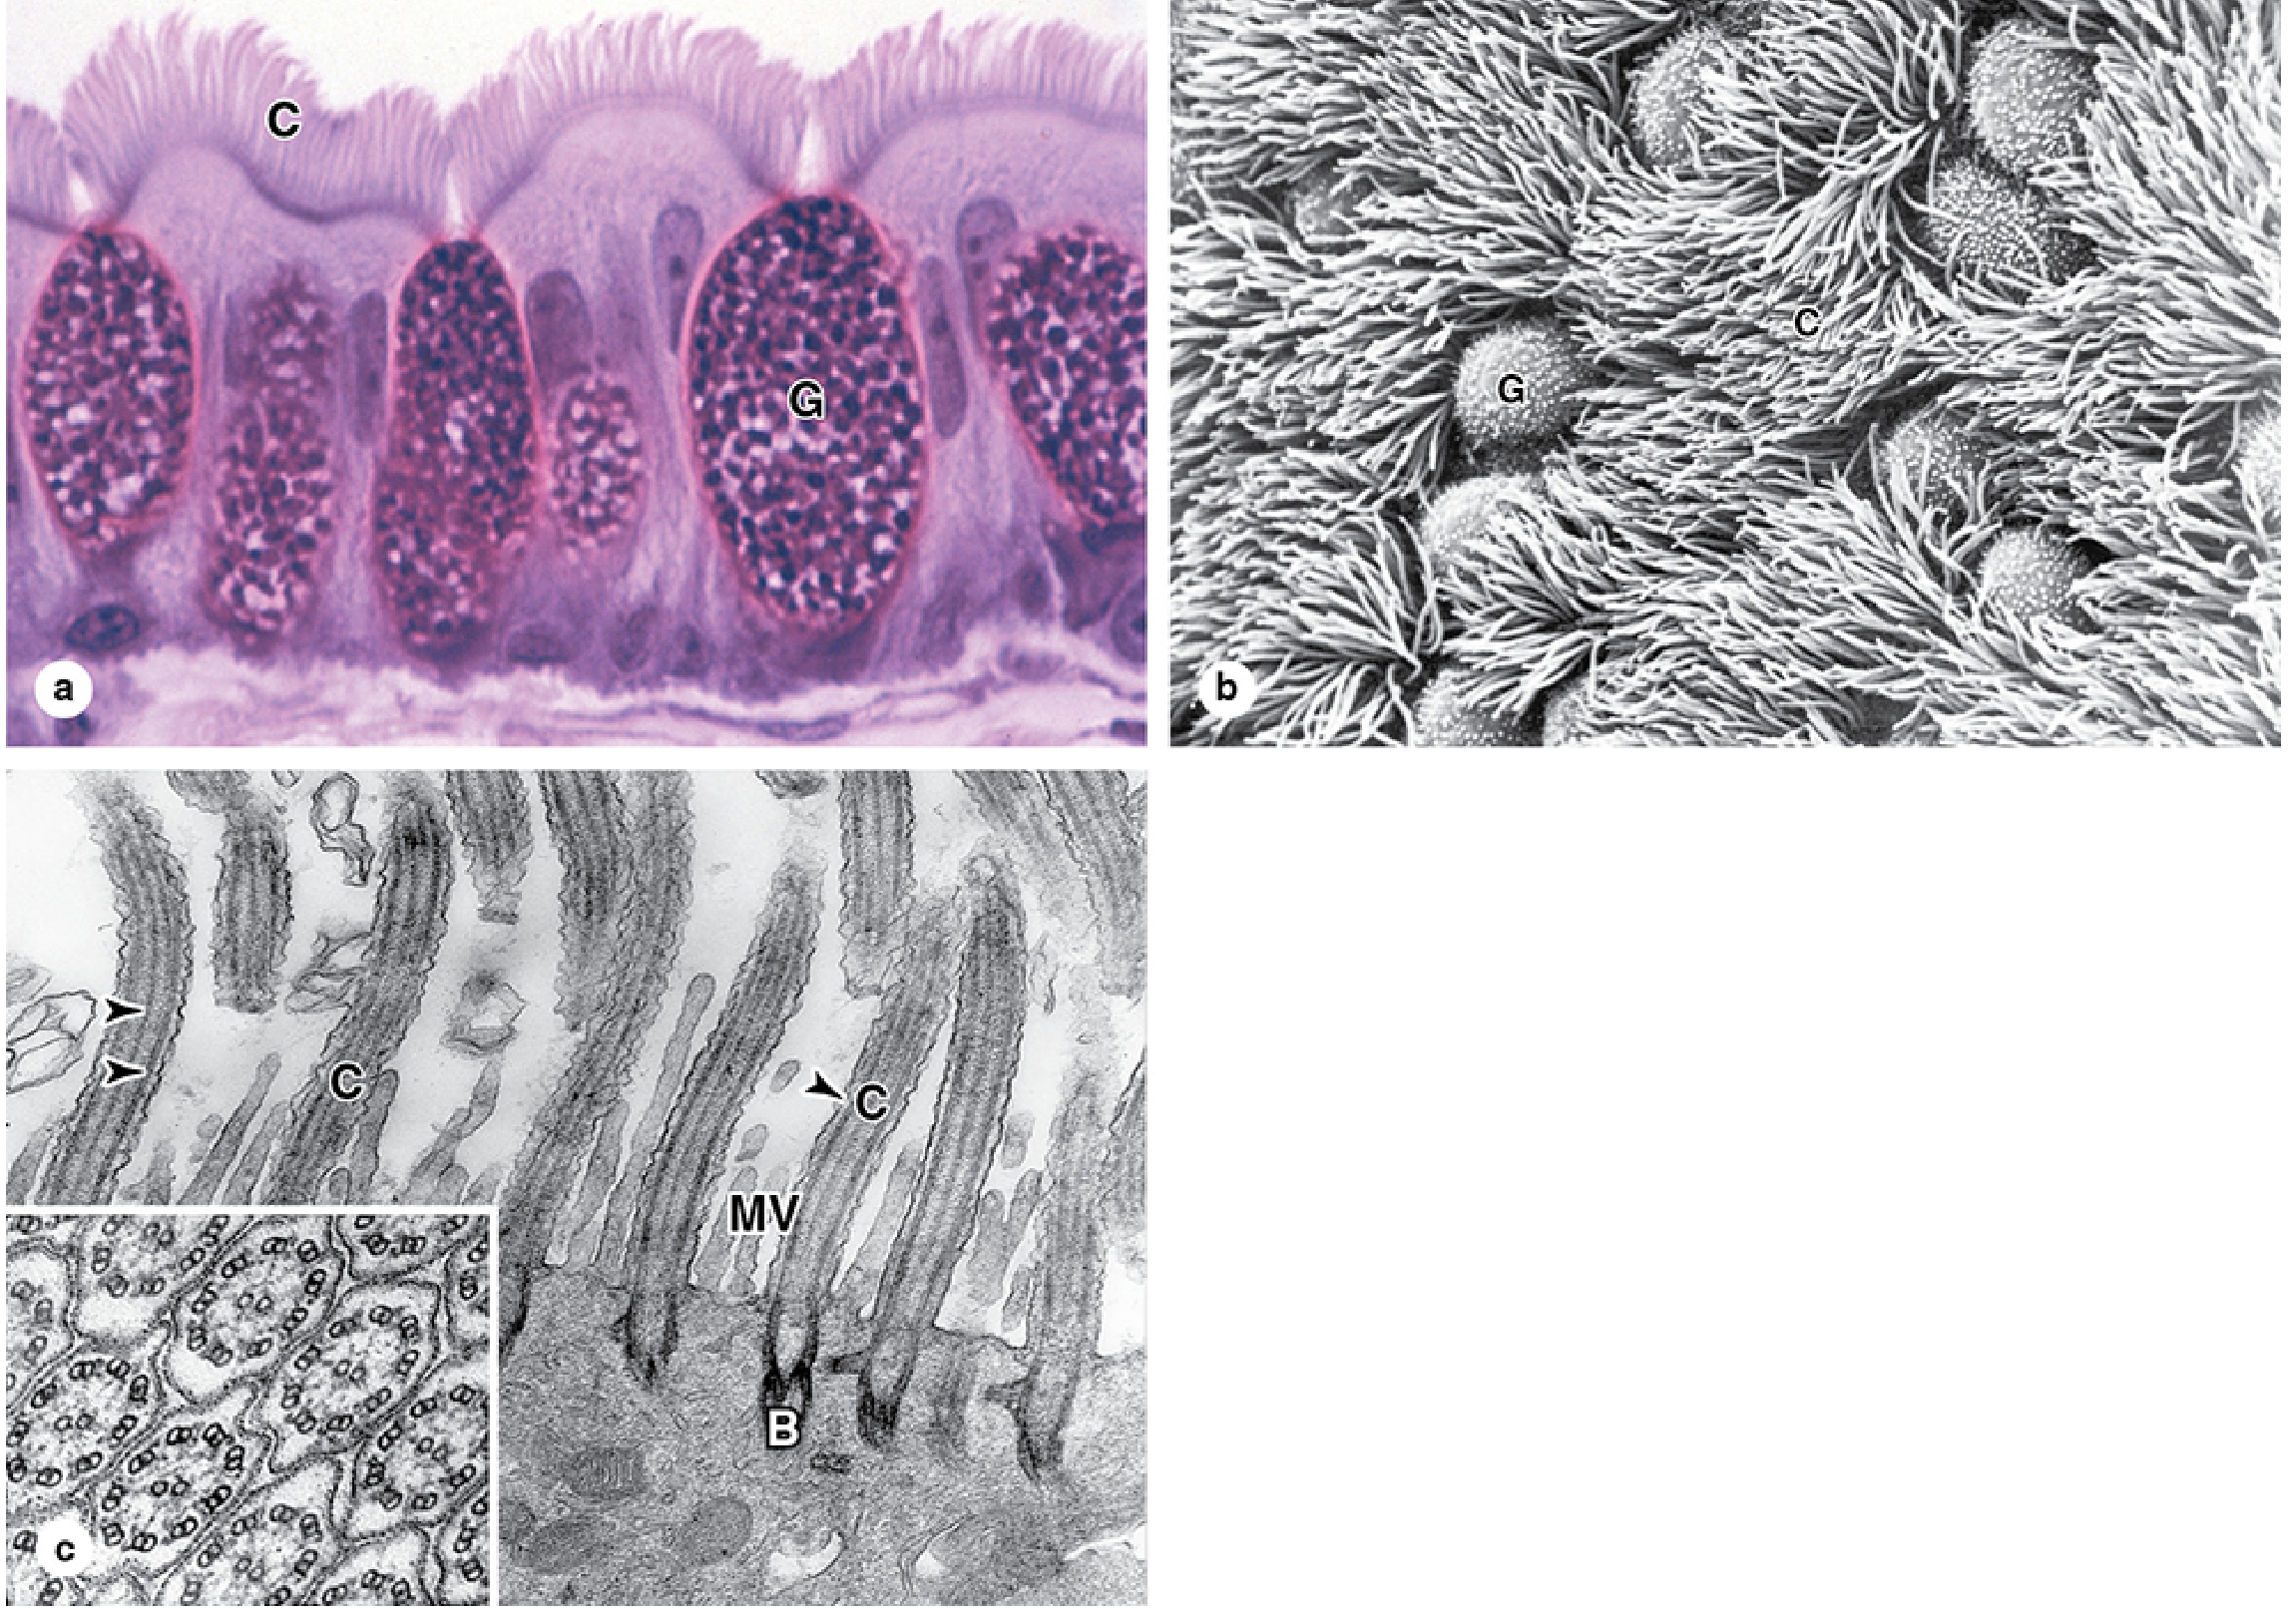
Figure: Cilia (C) of respiratory epithelium alternating with goblet cells (G). TEM inset shows the 9+2 microtubule arrangement of the axoneme. - Junqueira's Basic Histology, 17e
Primary Cilia: Almost all cell types have a single, non-motile primary cilium (lacking the central pair - 9 + 0 arrangement). These are enriched with receptors and signal transduction complexes for sensing light, odors, mechanical flow, and various chemical signals.
- Clinical relevance: Defective motile cilia cause Primary Ciliary Dyskinesia (Kartagener syndrome) - bronchiectasis, situs inversus, and male infertility
8. CLASSIFICATION OF EPITHELIUM
Epithelium is classified based on two morphologic criteria:
- Number of cell layers (simple or stratified)
- Shape of the surface cells (squamous, cuboidal, or columnar)
A third factor - specialization of the apical surface (e.g., ciliated, keratinized) - can be added.
8.1 Simple Epithelia (One Cell Layer Thick)
All cells rest on the basement membrane and touch the free surface.
A. Simple Squamous Epithelium
- Cells are wider than tall; flattened with flattened nuclei
- Locations: Alveoli of the lung, Bowman's capsule (parietal layer), loop of Henle, mesothelium lining pleural/peritoneal/pericardial cavities, endothelium lining blood and lymph vessels
- Functions: Allows passive diffusion across thin barrier; reduces friction for fluid and blood flow; forms filtration membranes
B. Simple Cuboidal Epithelium
- Cells approximately equal in height and width; spherical nucleus
- Locations: Kidney tubules (distal convoluted tubule), thyroid follicles, small collecting ducts, surface of ovary
- Functions: Secretion and absorption; forms barriers with moderate transport capacity
C. Simple Columnar Epithelium
- Cells taller than wide; oval nuclei basally positioned
- Locations: Lining of stomach, small and large intestine (absorptive), gallbladder, uterus, oviduct, many glands
- May be ciliated (oviduct, uterus, bronchioles) or non-ciliated (stomach, intestine)
- Functions: Absorption (intestine), secretion (stomach), transport of ova (oviduct)
8.2 Stratified Epithelia (Two or More Cell Layers)
Classification is based on the shape of the surface (outermost) cells only.
A. Stratified Squamous Epithelium
- Multiple layers; surface cells are squamous/flat
- May be keratinized or non-keratinized
Keratinized (cornified):
- As cells differentiate and migrate toward the surface, they become filled with keratin and other proteins, lose their nuclei and organelles, and form dead, scale-like squames
- Location: Epidermis of skin (thick in palms and soles)
- Function: Provides a waterproof, tough barrier; impedes water loss and microbial invasion; the outermost cells are sloughed and replaced continuously from basal stem cells
Non-keratinized:
- Surface cells retain their nuclei; kept moist by secretions
- Locations: Oral cavity, esophagus, vagina, cornea, external anal canal
- Function: Protection against mechanical abrasion while remaining moist
B. Stratified Cuboidal Epithelium
- Two or more layers; surface cells cuboidal
- Locations: Ducts of sweat glands, sebaceous glands
- Function: Secretion and protection in large ducts
C. Stratified Columnar Epithelium
- Rare; surface cells columnar
- Locations: Parts of the male urethra, large excretory ducts of some glands, conjunctiva
- Function: Protection with secretory activity
8.3 Special Categories
A. Pseudostratified Epithelium
- Appears stratified at first glance because nuclei are at different heights
- However, all cells rest on the basement membrane - it is technically a simple epithelium
- Not all cells reach the free surface (short/basal cells do not reach it)
- Identification relies heavily on knowing its typical locations:
- Pseudostratified ciliated columnar epithelium (respiratory epithelium): Lines the trachea and bronchi; cells include ciliated columnar cells, goblet cells, brush cells, and basal cells
- Pseudostratified columnar with stereocilia: Epididymis and vas deferens
- Function: Mucociliary clearance (respiratory); sperm maturation and transport (reproductive)
B. Transitional Epithelium (Urothelium)
- Specialized stratified epithelium lining the lower urinary tract (from minor calyces of the kidney to the proximal urethra)
- Characterized by its ability to distend (stretch): surface "umbrella cells" (dome-shaped when relaxed, flat when stretched) change shape without rupturing the epithelial barrier
- Contains uroplakins - proteins specific to the plasma membrane of umbrella cells that make them almost impermeable to urine
- Function: Acts as a permeability barrier preventing urine from being reabsorbed; accommodates volume changes during filling and voiding
9. SECRETORY EPITHELIA AND GLANDS
When epithelial cells are specialized primarily for secretion, they form glands. Glands arise embryologically by proliferation and invagination of epithelial surfaces into underlying connective tissue.
9.1 Types of Glands by Secretion Destination
| Type | Definition | Examples |
|---|---|---|
| Endocrine | Secrete directly into bloodstream (no duct) | Thyroid, adrenal cortex, anterior pituitary |
| Exocrine | Secrete onto a surface via a duct | Salivary glands, sweat glands, pancreas (exocrine part) |
| Paracrine | Secrete locally - diffuse to adjacent cells | Many gut enteroendocrine cells |
9.2 Structural Classification of Exocrine Glands
By the shape of the secretory unit:
- Acinar/alveolar: Rounded, sac-like secretory end-pieces (e.g., parotid gland, pancreas)
- Tubular: Cylindrical secretory units (e.g., intestinal crypts, sweat glands)
- Tubuloalveolar (seromucous): Both tubular and acinar units (e.g., submandibular gland)
By duct branching:
- Simple: Unbranched duct (e.g., intestinal glands, sweat glands)
- Compound: Branched duct (e.g., salivary glands, pancreas, liver)
9.3 Mechanisms of Secretion
A. Merocrine (Eccrine) Secretion
- Secretory products are released by exocytosis - membrane-bound secretory vesicles fuse with the apical plasma membrane and discharge their contents without any loss of cell membrane or cytoplasm
- Most common secretory mechanism
- Examples: Pancreatic acinar cells (digestive enzymes), most salivary gland cells, intestinal goblet cells
B. Apocrine Secretion
- The apical portion of the cell (containing secretory vesicles) pinches off along with some surrounding plasma membrane and cytoplasm
- The cell survives and regenerates after secretion
- Examples: Apocrine sweat glands in the axilla/groin, mammary glands (lipid-rich milk fat)
C. Holocrine Secretion
- The entire cell disintegrates and becomes the secretory product
- Cells differentiate, accumulate secretory material, and lyse
- Examples: Sebaceous glands (sebum production)
- Clinical note: Excess holocrine secretion of sebum triggered by testosterone at puberty, combined with colonization by Cutibacterium acnes in blocked ducts, is the primary mechanism of acne vulgaris
9.4 Nature of Secretory Products
Serous cells:
- Produce non-glycosylated proteins (mainly digestive enzymes and other proteins)
- Have abundant RER (basophilic base) and Golgi; apical zymogen granules stain intensely eosinophilic
- Examples: Pancreatic acini, parotid gland acini, serous demilunes of submandibular gland
Mucous cells:
- Produce heavily glycosylated proteins called mucins, which hydrate to form viscous mucus
- Secretory granules stain poorly with eosin (mucins washed out in routine processing) but are PAS-positive
- Examples: Goblet cells, sublingual gland, gastric surface mucous cells, cervical glands
10. TRANSPORT ACROSS EPITHELIA
Epithelia regulate the bidirectional movement of ions and water. The direction of transport depends on the organ.
Absorption
- Movement from lumen → capillaries (apical → basolateral direction)
- Examples: Gallbladder (concentrates bile by absorbing water); intestinal epithelium (absorbs water and ions from digested material)
Secretion
- Movement from capillaries → lumen (basolateral → apical direction)
- Examples: Salivary and other exocrine glands; choroid plexus (secretes CSF)
Structural Adaptations for Transport
The proximal renal tubule exemplifies cells highly specialized for transcellular transport:
- Apical surface: Dense brush border (microvilli) for maximum surface area; allows free entry of Na⁺
- Basolateral membrane: Elaborately folded with many deep infoldings containing rows of mitochondria to supply ATP for Na⁺/K⁺-ATPase pumps that actively extrude Na⁺ into interstitial fluid
- Tight junctions are essential in all transporting epithelia to prevent back-leakage and maintain separate apical and basolateral compartments
11. CELL POLARITY
Epithelial cells are fundamentally polar - their apical and basolateral surfaces have distinct molecular compositions:
- Tight junctions act as a "fence" preventing lateral diffusion of membrane lipids and proteins between apical and basolateral domains
- The basement membrane organizes the basal domain by signaling through integrins and laminin
- Polarity is critical for directional transport (absorptive or secretory function)
12. RENEWAL AND REGENERATION OF EPITHELIAL CELLS
- Most epithelial cells have a limited lifespan and are continuously replaced by mitosis of stem/progenitor cells
- The rate of renewal varies by tissue:
- Intestinal epithelium: complete renewal every 3-5 days
- Epidermis: turnover every ~28-30 days
- Some specialized epithelia (e.g., kidney tubules, olfactory) have slower renewal
Sources of New Epithelial Cells
- In stratified epithelia, the basal (germinal) layer contains stem cells that continuously divide; daughter cells migrate outward, differentiate, and are eventually shed from the surface
- In simple epithelia, stem cells are less well-defined morphologically but are scattered among the epithelial population or located at specific zones (e.g., crypts of Lieberkühn in the intestine)
Repair After Injury
The basement membrane acts as a scaffold for rapid epithelial repair. After injury, surviving epithelial cells flatten, migrate over the denuded basement membrane, and then proliferate to restore normal thickness and function.
13. SUMMARY TABLE: TYPES OF COVERING/LINING EPITHELIA
| Type | Layers | Surface Cell Shape | Location | Main Function |
|---|---|---|---|---|
| Simple squamous | 1 | Flat | Alveoli, endothelium, mesothelium, Bowman's capsule | Diffusion, filtration, lubrication |
| Simple cuboidal | 1 | Cube-like | Kidney tubules, thyroid, ovary surface | Secretion, absorption |
| Simple columnar (non-ciliated) | 1 | Tall, no cilia | Stomach, intestine, gallbladder | Absorption, secretion |
| Simple columnar (ciliated) | 1 | Tall, with cilia | Oviduct, uterus, bronchioles | Moves fluid/ovum by ciliary action |
| Pseudostratified ciliated columnar | 1 (appears multi) | Columnar with cilia | Trachea, bronchi (respiratory tract) | Mucociliary clearance |
| Pseudostratified columnar with stereocilia | 1 (appears multi) | Columnar with stereocilia | Epididymis, vas deferens | Sperm maturation and transport |
| Stratified squamous (keratinized) | Multi | Flat, dead, no nucleus | Epidermis | Waterproof barrier, protection |
| Stratified squamous (non-keratinized) | Multi | Flat, nucleated | Oral cavity, esophagus, vagina, cornea | Protection with moisture |
| Stratified cuboidal | Multi | Cuboidal | Sweat gland ducts | Secretion, protection |
| Stratified columnar | Multi | Columnar | Parts of urethra, large ducts | Protection, secretion |
| Transitional (urothelium) | Multi | Variable (dome/flat) | Ureter, bladder, proximal urethra | Stretch + permeability barrier |
14. SUMMARY OF KEY POINTS
- Epithelial tissue forms sheets of closely packed, polar cells resting on a basement membrane, with no internal blood supply.
- Functions include protection, absorption, secretion, transport, and sensory reception.
- The basement membrane is a bilaminar structure (basal lamina + reticular lamina) containing type IV collagen, laminins, nidogen, and perlecan; it anchors, supports, and guides regeneration.
- Junctions (tight, adherens, desmosomal, gap, hemidesmosomal) maintain cohesion, polarity, and communication.
- Apical specializations - microvilli (absorption), stereocilia (absorption/sensory), and cilia (transport) - adapt cells to their specific roles.
- Classification is based on number of layers (simple/stratified) and surface cell shape (squamous/cuboidal/columnar).
- Special types include pseudostratified epithelium (all cells contact basement membrane but not all reach surface) and transitional epithelium (urothelium, adapts to stretch).
- Glands are exocrine (with ducts) or endocrine (ductless); exocrine secretion may be merocrine (exocytosis), apocrine (cell tip pinches off), or holocrine (whole cell disintegrates).
- Epithelial renewal is continuous; basal stem cells replenish surface cells lost to normal wear or injury.
All content sourced from: Junqueira's Basic Histology: Text and Atlas, 17e (ISBN 9781264930395) and Histology: A Text and Atlas with Correlated Cell and Molecular Biology (ISBN 9781975181512)
Give me a very detailed well explained contents for the topic light Microscopy and Tissue Preparation Covering each and every contents and concepts in step by step
Reading File
Finding Sources
Finding Sources
Finding Sources
Finding Sources
Finding Sources
Finding Sources
Finding Sources
Finding Sources
Excellent! Found Chapter 1 of Junqueira's and the Tissue Preparation section in Histology Text & Atlas. Let me read both in parallel.
Reading File
Reading File
Excellent content from both sources. Let me continue reading the detailed sections from Junqueira's and more from the Histology Atlas.
Reading File
Reading File
Good. Let me read the full tissue preparation and staining details from Junqueira's, and also the electron microscopy, immunohistochemistry sections.
Reading File
Reading File
Reading File
I now have comprehensive, rich textbook content covering all aspects of the topic. Let me fetch a couple of key diagrams and write the full answer.
Loading Image
Loading Image
Here is your complete, step-by-step, deeply detailed guide on Light Microscopy and Tissue Preparation.
LIGHT MICROSCOPY AND TISSUE PREPARATION
A Complete Step-by-Step Detailed Guide
Sources: Junqueira's Basic Histology: Text and Atlas, 17e | Histology: A Text and Atlas with Correlated Cell and Molecular Biology
INTRODUCTION: WHAT IS HISTOLOGY AND WHY DOES TISSUE PREPARATION MATTER?
Histology is the scientific study of the microscopic structure of tissues and organs of the body. It explores all aspects of tissue biology - from cellular biology to microscopic anatomy - focusing on how cell activities, shapes, and groupings are optimized for specific organ functions.
Tissues have two interacting components: cells and extracellular matrix (ECM). The ECM involves many kinds of macromolecules (most forming complex structures such as collagen fibrils). It supports cells, transports nutrients to them, and carries away their wastes and secretory products.
Because cells are extremely small, histology is dependent on the use of microscopes and molecular methods of study. This makes proper tissue preparation the absolute foundation of all microscopic examination - without it, tissue would degrade, structures would be unrecognizable, and no meaningful study would be possible.
PART 1: PREPARATION OF TISSUES FOR STUDY
The goal of tissue preparation is to produce thin, transparent sections that preserve the tissue's structure as closely as possible to its living state, and then make internal structures visible through staining.
The standard procedure involves these sequential steps:
STEP 1 - TISSUE COLLECTION AND INITIAL CUTTING
- The tissue or organ sample is removed from the body as quickly as possible after death or surgical excision
- Because fixatives must diffuse fully through the tissue, organs are immediately cut into small fragments (usually a few millimeters thick) to facilitate penetration
- In large organs, fixatives are often introduced via blood vessels (vascular perfusion) to allow rapid fixation throughout all tissues simultaneously
- Speed matters: delay allows autolysis (self-digestion by cellular enzymes) and bacterial decomposition, which destroy cell structure
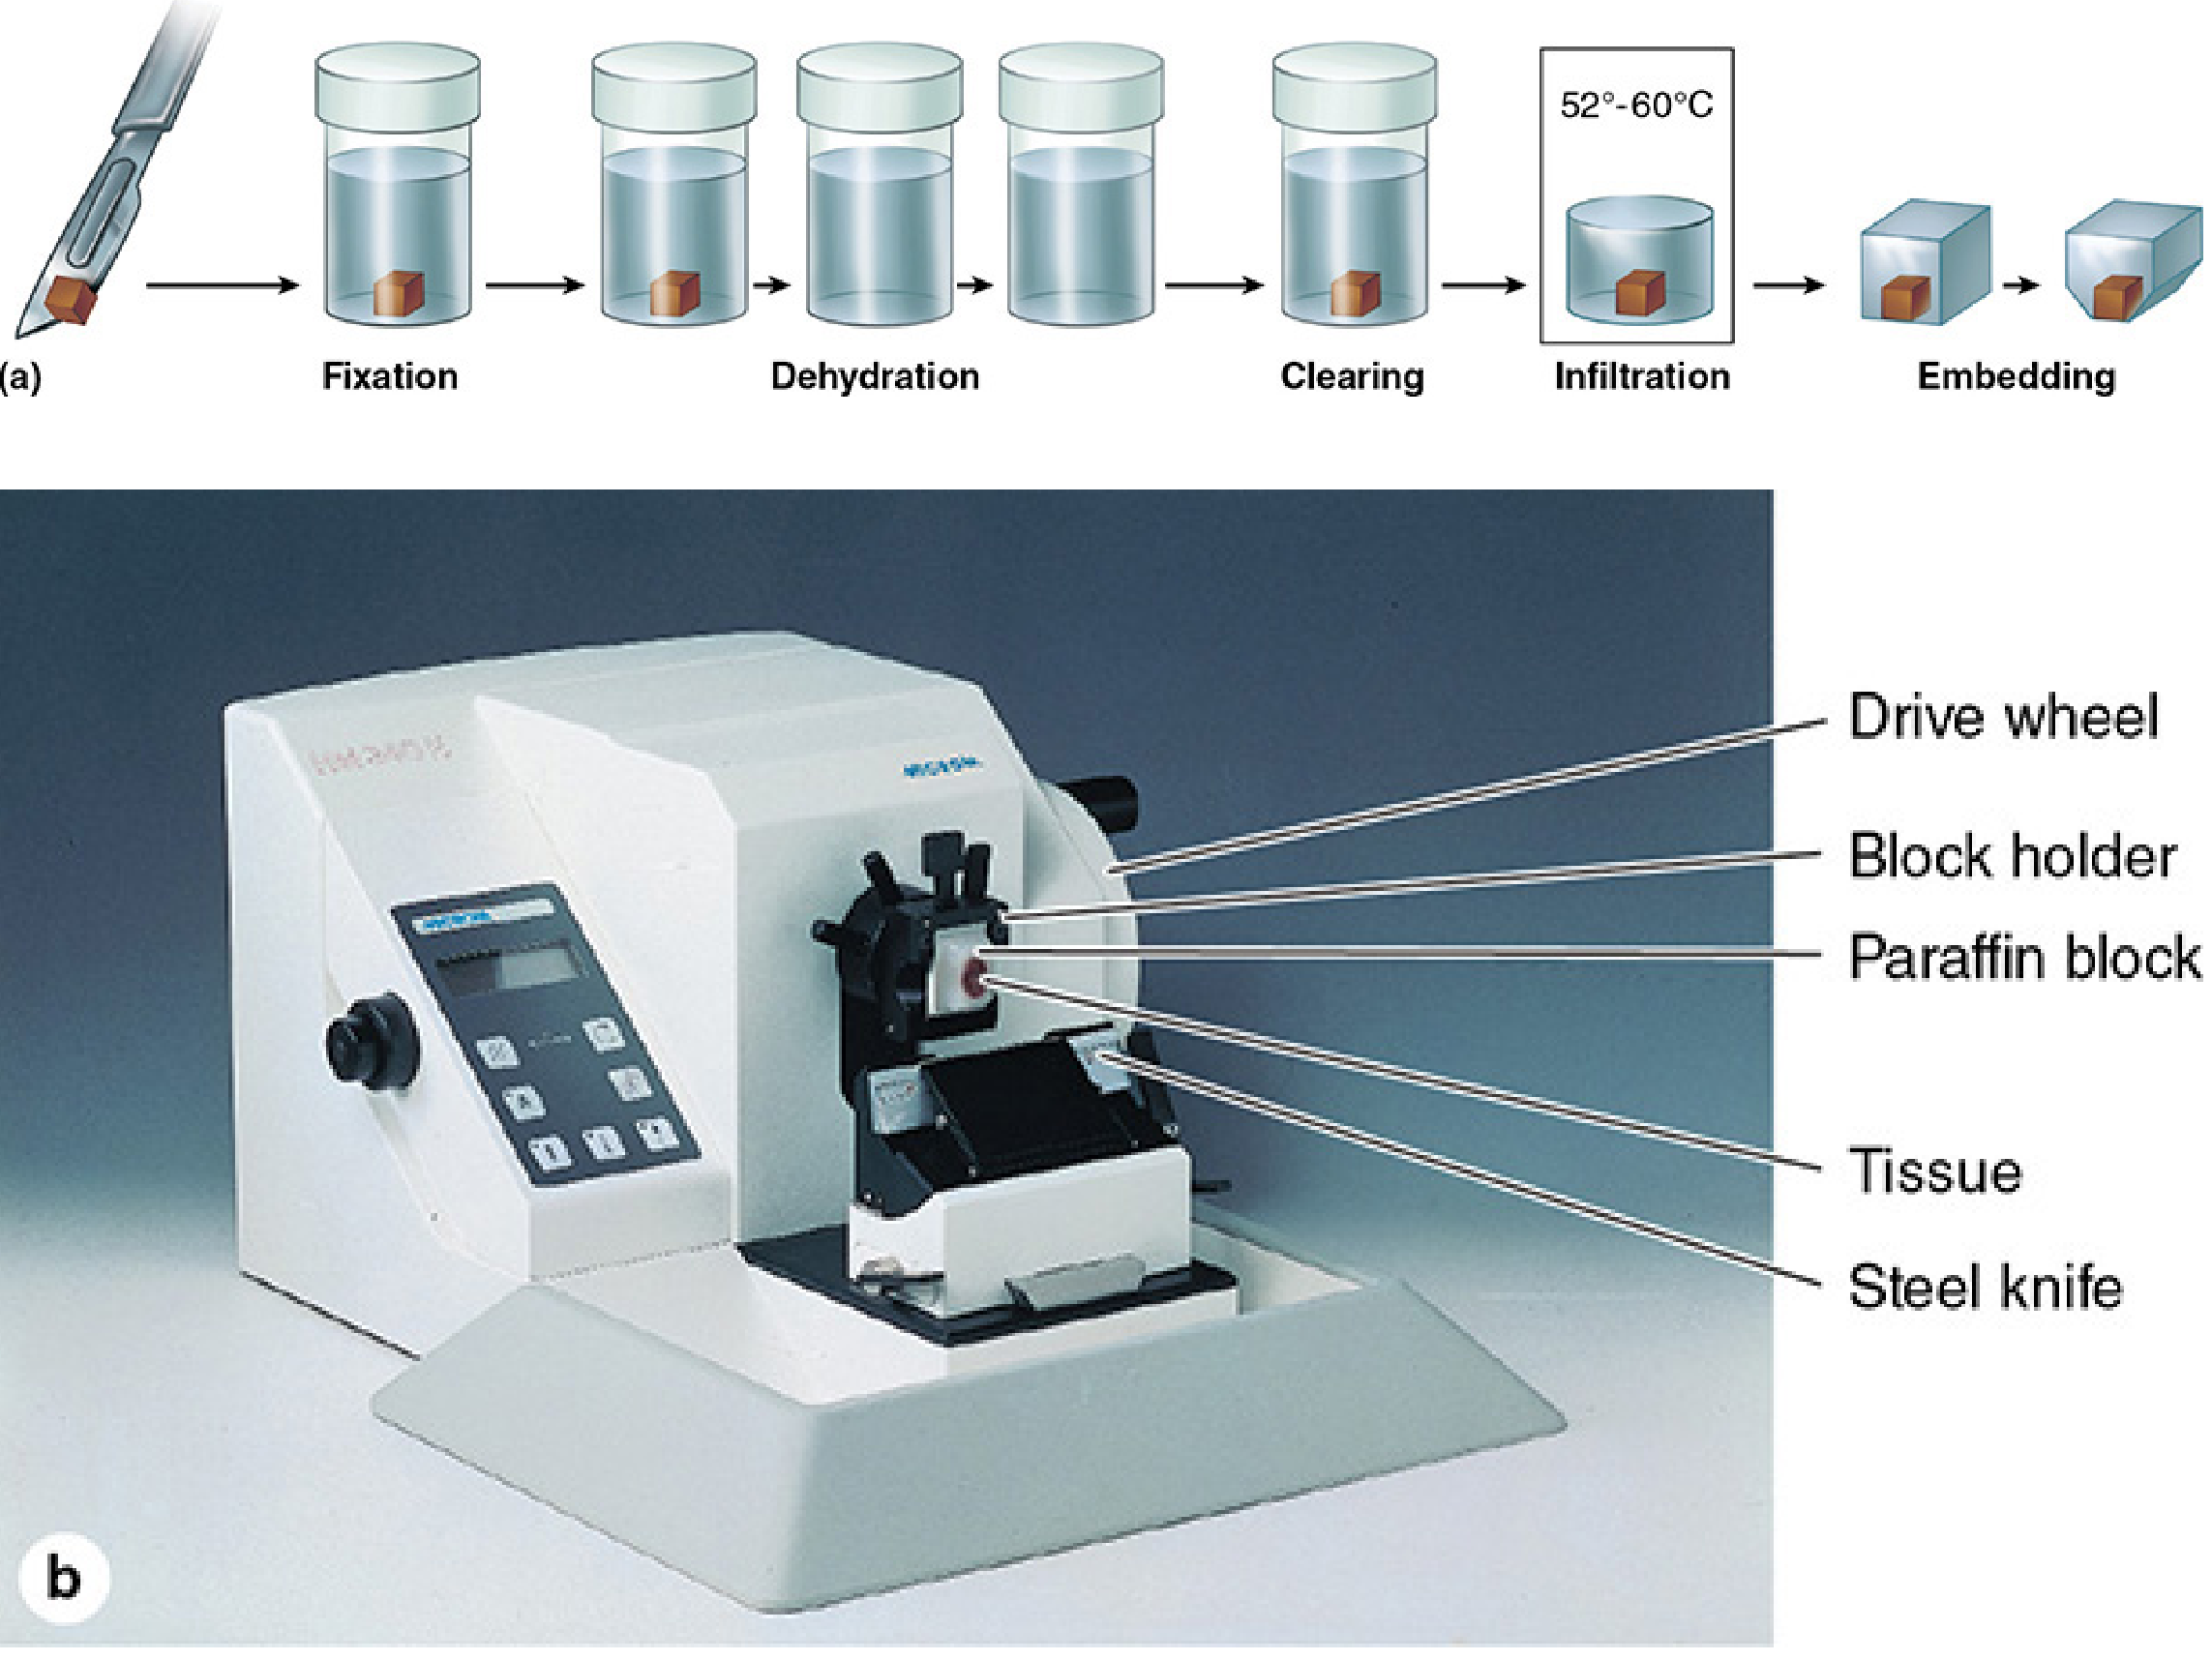
Figure: The standard tissue preparation sequence for light microscopy, from fixation through paraffin embedding, and the rotary microtome used for sectioning. - Junqueira's Basic Histology, 17e
STEP 2 - FIXATION
What is Fixation?
Fixation is the process of chemically stabilizing ("fixing") the tissue to:
- Prevent autolysis - stop the action of degradative enzymes released from lysosomes and other organelles after cell death
- Prevent bacterial decomposition - inactivate microorganisms that would otherwise digest the tissue
- Preserve structural morphology - maintain cell shapes, organelles, and molecular organization as close to the living state as possible
- Harden the tissue - make it firm enough to withstand subsequent processing steps
Mechanism of Fixation
Most chemical fixatives work by cross-linking proteins - they create covalent bonds between adjacent protein molecules, forming a stable three-dimensional meshwork that locks structures in place. This cross-linking:
- Inactivates enzymes (preventing degradation)
- Stabilizes membranes
- Preserves the spatial relationships between cellular components
Common Fixatives
1. Formalin (Formaldehyde)
- The most widely used fixative for light microscopy
- A buffered isotonic solution of 37% formaldehyde (typically used as 10% formalin)
- Formaldehyde is a monoaldehyde that cross-links proteins through their amino groups (-NH₂)
- Advantages: excellent penetration, good morphological preservation, inexpensive, compatible with most stains
- Limitation: can denature some antigens, making immunohistochemistry less sensitive; may require antigen retrieval steps
2. Glutaraldehyde
- A dialdehyde fixative; has two reactive aldehyde groups
- Creates stronger and more extensive cross-links than formaldehyde
- Preferred fixative for electron microscopy because it preserves ultrastructural detail much better
- Limitation: poor penetration into thick tissue (therefore must be used with very small tissue pieces, 1 mm or less)
- Often used in combination with paraformaldehyde (Karnovsky's fixative)
3. Osmium Tetroxide (OsO₄)
- Used as a secondary fixative (after glutaraldehyde) for electron microscopy
- Reacts with and stabilizes lipid membranes (preserves membrane ultrastructure)
- Also acts as a stain - deposits heavy osmium metal on membranes, making them electron-dense
- Highly toxic; must be handled in a fume hood
4. Bouin's Fixative
- Contains picric acid, formaldehyde, and acetic acid
- Used for fixation of testicular tissue, kidney biopsies, and gastrointestinal biopsies
- Gives better nuclear detail but shrinks tissue more than formalin
5. Carnoy's Fixative
- Contains ethanol, chloroform, and acetic acid
- Rapid fixative; good for glycogen and nucleic acid preservation
- Used when speed is important (e.g., urgent frozen sections)
Fixation Artifacts
Because even optimal fixation is not perfect:
- Shrinkage of cells can occur
- Extraction of lipids during later dehydration steps creates empty spaces where lipid droplets were
- Some proteins may be denatured, affecting antigen detection
- The histologist must be aware of these artifacts when interpreting sections
STEP 3 - DEHYDRATION
After fixation, the tissue still contains large amounts of water. Since paraffin (the standard embedding medium) is immiscible with water, all water must be removed before embedding.
Process:
- The tissue is transferred through a graded series of increasing ethanol (alcohol) concentrations:
- 50% → 70% → 80% → 95% → 100% (absolute) alcohol
- Each step gradually replaces tissue water with alcohol
- The series prevents osmotic shock and tissue distortion that would occur with sudden transfer to 100% alcohol
- Final step is absolute (100%) ethanol, which removes all remaining water
Why graded series?
A sudden jump to 100% alcohol would cause excessive and uneven shrinkage and distortion of cells. The gradual progression minimizes these effects.
STEP 4 - CLEARING
- After dehydration, the tissue is in 100% alcohol. However, most embedding media (especially paraffin) are not miscible with alcohol.
- The tissue must be transferred into an organic solvent that is miscible with BOTH alcohol AND paraffin - this is called the "clearing agent"
- Common clearing agents: xylene, toluene, cedar wood oil, chloroform
- The clearing agent replaces all the alcohol in the tissue
- Tissues become transparent (clear) during this step (hence "clearing") because the refractive index of clearing agents is similar to that of proteins - this transparency confirms full clearing has occurred
- Excessive time in clearing agents can make tissue brittle
STEP 5 - INFILTRATION AND EMBEDDING
Infiltration:
- The cleared tissue is placed in melted liquid paraffin (kept at 52-60°C, just above its melting point)
- The paraffin diffuses into and completely fills all the spaces previously occupied by clearing agent within the tissue
- The tissue becomes thoroughly infiltrated with paraffin throughout
Embedding:
- The fully infiltrated tissue is placed in a small metal or plastic mold filled with more melted paraffin
- The tissue is oriented in the desired plane of section (critical: wrong orientation = uninterpretable sections)
- The mold is cooled, allowing the paraffin to solidify into a firm block with the tissue suspended inside it
- The resulting "paraffin block" provides the mechanical support needed to cut very thin sections without the tissue crumbling or distorting
Why paraffin?
Paraffin is an ideal embedding medium because it:
- Solidifies at room temperature into a firm but cuttable block
- Supports delicate tissue structures during sectioning
- Can be easily removed from sections before staining (deparaffinization)
- Allows long-term storage of tissue blocks
Alternative embedding: Epoxy Resins
- Used for transmission electron microscopy (TEM)
- Resins (e.g., Epon, Araldite) are much harder than paraffin
- Needed because TEM sections must be 50-100 nm thick (100x thinner than light microscope sections) - this extreme thinness requires the greater hardness of resin blocks
- Special fixatives (glutaraldehyde + osmium) and dehydrating solutions are used
STEP 6 - SECTIONING (MICROTOMY)
The Microtome
The rotary microtome is the instrument used to cut paraffin-embedded tissue into thin, uniform sections.
How it works:
- The trimmed paraffin block is mounted in the block holder
- Each turn of the drive wheel by the histologist advances the block holder a controlled, precise distance - generally 1 to 10 micrometers (μm) per turn
- After each forward advance, the tissue block passes over a sharp steel knife edge and a section is cut at a thickness equal to the set advance distance
- Standard sections for light microscopy are 3-7 μm thick - thin enough for light to pass through, yet thick enough to show cell layers in context
Section Collection:
- The cut paraffin sections form a ribbon (as each section sticks to the edge of the previous one)
- The ribbon of sections is floated on warm water (a water bath at ~40°C) to flatten out any wrinkles or folds
- Sections are then picked up onto glass slides and allowed to adhere by drying on a warming plate
- Mounting adhesives (e.g., albumin, poly-L-lysine) are sometimes applied to the slide surface to help sections stick firmly
Ultramicrotomy (for TEM):
- Uses an ultramicrotome fitted with a glass or diamond knife (steel is too rough for the required thinness)
- Sections cut at 50-100 nm thick (0.05-0.1 μm) - much thinner than for light microscopy
- Sections float on a water surface and are collected on small copper grids rather than glass slides
STEP 7 - DEPARAFFINIZATION AND REHYDRATION
Before staining with water-based dyes, the paraffin must be removed from the section:
- Deparaffinization: Sections are immersed in xylene (or another clearing agent) to dissolve and remove all paraffin
- Rehydration: Sections are moved through a descending series of alcohols (100% → 95% → 80% → 70% → water) back to aqueous conditions, ready for water-based staining
- Staining is then performed
STEP 8 - STAINING
Most tissues appear colorless and transparent when unstained - cell structures are nearly invisible. Staining uses dyes that selectively bind to specific cellular components, creating color contrast to make structures visible and distinguishable.
Why is staining necessary?
- Cell organelles and ECM have similar refractive indices - they scatter light almost identically
- Dyes bind selectively based on chemical affinities (charge, pH, chemical groups)
- After staining, different structures appear in different colors, allowing identification
The Basis of Staining: Acidic vs. Basic Dyes
Basophilia (basic/cationic dyes):
- Basic dyes carry a positive charge at physiological pH
- They bind to negatively charged (acidic) components of cells
- The property of staining with basic dyes is called basophilia
- Key basophilic structures:
- Nucleus (chromatin/DNA is negatively charged due to phosphate groups)
- Rough endoplasmic reticulum (ribosomal RNA is highly acidic)
- Ribosomes
- Cytoplasm of cells actively synthesizing protein
- Examples of basic dyes: Hematoxylin, methylene blue, toluidine blue, crystal violet
Acidophilia/Eosinophilia (acid/anionic dyes):
- Acid dyes carry a negative charge at physiological pH
- They bind to positively charged (basic) components of cells
- The property of staining with acid dyes is called acidophilia or eosinophilia
- Key acidophilic/eosinophilic structures:
- Cytoplasmic proteins (especially collagen and other ECM proteins)
- Mitochondria
- Secretory granules of many cells (e.g., eosinophil granules)
- Red blood cells (hemoglobin is very acidophilic)
- Examples of acid dyes: Eosin, orange G, acid fuchsin
THE HEMATOXYLIN AND EOSIN (H&E) STAIN
The H&E stain is the single most widely used stain in histology and pathology worldwide. It is the standard routine stain for almost all tissue sections.
Hematoxylin:
- A natural dye extracted from the logwood tree (Haematoxylum campechianum)
- By itself is not a dye - it must first be oxidized to hematin (the active staining molecule) and then combined with a mordant (usually alum - potassium aluminum sulfate) to form a "lake" (chelate complex) called hemalum or "alum hematoxylin"
- The mordant (metal ion) acts as a bridge between the dye and the tissue
- This complex is positively charged and acts as a basic dye - staining acidic structures
- Staining result: Nuclei (chromatin/DNA), ribosomes, and areas of active protein synthesis (RER) stain BLUE-PURPLE (basophilic)
- After staining in hematoxylin, sections are "blued" in a mild alkaline solution (e.g., running tap water or Scott's solution) to shift color from red to blue-purple
Eosin:
- A synthetic dye (eosin Y - tetrabromofluorescein)
- An anionic (acid) dye with negative charge
- Binds to positively charged (basic) cellular proteins
- Staining result: Cytoplasm, collagen fibers, muscle fibers, and most ECM components stain PINK-RED (eosinophilic)
Combined H&E Result:
| Structure | H&E Color | Reason |
|---|---|---|
| Nuclei (chromatin) | Blue-purple | DNA/RNA negatively charged → binds hematoxylin |
| Nucleoli | Dark blue-purple | Rich in rRNA |
| RER/ribosomes | Dark blue/basophilic | rRNA is strongly acidic |
| Cytoplasm (general) | Pink | Proteins are net positive → bind eosin |
| Collagen fibers (ECM) | Bright pink | Rich in basic amino acids |
| Red blood cells | Bright pink/red | Hemoglobin is strongly eosinophilic |
| Muscle fibers | Deep pink | Myosin/actin are acidophilic |
| Fat cells | Empty spaces (white) | Lipid extracted during dehydration |
| Bone matrix (calcified) | Pink-purple | Calcium salts take up both dyes |
| Mitochondria | Faintly pink | Cannot be resolved by routine LM |
| Goblet cell mucin | Very pale/washed out | Glycoproteins washed out in processing |
OTHER SPECIAL STAINS
Beyond H&E, many specialized stains target specific tissue components:
| Stain | Target Structures | Color Produced | Uses |
|---|---|---|---|
| Masson's Trichrome | Collagen / muscle | Collagen = blue/green; muscle = red | Detect fibrosis, cirrhosis, kidney disease |
| Periodic Acid-Schiff (PAS) | Glycogen, mucins, glycoproteins, basement membranes | Magenta/pink-purple | Identify carbohydrate-rich structures; fungal cell walls |
| Alcian Blue | Acid mucopolysaccharides (hyaluronic acid, chondroitin sulfate) | Blue | Cartilage matrix, goblet cell mucin |
| Silver stains (Reticulin) | Reticular fibers (type III collagen), nerve axons | Black | Liver fibrosis, nerve tissue |
| Orcein / Weigert's | Elastic fibers | Dark brown/black | Arterial walls, lung, ligaments |
| Oil Red O / Sudan Black | Lipids (fresh frozen sections only) | Red / Black | Atherosclerosis, fatty liver (cannot use paraffin) |
| Von Kossa | Calcium deposits | Black | Bone, calcifications |
| Congo Red | Amyloid | Pink; apple-green birefringence under polarized light | Amyloidosis diagnosis |
| Toluidine Blue | Mast cell granules, cartilage matrix | Metachromatic purple-red | Mast cells, heparin |
| Giemsa | Blood cells, bacteria, parasites | Multicolor | Bone marrow biopsies, malaria |
| Crystal Violet / Gram Stain | Bacteria (gram positive) | Purple | Microbiological identification in tissue |
MOUNTING AND COVERSLIPPING
After staining:
- Sections are dehydrated again (ascending alcohol series)
- Cleared in xylene
- A coverslip is applied over the section using a resinous mounting medium (e.g., DPX, Canada balsam)
- The mounting medium has a refractive index similar to glass, which:
- Prevents fading of dyes
- Provides optical clarity
- Protects the section for long-term storage (decades to centuries)
PART 2: LIGHT MICROSCOPY - THE INSTRUMENTS
WHAT IS LIGHT MICROSCOPY?
Light microscopy (LM) uses visible light that passes through or is reflected by a tissue section to produce a magnified image. It remains the most widely used method in histology, teaching, pathology, and clinical diagnosis.
The maximum useful magnification of a light microscope is approximately 1,000-1,500x (limited by the wavelength of visible light).
The resolution (ability to distinguish two closely spaced points as separate) of a light microscope is approximately 0.2 μm (200 nm) - this is the diffraction limit of visible light.
TYPE 1: BRIGHT-FIELD MICROSCOPY
Principle:
- Light from a source (bulb or LED) passes through a condenser that focuses a bright, even beam of light onto the specimen
- Light then travels through the specimen (tissue section on a glass slide)
- The objective lens collects the transmitted light and magnifies the image
- The ocular lens (eyepiece) further magnifies the image for the observer
- Stained regions absorb light at specific wavelengths - those areas appear colored; unstained regions transmit light and appear light/transparent
Key Components of a Bright-Field Microscope:
| Component | Function |
|---|---|
| Light source (lamp) | Provides illumination |
| Condenser | Focuses light onto specimen |
| Stage | Holds and moves the glass slide |
| Objective lens | Primary magnification (4x, 10x, 40x, 100x oil) |
| Ocular (eyepiece) | Secondary magnification (usually 10x) |
| Focus knobs (coarse/fine) | Adjust focal plane |
| Diaphragm/Iris | Controls diameter of light beam (affects contrast and depth of field) |
Total Magnification = Objective x Ocular
- 4x objective × 10x ocular = 40x total (scanning)
- 10x objective × 10x ocular = 100x total (low power)
- 40x objective × 10x ocular = 400x total (high power)
- 100x objective × 10x ocular = 1,000x total (oil immersion)
Oil Immersion (100x objective):
- A drop of immersion oil (same refractive index as glass, ~1.515) is placed between the objective lens and the glass slide
- Prevents light from refracting as it exits the coverslip - keeps light rays within the objective, significantly increasing resolution at high magnification
- Allows the highest resolution achievable with light microscopy (~0.2 μm)
Uses:
- Routine histology of H&E-stained and special-stained sections
- Surgical pathology, clinical diagnosis
- Standard teaching in medical and dental schools
Virtual Microscopy:
- A modern extension of bright-field microscopy
- Glass slides are scanned with a high-resolution automated slide-scanning microscope, creating high-resolution digital image files
- The entire slide is digitized as thousands of consecutive images at multiple magnifications
- Software stitches these into a single navigable digital "virtual slide"
- Stored on servers and viewable via web browser, computer, tablet, or smartphone with virtual microscopy software
- Features include: orientation thumbnails, zooming, measuring tools, color adjustment, annotation tools, side-by-side comparison of different tissues/stains, collaborative learning
- Rapidly replacing collections of glass slides and physical microscopes in histology education
- Also used in pathology (telepathology) for remote diagnosis
TYPE 2: FLUORESCENCE MICROSCOPY
Principle:
- Based on the phenomenon of fluorescence: when certain substances absorb light of one wavelength (excitation wavelength), they re-emit light at a longer wavelength (emission wavelength)
- The microscope has a source of UV or specific-wavelength visible light and appropriate filters:
- Excitation filter: selects the specific wavelength to excite the fluorophore
- Dichroic mirror: reflects excitation light toward the specimen but transmits emission light toward the detector
- Emission (barrier) filter: blocks excitation light; passes only the emitted (fluorescent) light to the eyepiece or camera
- Fluorescent structures appear as bright colored signals against a dark background (dark-field appearance)
Types of Fluorescence:
Autofluorescence (Primary/Natural Fluorescence):
- Some tissue components fluoresce naturally when irradiated
- Examples: lipofuscin granules (yellow-brown), elastin (blue-white), chlorophyll (red)
- Can sometimes interfere with experimental fluorescence signals
Secondary (Induced) Fluorescence:
- Fluorescent dyes (fluorochromes/fluorophores) with affinity for specific cell molecules are added to the tissue
- DAPI (4',6-diamino-2-phenylindole): binds specifically to the minor groove of dsDNA → emits blue fluorescence under UV → standard nuclear counterstain
- Hoechst dyes: similar to DAPI, blue fluorescence with DNA
- Acridine orange: binds both DNA and RNA but emits different colors - DNA → yellow-green; RNA-rich cytoplasm → orange - allows simultaneous visualization of both nucleic acids
- Propidium iodide: binds DNA/RNA; red fluorescence; used to distinguish live from dead cells
- Phalloidin-fluorescein: phalloidin binds actin filaments specifically; coupled to fluorescein (green) → visualizes the actin cytoskeleton
- DiI, DiO: lipophilic dyes that insert into membranes; used to trace neuronal connections
Applications:
- Identifying specific cell components and molecular distributions
- Critical for immunofluorescence (see Immunohistochemistry below)
- Cell viability assays
- Flow cytometry
- FISH (Fluorescence In Situ Hybridization)
TYPE 3: PHASE-CONTRAST MICROSCOPY
Principle:
- Unstained cells and tissue sections are nearly invisible with bright-field microscopy because all parts of the cell have similar light absorption - differences exist only in their optical density (refractive index)
- When light passes through structures with different refractive indices (e.g., nucleus vs. cytoplasm), it undergoes slight phase shifts (changes in timing of light wave cycles), but the human eye cannot detect phase differences - only amplitude (brightness) differences
- The phase-contrast microscope uses a special optical system (annular diaphragm in the condenser + phase plate in the objective) that converts phase differences into amplitude (brightness) differences visible to the eye
- Structures with higher refractive indices appear darker on a lighter background (or vice versa in "positive" vs. "negative" phase contrast)
Key advantage:
- Allows visualization of living, unstained cells without fixation or staining
- Preserves cell viability during observation
- Essential for time-lapse microscopy of living cells
Uses:
- Studying living cells in culture
- Observing cell division, movement, and shape changes in real time
- Quality control of cell cultures
- Observation of unstained cells in clinical samples (e.g., urine sediment)
TYPE 4: CONFOCAL MICROSCOPY
The Problem with Conventional Fluorescence Microscopy:
- In a thick fluorescently stained specimen, the entire depth of the specimen is illuminated simultaneously
- Out-of-focus fluorescence from planes above and below the focal plane creates a blurry background haze that obscures fine detail
Principle of Confocal Microscopy:
- Uses a laser (or LED) as the light source - laser light is monochromatic, coherent, and very bright
- A pinhole aperture (confocal aperture) is placed in front of the detector at a position conjugate (confocal) with the focal plane of the objective
- Only light originating from the exact focal plane passes through the pinhole and reaches the detector
- Light from structures above and below the focal plane is geometrically blocked by the pinhole
- A computer-driven mirror system (scanning mirrors) moves the laser spot rapidly across the specimen
- Digital images captured point-by-point across a very thin plane produce an "optical section" with exceptional sharpness and contrast
- Capturing optical sections at a series of focal depths and digitally combining them creates a three-dimensional (3D) image reconstruction of the specimen
Advantages:
- Eliminates out-of-focus blur → dramatically improved image contrast and resolution (~0.1-0.2 μm laterally)
- Can produce 3D reconstructions from thick specimens (up to ~200 μm)
- Can image deep structures in living tissue without physical sectioning
- Can image multiple fluorescent labels simultaneously using different laser wavelengths
Uses:
- 3D mapping of cell organelles
- Imaging protein distributions in intact tissues
- Neuronal tracing and brain mapping
- Developmental biology (imaging of embryos)
- Live cell imaging with fluorescent protein markers (e.g., GFP-tagged proteins)
TYPE 5: POLARIZING MICROSCOPY
Principle:
- Normal (white) light vibrates in all directions perpendicular to its direction of travel
- A polarizing filter (polarizer) placed below the specimen allows only light vibrating in one specific plane to pass through → "plane-polarized light"
- A second filter, the analyzer, is placed above the specimen (between specimen and eye), oriented perpendicular to the polarizer → normally, no light passes through (the field appears completely dark)
- If, however, the tissue section contains structures made of highly organized, regularly repeating macromolecules (crystalline or paracrystalline order), these structures interact with polarized light and rotate its plane of vibration (a property called birefringence)
- Birefringent structures allow some light to pass through the analyzer → they appear as bright (colored) structures against the dark background
Birefringent Structures in Tissue:
- Collagen fibers (strongly birefringent; appear bright yellow/orange with picosirius red staining)
- Myelin sheaths (lipid-rich membranes in peripheral nerves)
- Bone and enamel crystals (hydroxyapatite)
- Actin and myosin filaments in striated muscle (the A-bands appear anisotropic - "A" stands for anisotropic = birefringent)
- Amyloid deposits (show characteristic apple-green birefringence when stained with Congo red - diagnostic for amyloidosis)
- Urate crystals (gout - negatively birefringent; needle-shaped crystals appear bright against dark background)
- Cellulose, starch granules, chitin
Uses:
- Diagnosing amyloidosis (Congo red + polarized light = apple-green birefringence)
- Identifying gout (urate crystals) and pseudogout (calcium pyrophosphate crystals)
- Studying collagen organization (degree of fibrosis)
- Distinguishing isotropic from anisotropic structures in muscle
- Analyzing crystalline deposits and foreign materials in tissue
PART 3: ELECTRON MICROSCOPY
While not strictly "light" microscopy, electron microscopy (EM) is always taught alongside LM because it extends visualization far beyond LM's resolution limits and is integral to the full understanding of tissue preparation principles.
Resolution comparison:
| Microscope | Resolution | Maximum Magnification |
|---|---|---|
| Human eye | ~100 μm | 1x |
| Light microscope | ~0.2 μm (200 nm) | 1,500x |
| Transmission EM | ~0.2 nm (2 Å) | >1,000,000x |
| Scanning EM | ~1-5 nm | ~500,000x |
TRANSMISSION ELECTRON MICROSCOPY (TEM)
Principle:
- Uses a beam of electrons (wavelength ~0.004 nm) instead of light (wavelength 400-700 nm)
- The much shorter wavelength of electrons gives ~1,000x better resolution than light microscopy
- Electrons are focused by electromagnetic lenses (magnetic coils) rather than glass lenses
- The specimen must be extremely thin (50-100 nm) because electrons cannot penetrate thick material
- Electron-dense structures (those containing heavy metals) scatter electrons and appear dark; electron-lucent structures appear light
- Images are captured on photographic film or a digital detector
Special Tissue Preparation for TEM:
- Fixation: glutaraldehyde (primary) + osmium tetroxide (secondary) - preserves membranes
- Dehydration: ascending graded alcohols
- Infiltration and embedding: in epoxy resin (Epon, Araldite) - much harder than paraffin, needed for ultra-thin sectioning
- Sectioning: ultramicrotome with a glass or diamond knife cuts 50-100 nm sections
- Staining: sections are stained with heavy metal salts - uranyl acetate (stains DNA, proteins) and lead citrate (enhances contrast of membranes and organelles) - these scatter electrons intensely
- Mounting: sections collected on copper grids (not glass slides)
Uses:
- Visualizing organelle ultrastructure (mitochondria, ER, Golgi, ribosomes, nuclear pores)
- Analyzing basement membrane structure
- Diagnosing glomerulonephritis (kidney biopsy EM)
- Identifying viral particles
- Characterizing cell junctions at molecular level
SCANNING ELECTRON MICROSCOPY (SEM)
Principle:
- Electrons are scanned across the surface of a specially coated specimen
- Electrons interact with the surface and secondary electrons (and backscattered electrons) are emitted
- These are captured by a detector to build a 3D topographic image of the surface
- Unlike TEM (which shows internal ultrastructure), SEM shows external surface morphology
Tissue Preparation for SEM:
- Fixation (glutaraldehyde)
- Critical-point drying (replaces water with CO₂ under pressure then release - avoids surface tension collapse)
- Mounting on a metal stub
- Coating with a thin layer of gold or gold-palladium (using a sputter coater) to make the surface electrically conductive and emit secondary electrons
- Examination in the SEM chamber under high vacuum
Uses:
- 3D imaging of cell surfaces (e.g., microvilli, cilia, cell shape, red blood cell morphology)
- Examining tissue surfaces and fracture planes
- Forensic analysis
PART 4: ADVANCED ANALYTICAL METHODS
AUTORADIOGRAPHY
Principle:
- Cells or tissues are exposed to radioactively labeled precursor molecules (e.g., tritiated thymidine [³H-thymidine] for DNA synthesis, ³H-uridine for RNA synthesis, ³H-amino acids for protein synthesis)
- After the cell incorporates the labeled molecule into the structure of interest, the tissue is fixed and sectioned
- A layer of photographic emulsion (silver bromide crystals) is applied over the section
- During exposure (days to weeks), radioactive emissions from the tissue strike the silver bromide crystals in the emulsion
- After development, the emulsion shows black silver grains deposited precisely over the radioactive structures
- The grain distribution reveals where the labeled molecule was incorporated and how much was incorporated
Uses:
- Identifying which cells are actively dividing (³H-thymidine incorporation into newly synthesized DNA)
- Tracing secretory pathways (e.g., Palade's classic experiments on pancreatic acinar cells revealed the ER→Golgi→secretory vesicle route for protein secretion)
- Studying mRNA transcription and translation sites
- Mapping receptor distributions
- Now largely replaced by in situ hybridization and immunohistochemistry but still used in some research applications
ENZYME HISTOCHEMISTRY
Principle:
- Cells are fixed under conditions that preserve enzyme activity (special fixatives, often cold, mild aldehyde)
- The tissue section is incubated with a specific substrate for the enzyme of interest
- When the enzyme cleaves the substrate, a colored or electron-dense reaction product is deposited precisely at the site of enzyme activity
- The location and intensity of staining reveals the distribution and relative activity of the enzyme in the tissue
Examples:
- Acid phosphatase: marks lysosomes and osteoclasts (cells that resorb bone)
- Alkaline phosphatase: marks brush borders of renal proximal tubule and intestinal absorptive cells; marks bone-forming osteoblasts
- Succinic dehydrogenase: marks mitochondria (SDH is a Krebs cycle enzyme embedded in the inner mitochondrial membrane)
- ATPase: identifies fast- vs. slow-twitch muscle fibers (types I and II)
- Peroxidase (myeloperoxidase): identifies granulocytes (neutrophils, eosinophils) in bone marrow
IMMUNOHISTOCHEMISTRY (IHC)
Principle:
- Based on the antigen-antibody reaction: antibodies are exquisitely specific proteins that bind to a single molecular target (antigen)
- Antibodies are used to detect and localize specific proteins (antigens) within tissue sections
- After binding, the antibody's location is visualized with a detectable label (fluorochrome, enzyme, gold particles)
Antibody Types:
Polyclonal antibodies:
- Produced by injecting the antigen of interest into an animal (e.g., rabbit, goat)
- The animal's immune system produces a mixture of antibodies (from many B-cell clones) against different parts (epitopes) of the antigen
- Blood is collected, and the antibody-containing fraction (antiserum) is used
- Advantage: high sensitivity (multiple epitopes recognized)
- Disadvantage: batch-to-batch variation; some non-specific cross-reactivity
Monoclonal antibodies:
- A specific protein is injected into a mouse
- Activated B-lymphocytes (antibody-producing cells) are isolated from the mouse and fused with immortal lymphocytic tumor cells (myeloma cells) to produce hybridoma cells
- Each hybridoma clone produces one single, specific antibody against one specific epitope
- Different clones are isolated and cultured separately; their antibodies collected individually
- Advantages: absolute specificity for one epitope; unlimited supply; no batch variation
- Uses: diagnostic pathology panels, targeted cancer therapy (e.g., trastuzumab, rituximab)
Methods of Immunohistochemistry:
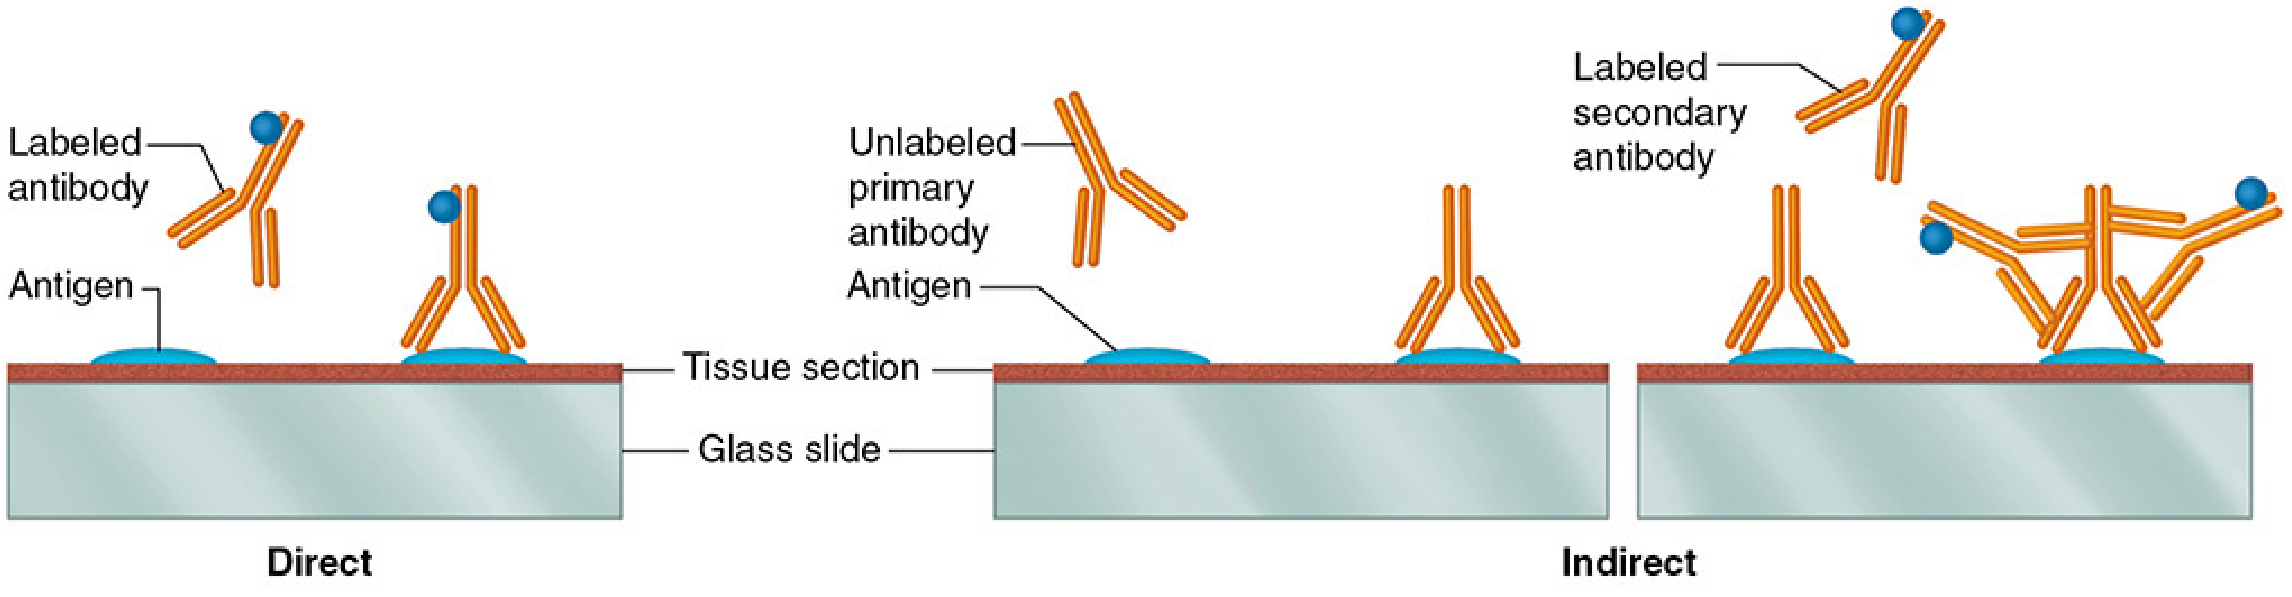
Figure: Direct immunohistochemistry (left) uses a labeled antibody directly against the antigen. Indirect immunohistochemistry (right) uses an unlabeled primary antibody bound to the antigen, then a labeled secondary antibody that recognizes the primary - amplifying the signal. - Junqueira's Basic Histology, 17e
Direct Method:
- A single, labeled primary antibody (made against the protein of interest) is directly applied to the tissue section
- The labeled antibody binds specifically to the antigen
- The label (fluorochrome, peroxidase) is directly visualized
- Simpler and faster, but less sensitive
Indirect Method (most common):
- Step 1: An unlabeled primary antibody (against the protein of interest) is applied to the tissue section and binds the antigen
- Step 2: After washing, a labeled secondary antibody is applied - this secondary antibody was made in a different species against the immunoglobulins (antibodies) of the species that made the primary antibody (e.g., if primary is from a mouse, the secondary is anti-mouse IgG made in a rabbit or goat)
- The labeled secondary antibody binds all the primary antibody molecules
- Signal amplification: multiple labeled secondary antibodies can bind each primary antibody molecule, greatly amplifying the detectable signal
- Advantages: more sensitive than direct method; the same secondary antibody preparation can be used with many different primary antibodies (from the same species) - saving resources
Labels Used:
- Fluorescent compounds (FITC, rhodamine, Cy3, Cy5): visualized by fluorescence microscopy; allows multiple antigens to be detected simultaneously using different-colored fluorophores
- Peroxidase (HRP) or alkaline phosphatase: enzyme labels that react with chromogenic substrates to produce a colored precipitate (e.g., DAB = diaminobenzidine → brown precipitate with HRP) visible by bright-field microscopy; permanent and does not fade
- Gold particles: electron-dense; used for immunoelectron microscopy (gold shows exactly where the antigen is at the ultrastructural level with TEM)
- Biotin-avidin/streptavidin system: biotin (vitamin) is conjugated to the secondary antibody; streptavidin (binds biotin with extremely high affinity) conjugated to a label provides further signal amplification
Antigen Retrieval:
- Formalin fixation cross-links proteins, which can mask epitopes (the binding sites for antibodies)
- Antigen retrieval techniques restore antigenicity:
- Heat-induced epitope retrieval (HIER): sections are heated in a buffer solution (microwave, pressure cooker, water bath) - heat breaks some cross-links and unmasks hidden epitopes
- Enzymatic retrieval: protease digestion (e.g., proteinase K, trypsin) partially digests cross-linked proteins to expose epitopes
Clinical Uses of IHC:
- Tumor diagnosis and classification (e.g., cytokeratin markers = carcinoma; S-100 = melanoma/neural tumors; CD markers = lymphoma classification)
- Hormone receptor status in breast cancer (ER, PR, HER2)
- Infectious disease diagnosis (viral antigens, bacterial antigens)
- Prognostic markers (Ki-67 = proliferation index)
- Identifying specific cell types in tissue biopsies
IN SITU HYBRIDIZATION (ISH)
Principle:
- Uses nucleic acid probes (single-stranded DNA or RNA) complementary to a specific mRNA or DNA sequence of interest
- The probe hybridizes (base-pairs) specifically to the complementary target sequence within the tissue section
- The probe is labeled (fluorescent, radioactive, or enzymatic) and its location visualized
- Detects specific nucleic acid sequences (rather than proteins as in IHC) directly within cells and tissues
Fluorescence In Situ Hybridization (FISH):
- Uses fluorescently labeled probes
- Widely used in clinical diagnostics to detect chromosomal abnormalities (gene amplifications, deletions, translocations)
- Example: HER2 gene amplification in breast cancer; BCR-ABL translocation in CML
Uses:
- Detecting viral DNA/RNA (e.g., HPV, EBV, CMV in tissue)
- Gene copy number analysis (cancer diagnostics)
- Identifying specific bacteria in tissues
- Mapping gene expression patterns in development
PART 5: CELL AND TISSUE CULTURE
Principle:
- Removes cells or tissue fragments from an organism and maintains them in an artificial environment (culture dish or flask) with appropriate growth media (nutrients, growth factors, hormones, buffered salts)
- Provides a controlled, simplified experimental system for studying cells without the complexity of the whole organism
Types:
- Cell culture (monolayer): single cells proliferate as a layer on a culture dish surface
- Organ culture: small tissue explants maintained with minimal structural disruption
- 3D cultures / organoids: cells grown in 3D matrices that self-organize into organ-like structures; increasingly used to model disease
Advantages:
- Direct visualization of living cells by phase-contrast, fluorescence, or confocal microscopy
- Ability to manipulate the chemical environment precisely (add/remove growth factors, drugs)
- Time-lapse recording of dynamic processes (cell division, migration, secretion)
- Genetic manipulation (transfection with plasmids, siRNA knockdown, CRISPR editing)
Limitations:
- Cells in culture may change their gene expression and behavior over time (dedifferentiation)
- Lack the complex tissue architecture and cell-cell interactions of the intact organ
- Two-dimensional culture does not fully recapitulate in vivo 3D environments
PART 6: INTERPRETATION OF STRUCTURES IN TISSUE SECTIONS
Understanding what you see in tissue sections requires knowing how 3D structures appear when cut as 2D slices.
Key Principles of Section Interpretation:
1. Plane of Section Fundamentally Changes Appearance:
- A tube (like a blood vessel or gland duct) cut transversely (cross-section) appears as a circle or ring
- The same tube cut longitudinally appears as two parallel lines with a space between them
- Cut obliquely, it appears as an oval
- Recognizing these cross-sectional appearances is essential for identifying tubular structures
2. Three-Dimensional Reconstruction:
- A single 2D section gives an incomplete picture of a 3D structure
- Multiple serial sections (cut in sequence) can be reconstructed into a 3D model
- Modern confocal microscopy can generate these 3D reconstructions optically without physical serial sectioning
3. Artifacts:
- Shrinkage: spaces between cells/tissues that were not present in life; caused by processing
- Empty spaces where lipid was: fat cells and lipid droplets appear as empty "holes" because lipid is extracted during dehydration
- Wrinkles and folds: from imperfect sectioning or mounting
- Knife marks: lines across sections from nicks in the knife edge
- Chatter marks: regular parallel marks from vibration during sectioning
- Precipitates: staining precipitates deposited on the section (not real structures)
4. Relationship Between Cell Morphology and Function:
- Cells with abundant RER → active protein secretion (basophilic cytoplasm)
- Cells with abundant SER → lipid/steroid synthesis (eosinophilic, foamy cytoplasm)
- Cells with large mitochondria → high energy demand
- Large nucleoli → active ribosome production → active protein synthesis
- Heterochromatin-rich (dark) nuclei → transcriptionally inactive cells
SUMMARY TABLE: COMPLETE COMPARISON OF MICROSCOPY TYPES
| Feature | Bright-Field | Fluorescence | Phase-Contrast | Confocal | Polarizing | TEM | SEM |
|---|---|---|---|---|---|---|---|
| Light source | White light | UV/laser | White light | Laser | White light + polarizer | Electron beam | Electron beam |
| Specimen state | Fixed, stained | Fixed or live | Live or fixed | Fixed or live | Fixed, stained | Fixed, resin-embedded | Fixed, metal-coated |
| Resolution | 0.2 μm | 0.2 μm | 0.2 μm | 0.1 μm | 0.2 μm | 0.2 nm | 1-5 nm |
| What it shows | General morphology | Specific molecules | Living cells | 3D optical sections | Birefringent structures | Ultrastructure (internal) | 3D surface topography |
| Section thickness | 3-7 μm | Variable | N/A (live cells) | Variable | 3-7 μm | 50-100 nm | Surface (no section) |
| Key advantage | Simplicity; standard | Molecular specificity | No staining needed | 3D imaging | Identifies crystalline arrays | Highest resolution | Surface 3D imaging |
| Common stain | H&E + special stains | Fluorophores/fluorochromes | None needed | Fluorophores | Congo red, picosirius red | Uranyl acetate, lead citrate | Gold/gold-palladium |
SUMMARY OF KEY POINTS
- Tissue preparation for light microscopy follows a precise sequence: Fixation → Dehydration → Clearing → Infiltration → Embedding → Sectioning → Deparaffinization → Staining → Mounting
- Fixation (most commonly with buffered formalin) preserves tissue by cross-linking proteins, preventing autolysis and degradation
- Paraffin embedding supports tissue for microtome sectioning at 3-7 μm; epoxy resin embedding is used for EM (50-100 nm sections)
- H&E is the standard stain: hematoxylin stains acidic structures (nuclei, ribosomes) blue-purple; eosin stains basic structures (cytoplasm, collagen) pink
- Stain selectivity is based on charge: basic dyes bind acidic structures (basophilia); acid dyes bind basic structures (eosinophilia/acidophilia)
- Special stains target specific tissue components: PAS (glycogen/mucins), Masson's trichrome (collagen/muscle), Congo red (amyloid), Van Kossa (calcium)
- Bright-field microscopy is the workhorse; virtual microscopy (digital scanning) is rapidly replacing physical microscopy in education and telepathology
- Fluorescence microscopy visualizes specific molecules using fluorescent labels; confocal microscopy eliminates out-of-focus blur and produces 3D optical sections
- Phase-contrast microscopy allows visualization of living, unstained cells by converting phase differences to amplitude differences
- Polarizing microscopy detects birefringent structures (collagen, amyloid with Congo red, crystals) by their rotation of polarized light
- Immunohistochemistry uses antibodies to localize specific proteins within tissue; the indirect method amplifies signal using labeled secondary antibodies
- In situ hybridization detects specific DNA/RNA sequences in tissue; FISH uses fluorescent probes for chromosomal analysis
- Autoradiography traces radioactively labeled molecules to determine their site of incorporation and metabolic fate
- TEM provides ultrastructural detail (~0.2 nm resolution); SEM provides 3D surface images of tissue
All content sourced from: Junqueira's Basic Histology: Text and Atlas, 17e (ISBN 9781264930395) and Histology: A Text and Atlas with Correlated Cell and Molecular Biology (ISBN 9781975181512)
This is a shared conversation. Sign in to Orris to start your own chat.