
Indirect opthalmoscopy
Reading File
Indirect ophthalmoscopy is a method of examining the fundus using a bright light source and a condensing lens, giving a wide-field, stereoscopic, inverted image of the retina.
Searching sources...
Finding Sources
Finding Sources
Reading File
Finding Sources
Reading File
Finding Sources
Reading File
Loading Image
Here is a thorough overview of indirect ophthalmoscopy, drawn from Kanski's Clinical Ophthalmology (10th ed.).
Indirect Ophthalmoscopy (Binocular Indirect Ophthalmoscopy - BIO)
Principle
Light is transmitted from a head-mounted illumination source through a condensing lens held at the focal point of the patient's eye. The lens forms a real, inverted and laterally reversed image of the fundus in the air between the lens and the examiner. The examiner views this image through a stereoscopic binocular viewing system.
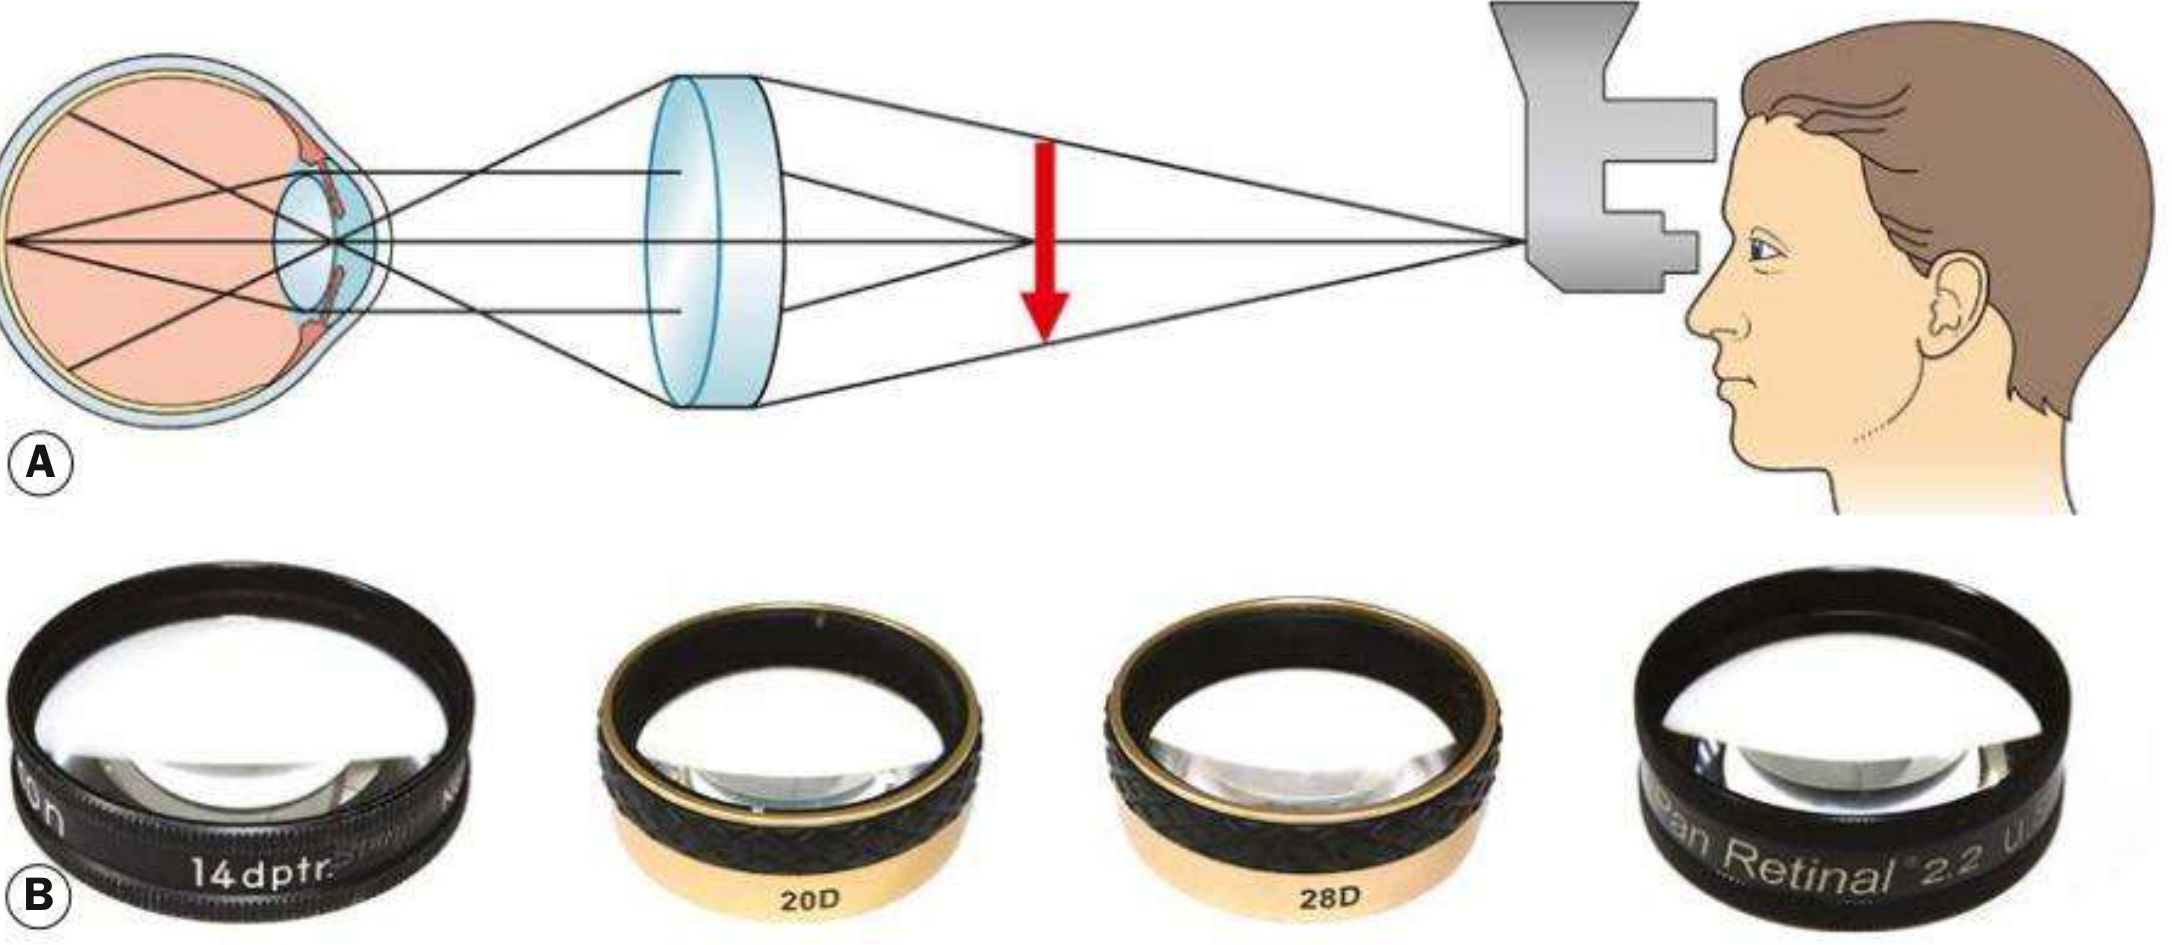
Fig. 1.38 - (A) Principles of indirect ophthalmoscopy; (B) condensing lenses. Kanski's Clinical Ophthalmology, 10th ed.
Advantages Over Direct Ophthalmoscopy
| Feature | Indirect (BIO) | Direct |
|---|---|---|
| Field of view | Wide (45-65°) | Narrow (~5°) |
| Stereopsis | Yes (binocular) | No |
| Magnification | Lower (x1.5 - x3) | Higher (~x15) |
| Media opacity penetration | Better | Worse |
| Peripheral retina access | Excellent (with scleral depression) | Limited |
| Image orientation | Inverted + reversed | Upright |
Condensing Lenses
Magnification = 60 / Dioptric power of lens
| Lens | Magnification | Field of View | Notes |
|---|---|---|---|
| 20 D | x3 | ~45° | Most commonly used; general fundus examination |
| 28 D | x2.27 | ~53° | Shorter working distance; useful for small pupils |
| 40 D | x1.5 | ~65° | Mainly for small children; also usable at slit lamp for high magnification |
| Panretinal 2.2 | ~x3 | ~53° | Combines 20D magnification with 28D field; good for small pupils |
| Macula Plus 5.5 | Ultra-high | Narrow | For detailed macula and optic disc examination |
Key rule: Lower power lens = higher magnification but smaller field of view. Higher power lens = wider field but less magnification.
Technique
- Patient position: Supine on a bed or reclining chair (not sitting upright).
- Pupil dilation: Mandatory. Reducing ambient light improves contrast and reduces required light intensity.
- Eyepiece setup: Set interpupillary distance correctly; centre the light beam in the viewing frame.
- Patient instruction: Keep both eyes open at all times. Gently separate lids if needed.
- Lens handling: Hold the condensing lens with the flat surface facing the patient.
- Examination order: Examine the peripheral fundus first - this allows the patient to adapt to the light. Ask the patient to move the eyes to optimal positions for each quadrant.
- Children: A speculum may be needed to keep lids apart; a squint hook can help direct globe position (e.g. for ROP screening).
Scleral Indentation (Depression)
Scleral indentation is used to:
- Improve visualization of the retina anterior to the equator (the peripheral retina not otherwise visible)
- Allow kinetic evaluation of retinal breaks and lesions
Important points:
- Should only be attempted after mastering the basic BIO technique.
- Requires coordination between the indenter position and the viewing apparatus.
- A cotton-tipped applicator is preferred by some practitioners.
- The indenter must be kept tangential to the globe at all times - perpendicular pressure causes pain and risks perforation if the sclera is thin.
Example - viewing ora serrata at 12 o'clock:
- Ask patient to look down.
- Apply the scleral indenter to the outside of the upper eyelid at the tarsal plate margin.
- Ask the patient to look up while advancing the indenter parallel to the globe.
- Align your eyes with the condensing lens and indenter.
- Exert gentle pressure to create a mound, then sweep to adjacent areas.
For the 3 and 9 o'clock positions, direct scleral indentation (with topical anaesthesia) is sometimes necessary.
Fundus Drawing
BIO examination findings are classically documented as a colour-coded fundus drawing:
| Finding | Colour |
|---|---|
| Detached retina | Blue shading |
| Flat retina | Red shading |
| Retinal veins / vessels | Blue lines |
| Retinal breaks | Red with blue outline |
| Flap of retinal tear | Blue |
| Thin retina / lattice | Red hatching outlined in blue |
| Retinal pigment | Black |
| Exudates | Yellow |
| Vitreous opacities | Green |
Wide-field photographic imaging (e.g. Optos) can supplement or sometimes replace manual drawings.
Clinical Uses
BIO is the preferred method for:
- Retinal detachment - detection and mapping of retinal breaks
- Retinopathy of Prematurity (ROP) screening in neonates
- Peripheral retinal examination (lattice degeneration, tears, dialysis)
- Trauma - detecting peripheral breaks or detachment after blunt eye injury (with scleral depression ~1 month post-trauma)
- Tumour evaluation (uveal melanoma, choroidal lesions)
- Vitreous haemorrhage - BIO penetrates media opacity better than slit lamp biomicroscopy
- Paediatric fundus examination
Source: Kanski's Clinical Ophthalmology: A Systematic Approach, 10th edition, pp. 40-42
Lacrimal flow
Tears flow from the lacrimal gland across the ocular surface and drain medially through the puncta, canaliculi, lacrimal sac, and nasolacrimal duct into the inferior meatus of the nose.
Searching sources...
Finding Sources
Finding Sources
Reading File
Finding Sources
Reading File
Loading Image
Loading Image
Lacrimal Flow
Anatomy of the Lacrimal Drainage System
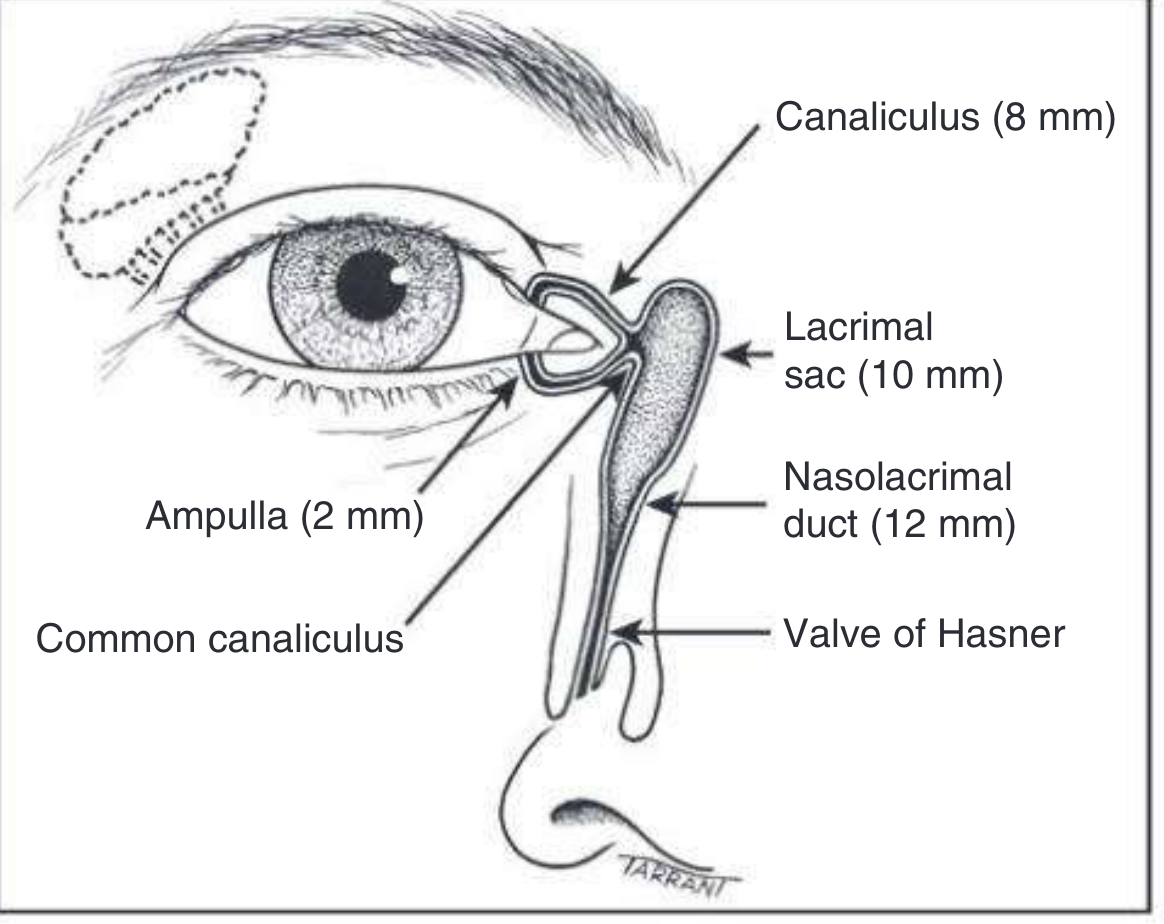
Fig. 3.1 - Anatomy of the lacrimal drainage system. Kanski's Clinical Ophthalmology, 10th ed.
The lacrimal drainage system consists of the following structures in sequence:
1. Puncta
- Located at the posterior edge of the lid margin, at the junction of the lash-bearing lateral 5/6 (pars ciliaris) and the medial non-ciliated 1/6 (pars lacrimalis)
- The punctum and vertical canaliculus are part of the tarsal plate
- Normally face slightly posteriorly - can be inspected by everting the medial lid
2. Canaliculi
- Each canaliculus passes vertically ~2 mm from the lid margin (this short vertical segment = ampulla)
- Then turns medially and runs horizontally ~8 mm to reach the lacrimal sac
- The horizontal canaliculus is surrounded by the palpebral part of orbicularis oculi (Horner muscle)
- The superior and inferior canaliculi unite (>90% of cases) to form the common canaliculus, which opens into the lateral wall of the lacrimal sac
- A small mucosal flap - the valve of Rosenmüller - overhangs the junction of the common canaliculus and lacrimal sac (the internal punctum), preventing reflux of tears back into the canaliculi
3. Lacrimal Sac
- 10-12 mm long, lies in the lacrimal fossa between the anterior and posterior lacrimal crests
- Separated from the middle meatus of the nasal cavity by the lacrimal bone and frontal process of the maxilla
- In dacryocystorhinostomy (DCR), an anastomosis is created between the sac and nasal mucosa to bypass nasolacrimal duct obstruction
4. Nasolacrimal Duct
- 12-18 mm long, the inferior continuation of the lacrimal sac
- Descends and angles slightly laterally and posteriorly
- Opens into the inferior nasal meatus, lateral to and below the inferior turbinate
- The opening is partially covered by a mucosal fold - the valve of Hasner
Physiology of Tear Flow
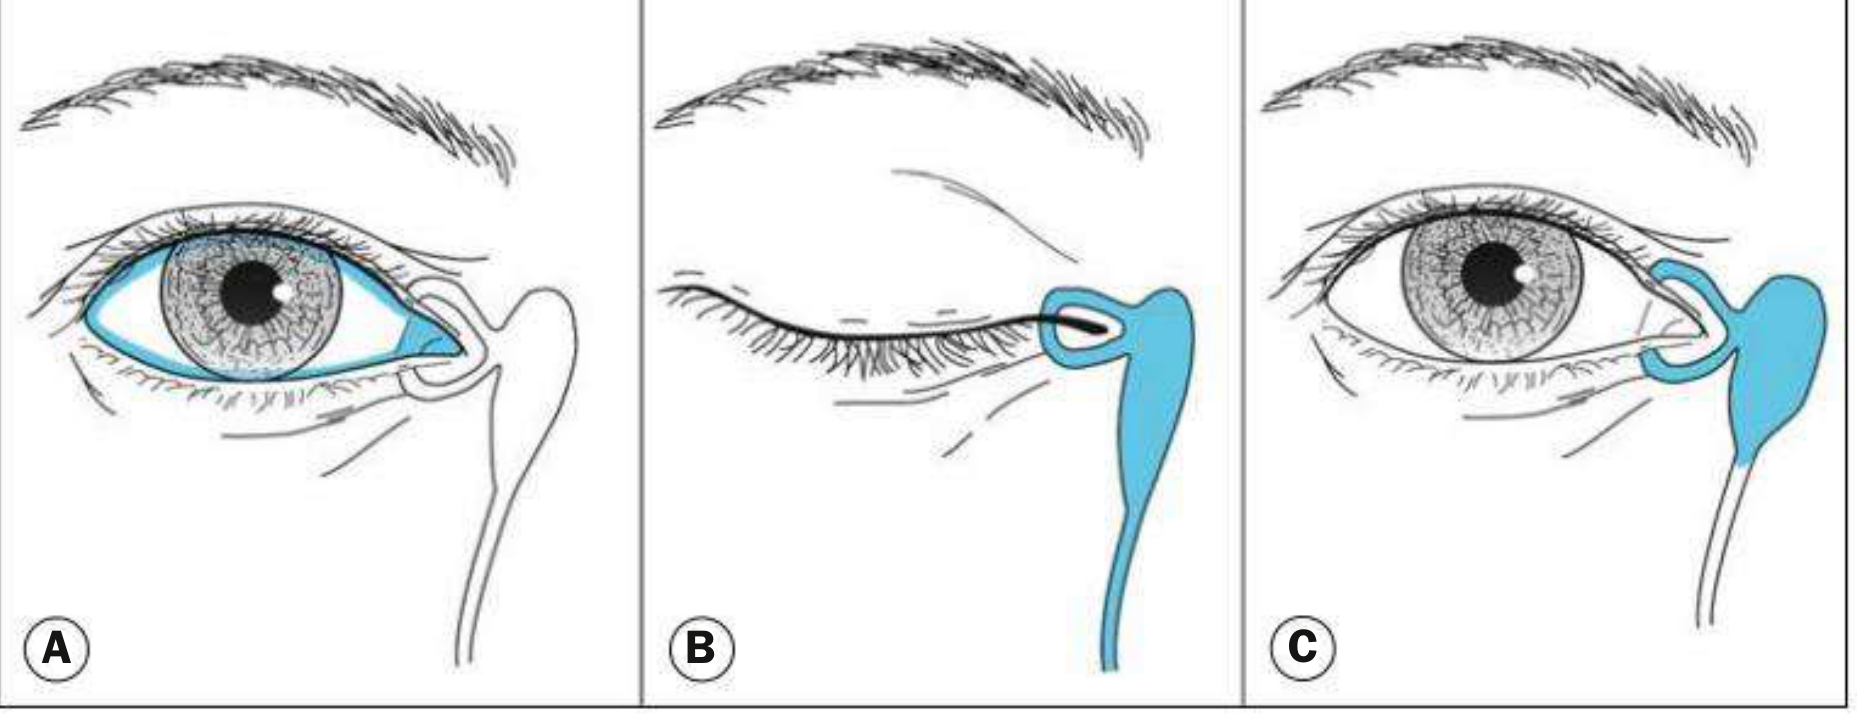
Fig. 3.2 - Physiology of lacrimal drainage. Kanski's Clinical Ophthalmology, 10th ed.
Tears are secreted by the main lacrimal gland and accessory lacrimal glands (of Krause and Wolfring). A variable amount of the aqueous component is lost by evaporation; the remainder drains as follows:
Step 1 - Surface flow (Fig. 3.2A)
Tears flow along the upper and lower marginal tear strips, pooling in the lacus lacrimalis (the medial lake at the inner canthus). From there they enter the upper and lower canaliculi by a combination of capillarity and suction.
Step 2 - Blink (Fig. 3.2B)
With each blink, the pretarsal orbicularis oculi muscle:
- Compresses the ampullae
- Shortens and compresses the horizontal canaliculi
- Closes and moves the puncta medially, resisting reflux
Simultaneously, contraction of the lacrimal part of orbicularis oculi (Horner muscle) creates a positive pressure that forces tears down the nasolacrimal duct and into the nose. This is mediated by helically arranged connective tissue fibres around the lacrimal sac.
Step 3 - Eye opening (Fig. 3.2C)
When the eyes open, the canaliculi and sac expand, creating negative pressure that draws tears from the canaliculi into the sac.
Summary of Tear Flow Path
Lacrimal gland
      ↓
Ocular surface (across conjunctiva and cornea)
      ↓
Marginal tear strips (upper and lower lids)
      ↓
Lacus lacrimalis (medial canthus)
      ↓
Puncta (upper & lower, ~2 mm vertical ampulla)
      ↓
Horizontal canaliculi (~8 mm each)
      ↓
Common canaliculus → Valve of Rosenmüller
      ↓
Lacrimal sac (10-12 mm) - in lacrimal fossa
      ↓
Nasolacrimal duct (12-18 mm) → Valve of Hasner
      ↓
Inferior nasal meatus
Key Valves
| Valve | Location | Function |
|---|---|---|
| Valve of Rosenmüller | Junction of common canaliculus and lacrimal sac | Prevents reflux of tears back into canaliculi |
| Valve of Hasner | Opening of nasolacrimal duct into inferior meatus | Partially covers the ductal opening; congenital failure to open = congenital NLD obstruction |
Clinical Relevance - Epiphora (Watering Eye)
Epiphora = overflow of tears at the eyelid margin. Two mechanisms:
- Hypersecretion - secondary to anterior segment disease (dry eye causing paradoxical reflex tearing, inflammation). Treatment is usually medical.
- Defective drainage - compromised lacrimal drainage system (punctal stenosis, canalicular obstruction, NLD obstruction, dacryocystitis). Treatment often requires surgical intervention.
Clinical tip: A watering eye is commonly caused by reflex hypersecretion secondary to a dry ocular surface - treat the dryness first before assuming a drainage problem.
Source: Kanski's Clinical Ophthalmology: A Systematic Approach, 10th edition, pp. 112-113
This is a shared conversation. Sign in to Orris to start your own chat.