Here is a comprehensive, clinically structured physiotherapy assessment and management plan for a 4-week postnatal woman presenting with urinary incontinence, low back pain, pelvic floor weakness, and mild postpartum depression.
Physiotherapy Assessment & Management
4-Week Postnatal Woman: Multi-System Presentation
⚠️ IMPORTANT CLINICAL PRECAUTIONS AT 4 WEEKS POSTPARTUM
Before any assessment or treatment begins, the physiotherapist must be aware of:
| Precaution | Rationale |
|---|
| Tissue healing still active | Perineal/episiotomy repair, C-section wound (if applicable) not fully healed |
| Relaxin still elevated | Ligamentous laxity persists during breastfeeding; joint instability risk |
| Diastasis recti likely present | Linea alba may be weakened; trunk loading must be graded carefully |
| Lochia still present | Indicates uterine involution is ongoing |
| Mild PPD confirmed | Requires sensitive communication, adapted goal-setting, MDT liaison |
| Fatigue and sleep deprivation | Limits exercise tolerance and compliance; session length adjusted |
| Breastfeeding status | Affects hormonal environment (low estrogen → pelvic tissue atrophy) |
PART A — PHYSIOTHERAPY ASSESSMENT
1. Subjective Assessment (History-Taking)
Patient Profile
- Age, parity (G_P_), mode of delivery (SVD / instrumental / C-section)
- Gestational age at delivery, birth weight, duration of second stage
- Any perineal trauma: 1st–4th degree tear, episiotomy, instrumental delivery (forceps/ventouse)
- Breastfeeding or formula feeding
- Pre-existing back pain or pelvic floor issues prior to/during pregnancy
Chief Complaints (explore each):
A. Urinary Incontinence
- Type: stress (leaks on cough, sneeze, laugh, exercise), urge (sudden strong need to void), mixed
- Onset: immediately postpartum vs. gradual
- Frequency: how many episodes per day
- Volume: drops, splashes, or large amounts
- Pad use: number of pads/day
- Triggers: specific activities, position changes
- Bladder diary: 3-day frequency–volume chart (completed prior to session)
- Associated symptoms: urgency, frequency, nocturia, incomplete emptying, hesitancy, dysuria
B. Low Back Pain
- Location: lumbar, lumbosacral, sacroiliac, pubic symphysis, or combined
- Character: aching, sharp, stabbing, burning
- Onset and mechanism: during pregnancy vs. post-delivery; related to labour positioning
- Aggravating factors: prolonged standing, sitting, walking, lifting (baby), rolling in bed, climbing stairs
- Relieving factors: rest, heat, support belt
- Night pain: waking at night
- Radiation: buttock, groin, leg — rule out nerve root involvement
- Functional impact: carrying baby, feeding positions, household tasks
- Numeric Pain Rating Scale (NPRS): 0–10 at rest and with activity
C. Pelvic Floor Weakness
- Symptoms of prolapse: heaviness, dragging, or bulge in the vagina
- Bowel: constipation, incomplete emptying, fecal urgency/incontinence
- Sexual dysfunction (not assessed at 4 weeks; flag for 3-month review)
D. Postpartum Depression
- Use Edinburgh Postnatal Depression Scale (EPDS) — validated 10-item self-report tool
- Score ≥10: likely depression; ≥13: probable major depression
- Critically assess Question 10 (self-harm ideation) — mandatory
- If EPDS score ≥13 or any self-harm ideation: immediate referral to GP/obstetrician/psychiatry
- Explore: mood, anxiety, sleep (beyond infant demands), appetite, motivation, bonding with baby
- Physiotherapy role: supportive, non-pharmacological; exercise has Level 1 evidence for reducing PPD symptoms
Other Subjective Information
- Medications: iron supplements, analgesics, laxatives, antidepressants
- Red flags to screen and refer if present:
- Cauda equina symptoms (saddle anesthesia, bilateral leg weakness, bladder/bowel paralysis)
- Fever, wound breakdown, postpartum hemorrhage
- Severe unremitting pain unrelated to activity
- Active suicidal ideation (EPDS Q10)
2. Objective Assessment
2.1 Observation and Posture
| Area | Findings to Note |
|---|
| Standing posture | Increased lumbar lordosis (common postpartum), forward head posture (from feeding), swayed back posture |
| Gait | Antalgic gait, Trendelenburg sign (gluteal weakness) |
| Abdominal contour | Diastasis recti visible as midline ridge or gap on sit-up or head lift |
| Perineum | Only if clinical setting allows; observe for prolapse, wound healing |
| Breathing pattern | Thoracic vs. diaphragmatic; breath-holding (increases intra-abdominal pressure) |
2.2 Pelvic Floor Assessment
A. Diastasis Recti Assessment (MUST assess at 4 weeks)
Method: Supine, knees bent, feet flat
- Place 2–3 fingers horizontally at the umbilicus
- Patient performs slow head lift
- Measure:
- Width of gap (in finger-widths or cm): normal ≤2 finger-widths (≤2 cm)
- Depth/tension: ability to feel tissue tension under the fingers (more important than width alone)
- Linea alba tension: poor tension = no resistance felt under fingers
Clinical relevance: Diastasis recti impairs abdominal–pelvic floor force transmission. No conventional abdominal crunches, sit-ups, or double-leg lifts until recti approximation restored.
B. Pelvic Floor Muscle Assessment (Internal — with consent)
At 4 weeks postpartum, internal examination is appropriate only if perineal wounds are healed. Defer if episiotomy/tear not healed.
Oxford Grading Scale (Modified):
| Grade | Description |
|---|
| 0 | No contraction |
| 1 | Flicker only |
| 2 | Weak contraction, no lift |
| 3 | Moderate contraction with some lift |
| 4 | Good contraction with elevation and resistance |
| 5 | Strong contraction, holds against strong resistance |
Additional findings:
- Ability to relax (equally important — hypertonic floor is also dysfunctional)
- Presence of trigger points, scar tissue, episiotomy tenderness
- Prolapse stage (modified POP-Q or Baden–Walker if applicable)
- Perineal body integrity
External observation:
- Observe perineal lift during voluntary contraction
- Assess for paradoxical (bearing down) instead of lifting
2.3 Lumbar Spine and Pelvic Girdle Assessment
| Test | Purpose |
|---|
| Active range of motion (flexion, extension, lateral flexion, rotation) | Identify lumbar restriction and pain arc |
| Posterior Pelvic Pain Provocation (P4) test | Screens for SIJ dysfunction — sensitivity 80%, specificity 79% |
| FABER test (Patrick's test) | SIJ and hip pathology |
| Active Straight Leg Raise (ASLR) | Tests lumbopelvic force closure; positive = inability to raise leg without compensating |
| Pubic symphysis palpation | Rules out diastasis symphysis pubis (DSP) |
| Trendelenburg test | Assesses gluteus medius strength |
| Prone hip extension | Assesses gluteal activation pattern; lumbar hyperextension compensation common |
| Slump test / SLR | Rules out radiculopathy if leg symptoms present |
Key muscle strength testing:
- Gluteus maximus, gluteus medius, hip abductors
- Transverse abdominis (TVA) — note: assessed functionally, not with conventional testing at 4 weeks
- Lumbar multifidus — prone multifidus contraction test
2.4 Functional Tests
| Test | What It Assesses |
|---|
| Timed sit-to-stand (5x) | Lower limb and pelvic strength |
| Single leg stance (timed) | Pelvic stability, gluteal endurance |
| Walking test (2-minute) | Functional endurance, pelvic pain provocation |
| Step test | Stair negotiation safety |
| Carrying baby simulation | Functional load assessment — lumbar and pelvic floor response |
2.5 Outcome Measures
| Tool | Domain |
|---|
| EPDS (Edinburgh Postnatal Depression Scale) | Postpartum depression screening |
| NPRS (0–10) | Pain intensity |
| ICIQ-UI SF | Urinary incontinence severity and QoL |
| Oxford Grading Scale | Pelvic floor strength |
| ASLR test score (0–5) | Lumbopelvic stability |
| Bladder diary (3-day) | Voiding patterns |
| Oswestry Disability Index | Low back pain functional disability |
| 24-hour pad test | Urine leakage volume |
3. Problem List and Goals
Problem List
- Stress urinary incontinence (most likely type at 4 weeks postpartum)
- Pelvic floor weakness (Oxford Grade likely 1–3)
- Lumbar/lumbosacral/SIJ pain
- Diastasis recti (probable)
- Postural dysfunction (increased lordosis, anterior pelvic tilt)
- Mild postpartum depression
- Reduced functional capacity (fatigue, deconditioning)
Short-Term Goals (4 weeks)
- Correct pelvic floor muscle identification and activation
- Reduce leakage episodes by 50%
- Reduce LBP from X/10 to X-2/10
- Improve pelvic floor strength to Oxford Grade 3–4
- Patient understands and manages diastasis recti safely
Long-Term Goals (3–6 months)
- Achieve continence (0 leakage episodes)
- Return to full functional activity (walking, exercise, return to work)
- Oxford Grade 4–5 pelvic floor
- Full lumbar mobility and pain-free function
- Safe return to impact exercise (running, aerobics) when cleared
- EPDS score <10; maintained with exercise and MDT support
PART B — PHYSIOTHERAPY MANAGEMENT
SESSION STRUCTURE
All sessions adapted for: fatigue, baby-care demands, breastfeeding, emotional lability from PPD. Sessions kept to 30–45 minutes. Home program is brief, realistic, and baby-friendly.
PHASE 1 — WEEKS 1–2 (Weeks 4–6 Postpartum)
Goals: Education, correct activation, pain management, gentle restoration
1. Education and Counselling
- Explain normal postnatal physiology: tissue healing, hormonal changes, relaxin effects
- Normalize the presenting symptoms — reassurance reduces anxiety (important for PPD)
- Breathing education: diaphragmatic breathing as the foundation of pelvic floor and core function
- Posture education: feeding positions (avoid prolonged neck flexion and thoracic kyphosis), lifting technique, sleeping posture
- Activity guidance:
- Avoid: heavy lifting, high-impact exercise, straining at stool, sit-ups/crunches
- Encourage: gentle walking, progressive activity within comfort
- Pelvic floor anatomy education with diagrams
- PPD management: validate feelings; explain exercise as evidence-based mood support; encourage social interaction, adequate rest, sunlight exposure; provide EPDS score feedback and refer if indicated
2. Low Back Pain Management
Manual Therapy / Passive Modalities
- Heat therapy: superficial heat to lumbar region for 15–20 min (safe while breastfeeding)
- Gentle soft tissue massage: lumbar paraspinals, gluteals, piriformis (common sites of tension)
- SIJ mobilization: gentle Grade I–II Maitland techniques if SIJ dysfunction confirmed
- TENS: safe postpartum for pain modulation (avoid abdomen if breastfeeding concerns)
- Positioning advice: sleeping with pillow between knees in side-lying, lumbar roll for sitting
Pelvic Support Belt / SIJ Belt
- Indicated if ASLR positive and SIJ provocation tests positive
- Worn at hip level to compress SIJ during painful activities
- Temporary measure (4–8 weeks); not a long-term solution
3. Pelvic Floor Exercises (Week 1–2)
Step 1: Diaphragmatic Breathing (Foundation Exercise)
Position: Supine, knees bent
- Place one hand on chest, one on abdomen
- Inhale through nose — abdomen rises, pelvic floor gently descends
- Exhale through mouth — abdomen falls, pelvic floor naturally recoils upward
- 3 sets × 10 breaths, 3× daily
- This alone begins pelvic floor rehabilitation
Step 2: Gentle Pelvic Floor Activation
Position: Supine, knees bent (gravity-eliminated)
Technique: Lift and squeeze around the urethra and vagina — imagine stopping urine flow and preventing passing wind simultaneously
- Hold: 3 seconds → relax fully for 6 seconds
- Repetitions: 8–10 contractions
- Sets: 3 per day
- Quick flicks: 10 rapid contractions added after holds
- Ensure NO breath-holding, gluteal contraction, or abdominal bracing
"At approximately 9 weeks postpartum, individualized physiotherapist-guided PFMT with biofeedback significantly reduced rates of urinary incontinence and improved pelvic floor muscle strength and endurance at 6 months" (Management of Pregnancy, p. 40). Starting gently at 4 weeks is appropriate and beneficial.
Step 3: Diastasis Recti Safe Exercises
Replace conventional abdominal exercises completely until linea alba tension restored.
Exercise 1 — Pelvic Floor + Transverse Abdominis Co-activation:
- Supine, knees bent
- Gently draw in lower abdomen (2–3 cm inward) while simultaneously lifting pelvic floor
- Hold 5–10 seconds, breathe normally
- 10 repetitions, 3× daily
Exercise 2 — Heel Slides:
- Supine, knees bent; activate TVA
- Slowly slide one heel along floor to extend the leg
- Return; alternate sides
- 10× each side, 2 sets
Exercise 3 — Knee Folds (Dead Bug preparation):
- Supine, activate TVA and pelvic floor
- Lift one foot off floor (knee to 90°), hold 5 sec, lower slowly
- 8× each side
Low Back Exercises (Week 1–2)
Exercise 1 — Pelvic Tilts:
- Supine, knees bent
- Gently flatten lumbar spine against floor → hold 5 sec → release
- 15 repetitions, 2 sets
Exercise 2 — Knee Rocks (Lumbar Rotation Stretch):
- Supine, knees bent together
- Gently rock knees side to side within pain-free range
- 15 repetitions each side
Exercise 3 — Cat-Cow:
- 4-point kneeling
- Alternate lumbar flexion and extension gently
- 10 repetitions, 2 sets
Exercise 4 — Clamshells (hip abductor/external rotator activation):
- Side-lying, hips flexed ~45°
- Lift top knee maintaining pelvis still
- 15 repetitions, 2 sets each side
PHASE 2 — WEEKS 3–4 (Weeks 6–8 Postpartum)
Goals: Progressive strengthening, bladder training introduction, posture correction
1. Progress Pelvic Floor Exercises
Endurance contractions:
- Progress hold to 5–7 seconds, 10 repetitions, 3 sets/day
- Progress position: sitting (more functional load)
Power contractions (quick flicks):
- 15–20 rapid maximum contractions per set, 3 sets/day
Knack maneuver introduction:
- Teach pre-contraction before coughing, sneezing, lifting baby
- Practice in sitting and standing
Functional integration:
- Pelvic floor contraction during nappy changing (standing)
- Contract during baby lifting (every lift = a pelvic floor rep)
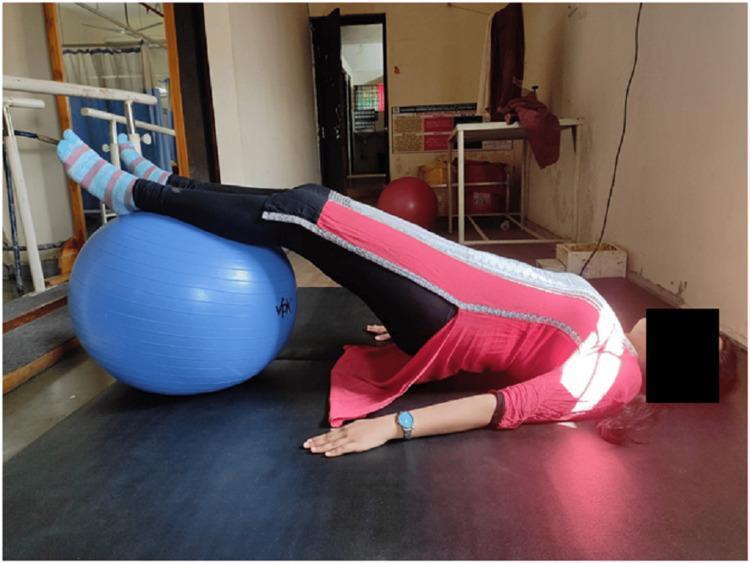
Pelvic bridging on a Swiss ball: gravity-resisted pelvic floor, gluteus maximus, and paraspinal activation — appropriate from ~6 weeks postpartum when diastasis recti tension is adequate.
2. Introduce Bladder Training
Establish baseline from the 3-day bladder diary:
- Typical voiding frequency (e.g., every 45–60 minutes)
- Urgency episodes and triggers
Urge suppression techniques (teach first):
- Freeze, don't rush to toilet
- 3–5 quick pelvic floor flicks to inhibit detrusor contraction
- Deep breathing and distraction
- Walk calmly to toilet only after urge wave subsides
Progressive voiding schedule:
| Week | Target Voiding Interval |
|---|
| Week 1 (Bladder training) | Every 60–75 min |
| Week 2 | Every 90 min |
| Week 3 | Every 2 hours |
| Week 4 | Every 2.5–3 hours |
Fluid management:
- 1.5–2 L water/day (do not restrict if breastfeeding — maintain adequate hydration)
- Reduce caffeine (tea, coffee, cola) — bladder irritants
- Avoid large fluid boluses; distribute intake evenly
3. Progressive Low Back and Lumbopelvic Exercises
Exercise 1 — Glute Bridges:
- Supine, knees bent, feet hip-width
- Activate pelvic floor and TVA; lift pelvis off floor
- Hold 5–8 seconds; lower slowly
- 12 repetitions, 3 sets
Exercise 2 — Bird-Dog:
- 4-point kneeling; activate deep core
- Extend opposite arm and leg simultaneously, maintaining neutral spine
- Hold 5 seconds; 10 each side, 3 sets
Exercise 3 — Side-Lying Hip Abduction:
- Progress from clamshells
- Full hip abduction in side-lying; slow and controlled
- 15 repetitions, 3 sets each side
Exercise 4 — Standing Wall Squat (Mini Squat):
- Stand with back against wall, feet hip-width
- Slide down to 30–45° knee flexion; hold 5 sec; rise
- Pelvic floor activated throughout
- 10 repetitions, 2 sets
Exercise 5 — Walking Program:
- Begin at 10–15 min flat walking; progress by 5 min/week
- Target 30 min continuous walking by week 8 postpartum
- Wear supportive footwear; avoid hills in early phase
PHASE 3 — MONTHS 2–3 (Weeks 8–12 Postpartum)
Goals: Return to full function, impact preparation, maximize pelvic floor strength
1. Advanced Pelvic Floor Training
- Oxford Grade 4–5 targeted
- Standing PFMT with functional movements
- Pelvic floor contractions during squats, lunges, step-ups
- Biofeedback review session to confirm progress
- Progressed to weighted exercises only when pelvic floor can sustain loading without leakage
2. Core and Trunk Rehabilitation
Only when diastasis recti linea alba tension is adequate (finger-gap width secondary to tension):
Safe progression:
- Dead bug (full version)
- Pallof press (anti-rotation)
- Modified plank (from knees → full plank at 12 weeks)
- Pilates-based exercises (transverse abdominis focus)
Still avoid (until 12+ weeks with clearance): conventional sit-ups, double-leg lifts, heavy barbell squats/deadlifts
3. Return to Impact Activity Guidance
Use the POGP (Pelvic, Obstetric and Gynaecological Physiotherapy) 2019 guidelines:
| Activity | Earliest Recommended Time Postpartum |
|---|
| Walking (gentle) | Immediately |
| Swimming (wounds healed) | 6 weeks |
| Cycling (static bike) | 8 weeks |
| Low-impact aerobics | 12 weeks |
| Running / jogging | Not before 12 weeks; pelvic floor must be symptom-free |
| High-impact sport | 3–6 months, symptom-free, full pelvic floor strength |
Criteria for running clearance:
- No urinary leakage during walking, jogging, or PFMT
- Oxford Grade ≥4
- Able to single leg hop 10× without leakage or pelvic heaviness
- No pelvic girdle pain on single leg stance
PPD Management — Physiotherapy Role
The physiotherapist plays a key non-pharmacological role:
| Strategy | Evidence |
|---|
| Aerobic exercise | Level 1 evidence — 30 min moderate exercise 3–5×/week reduces PPD symptoms significantly |
| Group physiotherapy sessions | Reduces isolation; peer support improves mood and adherence |
| Goal-setting and mastery | Achieving exercise goals improves self-efficacy and combats helplessness |
| Mind-body exercises | Yoga, breathing exercises, relaxation — reduce cortisol, improve sleep quality |
| Education and normalization | Reduces shame and anxiety about symptoms |
| Therapeutic relationship | Active listening, validation, empathy during sessions |
MDT Liaison — refer/communicate with:
- GP/Obstetrician: EPDS result; consider antidepressant therapy if EPDS ≥13
- Midwife / Health Visitor: continuity of monitoring at home
- Psychologist/Counsellor: CBT or interpersonal therapy if EPDS warrants
- Lactation consultant: if breastfeeding difficulties contributing to stress
"Patients who experience low back/pelvic girdle pain during pregnancy are at higher risk for postpartum depression and chronic pain... Providers should consider postpartum referral to rehabilitation services should the patient continue to experience persistent symptoms" (Management of Pregnancy, p. 97). This case illustrates exactly that clinical profile.
4-Week Session-by-Session Physiotherapy Plan
| Session | Week | Duration | Content |
|---|
| 1 | Week 4 (today) | 45 min | Subjective Hx; EPDS; bladder diary issue; full objective assessment; education; begin diaphragmatic breathing; pelvic tilt; pelvic floor identification |
| 2 | Week 5 | 45 min | Review bladder diary; begin pelvic floor holds (3-sec); heel slides; knee folds; lumbar mobility; soft tissue therapy for LBP; TENS if indicated |
| 3 | Week 6 | 45 min | Internal pelvic floor assessment (if wounds healed); Oxford grading; progress PFMT; introduce bladder training schedule; clamshells; cat-cow; advise SIJ belt if needed |
| 4 | Week 7 | 45 min | Progress PFMT to 5-sec holds + quick flicks in sitting; Knack maneuver; introduce bladder training interval; glute bridges; bird-dog; walking program |
| 5 | Week 8 | 45 min | Review EPDS; biofeedback session; PFMT in standing; progress voiding interval; mini squats; step-up preparation; walking 20–25 min |
| 6 | Week 10 | 45 min | Full functional PFMT assessment; discharge planning; design home maintenance program; return-to-activity counselling; refer for psychology if PPD not improving |
Home Exercise Programme (Weeks 4–6 Postpartum)
Designed to be baby-friendly — exercises can be done with baby nearby or during naptime:
| Exercise | Dose | When |
|---|
| Diaphragmatic breathing | 10 breaths × 3 | Morning, afternoon, evening |
| Pelvic floor holds (3 sec → 5 sec) | 10 reps × 3 sets | Morning, feeding time, evening |
| Quick flicks | 10–20 reps × 3 sets | Alongside holds |
| Pelvic tilts | 15 reps × 2 sets | Morning |
| Knee rocks | 15 each side | After feeding |
| Heel slides | 10 each side × 2 sets | During baby floor time |
| Clamshells | 15 each side × 2 sets | Naptime |
| Gentle walking | Start 10–15 min | Daily |
Frequency: 3× daily PFMT; other exercises once daily
Time needed: 15–20 minutes for full home program
Red Flags — When to Escalate or Refer Immediately
| Red Flag | Action |
|---|
| EPDS ≥13 or suicidal ideation | Same-day GP/psychiatry referral |
| Cauda equina signs (saddle numbness, bilateral leg weakness, loss of bowel/bladder control) | Emergency surgical referral |
| Wound breakdown / infection signs | Refer to GP/midwife |
| Sudden severe LBP with radiation | Rule out vertebral fracture, disc prolapse — MRI |
| Prolapse grade III–IV | Refer to urogynaecology |
| No improvement in UI after 12 weeks PFMT | Refer to urogynaecology / urology |
| Worsening depression, inability to bond with baby | Urgent psychiatric referral |
Summary Overview
4-WEEK POSTNATAL PHYSIOTHERAPY PROGRAM

ASSESSMENT:         Subjective → Objective → Problem List → Goal Setting
                    (EPDS + ICIQ-UI SF + Oxford Grade + ASLR + Bladder Diary)

MANAGEMENT:
┌─────────────────────┬──────────────────────────────────────────────────────┐
│ DOMAIN              │ KEY INTERVENTIONS                                    │
├─────────────────────┼──────────────────────────────────────────────────────┤
│ Urinary Incontinence│ PFMT (holds + quick flicks + Knack) + Bladder        │
│                     │ Training + Urge Suppression                          │
├─────────────────────┼──────────────────────────────────────────────────────┤
│ Low Back Pain       │ Heat / Soft tissue / TENS / Pelvic belt +            │
│                     │ Pelvic tilts / Bird-dog / Glute bridges / Walking    │
├─────────────────────┼──────────────────────────────────────────────────────┤
│ Pelvic Floor        │ Oxford Grade progression + Biofeedback +             │
│ Weakness            │ Functional integration + Diastasis recti rehab       │
├─────────────────────┼──────────────────────────────────────────────────────┤
│ Postpartum          │ Exercise therapy + Education + Goal-setting +        │
│ Depression          │ MDT referral + Therapeutic relationship              │
└─────────────────────┴──────────────────────────────────────────────────────┘

TIMELINE:   Weeks 4–6: Foundation phase
            Weeks 6–8: Progressive loading
            Weeks 8–12: Return to function
            Months 3–6: Return to sport/impact
This integrated approach recognizes that all four problems are interrelated — a weak pelvic floor contributes to incontinence and LBP, LBP perpetuates depression, and depression reduces exercise adherence. Treating them as a unified clinical picture is the hallmark of high-quality postnatal physiotherapy.