) What is the causative organism of malaria and how does it spread? b) Write the symplorms of malaria. c) Write the preventive measures of this disease.)(3+6+6)
Malaria - Causative Organism, Symptoms, and Prevention
a) Causative Organism and How It Spreads (3 marks)
Causative Organism
| Species | Disease Type |
|---|---|
| P. falciparum | Malignant tertian malaria (most deadly) |
| P. vivax | Benign tertian malaria |
| P. ovale | Tertian malaria (with relapses) |
| P. malariae | Quartan malaria |
| P. knowlesi | Quotidian malaria (Southeast Asia) |
| P. simium / P. cynomolgi | Rare zoonotic infections |
How It Spreads (Transmission)
- Sporozoites travel via the bloodstream to the liver, where they invade liver cells and multiply asexually (a process called intrahepatic schizogony). A single sporozoite can produce 10,000 to over 30,000 daughter merozoites.
- Merozoites are released into the bloodstream and invade red blood cells (RBCs), multiplying every 48 hours (24 h for P. knowlesi, 72 h for P. malariae).
- In P. vivax and P. ovale, some liver forms remain dormant (hypnozoites) and can cause relapses months to over a year later.
- Some RBC-stage parasites develop into gametocytes, which are taken up by a feeding female Anopheles mosquito, completing the cycle.
- Blood transfusion with infected blood
- Needle/syringe sharing (intravenous drug use)
- Congenital transmission (mother to fetus)
Harrison's Principles of Internal Medicine 22E, p. 1804-1805; Medical Microbiology 9e, p. 812
b) Symptoms of Malaria (6 marks)
Early / Non-specific Symptoms
- General feeling of being unwell (malaise)
- Headache (often severe - a characteristic early symptom)
- Fatigue and weakness
- Muscle aches (myalgia)
- Abdominal discomfort
- Nausea and vomiting
Classic Malarial Paroxysm (Fever Pattern)
| Stage | Description |
|---|---|
| Cold stage | Intense chills and rigors, feeling of cold |
| Hot stage | High fever (often >40°C / 104°F), flushing, tachycardia, sometimes delirium |
| Sweating stage | Profuse sweating as temperature falls |
- Every 24 hours (daily/quotidian): P. knowlesi
- Every 48 hours (tertian): P. falciparum, P. vivax, P. ovale
- Every 72 hours (quartan): P. malariae
Additional Symptoms
- Orthostatic hypotension (dizziness on standing)
- Arthralgia (joint pains)
- Cough and chest pain (in some)
- Diarrhea (especially with P. falciparum)
Physical Signs
- Fever (most consistent finding)
- Anemia (pallor due to destruction of red blood cells)
- Splenomegaly (enlarged spleen, especially after repeated infections)
- Jaundice (mild, due to hemolysis)
- Thrombocytopenia (low platelet count)
Severe / Complicated Malaria (mostly P. falciparum)
- Cerebral malaria: coma, seizures, encephalopathy
- Severe anemia
- Acute respiratory distress syndrome (ARDS)
- Renal failure (blackwater fever - haemoglobinuria)
- Hypoglycemia
- Multi-organ failure
- Petechial hemorrhages (rare)
Harrison's Principles of Internal Medicine 22E, p. 1805; Goodman & Gilman's Pharmacological Basis of Therapeutics; Murray & Nadel's Textbook of Respiratory Medicine
c) Preventive Measures of Malaria (6 marks)
1. Personal Protection Against Mosquito Bites
- Insecticide-treated mosquito nets (ITNs): Sleeping under ITNs is the primary and most effective prevention method, especially in sub-Saharan Africa.
- Insect repellents: Apply DEET-containing repellents on exposed skin.
- Protective clothing: Wear long-sleeved shirts and long trousers, especially at dawn and dusk when Anopheles mosquitoes are most active.
- Indoor residual spraying (IRS): Spray insecticides on the inner walls of houses to kill mosquitoes resting indoors.
- Window and door screens: Use fine mesh screens to prevent mosquitoes entering buildings.
2. Chemoprophylaxis (Preventive Medication)
- Chloroquine - for areas with chloroquine-sensitive strains
- Doxycycline - broad-spectrum, taken daily
- Atovaquone-proguanil (Malarone) - well-tolerated, taken daily
- Mefloquine - taken weekly
- Primaquine - used in some settings (causal prophylaxis)
Note: P. falciparum has developed widespread resistance to chloroquine, so drug choice depends on the destination and current resistance patterns (CDC guidelines should be consulted).
3. Vector Control (Community Level)
- Elimination of mosquito breeding sites: Drain stagnant water, clear swamps, and fill puddles where Anopheles mosquitoes breed.
- Larviciding: Apply chemical or biological agents (e.g., Bacillus thuringiensis israelensis) to standing water to kill mosquito larvae.
- Environmental management: Proper sanitation, covering water storage containers, improving drainage systems.
- Biological control: Introduce natural predators of mosquito larvae (e.g., larvivorous fish like Gambusia).
- DDT and other insecticide spraying programs (in some endemic countries).
4. Vaccination
- The RTS,S/AS01 (Mosquirix) malaria vaccine is now recommended by the WHO for use in children in sub-Saharan Africa and other regions with moderate-to-high P. falciparum transmission. It provides partial protection.
- The R21/Matrix-M vaccine has shown higher efficacy in recent trials and is being deployed in some African countries.
5. Health Education and Early Diagnosis
- Educating communities about the dangers of malaria, the importance of sleeping under nets, and seeking prompt treatment.
- Early diagnosis and prompt treatment prevents severe disease and reduces the reservoir of infection in the community.
- Blood screening of donors to prevent transfusion-transmitted malaria.
Medical Microbiology 9e, p. 812-813; Fitzpatrick's Dermatology, p. 28; Harrison's Principles of Internal Medicine 22E, p. 1819
| Category | Key Measure |
|---|---|
| Causative organism | Plasmodium spp. (5 species), mainly P. falciparum |
| Vector | Female Anopheles mosquito |
| Main symptoms | Periodic fever, chills, headache, anemia, splenomegaly |
| Personal prevention | Mosquito nets, repellents, protective clothing |
| Chemoprophylaxis | Doxycycline, Malarone, mefloquine, chloroquine |
| Community prevention | Eliminate breeding sites, IRS, vector control, vaccination |
:Write down the methods for preparation of Thick and thin Smear for Malaria patient.(10)
thick thin blood smear preparation malaria technique WHO steps Giemsa staining
thick thin blood smear preparation technique steps malaria
Preparation of Thick and Thin Blood Smears for Malaria Diagnosis
Equipment / Materials Required
- Clean, grease-free glass slides (pre-cleaned with alcohol and wiped dry)
- Lancet or venepuncture needle / EDTA anticoagulated blood
- Spreading slide (with smooth, chipped edge) or coverslip spreader
- Absolute methanol (100%) - for fixation of thin smear only
- Giemsa stain stock solution (Romanowsky-type)
- Buffered water pH 7.2 (phosphate buffer)
- Staining rack / Coplin jar
- Immersion oil
- Light microscope
- Marker/pencil for labelling
A. Collection of Blood Sample
- Clean the patient's fingertip (ring or middle finger) with 70% alcohol and allow to dry completely.
- Prick the fingertip firmly with a sterile lancet to obtain a free-flowing drop of blood.
- Wipe away the first drop with dry gauze (it may contain tissue fluid).
- Use the second and subsequent drops for making the smear.
- Collect blood into an EDTA anticoagulated tube.
- Smears must be prepared within 1 hour of collection to avoid morphological changes (EDTA causes RBC swelling and distortion of parasites after prolonged contact).
Important: Smears should ideally be made during a febrile episode when parasite density is highest.
B. Preparation of the THIN Blood Smear
Steps:
- Place a small drop of blood (about 2-3 µL, approximately 2 mm in diameter) near one end of a clean glass slide, about 1-2 cm from the end.
- Place the edge of a second (spreader) slide in front of the blood drop at an angle of 30-45 degrees.
- Draw the spreader slide back at the same angle until it touches and contacts the blood drop. Allow the blood to spread along the full width of the spreader slide by capillary action.
- Push the spreader slide forward smoothly and quickly in one continuous stroke. Do not press down hard. This produces a film that is:
- Thick at the start
- Progressively thinner toward the tail end
- Ending in a "feathered edge"
- Allow the thin smear to air-dry quickly (use a fan if available). Do not wave or blow on it.
- A good thin smear should be tongue-shaped with a visible feathered edge and should cover approximately 2/3 of the slide.
- Once completely dry, dip the slide for 2 seconds into absolute (100%) methanol, or drop methanol onto the thin film using a Pasteur pipette.
- Allow to dry in air for about 2 minutes.
- Critical: Never allow methanol to contact the thick smear portion, as it will fix the thick film and prevent RBC lysis during staining.
C. Preparation of the THICK Blood Smear
Steps:
- Place a larger drop of blood (about 5-15 µL) on the same slide as the thin smear (at the labelled end), or on a separate slide.
- Using the corner of another slide or a toothpick, spread the blood drop in a circular motion to make a circular film about 1-2 cm in diameter (roughly the size of a small coin).
- The smear should be of uneven thickness but just thin enough that the hands of a watch can be read through part of it - this is the classic WHO thickness guideline.
- Leave the thick film to air-dry completely (minimum 30-60 minutes at room temperature, or use a gentle warm hair-dryer).
- Never use heat to fix or hasten drying, as overheating "heat-fixes" the film and prevents haemolysis of RBCs during staining.
- Do NOT fix the thick smear with methanol - unlike the thin smear, the thick smear must remain unfixed so that RBCs lyse during the staining process, releasing and concentrating the parasites.
D. Labelling
- Label both smears with the patient's name, ID number, date, and time of collection using a diamond-tip pen or pencil on the frosted end of the slide.
- Label before staining to avoid confusion.
E. Staining with Giemsa Stain
Giemsa Working Solution Preparation:
- Slow method (3%): 3 mL Giemsa stock + 97 mL phosphate buffered water (pH 7.2)
- Rapid method (10%): 10 mL Giemsa stock + 90 mL buffered water (pH 7.2)
Staining Procedure:
| Step | Slow Method (3% Giemsa) | Rapid Method (10% Giemsa) |
|---|---|---|
| Fix thin smear | Methanol, 2 sec | Methanol, 2 sec |
| Flood slide with stain | Pour slowly, do NOT splash thick film | Pour slowly |
| Staining time | 45-60 minutes | 10 minutes |
| Rinse | Gently float off iridescent scum with clean buffered water | Dip in buffered water 3-4 times |
| Thick smear rinse | Leave in buffer for 5 minutes (for haemolysis) | Brief rinse |
| Dry | Air-dry upright in rack | Air-dry upright in rack |
Note: Rinse water must also be at pH 7.2, as acidic water decolorizes the films and may cause false negatives.
F. Microscopic Examination
| Feature | Thin Smear | Thick Smear |
|---|---|---|
| Objective | Oil immersion ×1000 | Oil immersion ×1000 |
| RBCs | Intact - morphology preserved | Lysed - absent |
| Parasite appearance | Within RBCs, full morphology visible | Free parasites, WBCs visible |
| Sensitivity | Low (<0.05% parasitemia) | High (0.001% parasitemia) |
| Species ID | Excellent | Difficult |
| Fields to examine | Examine tail end (RBC monolayer) | Minimum 100-200 fields before calling negative |
- Count parasitized RBCs per 1000 RBCs. Express as % parasitemia.
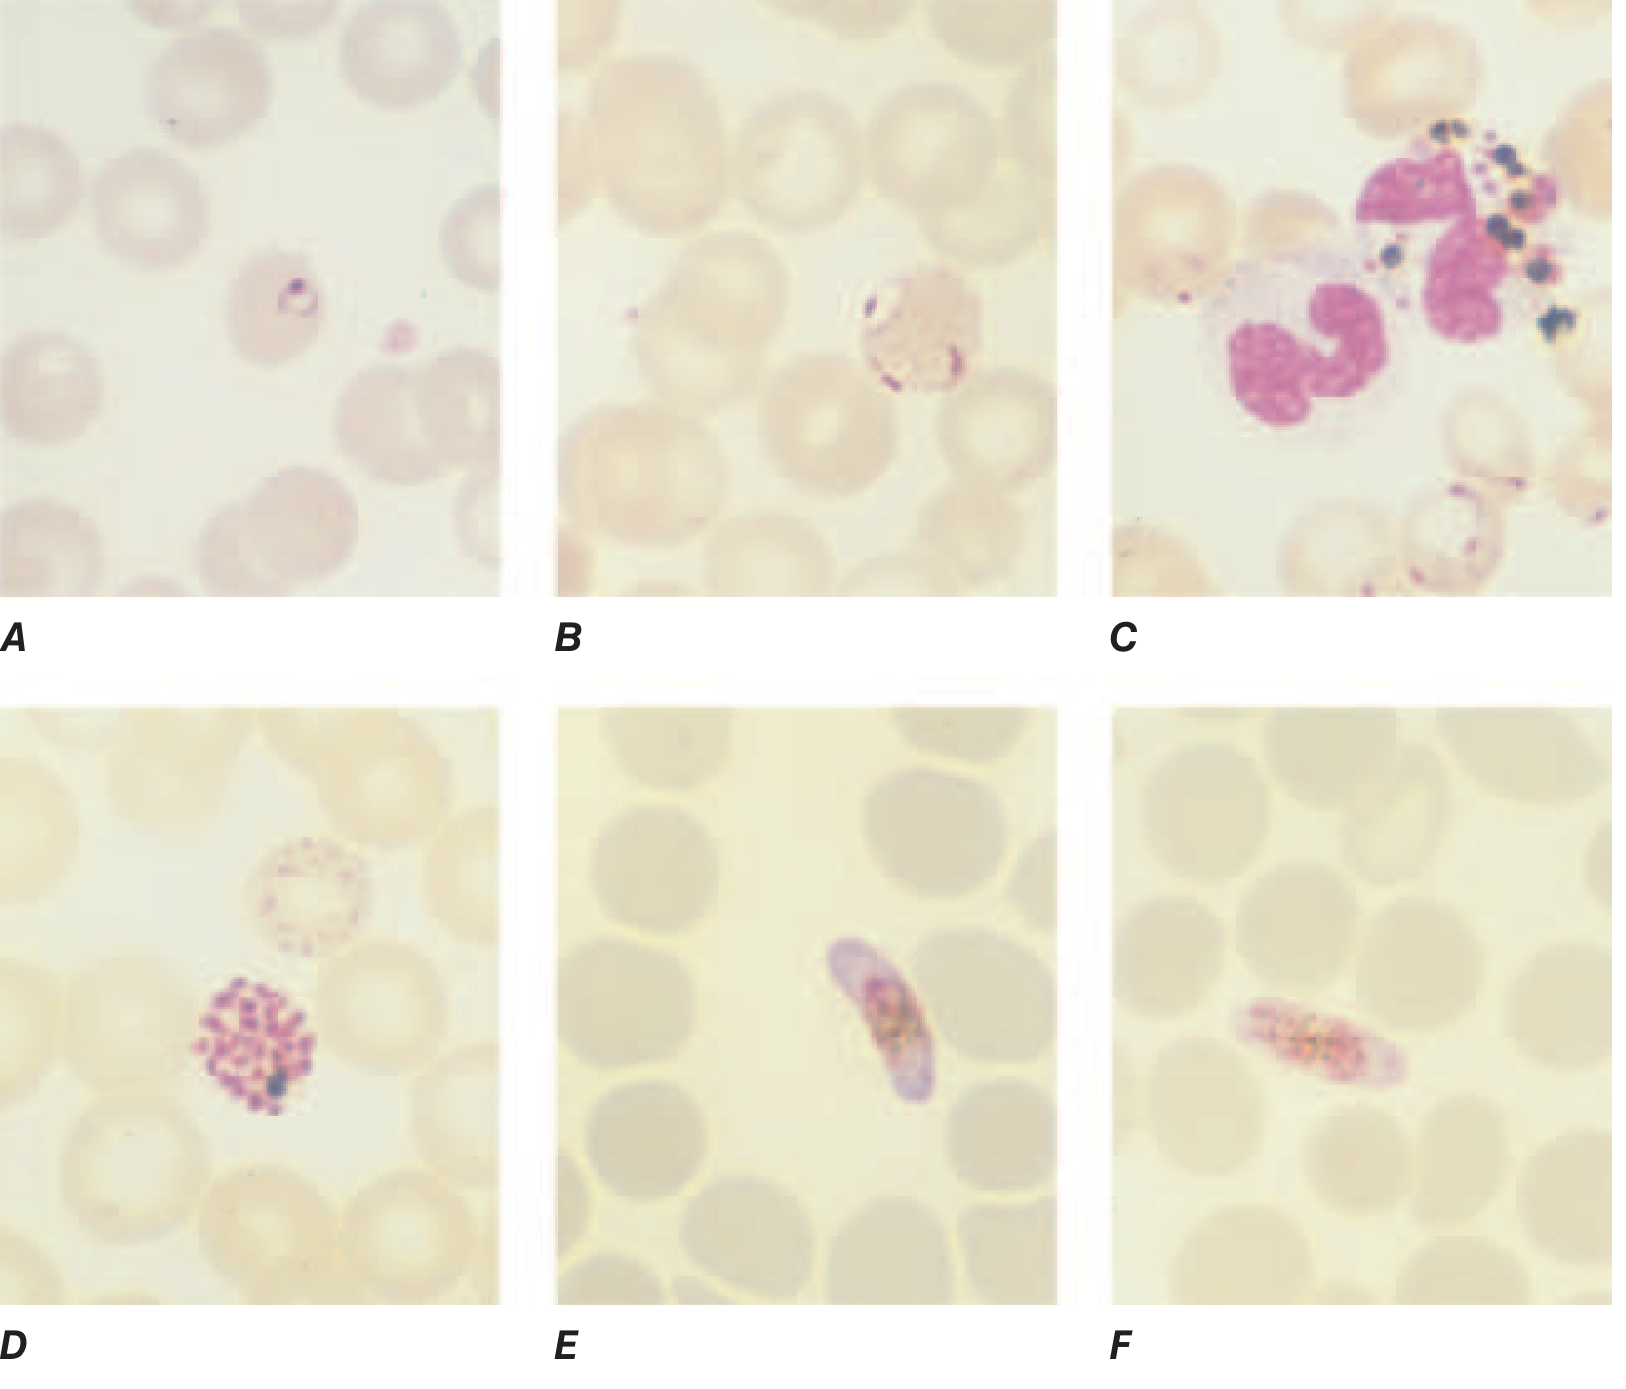
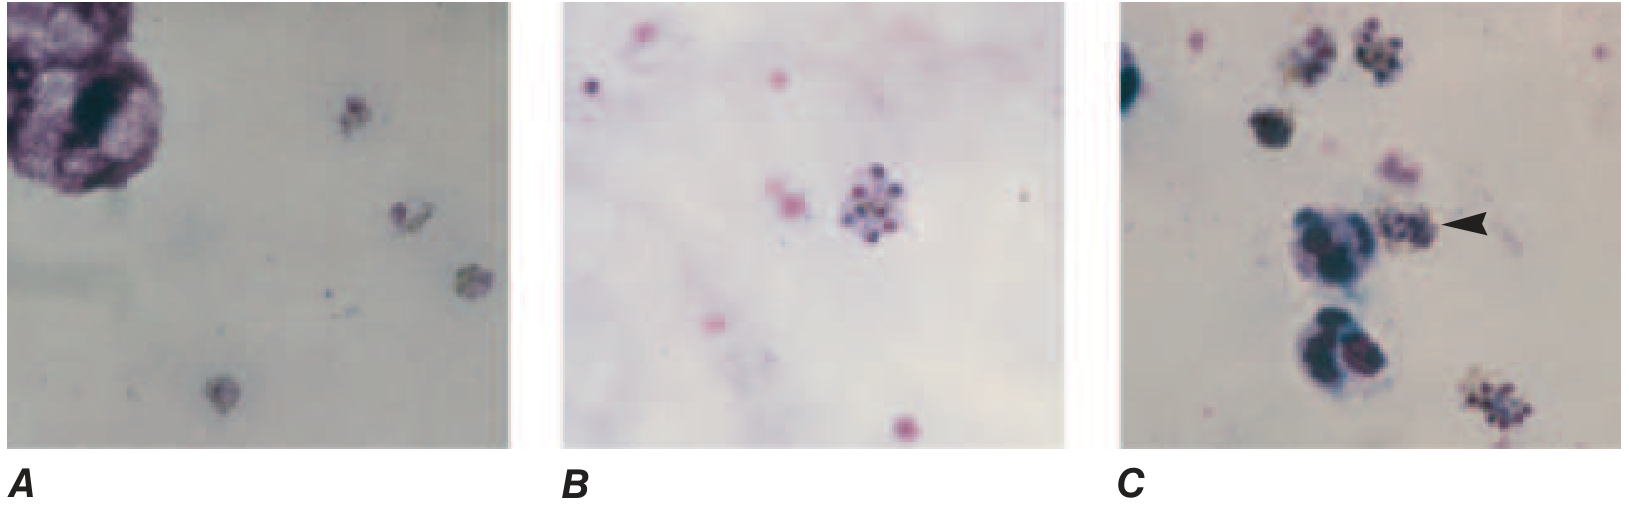
- Assess parasite stage (ring, trophozoite, schizont, gametocyte) for species ID and prognosis.
- Count asexual parasites per 200 WBCs (or per 500 WBCs at very low densities).
- Convert to parasites/µL using the actual WBC count, or assume 8,000 WBC/µL if unavailable.
- Count gametocytes separately.
G. What a Well-Prepared Smear Looks Like
Microscopic Appearance of Parasites After Staining
Summary Comparison
| Parameter | Thick Smear | Thin Smear |
|---|---|---|
| Purpose | Screening - detect parasite | Speciation - identify species |
| Blood volume | ~5-15 µL (large drop) | ~2-3 µL (small drop) |
| Spreading | Circular, 1-2 cm diameter | Feathered, tongue-shaped |
| Fixation | NOT fixed (methanol avoided) | Fixed with absolute methanol |
| RBC status | Lysed during staining | Intact |
| Sensitivity | High (40-100x concentrated) | Low |
| Species ID | Difficult | Easy |
| Stain | Giemsa (pH 7.2) | Giemsa (pH 7.2) |
| Reading | Parasites per 200 WBCs | Parasitized RBCs per 1000 RBCs |
Sources: Harrison's Principles of Internal Medicine 22E (2025), p. 1810; WHO Malaria Microscopy SOP-07a; CDC Malaria Staining Bench Aid
Write a 10 marks note on leprosy its epidemiological factors, sign and symptoms, risk factors, treatment , prevention
Write a 10 marks note on leprosy its epidemiological factors, sign and symptoms, risk factors, treatment , 2. prevention ( 10)
LEPROSY (HANSEN DISEASE)
Definition
Causative Organism
- A non-motile, non-spore forming, microaerophilic, weakly acid-fast, rod-shaped bacterium (1-8 µm long)
- Obligate intracellular - cannot be cultured on any artificial medium in vitro
- Has an extremely slow generation time of 14 days (one of the slowest growing bacteria)
- Needs a temperature of about 30°C, so it prefers cooler body parts - skin, ears, nose, and superficial peripheral nerves
- The only bacterium known to infect Schwann cells of peripheral nerves - finding acid-fast bacilli in peripheral nerves is pathognomonic for leprosy
1. Epidemiological Factors
Global Burden
- Leprosy occurs in more than 120 countries, with over 200,000 new cases reported annually.
- About 75% of all cases come from just three countries: India, Indonesia, and Brazil.
- During 2021, 140,594 new cases were reported globally (detection rate ~18 per million population).
- In the USA, fewer than 250 cases are diagnosed annually, mostly in immigrants.
Geographic Distribution
- Most prevalent in tropical and subtropical zones - South Asia, sub-Saharan Africa, Latin America.
- The WHO target of elimination (<10 cases per 10,000 population) was achieved globally in 2000 and in India in 2005, but the disease persists.
Transmission
- The primary route is respiratory droplets from the nasal secretions of untreated multibacillary cases.
- Entry can also occur via breached skin.
- M. leprae can survive outside the human body in humid environments for 7-10 days and in moist soil for a few weeks.
- Transmission requires prolonged, close contact - it is not highly transmissible.
- Spouses of leprosy patients are NOT at high risk; however, biological household contacts (parents, children, siblings) of untreated patients carry some increased risk.
Reservoir
- Humans are the main natural host.
- The nine-banded armadillo (Dasypus novemcinctus) is a recognized animal reservoir in the Americas (zoonotic transmission reported in the southern USA).
- Red squirrels in the British Isles and non-human primates may also harbor M. leprae.
Incubation Period
- Extremely long: average 3-5 years, but can range from 6 months to over 20 years.
2. Risk Factors
| Risk Factor | Detail |
|---|---|
| Close household contact | Living with an untreated multibacillary patient is the single greatest risk |
| Poverty and overcrowding | Poor living conditions, malnutrition, and inadequate sanitation increase susceptibility |
| Genetic susceptibility | Genome-wide scans show certain genes (e.g., PARK2, PACRG, HLA loci) are associated with susceptibility; only 0.1-1% of exposed persons develop clinical disease |
| Age | Children are more susceptible; disease peaks in young adults |
| Sex | Males are affected twice as often as females in most endemic settings |
| Immunosuppression | Use of anti-inflammatory / autoimmune therapies, elderly patients (immunosenescence); HIV co-infection can worsen leprosy during antiretroviral therapy (immune reconstitution inflammatory syndrome) |
| Travel/residence in endemic areas | Long-term residents of or travelers to endemic regions |
| Contact with armadillos | Particularly in the southern United States |
3. Classification
| Type | Skin Lesions | Nerve Involvement | Bacilli (Bacteriologic Index) | Lepromin Test |
|---|---|---|---|---|
| Tuberculoid (TT) | 1-2, well-defined, hypopigmented, anesthetic | One nerve, severe | Very few (paucibacillary) | Strongly positive |
| Borderline Tuberculoid (BT) | Few, well-defined | Several nerves | Few (paucibacillary) | Positive |
| Borderline (BB) | Multiple, annular "punched out" | Moderate | Moderate | Weakly positive |
| Borderline Lepromatous (BL) | Many, ill-defined, coppery macules | Many nerves | Many | Negative |
| Lepromatous (LL) | Innumerable, symmetric, nodules/plaques | Diffuse, symmetric | Very many (multibacillary) | Negative |
- Paucibacillary (PB): 1-5 skin lesions, smear negative
- Multibacillary (MB): >5 skin lesions, smear positive
4. Signs and Symptoms
Cardinal Signs (WHO Diagnostic Criteria - any ONE is sufficient for diagnosis):
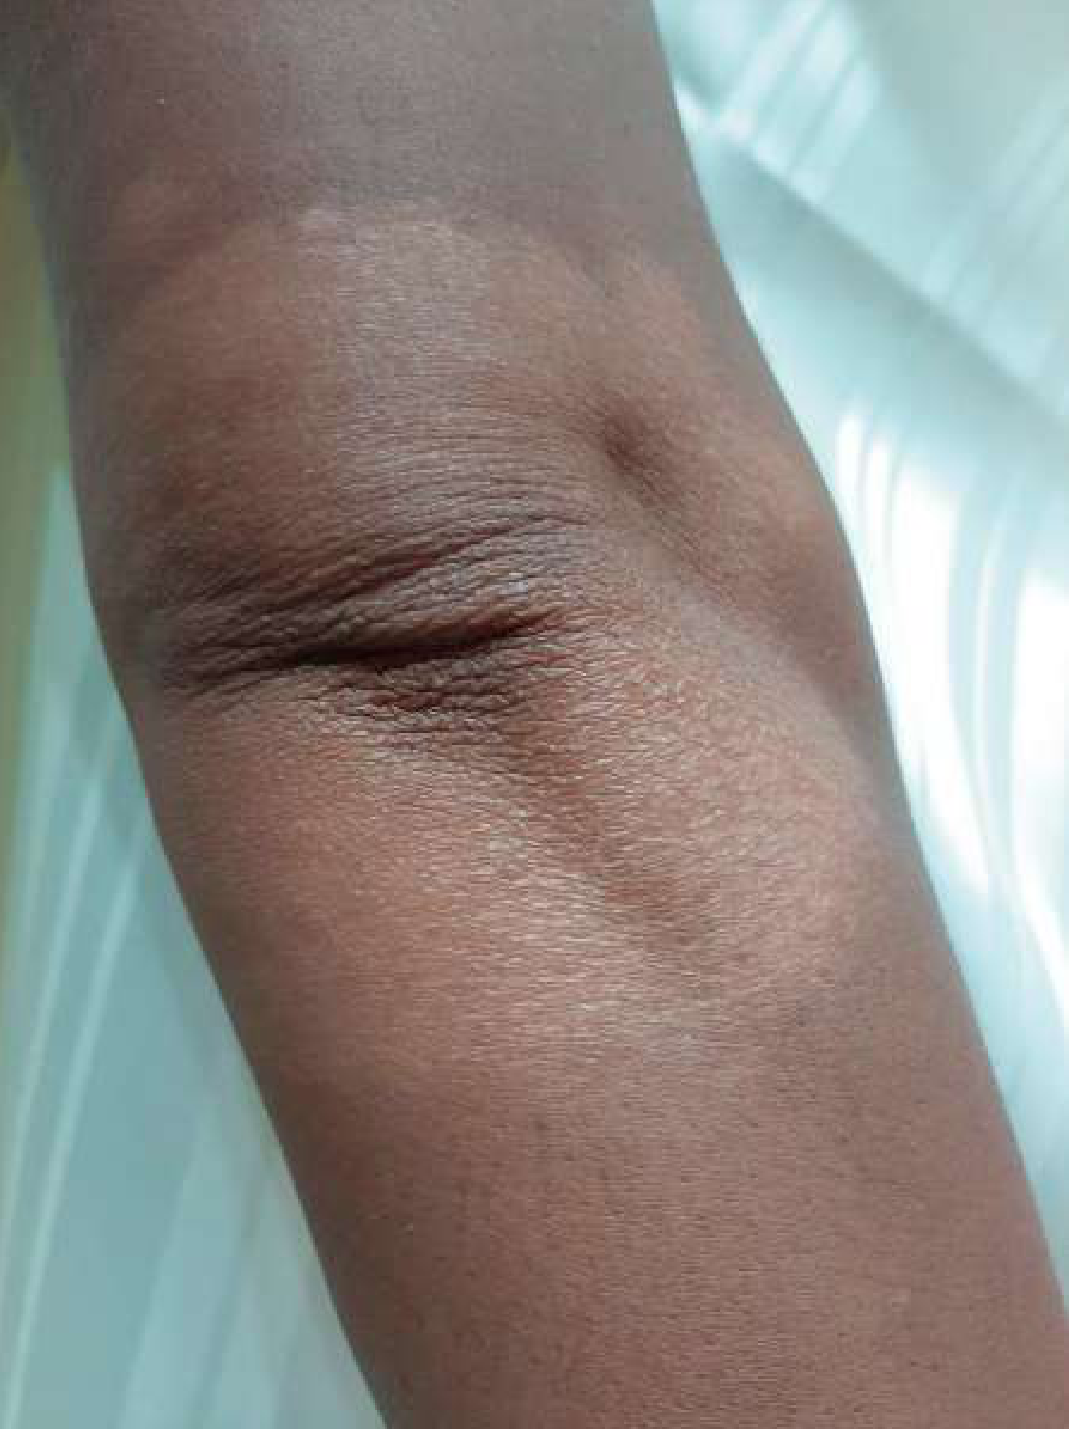
- Hypopigmented or reddish skin patch with definite loss of sensation
- Thickened or enlarged peripheral nerve with loss of sensation and/or muscle weakness
- Acid-fast bacilli in slit-skin smear
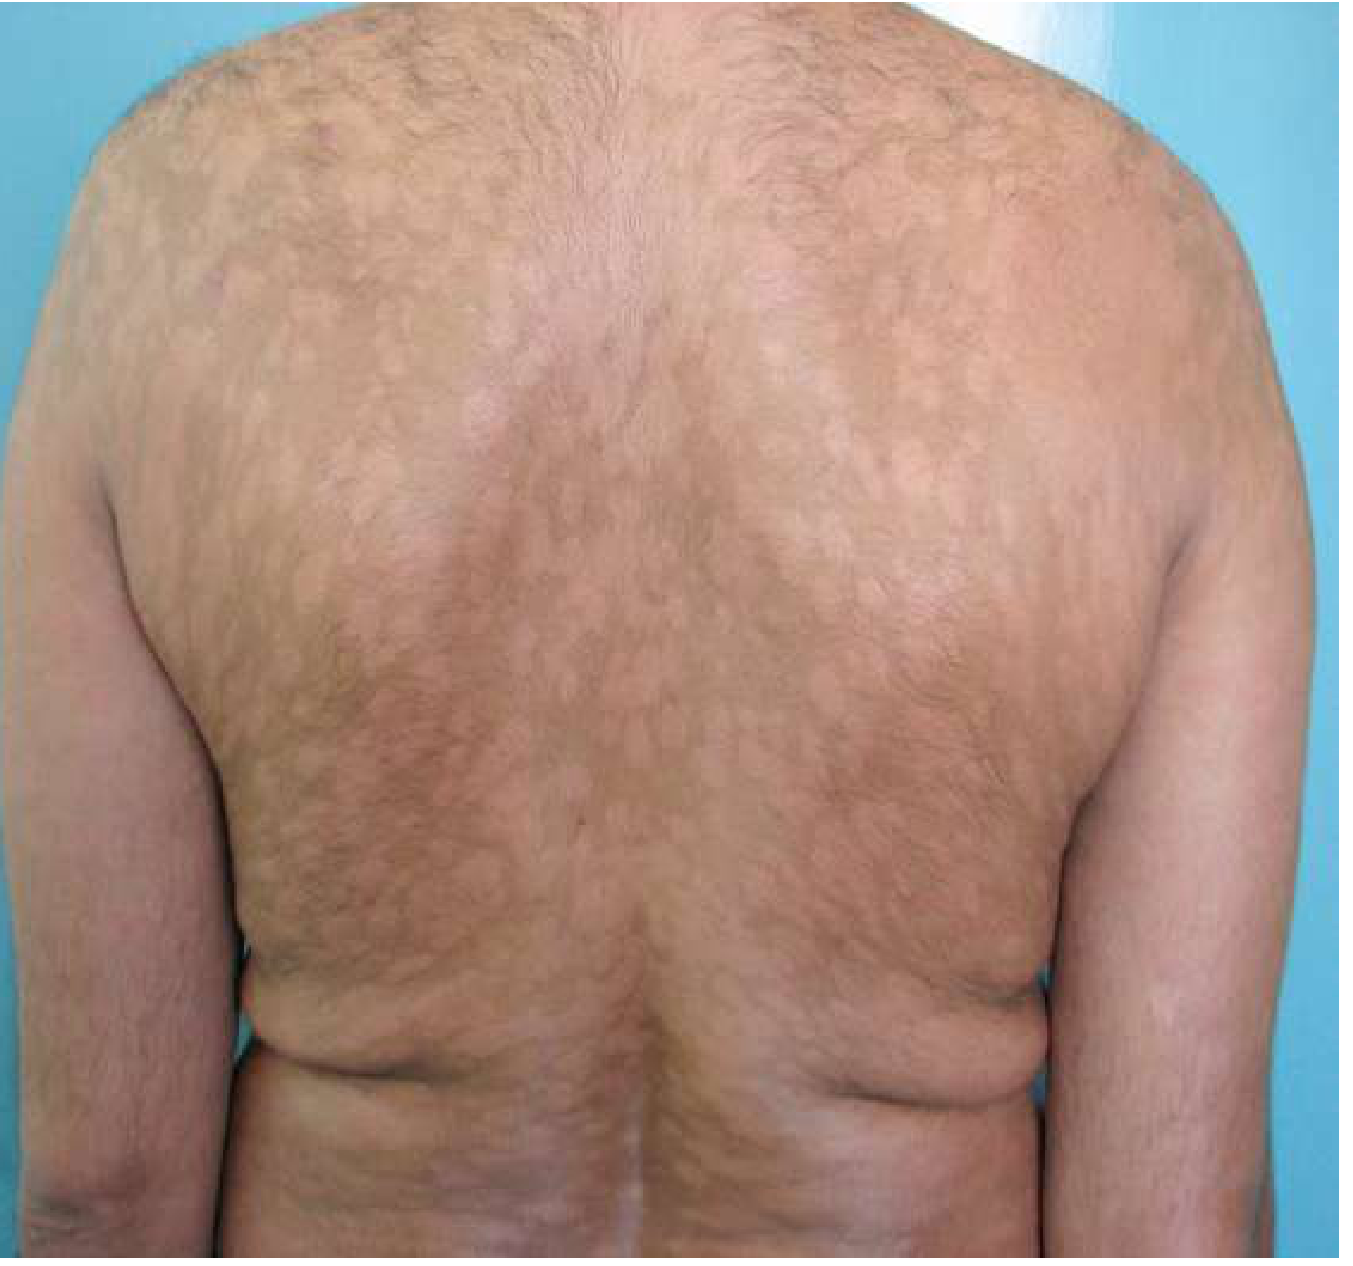
Skin Manifestations:
- Hypopigmented macules or patches - pale, flat, non-itchy, with reduced or absent sensation (hallmark feature)
- Annular (ring-shaped) lesions with well-defined inner edge ("punched out") and ill-defined outer edge - characteristic of borderline leprosy
- Nodules and plaques in lepromatous leprosy
- Leonine facies - thickening of facial skin giving a "lion-like" appearance in advanced lepromatous leprosy
- Loss of eyebrows (madarosis) and eyelashes
- Shiny, waxy skin appearance
Nerve Involvement (Peripheral Neuropathy):
- Enlarged, thickened, palpable peripheral nerves - commonly: ulnar nerve at the elbow, common peroneal nerve at the fibular head, great auricular nerve in the neck
- Sensory loss - starts with loss of light touch, then temperature, then pain; follows "glove and stocking" distribution in lepromatous leprosy
- Motor weakness - intrinsic muscles of hands and feet affected early, causing:
- Claw hand (ulnar nerve)
- Foot drop (common peroneal nerve)
- Lagophthalmos (facial nerve - inability to close the eye)
- Autonomic dysfunction - loss of sweating, trophic skin changes
Nasal Involvement:
- Nasal stuffiness, epistaxis (nosebleeds)
- Anosmia, nasal crusting
- Nasal septal perforation and "saddle nose" deformity in advanced disease
Eye Involvement (Ocular Leprosy):
- Corneal anesthesia (from trigeminal nerve damage)
- Iritis, uveitis
- Corneal ulceration and opacity
- Blindness in advanced cases
Hands and Feet:
- Repeated painless trauma due to anesthesia leads to: trophic ulcers, bone resorption, shortening of digits, and deformities
- Secondary bacterial infections are common
Leprosy Reactions (Immunological Exacerbations):
- Type 1 (Reversal Reaction): Sudden increase in cell-mediated immunity; existing lesions become red, swollen, tender; acute nerve damage can occur
- Type 2 (Erythema Nodosum Leprosum - ENL): Systemic inflammation in BL/LL patients; tender red subcutaneous nodules, high fever, arthralgia, iridocyclitis, lymphadenopathy
5. Treatment
WHO Multidrug Therapy (MDT) - Gold Standard
| Drug | Mechanism | Role |
|---|---|---|
| Rifampicin | Inhibits RNA polymerase | Bactericidal - most potent anti-leprosy drug |
| Dapsone | Inhibits folate synthesis (DHPS) | Bacteriostatic |
| Clofazimine | Binds to DNA; anti-inflammatory | Bacteriostatic + controls reactions |
WHO MDT Regimens:
| Type | Duration | Rifampicin | Dapsone | Clofazimine |
|---|---|---|---|---|
| Paucibacillary (PB) | 6 months | 600 mg once monthly (supervised) | 100 mg daily (self-administered) | Not used |
| Multibacillary (MB) | 12 months | 600 mg once monthly (supervised) | 100 mg daily | 300 mg monthly + 50 mg daily |
- MDT is free of charge worldwide through WHO.
- Treatment cures the infection but does not reverse established nerve damage.
Treatment of Reactions:
- Type 1 (Reversal Reaction): Prednisolone (oral corticosteroids) - starting dose 40-60 mg/day, tapered over months
- Type 2 (ENL): Thalidomide (drug of choice for recurrent/severe ENL in males) or prednisolone; clofazimine also used
Other Considerations:
- G6PD deficiency must be excluded before using dapsone (risk of haemolysis)
- MDT continues even during pregnancy (rifampicin and dapsone are safe)
- Relapse rates: ~0.1%/year for PB; up to 5%/year for MB (especially high bacteriologic index at baseline)
6. Prevention
A. Early Detection and Treatment
- The most effective prevention is early diagnosis and prompt MDT to render the patient non-infectious rapidly.
- After the first dose of rifampicin, the patient is essentially non-infectious.
- Contact tracing: All household contacts of newly detected cases should be examined annually for 5 years.
B. Chemoprophylaxis (Post-Exposure Prophylaxis)
- Single-dose rifampicin (SDR) given to household contacts reduces risk of leprosy by 57% at 2 years and 30% after 5-6 years.
- WHO recommended doses by age:
| Age/Weight | Dose |
|---|---|
| ≥15 years | 600 mg |
| 10-14 years | 450 mg |
| 6-9 years (≥20 kg) | 300 mg |
| <20 kg (≥2 years) | 10-15 mg/kg |
C. Vaccination
- BCG (Bacillus Calmette-Guérin) vaccine at birth reduces the risk of leprosy and should be continued in all high-burden countries.
- BCG at birth combined with SDR prophylaxis increases protection in contacts from 57% to 80%.
- Mycobacterium indicum praanii vaccine has shown moderate protective efficacy.
- No dedicated leprosy-specific vaccine is currently available.
D. Health Education and Awareness
- Community education to reduce stigma and encourage early reporting.
- Training of healthcare workers in endemic areas to recognize early signs.
- Reducing overcrowding and improving living conditions and nutrition (addressing social determinants).
E. Disability Prevention
- Regular nerve function assessments during and after treatment.
- Patient education on self-care of anesthetic hands and feet to prevent trophic ulcers (protective footwear, wound care, eye care).
- Physiotherapy and reconstructive surgery for established deformities.
F. Surveillance and Global Strategy
- The Global Partnership for Zero Leprosy aims to reduce the disease burden by 70% to fewer than 63,000 cases worldwide.
- Achieving this will require effective early diagnostics, newer therapies, vaccines, and addressing social/environmental determinants.
Summary Table
| Aspect | Key Points |
|---|---|
| Causative organism | Mycobacterium leprae (acid-fast, intracellular) |
| Transmission | Respiratory droplets; prolonged close contact |
| Incubation period | 3-5 years (up to 20 years) |
| Cardinal signs | Anesthetic skin patch, enlarged nerve, acid-fast bacilli |
| Classification | Paucibacillary vs. Multibacillary |
| Treatment | WHO MDT - 6 months (PB) or 12 months (MB) |
| Key drugs | Rifampicin + Dapsone ± Clofazimine |
| Prevention | Early treatment, SDR prophylaxis, BCG vaccine, contact tracing |
| Global burden | >200,000 new cases/year; 75% from India, Indonesia, Brazil |
Sources: Goldman-Cecil Medicine 26E (2022), p. 3271-3280; Red Book 2021 (AAP), p. 761-763; WHO Guidelines for Diagnosis, Treatment and Prevention of Leprosy (2018)
What is name of the vector responsible for dengue fever? (b) What are the clinical features of dengue feve? Describe the transmission process of dengue fever. (d) Write down the role of an ANM to prevent dengue fever in community(2+5+5+8)
DENGUE FEVER
a) Vector Responsible for Dengue Fever (2 marks)
- It is a day-biting mosquito, most active 2 hours after sunrise and several hours before sunset
- Only the female mosquito transmits dengue - males feed only on plant juices
- A secondary vector, Aedes albopictus (the Asian tiger mosquito), can also transmit dengue but is less efficient
- Both species are identified by distinctive black-and-white striped markings on their body and legs
Tintinalli's Emergency Medicine; Brenner & Rector's The Kidney, 2-Volume Set; Park's Textbook of Preventive and Social Medicine
b) Clinical Features of Dengue Fever (5 marks)
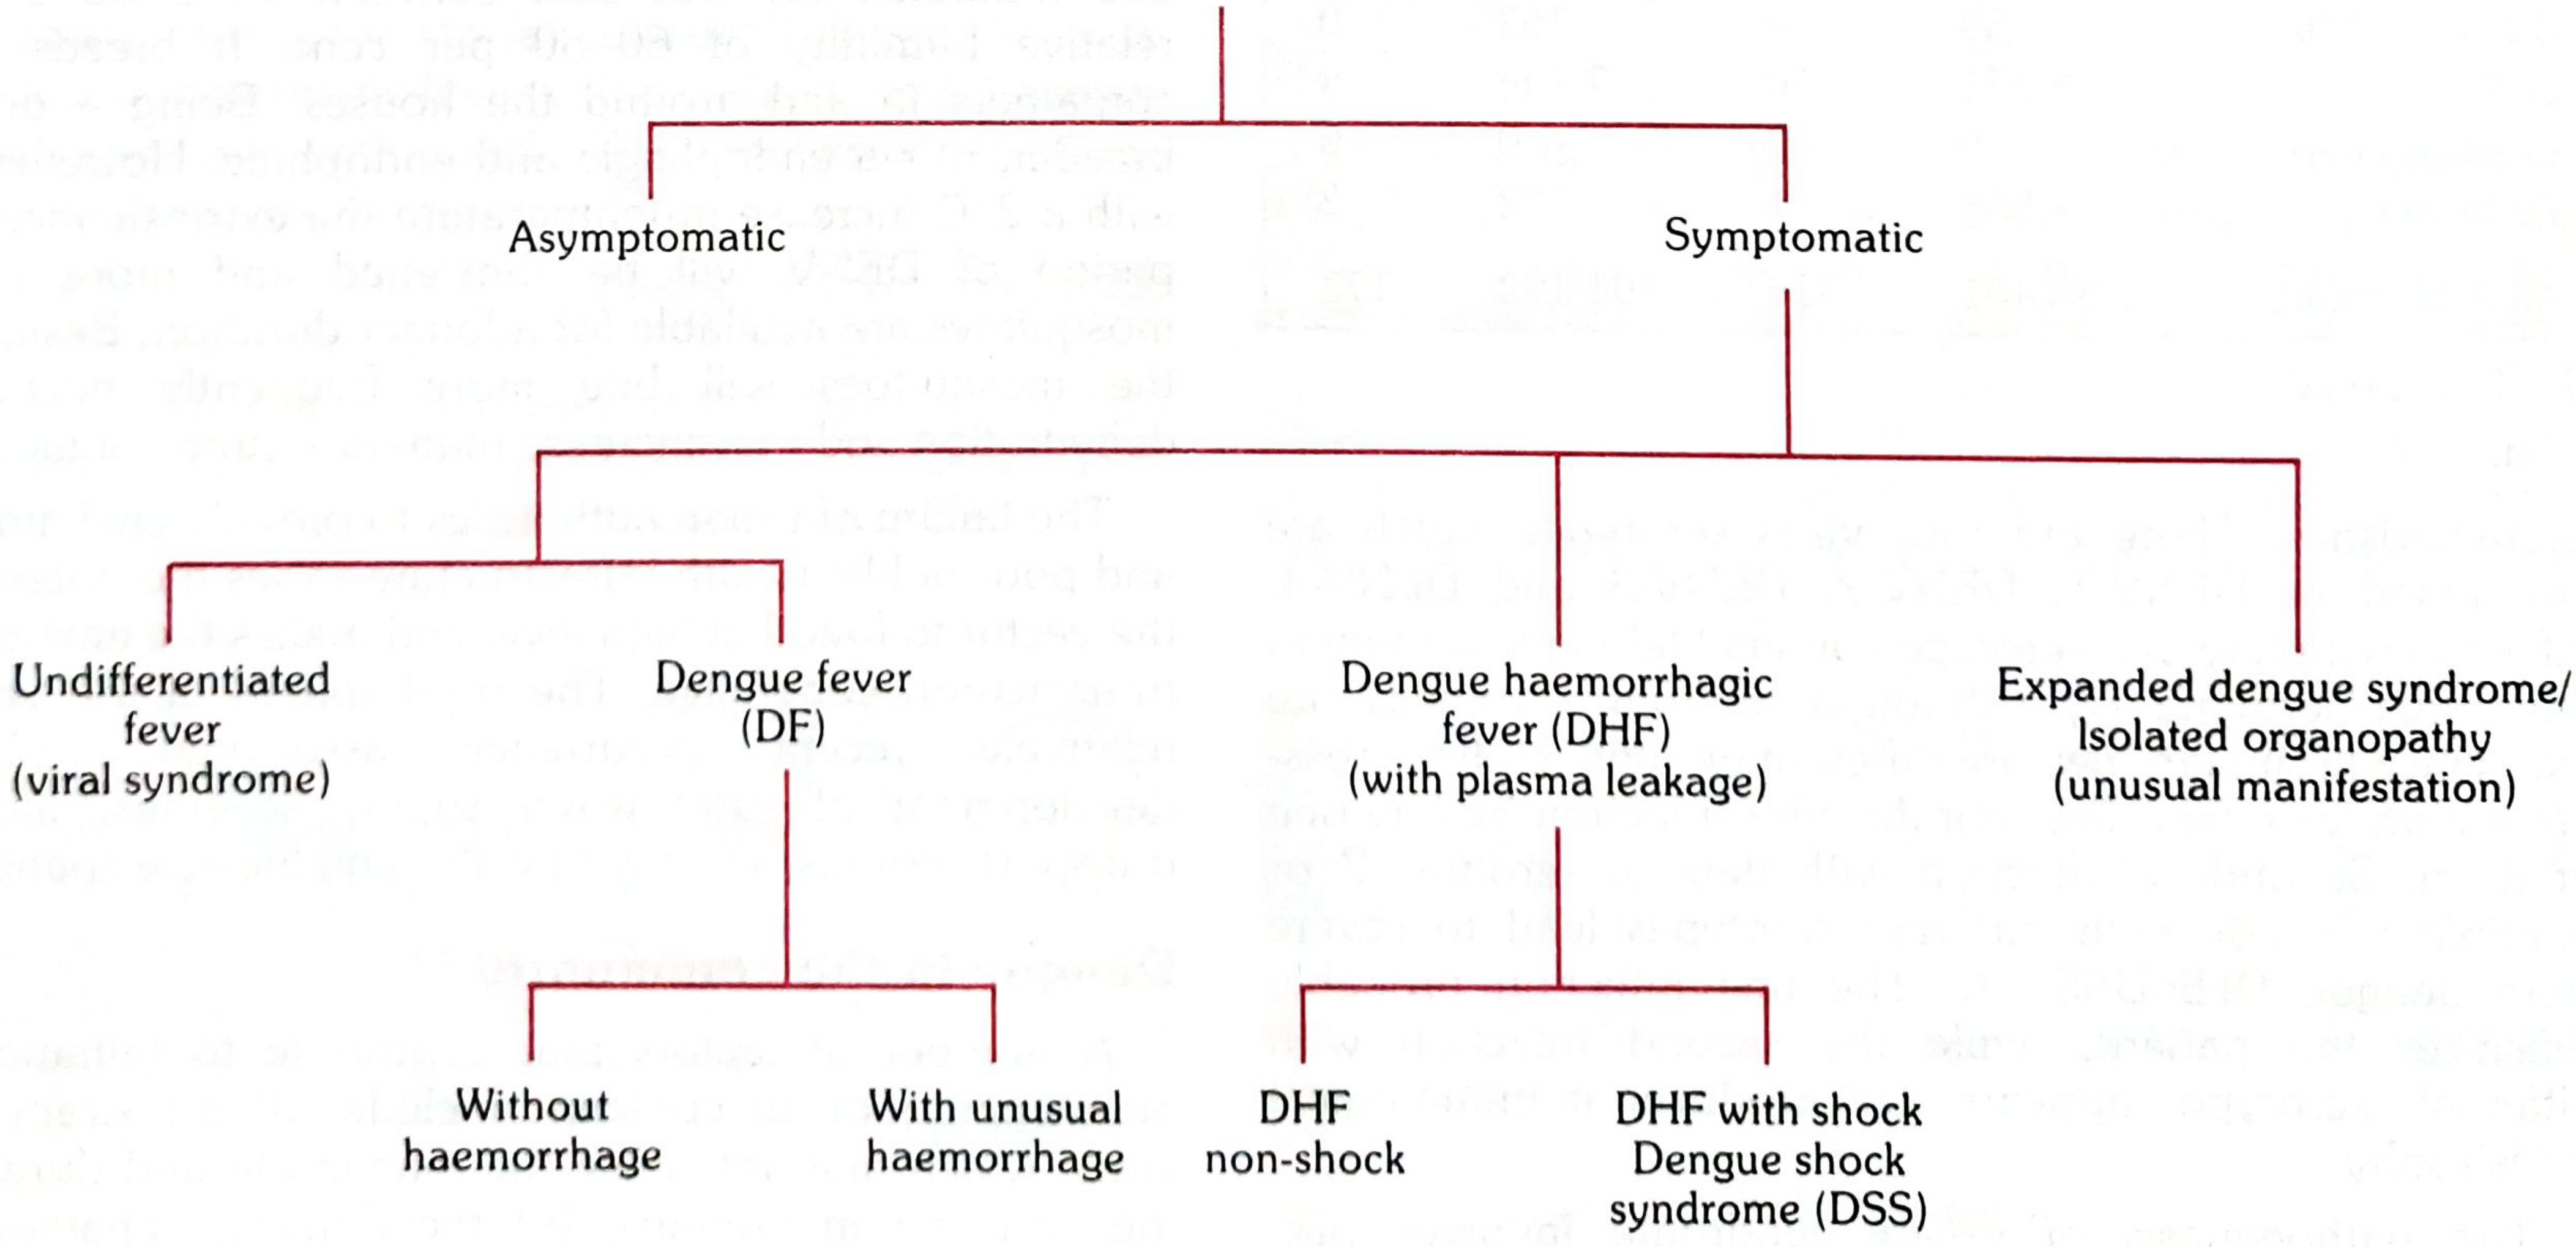
I. Classical Dengue Fever (DF)
- High fever (39°C-40°C), chills
- Severe headache (intense, frontal)
- Retro-orbital pain - pain behind the eyes, especially on eye movement or pressure (a hallmark symptom)
- Severe myalgia and arthralgia (bone and joint pain) - so severe it earned the name "breakbone fever"
- Facial flushing
- Extreme weakness, fatigue, anorexia
- Nausea, vomiting, abdominal pain
- Sore throat, altered taste sensation, constipation
- Appears in 80% of cases during defervescence or the second febrile phase
- Starts as diffuse flushing or mottling on face, neck, chest in early illness
- On 3rd-4th day: maculopapular or scarlatiniform rash starting on chest/trunk, spreading to extremities
- May be accompanied by itching and hyperaesthesia
- Lasts 2 hours to several days, may be followed by desquamation
II. Dengue Haemorrhagic Fever (DHF)
Phase 1 - Febrile Phase (Days 1-3)
- Abrupt high fever (40-41°C), facial flushing
- Headache, anorexia, vomiting, epigastric discomfort
- Positive tourniquet test (≥20 petechiae per 2.5×2.5 cm): most common haemorrhagic sign
- Hepatomegaly, right costal tenderness
Phase 2 - Critical Phase (Days 3-7, around defervescence)
- Temperature drops to 37.5-38°C or below
- Plasma leakage begins - increased capillary permeability leads to:
- Rising haematocrit (haemoconcentration ≥20% above baseline)
- Thrombocytopenia (platelets ≤100,000/mm³)
- Pleural effusion (predominantly right-sided), ascites
- Gall bladder oedema
- Haemorrhagic manifestations:
- Petechiae, ecchymoses, purpura
- Bleeding from mucosa, gums, gastrointestinal tract, injection sites
- Haematemesis, melaena
- Progressive leucopenia
Phase 3 - Recovery Phase
- Reabsorption of leaked fluid
- Improvement of general condition
- Bradycardia, characteristic rash may appear
- Risk of fluid overload if IV fluids given in excess during this phase
III. Dengue Shock Syndrome (DSS)
- All features of DHF plus signs of circulatory failure:
- Tachycardia, cold clammy extremities, delayed capillary refill
- Weak/absent pulse, hypotension
- Pulse pressure ≤20 mmHg (e.g., 100/80 mmHg)
- Restlessness, lethargy, decreased consciousness
- Mortality >10% if not promptly treated
Warning Signs (Requiring Urgent Hospital Admission)
- Abdominal pain or tenderness
- Persistent vomiting
- Clinical fluid accumulation
- Mucosal bleeding
- Lethargy, restlessness
- Liver enlargement >2 cm
- Rising haematocrit with rapid decrease in platelet count
c) Transmission Process of Dengue Fever (5 marks)
Causative Agent
- Dengue virus (DENV) - a single-stranded RNA virus of the genus Flavivirus, family Flaviviridae
- Four distinct serotypes: DENV-1, DENV-2, DENV-3, DENV-4
- Infection with one serotype gives lifelong immunity to that serotype only; secondary infection with a different serotype carries the highest risk of severe DHF
Reservoir of Infection
- Humans are the primary amplifying host and reservoir in urban settings
- Infected persons are viraemic (infective to mosquitoes) for 4-5 days after onset of fever (sometimes up to 12 days)
- In jungle/sylvatic cycles, non-human primates may serve as reservoirs
Step-by-Step Transmission Cycle
- A female Aedes aegypti bites a person who is viraemic (dengue virus circulating in blood during febrile period, days 1-5 of illness)
- The mosquito ingests the dengue virus along with the blood meal
- Inside the mosquito's midgut, the virus replicates and multiplies
- The virus then disseminates to the mosquito's salivary glands
- This process takes 8-12 days and is called the extrinsic incubation period (EIP)
- Temperature affects EIP: higher temperature shortens it (virus multiplies faster in warm climates)
- Once the virus reaches the salivary glands, the mosquito becomes permanently infective for life
- Transovarian (vertical) transmission of dengue virus in mosquitoes has been shown - infected female mosquitoes can pass the virus to their offspring eggs
- The infective mosquito injects virus-laden saliva into a new human host during a blood meal
- The virus enters the bloodstream
- After inoculation, an intrinsic incubation period of 3-10 days occurs before symptoms appear
- The virus replicates in regional lymph nodes and disseminates throughout the body
- The newly infected person becomes viraemic and serves as a new source for Aedes mosquitoes, perpetuating the urban transmission cycle
Transmission Cycle Diagram
Infected Human (viraemic)
↓
Female Aedes aegypti bites (takes blood meal)
↓
Virus replicates in mosquito midgut → salivary glands
(Extrinsic incubation: 8-12 days)
↓
Infective mosquito bites new susceptible human
↓
Intrinsic incubation period (3-10 days)
↓
New dengue case → perpetuates cycle
Other (Rare) Routes of Transmission
- Blood transfusion with infected blood
- Needle-sharing (intravenous drug users)
- Vertical transmission (mother to newborn, especially peripartum)
- Organ transplantation (rare)
Factors Favouring Transmission
- Warm and humid climate (ideal for mosquito breeding and shorter EIP)
- Stagnant water containers near homes - breeding sites (flower pots, tyres, water storage containers, discarded cans)
- Urbanization and overcrowding without adequate sanitation
- International travel spreading serotypes to new areas
- Lack of herd immunity to circulating serotypes
Park's Textbook of Preventive and Social Medicine, p. 291-298; Tintinalli's Emergency Medicine, p. 1123
d) Role of ANM (Auxiliary Nurse Midwife) in Preventing Dengue Fever in the Community (8 marks)
1. Health Education and Community Awareness (IEC Activities)
- Conduct house-to-house visits to educate families about dengue - its cause, transmission, symptoms, and prevention
- Organize community meetings, mohalla meetings, and self-help group meetings to spread awareness
- Use Information, Education and Communication (IEC) materials - posters, pamphlets, flip charts, and demonstration tools in the local language
- Educate the community on warning signs of dengue that require immediate hospital referral:
- Persistent vomiting, abdominal pain, bleeding gums, restlessness, rapid breathing
- Teach the "5-S" approach - Search and destroy breeding sites, Use protective clothing, Use mosquito nets, Use repellents, Seek medical care early
- Educate regarding the day-biting behaviour of Aedes aegypti (active during morning and late afternoon) so people take precautions accordingly
2. Vector Control and Source Reduction
- Advise community to drain and dry all stagnant water containers every week - flower pots, buckets, coolers, tyres, drums
- Promote covering of water storage containers with tight-fitting lids
- Advise removal and proper disposal of discarded tyres, coconut shells, broken pots, and other solid waste that collect rainwater
- Educate about turning over containers when not in use
- Encourage filling of potholes, drains, and low-lying areas that collect water
- Promote use of Gambusia fish (larvivorous fish) in water tanks, ponds, and fountains to eat mosquito larvae
- Assist in larval surveillance - inspect containers for larvae (wriggling larvae in stagnant water)
- Coordinate with health department for larviciding (application of Temephos/Abate to water storage containers)
- Facilitate anti-adult fogging/space spraying with insecticides during outbreaks and report the need promptly to the Medical Officer
3. Personal Protection Measures - Education
- Use of mosquito repellents (DEET-containing creams/sprays, citronella) on exposed skin
- Wearing full-sleeve clothing (long-sleeved shirts, long trousers) especially during peak biting hours
- Use of mosquito nets (even during daytime sleep for infants and children)
- Use of coils, mats, and vaporizers indoors
- Installing wire mesh screens on windows and doors
- Using bed nets for infants, young children, and pregnant women
4. Disease Surveillance and Early Case Detection
- Conduct active surveillance in her sub-centre area during monsoon and post-monsoon season (high dengue transmission period)
- Identify and report suspected dengue cases (acute fever with two or more symptoms: headache, retro-orbital pain, myalgia, rash, haemorrhagic manifestations) to the Medical Officer immediately
- Maintain a line listing of fever cases in her area and report to the Primary Health Centre
- Participate in sentinel surveillance activities as directed by health department
- Report unusual clustering of fever cases to alert about potential outbreaks
- Notify the Sub-Centre In-charge and PHC about dengue cases for disease notification and urgent public health action
5. Referral and Case Management Support
- Advise patients with warning signs to go immediately to the nearest hospital - do NOT delay
- Advise rest and adequate hydration (ORS, fruit juices, coconut water) for patients with mild dengue fever
- Educate families to avoid aspirin and NSAIDs (ibuprofen, diclofenac) as they increase bleeding risk; Paracetamol is the safe choice for fever
- Encourage early reporting to health facilities - explain that early treatment saves lives
- Accompany/refer severe cases to the sub-district or district hospital with a proper referral slip
6. Special Attention to High-Risk Groups
- Infants and young children - more prone to severe dengue and DHF
- Pregnant women - dengue in pregnancy carries risk of preterm labour, bleeding
- Immunocompromised individuals
- People in areas with active outbreaks
7. Coordination and Inter-Sectoral Collaboration
- Coordinate with ASHA workers and Anganwadi workers for community mobilization and joint home visits
- Liaise with Gram Panchayat and local bodies for environmental sanitation activities - garbage disposal, drainage clearing
- Coordinate with schools for student awareness programs
- Work with urban local bodies in urban areas for water container management
- Participate in block and district-level review meetings and report dengue situation from her catchment area
8. Monitoring and Evaluation
- Maintain sub-centre records of dengue cases reported, referred, and followed up
- Monitor larval indices (Breteau Index, House Index) in her area regularly
- Evaluate uptake of prevention behaviors during home visits (are people covering containers? wearing protective clothes?)
- Submit regular weekly/monthly reports to the PHC as part of the National Vector Borne Disease Control Programme (NVBDCP)
Summary: ANM's Role at a Glance
| Domain | Activities |
|---|---|
| Health Education | House visits, community meetings, IEC materials, warning signs education |
| Vector Control | Source reduction, larval surveillance, coordinate spraying/fogging |
| Personal Protection | Repellents, clothing, nets, screens |
| Surveillance | Active case finding, line listing, outbreak reporting |
| Referral | Identify warning signs, refer early, avoid aspirin |
| High-risk groups | Prioritize children, pregnant women |
| Coordination | ASHA, AWW, Panchayat, schools, district health team |
| Record Keeping | Maintain registers, submit reports, monitor indices |
Park's Textbook of Preventive and Social Medicine, p. 291-298; National Vector Borne Disease Control Programme (NVBDCP) India Guidelines
Please give
What is name of the vector responsible for dengue fever? (b) What are the clinical features of dengue feve? Describe the transmission process of dengue fever. (d) Write down the role of an ANM to prevent dengue fever in community(2+5+5+8).... please complete the questions answer
DENGUE FEVER - Complete Answer (2+5+5+8 = 20 Marks)
a) Name of the Vector Responsible for Dengue Fever (2 marks)
- It is a day-biting mosquito - most active 2 hours after sunrise and a few hours before sunset
- Only the female bites humans (males feed on plant nectar only)
- Identified by distinctive black-and-white striped markings on its legs and body
- A secondary vector, Aedes albopictus (Asian tiger mosquito), can also transmit dengue but is less efficient
- Breeds in small collections of clean, stagnant water around homes - flower pots, water drums, coolers, discarded tyres
b) Clinical Features of Dengue Fever (5 marks)
I. Classical Dengue Fever (DF)
| Symptom | Description |
|---|---|
| High fever | 39°C-40°C with chills, biphasic ("saddle-back") pattern |
| Severe headache | Intense, frontal |
| Retro-orbital pain | Pain behind the eyes on movement or pressure - hallmark symptom |
| Breakbone pain | Severe myalgia (muscle pain) and arthralgia - so severe it earned the name "breakbone fever" |
| Facial flushing | Reddening of face |
| General symptoms | Extreme weakness, anorexia, nausea, vomiting, altered taste, sore throat |
| Rash | Appears in 80% of cases on 3rd-4th day - maculopapular/scarlatiniform rash starting on chest/trunk, spreading to extremities; may itch and desquamate |
II. Dengue Haemorrhagic Fever (DHF) - Three Phases
Phase 1 - Febrile Phase (Days 1-3)
- Abrupt high fever (up to 40-41°C)
- Facial flushing, headache, vomiting, abdominal pain
- Positive tourniquet test (≥20 petechiae per inch square) - most common early hemorrhagic sign
- Mild maculopapular rash may appear
Phase 2 - Critical Phase (Days 3-7, around defervescence)
- Temperature falls to 37.5-38°C or below
- Plasma leakage begins due to increased capillary permeability:
- Rising haematocrit (≥20% above baseline) - haemoconcentration
- Thrombocytopenia (platelets ≤100,000/mm³)
- Pleural effusion (right-sided), ascites, gall bladder oedema
- Haemorrhagic manifestations:
- Petechiae, ecchymoses, purpura
- Bleeding from gums, nose, GI tract, injection sites
- Haematemesis, melaena
- Progressive leucopenia
Phase 3 - Recovery Phase
- Leaked fluid reabsorbed back into circulation
- General condition improves, appetite returns
- Warning: Risk of fluid overload if excessive IV fluids were given during critical phase
III. Dengue Shock Syndrome (DSS)
- Tachycardia, cold clammy extremities, delayed capillary refill
- Weak pulse, hypotension
- Pulse pressure ≤20 mmHg (e.g., 100/80 mmHg)
- Restlessness, altered consciousness
- Mortality >10% without prompt treatment
Warning Signs Requiring Immediate Hospital Admission:
- Abdominal pain or tenderness
- Persistent vomiting
- Bleeding from any site
- Lethargy, restlessness
- Rapid breathing, cold extremities
- Rising haematocrit with rapidly falling platelet count
c) Transmission Process of Dengue Fever (5 marks)
Causative Agent
- Dengue virus (DENV) - single-stranded RNA virus, genus Flavivirus
- 4 serotypes: DENV-1, DENV-2, DENV-3, DENV-4
- Infection with one serotype gives lifelong immunity to that serotype only
- Secondary infection with a different serotype carries the highest risk of severe DHF (antibody-dependent enhancement)
Step-by-Step Transmission Cycle
- The female Aedes aegypti bites a dengue patient who is viraemic (virus circulating in blood during days 1-5 of illness)
- The mosquito ingests dengue virus along with the blood meal
- Virus replicates in the mosquito's midgut epithelium
- Virus then travels (disseminates) to the salivary glands
- This process takes 8-12 days - called the Extrinsic Incubation Period
- Warmer temperatures shorten the EIP (faster viral replication)
- Once virus reaches salivary glands, the mosquito is infective for the rest of its life
- Transovarial (vertical) transmission also occurs - infected female passes virus to eggs, so offspring mosquitoes may be born already infected
- During the next blood meal, the mosquito injects virus-laden saliva into a new human host
- Virus enters the bloodstream
- Virus replicates in regional lymph nodes and disseminates throughout the body
- Intrinsic incubation period: 3-10 days before symptoms appear
- Newly infected person becomes viraemic during febrile period
- Can infect new Aedes mosquitoes - cycle perpetuates
Transmission Cycle (Summary Diagram)
Viraemic Human (fever days 1-5)
↓ (mosquito bites)
Female Aedes aegypti ingests virus
↓
Virus replicates: midgut → salivary glands
(Extrinsic Incubation Period: 8-12 days)
↓
Mosquito permanently infective
↓ (bites new person)
Virus injected into new susceptible human
↓
Intrinsic Incubation Period (3-10 days)
↓
New dengue case → cycle continues
Other (Rare) Routes of Transmission
- Blood transfusion
- Needle/syringe sharing
- Mother to newborn (vertical/perinatal transmission)
- Organ transplantation
Factors Favouring Transmission
- Warm, humid tropical climate
- Stagnant water around homes (breeding sites)
- Urbanization, overcrowding
- International travel spreading serotypes
- Poor sanitation and waste disposal
d) Role of ANM in Preventing Dengue Fever in the Community (8 marks)
1. Health Education and Community Awareness
- Conduct regular house-to-house visits to educate families about dengue - its cause, symptoms, transmission, and prevention
- Organize community meetings, mohalla meetings, and self-help group sessions
- Use IEC (Information, Education and Communication) materials - posters, pamphlets, flip charts in local language
- Educate community on warning signs requiring immediate hospital care (bleeding, severe abdominal pain, restlessness, cold extremities)
- Teach the "5-S" rule:
- Search and destroy breeding sites
- wear protective Sleeves/clothing
- Sleep/rest under mosquito nets
- use Screens on windows and doors
- Seek early medical care if fever develops
- Inform community that Aedes aegypti bites during the day - so repellents and protective clothing must be used in daytime too, not just at night
2. Vector Control and Source Reduction
- Advise community to drain and dry all water containers every 7 days (breaks the mosquito breeding cycle)
- Promote covering of water storage containers with tight-fitting lids at all times
- Advise removal of discarded items that collect water - old tyres, coconut shells, broken pots, plastic containers
- Encourage proper waste disposal and maintaining clean surroundings
- Advise changing water in flower vases and coolers weekly
- Promote use of Gambusia (larvivorous) fish in water tanks, ornamental ponds, and open water storage
- Conduct larval surveys in the sub-centre area - inspect containers for Aedes larvae (wriggling organisms near water surface)
- Coordinate with PHC/district for larviciding (Temephos/Abate application) in water containers that cannot be emptied
- Report need for insecticidal space spraying/fogging to Medical Officer, especially during outbreaks
3. Personal Protection - Education and Demonstration
- Apply mosquito repellents (DEET-based) on exposed skin, especially for children and pregnant women
- Wear full-sleeve clothing and long trousers, especially during morning and evening hours
- Use insecticide-treated mosquito nets even during daytime sleep (especially for infants and young children)
- Use mosquito coils, mats, and electric vaporizers inside the house
- Install wire mesh screens on windows and doors to prevent mosquito entry
4. Disease Surveillance and Early Case Detection
- Conduct active fever surveillance in her sub-centre area, especially during and after the monsoon season (July-November - peak dengue season)
- Identify suspected dengue cases - acute fever with headache, retro-orbital pain, myalgia, rash, or bleeding tendency
- Maintain a line listing of all fever cases in the area with dates, addresses, and clinical details
- Report promptly to the Medical Officer at PHC - any clustering of fever cases may indicate an impending outbreak
- Participate in sentinel surveillance activities as part of the National Vector Borne Disease Control Programme (NVBDCP)
- Ensure disease notification of probable and confirmed dengue cases to the health department
5. Early Referral and Case Management Guidance
- Identify and immediately refer patients with warning signs to the nearest hospital
- Advise patients with mild dengue (no warning signs) to:
- Take adequate rest
- Drink plenty of fluids - ORS, coconut water, fruit juices, soups
- Take only Paracetamol for fever (never aspirin or ibuprofen - they increase bleeding risk)
- Return immediately if warning signs develop
- Carry a referral slip when sending patients to PHC or district hospital
- Follow up with referred patients and their families
6. Special Attention to High-Risk Groups
- Infants and young children - highest risk of DHF and DSS
- Pregnant women - dengue in pregnancy can cause premature labour, maternal bleeding, low birth weight
- Elderly and immunocompromised individuals
- Families in areas with confirmed dengue cases - targeted source reduction around index case homes
7. Coordination and Inter-Sectoral Collaboration
- Work with ASHA workers for community mobilization and joint home visits
- Coordinate with Anganwadi workers for awareness among mothers and children
- Liaise with Gram Panchayat and local bodies for community-level sanitation drives - drain cleaning, garbage removal
- Coordinate with schools to educate students and send messages home via children
- Work with urban local bodies in urban areas for water container management and street cleaning
- Report to the block/district health officer during outbreaks for additional resources and fogging support
8. Record Keeping and Reporting
- Maintain sub-centre registers of dengue suspect cases, referred cases, and outcomes
- Monitor larval indices (House Index, Container Index, Breteau Index) in her catchment area
- Submit weekly and monthly reports to the PHC as per NVBDCP guidelines
- Evaluate effectiveness of prevention activities during regular home visits
Summary Table: ANM's Role in Dengue Prevention
| Domain | Key Activities |
|---|---|
| Health Education | House visits, community meetings, IEC materials, warning sign awareness |
| Vector Control | Weekly draining of containers, covering water storage, coordinate larviciding/fogging |
| Personal Protection | Teach use of repellents, protective clothing, mosquito nets, screens |
| Surveillance | Active fever detection, line listing, outbreak reporting to PHC |
| Referral | Recognize warning signs, refer early, advise paracetamol only |
| High-Risk Groups | Extra attention to children, pregnant women, immunocompromised |
| Coordination | ASHA, AWW, Panchayat, schools, district health team |
| Record Keeping | Registers, monthly reports, larval index monitoring |
Sources: Park's Textbook of Preventive and Social Medicine; Tintinalli's Emergency Medicine; National Vector Borne Disease Control Programme (NVBDCP), Government of India Guidelines
What is hypertension? (b) Mention the important points to be kept in mind during measuring Blood pressure. (c) What are the sign & symptoms of cardiovascular problems? (d) Describe the preventive measures of cardiovascular problems in community level(2+9+6)