
Give me detailed explanation of emergency medicine procedures such as cannulation , catheterisation and intubation etcc for a deep knowledge on procedures as a medical clinician !
Reading File
Now I'll run parallel searches across all three procedures simultaneously.
Finding Sources
Finding Sources
Finding Sources
Finding Sources
Finding Sources
Reading File
Reading File
Finding Sources
Finding Sources
Reading File
Finding Sources
Finding Sources
Reading File
Reading File
Reading File
Reading File
Finding Sources
Reading File
Loading Image
I now have rich, detailed content from authoritative textbooks. Let me compile the comprehensive response.
Emergency Medicine Procedures: Deep Clinical Reference
Overview
This guide covers the three core emergency access/airway procedures every clinician must master: peripheral IV cannulation, central venous catheterisation (CVC), and endotracheal intubation, plus essential rescue techniques (cricothyrotomy, urinary catheterisation). All content is drawn from The Washington Manual of Medical Therapeutics, Pfenninger & Fowler's Procedures for Primary Care, and Roberts & Hedges' Clinical Procedures in Emergency Medicine.
1. PERIPHERAL IV CANNULATION
Overview
Peripheral IV access is the first-line vascular route in any emergency. A critical principle that is often overlooked: a short, large-bore peripheral cannula (14-16G) delivers fluid faster than a long central venous catheter, because resistance to flow is inversely proportional to the 4th power of the radius (Poiseuille's law). Always attempt large-bore peripheral access first in haemorrhage/shock.
Gauge Selection by Clinical Context
| Gauge | Colour | Use |
|---|---|---|
| 14G | Orange | Massive haemorrhage, rapid transfusion |
| 16G | Grey | Major trauma, surgical cases |
| 18G | Green | General emergency access, blood products |
| 20G | Pink | Routine IV fluids, medications |
| 22G | Blue | Elderly, paediatric, fragile veins |
| 24G | Yellow | Neonates, children, very fragile veins |
Site Selection
- First choice: Antecubital fossa (median cubital, cephalic, basilic) - large, easily visible
- Second choice: Forearm (cephalic, basilic)
- Third choice: Dorsum of hand
- Avoid: Lower limb veins (high DVT/phlebitis risk), femoral vein for peripheral (infection risk), limb with AV fistula, mastectomy side, or limb with lymphoedema
Technique (Step by Step)
Equipment: Appropriate gauge cannula, tourniquet, 70% alcohol swab/chlorhexidine, sterile tape/dressing, 10mL normal saline flush, gloves, sharps bin immediately available.
- Prepare patient: Explain procedure, obtain consent, position arm at heart level or below.
- Apply tourniquet: 10-15cm proximal to insertion site. Ask patient to open and close fist.
- Vein identification: Visually identify and palpate - a patent vein feels soft and bouncy. Use warm compresses or transillumination for difficult veins.
- Asepsis: Don gloves. Clean site with chlorhexidine or 70% alcohol swab for 30 seconds; allow to dry completely.
- Skin stretch: Use non-dominant hand to apply traction distal to insertion site, anchoring the vein.
- Insertion: With bevel up, insert at 15-30 degree angle in the direction of venous flow (toward heart). Advance until a flashback of blood is seen in the chamber.
- Advance cannula: Lower angle to almost skin level, advance the catheter 1-2mm further into the vessel to ensure the plastic cannula tip is intraluminal, then slide cannula off the needle while keeping needle still.
- Release tourniquet: Before removing the needle/stylet.
- Secure and flush: Apply digital pressure proximal to tip, remove needle, connect to cap/giving set, flush with 10mL normal saline and observe for resistance or swelling (extravasation).
- Secure dressing: Apply transparent sterile dressing. Document date, time, gauge, and site.
Complications and Management
| Complication | Prevention/Action |
|---|---|
| Haematoma | Apply pressure for 2-3 min after failed attempt |
| Extravasation/tissuing | Remove immediately, elevate limb, apply cold compress |
| Phlebitis | Use smallest effective gauge; remove at first signs (redness, tenderness) |
| Air embolism | Always flush and expel air before connection |
| Infection | Strict asepsis; replace cannula every 72-96h or per local policy |
| Nerve injury | Do not probe deeply; if paresthesia, withdraw immediately |
2. CENTRAL VENOUS CATHETERISATION (CVC)
Indications
(Pfenninger & Fowler's Procedures for Primary Care)
- Peripheral venous access impossible (obesity, collapsed veins)
- Cardiac arrest / CPR - emergency access
- Central venous pressure (CVP) monitoring
- Administration of vasopressors (noradrenaline, adrenaline)
- Total parenteral nutrition (TPN) or hyperosmolar solutions
- Chemotherapy agents causing peripheral phlebitis
- Haemodialysis / plasmapheresis
- Pulmonary artery catheter placement (Swan-Ganz)
- Transvenous cardiac pacing
Absolute Contraindications
- Patient refusal
- Distorted local anatomy (trauma, prior surgery, radiation, tumour)
- Superior vena cava syndrome (for subclavian/IJ routes)
- Bleeding diathesis with noncompressible vessel
- Active infection at insertion site
Routes Compared
| Site | Advantages | Disadvantages |
|---|---|---|
| Internal Jugular (IJ) | Accessible during CPR; lower pneumothorax risk; right side preferred (direct route to RA) | Carotid artery risk; neck immobility; avoid with thrombolytic therapy |
| Subclavian | Preferred for long-term; comfortable; lower infection rates | Highest pneumothorax/haemothorax risk; non-compressible if arterial puncture |
| Femoral | Easiest in emergency/CPR; no thoracic complications; use if respiratory distress prevents Trendelenburg | Higher infection risk with prolonged placement; limits ambulation; DVT risk |
Key rule: Right-sided approaches are preferred - more direct path to the right atrium, lower risk of thoracic duct injury (the thoracic duct enters the venous system on the LEFT).
The Seldinger Technique (Universal Method for CVC)
The Seldinger technique is the standard method for CVC insertion:
- Set up: Full aseptic technique - sterile gown, gloves, mask, cap, large sterile drape. Open commercial CVC kit.
- Position: Trendelenburg (head down 15-20°) for IJ/subclavian to distend veins and reduce air embolism risk. NOT required for femoral.
- Anaesthesia: Infiltrate 2mL of 1% lidocaine (with 25G needle) into skin and deeper tissues.
- Seeker needle: Attach 22G "seeker" to 5mL syringe. Advance with continuous gentle aspiration until free blood return confirms venous placement.
- Introducer needle: Once vein located, use 18G introducer needle (with syringe) to puncture at the same trajectory, aspirating continuously. Dark, non-pulsatile blood = vein; bright red/pulsatile = artery (withdraw immediately, compress).
- Guidewire: Remove syringe. Thread J-wire (0.089cm diameter, 45cm long) through the needle into the vein. The wire must pass without resistance. Never lose control of the proximal end of the wire.
- Remove needle: Holding the wire steady, remove the introducer needle over the wire.
- Skin nick: Make a small stab incision with a #11 scalpel blade at the wire entry site.
- Dilator: Thread dilator over wire to dilate subcutaneous track. Remove dilator, maintaining wire position.
- Catheter placement: Thread CVC over the wire. The wire must be visible at the proximal end of the catheter before advancing. Advance catheter to appropriate depth (right IJ: ~15cm; right subclavian: ~15cm; left-sided: ~17-20cm; femoral: ~30cm for IVC reach).
- Remove wire: Hold catheter firmly, remove wire completely.
- Confirm and aspirate: Aspirate each lumen for blood return, then flush all lumens with saline.
- Secure: Suture catheter hub to skin with 3-0 silk. Apply chlorhexidine-impregnated dressing.
- Post-insertion CXR: Mandatory - confirm tip position (should be at SVC-RA junction, NOT in right atrium or ventricle) and exclude pneumothorax/haemothorax.
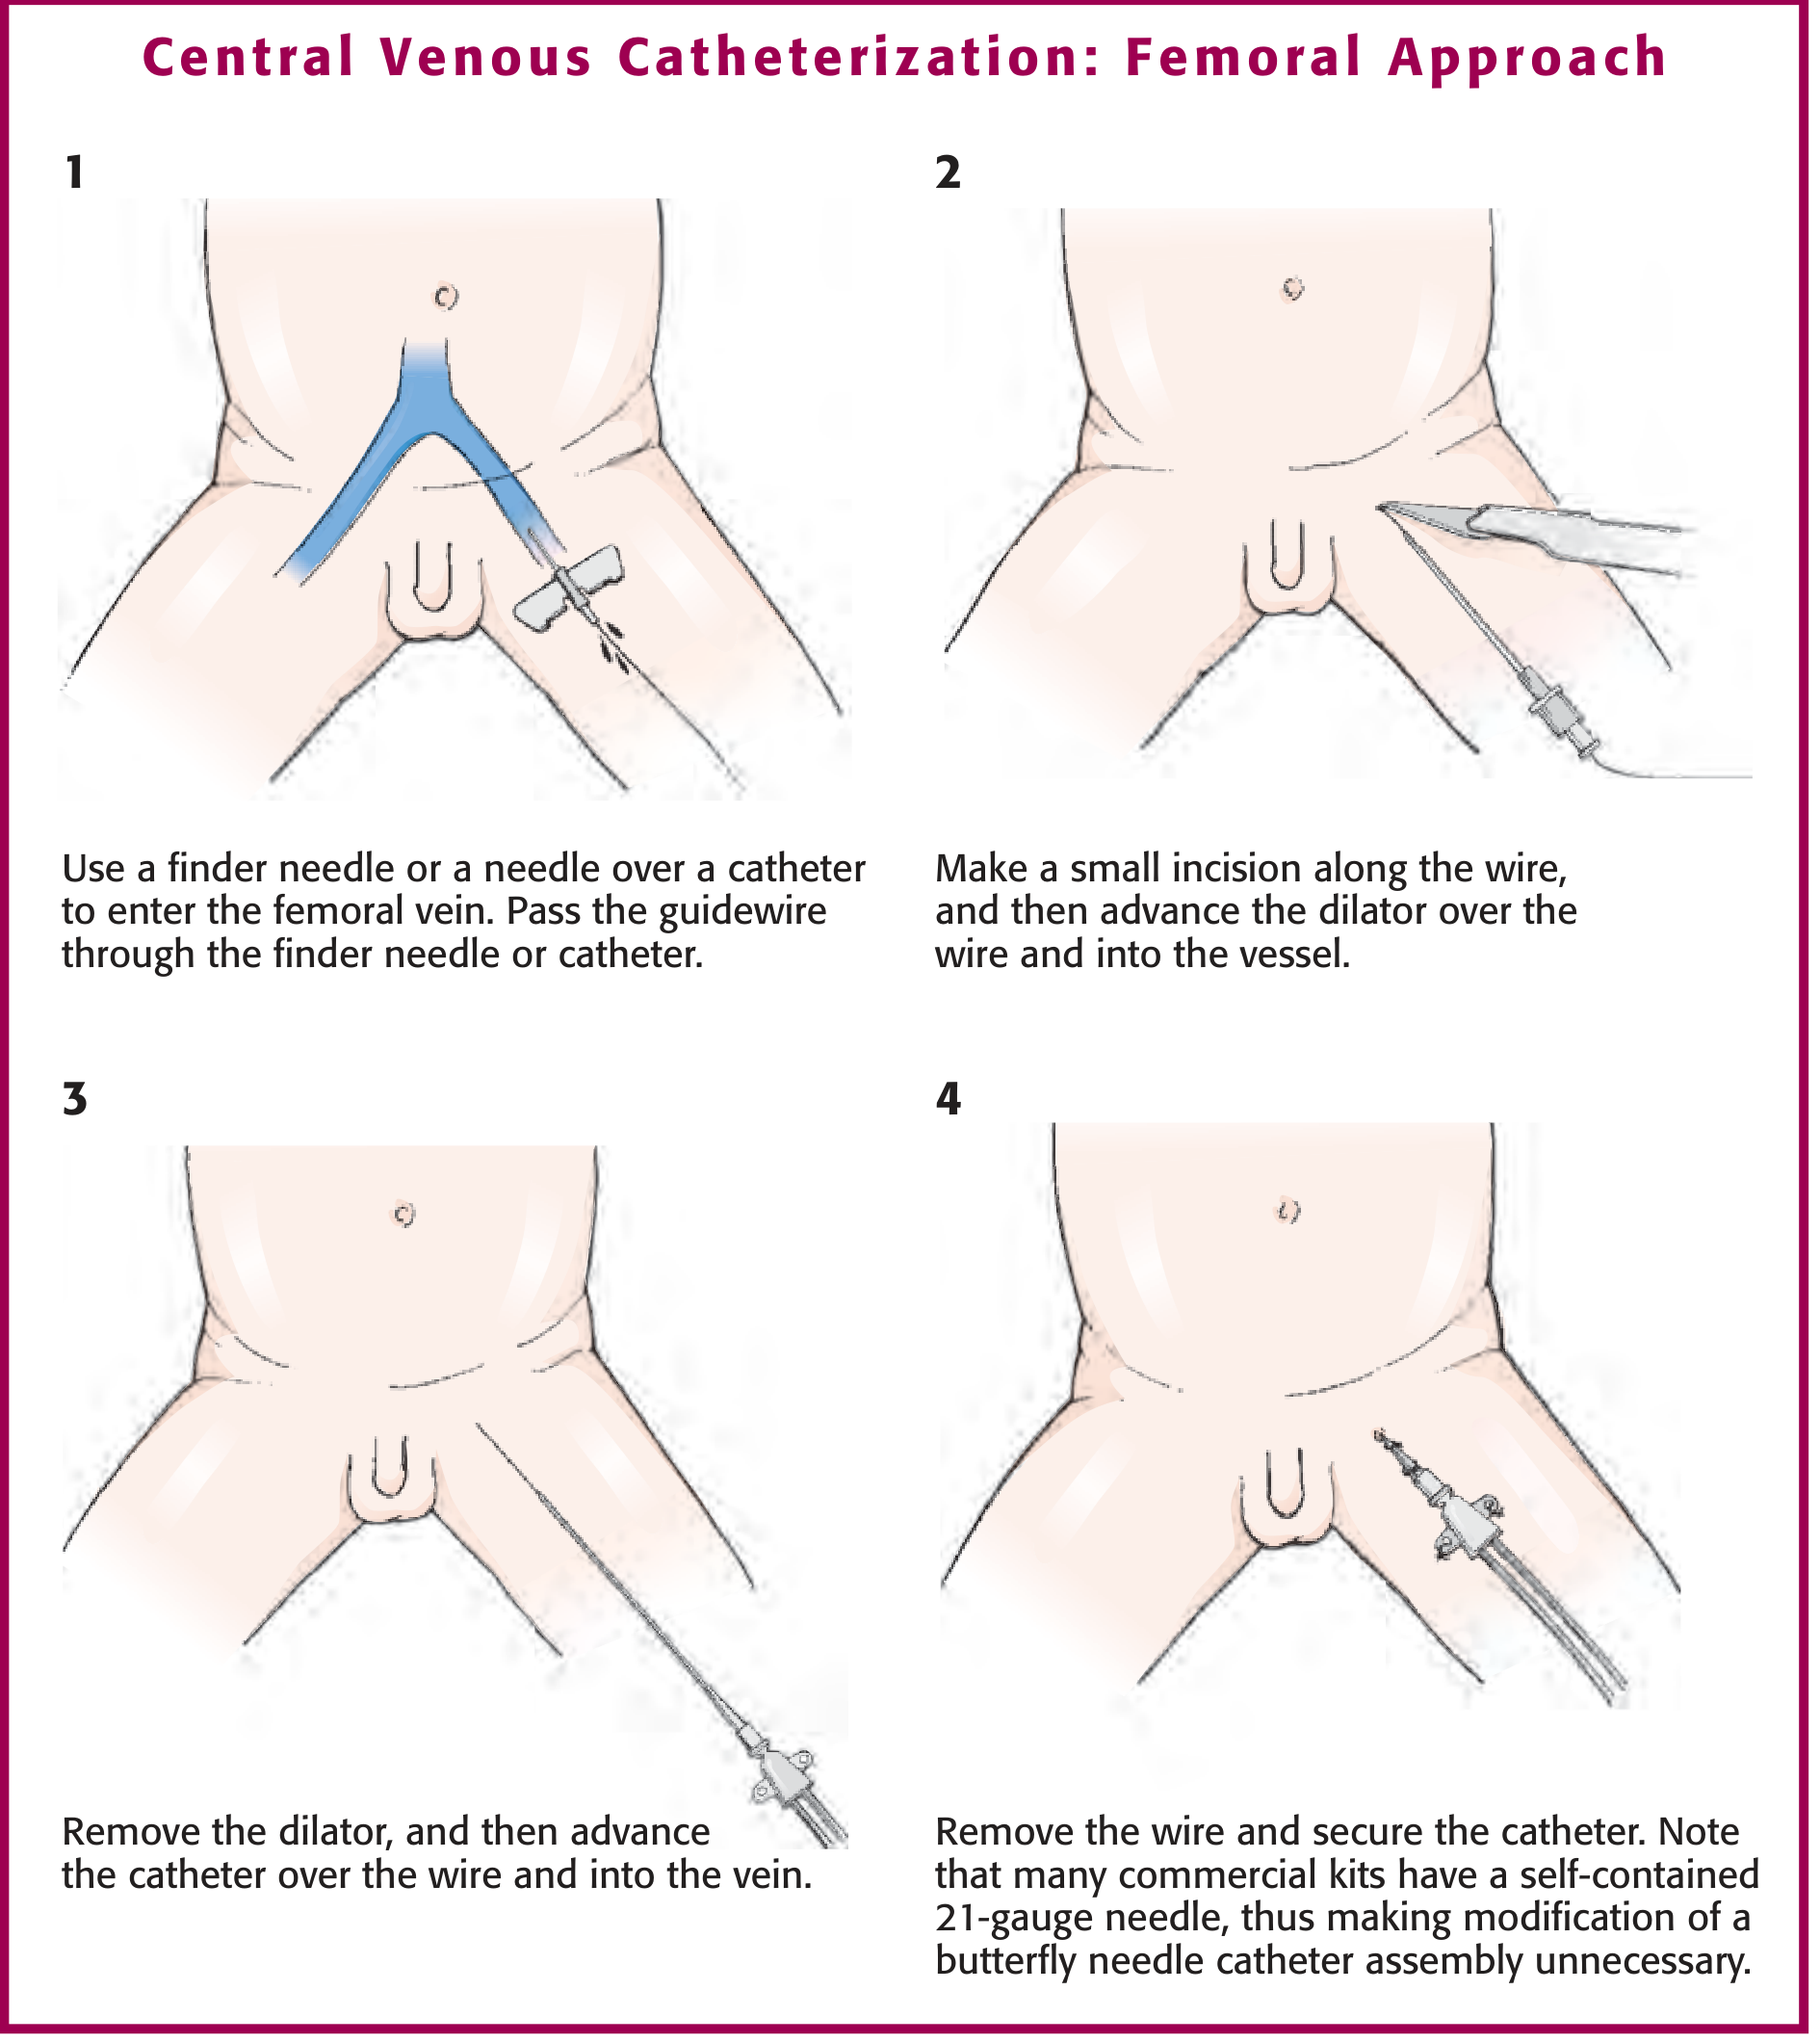
Central Venous Catheterization: Femoral Approach - showing Seldinger technique in 4 steps - Roberts & Hedges' Clinical Procedures in Emergency Medicine
Subclavian Vein - Infraclavicular Approach
(Pfenninger & Fowler's)
- Patient in Trendelenburg with ipsilateral arm by side
- Identify landmarks: thumb on distal clavicle, middle finger on sternoclavicular joint - insertion point is where the index finger crosses the inferior border of the clavicle
- Aim needle toward the sternal notch, advancing under the clavicle "hugging" the inferior cortex
- Direct the needle medially, staying parallel to the floor
Internal Jugular Approach
- Position: Head rotated 30-45° contralaterally (not excessively)
- Identify the triangle formed by the two heads of sternocleidomastoid (SCM)
- Insert at the apex of the triangle at 30-45° angle toward ipsilateral nipple
- Ultrasound guidance is strongly recommended and evidence-based - reduces complications significantly in both adult and paediatric patients
Ultrasound Guidance
Current guidelines recommend routine ultrasound guidance for IJ and subclavian CVC insertion. It allows real-time visualisation of needle entry, confirms venous (compressible) vs arterial (non-compressible) nature, and reduces number of puncture attempts. Use short-axis (transverse) or long-axis (in-plane) technique.
CVC Complications
| Complication | Rate | Notes |
|---|---|---|
| Pneumothorax | ~2% subclavian | Highest risk with subclavian route; requires CXR post-procedure |
| Haemothorax | ~1% subclavian | Arterial injury during insertion |
| Arterial puncture | Variable | Apply firm pressure x10 min; surgical consult if large haematoma |
| Air embolism | Rare | Prevent: Trendelenburg position, occlude hub during wire/catheter exchange |
| CLABSI (infection) | 1-3/1000 catheter-days | Chlorhexidine prep reduces risk; daily review of necessity |
| Thrombosis | 5-10% | Remove when no longer needed; consider prophylaxis if high risk |
3. ENDOTRACHEAL INTUBATION (ETI)
Indications
(Washington Manual of Medical Therapeutics)
- Refractory hypoxaemic respiratory failure (SpO2 <90% despite high-flow O2)
- Hypercapnic respiratory failure (rising pCO2, tiring patient)
- Airway protection: intoxication, head trauma, severe haematemesis, coma (GCS ≤8)
- Upper airway obstruction: angioedema, tumour, epiglottitis
- Severe metabolic acidosis/haemodynamic shock ("type 4 respiratory failure")
- Need for controlled hyperventilation (raised ICP management)
Pre-intubation Checklist (SOAPME)
- S - Suction (working, at bedside)
- O - Oxygen (15L/min via BVM; pre-oxygenate to SpO2 >95% for 3-5 minutes)
- A - Airway adjuncts (oral airway, nasopharyngeal airway, LMA as rescue)
- P - Position ("sniffing" position: neck flexed, head extended; ramp for obese patients)
- M - Monitoring (SpO2, ECG, NIBP, capnography)
- E - Equipment (laryngoscope + blade tested, ETT with stylet and tested cuff, 10mL syringe, end-tidal CO2 colorimeter, video laryngoscope as backup, bougie/tracheal tube introducer)
Drugs for Rapid Sequence Intubation (RSI)
(Washington Manual of Medical Therapeutics, Table 8-2)
| Drug | Class | Dose (IV) | Onset | Duration | Key Considerations |
|---|---|---|---|---|---|
| Etomidate | Sedative | 0.3 mg/kg (stable); 0.15 mg/kg (unstable) | 15-45s | 3-12 min | Haemodynamically neutral - drug of choice in haemodynamic instability; inhibits cortisol synthesis (avoid in adrenal insufficiency) |
| Ketamine | Dissociative | 1-3 mg/kg | 30s | 5-10 min | Increases HR and BP (good in shock); bronchodilator (good in asthma); may increase ICP |
| Propofol | Sedative | 1-1.5 mg/kg (stable); 0.5 mg/kg (unstable) | 30-60s | 5-10 min | Causes hypotension and bradycardia; beneficial in status epilepticus |
| Midazolam | Benzodiazepine | 0.02-0.08 mg/kg (~1-5mg adult) | 30-60s | 15-30 min | Causes hypotension; good amnesia |
| Fentanyl | Opioid | ~2 μg/kg | 15s | 30-60 min | Adjunct agent; attenuates sympathetic response to laryngoscopy; causes hypotension at higher doses |
| Succinylcholine | Depolarising NMB | 1-1.5 mg/kg | 30-60s | 5-15 min | Fastest onset/offset; CONTRAINDICATED in: hyperkalaemia (burns >48h, crush injury, renal failure), malignant hyperthermia history, myopathies, prolonged immobility |
| Rocuronium | Non-depolarising NMB | 1 mg/kg (RSI dose 1.2 mg/kg) | 45-60s | 30-45 min | Preferred when succinylcholine contraindicated; reversible with sugammadex |
Direct Laryngoscopy - Step by Step Technique
(Washington Manual of Medical Therapeutics, Table 8-3)
Step 1: Position - "Sniffing position": neck flexed (~35°), head extended at atlanto-occipital joint. Aligns oral, pharyngeal, and laryngeal axes. Obese patients need a shoulder roll/ramp ("ear to sternal notch" alignment).
Step 2: Pre-oxygenate with 100% O2 via BVM to SpO2 >95% for 3-5 minutes. Suction oral secretions.
Step 3: Check all equipment - test ETT cuff inflation/deflation; check laryngoscope light; confirm stylet placement and ETT size (women: 7.0-7.5mm; men: 7.5-8.0mm ID).
Step 4: Administer RSI medications. Once adequate sedation and paralysis achieved (jaw relaxed), open the mouth with the right hand.
Step 5: Insert laryngoscope (held in left hand) into the RIGHT side of the mouth. Sweep the tongue to the LEFT. Advance blade along the tongue.
Step 6 (Macintosh blade): Advance curved blade tip into the vallecula (space between base of tongue and epiglottis). Lift vertically (do not lever/tilt) to visualise the glottis. The epiglottis lifts indirectly via the hyoepiglottic ligament.
Step 6 (Miller blade): Advance straight blade tip under the epiglottis, lifting it directly.
Step 7: Once vocal cords visible, insert ETT from the right corner of the mouth with the right hand, guiding the cuff past the vocal cords under direct vision.
Step 8: Remove stylet once cuff is past the cords. Advance to 21cm at teeth for women, 22cm for men.
Step 9: Inflate cuff with 5-10mL air. Connect to BVM and ventilate.
Step 10: Confirm placement (triple confirmation):
- End-tidal CO2 colorimeter (yellow = CO2 = correct placement)
- Auscultation: bilateral breath sounds over chest AND absence of gurgling over epigastrium
- Chest X-ray: tip should be 3-5cm above the carina
Post-Intubation Management
- Cuff pressure: Monitor regularly; maintain <25 mmHg (below capillary filling pressure) to prevent ischaemic mucosal injury
- Secure ETT with tape or commercial holder
- Continuous sedation and analgesia (see post-intubation sedation table below)
Post-Intubation Sedation
(Washington Manual, Table 8-4)
| Drug | Dose | Notes |
|---|---|---|
| Propofol | 20-100 mcg/kg/min | Short-acting; good for neuro patients (can interrupt for exam) |
| Midazolam | 0.02-0.08 mg/kg/h | Longer-acting benzodiazepine |
| Fentanyl | 25-200 mcg/h | Opioid infusion for analgesia |
| Dexmedetomidine | 0.2-0.7 mcg/kg/h | Cooperative sedation; no respiratory depression |
4. VIDEO LARYNGOSCOPY
Video laryngoscopy (VL) should be the primary tool or immediately available backup in all emergency intubations. Devices (GlideScope, McGrath, C-MAC) provide a hyperangulated view of the glottis, particularly useful in:
- Cervical spine immobilisation (cannot optimally position)
- Facial/oral trauma with distorted anatomy
- Obese patients with short neck
- Predicted difficult airway (LEMON score positive)
VL allows a second clinician to observe the procedure in real time - valuable for teaching and quality assurance.
5. DIFFICULT AIRWAY AND RESCUE TECHNIQUES
LEMON Score (Predict Difficult Airway)
- L - Look externally (micrognathia, macroglossia, short neck)
- E - Evaluate 3-3-2 rule (3 finger mouth opening; 3 finger hyoid-chin distance; 2 finger thyroid-floor of mouth)
- M - Mallampati score (Class III-IV = difficult)
- O - Obstruction (foreign body, angioedema, tumour)
- N - Neck mobility
Needle Cricothyrotomy (Cannot Intubate/Cannot Oxygenate)
Equipment: Large-bore IV cannula (14G), 3mL Luer-lock syringe, 7mm ETT adaptor
- Extend neck; identify the cricothyroid membrane (inferior to thyroid cartilage, superior to thyroid gland - felt as a soft indent in the midline)
- Stabilise thyroid cartilage with non-dominant hand
- Insert 14G cannula on syringe at 45° angle through membrane, aspirating continuously
- Free air aspiration confirms tracheal placement
- Advance cannula to hub; remove needle
- Attach syringe barrel (plunger removed) then 7mm ETT adaptor for BVM ventilation
- Limitation: Allows oxygenation only (~30-40 min before CO2 build-up); bridges to definitive airway
Surgical Cricothyrotomy
Equipment: Scalpel (#10 or #20 blade), Kelly forceps, 6mm ETT (or 6mm tracheostomy tube)
- Extend neck; palpate and identify cricothyroid membrane
- Stabilise thyroid cartilage with non-dominant hand
- Make 1cm horizontal skin incision just above the superior border of the cricoid cartilage
- Use Kelly forceps to dissect until cricothyroid membrane is visible
- Make a vertical incision through the midline of the membrane (depth: 1-1.5cm, do not pass too deeply)
- Widen incision with Kelly forceps; insert 6mm ETT or cric tube through incision
- Inflate cuff; confirm with capnography and auscultation
- Secure tube
6. URINARY CATHETERISATION
Indications
- Urinary retention (acute)
- Accurate urine output monitoring in critically ill patients
- Pre-operative/peri-operative bladder decompression
- Collection of uncontaminated urine specimen
- Bladder irrigation (haematuria, clot retention)
- Administration of intravesical medication
Catheter Types
- Foley catheter: Most common; balloon retention; sizes 12-18 French (smaller = thinner)
- Coude catheter: Curved tip; preferred in male patients with benign prostatic hyperplasia (BPH) or urethral stricture
- Three-way catheter: Extra port for continuous bladder irrigation (haematuria)
- Intermittent/in-out catheter: No balloon; single drainage then removed
Male Technique (Step by Step)
- Equipment: Catheterisation pack (drape, cleansing solution, forceps, urinary catheter, 10mL sterile water for balloon, drainage bag, lubricating gel with lignocaine)
- Position: Supine; expose genitalia
- Sterile field: Open pack aseptically; don sterile gloves
- Clean: Hold penis with non-dominant hand (becomes non-sterile); retract foreskin (document if phimosis). Cleanse glans and urethral meatus with chlorhexidine or antiseptic from meatus outward, 3 times.
- Lubricate: Instil 10-15mL lignocaine gel into the urethra; wait 3-5 minutes for effect
- Insert catheter: Hold catheter with sterile dominant hand; insert into urethral meatus advancing smoothly. For male, advance the full length (~20cm) before inflating balloon - the urethra is long (~20-25cm) and the balloon must NOT be inflated in the urethra
- Confirm placement: Urine drains freely into catheter. If no drainage, connect drainage bag and apply gentle suprapubic pressure, OR ask patient to cough
- Inflate balloon: Once urine drains, inflate balloon with 10mL sterile water (as per catheter label). Gently pull back to feel balloon seat at bladder neck
- Replace foreskin: Critical - prevents paraphimosis
- Connect drainage bag: Hang below bladder level for gravity drainage
- Secure catheter: Tape to inner thigh to prevent traction
Female Technique
- Position in dorsal lithotomy; identify urethral meatus (between clitoris above and vaginal orifice below)
- Cleanse labia minora and meatus with downward strokes, inner-to-outer
- Insert lubricated catheter 5-7cm into urethra (female urethra ~4cm)
- Confirm urine drainage; inflate balloon with 10mL sterile water
- Attach drainage bag
Difficulty Encountered
- Male - resistance at external sphincter: Ask patient to take deep breath and bear down; avoid excessive force
- Male - resistance at prostatic urethra: Use Coude catheter (curved tip facilitates passage through BPH)
- Cannot pass at all: Do NOT force; consider urological suprapubic catheterisation
- No urine despite correct placement: Bladder may be empty; flush with 20mL saline to confirm intravesical position
Complications of Urinary Catheterisation
| Complication | Notes |
|---|---|
| CAUTI (catheter-associated UTI) | Most common complication; review daily for continued necessity |
| Urethral trauma/false passage | Created by forced insertion; avoid excessive force |
| Balloon inflation in urethra | Causes severe pain; never inflate before urine drains |
| Paraphimosis | Replace foreskin after each procedure |
| Bladder spasm | Common; managed with anticholinergics (oxybutynin) |
| Haematuria | Usually transient; monitor |
7. CLINICAL PEARLS ACROSS PROCEDURES
- RSI drug selection by haemodynamic state: Use etomidate or ketamine in haemodynamic instability. Reserve propofol for haemodynamically stable patients.
- Never lever a laryngoscope - lift vertically in the direction of the handle. Levering risks dental injury and poor glottic view.
- The 3-attempt rule: No more than 3 intubation attempts before declaring a failed airway and activating the difficult airway algorithm (LMA → cricothyrotomy).
- Peripheral > central in haemorrhage: A 14G peripheral cannula in the antecubital fossa delivers more volume per minute than a 16G triple-lumen CVC.
- Flush before blood products: Never run blood through a glucose-containing line - causes haemolysis. Flush with normal saline first.
- Seldinger principle: The wire must ALWAYS be visible at the proximal end of any catheter before advancing. If you lose the wire, STOP - it can embolise.
- Post-intubation cuff pressure: Monitor at regular intervals and keep <25 mmHg to prevent tracheal ischaemia and subsequent stricture.
- Urinary catheters: Advance fully in males before balloon inflation - the male urethra is 20cm long; premature balloon inflation is the most common cause of urethral rupture.
Sources:
- The Washington Manual of Medical Therapeutics (Airway Management and Endotracheal Intubation section, p.280-283)
- Pfenninger and Fowler's Procedures for Primary Care, 3rd Edition (Central Venous Catheter Insertion chapter)
- Roberts and Hedges' Clinical Procedures in Emergency Medicine (Central Venous Access chapter)
This is a shared conversation. Sign in to Orris to start your own chat.