
General Examination 1: Check for Clubbing General Examination 2: Check for Pallor • System Examination 1: Test Light Touch sensory modality System Examination 2: Test Pain sensory modality procedures with photos
clubbing of fingers clinical examination
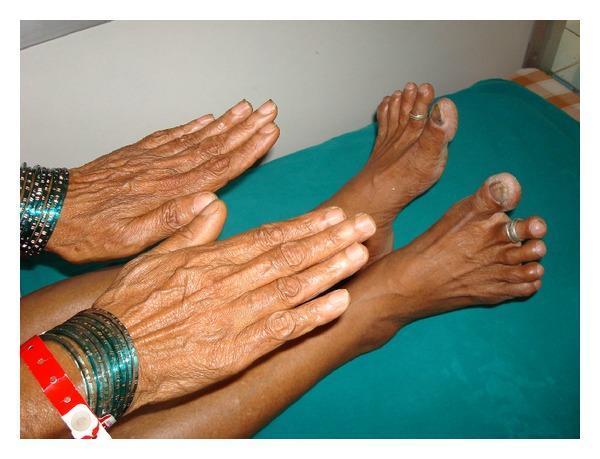
Clinical photograph showing a side-by-side comparison of the hands and feet of a 62-year-old patient to demonstrate selective digital clubbing. The fingernails exhibit normal morphology, curvature, and nail-bed angles, with no evidence of hypertrophic osteoarthropathy or swelling in the finger pads. In contrast, the toes demonstrate prominent digital clubbing (hippocratic fingers), characterized by increased convexity of the nail plates and bulbous expansion of the distal phalanges, most notably in the hallux bilaterally. The skin on both the hands and feet appears thin and wrinkled, consistent with chronological age, but lacks acute skin lesions, cyanosis, or pedal edema. Clinically, this isolated lower limb clubbing is a significant finding that often suggests a patent ductus arteriosus with reversed shunt (Eisenmenger syndrome), although in this specific educational context, it illustrates a rare presentation associated with interstitial lung disease. The image serves as a diagnostic reference for distinguishing localized versus systemic clubbing during a physical examination.
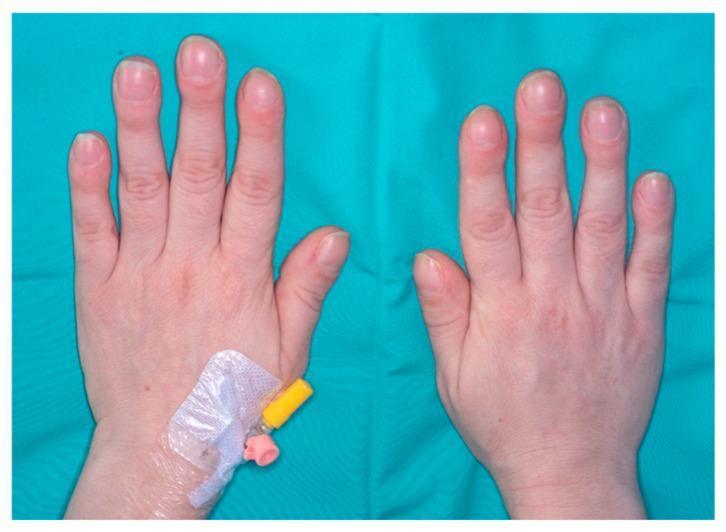
This clinical photograph displays the dorsal view of both hands of a 39-year-old female patient against a teal background, demonstrating classic features of digital clubbing. The distal phalanges of all fingers show noticeable bulbous enlargement and rounding, known as a drumstick appearance. The fingernails exhibit increased longitudinal and transverse convexity with an obliterated Lovibond angle (the angle between the nail plate and the proximal nail fold). On the left wrist, an indwelling intravenous (IV) catheter is visible, secured with a transparent adhesive dressing. The skin appears pale, and the overall morphology is highly suggestive of hypertrophic osteoarthropathy or secondary clubbing related to chronic systemic disease. In this specific clinical context, the clubbing was associated with a large cardiac sarcoma causing functional mitral stenosis. This image serves as an educational example of paraneoplastic or cardiovascular-related physical signs during a clinical examination.
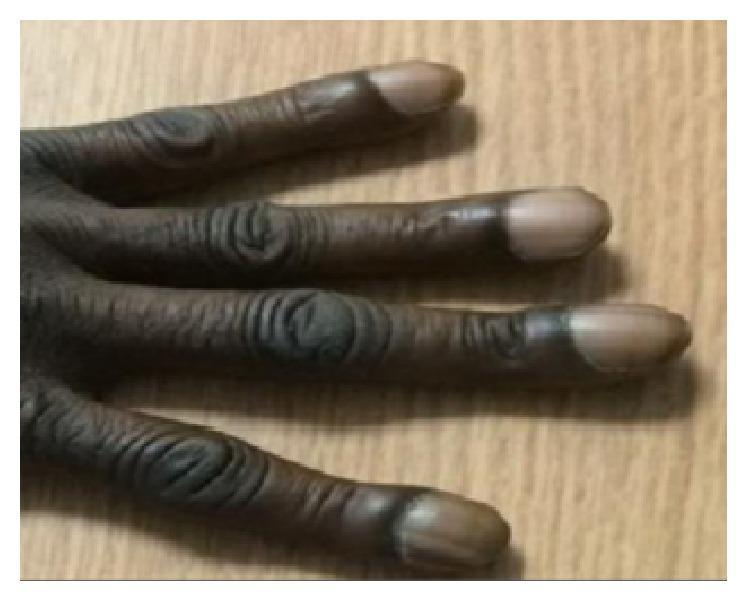
This clinical photograph displays the hand and fingers of a patient with severe digital clubbing, a clinical sign often associated with chronic hypoxia or certain systemic diseases. The image demonstrates characteristic 'drumstick' appearances of the distal phalanges, characterized by bulbous swelling and enlargement of the fingertips. The nails exhibit increased convexity in both the longitudinal and transverse planes, along with a significant increase in the Lovibond angle (the angle between the nail plate and the proximal nail fold). The skin overlying the interphalangeal joints shows marked thickening and deep, horizontal wrinkling, consistent with pachydermoperiostosis (primary hypertrophic osteoarthropathy). These visual findings are diagnostic markers for advanced clubbing (Grade 4). The content is relevant for medical education focusing on physical examination signs, rheumatology, and pulmonology.
light touch sensory testing cotton wool neurological examination
pain sensation pinprick neurological sensory testing
Schamroth window test clubbing diagnosis
sensory testing neurological examination dermatomal
grading clubbing nails Schamroth lovibond angle
pallor nail beds palmar creases anemia
Clinical Examination Guide: General & System Examinations
GENERAL EXAMINATION 1: Clubbing
Definition
Pathophysiology
How to Examine for Clubbing - Step-by-Step
- Look at the nail from the side. Normally, the angle between the nail plate and the proximal nail fold (Lovibond angle) is less than 165°.
- In clubbing, this angle is obliterated (≥180°) - the nail lies flat or curves upward.
- Ask the patient to place the dorsal surfaces of the terminal phalanges of corresponding fingers (index or middle finger) of opposite hands together.
- Normally, a small diamond-shaped window (gap) is visible at the base of the nail beds.
- In clubbing, this window is absent - the gap is obliterated.
- Press gently on the base of the nail. In clubbing, the nail bed feels boggy/fluctuant (floating nail sign) - the nail appears to "float" on the soft tissue.
- There may be periungual erythema and warmth.
- Look for bulbous enlargement (drumstick appearance) of the distal phalanx.
- The nail itself may curve both longitudinally and transversely (watch-glass/parrot-beak nail).
- Examine the toes in the same manner (often involved together with fingers).
Grading of Clubbing (Schamroth / Clinical Grading)
| Grade | Features |
|---|---|
| Grade 1 | Fluctuation and softening of the nail bed (floating nail) |
| Grade 2 | Obliteration of the Lovibond angle |
| Grade 3 | Drumstick appearance - bulbous enlargement of the distal phalanx |
| Grade 4 | Hypertrophic osteoarthropathy (periosteal new bone formation in long bones) |
Clinical Photos
Causes of Clubbing (Mnemonic: CLUBBING)
- Cardiovascular: cyanotic congenital heart disease, infective endocarditis, atrial myxoma
- Lung: bronchogenic carcinoma, bronchiectasis, lung abscess, empyema, cystic fibrosis, ILD
- Ulcerative colitis / IBD
- Biliary cirrhosis / hepatopulmonary syndrome
- Benign (idiopathic/familial)
- Infective: HIV (in children), subacute bacterial endocarditis
- Not present in: COPD, asthma (except in complications)
- Gut: Crohn's disease, GI lymphoma
GENERAL EXAMINATION 2: Pallor
Definition
How to Examine for Pallor - Step-by-Step
- Examine in bright daylight or good artificial light. Fluorescent/yellow light makes pallor assessment unreliable.
- Ask the patient to look upward.
- Gently pull down the lower eyelid with your thumb.
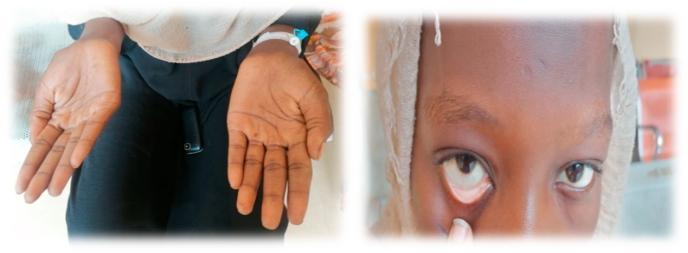
- Inspect the palpebral conjunctiva: normally it is deep pink/red.
- Pallor = the conjunctiva appears pale pink, whitish, or white.
- This is the single most reliable clinical indicator of anemia.
- Hold the patient's hand, fingers extended and slightly hyperextended to stretch the palmar skin.
- Compare the color of the palmar creases with your own (or with those of someone known not to be anemic).
- Pallor of the palmar creases = hemoglobin is likely <7-8 g/dL (severe anemia).
- Press the nail bed momentarily then release.
- In pallor, the nail bed and the blanched area after pressure release both appear white/pale rather than pinkish.
- Inspect the tongue and buccal mucosa (inner cheeks): normally moist and pink.
- Pale/white tongue/buccal mucosa supports pallor.
- Skin creases of the palm (already covered), lips, and ear lobes.
- In dark-skinned individuals, conjunctival and mucosal assessment is much more reliable than skin inspection.
Grading of Pallor
| Grade | Clinical Finding |
|---|---|
| Mild | Pallor in conjunctiva or mucous membranes only |
| Moderate | Pallor in conjunctiva + palmar creases |
| Severe | Pallor in all sites including tongue, lips, nail beds |
Clinical Photo
Causes of Pallor
- Anemia (most common): iron deficiency, hemolytic, megaloblastic, aplastic
- Acute blood loss
- Shock / reduced cardiac output
- Hypothyroidism / hypopituitarism (reduced skin blood flow)
- Chronic renal failure
- Leukemia, lymphoma, bone marrow infiltration
SYSTEM EXAMINATION 1: Light Touch Sensory Modality
Pathway (Dorsal Columns)
How to Test Light Touch - Step-by-Step
- Tell the patient: "I am going to touch your skin very gently with a piece of cotton. Please say 'yes' each time you feel it, and tell me if it feels the same on both sides."
- Demonstrate the touch on the patient's sternum or forehead (an area where sensation should be normal) so the patient knows what to expect.
- This eliminates visual cues and ensures responses are purely sensory.
- Using a small wisp of cotton (teased to a fine point) or a very gentle fingertip touch, lightly dab (do not stroke) the skin surface.
- Apply a single touch, not a repeated stroke (to avoid adapting to movement).
- Touch at irregular intervals so the patient cannot anticipate.
- Distal to proximal on each limb (start distally - most sensitive for peripheral neuropathy)
- Left vs. right side (compare symmetric areas)
- Upper limbs: fingertips → dorsum of hand → forearm → upper arm
- Lower limbs: dorsum of toes → dorsum of foot → anterior shin → thigh
- Trunk: if a spinal level is suspected, map from numb area upward to find the sensory level
- "Does this feel the same as the other side?" A subtle reduction (hypoesthesia) may be noticed by the patient even when they report feeling the touch.
- Record as: normal, reduced (hypoesthesia), absent (anesthesia), increased (hyperesthesia), or mislocalised.
- Map out any sensory loss pattern to determine if it is:
- Glove-and-stocking (peripheral neuropathy)
- Dermatomal (nerve root/spinal cord)
- Hemisensory (cortical or brainstem)
Key Points - Light Touch
-
Light touch is carried in the dorsal columns (ipsilateral, then crosses at medulla).
-
Lesions of the dorsal column: light touch and vibration are lost on the same side as the lesion.
-
Light touch is also partially carried in the anterior spinothalamic tract - this is why light touch is preserved more than pain/temperature in anterolateral (Brown-Séquard) lesions.
-
Always compare the two sides and check for a sensory level if a spinal cord lesion is suspected.
-
Harrison's Principles of Internal Medicine 22E
SYSTEM EXAMINATION 2: Pain Sensory Modality
Pathway (Spinothalamic Tract)
How to Test Pain Sensation - Step-by-Step
- Tell the patient: "I am going to use a pin to test your sensation. You will feel a sharp prick. Please tell me 'sharp' or 'dull' when I touch you, and say if it feels the same on both sides. Close your eyes."
- Show the patient the difference between the sharp end and the blunt end of the pin on a normal area (e.g., sternum or unaffected limb) with their eyes open first.
- Then ask them to close their eyes for the actual testing.
- Apply the sharp end to the skin with just enough pressure to be felt as sharp - do not cause pain or draw blood.
- Intermittently use the blunt end as a control to ensure the patient is not guessing.
- Apply at irregular intervals.
- Same approach as light touch: distal to proximal, compare left vs. right.
- Upper limbs: fingertips → hand → forearm → upper arm
- Lower limbs: toes → dorsum foot → shin → thigh
- If spinal cord involvement suspected: test the trunk from below upward to find the level; the highest level of normal sensation = the sensory level.
- "Is this sharp or dull?"
- "Does this feel the same as the other side?"
- "Does the sharpness feel equally strong here compared to there?"
- Normal, hypoalgesia (reduced pain), analgesia (absent pain), hyperalgesia (increased pain), allodynia (pain from normally non-painful touch).
- Map the pattern: glove-and-stocking vs. dermatomal vs. hemisensory.
Key Points - Pain Sensation
-
Pain is carried in the contralateral anterolateral spinothalamic tract - it crosses within 1-2 spinal segments of entry.
-
In a Brown-Séquard (hemisection of cord) lesion: pain and temperature are lost contralateral to the lesion, while weakness and proprioception are lost ipsilateral.
-
Always test pain and light touch together - their dissociation is diagnostically important:
- Pain lost + light touch preserved = spinothalamic/anterolateral lesion
- Light touch and vibration lost + pain preserved = dorsal column lesion
- Both lost = complete peripheral neuropathy or complete cord transection.
-
Harrison's Principles of Internal Medicine 22E, Textbook of Family Medicine 9e
Summary Table
| Examination | Modality | Pathway | Equipment | Key Testing Site | Abnormality Pattern |
|---|---|---|---|---|---|
| Clubbing | Visual + palpation | - | None | Finger nail beds | Schamroth window sign absent, boggy nail bed, obliterated Lovibond angle |
| Pallor | Visual inspection | - | None | Palpebral conjunctiva | Pale/white conjunctiva; pale palmar creases |
| Light Touch | Touch | Dorsal columns (ipsilateral) | Cotton wisp | Distal limbs → proximal | Glove-stocking / dermatomal / hemisensory loss |
| Pain | Pin-prick | Spinothalamic tract (contralateral) | New sterile pin | Distal limbs → proximal | Contralateral loss in cord lesion; hypoalgesia/analgesia in neuropathy |