
Peripheral nerve blocks
Reading File
This is a broad topic. Let me clarify what you need before diving in.
Asking for Preferences
What aspect of peripheral nerve blocks are you interested in? · What is the context for your question?
Searching sources...
Finding Sources
Finding Sources
Searching PubMed
"peripheral nerve block" AND "ultrasound guidance"
Good. Now let me pull the dedicated sections from the most relevant books.
Finding Sources
Finding Sources
Finding Sources
Reading File
Good content from Roberts and Hedges. Now let me get the ultrasound box and more specific technique content, plus Morgan & Mikhail's content.
Reading File
Finding Sources
Reading File
Reading File
Now let me get more specific ultrasound technique content from Miller's and Morgan & Mikhail's.
Finding Sources
Finding Sources
Reading File
Reading File
Excellent. Let me fetch the key diagrams and get the complications content from Miller's.
Loading Image
Loading Image
Reading File
I now have comprehensive content from multiple authoritative sources. Let me compile the full answer.
Ultrasound-Guided Peripheral Nerve Blocks
Why Ultrasound?
Ultrasound guidance has become the dominant modality for nerve localization. Compared to anatomic landmark-based blocks or nerve stimulation alone, it offers:
- Superior success rates with fewer needle passes
- Less time to perform the block
- Real-time visualization of the needle, nerve, and spread of local anesthetic
- Ability to negate anatomic variability (particularly important in obese patients, where landmark-based failure rates are higher)
- Allows variable, often smaller volumes of local anesthetic - typically 10-30 mL, guided by what you observe rather than a fixed protocol
- Morgan and Mikhail's Clinical Anesthesiology, 7e, p. 1869; Roberts and Hedges' Clinical Procedures in Emergency Medicine, p. 672
Ultrasound Basics for Nerve Imaging
Echogenicity
- Hypoechoic (dark/black): fluid, fat, structures through which sound passes easily
- Hyperechoic (bright/white): bone, fascial layers, connective tissue, needle
Nerve Appearance
Nerves appear as honeycomb structures in short axis (cross-section) - multiple round hypoechoic fascicles surrounded by hyperechoic connective tissue (epineurium). Always image the target nerve in short axis first to identify it, then decide your approach.
Transducer Selection
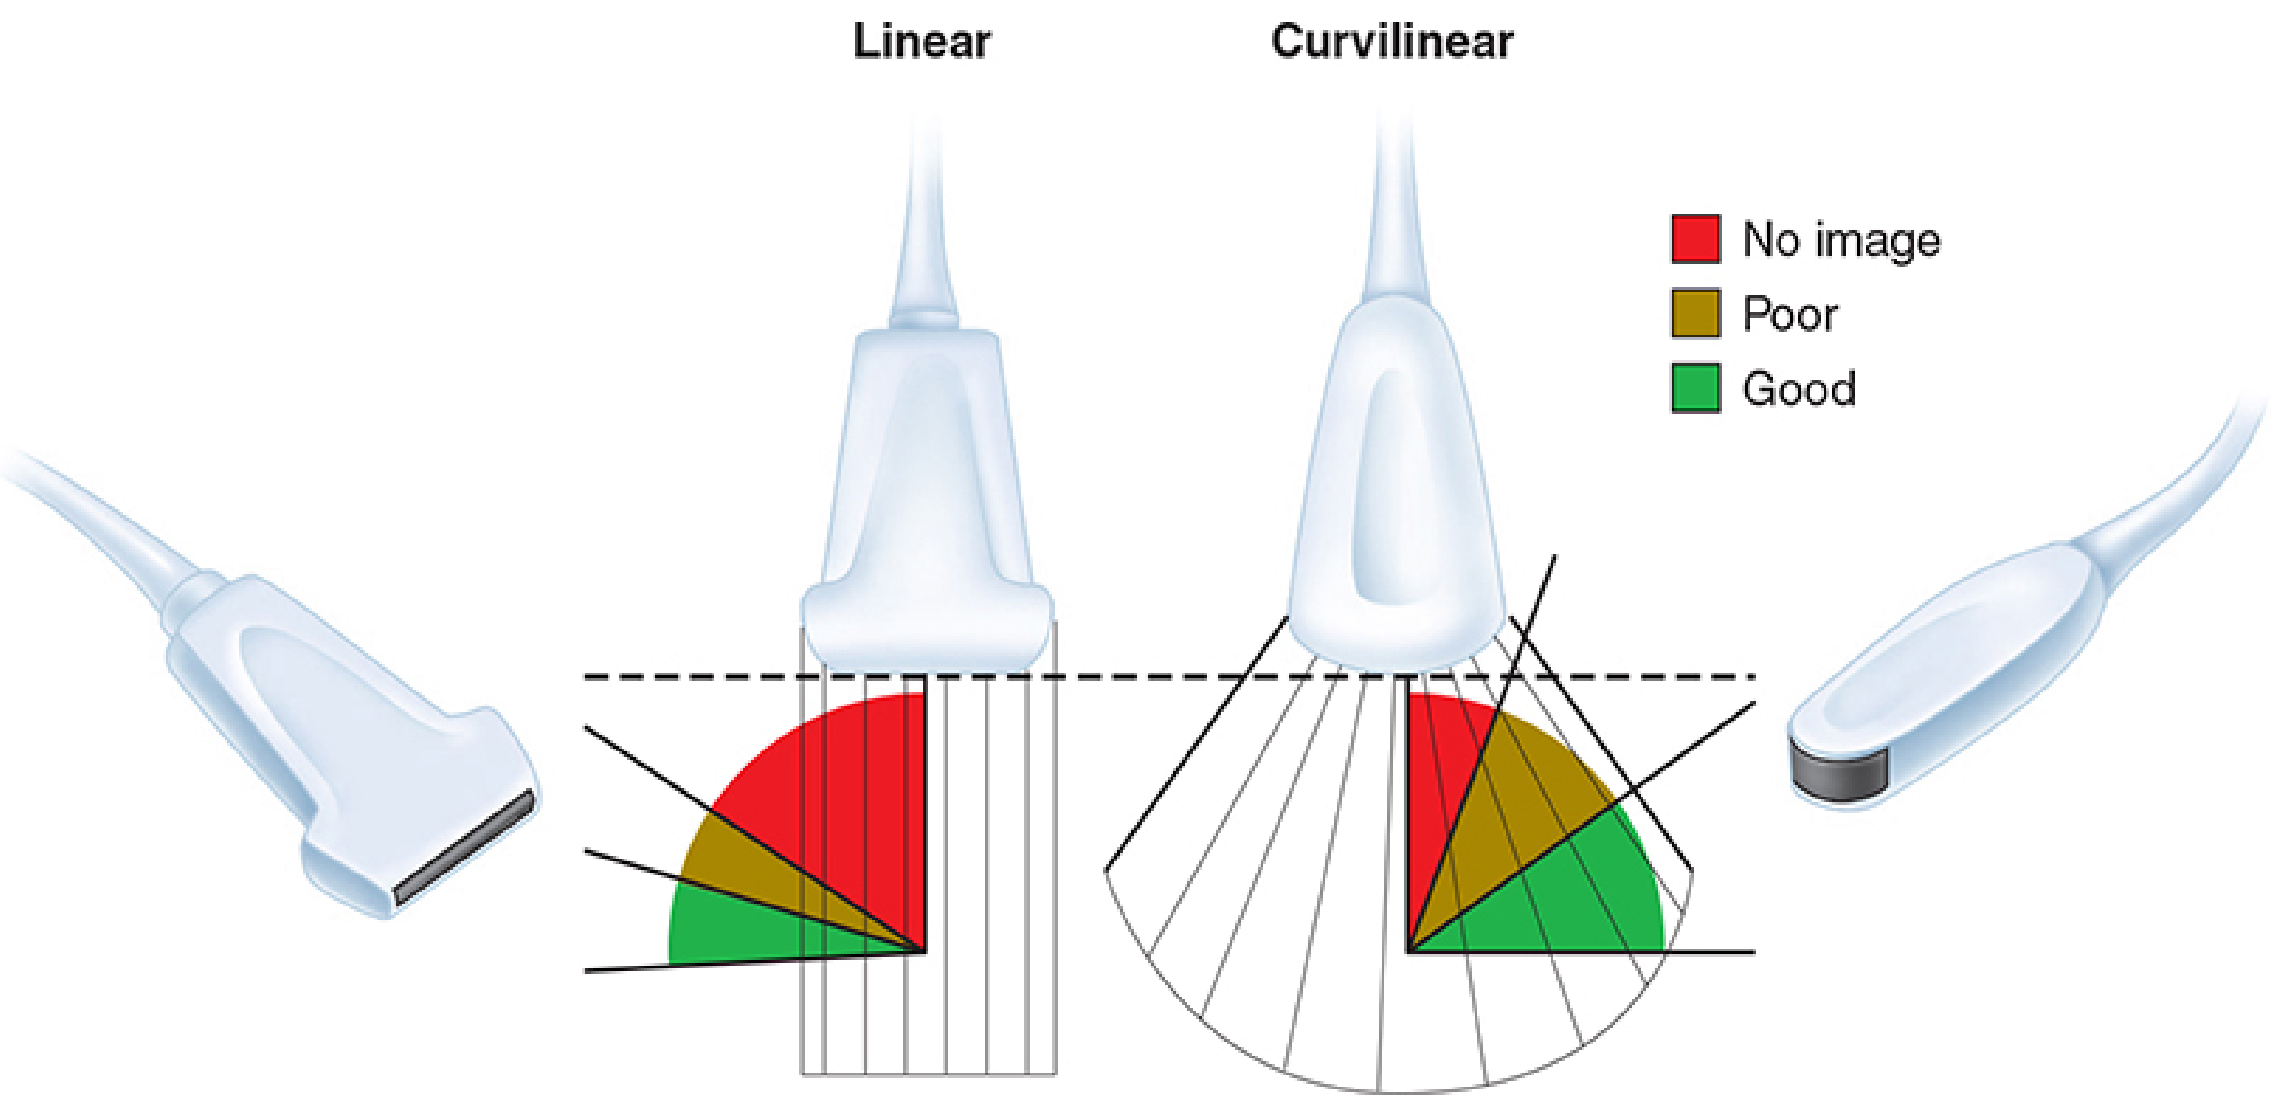
Morgan and Mikhail's Clinical Anesthesiology - Figure 46-3: Linear probe = higher resolution, less penetration. Curvilinear probe = better penetration, lower resolution.
| Transducer | Frequency | Best For |
|---|---|---|
| Linear array | High (10-15 MHz) | Superficial nerves (brachial plexus, femoral, most peripheral blocks) |
| Curvilinear array | Low (2-5 MHz) | Deep structures (lumbar plexus, sciatic at gluteal level, obese patients) |
Key principle: when a steep needle trajectory is required relative to the transducer long axis, a linear array visualizes the needle poorly - switch to curvilinear.
Needle Approach: In-Plane vs Out-of-Plane
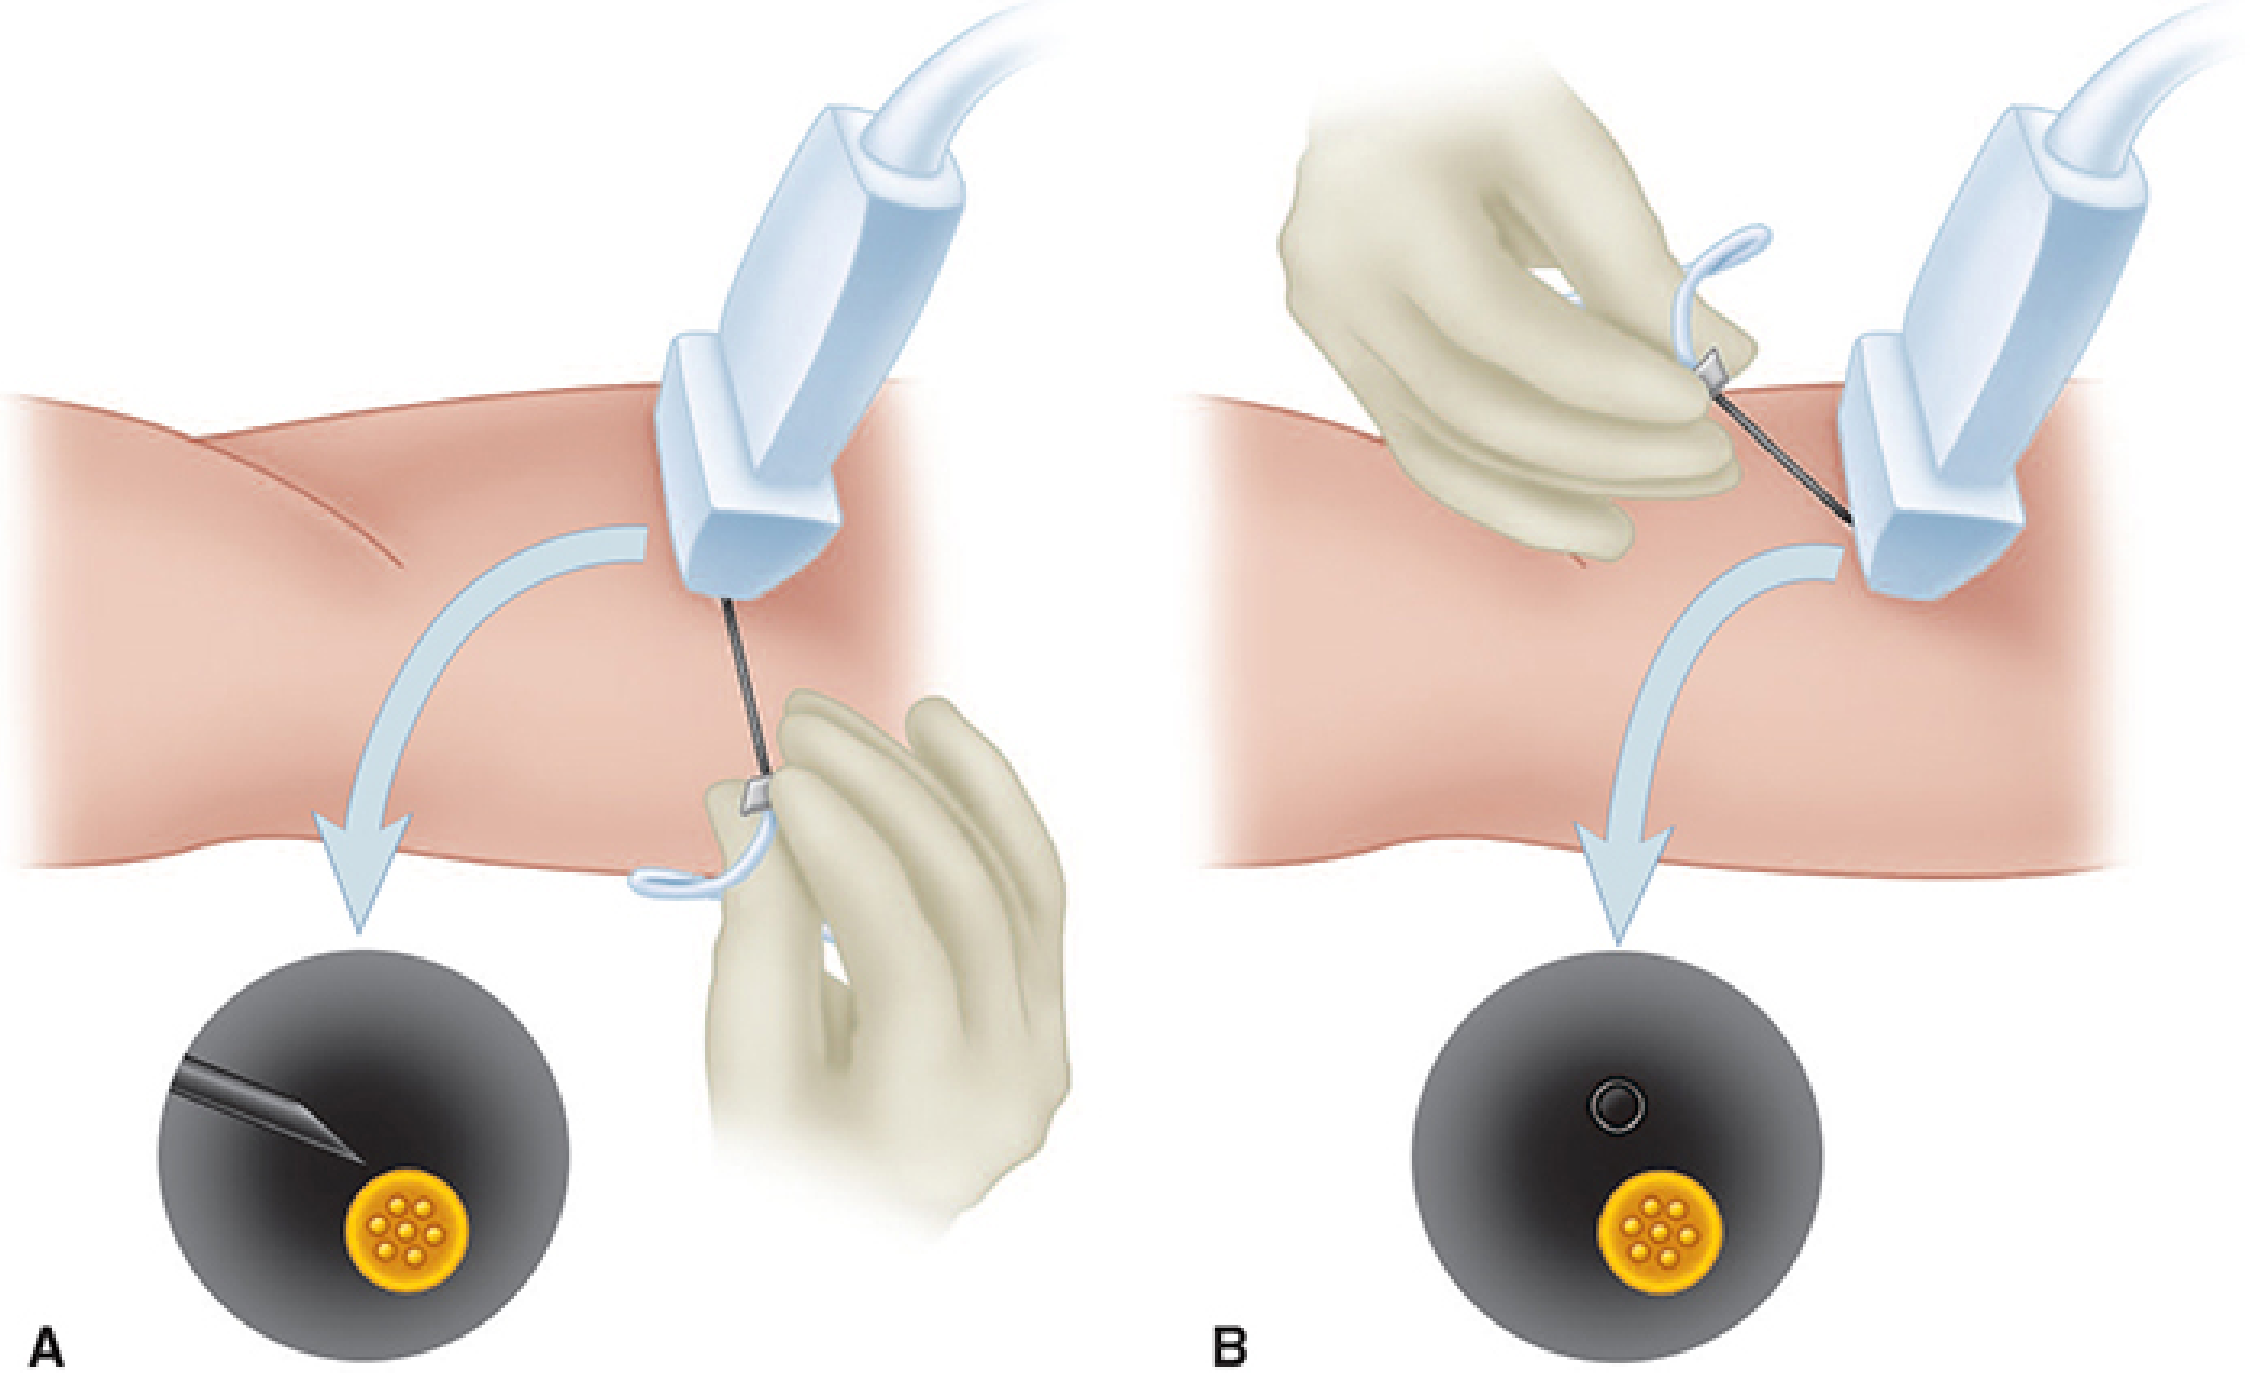
Morgan and Mikhail's Clinical Anesthesiology - Figure 46-4
In-Plane (Long-Axis Needle Approach)
- Needle inserted at the side of the probe and advanced parallel to the ultrasound beam
- Entire needle shaft and tip visible as a bright echogenic line throughout advancement
- Preferred for most blocks - safer in experienced hands because you always see the tip
- Requires a longer skin-to-target path along the beam; takes more practice to stay perfectly in-plane
- Downside: longer needle path, more difficult to maneuver around structures
Out-of-Plane (Short-Axis Needle Approach)
- Needle crosses the ultrasound beam perpendicular to it
- Only the needle tip appears as a bright dot on screen (not the shaft)
- Easier for novices to get started; shorter path to target
- Risk: you may be visualizing the shaft rather than the true tip - advance incrementally and use "jiggling" to confirm position
- Better for superficial targets where the needle path is short
Roberts and Hedges' Clinical Procedures in Emergency Medicine, p. 673; Miller's Anesthesia 10e, p. 6221
Needle Visibility Tips
Plain smooth needles reflect sound away from the transducer at steep angles, making them hard to see. Strategies to improve visibility:
- Echogenic needles - textured/etched shafts with retroreflective surfaces; commercially available and most effective
- Decrease the angle between needle and transducer to bring more of the shaft into the imaging plane
- Heel-toe the probe (tilt toward the needle insertion site) to bring the beam more perpendicular to the needle shaft
- Inject a small amount of saline or local anesthetic to confirm tip position by watching fluid spread
- Jiggle the needle - small movements help identify the tip as a moving bright spot
Miller's Anesthesia, 10e, p. 6221 (Fig. 42.8)
Recognizing a Successful Injection
Under ultrasound, a correctly placed injection should:
- Distribute circumferentially around the nerve - the nerve appears to "float" or be surrounded by hypoechoic fluid
- Clarify the nerve border - the spread separates the nerve from adjacent structures (commonly an artery wrapped in the same fascial sheath)
- Track along the nerve path distally
If you see the injectate spreading elsewhere (e.g., into muscle planes, away from the nerve), reposition before giving the full dose. If you cannot see spread at all, suspect intravascular injection - aspirate and redirect.
Miller's Anesthesia, 10e, p. 6223
Continuous Nerve Block Catheters
For postoperative analgesia, a perineural catheter can be placed adjacent to the nerve under ultrasound guidance, allowing infusion of local anesthetic for extended periods. Placement mirrors single-injection technique, with the catheter threaded through the introducer needle under direct visualization. Confirm catheter tip position by injecting a small volume and watching spread.
Universal Complications
All peripheral nerve blocks carry these risks:
| Complication | Notes |
|---|---|
| Local Anesthetic Systemic Toxicity (LAST) | Incidence ~0.76:10,000 cases; most in infants/neonates. Circumoral numbness → seizures → cardiovascular collapse. Always aspirate before injection; watch for intravascular spread on US |
| Nerve injury | ~1.9:10,000 blocks. Causes: intraneural injection, ischemia, chemical neuritis. Stop immediately if severe pain or resistance to injection |
| Bleeding/hematoma | Avoid blocks near non-compressible arteries (infraclavicular, psoas compartment) in coagulopathy |
| Infection | Careful skin prep mandatory; especially important with catheters |
| Adjacent structure injury | Phrenic nerve (interscalene), pneumothorax (interscalene/supraclavicular), visceral injury |
Injection pressure monitoring: High injection pressure signals possible intraneural placement - inject only when resistance is low. Stop immediately if resistance is high, pain is elicited, or paresthesia persists.
Miller's Anesthesia, 10e, p. 6229; Roberts and Hedges', p. 673
Key Safety Rules (Applicable to All Blocks)
- Aspirate before every injection - check for blood
- Dose incrementally - inject in 3-5 mL aliquots with frequent aspiration
- Dose on IBW in obese patients, not actual body weight (LAST risk)
- Use the minimal effective volume - circumferential spread is the goal, not large volume flooding
- If paresthesia is elicited or motor response at <0.5 mA on stimulator, withdraw 1-2 mm before injecting (suggests intimate needle-nerve contact)
- Monitor the patient for at least 30 minutes post-block for immediate complications
- Document pre-existing neurologic deficits before the block
Practical Workflow for Any Ultrasound-Guided Block
1. Survey scan (no needle) → identify nerve in short axis, map vessels, depth
2. Select transducer frequency based on depth
3. Plan needle approach (in-plane preferred)
4. Sterile prep: probe cover, sterile gel, sterile field
5. Infiltrate skin at insertion site with local anesthetic
6. Advance needle under real-time guidance to nerve vicinity
7. Confirm position: aspirate → inject 1 mL → watch for circumferential spread
8. Inject in increments (total 10-30 mL depending on block)
9. Remove needle, apply dressing
10. Monitor 30 min; document block onset time
Recent evidence note: A 2025 systematic review and meta-analysis (PMID 40581552) specifically examined complications of ultrasound-guided peripheral nerve blocks in the emergency department, confirming the generally low complication profile seen in anesthesia practice.
Adductor canal block
Searching sources...
Finding Sources
Searching PubMed
"adductor canal block" AND "knee" AND analgesia
Three dedicated sections found. Pulling all of them in parallel.
Reading File
Reading File
Reading File
Excellent content from all three sources. Now fetch the key images.
Loading Image
Loading Image
Loading Image
All three images are clear and highly informative. I have comprehensive content. Compiling the full answer now.
Adductor Canal Block (ACB)
Overview and Clinical Rationale
The adductor canal block has become the go-to motor-sparing analgesic technique for knee surgery - particularly total knee arthroplasty (TKA). Its key advantage over the traditional femoral nerve block is that it predominantly targets sensory nerves, preserving quadriceps strength and enabling earlier ambulation. Studies show patients with continuous ACB catheters walk further on postoperative day 1 after TKA than those with either a femoral block (limited by weakness) or no block (limited by pain).
- Morgan and Mikhail's Clinical Anesthesiology, 7e, p. 1926; Miller's Anesthesia, 10e, p. 6270
Anatomy of the Adductor Canal
The adductor canal (Hunter's canal) is a fascial tunnel in the middle third of the medial thigh, bounded by three walls:
| Wall | Structure |
|---|---|
| Anterior (roof) | Sartorius muscle / vastoadductor membrane |
| Antero-lateral | Vastus medialis |
| Posterior | Adductor longus and adductor magnus |
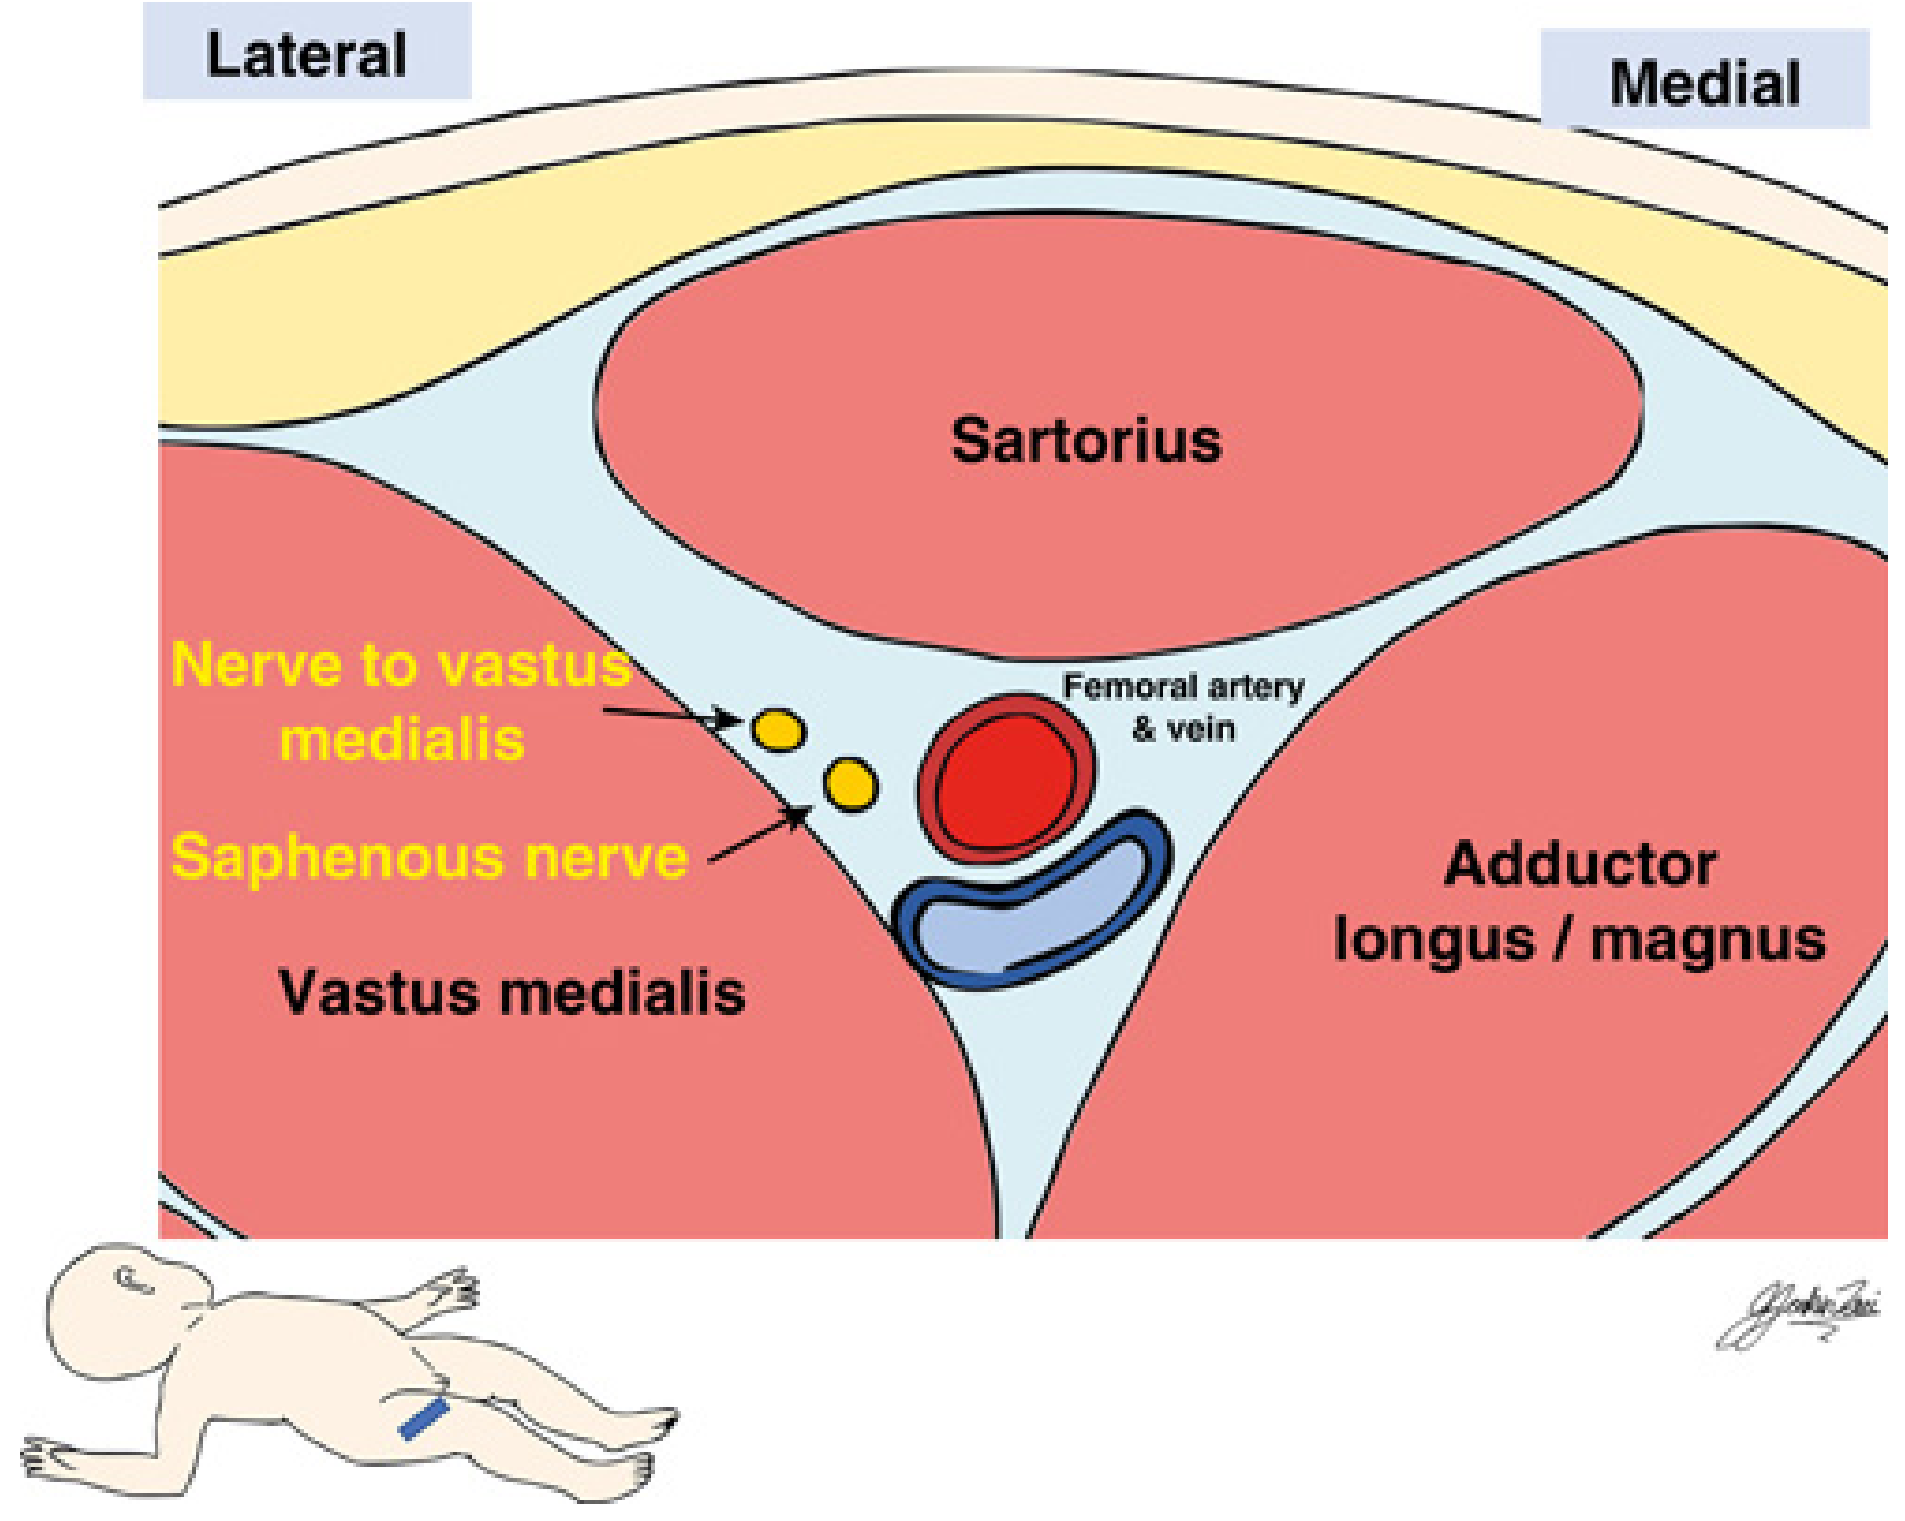
Miller's Anesthesia Fig. 74.51 - Cross section showing the saphenous nerve and nerve to vastus medialis within the canal, lateral to the femoral artery and vein
Contents - what you are blocking:
- Saphenous nerve - terminal sensory branch of the femoral nerve; supplies the medial leg and infrapatellar branches to the knee joint. Located anterolateral to the femoral artery inside the canal.
- Nerve to vastus medialis (NVM) - mixed nerve (sensory + motor); major contributor to anterior knee joint pain after TKA. Lies in a distinct fascial sheath, often slightly outside the true canal.
- Posterior division of the obturator nerve - variable contribution.
The "true" ACB location debate: The NVM often lies just outside the adductor canal proper. A block placed too distally within the canal may miss the NVM entirely. The optimal injection point is midway between the ASIS and the patella, where the medial border of sartorius converges with the medial border of adductor longus - here you are most likely to cover both the saphenous nerve and NVM simultaneously.
- Miller's Anesthesia, 10e, p. 6270
Patient Positioning
Supine, with the leg in slight external rotation and knee extended to expose the medial/anteromedial thigh.
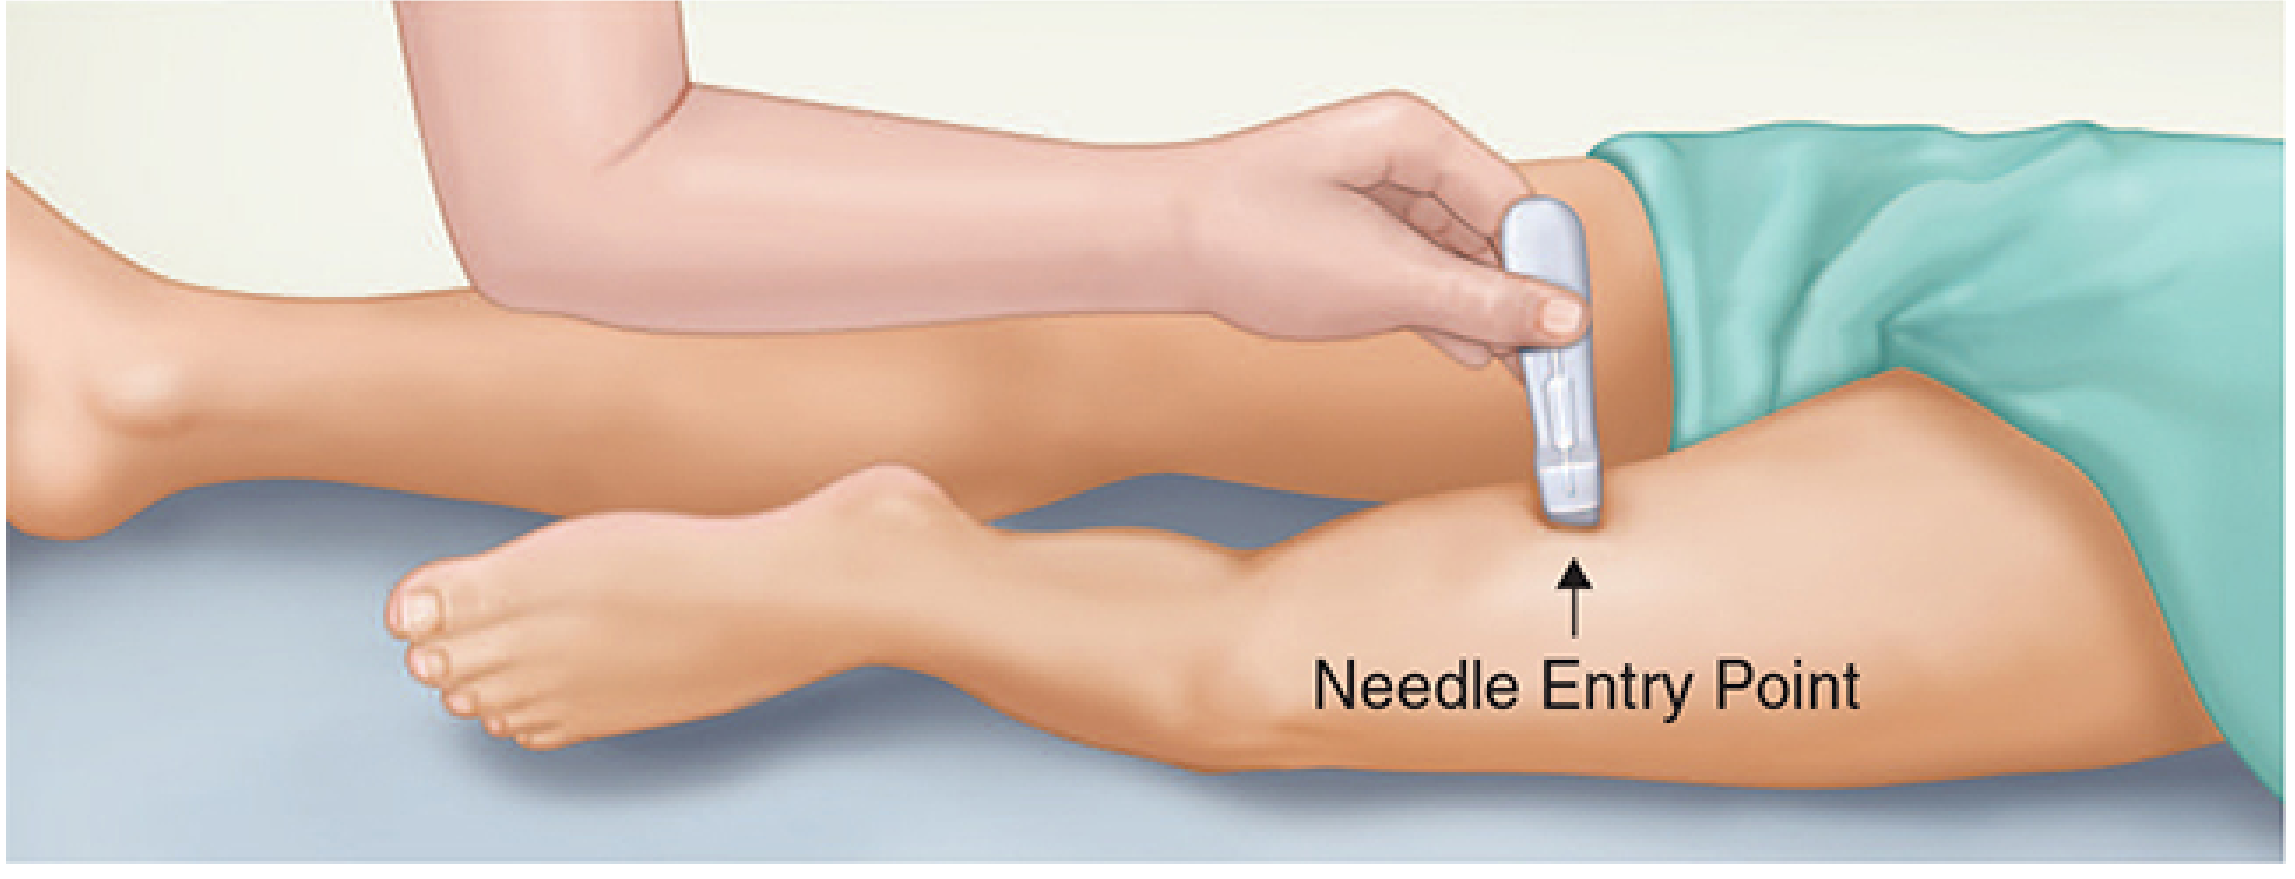
Morgan and Mikhail's Clinical Anesthesiology Fig. 46-54
Ultrasound-Guided Technique
Step 1 - Transducer setup
- High-frequency linear transducer (typically 10-15 MHz)
- Placed in a transverse (short-axis) orientation on the anteromedial thigh
- Start scanning at the junction of the middle and distal thirds of the thigh (midpoint between ASIS and superior patellar pole)
Step 2 - Identify the key landmarks on ultrasound
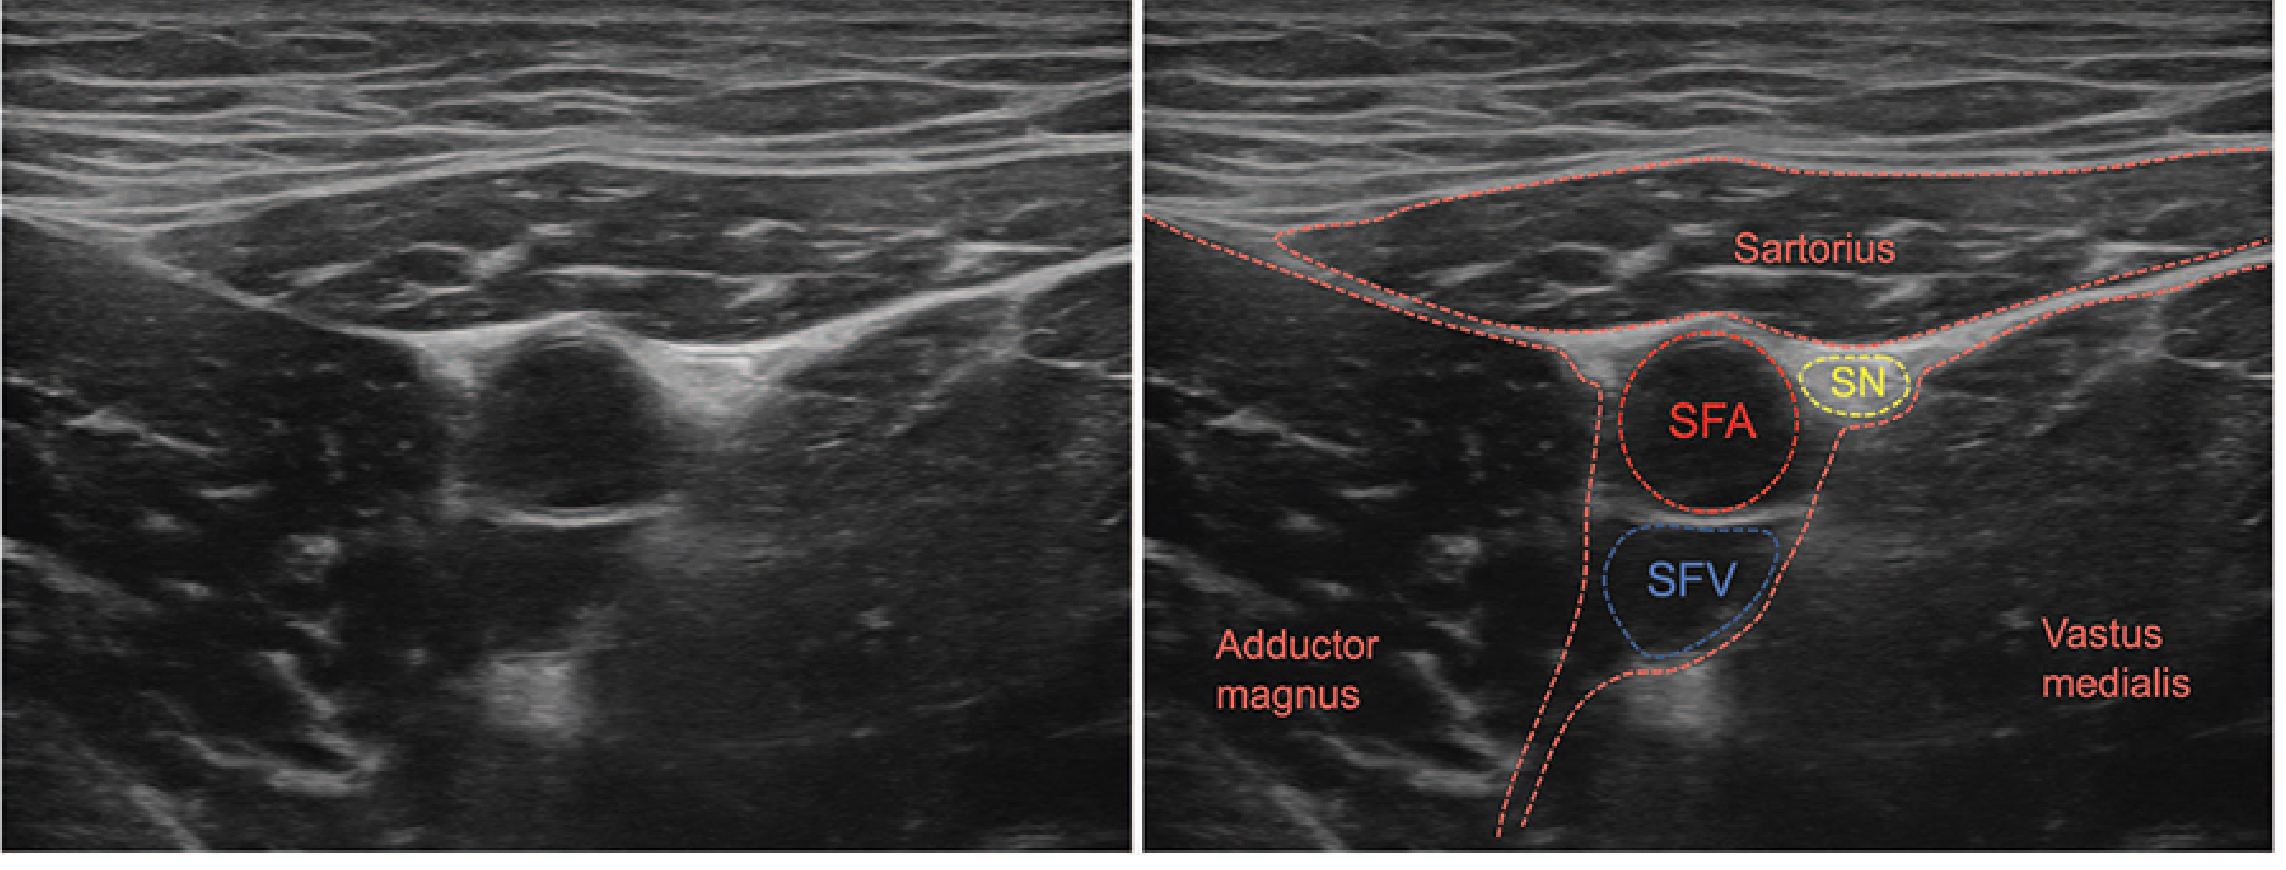
Morgan and Mikhail's Clinical Anesthesiology Fig. 46-55 - Labeled ultrasound of adductor canal. SFA = superficial femoral artery (pulsatile); SFV = superficial femoral vein (compressible); SN = saphenous nerve (small hyperechoic dot anterolateral to SFA)
What you will see in cross-section:
- Sartorius - superficial, triangular muscle forming the roof
- Superficial femoral artery (SFA) - round, pulsatile, non-compressible; the key landmark
- Superficial femoral vein (SFV) - posterior to the artery, compressible
- Saphenous nerve (SN) - small hyperechoic dot anterolateral to the SFA, just under the sartorius
- Vastoadductor membrane - a double echogenic line forming the canal roof; its inner border marks the true canal
- Nerve to vastus medialis - typically lateral to the SFA, may be in a separate fascial plane
Step 3 - Needle insertion and injection
- Insert block needle 2-3 cm lateral to the transducer, in-plane approach
- Advance deep to the sartorius muscle, into the triangular fascial space anterior/lateral to the SFA
- Target: the space between the SFA and the vastoadductor membrane
- Aspirate before injecting to confirm no intravascular placement
- Inject 10-20 mL of local anesthetic (15-20 mL typical for a full ACB)
- Keep to 10-15 mL if concerned about spread - higher volumes may reach the femoral nerve proximally and cause quadriceps paresis
- Goal: watch local anesthetic spread circumferentially around the saphenous nerve and lateral to the artery, separating the nerve from adjacent structures
- Morgan and Mikhail's Clinical Anesthesiology, 7e, p. 1926-1927; Miller's Anesthesia, 10e, p. 6271
Continuous ACB Catheter
For major knee surgery (TKA), a perineural catheter placed in the adductor canal provides superior sustained analgesia:
- Catheter threaded through the introducer needle under direct ultrasound visualization
- Confirm tip position by injecting a small volume and watching spread
- Infusion of local anesthetic postoperatively (e.g., 0.1-0.2% ropivacaine at 5-10 mL/hr)
- Continuous ACB > femoral block for mobilization on POD 1
Indications
| Procedure | Role of ACB |
|---|---|
| Total knee arthroplasty | Primary analgesic block (often combined with IPACK block for posterior knee pain) |
| ACL reconstruction | Effective postoperative analgesia |
| Knee arthroscopy | Analgesic adjunct |
| Distal femur fractures | Perioperative pain management |
| Medial leg / ankle procedures | Combined with sciatic for below-knee coverage |
ACB vs Femoral Nerve Block
| Feature | Adductor Canal Block | Femoral Nerve Block |
|---|---|---|
| Quadriceps strength | Preserved (motor-sparing) | Significantly reduced |
| Ambulation POD 1 | Earlier / further | Impaired |
| Analgesia quality | Comparable (with multimodal regimen) | Comparable |
| Fall risk | Lower (but not zero) | Higher |
| NVM coverage | Variable (depends on level) | More consistent |
Complications and Cautions
- Vascular injury / arterial pseudoaneurysm - rare; the SFA runs through the canal, so always aspirate and use real-time guidance
- Intramuscular injection - spread into the sartorius or adductor muscles risks severe myonecrosis - ensure proper fascial plane placement
- Unexpected thigh weakness - ACB is considered motor-sparing, but weakness can still occur if local anesthetic spreads proximally to the femoral nerve; always evaluate and implement fall-prevention protocols
- Patient education: no unsupported ambulation
- Physical therapy supervision for first ambulation
- Block failure - historically 30%+ with landmark techniques; ultrasound guidance dramatically reduces this
- Miller's Anesthesia, 10e, p. 6272
Nerve Stimulator Option
Because the NVM is a mixed nerve (motor + sensory), it can be identified with nerve stimulation - twitches in the vastus medialis confirm correct needle placement. Inject 0.1-0.2 mL/kg of local anesthetic to block both the NVM and saphenous nerve simultaneously. This is particularly useful when ultrasound image quality is poor or to confirm needle position in combination with ultrasound.
Recent Evidence
Two 2024-2025 systematic reviews are relevant to clinical practice:
- A 2024 Bayesian network meta-analysis (J Clin Anesth, PMID 38692069) examined analgesic strategies for TKA and ranked nerve block combinations.
- A 2025 systematic review in BJA (PMID 39753403) specifically reviewed motor-sparing regional anaesthesia for TKA - directly relevant to ACB vs femoral block comparisons. Worth reviewing for current best practice in your unit.
This is a shared conversation. Sign in to Orris to start your own chat.