
Diabetic foot ms ortho 20 marks answer
I'll read the medical library skill first, then research diabetic foot comprehensively for a 20-mark MS Ortho answer.
Reading File
Now let me search the library database in parallel for all relevant sections on diabetic foot:
Finding Sources
Finding Sources
Excellent! Found great sources. Let me now read the key orthopaedic and surgical texts in parallel:
Reading File
Reading File
Reading File
Excellent content. Now let me read more from Campbell's (classification, management) and Bailey & Love (surgical management, amputation) in parallel:
Reading File
Reading File
Reading File
Great data on classification. Let me get the Charcot joint, amputation levels, and management details:
Reading File
Reading File
I now have comprehensive material from multiple authoritative orthopaedic sources. Let me compile the complete 20-mark MS Ortho answer:
Loading Image
Loading Image
I now have all the content needed for a comprehensive 20-mark MS Ortho answer. Here it is:
DIABETIC FOOT
MS Orthopaedics - 20 Marks Answer
DEFINITION / INTRODUCTION
Diabetic foot refers to the spectrum of pathological conditions affecting the foot in a patient with diabetes mellitus, arising from the triad of peripheral neuropathy, peripheral vascular disease, and impaired immunity. It is the leading cause of non-traumatic lower extremity amputation worldwide. A diabetic patient has a lifetime risk of 15% for developing a foot ulcer, with an annual incidence of 2%. Foot ulcers result in the highest rate of hospital admissions and lower extremity amputations among diabetics.
PATHOPHYSIOLOGY / ETIOPATHOGENESIS
The pathology is multifactorial. Six distinct mechanisms operate simultaneously:
1. Peripheral Neuropathy (MOST IMPORTANT)
High blood glucose causes glycosylation of proteins and haemoglobin, forming advanced glycation end-products that precipitate in walls of small peripheral vessels and nerve tissue. This leads to:
-
Sensory neuropathy: Polyneuropathic loss of sensation in a "stocking distribution," progressing proximally. Loss of protective sensation is the most common cause of plantar foot ulcers. Diagnosed by inability to perceive the 5.07 Semmes-Weinstein monofilament (10 g pressure). Patients with this finding have a 30% risk of developing a foot ulcer.
-
Autonomic neuropathy: Abnormal sweating mechanism leads to a dry foot. This creates fissuring cracks, which become portals for infection.
-
Motor neuropathy: Most commonly involves the common peroneal nerve, causing foot drop and loss of tibialis anterior function. Small intrinsic muscles are also affected, resulting in claw toes with toe-tip ulcerations due to excessive pressure.
2. Hypomobility Syndrome
Excessive glycosylation of soft tissues causes decreased joint range of motion, altered foot biomechanics, and increased plantar pressures (midfoot pressures are 46% higher in diabetic cadaver feet during simulated walking).
3. Peripheral Vascular Disease
Occurs in 60-70% of patients with diabetes for >10 years. Involves both large vessels (atherosclerosis) and small vessels (basement membrane thickening, reduced endothelial nitric oxide). Diabetic patients are twice as likely to develop peripheral arterial disease; with PVD present, they are nine times more likely to develop a foot ulcer.
4. Immune System Impairment
Hyperglycemia causes abnormal phagocytosis, altered chemotaxis of WBCs, and a poor cytotoxic environment - making it difficult to fight off infection once established.
5. Metabolic Deficiency
Reduced total protein (<6.0 g/dL), albumin (<2.5 g/dL), and WBC (<1500/mm³) result in poor wound healing potential.
6. Structural/Biomechanical Factors
Equinus contracture (Achilles tightening) transfers excessive load to the forefoot. Charcot joint further deforms foot architecture.
CLINICAL FEATURES
History
- Long-standing diabetes (usually >10 years)
- Peripheral neuropathy symptoms: numbness, tingling, paresthesias
- Claudication (suggests PVD)
- Prior ulcers, amputations, vision problems, renal disease
- Patients frequently deny trauma due to sensory loss
Physical Examination
Inspection:
- Shiny, hairless, taut skin - suggests peripheral arterial disease
- Dry, scaly, fissured skin - suggests autonomic neuropathy
- Erythema, swelling, warmth - may indicate infection or Charcot neuroarthropathy (distinguish by elevation: Charcot subsides; infection does not)
- Claw toes, hammer toes, midfoot collapse ("rocker bottom" deformity)
Ulcers: Note size (length × width), depth, wound bed quality (granulation vs. fibrous vs. necrotic), probe-to-bone test
Probe-to-bone test: 57% positive predictive value and 96% negative predictive value for osteomyelitis (Campbell's Operative Orthopaedics 15e)
Vascular examination:
- Palpate dorsalis pedis and posterior tibial pulses
- Doppler examination if pulses absent
- Ankle-Brachial Index (ABI): Normal = 1.0; Minimum for healing = 0.45; Value >1.3 indicates vessel calcification (non-compressible)
- Absolute toe pressures: Minimum for healing = 40 mmHg; TcPO₂ >40 mmHg predictive of healing
Neurological examination:
- 10-g monofilament testing at 10 sites on foot
- Vibration sense (128 Hz tuning fork), proprioception
- Silfverskiöld test: assesses gastrocnemius vs. Achilles contracture
Gait assessment for balance and safe mobilization
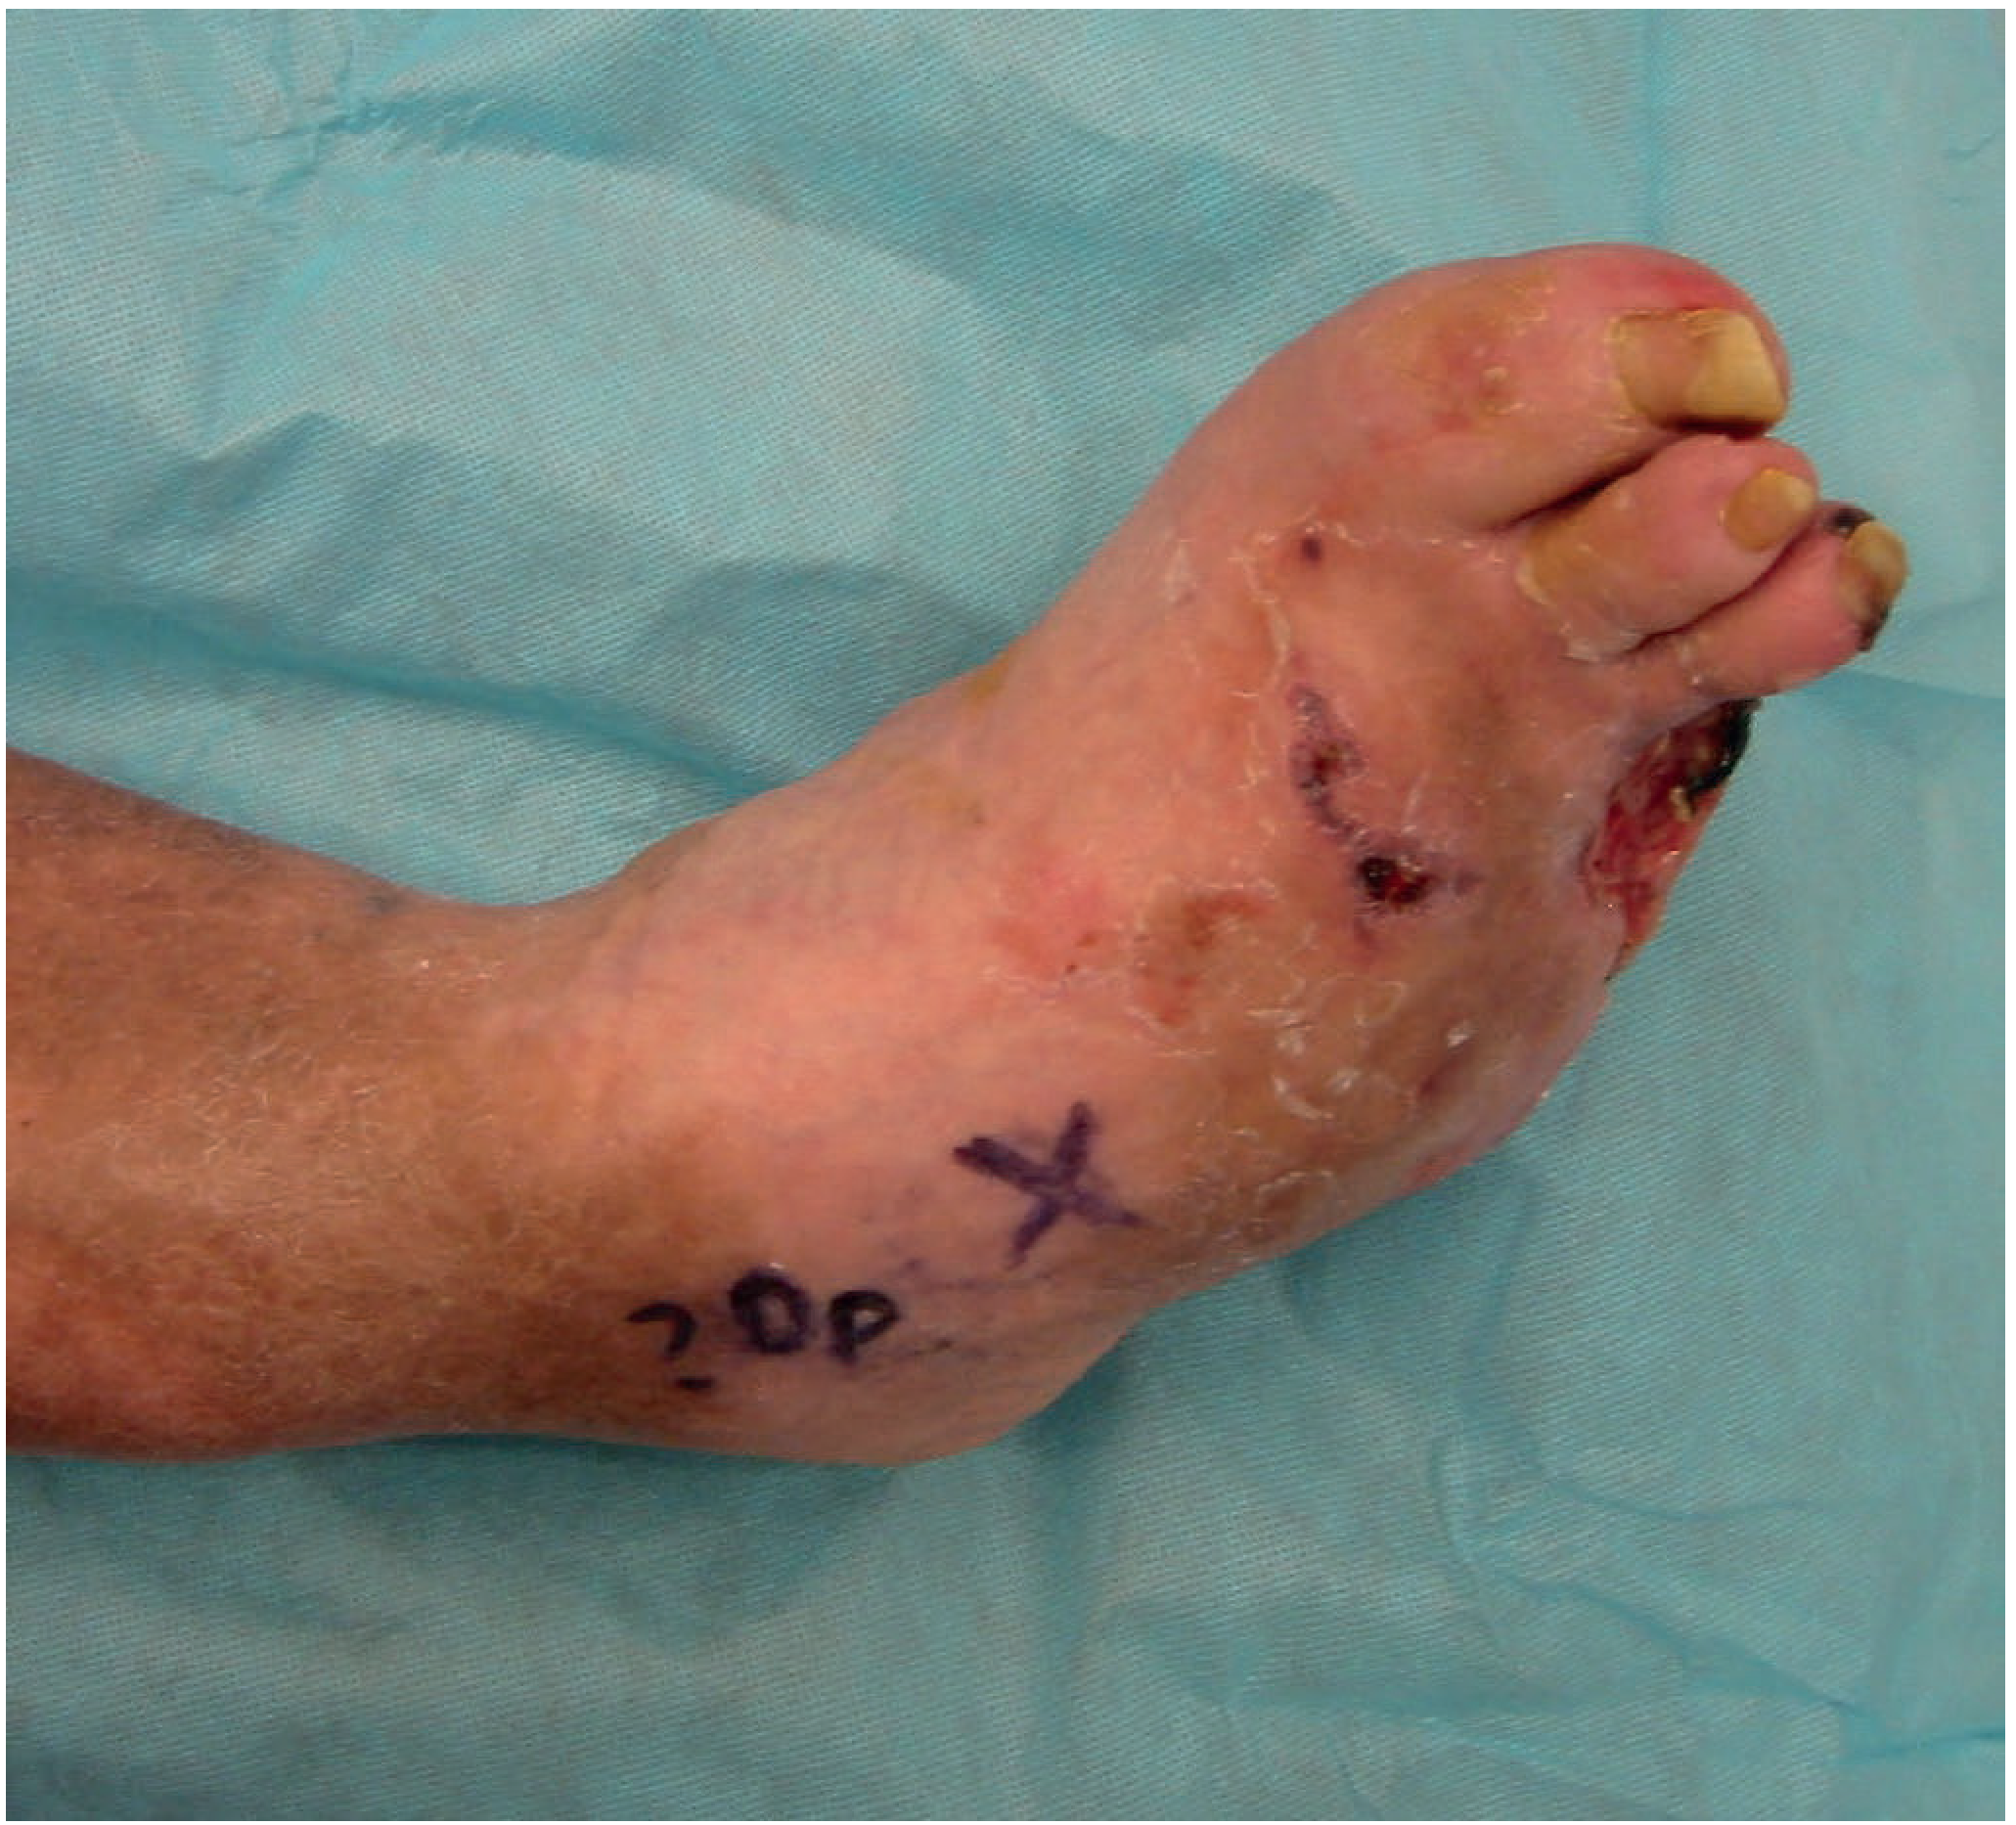
CLASSIFICATION OF DIABETIC FOOT ULCERS
Wagner-Meggitt Classification (Most Widely Used)
| Grade | Description |
|---|---|
| 0 | Intact skin; bony deformity only - "at risk foot" |
| 1 | Superficial ulcer - skin/subcutaneous only |
| 2 | Deep ulcer - involves tendon, capsule, or bone |
| 3 | Deep ulcer + osteomyelitis or abscess |
| 4 | Partial gangrene (forefoot) |
| 5 | Whole foot gangrene |
University of Texas (Depth-Ischemia) Classification (Modification)
Grades ulcers on Depth (0-3) × Ischemia (A-D):
| A (No ischemia) | B (Ischemia, no gangrene) | C (Partial gangrene) | D (Whole foot gangrene) | |
|---|---|---|---|---|
| 0 | Skin intact; at risk | |||
| 1 | Superficial ulcer | |||
| 2 | Tendon/capsule exposed | |||
| 3 | Bone/osteomyelitis exposed |
INVESTIGATIONS
| Investigation | Purpose |
|---|---|
| Blood glucose, HbA1c | Assess glycemic control (HbA1c reflects past 3 months) |
| CBC, ESR, CRP | Inflammatory markers (may be normal even with infection) |
| Serum albumin, total protein | Healing potential |
| Renal function (BUN, Cr) | Frequent diabetic complication |
| Plain X-ray foot | Osteomyelitis (may be normal early), gas in soft tissues, Charcot changes |
| MRI foot | Gold standard for osteomyelitis - most sensitive modality for bone involvement |
| Doppler/ABI | Vascular assessment |
| Wound culture/bone biopsy | Guide antibiotic therapy; superficial swabs are unreliable for deep infection |
| Angiography | If revascularization considered |
MICROBIOLOGY
- Superficial/mild infections: Gram-positive cocci - S. aureus (including MRSA), Streptococci
- Severe/deep infections: Polymicrobial - aerobic Gram-negatives, Pseudomonas (over-represented), Anaerobes
- Empirical therapy for severe infections must cover Pseudomonas; add metronidazole for abscess/devitalised tissue
- Superficial swabs are unreliable for determining deep infection organisms - bone biopsy is preferred
CHARCOT NEUROARTHROPATHY (Charcot Joint)
A chronic, progressive, destructive process affecting bone architecture and joint alignment in patients lacking protective sensation.
- Occurs in 1-1.5% of diabetics; 7.5% of diabetic patients with neuropathy
- Two pathophysiologic theories: neurotraumatic (repeated microtrauma with no pain response) and neurovascular (autonomic dysfunction causes hyperemia and bone resorption)
- Presents as swollen, warm, erythematous foot - often confused with infection or gout
- Classic radiographic appearance: "bag of bones" pattern - fragmentation, dislocation, dense new bone
- Most commonly affects tarsometatarsal joints (Lisfranc) → "rocker bottom" deformity
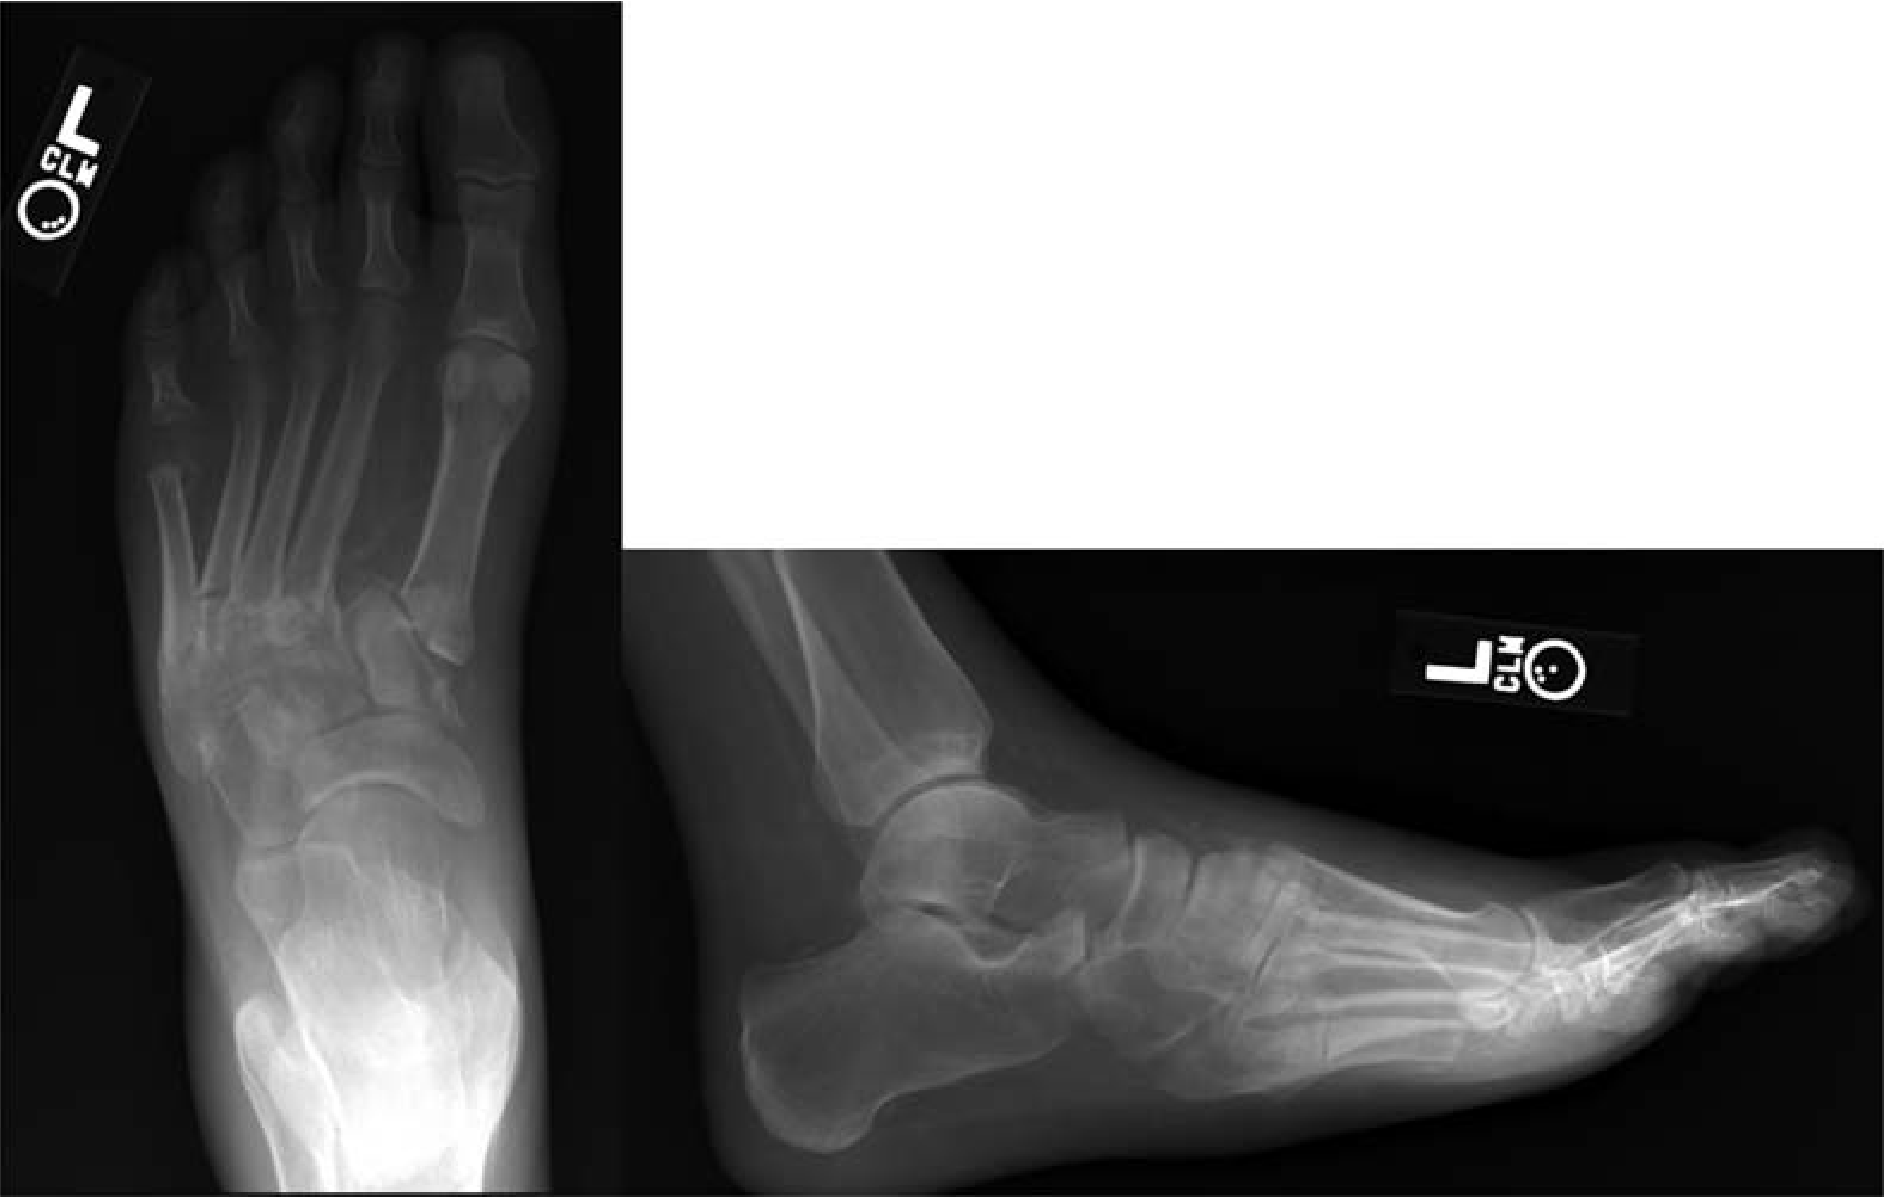
Stages (Eichenholtz):
- Stage 0 (Prodromal): Warmth, swelling, normal X-ray
- Stage I (Fragmentation/Development): Bone fragmentation, joint dislocation
- Stage II (Coalescence): New bone formation, fusion begins
- Stage III (Reconstruction): Consolidation, deformity fixed
MANAGEMENT
Principles: Multidisciplinary Team
Endocrinology, Orthopaedics, Vascular Surgery, Infectious Disease, Podiatry, Nutrition
A. Medical / Conservative Management
- Glycemic control - HbA1c optimization (cornerstone of all treatment)
- Nutritional optimization - Delay surgery if albumin <2.5 g/dL or total protein <6 g/dL
- Antibiotics:
- Mild-moderate infection: Oral agent active against Gram-positive cocci (MRSA-active if risk factors)
- Severe infection: IV broad-spectrum (cover Gram-negatives, Pseudomonas, anaerobes)
- Duration guided by tissue vs. bone involvement (soft tissue: 2 weeks; osteomyelitis: 4-6 weeks)
- Wound care:
- Regular debridement of callus and necrotic tissue
- Moist wound dressings
- Negative-pressure wound therapy (NPWT/VAC dressing) for large wounds
- Biological dressings (collagen, growth factor-containing)
- Offloading (MOST IMPORTANT for ulcer healing):
- Total Contact Cast (TCC): Gold standard for plantar neuropathic ulcers - distributes pressure over entire plantar surface
- Removable cast walkers (RCW) / Scotchcast boots
- Extra-depth therapeutic shoes with custom insoles (Plastazote - closed-cell cross-linked polyethylene)
- Crutches/wheelchair
B. Vascular Intervention
- Full vascular assessment mandatory in patients with poor pulses
- Percutaneous transluminal angioplasty (PTA) for suitable lesions
- Bypass surgery (femoropopliteal/tibial) for long occlusions
- Improving vascularity is essential before foot salvage surgery
C. Surgical Management
1. Wound debridement:
- All necrotic tissue, slough, and infected bone must be removed
- Leave wound open; secondary closure or skin grafting once healthy granulation bed established
2. Procedures for specific deformities:
- Claw toes / dorsal toe ulcers: Flexor tenotomy or proximal interphalangeal joint resection
- Plantar hallux IP joint ulcers: Keller arthroplasty (if TCC failed)
- Achilles lengthening: For recurrent forefoot/midfoot ulcers with equinus contracture - offloads forefoot pressure
- Midfoot collapse (Charcot): Osteotomy of bony prominence (if stable deformity) OR midfoot fusion (if instability present)
- Charcot active phase: Total Contact Cast immobilization until Stage III; surgical reconstruction (superconstructs) for unstable deformity
3. Amputation:
Indication: Gangrene, severe uncontrolled infection, non-healing ulcer with no vascular inflow.
| Level | Indication |
|---|---|
| Ray amputation | Single metatarsal + toe |
| Transmetatarsal amputation (TMA) | Multiple forefoot involvement |
| Lisfranc/Chopart | Midfoot salvage |
| Syme's amputation | Ankle disarticulation; preserves heel pad |
| Below-knee (BKA) | Forefoot gangrene failing revascularization |
| Above-knee (AKA) | Unsalvageable limb / BKA non-healing |
In extensive peripheral neuropathy, a below-knee amputation in a zone with better sensation may be more appropriate than a foot-level procedure (Bailey & Love 28e).
Skin closure must be tension-free; excess bone may need resection to allow this.
PREVENTION (Highly Examinable)
- Optimal glycemic control - target HbA1c <7%
- Daily foot inspection (use mirror if needed; arrange assistance if retinopathy)
- Proper footwear - well-fitting shoes; avoid walking barefoot
- Regular chiropody/podiatry review
- Monofilament screening at every diabetes clinic visit
- Patient education on foot hygiene, nail care, avoidance of extremes of temperature
- Smoking cessation - worsens peripheral vascular disease
- Diabetic therapeutic shoe bill (USA) allows for extra-depth shoes + 3 custom insoles/year for at-risk patients
PROGNOSIS
- Infected diabetic foot ulcer must be regarded with urgency - can quickly progress to render the limb non-salvageable
- Five-year mortality of diabetic foot complications (30.5%) is comparable to that of many cancers
- Major amputation 5-year mortality: ~50-70%
- Goal of treatment: Ulcer-free, functional, plantigrade foot that fits within a brace or shoe
SUMMARY BOX (Bailey & Love 28e Key Points)
- Most important risk factor for osteomyelitis is presence of a foot ulcer
- Superficial swabs are unreliable for identifying deep pathogens
- In severe disease, surgical debridement is mandatory followed by culture-guided antibiotics
- Probe-to-bone test + elevated CRP + abnormal plain X-ray = confirmed osteomyelitis
- Full vascular assessment is mandatory in all diabetic foot infections
- Amputation wound healing is problematic; always plan for tension-free closure
Sources: Campbell's Operative Orthopaedics 15th Ed 2026 (Ch. 91); Miller's Review of Orthopaedics 9th Ed; Bailey & Love's Short Practice of Surgery 28th Ed (Ch. 43)
Pearson flexion apparatus ms ortho 20 marks answer with proper pictures
Reading File
Now searching the library and web simultaneously for Pearson flexion apparatus:
Finding Sources
Finding Sources
Searching the Web
Pearson flexion attachment traction femur fracture orthopaedics
Good material found. Let me now search the library for Thomas splint + traction content, extract the musculoskeletal key page, and fetch all relevant images in parallel:
Finding Sources
Reading Web Page
https://musculoskeletalkey.com/fractures-of-the-femur-and-in…
Loading Image
Loading Image
Excellent! Found Pye's Surgical Handicraft with a dedicated section on Thomas splint with Pearson attachment, and Rockwood & Green. Let me now read all the key textbook sections in parallel:
Reading File
Reading File
Reading File
Loading Image
Excellent! Now let me get the dedicated Pearson attachment section from Pye's and the Rockwood & Green traction section, plus key library images:
Reading File
Reading File
Reading File
Loading Image
Now let me fetch the Rockwood & Green six-methods-of-traction diagram and the Bailey & Love Thomas splint image, plus search for a good clinical photograph:
Loading Image
Loading Image
Loading Image
I now have all the content and images needed. Here is the complete 20-mark MS Ortho answer:
PEARSON FLEXION ATTACHMENT (PEARSON KNEE-FLEXION PIECE)
MS Orthopaedics - 20 Marks Answer
INTRODUCTION / DEFINITION
The Pearson flexion attachment (also called the Pearson knee-flexion piece or Pearson knee piece) is a hinged supplementary frame that is fixed to the distal end of the Thomas splint to allow controlled flexion of the knee joint while maintaining skeletal traction for fractures of the femoral shaft. It converts the Thomas splint from a rigid immobilization device into a dynamic system that permits progressive knee mobilization during the later stages of fracture healing.
It was designed to address the major drawback of the standard Thomas splint - complete immobility of the knee joint, which leads to stiffness, quadriceps wasting, and prolonged rehabilitation.
HISTORICAL BACKGROUND
- Hugh Owen Thomas (1834-1891) designed the Thomas splint originally as a knee splint for tuberculosis, but it was later adapted for femoral shaft fractures
- The Pearson attachment was subsequently developed specifically to overcome knee stiffness by allowing controlled flexion while traction is maintained
- The combination of Thomas splint + Pearson attachment with skeletal traction became the standard non-operative treatment for femoral shaft fractures before the era of intramedullary nailing
- By the 1970s-1980s, intramedullary nailing gradually superseded this method in developed countries, but it remains in use where operative facilities are limited
ANATOMY OF THE APPARATUS
A. Thomas Splint (The Base Frame)
The Thomas splint consists of:
- Ring (proximal end) - oval padded ring that sits in the groin against the ischial tuberosity; provides counter-traction in static mode
- Two parallel side bars - medial and lateral; extend distally beyond the foot
- Distal crossbar - connects the two side bars at the foot end
Sizing:
- Ring circumference = circumference of thigh at groin level
- Length = length of good limb (crotch to heel) + 15-25 cm
Three slings of non-stretch bandage are applied:
- One under the thigh
- One under the knee
- One just above the tendo calcaneus
B. Pearson Attachment (Knee-Flexion Piece)
The Pearson attachment consists of:
- Two short side bars (thigh piece) that clamp onto the side bars of the Thomas splint at the level of the knee joint
- A hinge joint at the level of the knee axis - allows controlled flexion/extension
- Leg piece bars - support the leg distal to the knee
- Slings supporting the leg between the bars
- Adjustable cord - limits the degree of knee flexion (can be progressively lengthened to increase ROM)
- Patient-assist cord - allows the patient to actively assist knee extension
The hinge of the Pearson attachment is positioned carefully to align with the axis of the knee joint.
CLINICAL PHOTOGRAPHS AND DIAGRAMS
Thomas Splint applied with skin traction (Pye's Surgical Handicraft 22e)
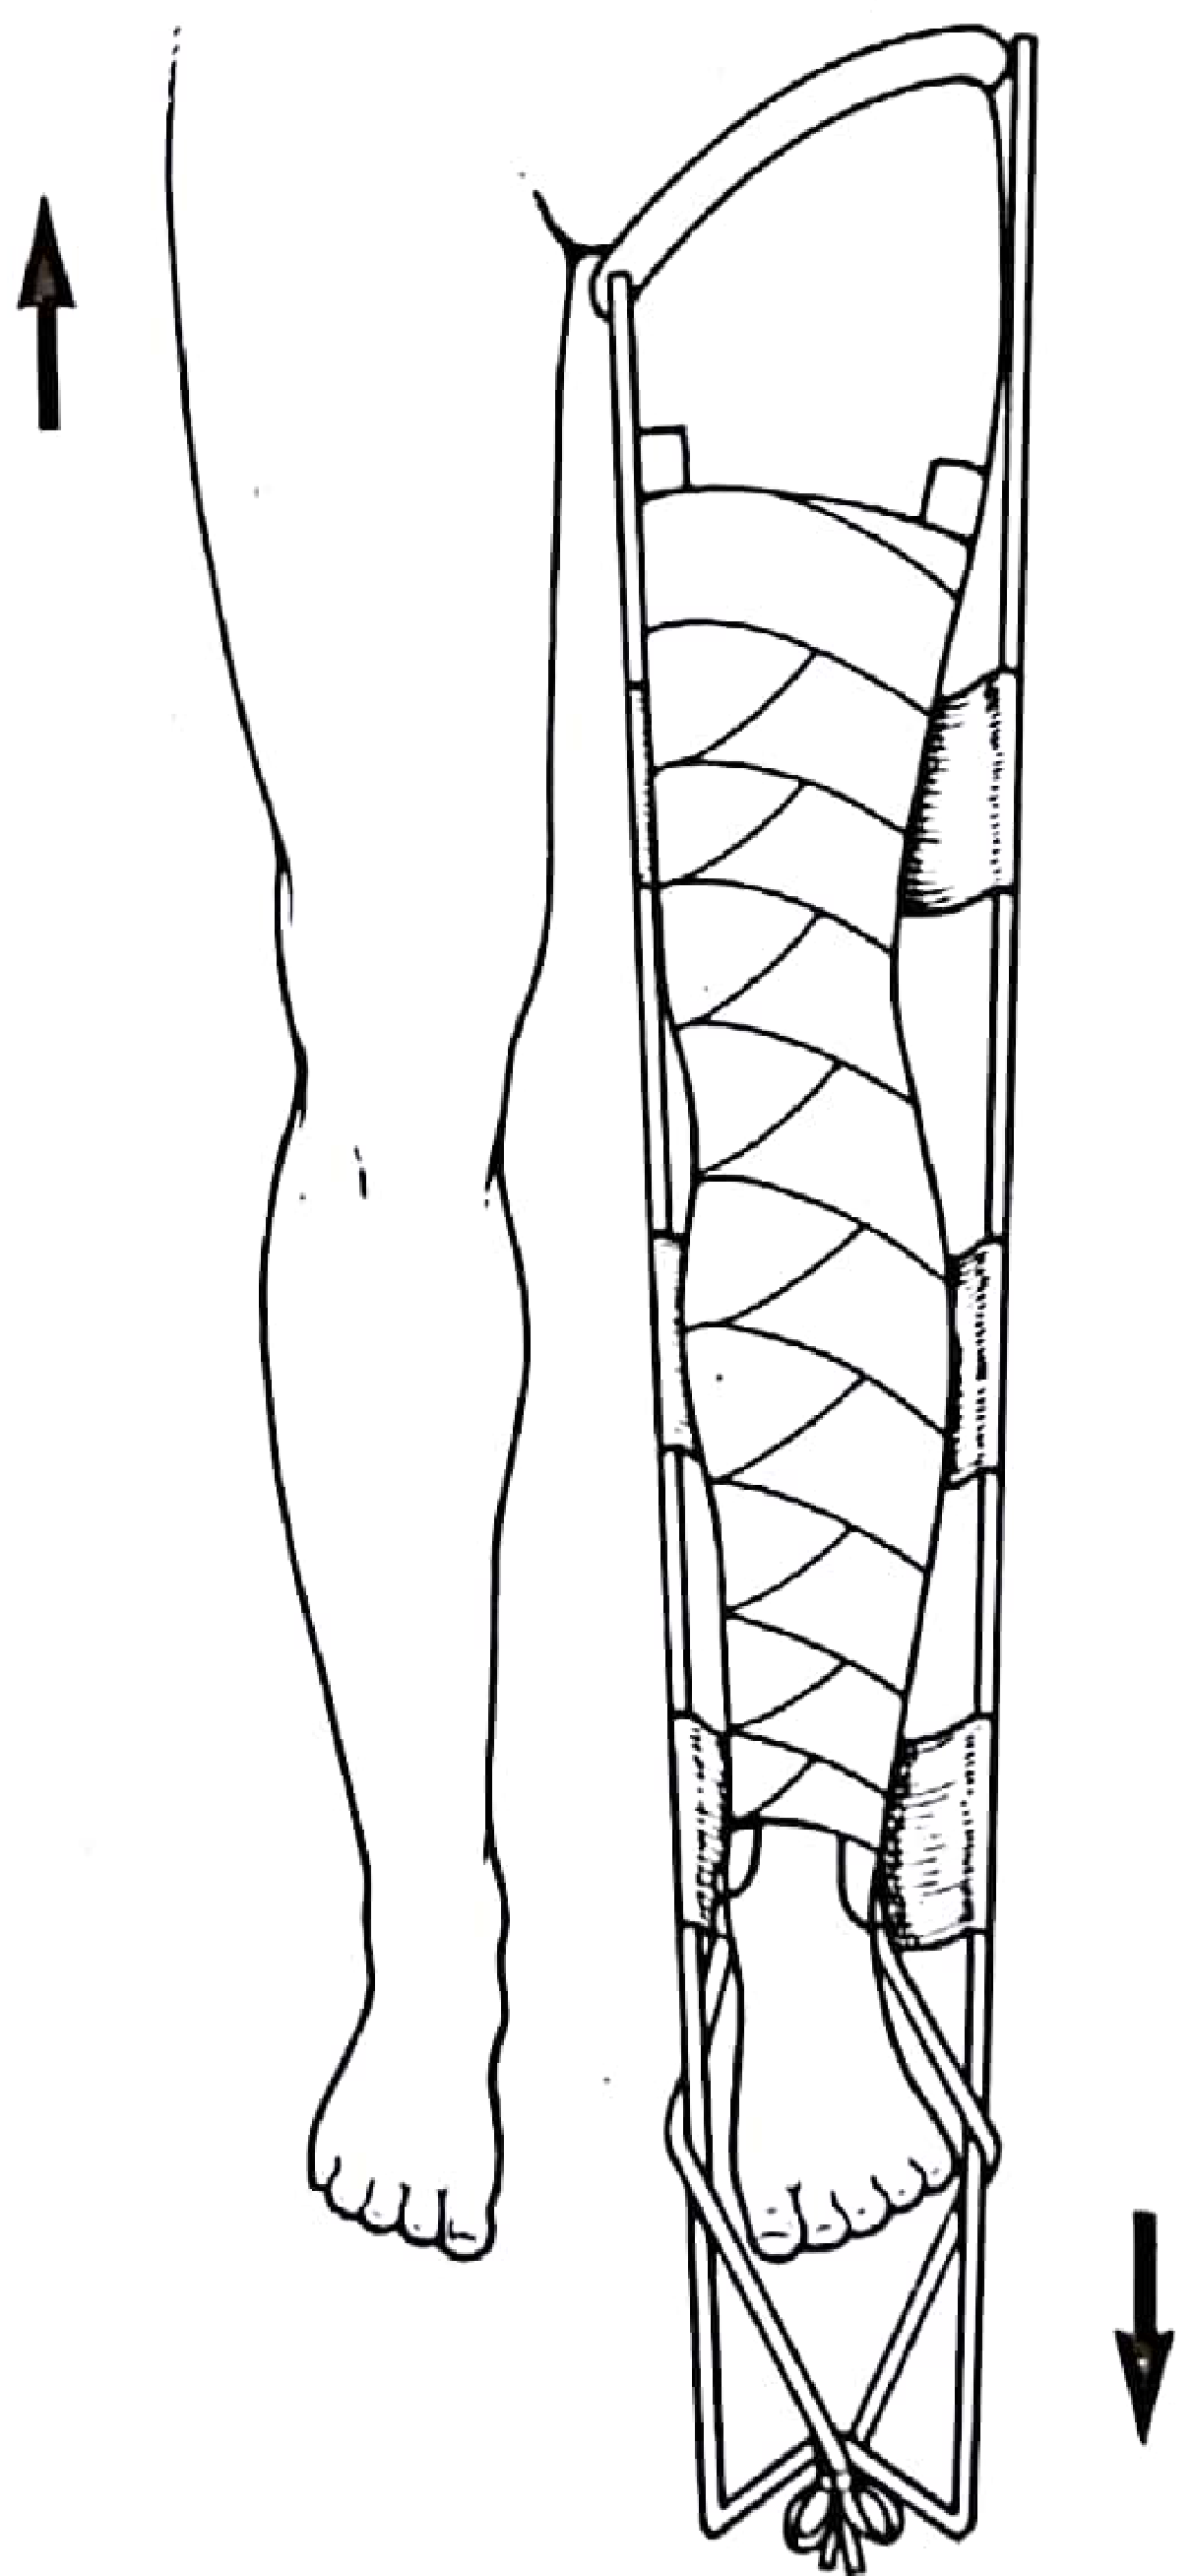
Thomas splint with Pearson knee attachment and skeletal traction (Pye's Surgical Handicraft 22e)
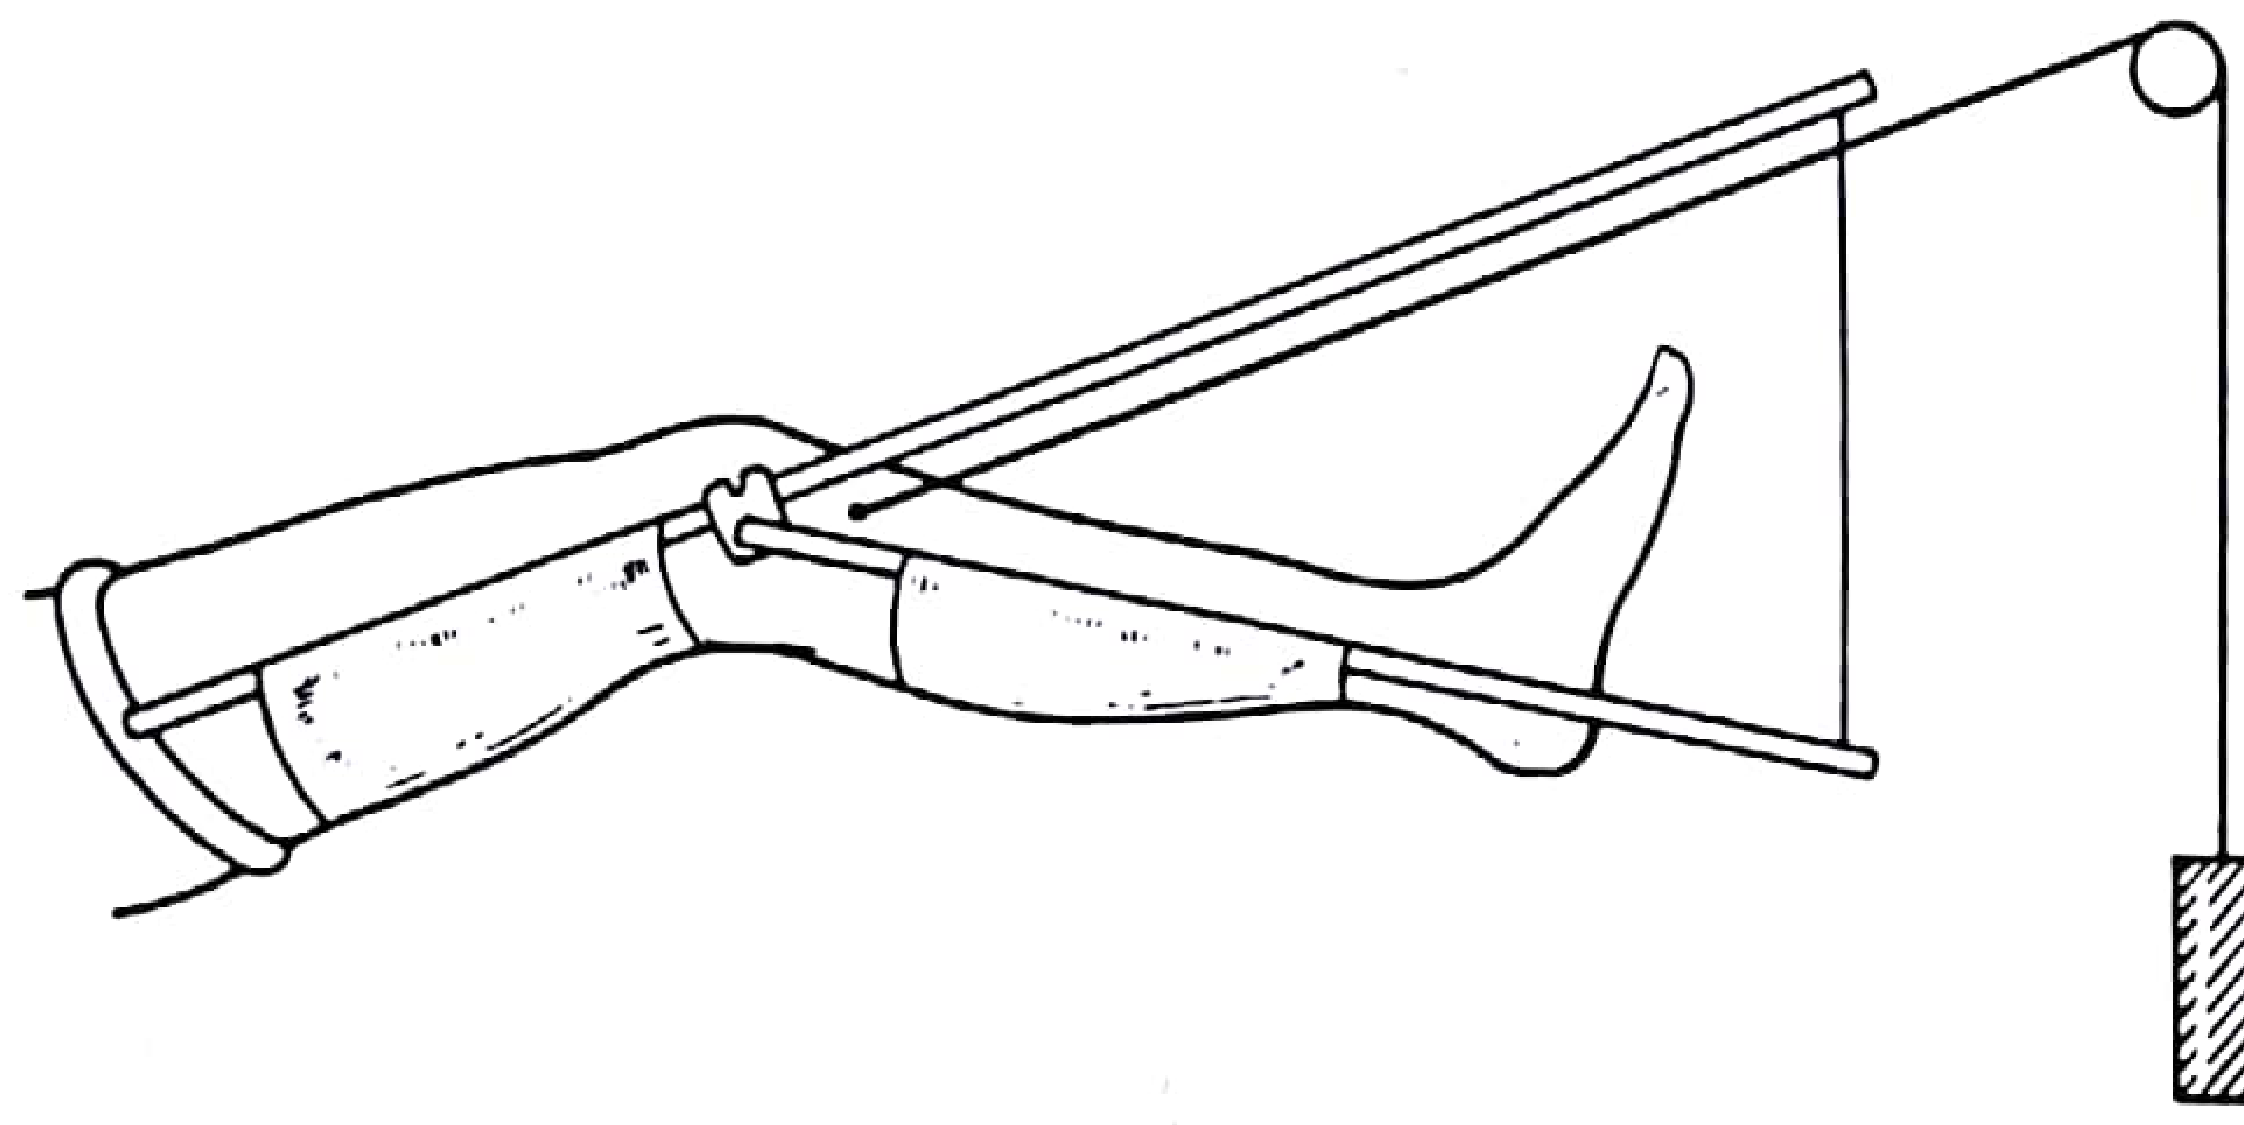
Pearson knee-flexion piece in use - showing key numbered components:

Key: (1) traction cord transferred to Pearson attachment; (2) Pearson attachment fixed to Thomas splint; (3) Thomas splint; (4) hinge at level of knee axis; (5) adjustable cord to control degree of flexion; (6) end of Thomas splint raised; (7) support cord; (8) patient-assist cord for active knee extension
Six methods of skeletal traction (A = Thomas splint + Pearson attachment) - Rockwood & Green 10e
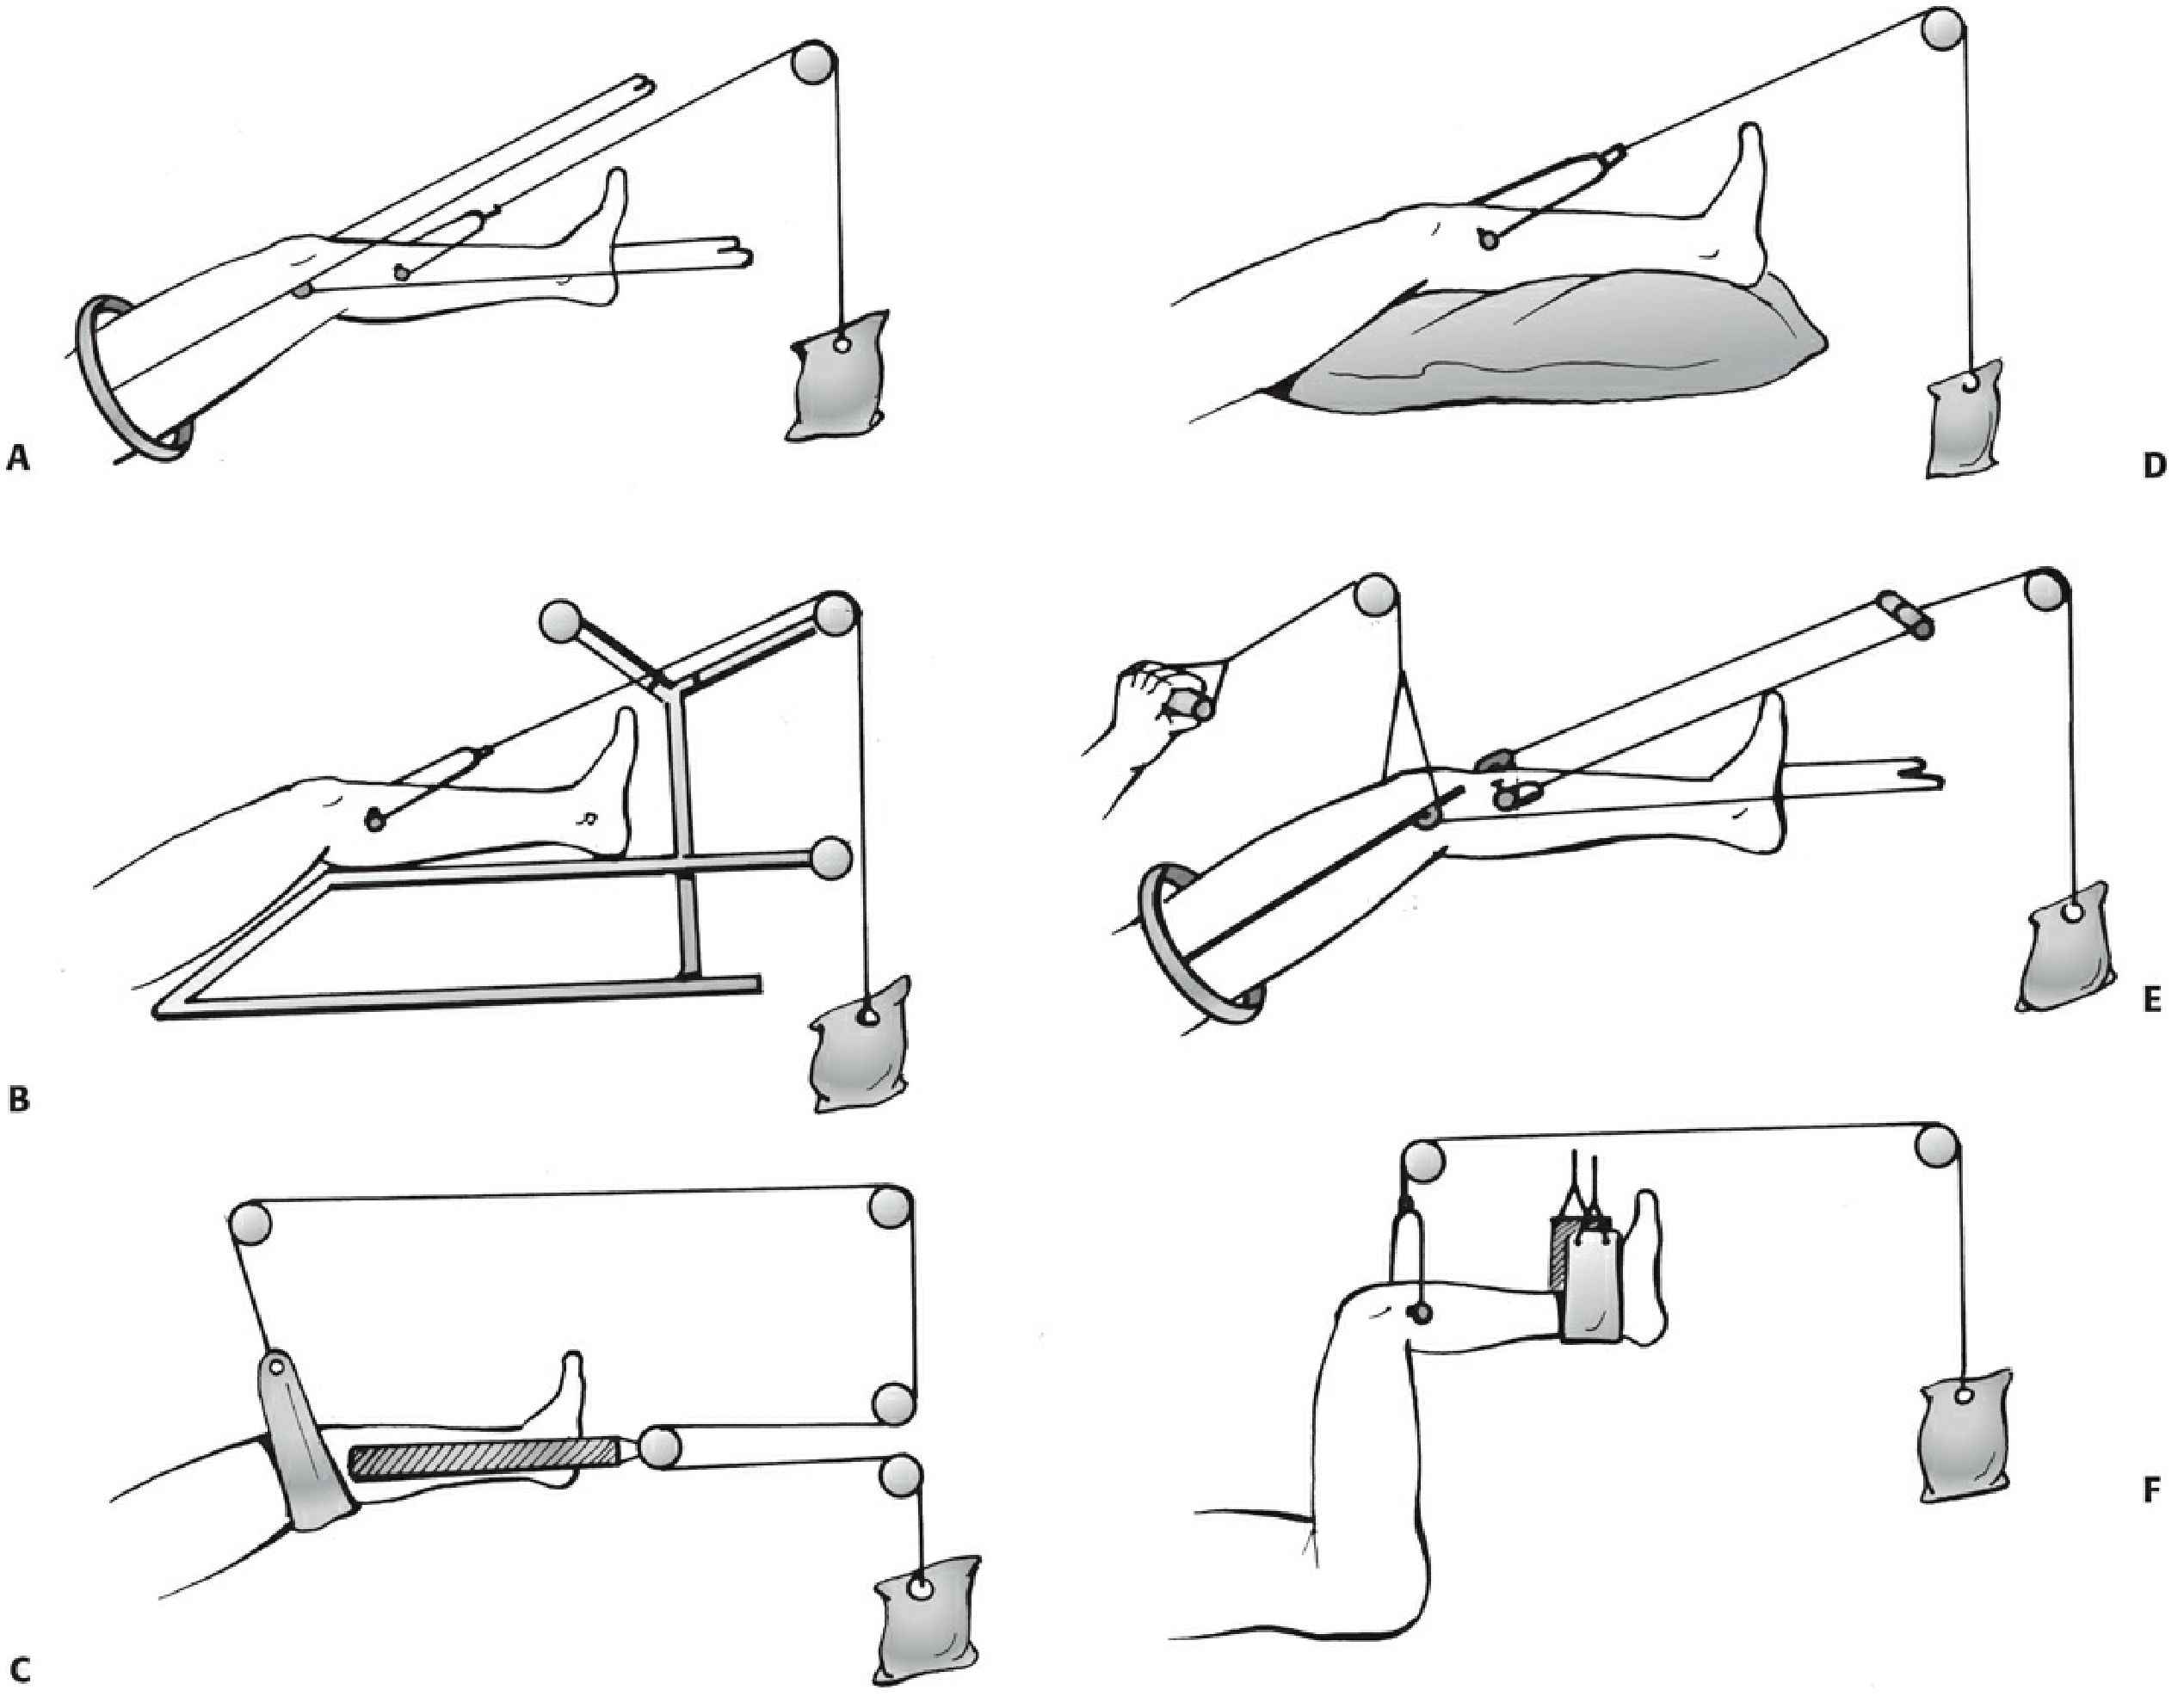
A = Thomas splint + Pearson knee piece; B = Braun traction; C = Hamilton-Russell traction; D = Perkins traction; E = Fisk traction; F = 90-90 traction
Clinical setup - Thomas leg splint with Pearson attachment on a hospital bed:
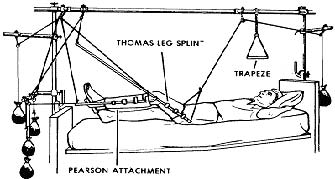
TYPES OF TRACTION WITH THOMAS SPLINT
1. Fixed (Static) Traction
- The traction cord from the tibial pin or skin extensions is tied directly to the distal end of the Thomas splint using a Spanish windlass
- The force and counterforce are contained within the closed system
- Counterforce = ring pressing on ischial tuberosity
- Used for: initial immobilization, transport of patient, pre-hospital/emergency phase
- Advantage: portable, no weights needed
2. Balanced (Sliding/Dynamic) Traction
- The splint is suspended by overhead slings and pulleys
- A separate weight is attached to the traction pin cord via a pulley at the foot of the bed
- Counterforce = patient's own body weight (foot of bed elevated)
- Allows some patient movement in bed
- Used for: definitive non-operative management in hospital
INDICATIONS FOR THOMAS SPLINT + PEARSON ATTACHMENT
- Fractures of the femoral shaft (diaphyseal fractures) - primary indication
- As a temporary measure for comfort and transport prior to operative fixation
- Where intramedullary nailing or operative fixation is unavailable (resource-limited settings)
- Pediatric femoral shaft fractures in older children (after 2 years)
- Pathological fractures where surgery is contraindicated
- Open fractures with significant soft tissue compromise where immediate IMN is deferred
PROCEDURE / TECHNIQUE OF APPLICATION
Step 1: Traction Pin Insertion (Steinmann/Denham Pin)
Under aseptic conditions, general or local anaesthesia:
- Preferred site: proximal tibia - just below and behind the tibial tubercle, 2 cm behind the anterior border
- Alternative sites: distal tibia (4-5 cm above medial malleolus), or calcaneum
- Pin inserted from the lateral side to avoid neurovascular structures
- Pin driven at right angles to the limb in the coronal plane
- Denham threaded pins preferred - prevent rotation and loosening
- Traction stirrup must move freely on the pin (if it binds, pin rotates → infection)
- Pin sites dressed with benzoin tincture-soaked pads
Step 2: Skin Extension Application
- Elastoplast strapping (7.5-10 cm wide) applied directly to shaved skin on both sides
- Outer strip placed slightly posteriorly; inner strip slightly anteriorly - to counteract external rotation tendency
- Extensions held with circumferential crepe bandages ending above the malleoli
- Orthopaedic felt pads protect the malleoli
Step 3: Thomas Splint Application
- Splint sized and prepared with three slings
- Passed over the foot and up the thigh to sit in the groin
- Tapes of skin extensions passed: outer tape over lateral bar; inner tape under medial bar (counteracts rotation)
- Tapes tied over distal end of splint; wooden bar used as windlass if needed
- Padding placed:
- Behind fracture site - acts as fulcrum for correction
- Behind knee - maintains 15° flexion
- Along shin - prevents pressure sores
Step 4: Balanced Suspension Setup (Once in Hospital Bed)
- Overhead Balkan beam frame with pulleys set up
- Splint suspended by slings attached to overhead frame
- Separate traction cord from tibial pin passed over pulley at foot of bed and loaded with weights (typically 4-7 kg initially)
- Foot of bed elevated on blocks for countertraction
- X-ray taken to check alignment; pads adjusted as needed
- A posterior pad under the distal femur is almost always required to correct posterior sag
Step 5: Pearson Attachment Application (after 4-6 weeks)
Applied when stabilizing callus appears at fracture site:
- Traction cord transferred from the Thomas splint end to the Pearson attachment
- The Pearson piece is clamped to the side bars of the Thomas splint at the level of the knee axis
- End of the Thomas splint is raised and supported
- Adjustable cord (cord 5) limits initial flexion to a small arc (20-30°)
- Patient-assist cord (cord 8) allows active knee extension exercises
- Flexion range is progressively increased over subsequent weeks as callus matures
TIMING
| Phase | Timing | Action |
|---|---|---|
| Initial | Immediately after injury | Static Thomas splint traction |
| Hospital admission | Day 1-2 | Convert to balanced traction |
| Early callus visible | ~4-6 weeks | Add Pearson attachment, begin knee flexion |
| Abundant callus | ~8-12 weeks | Discard splintage; mobilize freely |
| Weight bearing | ~12-16 weeks | After mature callus confirmed on X-ray |
ADVANTAGES OF THE PEARSON ATTACHMENT
- Prevents knee stiffness - major advantage over rigid Thomas splint alone
- Maintains traction while allowing knee movement simultaneously
- Prevents quadriceps wasting by allowing active and passive knee exercises
- Psychological benefit - patient can partially mobilize the knee
- Graduated - flexion range can be controlled and progressively increased
- Patient can actively assist knee extension using the assist cord
COMPLICATIONS
General Traction Complications:
| Complication | Mechanism / Details |
|---|---|
| Pressure sores | Ring over ischial tuberosity, peroneal nerve at fibular head, heel |
| Common peroneal nerve palsy | Pressure by lateral bar at fibular head - results in foot drop |
| Pin site infection | Commonest skeletal traction complication; prevented by aseptic insertion and site care |
| Pin loosening | Pin rotates if stirrup not free; use Denham threaded pins |
| DVT/PE | Immobility; prophylactic anticoagulation required |
| Malunion | Most common fracture complication; varus/valgus/rotational deformity |
| Delayed union | Over-traction causing distraction at fracture site |
| Urinary complications | Difficulty voiding in supine position; UTI risk |
| Chest complications | Hypostatic pneumonia, atelectasis |
Specific to Pearson Attachment:
- If applied too early (before stabilizing callus): angulation at fracture site
- Hinge misalignment with knee axis: uneven joint loading, cartilage stress
- Excessive or rapid flexion increase: pain and fracture instability
NURSING CARE / MONITORING
- Inspect ring area (groin/ischial tuberosity) for pressure sores every 4 hours; apply olive oil
- Check peroneal nerve function daily (dorsiflexion, sensation first web space)
- Pin site care: clean with antiseptic, inspect for erythema/discharge
- Check traction cords and pulleys - cords must not touch bed or pulleys
- Check traction weights are hanging freely (not resting on floor)
- Ensure foot of bed is elevated (countertraction)
- Regular quadriceps exercises even before Pearson attachment
- Foot/ankle exercises to prevent DVT
- Regular chest physiotherapy
COMPARISON: THOMAS SPLINT + PEARSON vs. INTRAMEDULLARY NAIL
| Feature | Thomas Splint + Pearson | IMN |
|---|---|---|
| Hospital stay | 12-16 weeks | 5-7 days |
| Return to function | Slow | Fast |
| Cost | Low | High |
| Requires OT/anaesthesia | No | Yes |
| Knee stiffness | Less (with Pearson) | Rare |
| Malunion risk | Higher | Lower |
| Infection risk | Pin site infection | Surgical site infection |
| Current role | Resource-limited settings | Gold standard |
CURRENT STATUS
As stated in Rockwood & Green's Fractures in Adults 10th Ed 2025: "Intramedullary nailing gradually grew more popular and essentially superseded traction as the treatment of choice for femoral fractures in the 1970s and 1980s... traction is still used in parts of the world and surgeons should understand the rationale behind its use and its complications."
The Thomas splint alone still has value as a temporary splint and transport device for femoral shaft fractures before definitive surgery. The complete Thomas + Pearson balanced traction system is now primarily used in:
- Resource-limited settings
- Where operative fixation is unavailable or contraindicated
- As a bridge to surgery
SUMMARY BOX (Examination Points)
- Pearson attachment is a hinged frame added to the Thomas splint at the knee axis
- Applied after 4-6 weeks when stabilizing callus appears
- Transfers the traction cord from the Thomas splint distal end to the Pearson piece
- Allows progressive knee flexion while maintaining femoral traction
- Thomas splint: invented by Hugh Owen Thomas, counter-traction on ischial tuberosity
- Skeletal traction preferred in adults (Steinmann/Denham pin in proximal tibia)
- Skin traction used in children and elderly
- Static traction = closed system (splint + windlass); Balanced traction = weights and pulleys
- Commonest complication: Pressure sore + common peroneal nerve palsy
Sources: Pye's Surgical Handicraft 22nd Ed; Rockwood & Green's Fractures in Adults 10th Ed 2025 (Ch. 10); Bailey & Love's Short Practice of Surgery 28th Ed (Ch. 32); Musculoskeletal Key - Fractures of the Femur
Pearson flexion apparatus ms ortho 20 marks answer with proper pictures
The complete answer was already provided just above in this conversation — here it is again in full for easy reference:
PEARSON FLEXION ATTACHMENT (PEARSON KNEE-FLEXION PIECE)
MS Orthopaedics - 20 Marks Answer
INTRODUCTION / DEFINITION
The Pearson flexion attachment (also called the Pearson knee-flexion piece or Pearson knee piece) is a hinged supplementary frame fixed to the distal end of the Thomas splint to allow controlled knee flexion while maintaining skeletal traction for femoral shaft fractures. It converts the Thomas splint from a rigid immobilization device into a dynamic system that permits progressive knee mobilization during the later stages of fracture healing.
It was designed to address the major drawback of the standard Thomas splint - complete knee immobility, leading to stiffness, quadriceps wasting, and prolonged rehabilitation.
HISTORICAL BACKGROUND
- Hugh Owen Thomas (1834-1891) designed the Thomas splint originally as a knee splint for tuberculosis, later adapted for femoral shaft fractures
- The Pearson attachment was subsequently developed to overcome knee stiffness by allowing controlled flexion while traction is maintained
- Thomas splint + Pearson attachment + skeletal traction became the standard non-operative treatment for femoral shaft fractures before the intramedullary nail era
- By the 1970s-1980s, intramedullary nailing superseded this method in developed countries, but it remains relevant where operative facilities are limited (Rockwood & Green 10e)
ANATOMY OF THE APPARATUS
A. Thomas Splint (The Base Frame)
Components:
- Ring (proximal) - oval padded ring seated in the groin against the ischial tuberosity; provides counter-traction in static mode
- Two parallel side bars - medial and lateral, extending distally beyond the foot
- Distal crossbar - connects side bars at the foot end
- Three slings of non-stretch bandage:
- One under the thigh
- One under the knee
- One just above the tendo calcaneus
Sizing:
- Ring size = circumference of thigh at groin
- Length = length of good limb (crotch to heel) + 15-25 cm
B. Pearson Attachment (Knee-Flexion Piece)
Components:
- Short thigh side bars - clamp onto the Thomas splint bars at knee level
- Hinge joint at the knee axis - allows controlled flexion/extension
- Leg piece bars - support the leg distal to the knee
- Slings supporting the leg between the bars
- Adjustable cord - limits and controls degree of knee flexion (progressively lengthened)
- Patient-assist cord - allows active knee extension by the patient
The hinge is carefully aligned with the anatomical axis of the knee joint.
DIAGRAMS AND PICTURES
Thomas splint applied with skin traction (Pye's Surgical Handicraft 22e)
Thomas splint with Pearson knee attachment and skeletal traction (Pye's Surgical Handicraft 22e)
Pearson knee-flexion piece - numbered components diagram
(1) Traction cord transferred to Pearson attachment (2) Pearson attachment fixed to Thomas splint (3) Thomas splint (4) Hinge at knee axis (5) Adjustable cord to control flexion range (6) End of Thomas splint raised (7) Support cord (8) Patient-assist cord for active knee extension
Six methods of skeletal traction - Rockwood & Green 10e (A = Thomas splint + Pearson piece)
A = Thomas splint + Pearson; B = Braun; C = Hamilton-Russell; D = Perkins; E = Fisk; F = 90-90 traction
Clinical bedside setup - Thomas leg splint with Pearson attachment
TYPES OF TRACTION
1. Fixed (Static) Traction
- Traction cord tied directly to the distal end of Thomas splint via a Spanish windlass
- Force and counterforce contained within a closed system
- Counterforce = ring pressing on ischial tuberosity
- Use: Emergency, transport, pre-hospital phase
2. Balanced (Sliding/Dynamic) Traction
- Splint suspended by slings and overhead pulleys; weights applied via pulley at foot of bed
- Counterforce = patient's own body weight (foot of bed elevated)
- Allows some patient movement in bed
- Use: Definitive in-hospital management
INDICATIONS
- Fractures of the femoral shaft (diaphyseal) - primary indication
- Temporary measure for transport/comfort before operative fixation
- Where IM nailing is unavailable (resource-limited settings)
- Pediatric femoral fractures in older children
- Pathological fractures where surgery is contraindicated
- Open fractures where immediate IMN is deferred
TECHNIQUE OF APPLICATION
Step 1: Skeletal Pin Insertion (Steinmann/Denham Pin)
Under aseptic technique, GA or LA:
- Preferred site: upper tibia - just below and behind the tibial tubercle, 2 cm behind the anterior border
- Alternative sites: distal tibia (4-5 cm above medial malleolus), calcaneum
- Inserted from the lateral side to protect neurovascular structures
- Inserted at right angles to the limb in the coronal plane
- Denham threaded pins preferred - prevent pin rotation and loosening
- Traction stirrup must move freely on pin (if it binds → rotation → sepsis)
- Pin sites covered with benzoin tincture-soaked pads
Step 2: Skin Extensions
- Elastoplast 7.5-10 cm wide, applied to shaved skin bilaterally
- Outer strip posteriorly; inner strip anteriorly - counteracts external rotation tendency
- Held with circumferential crepe bandages above the malleoli
- Orthopaedic felt pads protect the malleoli
Step 3: Thomas Splint Application
- Splint passed over foot and up thigh with ring seated in groin
- Tapes: outer tape over lateral bar; inner tape under medial bar (counteracts rotation)
- Tapes tied to distal end with windlass if needed
- Padding:
- Behind fracture site - acts as corrective fulcrum
- Behind knee - maintains 15° flexion
- Along shin - prevents pressure sores
Step 4: Balanced Suspension (In-Hospital)
- Balkan beam overhead frame set up with pulleys
- Splint suspended by slings; traction weights (4-7 kg) applied via proximal tibial pin
- Foot of bed elevated on blocks
- X-ray taken; posterior pad under distal femur almost always needed to correct posterior sag (Rockwood & Green 10e)
- Fracture position checked and adjusted with pads
Step 5: Pearson Attachment Application (at 4-6 weeks)
Applied when stabilizing callus appears radiologically:
- Traction cord transferred from Thomas splint end to Pearson attachment
- Pearson piece clamped to side bars at the knee axis level
- End of Thomas splint raised and supported
- Adjustable cord set to allow initial small arc of flexion (20-30°)
- Flexion progressively increased over weeks as callus matures
- Patient uses assist cord for active knee extension exercises
TIMING GUIDE
| Phase | Time | Management |
|---|---|---|
| Acute/Emergency | Day 0 | Static Thomas splint |
| Hospital admission | Day 1-2 | Convert to balanced traction |
| Stabilizing callus visible | 4-6 weeks | Apply Pearson attachment |
| Abundant callus | 8-12 weeks | Discard splintage; mobilize freely |
| Weight bearing | 12-16 weeks | When mature callus confirmed |
ADVANTAGES OF PEARSON ATTACHMENT
- Prevents knee stiffness - most important advantage over rigid splint alone
- Maintains traction while simultaneously allowing knee flexion/extension
- Reduces quadriceps wasting - active and passive knee exercises possible
- Gradual and controlled - adjustable cord allows incremental increase in ROM
- Patient can actively assist knee extension - psychological benefit and muscle activation
- Simple, cheap, no anaesthesia required for application
COMPLICATIONS
General Traction Complications
| Complication | Cause / Notes |
|---|---|
| Pressure sore | Ring on ischial tuberosity, heel, sacrum |
| Common peroneal nerve palsy | Lateral bar pressure at fibular head → foot drop |
| Pin site infection | Most common skeletal traction complication |
| Pin loosening | Stirrup binding on pin → pin rotation → loosening |
| DVT / PE | Immobility; prophylaxis mandatory |
| Malunion | Varus/valgus/rotational; most common fracture complication |
| Delayed/non-union | Over-traction → distraction at fracture site |
| Knee stiffness | If Pearson attachment not used or used too late |
| Hypostatic pneumonia | Prolonged recumbency |
| Urinary complications | Difficulty voiding supine; UTI risk |
Specific to Pearson Attachment
- Applied too early (before callus): angulation at fracture site
- Hinge misalignment with knee axis: uneven joint loading
- Rapid flexion increase: pain and fracture instability
NURSING CARE (Key for Examination)
- Inspect ring/groin area for pressure sores every 4 hours; apply olive oil to ring
- Daily peroneal nerve check - dorsiflexion power, sensation in first web space
- Pin site care - antiseptic dressing, inspect for erythema/discharge
- Traction cords must not touch bed; weights must hang freely
- Foot of bed elevated for countertraction
- Quadriceps exercises from day one
- Foot/ankle exercises to prevent DVT
- Regular chest physiotherapy
- Ensure patient can plantarflex and dorsiflex the foot
COMPARISON: THOMAS SPLINT + PEARSON vs. INTRAMEDULLARY NAIL
| Feature | Thomas Splint + Pearson | Intramedullary Nail |
|---|---|---|
| Hospital stay | 12-16 weeks | 5-7 days |
| Return to function | Slow | Rapid |
| Cost | Very low | High |
| Requires OT/anaesthesia | No | Yes |
| Knee stiffness | Reduced with Pearson | Rare |
| Malunion risk | Higher | Lower |
| Infection risk | Pin site infection | Surgical site infection |
| Current role | Resource-limited settings | Gold standard |
CURRENT ROLE / STATUS
As per Rockwood & Green's Fractures in Adults 10e: "Intramedullary nailing gradually grew more popular and essentially superseded traction as the treatment of choice for femoral fractures in the 1970s and 1980s... traction is still used in parts of the world and surgeons should understand the rationale behind its use and its complications."
Thomas splint alone still has value as:
- Emergency splinting and patient transport device
- Pre-operative temporary immobilization
Thomas + Pearson traction still used when:
- Operative fixation unavailable or contraindicated
- Patient unfit for surgery
- Bridge to delayed definitive surgery
EXAMINATION SUMMARY BOX
- Pearson = hinged frame added to Thomas splint at knee axis
- Applied after 4-6 weeks when stabilizing callus appears
- Traction cord transferred from Thomas splint to Pearson piece
- Allows progressive knee flexion while maintaining femoral traction
- Thomas splint: counter-traction on ischial tuberosity
- Static traction = closed system (windlass); Balanced = weights + pulleys
- Steinmann pin in proximal tibia is the anchor point for skeletal traction
- Denham threaded pins prevent rotation and loosening
- Most important complication to monitor: common peroneal nerve palsy (foot drop)
- Key nursing check every 4 hours: peroneal nerve function + pressure areas
Sources: Pye's Surgical Handicraft 22nd Ed (Ch. 14, 15); Rockwood & Green's Fractures in Adults 10th Ed 2025 (Ch. 10); Bailey & Love's Short Practice of Surgery 28th Ed (Ch. 32)
This is a shared conversation. Sign in to Orris to start your own chat.