
Matrices for class 5 cavity restorations for 10 marks . Give me answer like from contents to references
matrix system class V cavity restoration cervical dental
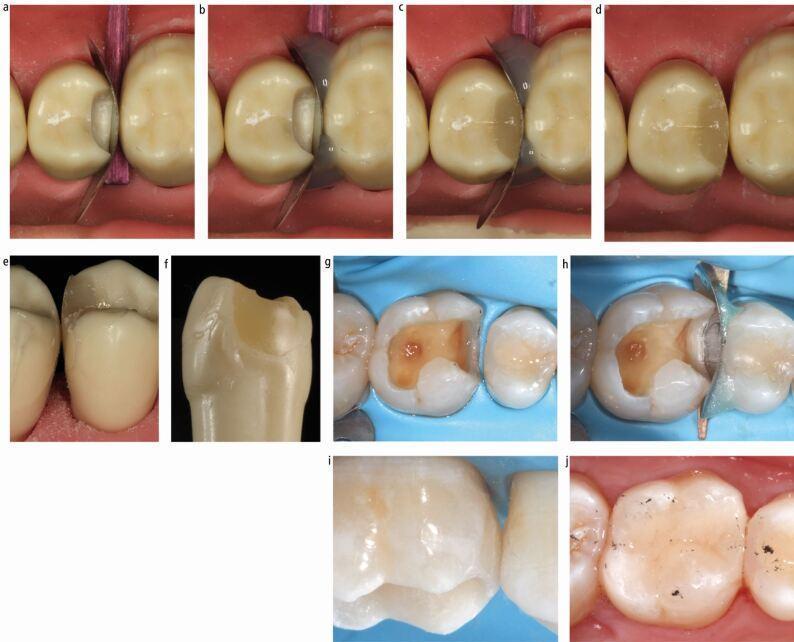
This series of intraoral clinical photographs and benchtop dental models illustrates the stepwise workflow for a Class II posterior composite resin restoration using a sectional matrix system. (g) shows a prepared occluso-distal cavity on a molar with cleared proximal contacts and a blue rubber dam for isolation. (a, b, c, h) demonstrate the adaptation of a pre-contoured, rigid metal sectional matrix. A wooden interproximal wedge is placed cervically to achieve apical seal and dental separation. Passive coronal stabilization is shown in (b, c, h) using a small amount of unbonded, translucent flowable composite resin at the matrix-tooth interface. (d, i, j) display the completed restoration, highlighting the anatomical recreation of the proximal contact area, smooth marginal ridges, and appropriate occlusal emergence profiles. (e, f) provide a lateral view of the finished restoration on a benchtop model, emphasizing the convex proximal contour and lack of cervical overhangs. The sequence serves as an educational guide for achieving predictable proximal contacts in restorative dentistry.
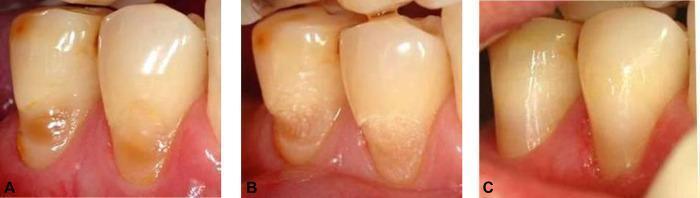
This sequence of clinical intraoral photographs documents the progression of a Class V dental restoration of non-carious cervical lesions (NCCLs) on teeth 44 and 45 (mandibular premolars). (A) The initial state shows wedge-shaped cervical defects near the gingival margin with characteristic yellowish-brown dentin exposure and surface irregularities. (B) Following preparation with an Er,Cr:YSGG laser, the treatment area exhibits a distinctive frosted, whitish-opaque, and roughened texture across the cervical third of the crowns, indicating surface conditioning for improved adhesion. (C) The final image shows the completed restoration using a resin-composite material. The cervical margins are smoothly contoured and the restorative material demonstrates high aesthetic integration with the natural enamel, exhibiting a seamless transition in color and surface gloss. This series serves as an educational example of laser-based cavity preparation and aesthetic direct restoration techniques in conservative dentistry.
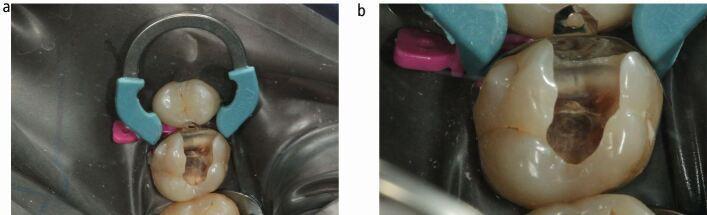
Two intraoral clinical photographs (Figures 7a and 7b) demonstrate the isolation and preparation phase of a direct adhesive restoration on a maxillary left first molar (tooth 26). The operative field is isolated using a grey rubber dam. A large, mesio-occlusal (Class II) cavity preparation is visible on tooth 26, extending deep into the dentin with clean peripheral margins at the amelodentinal junction. An anatomical sectional matrix system (Palodent V3) is in place, consisting of a thin, pre-curved metallic matrix band secured by a nickel-titanium V-ring with light-blue plastic tines. A pink interproximal wedge is positioned between teeth 25 and 26 to achieve tight cervical adaptation of the matrix and facilitate proper proximal contouring. The setup illustrates contemporary restorative techniques aimed at recreating anatomical embrasures and contact points while preventing food impaction. The visual demonstrates the spatial relationship between the prepared cavity, the matrix band, and auxiliary stabilizing components in a clinical operative dentistry setting.
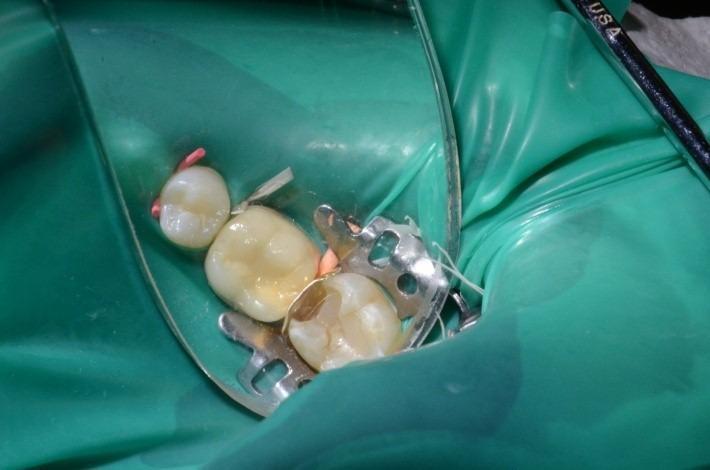
This clinical photograph shows an intraoperative occlusal view of a restorative dental procedure on the mandibular left quadrant. The operative field is isolated using a green rubber dam and a metal clamp. The image demonstrates a group isolation technique encompassing the premolar and molar regions. A Class II atypical cavity preparation is visible on the second molar. To manage the restoration of the proximal wall, a silver-colored metal matrix band has been placed circumferentially and stabilized interproximally with a pink wedge. Additional isolation and moisture control are achieved via pink cervical ligatures (floss ties) applied around the necks of the adjacent teeth to further retract the dam. A transparent intraoral mirror or protective film is positioned to facilitate the occlusal perspective of the treatment area. This image serves as an educational example of proper moisture control, gingival retraction, and matrix adaptation essential for successful posterior composite or amalgam restorations in operative dentistry.
matrices for class 5 cavity restoration types cervical retainer operative dentistry
https://ternadental.com/wp-content/uploads/17.-Matrices-Wedg…
MATRICES FOR CLASS V CAVITY RESTORATIONS
Contents
- Introduction
- Definition and Purpose
- Ideal Requirements of a Matrix
- Functions of a Matrix
- Parts of a Matrix System
- Classification of Matrices
- Matrices Specifically Used for Class V Cavity Restorations
- A. Window Matrix
- B. Anatomic Matrix (Compound Matrix)
- C. Aluminum/Copper Collar Matrix
- D. Preformed Transparent Cervical Matrix
- E. Mylar (Celluloid) Strip
- Procedure for Matrix Placement in Class V
- Conclusion
- References
1. Introduction
- They are bounded on all sides by tooth structure
- The gingival margin often lies at or below the gingival crest
- Access is limited by the cheek, tongue, and gingival tissue
- A conventional circumferential retainer (e.g., Tofflemire) cannot be placed effectively
2. Definition
3. Ideal Requirements of a Matrix
- Should be rigid enough to withstand condensation forces
- Should adapt closely to the cavity margins without gaps
- Should reproduce the correct anatomical contour of the tooth surface
- Should be easy to place and remove without disturbing the restoration
- Should not impinge on the gingival tissue unnecessarily
- Should be compatible with the restorative material
- Should resist deformation under pressure
- For tooth-colored restorations: must be transparent to allow light-curing
4. Functions of a Matrix
- Replaces the missing cavity wall and confines restorative material within the preparation
- Provides the correct three-dimensional anatomical contour to the restoration
- Displaces gingival tissue and rubber dam away from gingival cavity margins
- Prevents cervical overhangs of the restoration
- Maintains the shape of the restoration while the material sets or is light-cured
- Allows adequate condensation/packing of restorative material
5. Parts of a Matrix System
| Component | Function |
|---|---|
| Matrix band/strip | The actual thin metal or plastic material that forms the artificial wall |
| Retainer | Holds the band in position around the tooth |
| Wedge | (Used in Class II; not always needed in Class V) Seals the gingival margin and prevents flash |
- Compound support (anatomic matrix)
- Finger pressure
- Preformed self-retaining collar design
6. Classification of Matrices (General)
- Based on material: Metal (stainless steel, copper, aluminum) / Non-metal (celluloid, Mylar)
- Based on support: Compound-supported / Non-compound-supported
- Based on retainer: With retainer (Tofflemire) / Without retainer (Automatrix)
- Based on transparency: Opaque / Transparent
7. Matrices Used for Class V Cavity Restorations
A. Window Matrix
- A thin strip of stainless steel or dead-soft metal with a rectangular "window" opening cut in its center
- The window is positioned over the Class V cavity, with the metal strip extending over the gingival and incisal margins
- Held in place by compound on the buccal or lingual surface of the tooth
- Adapt the window of the matrix over the prepared cavity
- The margins of the window must coincide exactly with the cavity margins
- Secure with compound or finger pressure
- Condense amalgam through the window
- Remove matrix once initial condensation is complete
B. Anatomic Matrix (Compound-Supported Anatomic Matrix)
- Fill the Class V cavity with gutta-percha or a piece of inlay wax, trimmed to the proper contour of the missing tooth surface
- Coat the filled cavity and adjacent tooth surface with cocoa butter or Vaseline (as a separating medium)
- Take a compound impression of that surface - press softened impression compound over the area and allow to cool
- Remove the compound impression from the tooth
- Remove the gutta-percha/wax from the cavity
- Clean the cavity and proceed with bonding/conditioning
- Place the restorative material into the cavity
- Reseat the compound matrix over the cavity under firm finger pressure to mold the material to the correct anatomy
- Hold securely until the material sets (chemically)
- Produces excellent anatomical contour
- Particularly suited for self-curing composites and GICs
- Does not require a separate retainer device
- Cannot be used with light-cured composites (compound is opaque)
- Requires a two-visit technique or a pre-formed step
C. Aluminum or Copper Collar Matrix (Dead-Soft Metal Collar)
- Pre-formed dead-soft aluminum or copper bands (copper rings) are adapted to fit the cervical area of the tooth
- Available in various sizes to fit different teeth
- The band is cut and shaped to extend slightly beyond the cavity margins on all sides
- Select an appropriately sized aluminum or copper collar
- Trim it so that it extends 1 mm beyond the cavity margins
- Adapt (burnish) the collar closely to the tooth surface using a burnisher or ball-ended instrument
- The collar is held in place by its close adaptation to the tooth
- Place the restorative material, condense/pack through the open side of the collar
- Remove the collar after the material has set
- Provides good circumferential confinement of material
- Easily shaped with instruments to match tooth contour
- Inexpensive and disposable
- Opaque - cannot be used with light-cure composites
- Difficult to achieve perfect adaptation in deeply sub-gingival preparations
D. Preformed Transparent Cervical Matrix (Cervical Matrix / Cervical Retainer)
- These are preformed, transparent (clear) plastic matrices made of polycarbonate or acetate
- Designed in a concave/cervical shape to conform to the buccal/lingual surface of the tooth at the cervical third
- Available in different sizes (small, medium, large) and shapes to fit anterior and posterior teeth
- Some designs include a lip/flange to engage the gingival sulcus for retention
- Brand examples: Kerr Hawe Cervical Matrix, various acetate matrix strips
- Select the correct size matrix to cover the prepared cavity
- Place the matrix over the cavity preparation and press it firmly against the tooth surface so it conforms to the tooth contour
- Hold in place with finger pressure or with a specially designed cervical matrix retainer
- Inject/place composite resin into the cavity through the access provided
- Light-cure through the transparent matrix - the transparency is what makes this matrix essential for photopolymerization
- Remove the matrix after curing; finish and polish the restoration
- Transparent - allows light activation through the matrix
- Produces a smooth, well-contoured restoration surface
- Reduces finishing time
- Produces anatomical contour with a single placement
- Hygienic and disposable
- May not adapt perfectly to complex cervical contours
- Requires correct size selection
- Can be difficult to hold in place without a retainer in inaccessible areas
E. Mylar (Celluloid) Strip
- Thin, flexible transparent polyester (Mylar) strip approximately 0.05 mm thick
- Not preformed - the strip is bent and adapted manually to cover the preparation
- Cut a piece of Mylar strip to appropriate size
- Curve it to fit over the cavity preparation
- Stabilize with finger or instrument pressure
- Place and light-cure composite through the strip
- Remove the strip after curing
- Very thin - does not alter occlusal contacts
- Transparent for light curing
- Flexible and easily adapted
- Creates a smooth, glossy surface on the restoration
- Difficult to maintain in position without assistance
- Does not give as precise a three-dimensional contour as preformed matrices
- Limited to accessible cavities
8. Procedure for Matrix Placement in Class V Restorations (General Steps)
- Rubber dam isolation (when possible) or retraction cord placement
- Cavity preparation completed with correct form
- Select appropriate matrix based on:
- Type of restorative material (amalgam vs. light-cure composite vs. chemical-cure)
- Tooth type and position (anterior vs. posterior)
- Cavity extent (sub-gingival vs. supragingival)
- Adapt the matrix closely to all margins with no gap
- Verify margin coverage - all cavity walls must be covered
- Place restorative material and condense/inject into cavity
- Remove matrix carefully after setting/curing
- Finish and polish the restoration
9. Conclusion
- The type of restorative material (light-cure vs. chemical-cure vs. amalgam)
- The location and accessibility of the cavity
- The esthetic requirements of the patient
References
- Roberson TM, Heymann HO, Swift EJ. Sturdevant's Art and Science of Operative Dentistry, 4th ed. St. Louis: Mosby; 2002.
- Charbenneau GT (ed). Principles and Practice of Operative Dentistry, 2nd ed. Philadelphia: Lea & Febiger; 1988.
- Marzouk MA, Simonton AL, Gross RD. Operative Dentistry: Modern Theory and Practice, 2nd ed. Ishiyaku EuroAmerica; 1985.
- Roberson TM, Heymann HO, Swift EJ. Sturdevant's Art and Science of Operative Dentistry, 5th ed. St. Louis: Mosby; 2006.
- Baum L, Phillips RW, Lund MR. Textbook of Operative Dentistry, 3rd ed. Philadelphia: WB Saunders; 1995.
- Mount GJ, Hume WR. Preservation and Restoration of Tooth Structure, 2nd ed. Queensland: Knowledge Books and Software; 2005.
- Anusavice KJ, Shen C, Rawls HR. Phillips' Science of Dental Materials, 12th ed. St. Louis: Elsevier Saunders; 2013.