

Diagnosis and management Ll
both bone forearm fracture radius ulna displaced diaphysis X-ray
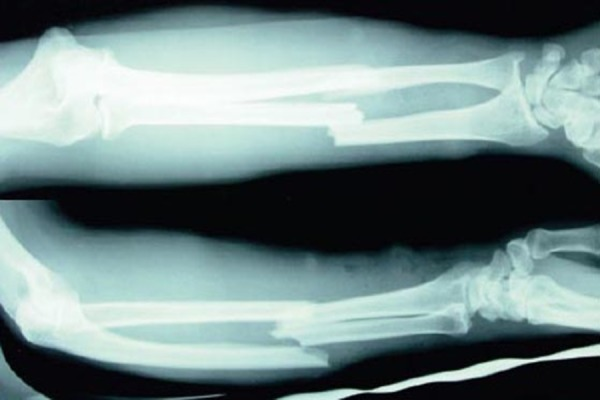
**Imaging Modality:** Conventional projectional radiography (X-ray). **Anatomical Region:** Forearm (radius and ulna) including the elbow and wrist joints. **Observed Pathology:** Displaced, mid-shaft fractures of both the radius and the ulna, commonly referred to as a "both-bone" forearm fracture. **Characteristic Visual Features:** - **Fracture Type:** Complete transverse or slightly oblique fractures involving the diaphysis of both bones. - **Displacement:** Significant lateral and longitudinal displacement of the distal fracture fragments relative to the proximal segments. - **Alignment:** Overlapping of the bony ends (shortening) is visible, with a loss of normal anatomical cortical continuity. - **Joints:** The proximal radioulnar, humeroulnar, and distal radioulnar joints appear grossly intact in these views, though alignment is altered by the diaphyseal trauma. - **Soft Tissue:** Associated soft tissue swelling is evident surrounding the fracture sites. **Key Diagnostic Features:** Simultaneous diaphyseal disruption of the radius and ulna with significant malalignment, requiring surgical intervention for anatomical reduction and stabilization.
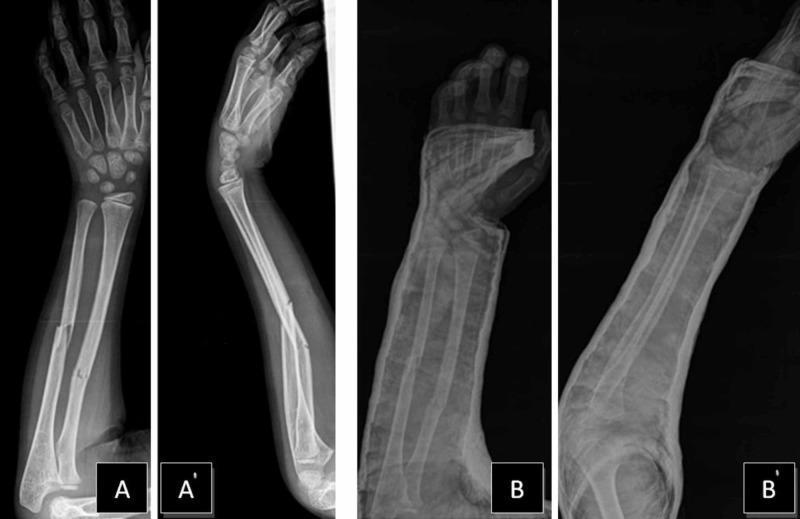
Diagnostic X-ray series of a pediatric patient's right forearm demonstrating a mid-shaft 'both-bone' fracture and subsequent management. Panels A (Anterior-Posterior) and A' (Lateral) show a complete, transverse to short-oblique fracture of the middle diaphysis of both the radius and ulna. The fracture displays significant lateral and dorsal displacement with associated angulation of the distal bone fragments. Panels B (AP) and B' (Lateral) depict the forearm following closed reduction and stabilization in a radiopaque long-arm cast. In these post-reduction views, the alignment of the radial and ulnar shafts is markedly improved, showing successful restoration of bone apposition and reduction of the initial angulation. Key educational landmarks include the open physes (growth plates) characteristic of a pediatric skeletal age and the clinical demonstration of non-operative orthopedic management of common diaphyseal forearm fractures through closed reduction and casting.
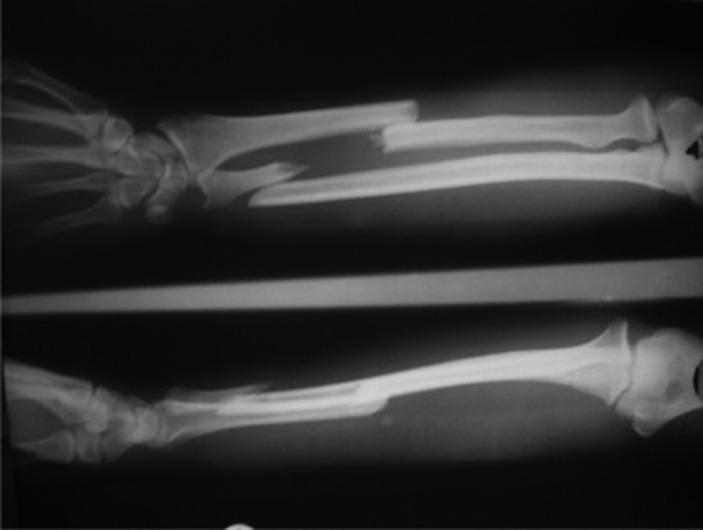
This diagnostic image consists of two X-ray views (radiography) of the forearm of a 42-year-old male, demonstrating complex fractures of the radius and ulna. The superior view displays a diaphyseal fracture of both bones: the radius presents a comminuted fracture mid-shaft with evident fragment separation, while the ulna shows a displaced fracture in the proximal to mid-shaft region. The inferior view provides an alternative longitudinal perspective, highlighting a distal-third radial fracture with significant displacement and overriding of the bony fragments, along with a more proximal ulnar fracture line. Clinical significance includes the assessment of forearm alignment and the integrity of the interosseous membrane in the context of orthopedic trauma. The image serves as an educational example of 'both-bone' forearm fractures, requiring evaluation for surgical stabilization and potential complications like compartment syndrome or infection.
Diagnosis: Both-Bone Forearm Fracture (Diaphyseal Fractures of Radius and Ulna)
- Significant overriding (shortening) and bayonet apposition of bone fragments
- Loss of cortical continuity of both bones
- Gross angulation at the fracture site
- No obvious concurrent dislocation of the wrist or elbow joints visible on this single view
Why Precise Reduction Matters
Management
Initial / Emergency Steps
- Neurovascular assessment - immediately check radial pulse, capillary refill, and sensorimotor function in all five digits (risk of anterior interosseous nerve, radial nerve, or vascular injury)
- Compartment syndrome vigilance - assess for the 6 P's; if suspected, emergent fasciotomy is required
- Splint/plaster backslab in the emergency setting for temporary immobilization (not definitive treatment)
- Full radiographic series - AP and lateral views of the forearm, including wrist and elbow to rule out concomitant DRUJ or PRUJ dislocation (Galeazzi or Monteggia variants)
Definitive Treatment
| Approach | Comment |
|---|---|
| ORIF with plate and screw fixation | Gold standard. Achieves anatomic reduction, restores radial bow, allows early mobilization |
| Intramedullary nailing | Less favoured in adults - difficult to achieve adequate reduction, poor rotational stability |
| Nonoperative casting | Only for selected isolated stable ulnar shaft fractures (<50% displacement, <10° angulation) |
ORIF Details (Standard Approach)
- Radius: approached via the Henry (anterior) or Thompson (posterior) approach depending on fracture location
- Ulna: subcutaneous border - direct approach
- Implant: 3.5 mm dynamic compression plate (DCP) or limited-contact DCP; minimum 6-8 cortices of fixation on each side
- Both bones are fixed at the same operative sitting
- Bone graft may be added if comminution or bone loss is present
Post-operative Rehabilitation
- Immobilization is not required when stable plate fixation is achieved - early active range of motion is started within days
- Forearm rotation exercises begin early to prevent stiffness
- Expected return to full function: 3-6 months depending on fracture severity and compliance
Key Complications to Watch For
| Complication | Comment |
|---|---|
| Compartment syndrome | Most urgent - must be excluded acutely |
| Radioulnar synostosis | Avoid plating both bones through a single incision; maintain separate approaches |
| Nonunion / malunion | More common with inadequate fixation or infection |
| Implant failure | Often indicates nonunion |
| Infection | Risk especially in open fractures |
| Nerve injury | Posterior interosseous nerve at risk during Thompson approach |
How to check sensorimotor function
hand nerve sensory distribution radial median ulnar diagram
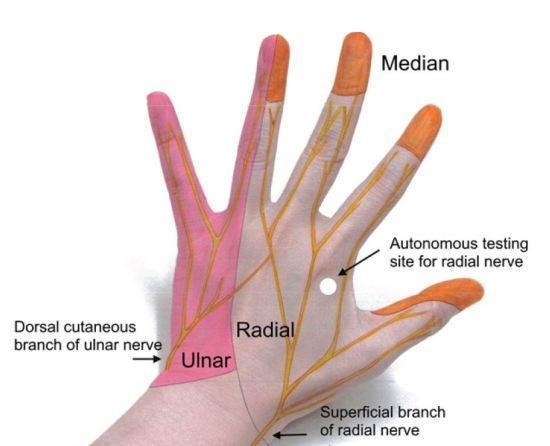
Anatomical diagram overlay on a clinical photograph showing the cutaneous sensory innervation of the dorsal hand. The image maps the distribution of three major nerves: the radial, ulnar, and median nerves. The radial nerve (shaded grey/yellow) covers the radial two-thirds of the dorsum, including the thumb and proximal portions of the index, middle, and radial half of the ring fingers up to the proximal interphalangeal (PIP) joints. A white dot identifies the 'autonomous testing site for the radial nerve' in the first dorsal webspace. The ulnar nerve (shaded pink) innervates the ulnar third of the hand, including the entire little finger and the ulnar half of the ring finger. The median nerve (shaded orange) provides sensation to the dorsal tips of the index, middle, and radial half of the ring fingers, extending distally from the PIP joints to the nail beds. Key anatomical structures labeled include the superficial branch of the radial nerve and the dorsal cutaneous branch of the ulnar nerve as they enter the hand from the forearm.
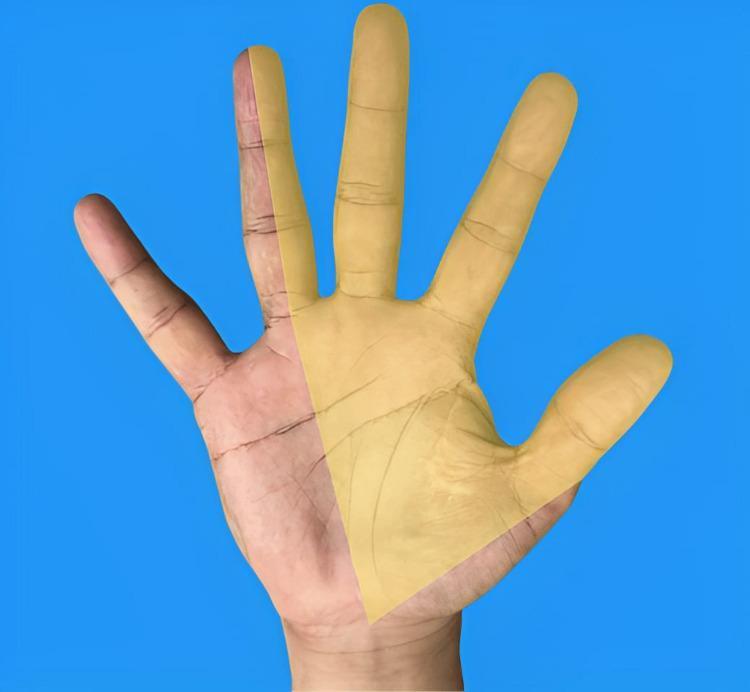
This clinical photograph/anatomical diagram hybrid illustrates the sensory distribution of the median nerve on the palmar surface of the right hand. The image displays a human hand against a blue background with a translucent yellow overlay highlighting the specific anatomical region innervated by the median nerve. The highlighted area covers the palmar aspect of the thumb (first digit), index finger (second digit), middle finger (third digit), and the radial half of the ring finger (fourth digit). The boundary line bisects the ring finger longitudinally and extends proximally across the palm toward the wrist, excluding the ulnar-innervated territory of the fifth digit and the ulnar half of the fourth. This visual is an essential educational tool for understanding peripheral nerve entrapment syndromes, specifically Carpal Tunnel Syndrome (CTS), as it clearly demonstrates the regions where patients typically experience paresthesia, numbness, or pain. It serves as a diagnostic reference for clinicians and medical students to correlate physical symptoms with nerve anatomy.
Sensorimotor Examination of the Hand After Forearm Fracture
Quick Bedside Screen (3 tests in 10 seconds)
| Action | Nerve tested |
|---|---|
| Make an "OK" sign (pinch thumb + index finger tip-to-tip) | Median (AIN component) |
| Dorsiflex the wrist (cock the wrist back) | Radial |
| Spread/abduct fingers (fan out 3rd, 4th, 5th fingers) | Ulnar |
Systematic Nerve-by-Nerve Assessment
1. Radial Nerve
| Test | Finding if intact | |
|---|---|---|
| Motor | Ask patient to extend/dorsiflex the wrist against resistance | Wrist rises against resistance |
| Sensory | Light touch / pinprick at the 1st dorsal web space (dorsum between thumb and index finger) | Normal sensation |
At risk in: lateral compartment syndrome, spiral fractures of the humerus, Thompson approach
2. Median Nerve
| Test | Finding if intact | |
|---|---|---|
| Motor (AIN) | Ask patient to make an "OK" sign - look at the shape: it should be a round O, not a pinch | Round O = intact; flat pinch = AIN palsy |
| Motor (thenar) | Ask patient to oppose thumb to little finger | Smooth opposition |
| Sensory | Touch/pinprick at tip of the index finger (palmar surface) | Normal sensation |
Median nerve sensory territory (palm): thumb, index, middle, and radial half of ring finger
3. Ulnar Nerve
| Test | Finding if intact | |
|---|---|---|
| Motor | Ask patient to abduct (spread) little finger against resistance; or ask to cross index over middle finger | Strong abduction; crossing possible |
| Sensory | Touch/pinprick at tip of little finger (palmar surface) | Normal sensation |
Ulnar nerve sensory territory: little finger and ulnar half of ring finger
Sensory Testing Technique
- Use the blunt ends of an unfolded paperclip (or caliper)
- Apply to the fingertip pulp, starting wide apart and narrowing
- Normal = can distinguish 2 points at 5 mm - Rosen's Emergency Medicine, p. 624
- Bedside shortcut: use a broken tongue blade or 18-gauge needle cap to distinguish sharp vs. dull - adequate for emergency screening
Summary Table (from Rosen's / Rockwood)
| Nerve | Motor test | Sensory area |
|---|---|---|
| Radial | Wrist extension | 1st dorsal web space (thumb-index dorsum) |
| Median | Thumb opposition / "OK" sign | Thumb, index, middle finger (palmar) |
| Ulnar | Finger abduction / adduction | Little finger (palmar) |
| AIN (pure motor) | Distal phalanx flexion of thumb + index ("OK" shape) | None |
Sensory Maps
Important Clinical Notes
- Always test before any manipulation, reduction, or splinting and document findings
- If a deficit is found after reduction that was not present before, suspect iatrogenic nerve injury or worsening compartment syndrome
- AIN palsy (weak "OK" sign, otherwise intact sensation) is the most commonly missed nerve injury in both-bone forearm fractures - it resolves spontaneously in most cases