140 human molar crowns were used after separating them from their roots at the cementoenamel junction with a water-cooled, low-speed diamond saw (Mecatome T201 A, Presi, Grenoble, France). The roots were discarded, and the crowns were randomly assigned into two groups: 70 samples for testing bond strength to enamel, and 70 for evaluating adhesion to dentin. To prepare enamel surfaces, a 0.5 mm-deep flat area was created in the center of the buccal surface of each crown using the cutting machine mentioned above. Each crown was then embedded in acrylic resin blocks (Acropars, Marlic Medical Industries Co., Tehran, Iran), positioning the buccal surface facing upward and level with the base. The enamel was polished gently with 320-grit silicon carbide abrasive paper (Starcke GmbH & Co. KG, Melle, Germany) to ensure surface uniformity. Enamel quality and flatness were examined using a stereomicroscope (Stemi 305, Carl Zeiss AG, Oberkochen, Germany). For the dentin group, the occlusal enamel and superficial dentin layers were removed to expose flat mid-coronal dentin using the same saw, under continuous water cooling. The dentin surfaces were also embedded in acrylic blocks with the surface aligned parallel to the base. A smear layer was created by polishing the exposed dentin for 60 s with 320-grit silicon carbide paper. Finally, the surfaces were rinsed and lightly dried using an air–water spray syringe (DABI Atlante, São Paulo, Brazil). Before bonding the RMGIC to the prepared enamel and dentin surfaces, a conditioning step was performed using GC Cavity Conditioner (GC Corporation, Tokyo, Japan) in accordance with the manufacturer's guidelines. The conditioner was applied to the tooth surface using a cotton pellet or applicator sponge. It was allowed to react for 10 s, after which the surface was thoroughly rinsed with water and gently blotted dry, leaving the surface moist but not desiccated. generate a image for this matter
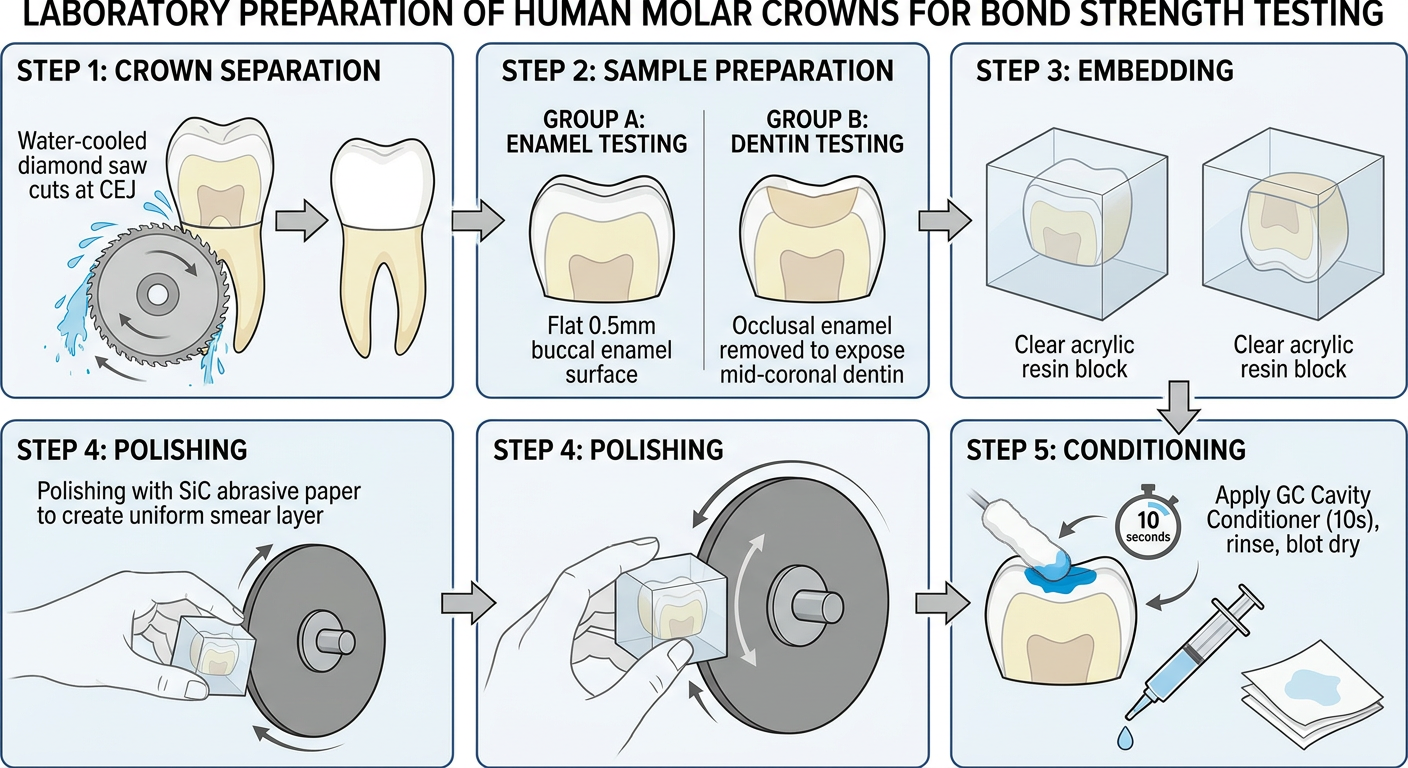
- Crown separation at the cementoenamel junction using the water-cooled diamond saw, with roots discarded
- Group division into enamel (flat 0.5 mm buccal surface) and dentin (occlusal enamel removed to expose mid-coronal dentin) subgroups
- Acrylic resin embedding with the prepared surface aligned flush with the block base
- Surface polishing with 320-grit silicon carbide paper to standardize the smear layer
- Cavity conditioner application with a cotton pellet for 10 s, followed by rinsing and moist blot-drying before RMGIC bonding
give me the methodology in step wise
Step-by-Step Methodology
Phase 1: Sample Collection & Crown Separation
- Collect 140 human molar teeth for the study.
- Separate each crown from its root at the cementoenamel junction (CEJ).
- Use a water-cooled, low-speed diamond saw (Mecatome T201 A, Presi, Grenoble, France).
- Discard all roots; retain only the crowns.
Phase 2: Random Group Assignment
- Randomly assign the 140 crowns into two equal groups:
- Group A (n = 70): Bond strength testing on enamel
- Group B (n = 70): Bond strength testing on dentin
Phase 3: Enamel Surface Preparation (Group A)
- Using the same low-speed diamond saw, create a 0.5 mm-deep flat area at the center of the buccal surface of each crown.
- Embed each crown in an acrylic resin block (Acropars, Marlic Medical Industries Co., Tehran, Iran).
- Position the buccal surface facing upward and level with the block base.
- Gently polish the enamel surface with 320-grit silicon carbide abrasive paper (Starcke GmbH & Co. KG, Melle, Germany) to achieve surface uniformity.
- Inspect enamel quality and flatness under a stereomicroscope (Stemi 305, Carl Zeiss AG, Oberkochen, Germany).
Phase 4: Dentin Surface Preparation (Group B)
- Remove the occlusal enamel and superficial dentin layers using the same water-cooled diamond saw to expose a flat mid-coronal dentin surface.
- Embed each crown in an acrylic resin block with the dentin surface positioned parallel to the block base.
- Polish the exposed dentin surface for 60 seconds using 320-grit silicon carbide paper to create a standardized smear layer.
- Rinse the surface and lightly dry it using an air-water spray syringe (DABI Atlante, São Paulo, Brazil).
- Leave the surface moist, not desiccated.
Phase 5: Surface Conditioning (Both Groups)
- Apply GC Cavity Conditioner (GC Corporation, Tokyo, Japan) to the prepared surface using a cotton pellet or applicator sponge, following the manufacturer's guidelines.
- Allow the conditioner to react on the surface for 10 seconds.
- Thoroughly rinse the surface with water to remove the conditioner.
- Gently blot the surface dry, ensuring it remains moist but not desiccated - ready for RMGIC bonding.
Summary Table
| Step | Action | Group |
|---|---|---|
| 1-2 | Crown separation at CEJ | Both |
| 3 | Random group assignment (70 + 70) | Both |
| 4-7 | Enamel flat surface prep, embedding, polishing, QC | Group A |
| 8-11 | Dentin exposure, embedding, smear layer, drying | Group B |
| 12-15 | Cavity conditioner application and surface prep | Both |
image format give me the flow chart of methodology
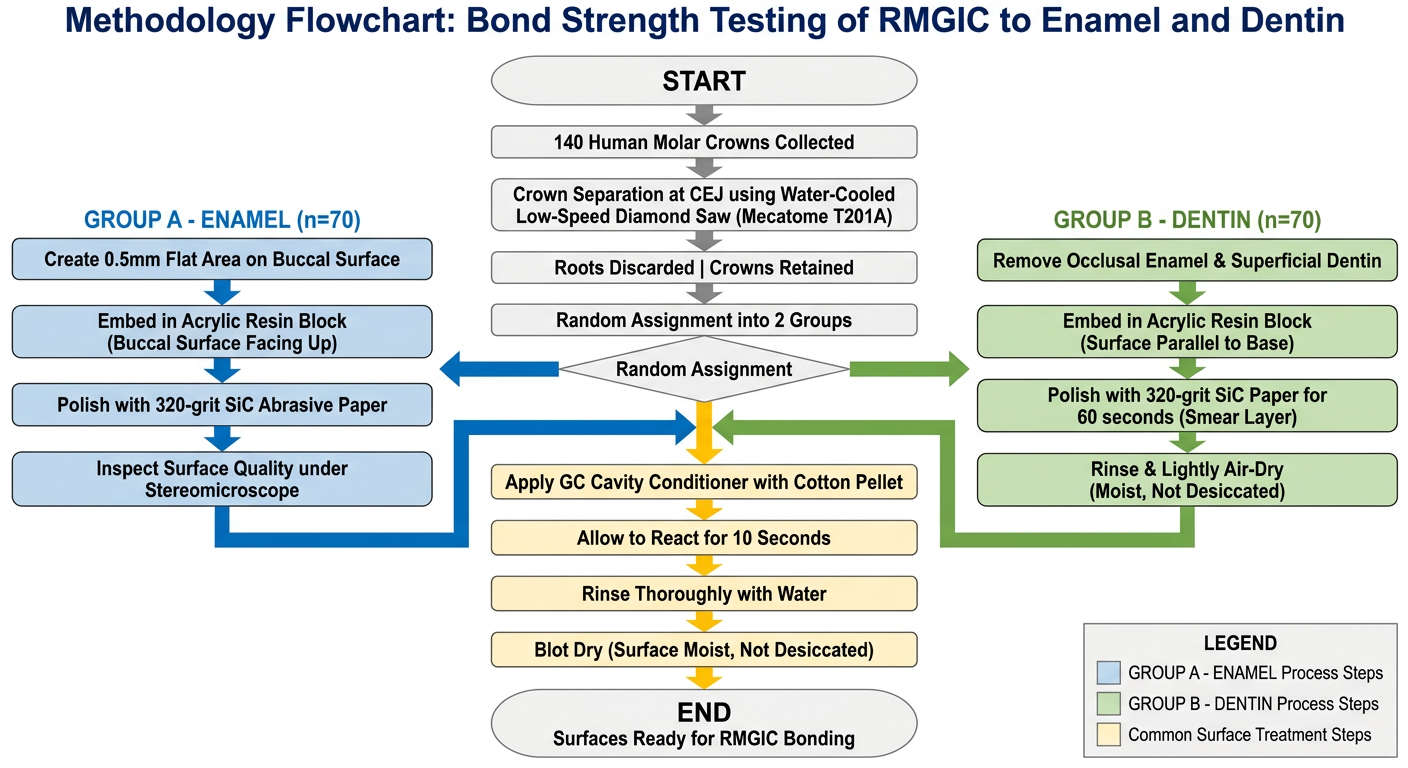
- Top section - Common initial steps: crown collection, CEJ separation, and random group assignment
- Left branch (blue) - Group A enamel preparation pathway (n = 70)
- Right branch (green) - Group B dentin preparation pathway (n = 70)
- Bottom merge (yellow) - Shared conditioning steps applied to both groups before RMGIC bonding
Generate a presentation slide deck for this research protocol
RMGIC Bond Strength Protocol
Presentation · PPTX
Slide Deck Contents (10 Slides)
| # | Slide | Design |
|---|---|---|
| 1 | Title Slide | Dark navy background, amber accent bar, study title and key metadata |
| 2 | Study Overview | 3 stat boxes (140 / 70 / 70), study objective paragraph |
| 3 | Materials & Equipment | 6 labeled cards for each instrument/material with manufacturer details |
| 4 | Specimen Prep - Visual | Full-slide embedded illustration of the preparation workflow |
| 5 | Enamel Preparation (Group A) | 4 numbered steps with teal step circles |
| 6 | Dentin Preparation (Group B) | 4 numbered steps with green step circles |
| 7 | Surface Conditioning | 4 horizontal step cards with amber headers and a critical warning box |
| 8 | Methodology Flowchart | Full-slide embedded flowchart image |
| 9 | Comparison Table | Side-by-side parameter table: Enamel vs. Dentin |
| 10 | Protocol Summary | Dark closing slide with numbered key takeaways |
Incorporating ZnO and mesoporous ZnO NPs in RMGIC image