Step by step procedure for abdominal hysterectomy
Reading File
Finding Sources
Searching the Web
abdominal hysterectomy surgical procedure steps technique
Reading File
Reading File
Reading File
Reading File
Reading File
Reading File
Reading File
I now have comprehensive, detailed content from both Berek & Novak's Gynecology and Sabiston's Textbook of Surgery. Here is the complete step-by-step procedure:
Abdominal Hysterectomy — Step-by-Step Procedure
Preoperative Preparation
Antibiotic prophylaxis: Cefazolin 1–2 g IV (3 g in obese patients) given 30–60 minutes before skin incision. Redose after 3 hours of surgery or with excessive blood loss.
Skin prep: Chlorhexidine-alcohol prep is preferred over povidone-iodine (lower SSI risk). Hair around the incision is clipped (not shaved). The patient bathes with chlorhexidine preoperatively.
Bowel prep: Not routinely required for benign disease.
Patient Positioning
- Dorsal supine position
- After anesthesia induction: place legs in stirrups → perform pelvic examination to confirm preoperative findings
- Insert Foley catheter to decompress the bladder; cleanse vagina with chlorhexidine or iodine solution
- Return legs to flat position
Surgical Technique
Step 1 — Incision
The incision choice depends on:
- Simplicity and exposure required
- Need for potential enlargement
- Wound strength and cosmesis
- Location of prior scars
Options: low transverse (Pfannenstiel) for most benign cases; vertical midline when wider access is needed (large uterus, malignancy, adhesions). The skin is opened with a scalpel, carrying down through subcutaneous tissue and fascia. The fascia is divided with lateral traction applied to its edges, and the peritoneum is opened sharply to minimize risk of enterotomy.
Step 2 — Abdominal Exploration
- Peritoneal cytology specimens collected before exploration if indicated
- Systematic exploration: liver, gallbladder, stomach, kidneys, para-aortic nodes, small and large bowel, and pelvis
Step 3 — Retractor Placement
- Self-retaining retractors placed (Balfour, O'Connor-O'Sullivan, or Bookwalter for obese patients)
- Small bowel packed out of the pelvis with moist laparotomy pads
Step 4 — Elevation of the Uterus
- Broad ligament clamps (e.g., Heaney or Ballantine) placed at each cornu, crossing the round ligament — this elevates and manipulates the uterus throughout the procedure
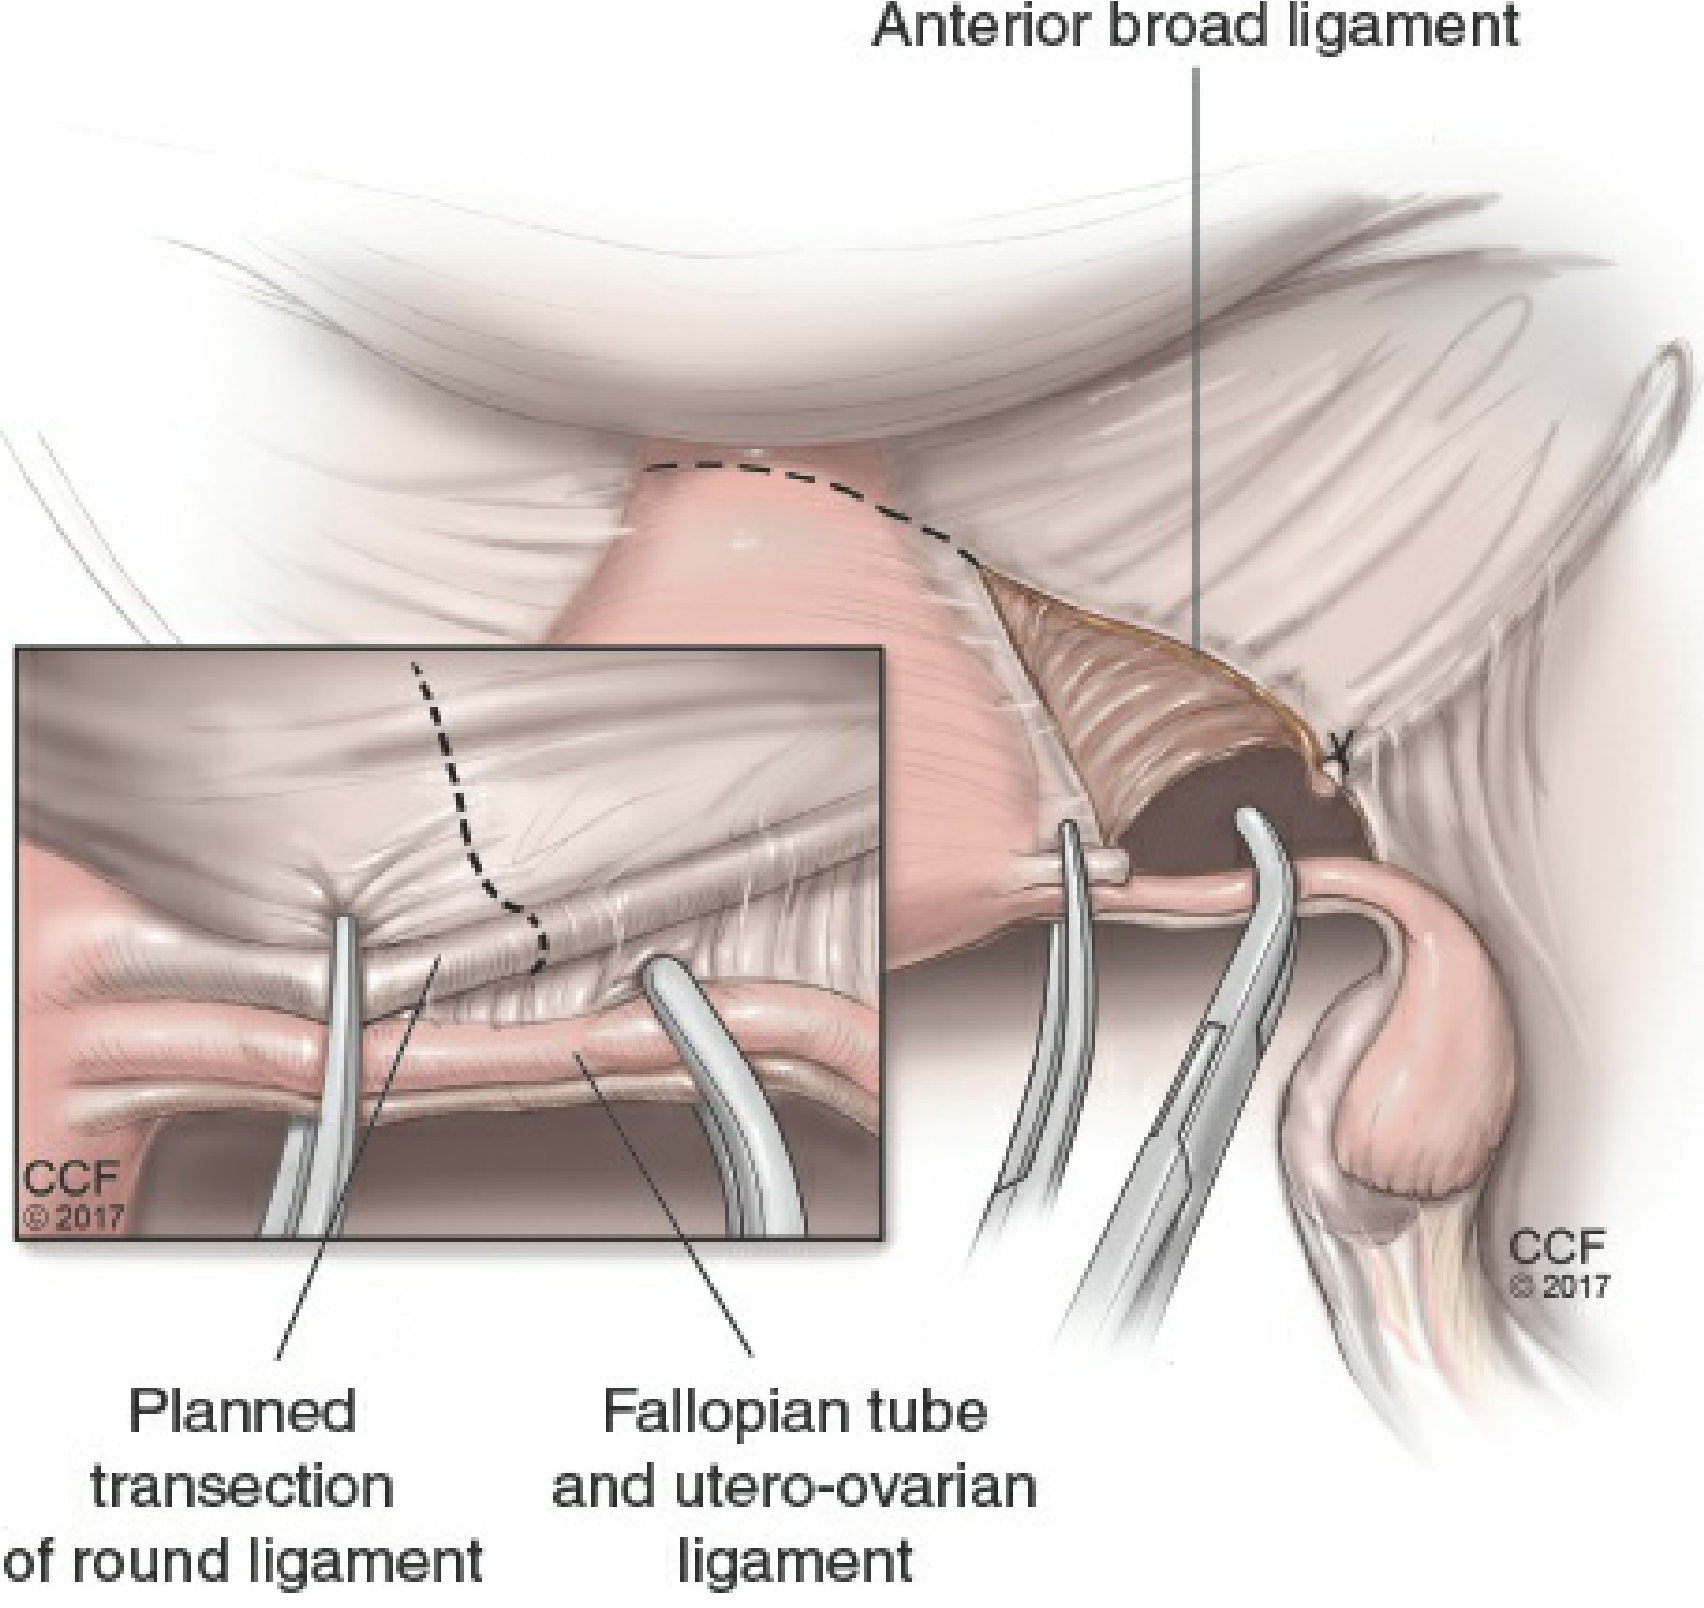
Step 5 — Round Ligament Ligation and Transection
- Uterus deviated to the left to stretch the right round ligament
- The distal round ligament is ligated with a suture ligature (or divided with electrosurgery) and cut
- This separates the anterior and posterior leaves of the broad ligament
- The anterior leaf of the broad ligament is incised with Metzenbaum scissors or electrosurgery along the vesicouterine fold, separating the bladder peritoneum from the lower uterine segment
- Repeated on the left side
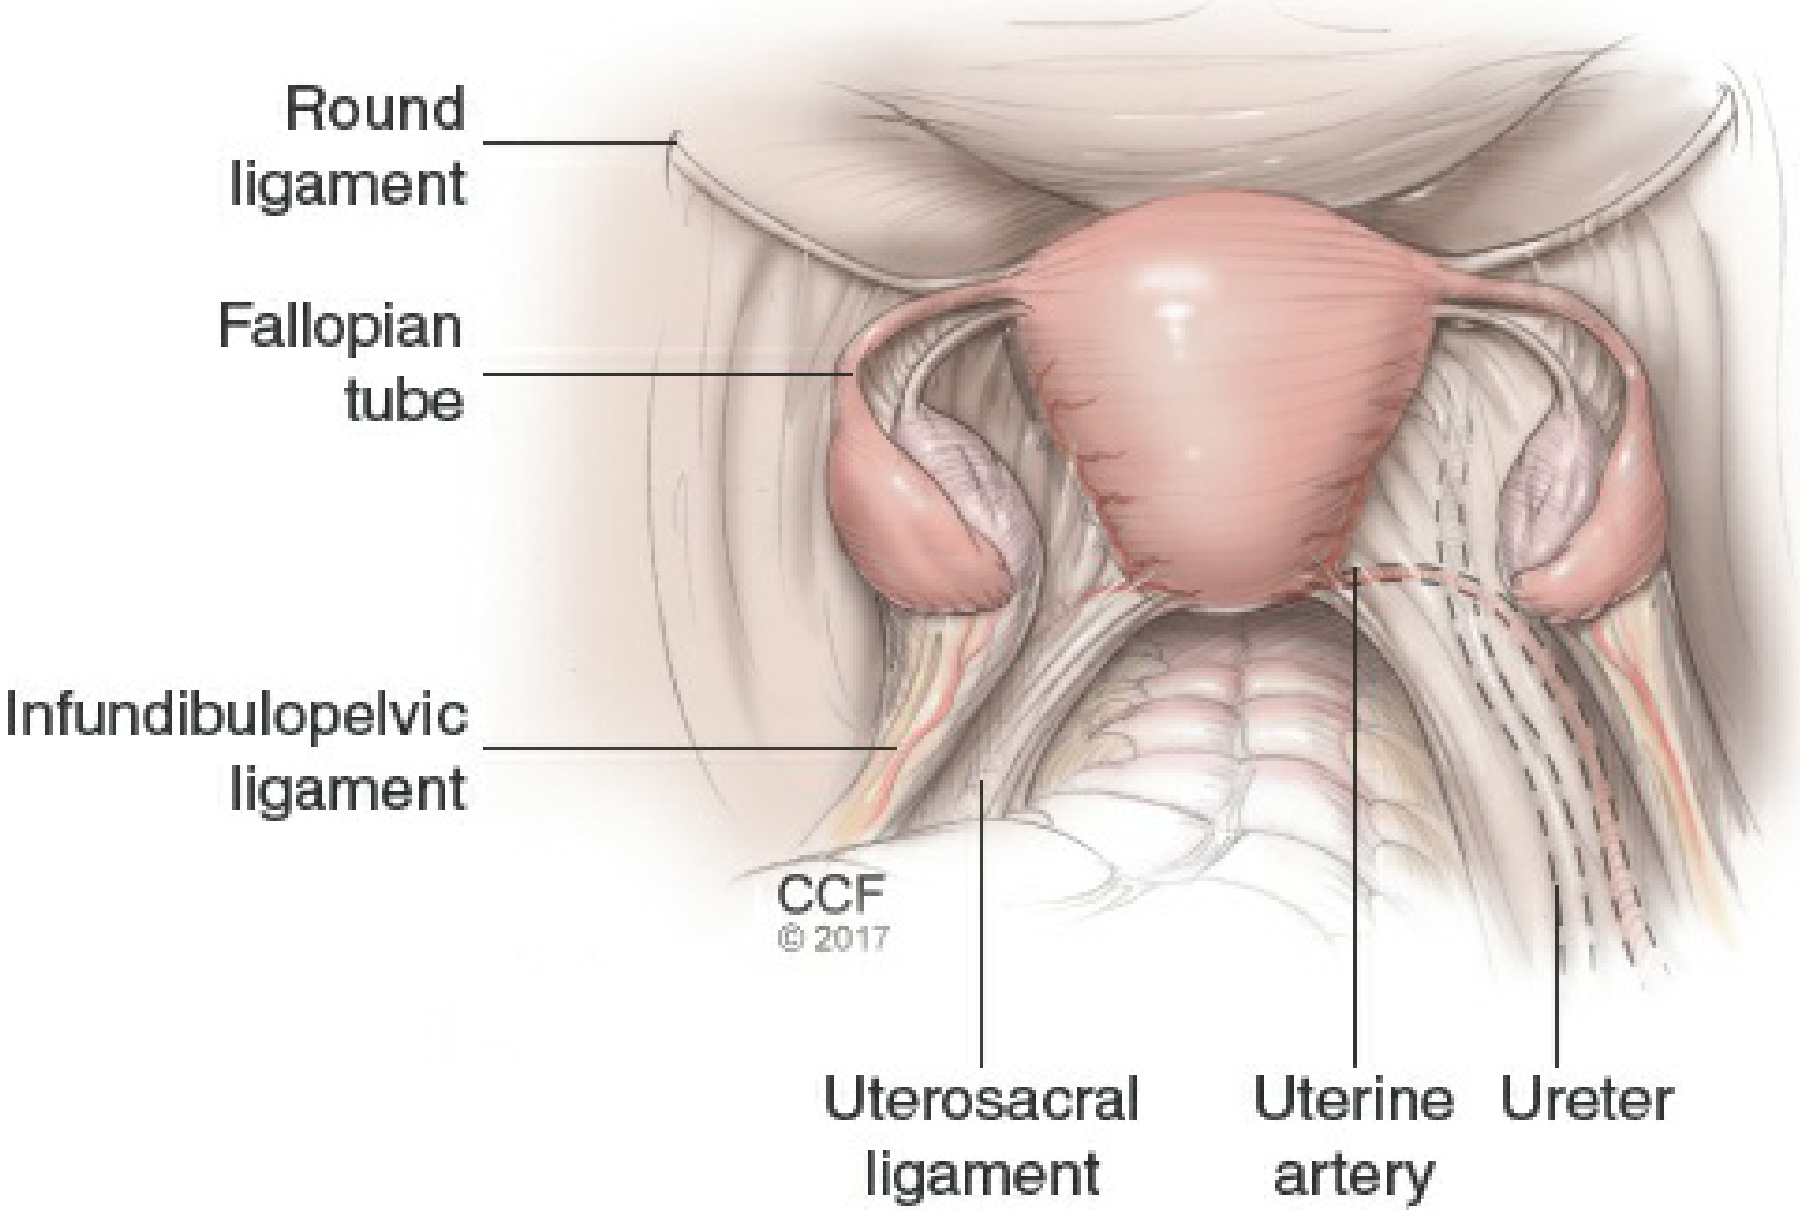
Step 6 — Ureter Identification
- The retroperitoneum is entered by extending the incision cephalad on the posterior leaf of the broad ligament, staying lateral to the infundibulopelvic ligament and iliac vessels
- The external iliac artery is identified along the medial psoas muscle by blunt dissection
- Following it cephalad to the common iliac bifurcation, the ureter is identified crossing the common iliac artery
- The ureter is left attached to the medial broad ligament leaf to protect its blood supply — this is critical throughout the remainder of the procedure
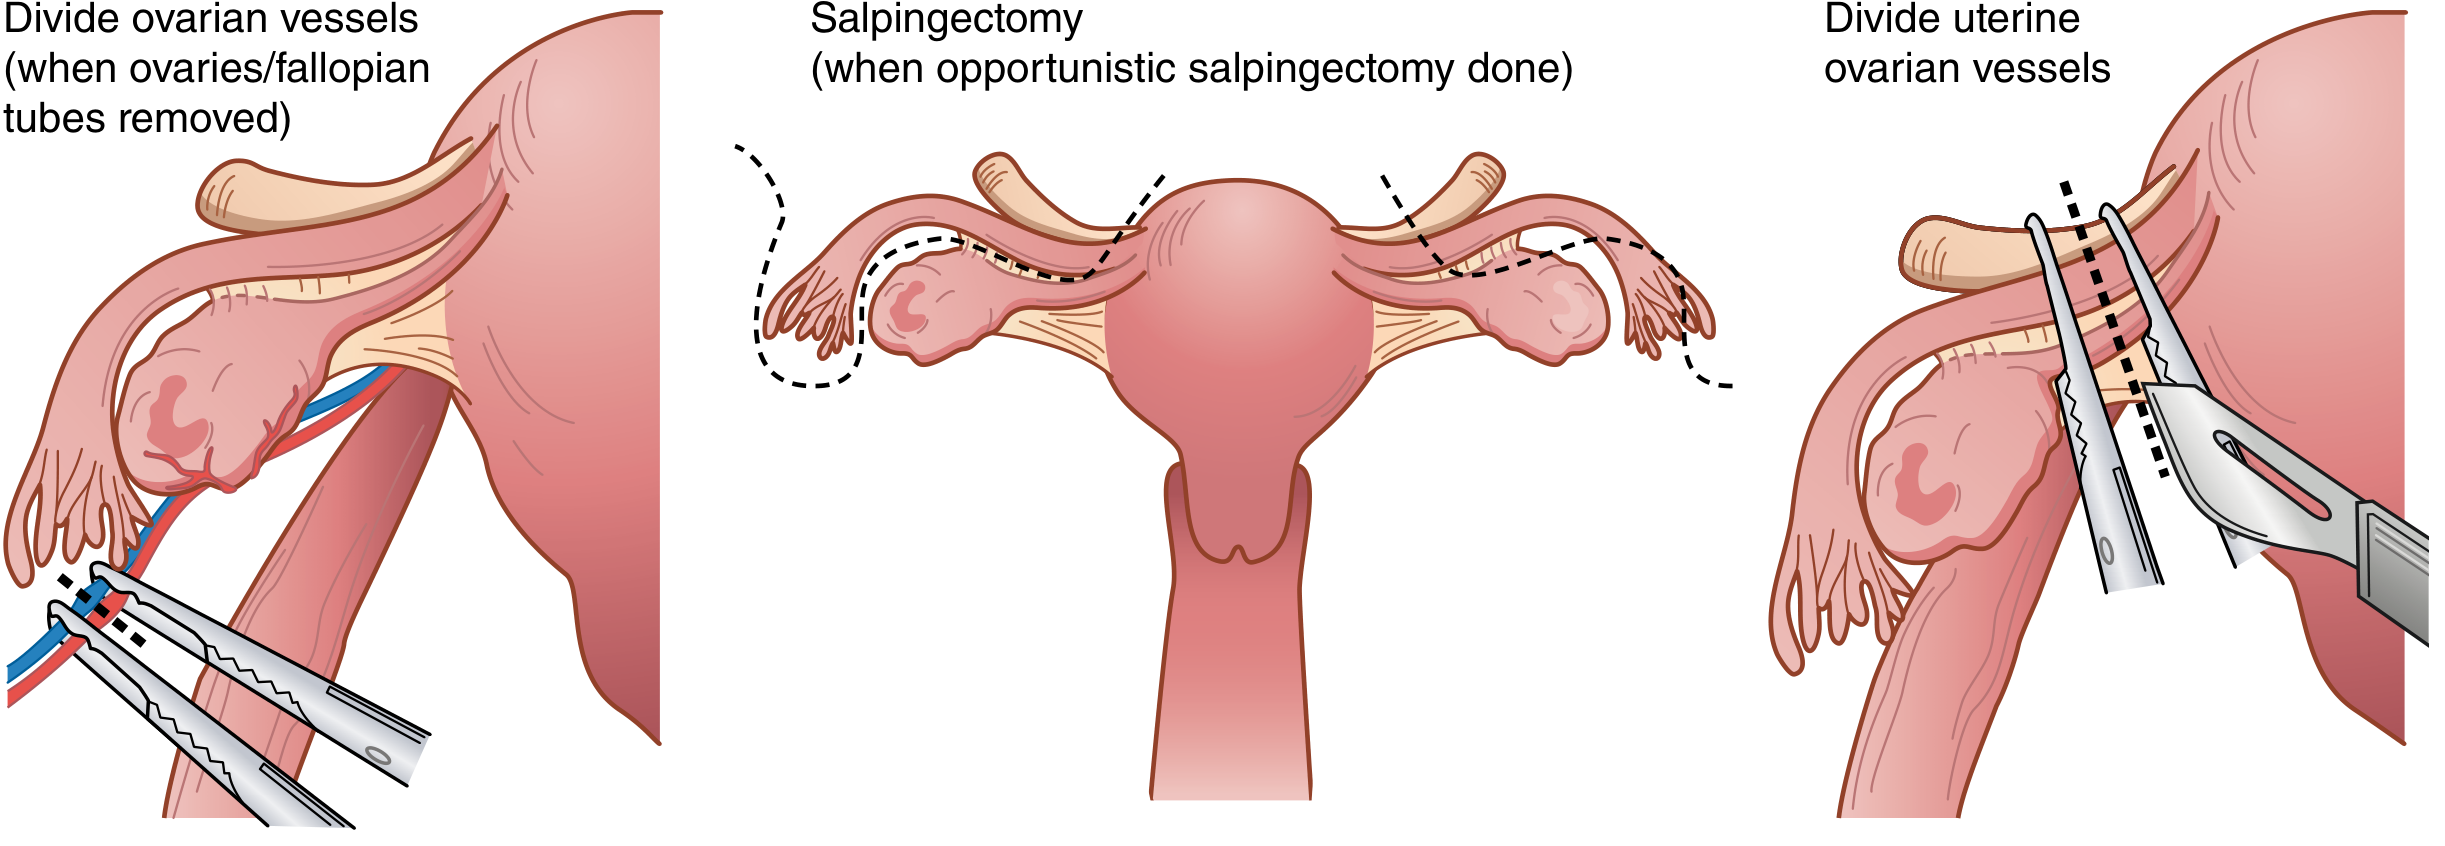
Step 7 — Utero-Ovarian / Infundibulopelvic (IP) Ligament Ligation
If ovaries are preserved:
- Uterus retracted toward pubic symphysis and deviated to one side
- The utero-ovarian ligaments are clamped bilaterally with curved Heaney or Ballantine clamps, cut, and ligated (free tie + suture ligature) at each uterine cornua
- Opportunistic salpingectomy may be performed at this point if desired
If ovaries are removed (BSO):
- The peritoneal opening is enlarged toward the infundibulopelvic ligament (ovarian vessels) cephalad and to the uterine artery caudad
- This releases the ureter from proximity to the ovarian vessels
- A curved Heaney/Ballantine clamp is placed lateral to the ovary across the IP ligament; the vessels are doubly clamped, incised, and doubly ligated
- Remaining posterior broad ligament leaves are incised inferiorly to skeletonize the uterine vessels
Step 8 — Development of the Bladder Flap
- The vesicouterine peritoneum (anterior leaf) is further incised and dissected
- The bladder is dissected off the cervix sharply with Metzenbaum scissors or electrocautery
- The bladder is pushed and retracted inferiorly, well below the level of the cervix, before any colpotomy is made
- This is the most important step to avoid bladder injury
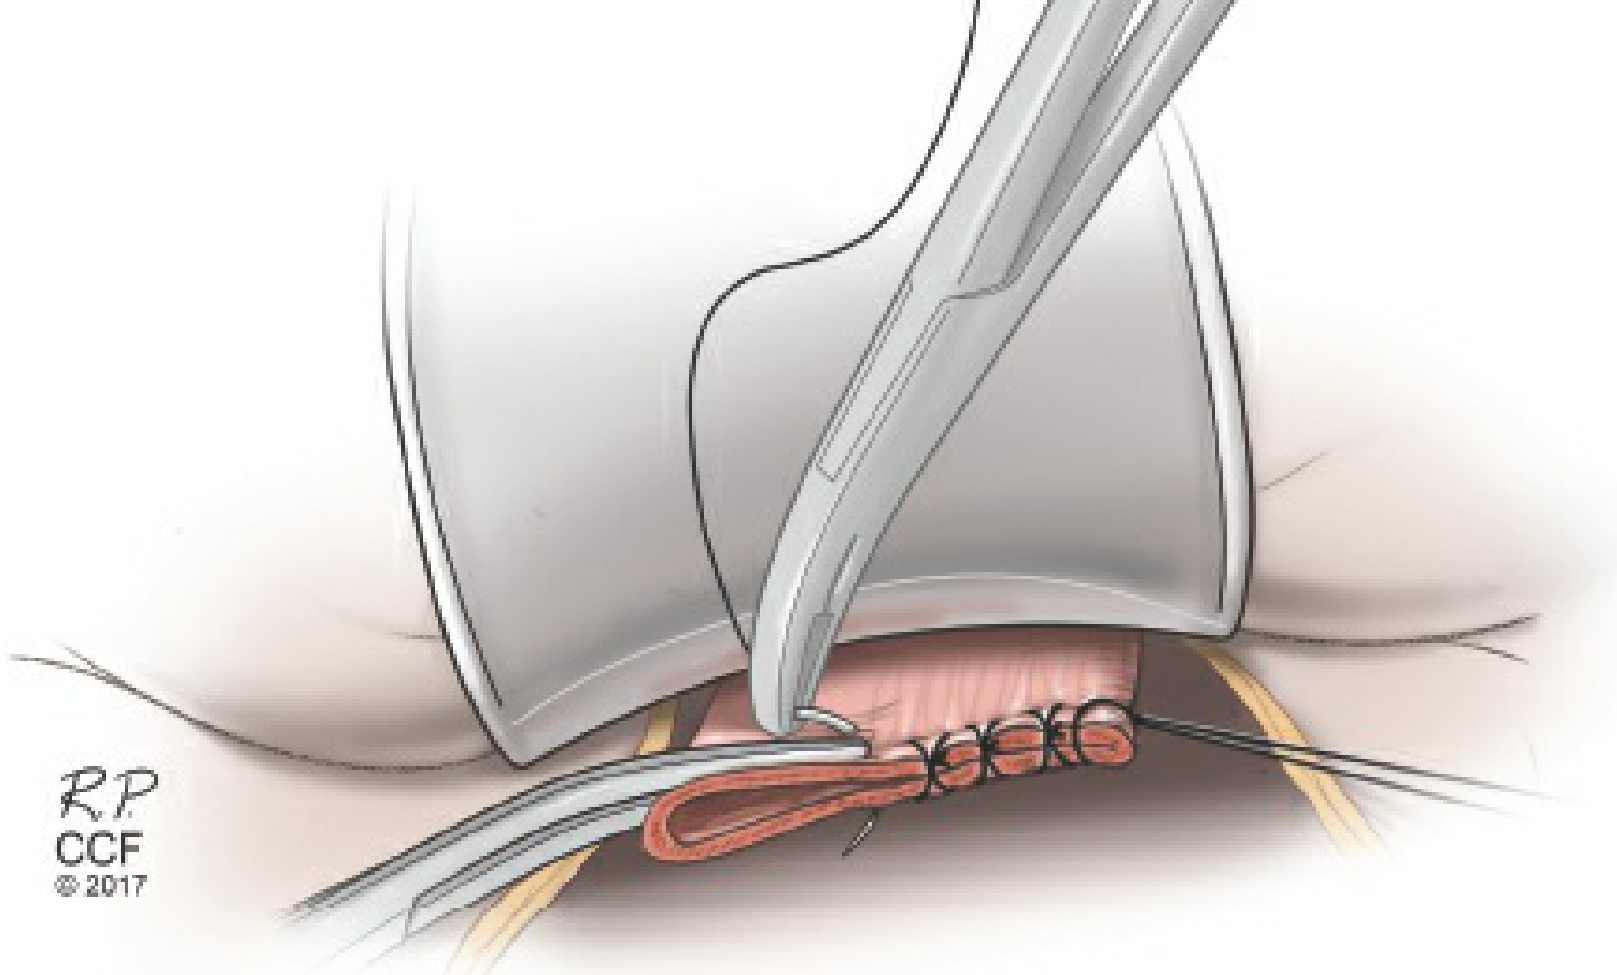
Step 9 — Uterine Vessel Ligation
- A curved Heaney or Zeppelin clamp is placed across the uterine vessels (uterine artery and vein) at the level of the internal cervical os, perpendicular to the uterus
- The pedicle is cut and suture ligated (transfixion stitch)
- Performed bilaterally — the ureter must be clearly visualized and free of the clamp (it passes within ~1 cm of the uterine artery)
Step 10 — Cardinal Ligament Ligation
- A straight Zeppelin or Heaney clamp is placed medial to the uterine vessel pedicle, 2–3 cm parallel to the uterus across the cardinal ligament
- The ligament is cut and the pedicle suture ligated
- This step is repeated in serial bites on each side, progressing inferiorly until the cervicovaginal junction is reached
Step 11 — Uterosacral Ligament Division
- If the rectum needs mobilization from the posterior cervix, the posterior peritoneum between the uterosacral ligaments just beneath the cervix is incised
- The relatively avascular plane here allows the rectum to be mobilized inferiorly out of the field
- The uterosacral ligaments are included in the final clamps placed for uterine removal
Step 12 — Colpotomy and Removal of the Uterus
- The uterus is placed on cephalad traction and the tip of the cervix palpated
- Curved Heaney clamps are placed bilaterally incorporating the uterosacral ligament and upper vagina just below the cervix (taking care not to foreshorten the vagina)
- The uterus and cervix are removed with a scalpel or curved scissors, cutting just above the clamps
- The specimen is passed off the field

Step 13 — Vaginal Cuff Closure
- A figure-of-eight suture (0 braided absorbable) is placed at each vaginal angle for traction and hemostasis
- Heaney transfixion stitches are placed incorporating the uterosacral and cardinal ligaments at the vaginal angles — this provides apical support
- The vaginal cuff is closed with running-locked or figure-of-eight sutures
- Alternatively: interrupted or running sutures with the lateral apex sutures incorporating the ipsilateral uterosacral ligament
Step 14 — Irrigation and Final Hemostasis
- The pelvis is thoroughly irrigated with normal saline
- Meticulous hemostasis of all vascular pedicles is ensured
- Ureters are inspected to confirm they are intact and non-dilated (peristalsis should be visible)
Step 15 — Peritoneal and Fascial Closure
- The pelvic peritoneum is not reapproximated (evidence shows no benefit)
- The parietal peritoneum is also left open
- Fascia is closed with interrupted or continuous 0 or 1 monofilament absorbable suture; bites taken ~1 cm from edge, ~1 cm apart
Step 16 — Skin Closure
- Subcutaneous tissue irrigated with hemostasis achieved
- Subcutaneous fat closed if ≥2 cm depth (reduces wound disruption)
- Skin closed with staples or subcuticular sutures
- Dressing applied for ~24 hours
Postoperative Management
| Domain | Guidance |
|---|---|
| Bladder catheter | Remove within 24 hours; check post-void residual if concerned |
| Diet | Resume as soon as alert; early solid feeds speed bowel recovery |
| Ambulation | Begin POD1; reduces DVT and pneumonia risk |
| Pain | Preemptive gabapentin, acetaminophen, COX-2 inhibitors; reduce opioid requirements |
| VTE prophylaxis | Sequential compression devices + pharmacologic per risk stratification |
| Activity restriction | Pelvic rest (no intercourse, tampons) for 6–8 weeks; no heavy lifting >10 lbs |
Key Intraoperative Dangers and Prevention
| Structure at Risk | Point of Risk | Prevention |
|---|---|---|
| Ureter | IP ligament ligation, uterine artery clamp | Identify ureter crossing iliac bifurcation before every clamp |
| Bladder | Bladder flap dissection, colpotomy | Develop bladder flap completely below cervix before cutting vagina |
| Bowel | Adhesiolysis, retractor placement | Inspect serosa and mucosa; repair any enterotomy |
| Uterine/ovarian vessels | Blind clamping for hemorrhage | Tamponade → identify ureter → then clamp |
Sources: Berek & Novak's Gynecology, Chapter 27; Sabiston Textbook of Surgery, Chapter 120
This is a shared conversation. Sign in to Orris to start your own chat.